Kodo
-
Posts
56 -
Joined
-
Last visited
-
If this was a buffet, what build should everyone try?
Kodo replied to oedipus_tex's topic in General Discussion
Fire/Fire/Fire Blaster Get a taste of the most powerful class in the game. It's delicious. -
Awesome tyvm. I'll tweak it. tytyty
-
@Makobola Can you look at this one please (like comb over it and see if there's anything blatantly wrong)?: I copied a lot of what you had &: - Removed Burn (The 3% DMG lost from Obliteration set, I regained on Fire Sword via Makos Bite Set.) (The 9% accuracy lost from Obliteration set, I regained on Weave.) (I lost 2.25 resist on Smash/Lethal) - Removed Hot Feet (I really wont use these two because I'll be mostly flying for fun and I'll fly down every now and then to Fire Sword Circle + Inferno + Fire Sword, just for show offs/style points). That plus all of my other tools, I probably just wont use them. - Removed Combat Jumping & Superspeed (Went with Hover/Flight instead) - Added Flight / Hover / Evasive Maneuvers - Added Assault - Fire Sword instead of Ring of Fire - On Fire shield, I thought about trading Aegis for Reactive Armor (thoughts?) I really like Rise of the Phoenix but I couldn't fit it in there... Hover/Evasive Off: Hover/Evasive On: This Hero build was built using Mids Reborn 3.2.17 https://github.com/LoadedCamel/MidsReborn Click this DataLink to open the build! Level 50 Magic Blaster Primary Power Set: Fire Blast Secondary Power Set: Fire Manipulation Power Pool: Fighting Power Pool: Leadership Power Pool: Speed Power Pool: Flight Ancillary Pool: Flame Mastery Hero Profile: Level 1: Fire Blast -- Thn-Acc/Dmg(A), Thn-Dmg/EndRdx(3), Thn-Dmg/Rchg(3), Thn-Acc/Dmg/Rchg(5), Thn-Acc/Dmg/EndRdx(5), Thn-Dmg/EndRdx/Rchg(7) Level 1: Fire Ball -- SprBlsWrt-Acc/Dmg(A), SprBlsWrt-Dmg/Rchg(7), SprBlsWrt-Acc/Dmg/Rchg(9), SprBlsWrt-Acc/Dmg/EndRdx(9), SprBlsWrt-Acc/Dmg/EndRdx/Rchg(11), SprBlsWrt-Rchg/Dmg%(11) Level 2: Rain of Fire -- Artl-Acc/Dam(A), Artl-Dam/End(13), Artl-Dam/Rech(13), Artl-Acc/Dam/Rech(15), Artl-Acc/Rech/Rng(15), Artl-End/Rech/Rng(17) Level 4: Fire Breath -- Artl-Acc/Dam(A), Artl-Dam/End(17), Artl-Dam/Rech(19), Artl-Acc/Dam/Rech(19), Artl-Acc/Rech/Rng(21), Artl-End/Rech/Rng(21) Level 6: Aim -- RechRdx-I(A) Level 8: Blaze -- Thn-Acc/Dmg(A), Thn-Dmg/EndRdx(23), Thn-Dmg/Rchg(23), Thn-Acc/Dmg/Rchg(25), Thn-Acc/Dmg/EndRdx(25), Thn-Dmg/EndRdx/Rchg(27) Level 10: Blazing Bolt -- StnoftheM-Acc/Dmg(A), StnoftheM-Dmg/EndRdx(27), StnoftheM-Acc/ActRdx/Rng(29), StnoftheM-Dmg/ActRdx/Rchg(29), StnoftheM-Dam%(31), Apc-Dam%(31) Level 12: Inferno -- SprDfnBrr-Acc/Dmg(A), SprDfnBrr-Dmg/Rchg(31), SprDfnBrr-Acc/Dmg/Rchg(33), SprDfnBrr-Acc/Dmg/EndRdx(33), SprDfnBrr-Acc/Dmg/EndRdx/Rchg(33), SprDfnBrr-Rchg/+Status Protect(34) Level 14: Fire Sword -- Mk'Bit-Acc/Dmg(A), Mk'Bit-Dmg/EndRdx(34), Mk'Bit-Dmg/Rchg(34), Mk'Bit-Acc/Dmg/EndRdx/Rchg(36) Level 16: Fire Sword Circle -- Arm-Dmg/Rchg(A), Arm-Acc/Dmg/Rchg(36), Arm-Acc/Rchg(36), Arm-Dmg/EndRdx(37), Arm-Dam%(37), FuroftheG-ResDeb%(37) Level 18: Build Up -- GssSynFr--ToHit(A), GssSynFr--ToHit/Rchg(39), GssSynFr--ToHit/Rchg/EndRdx(39), GssSynFr--Rchg/EndRdx(39), GssSynFr--ToHit/EndRdx(40), GssSynFr--Build%(40) Level 20: Cauterizing Aura -- Prv-Absorb%(A), Prv-Heal(40), PwrTrns-EndMod(42), PwrTrns-+Heal(42), PrfShf-EndMod(42), PrfShf-End%(43) Level 22: Kick -- Empty(A) Level 24: Assault -- EndRdx-I(A) Level 26: Tactics -- AdjTrg-ToHit/EndRdx(A) Level 28: Tough -- GldArm-ResDam(A), GldArm-3defTpProc(43) Level 30: Weave -- LucoftheG-Def/Rchg+(A), LucoftheG-Def/EndRdx(43), LucoftheG-Def/EndRdx/Rchg(45), LucoftheG-Def(45) Level 32: Maneuvers -- LucoftheG-Def/Rchg+(A), LucoftheG-Def/EndRdx(45) Level 35: Hasten -- RechRdx-I(A), RechRdx-I(46) Level 38: Fly -- Flight-I(A) Level 41: Hover -- LucoftheG-Def/Rchg+(A), Rct-ResDam%(46), ShlWal-ResDam/Re TP(46), HypSnc-+Special(48) Level 44: Evasive Maneuvers -- LucoftheG-Def/Rchg+(A), LucoftheG-Def/EndRdx(48) Level 47: Bonfire -- OvrFrc-Dam/KB(A), OvrFrc-Dmg/End/Rech(48) Level 49: Fire Shield -- Ags-ResDam(A), Ags-ResDam/EndRdx(50), Ags-ResDam/Rchg(50), StdPrt-ResDam/Def+(50) Level 1: Defiance Level 1: Brawl -- Empty(A) Level 1: Sprint -- Empty(A) Level 2: Rest -- Empty(A) Level 1: Swift -- Empty(A) Level 1: Hurdle -- Empty(A) Level 1: Health -- Pnc-Heal/+End(A) Level 1: Stamina -- PrfShf-End%(A) Level 49: Quick Form Level 38: Afterburner ------------

-
Ahh Tyvm. I'm in Mids sorting things out. I'm not going to use it then lol. Tytyty
-
Does this visually affect your character? Like, will it make me appear faded? Or Is it just a buff without the visual effects? https://cityofheroes.fandom.com/wiki/Freebird:_Stealth Effects: Grants Stealth for 120 seconds when used in an instant effect power. If used in a toggle, stealth will last 120 seconds after the toggle is turned off. Range of stealth is 389 feet in PvP, 35 feet in PvE Thank you!
-
Ty for this, I just got time to look at it. In general, is this the build you'd run, or do you have something else that you'd run/build?
-
You should not pick the cheapest one. You should pick the one that is going to be the most fun. Because there is a variable of a grind at the end. You won't make it without having fun. With that being said. This community has been very kind to me by teaching me how to make money and how to make merit's and how to turn those merits into reward merits and how to turn Reward merits into enhancements. They have taught me how to craft using recipes, etc. So the fact is that you don't have to grind for influence in order to complete your build. You essentially have to grind for merits and then you turn those merits into reward merits. Which basically means you are doing cool in-game stuff, including raiding to build your character out. Which brings me back to the point. It doesn't matter what you choose. What you need to do is pick something that you love play. " so I don’t get distracted and quit it, " = 100% Pick something that you want to play, Don't set yourself up for failure by not doing that. For me that is Titan weapon / bio armor scrapper and fire fire fire blaster. I am a damaged Junkie and both of those give me my power fix. And even though almost everybody else hates Titan weapons, I love them. I don't just love them for the damage, I love them for the attacks. I even sort of custom built my build around keeping attacks that other in-game builds took out of the loop in order to maximize a DPS rotation. If you want to meet in game, I will walk you through the process, the way that somebody else has walk me through the process. You just let me know what time is convenient for you, and I will log on and show you the ropes.
-
@Arcadian-Prime He's actually right & I've tried both. BS definitely has better weapon choices but WM out performs it in every single way. WM Scrapper is a front runner for the highest DPS in game and BS is one of the lowest performers. But if you're not min/maxing and you prefer BS, then go BS because they definitely look sexy.
-
Does anybody have a Fire/Fire/Fire Build with Highest Possible DPS? I'm curious to see what that would look like, a build that purely focuses on DPS. I'm also interested in seeing the Meta-OP fire/fire/fire build (assuming that has +defenses too?).
-
Broad Sword/Shield is so sexy... It just is.
-
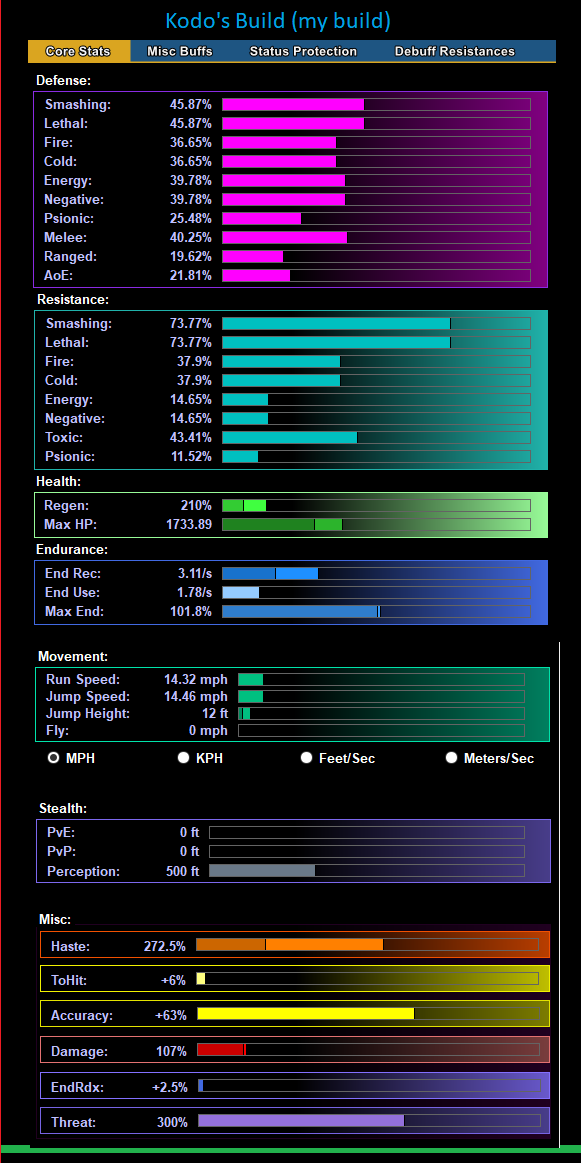
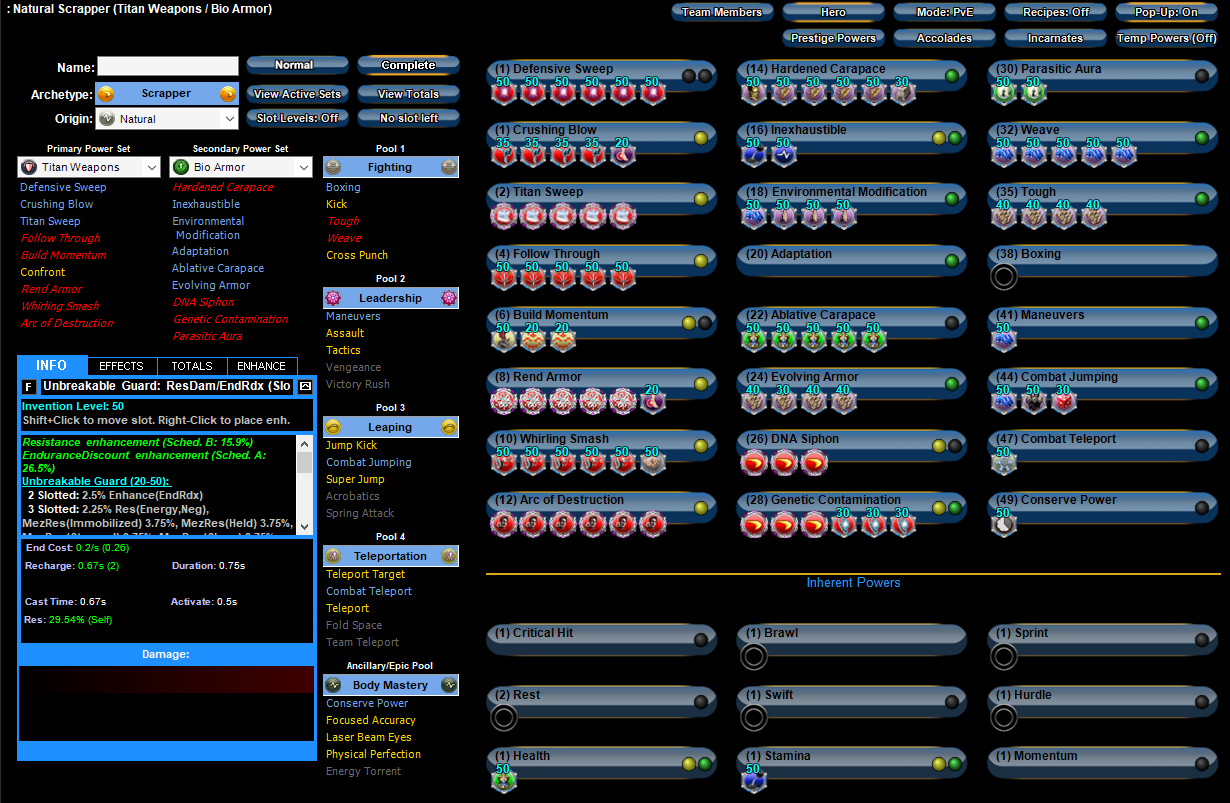
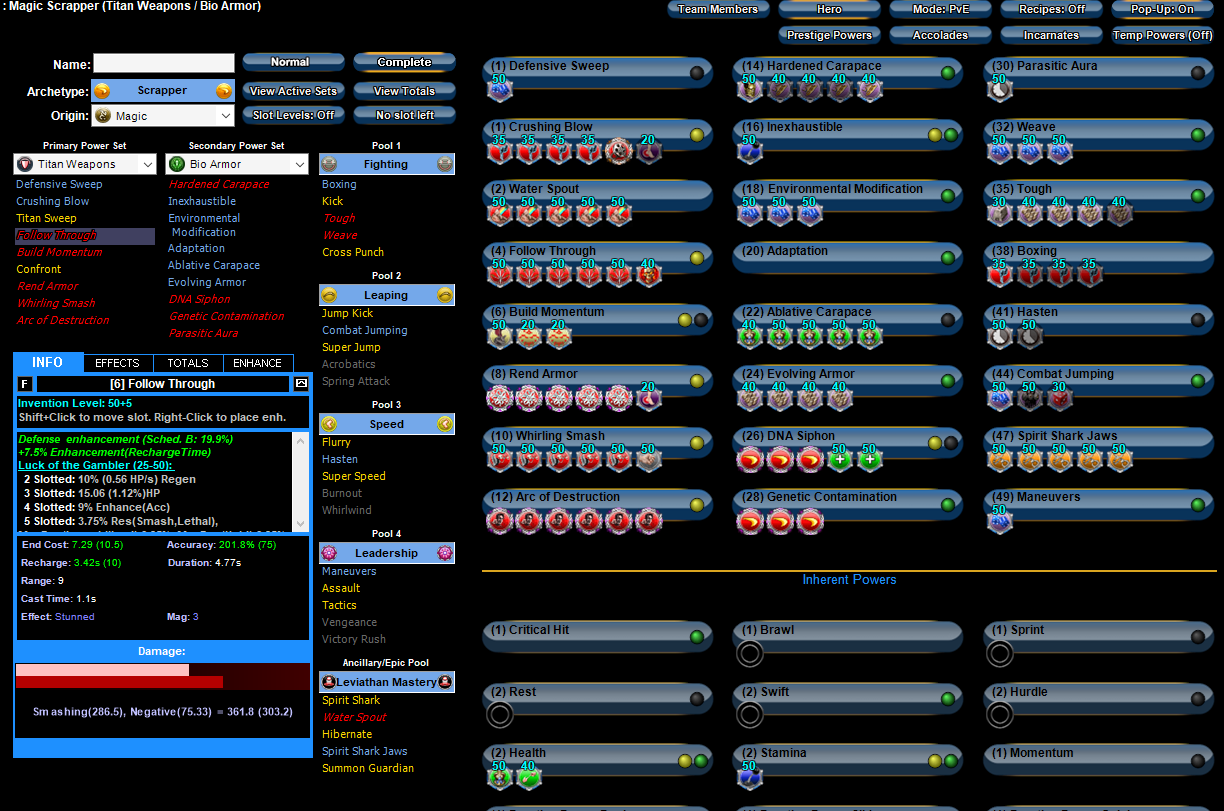
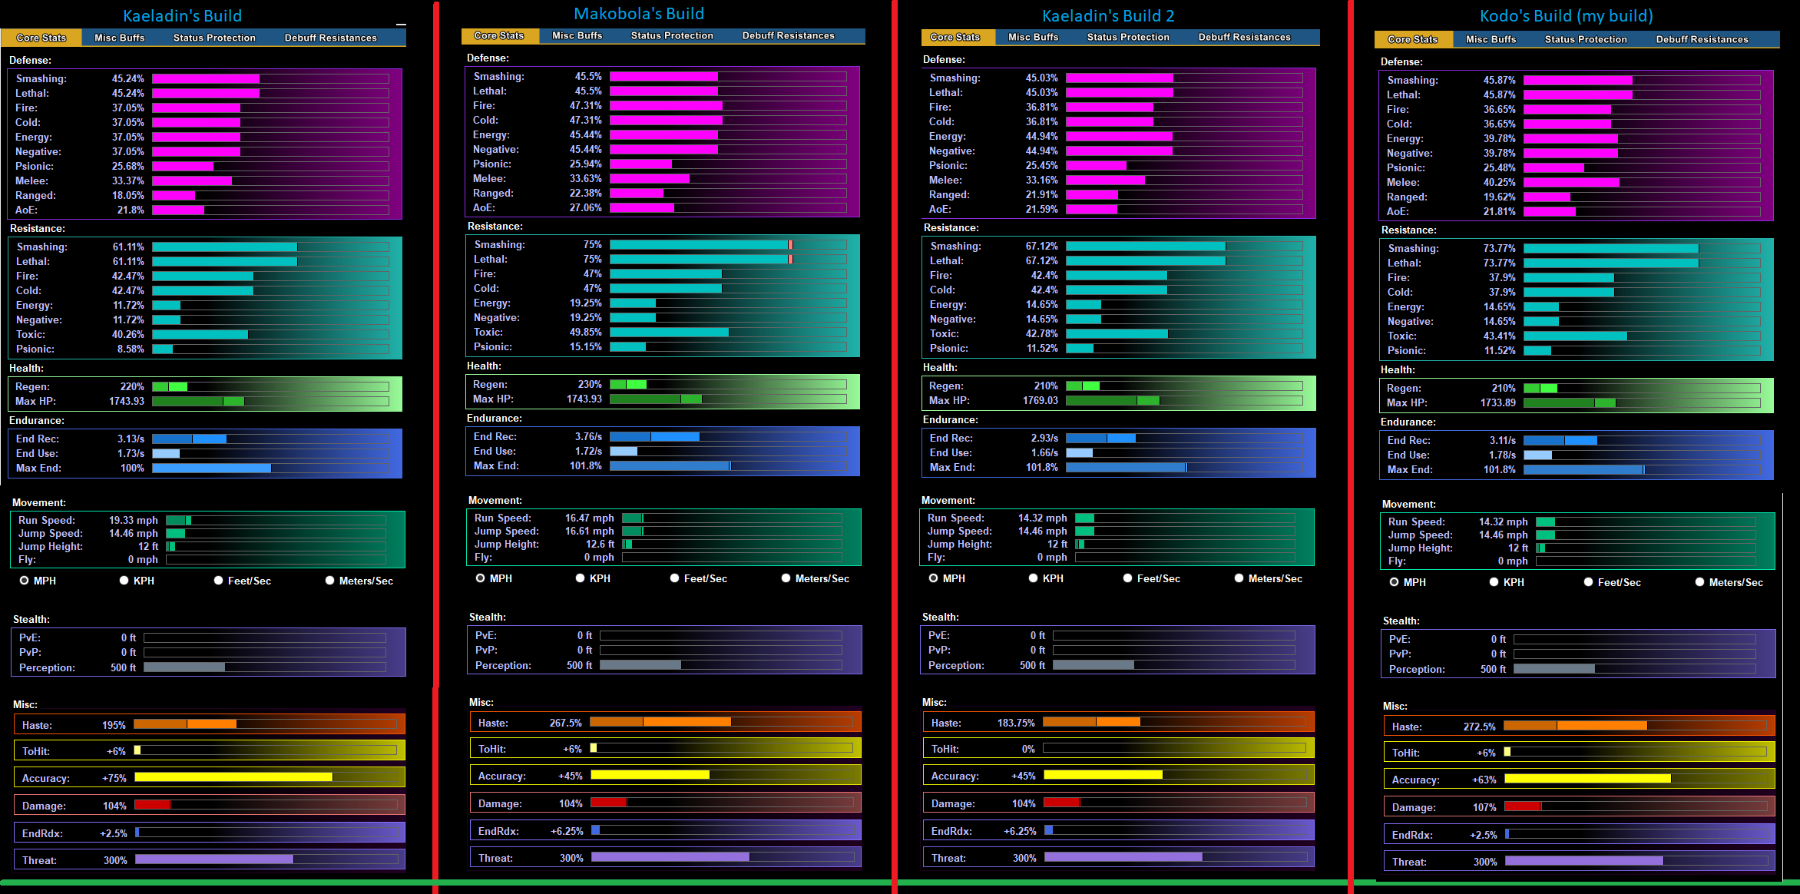
Kodo's Build (my variation): Ok, I can elaborate on this one. I butchered a bunch of different logic from other builds online, mainly from Kaeladin & Makobola, and pieced them together to fit my playstyle the most. Here's what I wanted before going into it: - All of my TW attacks. I know it's not optimal for rotations but for me, I chose to keep all of the TW attacks because they are fun and cool to see. - Combat Teleport. I had to choose between Teleport and Combat Teleport, in the end, I chose Combat Teleport. Again for fun, I love it and the +21% ToHit is nice too (yes it stacks) x3 times. I bounce all around mid fights and it makes me feel cool like Nightcrawler. - No Haste. End game, you have a lot of buttons... Build Momentum, Incarnate Powers, Etc. etc. etc. I really didn't want another pre-attack power, plus I don't really need haste. I'm not missing it at all to be honest. I don't even realize it's gone. - I 100% Did not want a build that would result in baby-sitting/watching my Endurance bar. I wasn't sure if this build would need baby sitting or not and it does not. I literally never even look at my endurance bar. (Conserve Power is useless/unnecessary in this build). Worth noting, my build is not The Optimal TW/BIO Scrapper Build. I took powers that I didn't not need and I did not choose haste. If you're min/maxing, don't consider this build. This Hero build was built using Mids Reborn 3.2.17 https://github.com/LoadedCamel/MidsReborn Click this DataLink to open the build! Level 50 Natural Scrapper Primary Power Set: Titan Weapons Secondary Power Set: Bio Armor Power Pool: Fighting Power Pool: Leadership Power Pool: Leaping Power Pool: Teleportation Ancillary Pool: Body Mastery Hero Profile: Level 1: Defensive Sweep -- Obl-Acc/Dmg/Rchg(A), Obl-Acc/Dmg/EndRdx/Rchg(3), Obl-Dmg(3), Obl-Acc/Rchg(5), Obl-Dmg/Rchg(5), Obl-%Dam(7) Level 1: Crushing Blow -- KntCmb-Acc/Dmg(A), KntCmb-Dmg/EndRdx(7), KntCmb-Dmg/Rchg(9), KntCmb-Dmg/EndRdx/Rchg(9), AchHee-ResDeb%(11) Level 2: Titan Sweep -- SprAvl-Acc/Dmg(A), SprAvl-Dmg/EndRdx(11), SprAvl-Acc/Dmg/EndRdx(13), SprAvl-Acc/Dmg/Rchg(13), SprAvl-Rchg/KDProc(15) Level 4: Follow Through -- Hct-Dmg(A), Hct-Dmg/Rchg(15), Hct-Acc/Dmg/Rchg(17), Hct-Dmg/EndRdx(17), Hct-Dam%(19) Level 6: Build Momentum -- GssSynFr--Build%(A), RctRtc-ToHit/Rchg(19), RctRtc-ToHit(21) Level 8: Rend Armor -- SprBlsCol-Acc/Dmg(A), SprBlsCol-Dmg/EndRdx(21), SprBlsCol-Acc/Dmg/EndRdx(23), SprBlsCol-Acc/Dmg/Rchg(23), SprBlsCol-Dmg/EndRdx/Acc/Rchg(25), AchHee-ResDeb%(25) Level 10: Whirling Smash -- Arm-Dmg(A), Arm-Acc/Dmg/Rchg(27), Arm-Acc/Rchg(27), Arm-Dmg/EndRdx(29), Arm-Dam%(29), FrcFdb-Rechg%(31) Level 12: Arc of Destruction -- SprCrtStr-Acc/Dmg(A), SprCrtStr-Dmg/Rchg(31), SprCrtStr-Acc/Dmg/Rchg(31), SprCrtStr-Dmg/EndRdx/Rchg(33), SprCrtStr-Acc/Dmg/EndRdx/Rchg(33), SprCrtStr-Rchg/+50% Crit(33) Level 14: Hardened Carapace -- GldArm-3defTpProc(A), UnbGrd-ResDam(34), UnbGrd-Max HP%(34), UnbGrd-ResDam/EndRdx(34), UnbGrd-Rchg/ResDam(36), StdPrt-ResDam/Def+(36) Level 16: Inexhaustible -- PrfShf-End%(A), EndMod-I(50) Level 18: Environmental Modification -- LucoftheG-Def/Rchg+(A), Rct-Def/EndRdx(36), Rct-Def(37), Rct-ResDam%(37) Level 20: Adaptation Level 22: Ablative Carapace -- Pnc-Heal/EndRedux(A), Pnc-EndRdx/Rchg(37), Pnc-Heal/Rchg(39), Pnc-Heal/EndRedux/Rchg(39), Pnc-Heal(39) Level 24: Evolving Armor -- RctArm-ResDam(A), RctArm-ResDam/EndRdx(40), RctArm-ResDam/Rchg(40), RctArm-ResDam/EndRdx/Rchg(40) Level 26: DNA Siphon -- SprScrStr-Rchg/+Crit(A), SprScrStr-Dmg/Rchg(42), SprScrStr-Acc/Dmg/Rchg(42) Level 28: Genetic Contamination -- SprScrStr-Acc/Dmg(A), SprScrStr-Dmg/EndRdx/Rchg(42), SprScrStr-Acc/Dmg/EndRdx/Rchg(43), Erd-Acc/Dmg/EndRdx/Rchg(43), Erd-%Dam(43), Erd-Dmg(45) Level 30: Parasitic Aura -- Prv-Heal(A), Prv-EndRdx/Rchg(50) Level 32: Weave -- LucoftheG-Def/Rchg+(A), LucoftheG-Def(45), LucoftheG-Def/EndRdx(45), LucoftheG-Def/Rchg(46), LucoftheG-Def/EndRdx/Rchg(46) Level 35: Tough -- RctArm-ResDam(A), RctArm-ResDam/EndRdx(46), RctArm-ResDam/Rchg(48), RctArm-ResDam/EndRdx/Rchg(48) Level 38: Boxing -- Empty(A) Level 41: Maneuvers -- LucoftheG-Def/Rchg+(A) Level 44: Combat Jumping -- LucoftheG-Def/Rchg+(A), ShlWal-ResDam/Re TP(48), Ksm-ToHit+(50) Level 47: Combat Teleport -- WntGif-RunSpd/Jump/Fly/Rng(A) Level 49: Conserve Power -- RechRdx-I(A) Level 1: Critical Hit Level 1: Brawl -- Empty(A) Level 1: Sprint -- Empty(A) Level 2: Rest -- Empty(A) Level 1: Swift -- Empty(A) Level 1: Hurdle -- Empty(A) Level 1: Health -- Pnc-Heal/+End(A) Level 1: Stamina -- PrfShf-End%(A) Level 1: Momentum Level 20: Defensive Adaptation Level 20: Efficient Adaptation Level 20: Offensive Adaptation ------------ For Google Keywords Search Results: City of Heros TW/BIO Scrapper Build City of Heros Titan Weapon / Bio Armor Scrapper Build City of Heros Titan Weapon/Bio Armor Scrapper Build City of Heros Titan/Bio Scrapper Build COH TW/BIO Scrapper Build
-
Kaeladin's Build 2 This Hero build was built using Mids Reborn 3.2.17 https://github.com/LoadedCamel/MidsReborn Click this DataLink to open the build! Level 50 Magic Scrapper Primary Power Set: Titan Weapons Secondary Power Set: Bio Armor Power Pool: Fighting Power Pool: Speed Power Pool: Leaping Power Pool: Leadership Ancillary Pool: Soul Mastery Hero Profile: Level 1: Defensive Sweep -- LucoftheG-Def/Rchg+(A) Level 1: Crushing Blow -- KntCmb-Acc/Dmg(A), KntCmb-Dmg/EndRdx(7), KntCmb-Dmg/Rchg(9), KntCmb-Dmg/EndRdx/Rchg(9), Mk'Bit-Acc/Dmg/EndRdx/Rchg(11), AchHee-ResDeb%(7) Level 2: Moonbeam -- SprWntBit-Acc/Dmg(A), SprWntBit-Dmg/Rchg(46), SprWntBit-Acc/Dmg/EndRdx(46), SprWntBit-Acc/Dmg/Rchg(46), SprWntBit-Dmg/EndRdx/Acc/Rchg(48) Level 4: Follow Through -- Hct-Dmg/Rchg(A), Hct-Acc/Dmg/Rchg(11), Hct-Acc/Rchg(13), Hct-Dmg/EndRdx(13), Hct-Dam%(15), TchofDth-Dam%(15) Level 6: Build Momentum -- GssSynFr--Build%(A), RctRtc-ToHit/Rchg(17), RctRtc-ToHit(17) Level 8: Rend Armor -- SprBlsCol-Acc/Dmg(A), SprBlsCol-Dmg/EndRdx(36), SprBlsCol-Acc/Dmg/EndRdx(37), SprBlsCol-Acc/Dmg/Rchg(37), SprBlsCol-Dmg/EndRdx/Acc/Rchg(37), AchHee-ResDeb%(39) Level 10: Whirling Smash -- Arm-Dmg/Rchg(A), Arm-Acc/Dmg/Rchg(39), Arm-Acc/Rchg(39), Arm-Dmg/EndRdx(40), Arm-Dam%(40), FrcFdb-Rechg%(40) Level 12: Arc of Destruction -- SprCrtStr-Acc/Dmg(A), SprCrtStr-Dmg/Rchg(19), SprCrtStr-Acc/Dmg/Rchg(43), SprCrtStr-Dmg/EndRdx/Rchg(43), SprCrtStr-Acc/Dmg/EndRdx/Rchg(43), SprCrtStr-Rchg/+50% Crit(45) Level 14: Hardened Carapace -- GldArm-3defTpProc(A), UnbGrd-Max HP%(3), UnbGrd-ResDam(3), UnbGrd-ResDam/EndRdx(5), UnbGrd-Rchg/ResDam(5) Level 16: Inexhaustible -- PrfShf-End%(A) Level 18: Environmental Modification -- Rct-Def/EndRdx/Rchg(A), Rct-Def(31), Rct-Def/EndRdx(31), Rct-ResDam%(33), Rct-EndRdx/Rchg(33), Rct-Def/Rchg(33) Level 20: Adaptation Level 22: Ablative Carapace -- Prv-Heal(A), Prv-Heal/Rchg(25) Level 24: Evolving Armor -- RctArm-ResDam(A), RctArm-ResDam/EndRdx(25), RctArm-ResDam/Rchg(27), RctArm-ResDam/EndRdx/Rchg(27) Level 26: DNA Siphon -- Heal-I(A), SprScrStr-Rchg/+Crit(34), SprScrStr-Dmg/Rchg(36), SprScrStr-Acc/Dmg/Rchg(19) Level 28: Genetic Contamination -- SprScrStr-Acc/Dmg(A), SprScrStr-Dmg/EndRdx/Rchg(34), SprScrStr-Acc/Dmg/EndRdx/Rchg(34), Erd-Acc/Dmg/EndRdx/Rchg(48), Erd-%Dam(48), Erd-Dmg(50) Level 30: Parasitic Aura -- Pnc-Heal/EndRedux(A), Pnc-EndRdx/Rchg(45), Pnc-Heal/Rchg(45), Pnc-Heal/EndRedux/Rchg(50), Pnc-Heal(50) Level 32: Weave -- LucoftheG-Def/Rchg+(A), ShlWal-Def(29), ShlWal-Def/EndRdx(29), ShlWal-ResDam/Re TP(31) Level 35: Tough -- StdPrt-ResDam/Def+(A), RctArm-ResDam(21), RctArm-ResDam/EndRdx(21), RctArm-ResDam/EndRdx/Rchg(23), RctArm-EndRdx(23) Level 38: Boxing -- KntCmb-Acc/Dmg(A), KntCmb-Dmg/EndRdx(42), KntCmb-Dmg/Rchg(42), KntCmb-Dmg/EndRdx/Rchg(36) Level 41: Hasten -- RechRdx-I(A), RechRdx-I(42) Level 44: Combat Jumping -- LucoftheG-Def/Rchg+(A) Level 47: Maneuvers -- LucoftheG-Def/Rchg+(A) Level 49: Shadow Meld -- LucoftheG-Def/Rchg+(A) Level 1: Critical Hit Level 1: Brawl -- Acc-I(A) Level 1: Sprint -- Clr-Stlth(A) Level 2: Rest -- IntRdx-I(A) Level 2: Swift -- Run-I(A) Level 2: Hurdle -- Jump-I(A) Level 2: Health -- Pnc-Heal/+End(A) Level 2: Stamina -- PrfShf-End%(A) Level 1: Momentum Level 49: Quick Form Level 1: Prestige Power Dash -- Run-I(A) Level 1: Prestige Power Slide -- Run-I(A) Level 1: Prestige Power Quick -- Run-I(A) Level 1: Prestige Power Rush -- Run-I(A) Level 1: Prestige Power Surge -- Run-I(A) Level 4: Ninja Run Level 50: Musculature Core Paragon Level 50: Assault Radial Embodiment Level 50: Ageless Core Epiphany Level 20: Defensive Adaptation Level 20: Efficient Adaptation Level 20: Offensive Adaptation ------------ For Google Keywords Search Results: City of Heros TW/BIO Scrapper Build City of Heros Titan Weapon / Bio Armor Scrapper Build City of Heros Titan Weapon/Bio Armor Scrapper Build City of Heros Titan/Bio Scrapper Build COH TW/BIO Scrapper Build
-
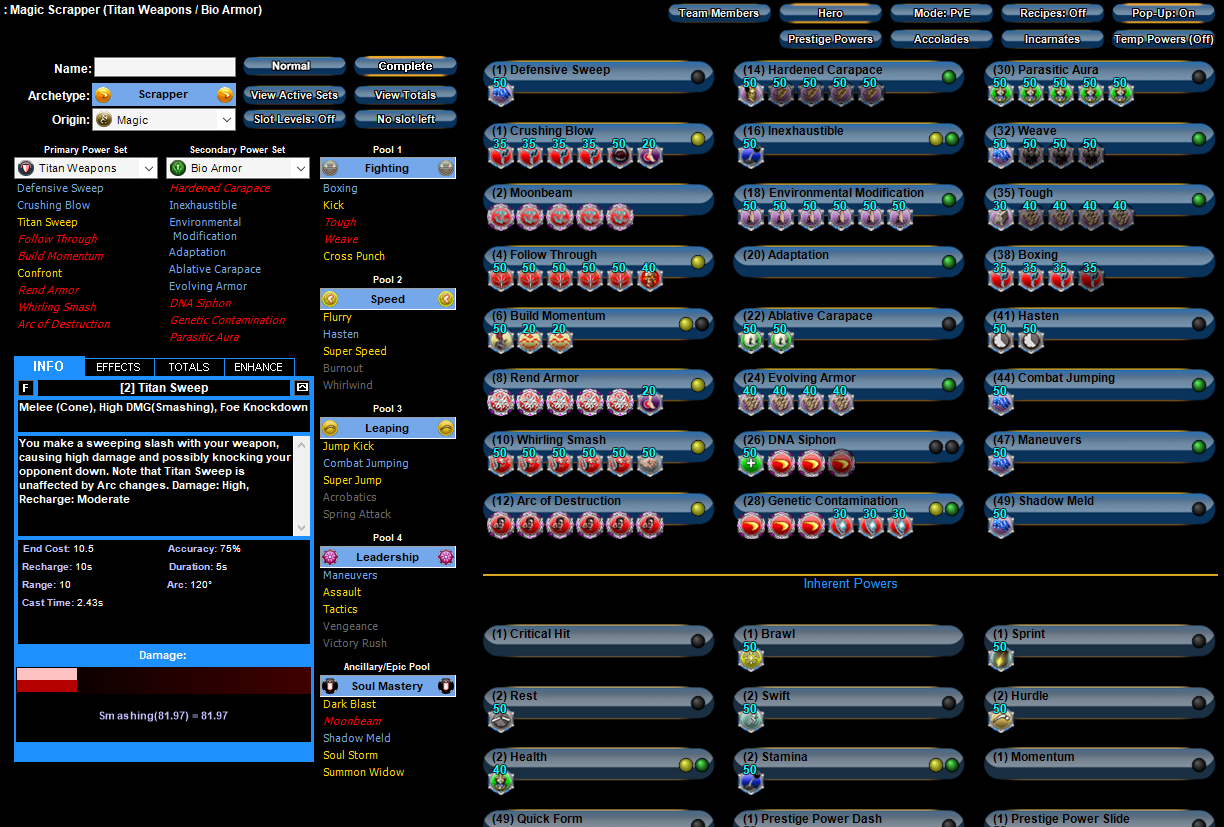
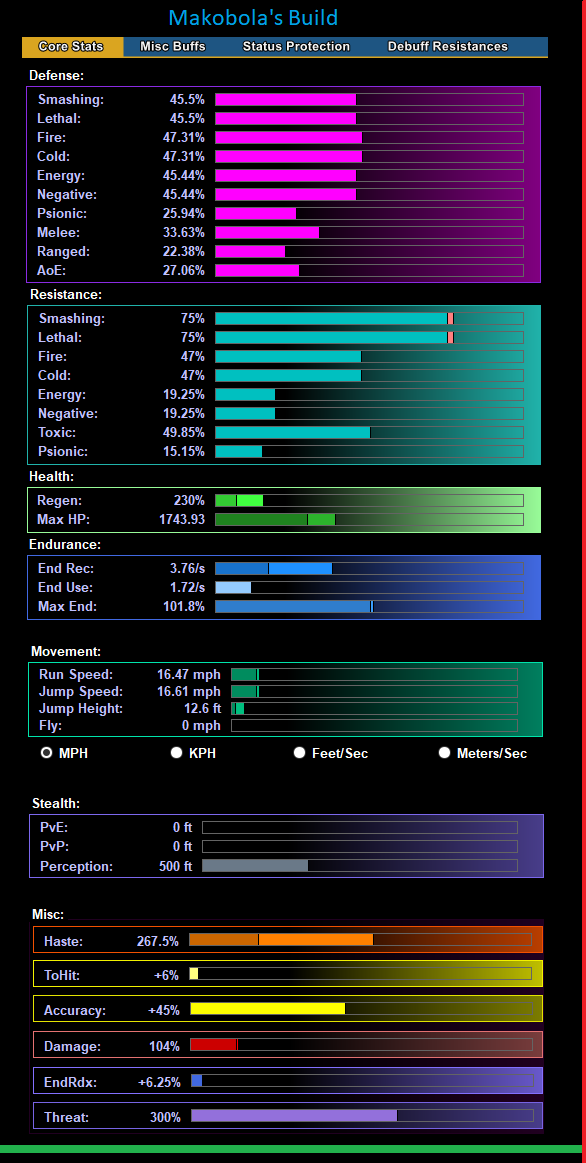
Makobola's Build: Quoteing Makobola: "I only do Arc - Whirling - Follow Through - Rend - Whirling - repeat for AoE; with bosses being targetted, Arc - Follow - Crush - Rend - Follow for single target. Moonbeam comes in between the momentum I made this with more endurance recovery, but they can all be siphoned off to get more recharge in Ablative and Parasitic." This Hero build was built using Mids Reborn 3.2.17 https://github.com/LoadedCamel/MidsReborn Click this DataLink to open the build! Level 50 Magic Scrapper Primary Power Set: Titan Weapons Secondary Power Set: Bio Armor Power Pool: Speed Power Pool: Fighting Power Pool: Leaping Power Pool: Leadership Ancillary Pool: Soul Mastery Hero Profile: Level 1: Crushing Blow -- KntCmb-Acc/Dmg(A), KntCmb-Dmg/EndRdx/Rchg(3), AchHee-ResDeb%(3), KntCmb-Dmg/EndRdx(5), KntCmb-Dmg/Rchg(5) Level 1: Boxing -- KntCmb-Acc/Dmg(A), KntCmb-Dmg/EndRdx(7), KntCmb-Dmg/Rchg(7), KntCmb-Dmg/EndRdx/Rchg(9) Level 2: Moonbeam -- SprWntBit-Rchg/SlowProc(A), SprWntBit-Dmg/EndRdx/Acc/Rchg(42), SprWntBit-Dmg/Rchg(48), SprWntBit-Acc/Dmg(50), SprWntBit-Acc/Dmg/EndRdx(50), SprWntBit-Acc/Dmg/Rchg(50) Level 4: Follow Through -- Hct-Dmg/Rchg(A), Hct-Acc/Dmg/Rchg(17), Hct-Acc/Rchg(17), Hct-Dam%(19), Hct-Dmg/EndRdx(19) Level 6: Build Momentum -- GssSynFr--Build%(A), RctRtc-ToHit/Rchg(13), RctRtc-ToHit(15) Level 8: Rend Armor -- SprBlsCol-Acc/Dmg(A), SprBlsCol-Dmg/EndRdx(31), SprBlsCol-Acc/Dmg/EndRdx(31), SprBlsCol-Acc/Dmg/Rchg(31), SprBlsCol-Dmg/EndRdx/Acc/Rchg(33), SprBlsCol-Rchg/HoldProc(33) Level 10: Whirling Smash -- Arm-Dmg/Rchg(A), Arm-Acc/Dmg/Rchg(37), Arm-Acc/Rchg(39), Arm-Dmg/EndRdx(39), Arm-Dam%(39), FrcFdb-Rechg%(40) Level 12: Arc of Destruction -- SprCrtStr-Acc/Dmg(A), SprCrtStr-Dmg/Rchg(42), SprCrtStr-Acc/Dmg/Rchg(42), SprCrtStr-Dmg/EndRdx/Rchg(43), SprCrtStr-Acc/Dmg/EndRdx/Rchg(43), SprCrtStr-Rchg/+50% Crit(43) Level 14: Hardened Carapace -- GldArm-3defTpProc(A), UnbGrd-Max HP%(23), UnbGrd-ResDam/EndRdx/Rchg(23), UnbGrd-ResDam(25), StdPrt-ResDam/Def+(9), UnbGrd-Rchg/ResDam(11) Level 16: Inexhaustible -- PrfShf-End%(A), PrfShf-EndMod(27) Level 18: Environmental Modification -- LucoftheG-Def/Rchg+(A), Rct-Def/EndRdx(21), Rct-Def(21), Rct-ResDam%(15) Level 20: Adaptation Level 22: Ablative Carapace -- Prv-Heal(A), Prv-Heal/EndRdx(34), Prv-Absorb%(36), Prv-Heal/Rchg(36), Prv-Heal/Rchg/EndRdx(29) Level 24: Evolving Armor -- RctArm-ResDam(A), RctArm-ResDam/EndRdx/Rchg(36), RctArm-ResDam/EndRdx(37), RctArm-ResDam/Rchg(37) Level 26: DNA Siphon -- SprScrStr-Acc/Dmg/Rchg(A), SprScrStr-Rchg/+Crit(40), SprScrStr-Acc/Dmg/EndRdx/Rchg(40) Level 28: Genetic Contamination -- SprScrStr-Acc/Dmg(A), SprScrStr-Dmg/Rchg(45), SprScrStr-Dmg/EndRdx/Rchg(45), Erd-%Dam(45), Erd-Acc/Dmg/EndRdx/Rchg(46), Erd-Dmg(46) Level 30: Parasitic Aura -- Prv-Heal/Rchg/EndRdx(A), Prv-Heal/Rchg(33) Level 32: Weave -- LucoftheG-Def/Rchg+(A), LucoftheG-Def(46), ShlWal-ResDam/Re TP(34), Ksm-ToHit+(34) Level 35: Tough -- RctArm-ResDam/EndRdx/Rchg(A), RctArm-ResDam/Rchg(48), RctArm-ResDam(27), RctArm-ResDam/EndRdx(29) Level 38: Hasten -- RechRdx-I(A) Level 41: Combat Jumping -- LucoftheG-Def/Rchg+(A) Level 44: Maneuvers -- LucoftheG-Def/Rchg+(A), LucoftheG-Def/EndRdx(48) Level 47: Super Speed -- WntGif-ResSlow(A) Level 49: Shadow Meld -- LucoftheG-Def/Rchg+(A) Level 1: Critical Hit Level 1: Brawl -- Acc-I(A) Level 1: Sprint -- Clr-Stlth(A) Level 2: Rest -- IntRdx-I(A) Level 2: Swift -- Run-I(A) Level 2: Hurdle -- Jump-I(A) Level 2: Health -- Pnc-Heal/+End(A), NmnCnv-Regen/Rcvry+(11), Mrc-Rcvry+(13) Level 2: Stamina -- PrfShf-End%(A), PrfShf-EndMod(25) Level 1: Momentum Level 12: Speed Phase Level 49: Quick Form Level 1: Prestige Power Dash -- Run-I(A) Level 1: Prestige Power Slide -- Run-I(A) Level 1: Prestige Power Quick -- Run-I(A) Level 1: Prestige Power Rush -- Run-I(A) Level 1: Prestige Power Surge -- Run-I(A) Level 4: Ninja Run Level 50: Assault Radial Embodiment Level 50: Ageless Core Epiphany Level 50: Musculature Radial Paragon Level 10: Defensive Adaptation Level 10: Efficient Adaptation Level 10: Offensive Adaptation ------------ For Google Keywords Search Results: City of Heros TW/BIO Scrapper Build City of Heros Titan Weapon / Bio Armor Scrapper Build City of Heros Titan Weapon/Bio Armor Scrapper Build City of Heros Titan/Bio Scrapper Build COH TW/BIO Scrapper Build
-
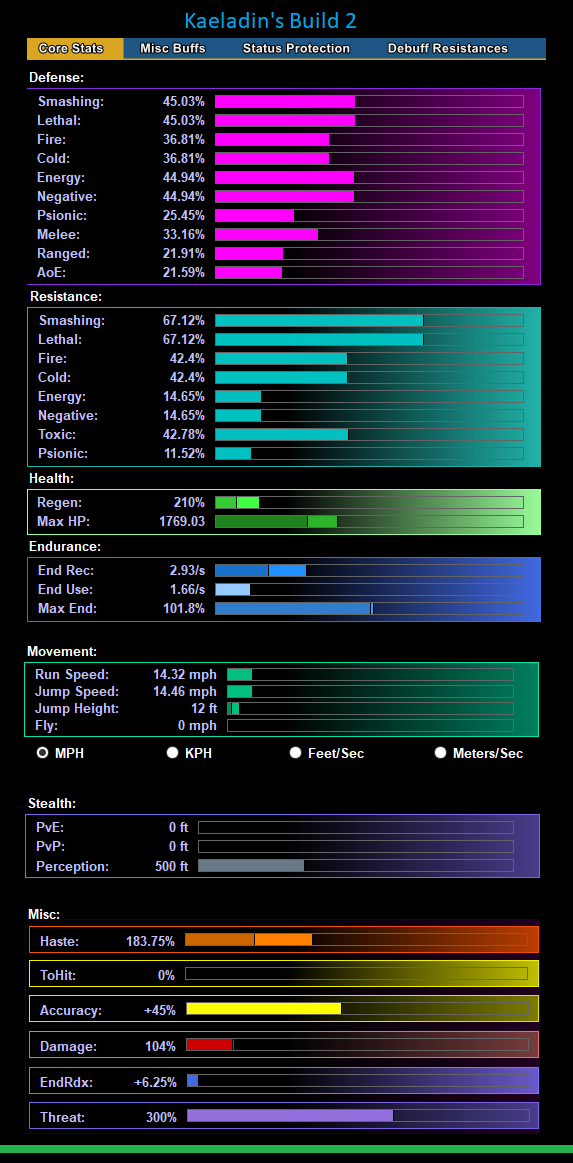
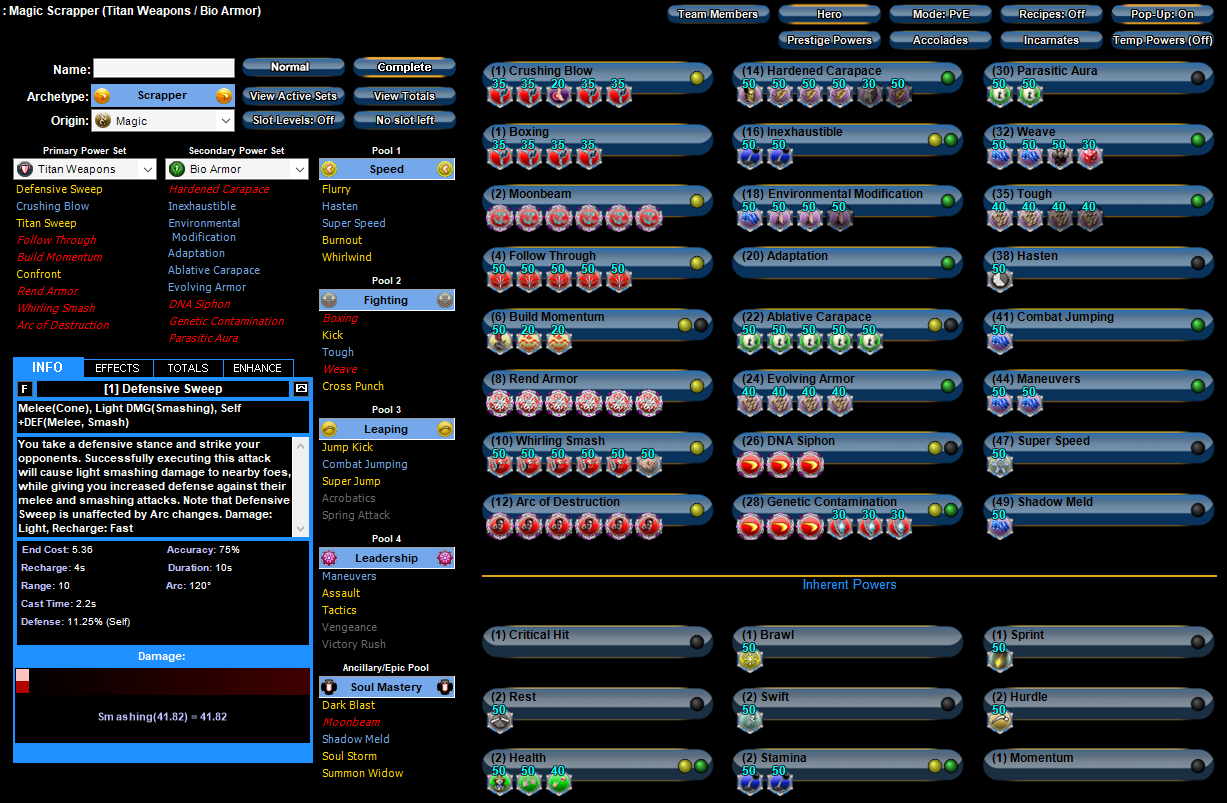
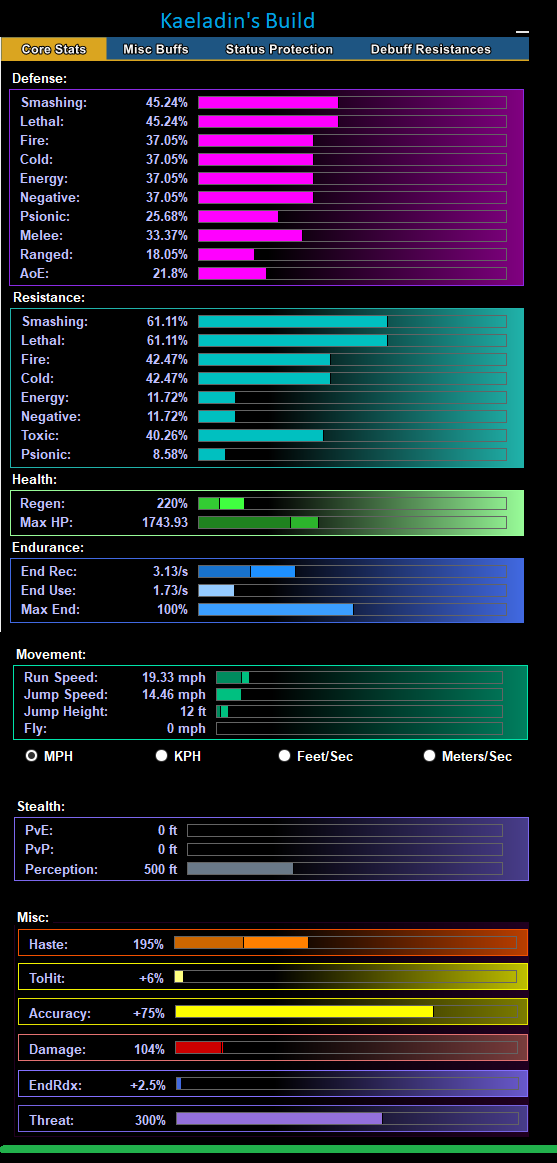
Kaeladin's Build: This Hero build was built using Mids Reborn 3.2.17 https://github.com/LoadedCamel/MidsReborn Click this DataLink to open the build! Level 50 Magic Scrapper Primary Power Set: Titan Weapons Secondary Power Set: Bio Armor Power Pool: Fighting Power Pool: Leaping Power Pool: Speed Power Pool: Leadership Ancillary Pool: Leviathan Mastery Hero Profile: Level 1: Defensive Sweep -- LucoftheG-Def/Rchg+(A) Level 1: Crushing Blow -- KntCmb-Acc/Dmg(A), KntCmb-Dmg/EndRdx(7), KntCmb-Dmg/Rchg(9), KntCmb-Dmg/EndRdx/Rchg(9), OvrFrc-Acc/Dmg/End/Rech(11), AchHee-ResDeb%(51) Level 2: Water Spout -- Rgn-Dmg(A), Rgn-Dmg/Rchg(46), Rgn-Acc/Dmg/Rchg(46), Rgn-Acc/Rchg(48), Rgn-Dmg/EndRdx(48) Level 4: Follow Through -- Hct-Dmg/Rchg(A), Hct-Acc/Dmg/Rchg(15), Hct-Acc/Rchg(15), Hct-Dmg/EndRdx(17), Hct-Dam%(17), TchofDth-Dam%(19) Level 6: Build Momentum -- GssSynFr--Build%(A), RctRtc-ToHit(13), RctRtc-ToHit/Rchg(13) Level 8: Rend Armor -- SprBlsCol-Acc/Dmg(A), SprBlsCol-Dmg/EndRdx(31), SprBlsCol-Acc/Dmg/EndRdx(33), SprBlsCol-Acc/Dmg/Rchg(33), SprBlsCol-Dmg/EndRdx/Acc/Rchg(33), AchHee-ResDeb%(34) Level 10: Whirling Smash -- Arm-Dmg/Rchg(A), Arm-Acc/Dmg/Rchg(37), Arm-Acc/Rchg(39), Arm-Dmg/EndRdx(39), Arm-Dam%(39), FrcFdb-Rechg%(40) Level 12: Arc of Destruction -- SprCrtStr-Acc/Dmg(A), SprCrtStr-Dmg/Rchg(21), SprCrtStr-Acc/Dmg/Rchg(23), SprCrtStr-Dmg/EndRdx/Rchg(23), SprCrtStr-Acc/Dmg/EndRdx/Rchg(45), SprCrtStr-Rchg/+50% Crit(45) Level 14: Hardened Carapace -- GldArm-3defTpProc(A), UnbGrd-Max HP%(3), UnbGrd-ResDam(3), UnbGrd-ResDam/EndRdx(5), UnbGrd-ResDam/EndRdx/Rchg(27) Level 16: Inexhaustible -- PrfShf-End%(A) Level 18: Environmental Modification -- LucoftheG-Def/Rchg+(A), LucoftheG-Def(19), LucoftheG-Def/EndRdx(21) Level 20: Adaptation Level 22: Ablative Carapace -- Pnc-Heal/EndRedux(A), Pnc-EndRdx/Rchg(29), Pnc-Heal/Rchg(40), Pnc-Heal/EndRedux/Rchg(42), Pnc-Heal(42) Level 24: Evolving Armor -- RctArm-ResDam(A), RctArm-ResDam/EndRdx(34), RctArm-ResDam/EndRdx/Rchg(34), RctArm-ResDam/Rchg(36) Level 26: DNA Siphon -- SprScrStr-Dmg/Rchg(A), SprScrStr-Acc/Dmg/Rchg(45), SprScrStr-Rchg/+Crit(46), Heal-I(31), Heal-I(40) Level 28: Genetic Contamination -- SprScrStr-Acc/Dmg(A), SprScrStr-Dmg/EndRdx/Rchg(37), SprScrStr-Acc/Dmg/EndRdx/Rchg(37) Level 30: Parasitic Aura -- RechRdx-I(A) Level 32: Weave -- LucoftheG-Def/Rchg+(A), LucoftheG-Def(36), LucoftheG-Def/EndRdx(36) Level 35: Tough -- StdPrt-ResDam/Def+(A), RctArm-ResDam(43), RctArm-ResDam/EndRdx(43), RctArm-ResDam/EndRdx/Rchg(43), RctArm-EndRdx(51) Level 38: Boxing -- KntCmb-Acc/Dmg(A), KntCmb-Dmg/EndRdx(25), KntCmb-Dmg/Rchg(25), KntCmb-Dmg/EndRdx/Rchg(27) Level 41: Hasten -- RechRdx-I(A), RechRdx-I(29) Level 44: Combat Jumping -- LucoftheG-Def/Rchg+(A), ShlWal-ResDam/Re TP(42), Ksm-ToHit+(31) Level 47: Spirit Shark Jaws -- UnbCns-Hold(A), UnbCns-Hold/Rchg(48), UnbCns-Acc/Hold/Rchg(50), UnbCns-Acc/Rchg(50), UnbCns-EndRdx/Hold(50) Level 49: Maneuvers -- LucoftheG-Def/Rchg+(A) Level 1: Critical Hit Level 1: Brawl -- Empty(A) Level 1: Sprint -- Empty(A) Level 2: Rest -- Empty(A) Level 2: Swift -- Empty(A) Level 2: Hurdle -- Empty(A) Level 2: Health -- Pnc-Heal/+End(A), Mrc-Rcvry+(11) Level 2: Stamina -- PrfShf-End%(A) Level 1: Momentum Level 1: Prestige Power Dash -- Empty(A) Level 1: Prestige Power Slide -- Empty(A) Level 1: Prestige Power Quick -- Empty(A) Level 1: Prestige Power Rush -- Empty(A) Level 1: Prestige Power Surge -- Empty(A) Level 4: Ninja Run Level 50: Musculature Core Paragon Level 50: Assault Radial Embodiment Level 50: Ageless Core Epiphany Level 50: Reactive Radial Flawless Interface Level 50: Ion Core Final Judgement Level 50: Cimeroran Core Superior Ally Level 49: Defensive Adaptation Level 49: Efficient Adaptation Level 49: Offensive Adaptation ------------ For Google Keywords Search Results: City of Heros TW/BIO Scrapper Build City of Heros Titan Weapon / Bio Armor Scrapper Build City of Heros Titan Weapon/Bio Armor Scrapper Build City of Heros Titan/Bio Scrapper Build COH TW/BIO Scrapper Build
-
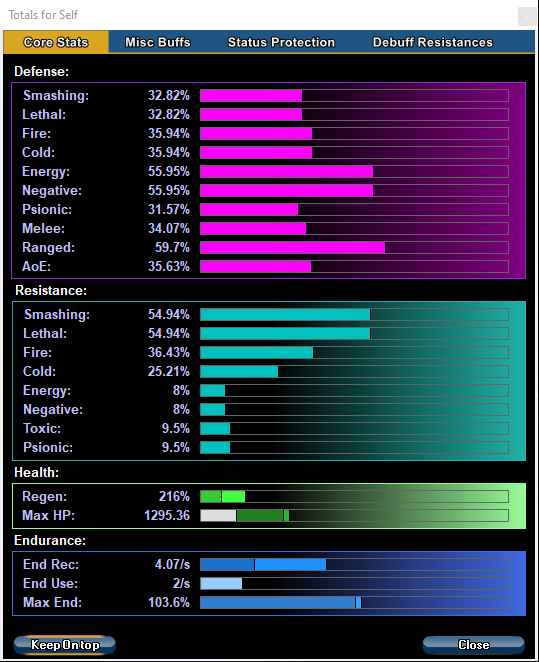
Ok so, I'm making this post to give back to the community "Paying for Forward". This community has been extremely good to me and I'm just trying to pass on the love. It's 2022 and if you're wondering if TW/BIO is still strong af then the answer is 100% yes (don't worry about the 2020 nerf, this class still rocks). I'm going to add different Builds in the comments, each build is slightly different and I do not take credit for any of them. There's a high probability that I will mess up on giving credit to the rightful original build owner (sorry), but the goal is to share the knowledge regardless. Furthermore if you have a build that works well for you, please post it in the comments, and if you don't mind, please use the format that I'm using to post the builds so people can see the results without loading it up in Mids. If you are a noob like me and you don't know how to use Mids, then start here to download Mids: (If you're intimated by mids like I was, don't worry, it's actually really fun and totally worth the time-dive). Here is a comparison of each build's Defenses and Offensives: See comments for each build's details: For Google Keywords Search Results: City of Heros TW/BIO Scrapper Build City of Heros Titan Weapon / Bio Armor Scrapper Build City of Heros Titan Weapon/Bio Armor Scrapper Build City of Heros Titan/Bio Scrapper Build COH TW/BIO Scrapper Build