Hellclaw
-
Posts
14 -
Joined
-
Last visited
Content Type
Profiles
Forums
Events
Store
Articles
Patch Notes
Everything posted by Hellclaw
-
Hello. Thanks to ToT I was able to powerlevel a cool concept character I rolled all the way to 50, but by missing the mid/late-game experience I'm now at a loss for what works and what doesn't, whether to blap or not, etc. Looking at some other builds posted on the forums, it feels like 100% range damage is the way to go with Energy/, so with that in mind this is the build: This Hero build was built using Mids Reborn 3.4.6 https://github.com/LoadedCamel/MidsReborn Click this DataLink to open the build! Level 50 Magic Blaster Primary Power Set: Energy Blast Secondary Power Set: Energy Manipulation Power Pool: Flight Power Pool: Leaping Power Pool: Fighting Power Pool: Leadership Ancillary Pool: Force Mastery Hero Profile: Level 1: Power Blast -- SprWntBit-Rchg/SlowProc(A), SprWntBit-Acc/Dmg(3), SprWntBit-Acc/Dmg/Rchg(5), SprWntBit-Dmg/EndRdx/Acc/Rchg(13), SprWntBit-Acc/Dmg/EndRdx(23), FrcFdb-Rechg%(48) Level 1: Power Thrust -- ExpStr-Dmg/KB(A), ExpStr-Dam%(40), ExpStr-Acc/KB(43), HO:Nucle(45), Hct-Dam%(50) Level 2: Energy Torrent -- Bmbdmt-+FireDmg(A), ExpStr-Dam%(3), PstBls-Dam%(5), HO:Nucle(13), Ann-ResDeb%(23), HO:Nucle(48) Level 4: Hover -- BlsoftheZ-Travel/EndRdx(A), BlsoftheZ-ResKB(36), ShlWal-ResDam/Re TP(40), Ksm-ToHit+(45), Rct-ResDam%(46) Level 6: Power Burst -- SprBlsWrt-Dmg/Rchg(A), SprBlsWrt-Acc/Dmg(7), SprBlsWrt-Acc/Dmg/Rchg(7), SprBlsWrt-Acc/Dmg/EndRdx(11), SprBlsWrt-Acc/Dmg/EndRdx/Rchg(15), SprBlsWrt-Rchg/Dmg%(36) Level 8: Sniper Blast -- SprDfnBrr-Acc/Dmg(A), SprDfnBrr-Acc/Dmg/Rchg(9), SprDfnBrr-Dmg/Rchg(9), SprDfnBrr-Acc/Dmg/EndRdx(11), SprDfnBrr-Acc/Dmg/EndRdx/Rchg(15), SprDfnBrr-Rchg/+Status Protect(34) Level 10: Fly -- Flight-I(A) Level 12: Build Up -- GssSynFr--Build%(A) Level 14: Aim -- RechRdx-I(A) Level 16: Energize -- NmnCnv-Heal/EndRdx(A), NmnCnv-EndRdx/Rchg(17), NmnCnv-Heal/Rchg(17), NmnCnv-Heal/EndRdx/Rchg(19), NmnCnv-Heal(19), NmnCnv-Regen/Rcvry+(48) Level 18: Combat Jumping -- LucoftheG-Def/Rchg+(A) Level 20: Stun -- Stp-Acc/Rchg(A), Stp-EndRdx/Stun(21), Stp-Acc/EndRdx(21), Stp-KB%(36), Stp-Acc/Stun/Rchg(37), Stp-Stun/Rng(45) Level 22: Boxing -- Empty(A) Level 24: Tough -- StdPrt-ResDam/Def+(A), RctArm-ResDam/EndRdx(25), RctArm-ResDam(25), RctArm-ResDam/Rchg(37) Level 26: Explosive Blast -- OvrFrc-Acc/Dmg(A), OvrFrc-End/Rech(27), OvrFrc-Acc/Dmg/End(27), OvrFrc-Dmg/End/Rech(29), OvrFrc-Acc/Dmg/End/Rech(29), FrcFdb-Rechg%(31) Level 28: Power Boost -- RechRdx-I(A) Level 30: Weave -- RedFrt-Def/EndRdx(A), RedFrt-Def(31), RedFrt-EndRdx/Rchg(31), RedFrt-Def/Rchg(37), RedFrt-Def/EndRdx/Rchg(40), RedFrt-EndRdx(46) Level 32: Nova -- FuroftheG-ResDeb%(A), Arm-Dam%(33), Obl-%Dam(33), Obl-Acc/Dmg/EndRdx/Rchg(33), SprAvl-Acc/Dmg/EndRdx/Rchg(34), SprAvl-Acc/Dmg/Rchg(34) Level 35: Personal Force Field -- LucoftheG-Def/Rchg+(A) Level 38: Maneuvers -- LucoftheG-Def/EndRdx(A), LucoftheG-Def/Rchg(39), LucoftheG-Def/EndRdx/Rchg(39), LucoftheG-Def(39), LucoftheG-Def/Rchg+(50) Level 41: Temp Invulnerability -- GldArm-End/Res(A), GldArm-RechRes(42), GldArm-RechEnd(42), GldArm-Res/Rech/End(42), GldArm-ResDam(43), GldArm-3defTpProc(43) Level 44: Force of Nature -- RechRdx-I(A), RechRdx-I(50) Level 47: Tactics -- HO:Enzym(A) Level 49: Vengeance -- LucoftheG-Def/Rchg+(A) Level 1: Defiance Level 1: Brawl -- Empty(A) Level 1: Sprint -- Empty(A) Level 2: Rest -- Empty(A) Level 1: Swift -- Empty(A) Level 1: Hurdle -- Empty(A) Level 1: Health -- Mrc-Rcvry+(A) Level 1: Stamina -- PrfShf-End%(A), PrfShf-EndMod(46) Level 49: Quick Form Level 10: Afterburner ------------ | Copy & Paste this data into Mids Reborn : Hero Designer to view the build | |-------------------------------------------------------------------| |MxDz;1634;709;1418;HEX;| |78DA75945B4F135110C7FFBB7BAA425B6EE52A37B9095228544DBC8B41E14120415| |05F49034DD9A4B6B52D119EBC7F015F4CBCE1A38AF8EC87D04F205EDE7CF292F86C| |D6D99D33C929864DDAFD9D993367FE67CE9C9D5BBF14F9F861F602ACE8C56CAA545| |A9AA4FF72BA189A4B65DC65F8CF7EFAB56BF3D2422A9749AF24A672E962668327F7| |896F71AD50C817CBE29C4BE5DCC25A365576F33984E7F3F96C623AEB6656CB91806| |7D3A9829BCB44D9E1DB69542BAE9574B1B4EA161AA60AEE72623A5F5C4ED37A7E96| |8D5692D343BF93BE360BF27821605B0149051BAF1814B6182278CBD08C370C63786| |8077063D732E4BE459E98C220361886B1CE3082B33445394822CED1A72A82498405| |3BA445E86885F7D022747433BE3B5A84B654518D1D5384834F9CA00F3B0C8398E1A| |011FCA5299D0AA3F8C396D3340E999508E1297BF6E189C033866A3C67A8C10B4767| |D86438E39FB5B90C89E2621D802D6029BD8CA3F4328AA10721863085551925A1411| |F17204FAFB0910061BCE6CDF965889A3151C439E626BD6A4D51B5B862059E3A2C08| |2C3234E0AAC0354B17F83A433389AA3753D7A3893D451AC6CC138CE1367B1A7147E| |0AEA54BF580A11FF72D7D18F7182C4AD064EEA0091E3D70C8DE6224765A82211D5F| |2BBA08067DE865E84737C3799AD9666EBA0D3B7C4607F159E00B4307BE0A7C63E89| |2D62EF917D7D4D42E5555A4AAD34CD0896A4B07D7084464AF614B77609461343811| |82098AED366BD78D09D67008E76C0D108B67EB4679291DB3C9B045337A4D9DBD723| |8F5A473C0BC1703A863CFE1E038038809343224257A9BD61D32773984248B3982E3| |02C704C6198631267094E11DBDE2863C2B2E654C0AC44867C26CAF044EF0CD6E24C| |FB8B9B77151D7A32A3F3C5E8782F97881915A68760FFBBCAAFCF6D020B0FFA8AE5C| |58E6FFDCC3FEEB7FFB65EEC3DFBB3C848F6DDD028F1866862BF7E7D1D7ADE2FA7BF| |F004F40C709| |-------------------------------------------------------------------|

-
Fluffy... Idk. It was hard to gauge his impact. On incarnate content I was either losing him, seeing him getting killed, or honestly forgetting that I had him as an option in the middle of all the blasting. The occasional heal from him was nice, since I'm pretty weak in that department... I'll probably just end up just doing a second build with him included, along with Fearsome Stare.
-
I do take Tar Patch, too good to pass up, but Rain of Fire didn't make the cut - put my reasoning in an earlier post but basically it just feels out of tune with the pace of the game. Like, would I like it in an MSR? Sure. But that's one of the few scenarios where I can imagine getting full use of it - normally things are dead much earlier, or other's don't appreciate the scatter (even if it's a slow scatter thanks to Tar Patch).
-
For those involved, this was my final build that I'm currently rolling with. Performance is.... mixed. It's not doing quite what I want, end is a problem, and mezzes are a pain, but that's just from a solo perspective. This Villain build was built using Mids Reborn 3.4.6 https://github.com/LoadedCamel/MidsReborn Click this DataLink to open the build! Level 50 Magic Corruptor Primary Power Set: Fire Blast Secondary Power Set: Dark Miasma Power Pool: Teleportation Power Pool: Fighting Power Pool: Speed Power Pool: Leadership Ancillary Pool: Dark Mastery Villain Profile: Level 1: Fire Blast -- Thn-Acc/Dmg(A), Thn-Dmg/EndRdx(3), Thn-Dmg/Rchg(3), Thn-Acc/Dmg/Rchg(7), Thn-Acc/Dmg/EndRdx(9), Thn-Dmg/EndRdx/Rchg(13) Level 1: Twilight Grasp -- TchoftheN-Acc/Heal(A), TchoftheN-Acc/EndRdx/Heal/HP/Regen(11), TchoftheN-Acc/EndRdx/Rchg(11) Level 2: Fire Ball -- Artl-Acc/Dam(A), Artl-Dam/End(5), Artl-Acc/Dam/Rech(5), SprScrBls-Acc/Dmg(7), SprScrBls-Dmg/Rchg(9), SprScrBls-Dmg/EndRdx/Rchg(13) Level 4: Tar Patch -- RechRdx-I(A) Level 6: Teleport -- BlsoftheZ-ResKB(A), BlsoftheZ-Travel/EndRdx(50) Level 8: Darkest Night -- DarWtcDsp-ToHitDeb(A), DarWtcDsp-ToHitDeb/EndRdx(15), DarWtcDsp-Slow%(15), DarWtcDsp-ToHitdeb/Rchg/EndRdx(25) Level 10: Howling Twilight -- RechRdx-I(A) Level 12: Aim -- GssSynFr--Build%(A) Level 14: Kick -- Empty(A) Level 16: Shadow Fall -- LucoftheG-Def/EndRdx(A), LucoftheG-Def/Rchg(17), LucoftheG-Def/EndRdx/Rchg(17), LucoftheG-Def(23), LucoftheG-Def/Rchg+(23), ShlWal-ResDam/Re TP(40) Level 18: Blaze -- SprMlcoft-Acc/Dmg(A), SprMlcoft-Dmg/Rchg(19), SprMlcoft-Acc/Dmg/Rchg(19), SprMlcoft-Dmg/EndRdx/Rchg(21), SprMlcoft-Acc/Dmg/EndRdx/Rchg(21), SprMlcoft-Rchg/Dmg%(25) Level 20: Hasten -- RechRdx-I(A), RechRdx-I(34) Level 22: Tough -- UnbGrd-Max HP%(A), UnbGrd-ResDam(42), UnbGrd-ResDam/EndRdx(42), UnbGrd-ResDam/EndRdx/Rchg(40), StdPrt-ResDam/Def+(31) Level 24: Weave -- RedFrt-Def/EndRdx(A), RedFrt-Def/Rchg(31), RedFrt-EndRdx/Rchg(37), RedFrt-Def/EndRdx/Rchg(37), RedFrt-Def(37), RedFrt-EndRdx(40) Level 26: Blazing Bolt -- StnoftheM-Acc/Dmg(A), StnoftheM-Dam%(27), StnoftheM-Dmg/EndRdx/Rchg(27), SprScrBls-Rchg/+End(29), SprScrBls-Acc/Dmg/Rchg(29), SprScrBls-Acc/Dmg/EndRdx/Rchg(31) Level 28: Maneuvers -- LucoftheG-Def/Rchg+(A), LucoftheG-Def/Rchg(36), LucoftheG-Def/EndRdx/Rchg(36), LucoftheG-Def/EndRdx(36), LucoftheG-Def(42), Rct-ResDam%(48) Level 30: Teleport Target -- EndRdx-I(A) Level 32: Inferno -- Obl-Dmg(A), Obl-Acc/Rchg(33), Obl-Dmg/Rchg(33), Obl-Acc/Dmg/Rchg(33), Obl-Acc/Dmg/EndRdx/Rchg(34), Obl-%Dam(34) Level 35: Oppressive Gloom -- AbsAmz-ToHitDeb%(A) Level 38: Dark Consumption -- PreOptmz-Acc/Rech(A), PreOptmz-EndMod/Rech(39), PreOptmz-EndMod/End(39), PreOptmz-EndMod/Acc/End(39), PreOptmz-EndMod/Acc/Rech(46), PreOptmz-EndMod/End/Rech(46) Level 41: Dark Embrace -- GldArm-End/Res(A), GldArm-RechRes(43), GldArm-RechEnd(43), GldArm-Res/Rech/End(43), GldArm-ResDam(46), GldArm-3defTpProc(48) Level 44: Soul Drain -- SprAvl-Acc/Dmg(A), SprAvl-Dmg/EndRdx(45), SprAvl-Acc/Dmg/EndRdx(45), SprAvl-Rchg/KDProc(45), SprAvl-Acc/Dmg/EndRdx/Rchg(48) Level 47: Soul Transfer -- RechRdx-I(A) Level 49: Fold Space -- RechRdx-I(A) Level 1: Scourge Level 1: Brawl -- Empty(A) Level 1: Sprint -- Empty(A) Level 2: Rest -- Empty(A) Level 1: Swift -- Empty(A) Level 1: Hurdle -- Empty(A) Level 1: Health -- Prv-Absorb%(A), Mrc-Rcvry+(50) Level 1: Stamina -- PrfShf-End%(A), PrfShf-EndMod(50) Level 49: Quick Form Level 50: Intuition Radial Paragon ------------
-
This looks weird to me - no Inferno? I'm still tinkering on a new version of the original build, but I'm not looking for a budget build - I play the market enough to have a stable income. Also have an honest question, to all present - does Rain of Fire actually make it into the final build? I originally chose it for the Scourge synergy, but (in normal content at least) it feels out of place for the pace of the game. Potentially phrased in a different way, what kind of attack chain is considered "optimal" for Fire?
-
Sure, let's see the hard content build 😃
-
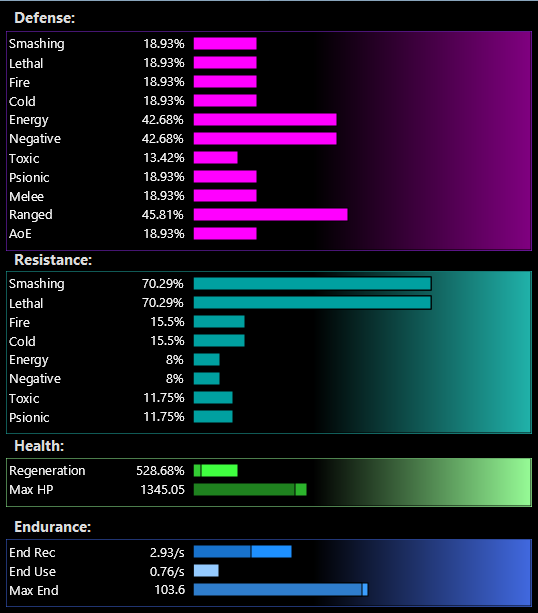
Thanks robopop. I realized that this build is actually much worse than it seemed... I only reach softcap with Power Boost on, so it's only relevant for short bursts. I simply can't reach ranged def softcap, but with Fearsome Stare in the rotation + Dark Servant I feel like most enemies I fight will have some -ToHit to help mitigate some damage anyway... Assuming I can't hit softcap, what are some <45% breakpoints that are good to aim for? I'm used to building tanks where the build goals (softcaps and hardcaps) are clear as day, but for these hybrid, ranged character builds I'm not 100% sure what I should be aiming for...
-
Hello. Been going back and forth on this build for a while, looking for feedback. Plan is to play in both solo (thinking +1x8?) and groups, and kick ass in both. This Villain build was built using Mids Reborn 3.2.17 https://github.com/LoadedCamel/MidsReborn Click this DataLink to open the build! Level 50 Magic Corruptor Primary Power Set: Fire Blast Secondary Power Set: Dark Miasma Power Pool: Teleportation Power Pool: Fighting Power Pool: Speed Power Pool: Leadership Ancillary Pool: Soul Mastery Villain Profile: Level 1: Fire Blast (A) Superior Scourging Blast - Accuracy/Damage (3) Superior Scourging Blast - RechargeTime/PBAoE +End (3) Superior Scourging Blast - Accuracy/Damage/Endurance/RechargeTime Level 1: Twilight Grasp (A) Numina's Convalesence - Heal/Endurance (11) Numina's Convalesence - +Regeneration/+Recovery (40) Numina's Convalesence - Endurance/Recharge (40) Numina's Convalesence - Heal/Recharge (42) Numina's Convalesence - Heal/Endurance/Recharge (42) Numina's Convalesence - Heal Level 2: Fire Ball (A) Bombardment - Chance for Fire Damage (5) Bombardment - Accuracy/Damage/Recharge (5) Bombardment - Accuracy/Damage/Recharge/Endurance (9) Bombardment - Damage/Recharge (50) Bombardment - Accuracy/Recharge/Endurance Level 4: Tar Patch (A) Recharge Reduction IO Level 6: Rain of Fire (A) Superior Scourging Blast - Accuracy/Damage/RechargeTime (7) Superior Scourging Blast - Damage/Endurance/RechargeTime (7) Superior Scourging Blast - Damage/RechargeTime (11) Superior Frozen Blast - Recharge/Chance for Immobilize Level 8: Darkest Night (A) Dark Watcher's Despair - To Hit Debuff/Endurance (13) Dark Watcher's Despair - To Hit Debuff (9) Dark Watcher's Despair - To Hit Debuff/Recharge/Endurance (50) Dark Watcher's Despair - Chance for Recharge Slow Level 10: Teleport (A) Warp - Endurance/Range Level 12: Howling Twilight (A) Absolute Amazement - Accuracy/Recharge (15) Absolute Amazement - Accuracy/Stun/Recharge Level 14: Kick (A) Empty Level 16: Shadow Fall (A) Kismet - Defense/Endurance (17) Kismet - Defense/Endurance/Recharge (17) Kismet - Defense/Recharge (31) Shield Wall - +Res (Teleportation), +5% Res (All) Level 18: Blaze (A) Superior Malice of the Corruptor - Accuracy/Damage (19) Superior Malice of the Corruptor - Damage/Recharge (19) Superior Malice of the Corruptor - Accuracy/Damage/Recharge (21) Superior Malice of the Corruptor - Damage/Endurance/Recharge (21) Superior Malice of the Corruptor - Accuracy/Damage/Endurance/Recharge (34) Superior Malice of the Corruptor - Recharge/Chance for Negative Energy Damage Level 20: Fearsome Stare (A) Nightmare - Accuracy/Fear/Recharge (23) Nightmare - Fear/Range (23) Nightmare - Endurance/Fear Level 22: Hasten (A) Recharge Reduction IO (25) Recharge Reduction IO Level 24: Maneuvers (A) Kismet - Defense/Endurance (25) Kismet - Defense/Recharge (31) Kismet - Defense/Endurance/Recharge (34) Reactive Defenses - Scaling Resist Damage (37) Reactive Defenses - Defense/Endurance Level 26: Blazing Bolt (A) Sting of the Manticore - Chance of Damage(Toxic) (27) Sting of the Manticore - Damage/Endurance/Recharge (27) Sting of the Manticore - Accuracy/Damage (29) Sting of the Manticore - Damage/Endurance (29) Sting of the Manticore - Damage/Interrupt/Recharge Level 28: Tough (A) Gladiator's Armor - TP Protection +3% Def (All) (31) Steadfast Protection - Resistance/+Def 3% (37) Steadfast Protection - Knockback Protection (37) Unbreakable Guard - +Max HP Level 30: Tactics (A) HamiO:Cytoskeleton Exposure (46) HamiO:Cytoskeleton Exposure Level 32: Inferno (A) Fury of the Gladiator - Chance for Res Debuff (33) Superior Avalanche - Accuracy/Damage/Recharge (33) Armageddon - Chance for Fire Damage (33) Armageddon - Accuracy/Recharge (34) Superior Avalanche - Damage/Endurance Level 35: Soul Drain (A) Gaussian's Synchronized Fire-Control - Chance for Build Up (36) Obliteration - Accuracy/Recharge (36) Obliteration - Chance for Smashing Damage (36) Obliteration - Accuracy/Damage/Recharge Level 38: Dark Servant (A) Trap of the Hunter - Accuracy/Recharge (39) Trap of the Hunter - Endurance/Immobilize (39) Trap of the Hunter - Accuracy/Endurance (39) Trap of the Hunter - Immobilize/Accuracy (40) Trap of the Hunter - Accuracy/Immobilize/Recharge (50) Trap of the Hunter - Chance of Damage(Lethal) Level 41: Dark Embrace (A) Impervious Skin - Status Resistance/Regeneration (42) Impervious Skin - Resistance/Endurance (43) Impervious Skin - Resistance/Endurance/Recharge (43) Impervious Skin - Endurance/Recharge (43) Impervious Skin - Resistance/Recharge Level 44: Summon Mistress (A) Call to Arms - Defense Bonus Aura for Pets (45) Call to Arms - Endurance/Damage/Recharge (45) Call to Arms - Accuracy/Recharge (45) Call to Arms - Accuracy/Damage/Recharge (46) Call to Arms - Accuracy/Damage Level 47: Weave (A) Kismet - Defense/Endurance (48) Kismet - Defense/Recharge (48) Kismet - Defense/Endurance/Recharge (48) Luck of the Gambler - Defense/Increased Global Recharge Speed Level 49: Power Boost (A) Recharge Reduction IO Level 1: Scourge Level 1: Brawl
-
Thanks all - back to Mid's for me to try to combine all the suggestions
-
That's a very good point about multiple builds... would Screech be instead of Shout or in addition to everything I already took? For the team-oriented build (which I think might be the only one I actually need), what break points/milestones should I aim for in the build? Just as much recharge as possible?
-
Interesting. A few things: - No love for Miracle +recovery? - Is the Amplify slotting not overkill? - Why Unbreakable Guard in the shields instead of something with more relevant set bonuses? - Why the preference for Scream? The higher DPA? And agreed about the Alpha slot, Vigor looks enticing. I took Spiritual since my character's a Priest (not a Phoenix 😛, though that could be an alt costume) so it seemed fitting
-
Fair points about changing up some of the sets for better bonuses. I'm not just taking powers for their set bonuses, but it's my first time playing Sonic Attack so I'm not sure which powers are the must-haves. Shockwave seems kinda weak? Insofar as my role on team's seems to mostly be spreading -Res rather than trying to do AoE damage. Greater Fire Sword I took as it least gives me some teeth when I'm solo. Self-heal is better slotted for general teaming/MSR and because the base recharge needs more help than Cauterize. Cauterize gets all the Heal and End that I can give it (already hit heavy by ED), which feel more important (especially End) given how with all my other bonuses the cooldown is already as fast as the actual cast animation...
-
Yeah, I concede that I'm chasing ranged defense perhaps a bit too hard, but saw no other way to softcap. Unless the point is that I shouldn't be trying to softcap? And yes, I'm hovering 100% of the time.
-
So this is what I came up with... Some of the power choices are thematic and I'd like to avoid changes to the pools selected (but am open to suggestions about which powers are best to skip/take within those pools). Main thing I ended up going for was 45% Ranged def, everything else is basically just a consequence of that. Let me know what I can improve! This Hero build was built using Mids Reborn 3.1.2.5 https://github.com/LoadedCamel/MidsReborn Click this DataLink to open the build! Level 50 Magic Defender Primary Power Set: Thermal Radiation Secondary Power Set: Sonic Attack Power Pool: Sorcery Power Pool: Flight Power Pool: Leadership Power Pool: Speed Ancillary Pool: Flame Mastery Hero Profile: Level 1: Warmth (A) Numina's Convalesence - Heal/Endurance (9) Numina's Convalesence - Endurance/Recharge (11) Numina's Convalesence - Heal/Recharge (15) Numina's Convalesence - Heal/Endurance/Recharge (21) Numina's Convalesence - Heal (37) Numina's Convalesence - +Regeneration/+Recovery Level 1: Shriek (A) Thunderstrike - Accuracy/Damage (3) Thunderstrike - Damage/Endurance (3) Thunderstrike - Damage/Endurance/Recharge (7) Thunderstrike - Damage/Recharge (21) Thunderstrike - Accuracy/Damage/Endurance (31) Thunderstrike - Accuracy/Damage/Recharge Level 2: Thermal Shield (A) Reactive Armor - Resistance (13) Reactive Armor - Resistance/Endurance (34) Reactive Armor - Resistance/Recharge (34) Impervious Skin - Status Resistance (37) Impervious Skin - Resistance/Endurance Level 4: Howl (A) Overwhelming Force - Damage/Chance for Knockdown/Knockback to Knockdown (5) Overwhelming Force - Accuracy/Damage (5) Overwhelming Force - Accuracy/Damage/Endurance/Recharge (7) Overwhelming Force - Accuracy/Damage/Endurance (13) Overwhelming Force - Endurance/Recharge Level 6: Cauterize (A) Preventive Medicine - Heal (9) Preventive Medicine - Heal/Endurance (11) Doctored Wounds - Heal/Endurance (15) Doctored Wounds - Heal Level 8: Power of the Phoenix (A) Stupefy - Accuracy/Recharge (17) Stupefy - Endurance/Stun (27) Stupefy - Accuracy/Endurance (43) Stupefy - Stun/Range (43) Stupefy - Accuracy/Stun/Recharge (50) Stupefy - Chance of Knockback Level 10: Mystic Flight (A) Freebird - +Stealth Level 12: Hover (A) Luck of the Gambler - Defense/Increased Global Recharge Speed (33) Shield Wall - +Res (Teleportation), +5% Res (All) (34) Reactive Defenses - Scaling Resist Damage Level 14: Maneuvers (A) Luck of the Gambler - Defense/Increased Global Recharge Speed Level 16: Shout (A) Superior Defender's Bastion - Accuracy/Damage (17) Superior Defender's Bastion - Damage/Endurance/Recharge (19) Superior Defender's Bastion - Accuracy/Damage/Endurance (19) Superior Defender's Bastion - Accuracy/Damage/Endurance/Recharge (25) Superior Defender's Bastion - Recharge/Chance for Minor PBAoE Heal Level 18: Forge (A) Recharge Reduction IO (25) Recharge Reduction IO Level 20: Amplify (A) Gaussian's Synchronized Fire-Control - Chance for Build Up Level 22: Hasten (A) Recharge Reduction IO (23) Recharge Reduction IO Level 24: Tactics (A) Rectified Reticle - Increased Perception Level 26: Heat Exhaustion (A) Accuracy IO (27) Accuracy IO Level 28: Plasma Shield (A) Reactive Armor - Resistance/Endurance (29) Reactive Armor - Resistance (29) Reactive Armor - Resistance/Recharge (31) Steadfast Protection - Knockback Protection (31) Steadfast Protection - Resistance/+Def 3% Level 30: Vengeance (A) Luck of the Gambler - Defense/Increased Global Recharge Speed Level 32: Melt Armor (A) Shield Breaker - Accuracy/Recharge (33) Shield Breaker - Accuracy/Defense Debuff (33) Shield Breaker - Accuracy/Endurance/Recharge Level 35: Char (A) Superior Entomb - Recharge/Chance for +Absorb (36) Superior Entomb - Accuracy/Hold (36) Superior Entomb - Accuracy/Hold/Endurance (36) Superior Entomb - Accuracy/Hold/Endurance/Recharge (37) Superior Entomb - Hold/Recharge Level 38: Dreadful Wail (A) Eradication - Chance for Energy Damage (39) Eradication - Accuracy/Damage/Endurance/Recharge (39) Eradication - Accuracy/Damage/Recharge (39) Superior Vigilant Assault - RechargeTime/PBAoE +Absorb (40) Superior Vigilant Assault - Accuracy/Damage (40) Superior Vigilant Assault - Damage/RechargeTime Level 41: Fire Shield (A) Gladiator's Armor - End/Resist (42) Gladiator's Armor - Recharge/Resist (42) Gladiator's Armor - Recharge/Endurance (42) Gladiator's Armor - Resistance/Rech/End (43) Gladiator's Armor - Resistance (46) Gladiator's Armor - TP Protection +3% Def (All) Level 44: Greater Fire Sword (A) Mako's Bite - Accuracy/Damage (45) Mako's Bite - Damage/Endurance (45) Mako's Bite - Damage/Recharge (45) Mako's Bite - Accuracy/Endurance/Recharge (46) Mako's Bite - Accuracy/Damage/Endurance/Recharge (46) Mako's Bite - Chance of Damage(Lethal) Level 47: Consume (A) Preemptive Optimization - Accuracy/Recharge (48) Preemptive Optimization - EndMod/Endurance (48) Preemptive Optimization - EndMod/Recharge (48) Preemptive Optimization - EndMod/Accuracy/Endurance (50) Preemptive Optimization - EndMod/Accuracy/Recharge (50) Preemptive Optimization - EndMod/Endurance/Recharge Level 49: Rise of the Phoenix (A) Recharge Reduction IO Level 1: Vigilance Level 1: Brawl