qwy
-
Posts
34 -
Joined
-
Last visited
-
i27 How I learned to stop wondering and love the Razar Naga Tray
qwy replied to qwy's topic in Tools, Utilities & Downloads
I've never actually used that kind of mouse, but I don't think so. I put the binds, in the first post, together before I even realized the connection. I also put some NumPad versions because of the visual similarities. When it finally clicked, I did a lot of search to try and justify spending the $100. I was already pretty invested, so I was really trying to convince myself. The wiki has the only mention of operation, I've seen. I found a few articles like this one, with links to pages that were probably taken down when Live was. All the wiki says is, 11 and 12 scroll through the trays, and 1-10 trigger the corresponding slot on the displayed tray. No mention of how it does it, or if there's anything else it can do. If your mouse isn't doing that inherently, there might have been something that unlocked the function, like a CD that came in the box, or a download through Razer's software, at the time. With the lack of information, and the similarity to the NumPad, instead of the mouses layout, I half expect that mapping was the plan. If that's all there is to it, the only advantage over the binds I was already using was keeping the hands on the mouse, and direction keys. That realization inspired my final version, which accomplishes the same end. Since you have the mouse, one of my number pad sets would probably help save you some time, if it comes to mapping to the keyboard. With a modifier, you can spare open keys. I was planning to write up other versions to the reserved slots, below my post, anyway. I just haven't decided which versions or bothered to write up anything. Let me know how you want see the mouse buttons working, I'll post my closest set.- 7 replies
-
- 1
-

-
- ui
- power trays
- (and 1 more)
-
i27 How I learned to stop wondering and love the Razar Naga Tray
qwy replied to qwy's topic in Tools, Utilities & Downloads
reserved -
i27 How I learned to stop wondering and love the Razar Naga Tray
qwy replied to qwy's topic in Tools, Utilities & Downloads
reserved -
i27 How I learned to stop wondering and love the Razar Naga Tray
qwy replied to qwy's topic in Tools, Utilities & Downloads
reserved -
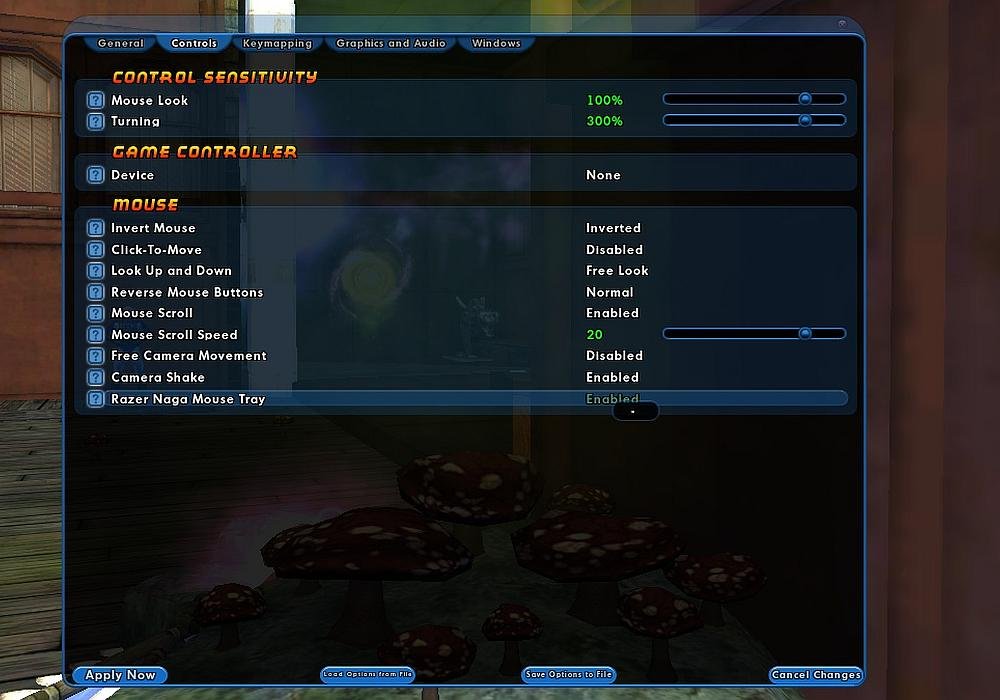
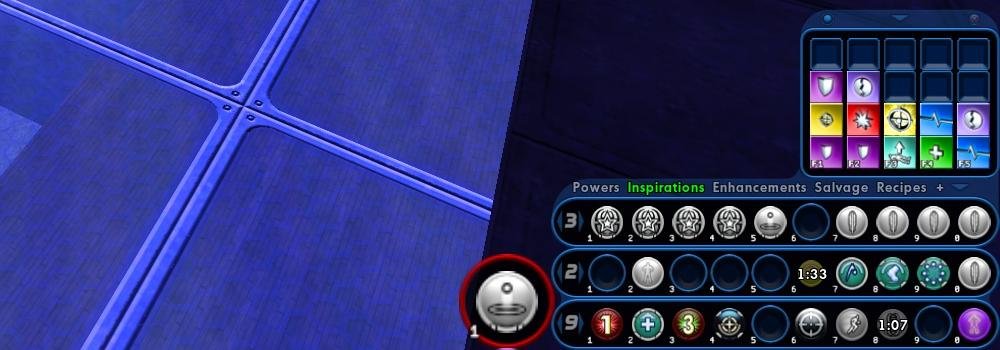
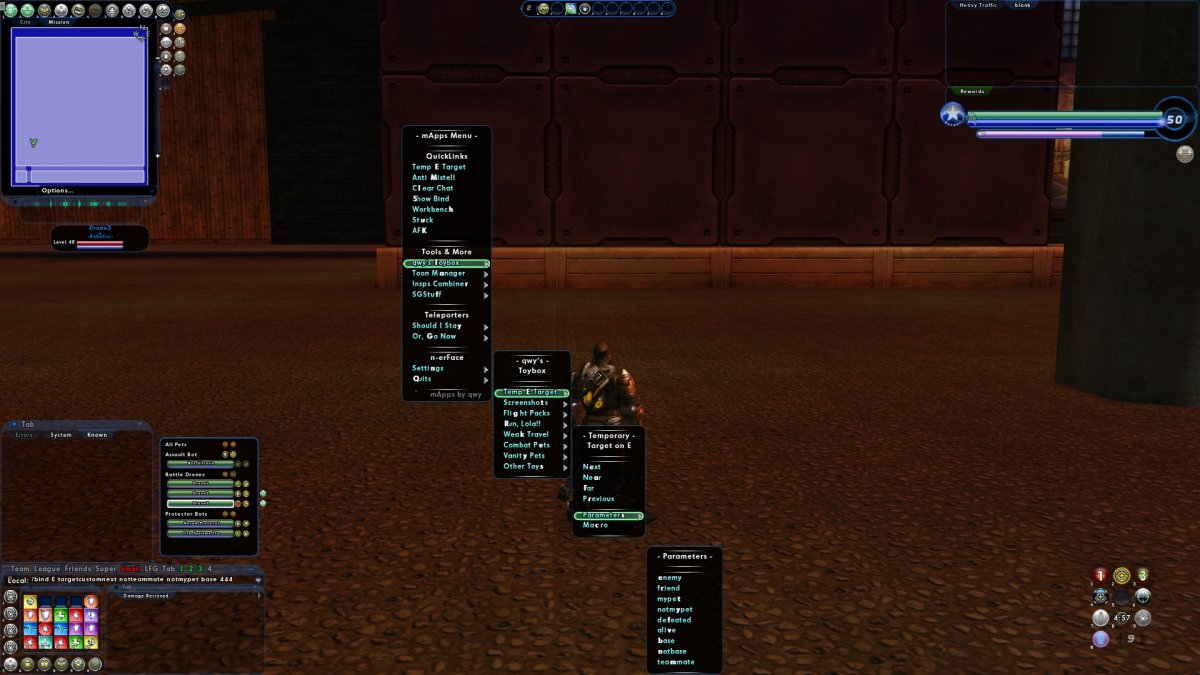
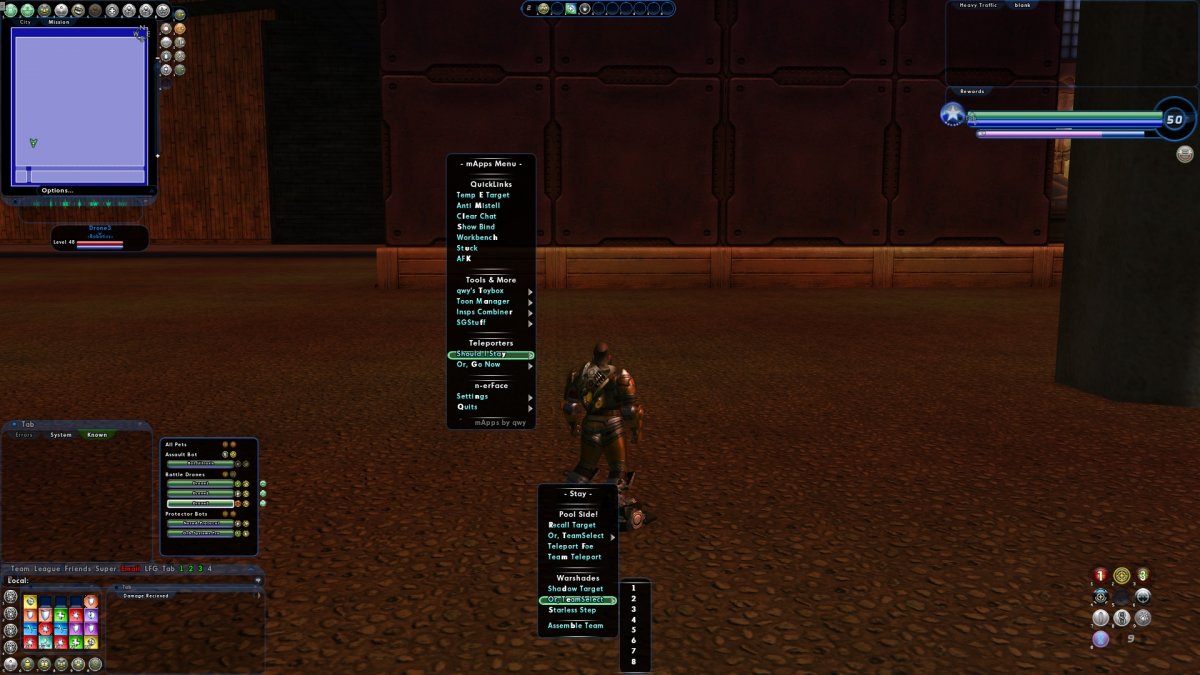
[i27] qwy's Razer How I Learned to Stop Wondering and Love the Razer Naga Tray. by qwy Default Layout Naga Tray Basics A closer look at the Razer ● Compact ● Pliable Transformation ● Show & Hide Through Menu ● Scales from .65 to 2.256410. ● Takes over as primary tray. ● No parent or child windows. Resembling the №Pad, pulling the borders creates a variety of shapes. Editing the WDW offers more flexibility, at risk of great peril. Don't mess with it until you know what your doing. Preamble I'm sure a lot of people remember the Razer Naga Tray, from way back when. Like most of 2010, I didn't remember it, at all. I found the setting to enable it, in options, a couple of days after creating my homecoming account and started using it. The actual purpose of the tray went straight over my head. II had been using the tray incorrectly for well over a year before I realized it. I'll save that story for another time. At first glance, I saw how I wanted to use it. It was going to track chord keys. Similar to the AltTray command but, in my humble opinion, this was even better. The Razer becomes the primary tray, while active so, I just needed to put some binds together that show one tray while a chord is pressed and flip back to a default tray when released. It took a few variations to get the feel I was going for but, I found a lot of variations that worked well. What's the benefit of that? Brief-ish backstory I prefer binds to clicking icons. Alternating focus between the action, zeroing the cursor on an icon and reorienting back on the action, isn't one of my superpowers. As I get older, my glasses prescription is leveling faster than my reflexes. On top of that, my memory is terrible. So, I got that going for me. Which is nice. In spite of these, natural gifts, I'm currently 2 levels from my 12th lvl50. I can jump from one alt to the another without anyone realizing I have more in common with Mr. Magoo than a super human. It's definitely thanks to the global binds, I've hacked together to create that illusion, not a natural born talent for discerning idiosyncratic nuance. The global file pairs slots with keys. Chances are some powers will have a reason to alter how a bind functions. The Details matter but, those couple of binds easily layer over the shared foundation. I don't have to remember how I set them up to actually work, if I get an icon in the right slot to remind me which key gets things started. Generally speaking, travel can still go here, defense and resist stay together, kaboom goes over there and, "OH #?@*!" is in slot 10 8. Trusty ol' CTRL+SPACE. the icons might be fake or no longer be triggered by a bind but, as long as it's there, I'll know what key to press. My 7th (or, 9th? I can't remember) lvl50, a beam/bio corrupter, only has 10 command lines in their general bind file. 7 of them are Nop. What's that have to do with the Razer Tray? I'll cover more on that in the next installment but in the simplest of terms, this set of binds allows me to essentially see 40 slots at once. That's 10 more than the main tray window while only taking up about 1/3 of the real estate at the same scale. The two, together, open up all kinds of possibilities. When you only get 1 shot, do not miss your chance to blow. Opportunity comes once in a lifetime, so...you need THE BUTTON!!! Razer Tray Binds I use 9 as my default tray. it covers my no chord binds. I like it because it's the last tray a temporary power is going to show up in. When I press and hold the LALT key, the Razer flips to Power tray 6, LSHIFT flips to 7 and LCTRL to 8. These are arbitrary assignments, easily edited to suit your needs. Version 1.1 K.txt C:\<RootInstall>\data\K.txt Included in a global bind file insures the bind set will be initialized after resetting or loading an alternate build file. Examples of redundancies are shown, following line 5. They aren't required however, in the event something gets hung up, forcing binds to fall out of sync, simply moving your character would resolve the issue if all of these were used. This isn't necessarily a frequent problem however, the more these are peppered throughout the active binds, the less likely an issue would even be noticed. Chord Keys There are 3 files, the global bind files point to, 1 for each Chord. They hold the Chord's Tray until released. Each file only has one command line and, they're nearly identical so, I'm combining them here. Open.txt C:\<RootInstall>\data\!\Razar\Open.txt The basic set has one last file which mirrors the original global binds toggles. This serves two purposes; 1. It reduces the data that needs to load, per request. 2. Once initialized, the set functions autonomously without interference to, or from, other bind sets in use. So, that concludes the basic set. As I continued to use the Razer tray, I couldn't help notice the similarity to the №Pad. In the next installment. I'll go over my first pass at connecting the two and an advanced version, inspired by actually seeing the Naga Mouse. In the meantime, hopefully this is as entertaining for some of you, as it has been for me. Where's Razer? Clicking the checkbox in the options menu, seems to be the only way to show/hide the tray. Using wdwload can tuck it away (as shown above), but it's still enabled as the primary tray. Glossary What I mean when I say words Razer_1-1.rar

-
Sounds like you got it all handled. I'd definitely recommend including the chat and options files, as well. If you don't need a lot of interface options, a couple macros might be a good call. Or, equivalent in a popmenu or customwindow. I've got a multi-UI switcher, I'm just starting to scratch the surface on making guides for.
-
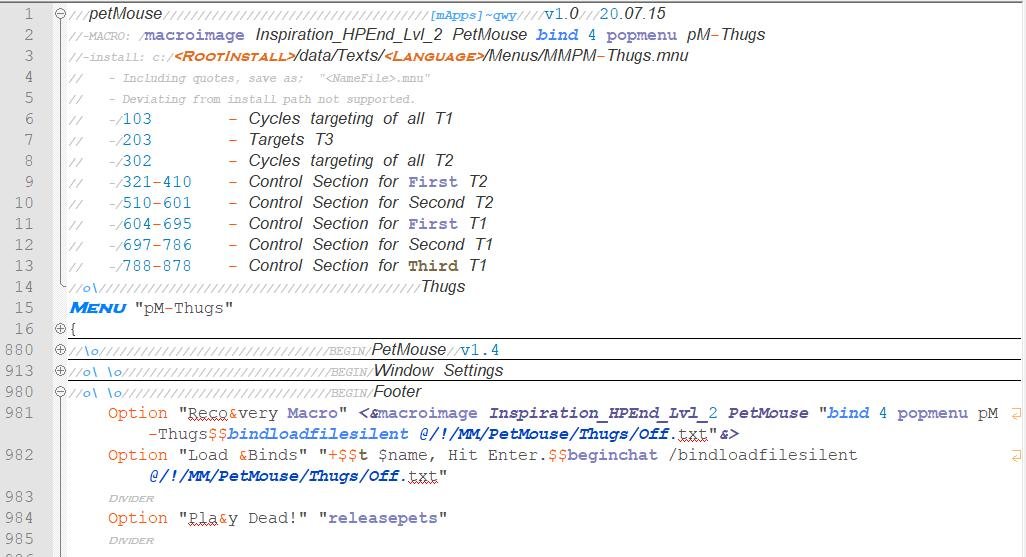
MMPetMouse Thugs * Not tested by qwy QuickLinks: Top | Beasts | Bots | Demons | Mercs | Necro | Ninjas | Thugs | 1. Preamble The attached download is specific to this primary and includes the folder hierarchy, starting from the data folder, in the CoX installation folder as well as all relevant files. Some editing may be required, see the top post for more information. 2. Load File @/!/MM/PetMouse/Thugs/Off.txt This file has the load commands to initiate all files. Some editing may be required, see section 5.1 in the top post. 3. Pet Files T1.txt | T2.txt Theses files are for the minions and lieutenants. Editing may be required, see section 5.2 in the top post. 4. Load File @/!/MM/PetMouse/Thugs/T3.txt This is the boss pet file. No editing required 5. Common File @/!/MM/PetMouse/All.txt No editing required. This file can be shared by all primaries. 6. Popmenu Texts/English/Menus/MMPM-Thugs.mnu This is a Popmenu version of MMPad+. Editing of the individual minions and, lieutenants, may be required. More information above, in section 6, as well as in the file, itself. * Not tested - Testers Wanted! PetMouse-Thugs.rar
-
MMPetMouse Ninjas * Not tested by qwy QuickLinks: Top | Beasts | Bots | Demons | Mercs | Necro | Ninjas | Thugs | 1. Preamble The attached download is specific to this primary and includes the folder hierarchy, starting from the data folder, in the CoX installation folder as well as all relevant files. Some editing may be required, see the top post for more information. 2. Load File @/!/MM/PetMouse/Ninjas/Off.txt This file has the load commands to initiate all files. Some editing may be required, see section 5.1 in the top post. 3. Pet Files T1.txt | T2.txt Theses files are for the minions and lieutenants. Editing may be required, see section 5.2 in the top post. 4. Load File @/!/MM/PetMouse/Ninjas/T3.txt This is the boss pet file. No editing required 5. Common File @/!/MM/PetMouse/All.txt No editing required. This file can be shared by all primaries. 6. Popmenu Texts/English/Menus/MMPM-Ninjas.mnu This is a Popmenu version of MMPad+. Editing of the individual minions and, lieutenants, may be required. More information above, in section 6, as well as in the file, itself. * Not tested - Testers Wanted! PetMouse-Ninjas.rar
-
MMPetMouse Necro* Not tested by qwy QuickLinks: Top | Beasts | Bots | Demons | Mercs | Necro | Ninjas | Thugs | 1. Preamble The attached download is specific to this primary and includes the folder hierarchy, starting from the data folder, in the CoX installation folder as well as all relevant files. Some editing may be required, see the top post for more information. 2. Load File @/!/MM/PetMouse/Necro/Off.txt This file has the load commands to initiate all files. Some editing may be required, see section 5.1 in the top post. 3. Pet Files T1.txt | T2.txt Theses files are for the minions and lieutenants. Editing may be required, see section 5.2 in the top post. 4. Load File @/!/MM/PetMouse/Necro/T3.txt This is the boss pet file. No editing required 5. Common File @/!/MM/PetMouse/All.txt No editing required. This file can be shared by all primaries. 6. Popmenu Texts/English/Menus/MMPM-Necro.mnu This is a Popmenu version of MMPad+. Editing of the individual minions and, lieutenants, may be required. More information above, in section 6, as well as in the file, itself. * Not tested - Testers Wanted! PetMouse-Necro.rar
-
MMPetMouse Mercs * Not tested by qwy QuickLinks: Top | Beasts | Bots | Demons | Mercs | Necro | Ninjas | Thugs | 1. Preamble The attached download is specific to this primary and includes the folder hierarchy, starting from the data folder, in the CoX installation folder as well as all relevant files. Some editing may be required, see the top post for more information. 2. Load File @/!/MM/PetMouse/Mercs/Off.txt This file has the load commands to initiate all files. Some editing may be required, see section 5.1 in the top post. 3. Pet Files T1.txt | T2.txt Theses files are for the minions and lieutenants. Editing may be required, see section 5.2 in the top post. 4. Load File @/!/MM/PetMouse/Mercs/T3.txt This is the boss pet file. No editing required 5. Common File @/!/MM/PetMouse/All.txt No editing required. This file can be shared by all primaries. 6. Popmenu Texts/English/Menus/MMPM-Mercs.mnu This is a Popmenu version of MMPad+. Editing of the individual minions and, lieutenants, may be required. More information above, in section 6, as well as in the file, itself. * Not tested - Testers Wanted! PetMouse-Mercs.rar
-
MMPetMouse Demons * Not tested by qwy QuickLinks: Top | Beasts | Bots | Demons | Mercs | Necro | Ninjas | Thugs | 1. Preamble The attached download is specific to this primary and includes the folder hierarchy, starting from the data folder, in the CoX installation folder as well as all relevant files. Some editing may be required, see the top post for more information. 2. Load File @/!/MM/PetMouse/Demons/Off.txt This file has the load commands to initiate all files. Some editing may be required, see section 5.1 in the top post. 3. Pet Files T1.txt | T2.txt Theses files are for the minions and lieutenants. Editing may be required, see section 5.2 in the top post. 4. Load File @/!/MM/PetMouse/Demons/T3.txt This is the boss pet file. No editing required 5. Common File @/!/MM/PetMouse/All.txt No editing required. This file can be shared by all primaries. 6. Popmenu Texts/English/Menus/MMPM-Demons.mnu This is a Popmenu version of MMPad+. Editing of the individual minions and, lieutenants, may be required. More information above, in section 6, as well as in the file, itself. * Not tested - Testers Wanted! PetMouse-Demons.rar
-
MMPetMouse Bots by qwy QuickLinks: Top | Beasts | Bots | Demons | Mercs | Necro | Ninjas | Thugs | 1. Preamble The attached download is specific to this primary and includes the folder hierarchy, starting from the data folder, in the CoX installation folder as well as all relevant files. Some editing may be required, see the top post for more information. 2. Load File @/!/MM/PetMouse/Bots/Off.txt This file has the load commands to initiate all files. Some editing may be required, see section 5.1 in the top post. 3. Pet Files T1.txt | T2.txt Theses files are for the minions and lieutenants. Editing may be required, see section 5.2 in the top post. 4. Load File @/!/MM/PetMouse/Bots/T3.txt This is the boss pet file. No editing required 5. Common File @/!/MM/PetMouse/All.txt No editing required. This file can be shared by all primaries. 6. Popmenu Texts/English/Menus/MMPM-Bots.mnu This is a Popmenu version of MMPad+. Editing of the individual minions and, lieutenants, may be required. More information above, in section 6, as well as in the file, itself. tested PetMouse-Bots.rar
-
MMPetMouse Beasts * Not tested by qwy QuickLinks: Top | Beasts | Bots | Demons | Mercs | Necro | Ninjas | Thugs | 1. Preamble The attached download is specific to this primary and includes the folder hierarchy, starting from the data folder, in the CoX installation folder as well as all relevant files. Some editing may be required, see the top post for more information. 2. Load File @/!/MM/PetMouse/Beasts/Off.txt This file has the load commands to initiate all files. Some editing may be required, see section 5.1 in the top post. 3. Pet Files T1.txt | T2.txt Theses files are for the minions and lieutenants. Editing may be required, see section 5.2 in the top post. 4. Load File @/!/MM/PetMouse/Beasts/T3.txt This is the boss pet file. No editing required 5. Common File @/!/MM/PetMouse/All.txt No editing required. This file can be shared by all primaries. 6. Popmenu Texts/English/Menus/MMPM-Beasts.mnu This is a Popmenu version of MMPad+. Editing of the individual minions and, lieutenants, may be required. More information above, in section 6, as well as in the file, itself. * Not tested - Testers Wanted! PetMouse-Beasts.rar
-
Appreciate the honorable mention! Here's a little more from my main global menu. Apps-lite.mnu
-
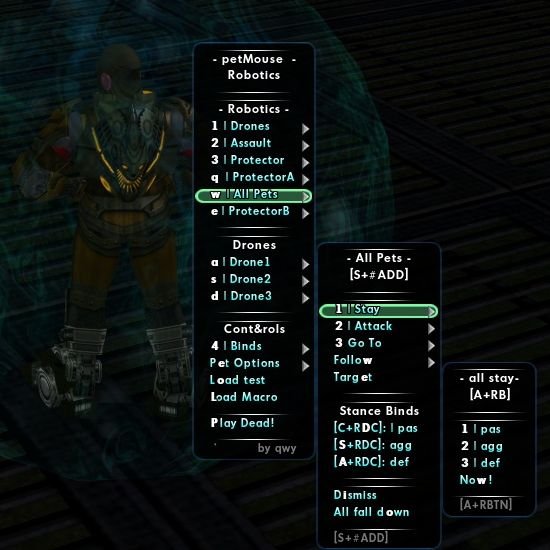
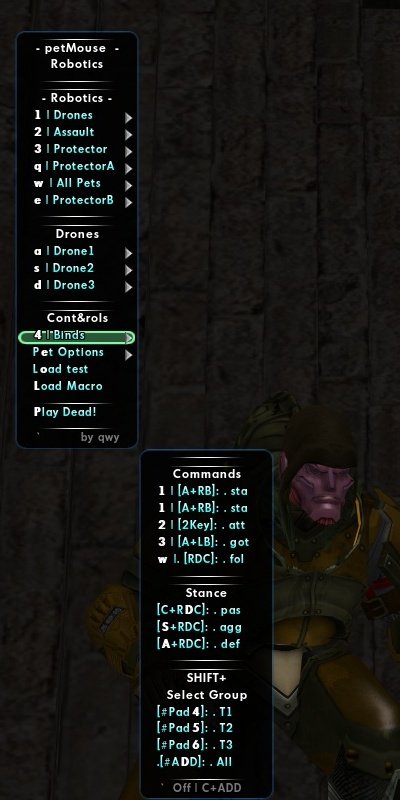
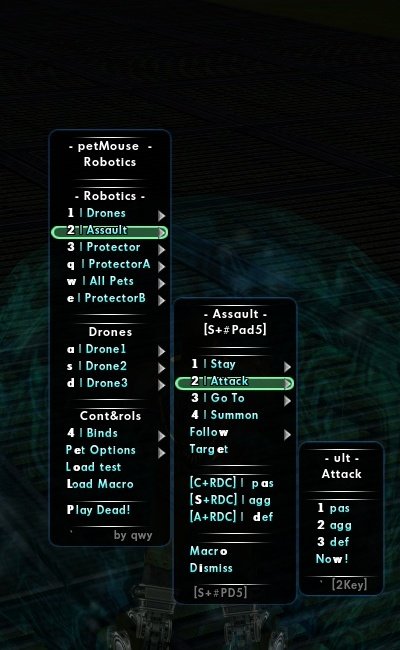
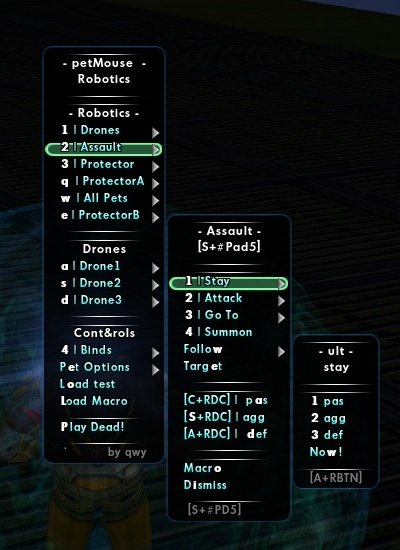
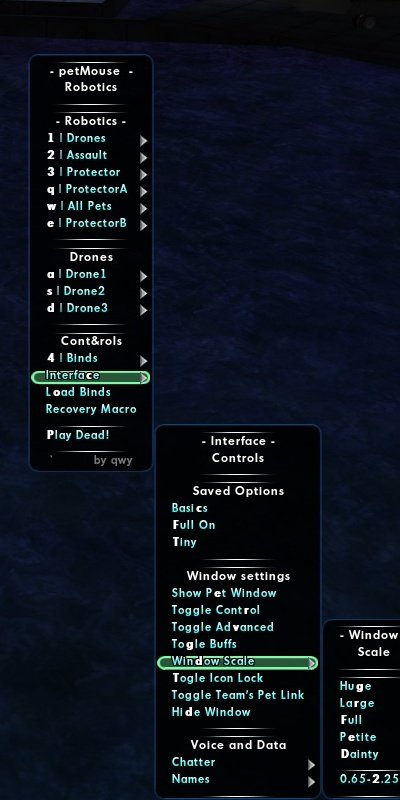
i26 The Mastermind's PetMouse by qwy QuickLinks: Top | Beasts | Bots | Demons | Mercs | Necro | Ninjas | Thugs Preamble This offsets my last mastermind post. I probably use this about 70% to 80% of the time. It's super easy, does what I need it to do and I can keep my hand on the mouse, for the most part. I just use a generic, left, right and middle scroll. Nothing special required. 1. How it's different I've seen other mouse based controls but nothing quite like this. Watching them maneuver through most every environment it would seem like there's a lot more work going on, behind the scenes, then there actually is. You can move them around with an almost military like precision, with one covering while the other advances, with single clicks of the LBUTTON. Another unique feature is the RightDoubleClick as an emergency abort follow, it was kind of fun using it for, " goto" but, ultimately, I preferred it this way. 2. How it Works Similar to most other mastermind controls, it starts with selecting one of the four groups or, modes. There are (2) types of modes; flexible, consisting of lieutenants and minions and, strict, with either the boss or all-pets. Strict is meant literally. Like other pet controls, to break the connection, another group must be selected. The lieutenant and minion modes aren't actually groups. There's a sense of group control however, only one pet is ever actually receiving commands, at a time. Command is toggled, between pets, with the, "go to" bind. This mode relies on the, "PetCom" command which sticks to the last targeted pet. Therefore, targeting a pet, outside the group, interrupts the selected mode, until the next time a, "go to" command is issued, (bound to ALT+LBUTTON). This flexibility allows quick access to any pet and still be in command of the selected group. Just, kinda not really. Included, is a Popmenu, with hotkeys modeled after my version of NumPad controller, providing support of each pet individually or, in groups, all centered around the W key. The two combined make a complete Mastermind solution however, this originated as a component of my version of the actual numpad controls posted here, and can be recombined with a simple cut and paste. Doing so adds additional targeting options that are easily accessible with the right thumb while maintaining control of the mouse. The bind keys for PetMouse were chosen from, what's left after installing the full bind set, as well as a global tp bindset, mentioned in another guide. I find them fairly ergonomic, despite this and, I'd encourage taking them for a spin before swapping them out. Let's go to the binds; 3. The Binds 3.1 Pet Commands Keys Minions.txt Lieutenant.txt Boss.txt All.txt 2: PetCom attack PetComPow* attack PetComAll attack ALT+LBUTTON: TargetCustomNext mypet* TargetCustomNext mypet* PetComPow* go to PetComAll go to PetCom go to ALT+RBUTTON: PetCom stay PetComPow* stay PetComAll stay RightDoubleClick: PetCom follow PetComPow* follow PetComAll follow ALT+RightDC: PetCom defensive PetComPow* defensive PetComAll defensive SHIFT+RightDC: PetCom aggressive PetComPow* aggressive PetComAll aggressive CTRL+RightDC: PetCom passive PetComPow* passive PetComAll passive * This definitely requires primary specific files. Some editing is probably going to be necessary. 3.2 The PetMouse File Load Commands Keys Commands SHIFT+NUMPAD4: TargetCustomNext alive mypet <PrimarySpecific> $$ Load Minion.txt SHIFT+NUMPAD5: TargetCustomNext alive mypet <PrimarySpecific> $$ Load Lieutenant.txt SHIFT+NUMPAD6: Load Boss.txt SHIFT+ADD Load All.txt CTRL+ADD Load Off.txt 4. The FIles Off.txt | T1.txt | T2.txt | T3.txt | All.txt The following code is intended to provide information and therefore, not entirely complete. However, the attachment to this post includes the entire package, covering all the primaries. The following posts are primary specific. The complete code is posted, along with any relevant points I might have and their attachments are scaled back QuickLinks: Top | Beasts | Bots | Demons | Mercs | Necro | Ninjas | Thugs 5. Installing 5.1 Off.txt A little editing is required. Determine the folder you're going to store these files in and, edit the (5) load commands, found in 4.1, and on the .mnu file at 981 and 982, replacing; @/!/PetMouse/Bots/Off.txt to match. Next, notice, I'm, using the 2 Key, just above the W key, for attack. It's super convenient and I'd recommend keeping it, if that works however, with this being the PetMouse Off state, edit this command line back to your usual. The menu is bound to the 4 key. This was an ergonomic decision however, an extra mouse button, the TILDE or whatever may suit you would be just as workable. The macros, generated by the .mnu file, also contain the bind to 4 so, edit them as well. One on line 2 and another on line 981. 5.2 T1.txt and T2.txt Assuming, the 2 was fine for attack, only the, "<Edit for TIer>" needs to be edited to something that reflects the given names of these pets. In other words, if you have Thugs and you named them Manny, Moe and Jack, going with, "ugs" or "Thugs", isn't going to work here. Both of the lieutenant and minion files will need this. You might have to get creative. 5.3 T3.txt This one's easy. All (7) command lines need, "<ID>", to get edited to, at least, (3) sequential characters of their summing power. PetComPow, doesn't care what they're called. For example, if you have the Beasts primary, you're limited, first, to, "Summon Dire Wolf". The problem here is, "Summon" is used in the powers of all your pets so, you're actually restricted to, "Dire Wolf". Therefore, "Dir, ire, wol and olf" are all good. In the case above, in 5.2, Thugs named Manny, Moe and Jack wouldn't be an issue. We'd be all set with, "ugs" The All.txt file is All.good so, let's talk loading. 6.Loading 6.1 Menu Load Features The included menu is the key to loading. At the top of the file, there's all the information required for installing it in the proper location and a macro command to bind the menu to the 4 key. Once the menu is opened, there's a link to add an optional macro to load the binds or load them through chat. Notice Line 6-13, those are the lines that might require editing to match your pet names. I'm assuming the edits will be fairly self-explanatory however, if any assistance is required, let me know. 6.2 New Menu! I modeled this menu after MMPad+, with numpad controls, centered around the, "W" key allowing independent pet control without ever having to take your hand off the mouse or away from your movement keys. Enjoy! PetMouse.rar QuickLinks: Top | Beasts | Bots | Demons | Mercs | Necro | Ninjas | Thugs