qwy
-
Posts
34 -
Joined
-
Last visited
Content Type
Profiles
Forums
Events
Store
Articles
Patch Notes
Everything posted by qwy
-
i27 How I learned to stop wondering and love the Razar Naga Tray
qwy replied to qwy's topic in Tools, Utilities & Downloads
I've never actually used that kind of mouse, but I don't think so. I put the binds, in the first post, together before I even realized the connection. I also put some NumPad versions because of the visual similarities. When it finally clicked, I did a lot of search to try and justify spending the $100. I was already pretty invested, so I was really trying to convince myself. The wiki has the only mention of operation, I've seen. I found a few articles like this one, with links to pages that were probably taken down when Live was. All the wiki says is, 11 and 12 scroll through the trays, and 1-10 trigger the corresponding slot on the displayed tray. No mention of how it does it, or if there's anything else it can do. If your mouse isn't doing that inherently, there might have been something that unlocked the function, like a CD that came in the box, or a download through Razer's software, at the time. With the lack of information, and the similarity to the NumPad, instead of the mouses layout, I half expect that mapping was the plan. If that's all there is to it, the only advantage over the binds I was already using was keeping the hands on the mouse, and direction keys. That realization inspired my final version, which accomplishes the same end. Since you have the mouse, one of my number pad sets would probably help save you some time, if it comes to mapping to the keyboard. With a modifier, you can spare open keys. I was planning to write up other versions to the reserved slots, below my post, anyway. I just haven't decided which versions or bothered to write up anything. Let me know how you want see the mouse buttons working, I'll post my closest set.- 7 replies
-
- 1
-

-
- ui
- power trays
- (and 1 more)
-
i27 How I learned to stop wondering and love the Razar Naga Tray
qwy replied to qwy's topic in Tools, Utilities & Downloads
reserved -
i27 How I learned to stop wondering and love the Razar Naga Tray
qwy replied to qwy's topic in Tools, Utilities & Downloads
reserved -
i27 How I learned to stop wondering and love the Razar Naga Tray
qwy replied to qwy's topic in Tools, Utilities & Downloads
reserved -
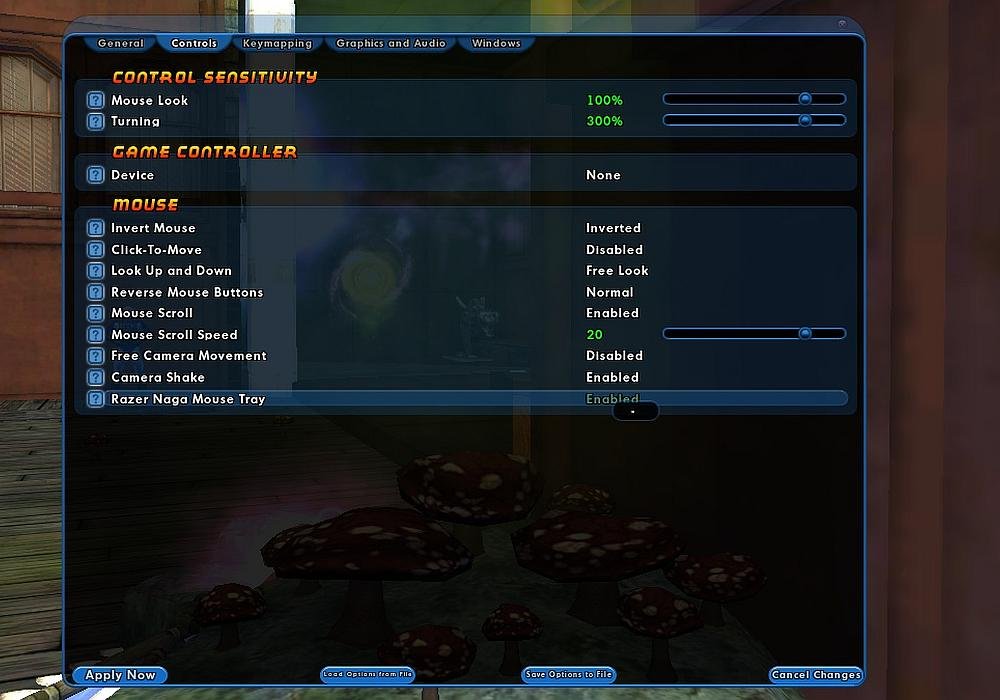
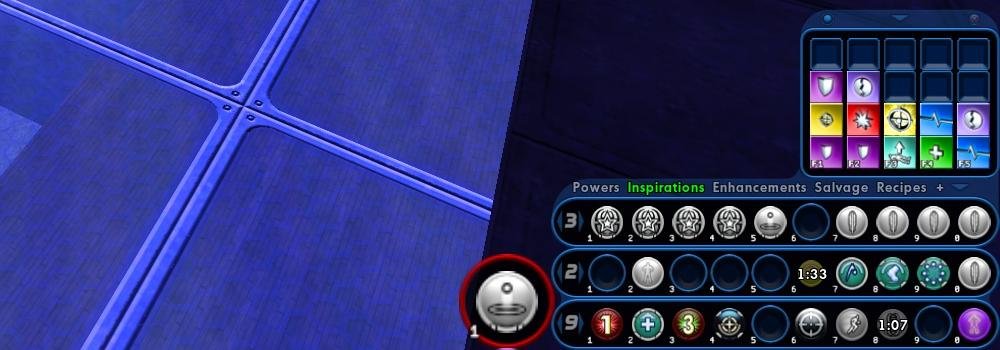
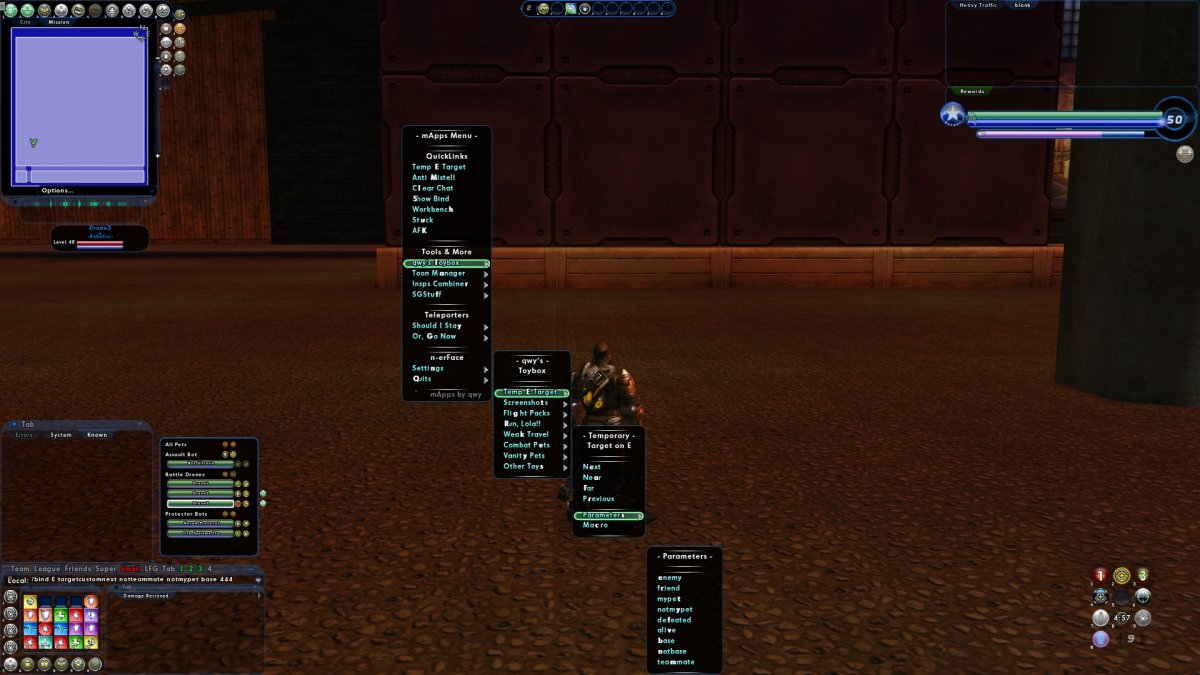
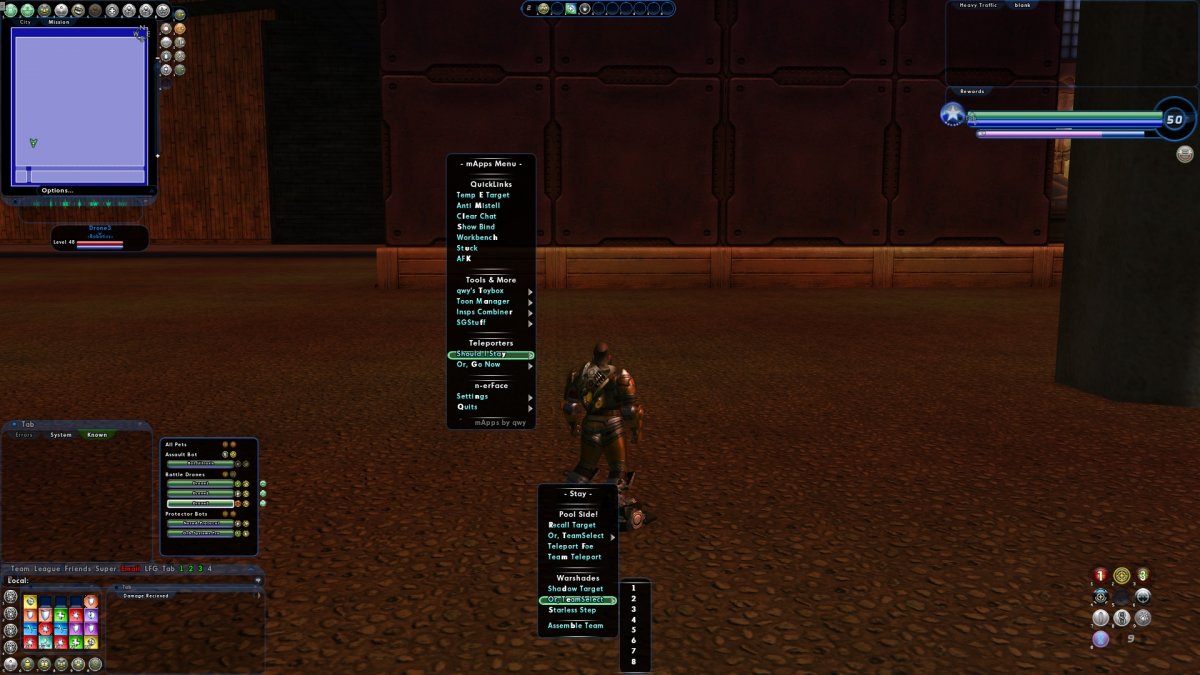
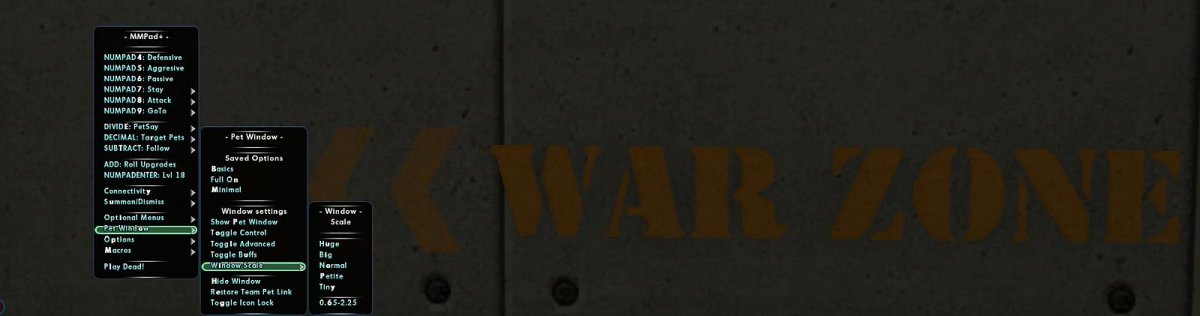
[i27] qwy's Razer How I Learned to Stop Wondering and Love the Razer Naga Tray. by qwy Default Layout Naga Tray Basics A closer look at the Razer ● Compact ● Pliable Transformation ● Show & Hide Through Menu ● Scales from .65 to 2.256410. ● Takes over as primary tray. ● No parent or child windows. Resembling the №Pad, pulling the borders creates a variety of shapes. Editing the WDW offers more flexibility, at risk of great peril. Don't mess with it until you know what your doing. Preamble I'm sure a lot of people remember the Razer Naga Tray, from way back when. Like most of 2010, I didn't remember it, at all. I found the setting to enable it, in options, a couple of days after creating my homecoming account and started using it. The actual purpose of the tray went straight over my head. II had been using the tray incorrectly for well over a year before I realized it. I'll save that story for another time. At first glance, I saw how I wanted to use it. It was going to track chord keys. Similar to the AltTray command but, in my humble opinion, this was even better. The Razer becomes the primary tray, while active so, I just needed to put some binds together that show one tray while a chord is pressed and flip back to a default tray when released. It took a few variations to get the feel I was going for but, I found a lot of variations that worked well. What's the benefit of that? Brief-ish backstory I prefer binds to clicking icons. Alternating focus between the action, zeroing the cursor on an icon and reorienting back on the action, isn't one of my superpowers. As I get older, my glasses prescription is leveling faster than my reflexes. On top of that, my memory is terrible. So, I got that going for me. Which is nice. In spite of these, natural gifts, I'm currently 2 levels from my 12th lvl50. I can jump from one alt to the another without anyone realizing I have more in common with Mr. Magoo than a super human. It's definitely thanks to the global binds, I've hacked together to create that illusion, not a natural born talent for discerning idiosyncratic nuance. The global file pairs slots with keys. Chances are some powers will have a reason to alter how a bind functions. The Details matter but, those couple of binds easily layer over the shared foundation. I don't have to remember how I set them up to actually work, if I get an icon in the right slot to remind me which key gets things started. Generally speaking, travel can still go here, defense and resist stay together, kaboom goes over there and, "OH #?@*!" is in slot 10 8. Trusty ol' CTRL+SPACE. the icons might be fake or no longer be triggered by a bind but, as long as it's there, I'll know what key to press. My 7th (or, 9th? I can't remember) lvl50, a beam/bio corrupter, only has 10 command lines in their general bind file. 7 of them are Nop. What's that have to do with the Razer Tray? I'll cover more on that in the next installment but in the simplest of terms, this set of binds allows me to essentially see 40 slots at once. That's 10 more than the main tray window while only taking up about 1/3 of the real estate at the same scale. The two, together, open up all kinds of possibilities. When you only get 1 shot, do not miss your chance to blow. Opportunity comes once in a lifetime, so...you need THE BUTTON!!! Razer Tray Binds I use 9 as my default tray. it covers my no chord binds. I like it because it's the last tray a temporary power is going to show up in. When I press and hold the LALT key, the Razer flips to Power tray 6, LSHIFT flips to 7 and LCTRL to 8. These are arbitrary assignments, easily edited to suit your needs. Version 1.1 K.txt C:\<RootInstall>\data\K.txt Included in a global bind file insures the bind set will be initialized after resetting or loading an alternate build file. Examples of redundancies are shown, following line 5. They aren't required however, in the event something gets hung up, forcing binds to fall out of sync, simply moving your character would resolve the issue if all of these were used. This isn't necessarily a frequent problem however, the more these are peppered throughout the active binds, the less likely an issue would even be noticed. Chord Keys There are 3 files, the global bind files point to, 1 for each Chord. They hold the Chord's Tray until released. Each file only has one command line and, they're nearly identical so, I'm combining them here. Open.txt C:\<RootInstall>\data\!\Razar\Open.txt The basic set has one last file which mirrors the original global binds toggles. This serves two purposes; 1. It reduces the data that needs to load, per request. 2. Once initialized, the set functions autonomously without interference to, or from, other bind sets in use. So, that concludes the basic set. As I continued to use the Razer tray, I couldn't help notice the similarity to the №Pad. In the next installment. I'll go over my first pass at connecting the two and an advanced version, inspired by actually seeing the Naga Mouse. In the meantime, hopefully this is as entertaining for some of you, as it has been for me. Where's Razer? Clicking the checkbox in the options menu, seems to be the only way to show/hide the tray. Using wdwload can tuck it away (as shown above), but it's still enabled as the primary tray. Glossary What I mean when I say words Razer_1-1.rar

-
Sounds like you got it all handled. I'd definitely recommend including the chat and options files, as well. If you don't need a lot of interface options, a couple macros might be a good call. Or, equivalent in a popmenu or customwindow. I've got a multi-UI switcher, I'm just starting to scratch the surface on making guides for.
-
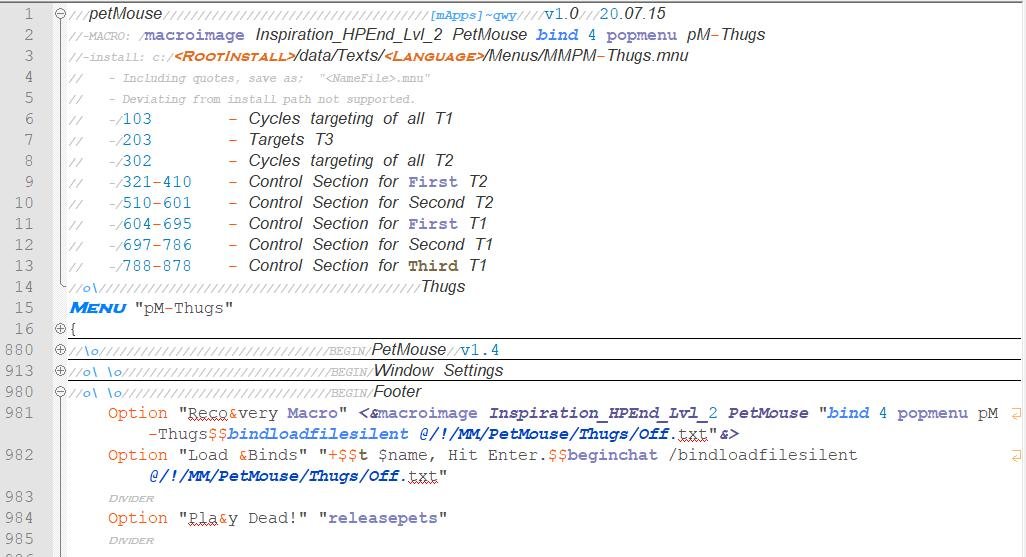
MMPetMouse Thugs * Not tested by qwy QuickLinks: Top | Beasts | Bots | Demons | Mercs | Necro | Ninjas | Thugs | 1. Preamble The attached download is specific to this primary and includes the folder hierarchy, starting from the data folder, in the CoX installation folder as well as all relevant files. Some editing may be required, see the top post for more information. 2. Load File @/!/MM/PetMouse/Thugs/Off.txt This file has the load commands to initiate all files. Some editing may be required, see section 5.1 in the top post. 3. Pet Files T1.txt | T2.txt Theses files are for the minions and lieutenants. Editing may be required, see section 5.2 in the top post. 4. Load File @/!/MM/PetMouse/Thugs/T3.txt This is the boss pet file. No editing required 5. Common File @/!/MM/PetMouse/All.txt No editing required. This file can be shared by all primaries. 6. Popmenu Texts/English/Menus/MMPM-Thugs.mnu This is a Popmenu version of MMPad+. Editing of the individual minions and, lieutenants, may be required. More information above, in section 6, as well as in the file, itself. * Not tested - Testers Wanted! PetMouse-Thugs.rar
-
MMPetMouse Ninjas * Not tested by qwy QuickLinks: Top | Beasts | Bots | Demons | Mercs | Necro | Ninjas | Thugs | 1. Preamble The attached download is specific to this primary and includes the folder hierarchy, starting from the data folder, in the CoX installation folder as well as all relevant files. Some editing may be required, see the top post for more information. 2. Load File @/!/MM/PetMouse/Ninjas/Off.txt This file has the load commands to initiate all files. Some editing may be required, see section 5.1 in the top post. 3. Pet Files T1.txt | T2.txt Theses files are for the minions and lieutenants. Editing may be required, see section 5.2 in the top post. 4. Load File @/!/MM/PetMouse/Ninjas/T3.txt This is the boss pet file. No editing required 5. Common File @/!/MM/PetMouse/All.txt No editing required. This file can be shared by all primaries. 6. Popmenu Texts/English/Menus/MMPM-Ninjas.mnu This is a Popmenu version of MMPad+. Editing of the individual minions and, lieutenants, may be required. More information above, in section 6, as well as in the file, itself. * Not tested - Testers Wanted! PetMouse-Ninjas.rar
-
MMPetMouse Necro* Not tested by qwy QuickLinks: Top | Beasts | Bots | Demons | Mercs | Necro | Ninjas | Thugs | 1. Preamble The attached download is specific to this primary and includes the folder hierarchy, starting from the data folder, in the CoX installation folder as well as all relevant files. Some editing may be required, see the top post for more information. 2. Load File @/!/MM/PetMouse/Necro/Off.txt This file has the load commands to initiate all files. Some editing may be required, see section 5.1 in the top post. 3. Pet Files T1.txt | T2.txt Theses files are for the minions and lieutenants. Editing may be required, see section 5.2 in the top post. 4. Load File @/!/MM/PetMouse/Necro/T3.txt This is the boss pet file. No editing required 5. Common File @/!/MM/PetMouse/All.txt No editing required. This file can be shared by all primaries. 6. Popmenu Texts/English/Menus/MMPM-Necro.mnu This is a Popmenu version of MMPad+. Editing of the individual minions and, lieutenants, may be required. More information above, in section 6, as well as in the file, itself. * Not tested - Testers Wanted! PetMouse-Necro.rar
-
MMPetMouse Mercs * Not tested by qwy QuickLinks: Top | Beasts | Bots | Demons | Mercs | Necro | Ninjas | Thugs | 1. Preamble The attached download is specific to this primary and includes the folder hierarchy, starting from the data folder, in the CoX installation folder as well as all relevant files. Some editing may be required, see the top post for more information. 2. Load File @/!/MM/PetMouse/Mercs/Off.txt This file has the load commands to initiate all files. Some editing may be required, see section 5.1 in the top post. 3. Pet Files T1.txt | T2.txt Theses files are for the minions and lieutenants. Editing may be required, see section 5.2 in the top post. 4. Load File @/!/MM/PetMouse/Mercs/T3.txt This is the boss pet file. No editing required 5. Common File @/!/MM/PetMouse/All.txt No editing required. This file can be shared by all primaries. 6. Popmenu Texts/English/Menus/MMPM-Mercs.mnu This is a Popmenu version of MMPad+. Editing of the individual minions and, lieutenants, may be required. More information above, in section 6, as well as in the file, itself. * Not tested - Testers Wanted! PetMouse-Mercs.rar
-
MMPetMouse Demons * Not tested by qwy QuickLinks: Top | Beasts | Bots | Demons | Mercs | Necro | Ninjas | Thugs | 1. Preamble The attached download is specific to this primary and includes the folder hierarchy, starting from the data folder, in the CoX installation folder as well as all relevant files. Some editing may be required, see the top post for more information. 2. Load File @/!/MM/PetMouse/Demons/Off.txt This file has the load commands to initiate all files. Some editing may be required, see section 5.1 in the top post. 3. Pet Files T1.txt | T2.txt Theses files are for the minions and lieutenants. Editing may be required, see section 5.2 in the top post. 4. Load File @/!/MM/PetMouse/Demons/T3.txt This is the boss pet file. No editing required 5. Common File @/!/MM/PetMouse/All.txt No editing required. This file can be shared by all primaries. 6. Popmenu Texts/English/Menus/MMPM-Demons.mnu This is a Popmenu version of MMPad+. Editing of the individual minions and, lieutenants, may be required. More information above, in section 6, as well as in the file, itself. * Not tested - Testers Wanted! PetMouse-Demons.rar
-
MMPetMouse Bots by qwy QuickLinks: Top | Beasts | Bots | Demons | Mercs | Necro | Ninjas | Thugs | 1. Preamble The attached download is specific to this primary and includes the folder hierarchy, starting from the data folder, in the CoX installation folder as well as all relevant files. Some editing may be required, see the top post for more information. 2. Load File @/!/MM/PetMouse/Bots/Off.txt This file has the load commands to initiate all files. Some editing may be required, see section 5.1 in the top post. 3. Pet Files T1.txt | T2.txt Theses files are for the minions and lieutenants. Editing may be required, see section 5.2 in the top post. 4. Load File @/!/MM/PetMouse/Bots/T3.txt This is the boss pet file. No editing required 5. Common File @/!/MM/PetMouse/All.txt No editing required. This file can be shared by all primaries. 6. Popmenu Texts/English/Menus/MMPM-Bots.mnu This is a Popmenu version of MMPad+. Editing of the individual minions and, lieutenants, may be required. More information above, in section 6, as well as in the file, itself. tested PetMouse-Bots.rar
-
MMPetMouse Beasts * Not tested by qwy QuickLinks: Top | Beasts | Bots | Demons | Mercs | Necro | Ninjas | Thugs | 1. Preamble The attached download is specific to this primary and includes the folder hierarchy, starting from the data folder, in the CoX installation folder as well as all relevant files. Some editing may be required, see the top post for more information. 2. Load File @/!/MM/PetMouse/Beasts/Off.txt This file has the load commands to initiate all files. Some editing may be required, see section 5.1 in the top post. 3. Pet Files T1.txt | T2.txt Theses files are for the minions and lieutenants. Editing may be required, see section 5.2 in the top post. 4. Load File @/!/MM/PetMouse/Beasts/T3.txt This is the boss pet file. No editing required 5. Common File @/!/MM/PetMouse/All.txt No editing required. This file can be shared by all primaries. 6. Popmenu Texts/English/Menus/MMPM-Beasts.mnu This is a Popmenu version of MMPad+. Editing of the individual minions and, lieutenants, may be required. More information above, in section 6, as well as in the file, itself. * Not tested - Testers Wanted! PetMouse-Beasts.rar
-
Appreciate the honorable mention! Here's a little more from my main global menu. Apps-lite.mnu
-
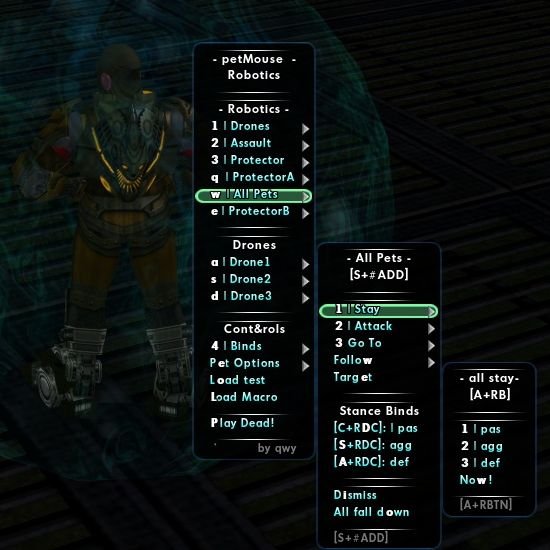
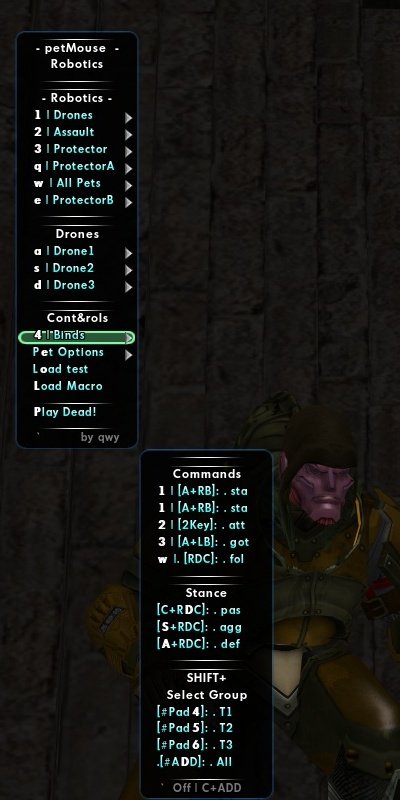
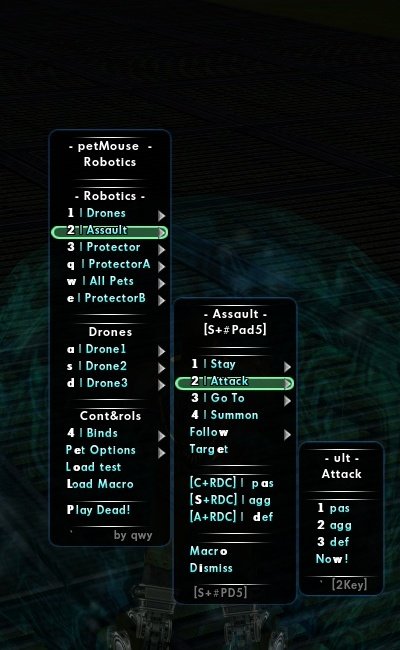
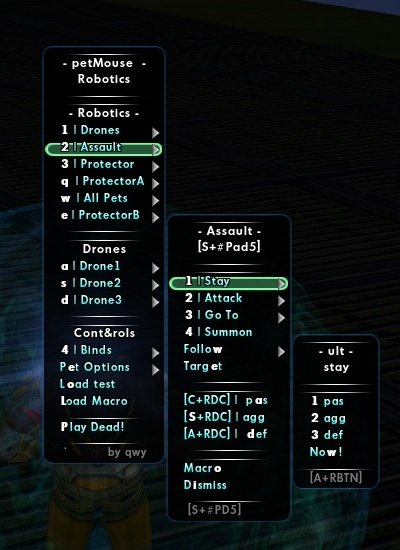
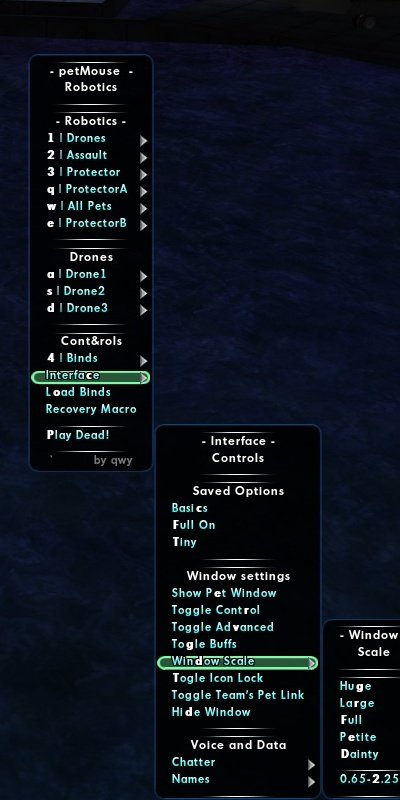
i26 The Mastermind's PetMouse by qwy QuickLinks: Top | Beasts | Bots | Demons | Mercs | Necro | Ninjas | Thugs Preamble This offsets my last mastermind post. I probably use this about 70% to 80% of the time. It's super easy, does what I need it to do and I can keep my hand on the mouse, for the most part. I just use a generic, left, right and middle scroll. Nothing special required. 1. How it's different I've seen other mouse based controls but nothing quite like this. Watching them maneuver through most every environment it would seem like there's a lot more work going on, behind the scenes, then there actually is. You can move them around with an almost military like precision, with one covering while the other advances, with single clicks of the LBUTTON. Another unique feature is the RightDoubleClick as an emergency abort follow, it was kind of fun using it for, " goto" but, ultimately, I preferred it this way. 2. How it Works Similar to most other mastermind controls, it starts with selecting one of the four groups or, modes. There are (2) types of modes; flexible, consisting of lieutenants and minions and, strict, with either the boss or all-pets. Strict is meant literally. Like other pet controls, to break the connection, another group must be selected. The lieutenant and minion modes aren't actually groups. There's a sense of group control however, only one pet is ever actually receiving commands, at a time. Command is toggled, between pets, with the, "go to" bind. This mode relies on the, "PetCom" command which sticks to the last targeted pet. Therefore, targeting a pet, outside the group, interrupts the selected mode, until the next time a, "go to" command is issued, (bound to ALT+LBUTTON). This flexibility allows quick access to any pet and still be in command of the selected group. Just, kinda not really. Included, is a Popmenu, with hotkeys modeled after my version of NumPad controller, providing support of each pet individually or, in groups, all centered around the W key. The two combined make a complete Mastermind solution however, this originated as a component of my version of the actual numpad controls posted here, and can be recombined with a simple cut and paste. Doing so adds additional targeting options that are easily accessible with the right thumb while maintaining control of the mouse. The bind keys for PetMouse were chosen from, what's left after installing the full bind set, as well as a global tp bindset, mentioned in another guide. I find them fairly ergonomic, despite this and, I'd encourage taking them for a spin before swapping them out. Let's go to the binds; 3. The Binds 3.1 Pet Commands Keys Minions.txt Lieutenant.txt Boss.txt All.txt 2: PetCom attack PetComPow* attack PetComAll attack ALT+LBUTTON: TargetCustomNext mypet* TargetCustomNext mypet* PetComPow* go to PetComAll go to PetCom go to ALT+RBUTTON: PetCom stay PetComPow* stay PetComAll stay RightDoubleClick: PetCom follow PetComPow* follow PetComAll follow ALT+RightDC: PetCom defensive PetComPow* defensive PetComAll defensive SHIFT+RightDC: PetCom aggressive PetComPow* aggressive PetComAll aggressive CTRL+RightDC: PetCom passive PetComPow* passive PetComAll passive * This definitely requires primary specific files. Some editing is probably going to be necessary. 3.2 The PetMouse File Load Commands Keys Commands SHIFT+NUMPAD4: TargetCustomNext alive mypet <PrimarySpecific> $$ Load Minion.txt SHIFT+NUMPAD5: TargetCustomNext alive mypet <PrimarySpecific> $$ Load Lieutenant.txt SHIFT+NUMPAD6: Load Boss.txt SHIFT+ADD Load All.txt CTRL+ADD Load Off.txt 4. The FIles Off.txt | T1.txt | T2.txt | T3.txt | All.txt The following code is intended to provide information and therefore, not entirely complete. However, the attachment to this post includes the entire package, covering all the primaries. The following posts are primary specific. The complete code is posted, along with any relevant points I might have and their attachments are scaled back QuickLinks: Top | Beasts | Bots | Demons | Mercs | Necro | Ninjas | Thugs 5. Installing 5.1 Off.txt A little editing is required. Determine the folder you're going to store these files in and, edit the (5) load commands, found in 4.1, and on the .mnu file at 981 and 982, replacing; @/!/PetMouse/Bots/Off.txt to match. Next, notice, I'm, using the 2 Key, just above the W key, for attack. It's super convenient and I'd recommend keeping it, if that works however, with this being the PetMouse Off state, edit this command line back to your usual. The menu is bound to the 4 key. This was an ergonomic decision however, an extra mouse button, the TILDE or whatever may suit you would be just as workable. The macros, generated by the .mnu file, also contain the bind to 4 so, edit them as well. One on line 2 and another on line 981. 5.2 T1.txt and T2.txt Assuming, the 2 was fine for attack, only the, "<Edit for TIer>" needs to be edited to something that reflects the given names of these pets. In other words, if you have Thugs and you named them Manny, Moe and Jack, going with, "ugs" or "Thugs", isn't going to work here. Both of the lieutenant and minion files will need this. You might have to get creative. 5.3 T3.txt This one's easy. All (7) command lines need, "<ID>", to get edited to, at least, (3) sequential characters of their summing power. PetComPow, doesn't care what they're called. For example, if you have the Beasts primary, you're limited, first, to, "Summon Dire Wolf". The problem here is, "Summon" is used in the powers of all your pets so, you're actually restricted to, "Dire Wolf". Therefore, "Dir, ire, wol and olf" are all good. In the case above, in 5.2, Thugs named Manny, Moe and Jack wouldn't be an issue. We'd be all set with, "ugs" The All.txt file is All.good so, let's talk loading. 6.Loading 6.1 Menu Load Features The included menu is the key to loading. At the top of the file, there's all the information required for installing it in the proper location and a macro command to bind the menu to the 4 key. Once the menu is opened, there's a link to add an optional macro to load the binds or load them through chat. Notice Line 6-13, those are the lines that might require editing to match your pet names. I'm assuming the edits will be fairly self-explanatory however, if any assistance is required, let me know. 6.2 New Menu! I modeled this menu after MMPad+, with numpad controls, centered around the, "W" key allowing independent pet control without ever having to take your hand off the mouse or away from your movement keys. Enjoy! PetMouse.rar QuickLinks: Top | Beasts | Bots | Demons | Mercs | Necro | Ninjas | Thugs
-
MMPad+Thugs * Not tested by qwy QuickLinks Top | Beasts | Bots | Demons | Mercs | Necro | Ninjas | Thugs 1. Preamble The attached download is primary specific and includes all the support docs not listed on this post. The other primaries binds, their menu commands and load options have been removed to minimize the clutter. 2. Default File @/!/MM/Thugs/Pad.txt No editing required. 3. Group Files Bruiser.txt | Enforcers.txt | Thugs.txt With exception of the command to target the boss pet, no editing necessary. See section 2.B of the top post. 4. Pet Files EnforcerA.txt | EnforcerB.txt | Thug1.txt | Thug2.txt | Thug3.txt These files need to link to individual pets. See section 2.C in the top post. 5. Rolling Bind Files 1up.txt | 2up.txt See the top posts section 3 and the support docs, for more information. 6. Support Docs LoadThugs.txt This is a primary specific version of the LoadMMPad+.txt file. There are no in-game functions but there are command options for loading the bind set to a logged in character. The attached .rar includes this version of the load commands and the full ReadMe, Install and Help.txt from above. 7. Optional Menus Thugs+.window | Thugs+.mnu This version of the window and menu are primary specific. If you're interested in more than one primary, I'd recommending using the version in the top posts section 5 or the top posts .rar file. 8. Downloads MMPad+Thugs.rar The download in this post is primary specific. If you're interested in additional primaries, I recommend the top post download. * Not tested - Testers Wanted! MMPad+Thugsv200703.rar
-
MMPad+Ninjas * Not tested by qwy QuickLinks Top | Beasts | Bots | Demons | Mercs | Necro | Ninjas | Thugs 1. Preamble The attached download is primary specific and includes all the support docs not listed on this post. The other primaries binds, their menu commands and load options have been removed to minimize the clutter. 2. Default File @/!/MM/Ninjas/Pad.txt No editing required. 3. Group Files Oni.txt | Jounin.txt | Genin.txt With exception of the command to target the boss pet, no editing necessary. See section 2.B of the top post. 4. Pet Files JouninA.txt | JouninB.txt | Genin1.txt | Genin2.txt | Genin3.txt These files need to link to individual pets. See section 2.C in the top post. 5. Rolling Bind Files 1up.txt | 2up.txt See the top posts section 3 and the support docs, for more information. 6. Support Docs LoadNinjas.txt This is a primary specific version of the LoadMMPad+.txt file. There are no in-game functions but there are command options for loading the bind set to a logged in character. The attached .rar includes this version of the load commands and the full ReadMe, Install and Help.txt from above. 7. Optional Menus Ninjas+.window | Ninjas+.mnu This version of the window and menu are primary specific. If you're interested in more than one primary, I'd recommending using the version in the top posts section 5 or the top posts .rar file. 8. Downloads MMPad+Ninjas.rar The download in this post is primary specific. If you're interested in additional primaries, I recommend the top post download. * Not tested - Testers Wanted! MMPad+Ninjasv200703.rar
-
MMPad+Necro * Not tested by qwy QuickLinks Top | Beasts | Bots | Demons | Mercs | Necro | Ninjas | Thugs 1. Preamble The attached download is primary specific and includes all the support docs not listed on this post. The other primaries binds, their menu commands and load options have been removed to minimize the clutter. 2. Default File @/!/MM/Necro/Pad.txt No editing required. 3. Group Files Lich.txt | Knights.txt | Zombies.txt With exception of the command to target the boss pet, no editing necessary. See section 2.B of the top post. 4. Pet Files KnightA.txt | KnightB.txt | Zombie1.txt | Zombie2.txt | Zombie3.txt These files need to link to individual pets. See section 2.C in the top post. 5. Rolling Bind Files 1up.txt | 2up.txt See the top posts section 3 and the support docs, for more information. 6. Support Docs LoadNecro.txt This is a primary specific version of the LoadMMPad+.txt file. There are no in-game functions but there are command options for loading the bind set to a logged in character. The attached .rar includes this version of the load commands and the full ReadMe, Install and Help.txt from above. 7. Optional Menus Necro+.window | Necro+.mnu This version of the window and menu are primary specific. If you're interested in more than one primary, I'd recommending using the version in the top posts section 5 or the top posts .rar file. 8. Downloads MMPad+Necro.rar The download in this post is primary specific. If you're interested in additional primaries, I recommend the top post download. * Not tested - Testers Wanted! MMPad+Necrov200703.rar
-
MMPad+Mercs * Not tested by qwy QuickLinks Top | Beasts | Bots | Demons | Mercs | Necro | Ninjas | Thugs 1. Preamble The attached download is primary specific and includes all the support docs not listed on this post. The other primaries binds, their menu commands and load options have been removed to minimize the clutter. 2. Default File @/!/MM/Mercs/Pad.txt No editing required. 3. Group Files Commando.txt | Ops.txt | Soldiers.txt With exception of the command to target the boss pet, no editing necessary. See section 2.B of the top post. 4. Pet Files OpsA.txt | OpsB.txt | Soldiers1.txt | Soldiers2.txt | Soldiers3.txt These files need to link to individual pets. See section 2.C in the top post. 5. Rolling Bind Files 1up.txt | 2up.txt See the top posts section 3 and the support docs, for more information. 6. Support Docs LoadMercs.txt This is a primary specific version of the LoadMMPad+.txt file. There are no in-game functions but there are command options for loading the bind set to a logged in character. The attached .rar includes this version of the load commands and the full ReadMe, Install and Help.txt from above. 7. Optional Menus Mercs+.window | Mercs+.mnu This version of the window and menu are primary specific. If you're interested in more than one primary, I'd recommending using the version in the top posts section 5 or the top posts .rar file. 8. Downloads MMPad+Mercs.rar The download in this post is primary specific. If you're interested in additional primaries, I recommend the top post download. * Not tested - Testers Wanted! MMPad+Mercsv200703.rar
-
MMPad+Demons * Not tested by qwy QuickLinks Top | Beasts | Bots | Demons | Mercs | Necro | Ninjas | Thugs 1. Preamble The attached download is primary specific and includes all the support docs not listed on this post. The other primaries binds, their menu commands and load options have been removed to minimize the clutter. 2. Default File @/!/MM/Demons/Pad.txt No editing required 3. Group Files Prince.txt | Demons.txt | Demonlings.txt With exception of the command to target the boss pet, no editing necessary. See section 2.B of the top post. 4. Pet Files DemonA.txt | DemonB.txt | Demonling1.txt | Demonling2.txt | Demonling3.txt These files need to link to individual pets. See section 2.C in the top post. 5. Rolling Bind Files 1up.txt | 2up.txt See the top posts section 3 and the support docs, for more information. 6. Support Docs LoadDemons.txt This is a primary specific version of the LoadMMPad+.txt file. There are no in-game functions but there are command options for loading the bind set to a logged in character. The attached .rar includes this version of the load commands and the full ReadMe, Install and Help.txt from above. 7. Optional Menus MMPad+Demons.window | Demons+.mnu This version of the window and menu are primary specific. If you're interested in more than one primary, I'd recommending using the version in the top posts section 5 or the top posts .rar file. 8. Downloads MMPad+Demons.rar The download in this post is primary specific. If you're interested in additional primaries, I recommend the top post download. * Not tested - Testers Wanted! MMPad+Demonsv200703.rar
-
MMPad+Bots * Not tested by qwy QuickLinks Top | Beasts | Bots | Demons | Mercs | Necro | Ninjas | Thugs 1. Preamble The attached download is primary specific and includes all the support docs not listed on this post. The other primaries binds, their menu commands and load options have been removed to minimize the clutter. 2. Default File @/!/MM/Bots/Pad.txt No editing required. 3. Group Files Assault.txt | Protectors.txt | Drones.txt With exception of the command to target the boss pet, no editing necessary. See section 2.B of the top post. 4. Pet Files ProtectorA.txt | ProtectorB.txt | Drone1.txt | Drone2.txt | Drone3.txt These files need to link to individual pets. See section 2.C in the top post. 5. Rolling Bind Files 1up.txt | 2up.txt See the top posts section 3 and the support docs, for more information. 6. Support Docs LoadBots.txt This is a primary specific version of the LoadMMPad+.txt file. There are no in-game functions but there are command options for loading the bind set to a logged in character. The attached .rar includes this version of the load commands and the full ReadMe, Install and Help.txt from above. 7. Optional Menus Bots+.window | Bots+.mnu This version of the window and menu are primary specific. If you're interested in more than one primary, I'd recommending using the version in the top posts section 5 or the top posts .rar file. 8. Downloads MMPad+Bots.rar The download in this post is primary specific. If you're interested in additional primaries, I recommend the top post download. tested MMPad+Botsv200703.rar
-
MMPad+Beasts * Not tested by qwy QuickLinks Top | Beasts | Bots | Demons | Mercs | Necro | Ninjas | Thugs 1. Preamble The attached download is primary specific and includes all the support docs not listed on this post. The other primaries binds, their menu commands and load options have been removed to minimize the clutter. 2. Default File @/!/MM/Beasts/Pad.txt No editing required 3. Group Files Dire.txt | Lions.txt | Wolves.txt Oh my! With exception of the command to target the boss pet, no editing necessary. See section 2.B of the top post. 4. Pet Files LionA.txt | LionB.txt | Wolf1.txt | Wolf2.txt | Wolf3.txt These files need to link to individual pets. See section 2.C in the top post. 5. Rolling Bind Files 1up.txt | 2up.txt See section 3 and the support docs, for more information. 6. Support Docs LoadBeasts.txt This is a primary specific version of the LoadMMPad+.txt file. There are no in-game functions but there are command options for loading the bind set to a logged in character. The attached .rar includes this version of the load commands and the full ReadMe, Install and Help.txt from above. 7. Optional Menus Beasts+.window | Beasts+.mnu This version of the window and menu are primary specific. If you're interested in more than one primary, I'd recommending using the version in the top posts section 5 or the top posts .rar file. 8. Downloads MMPad+Beasts.rar The download in this post is primary specific. For more than one primary, use the .rar in the first post. * Not tested - Testers Wanted! MMPad+Beastsv200703.rar
-
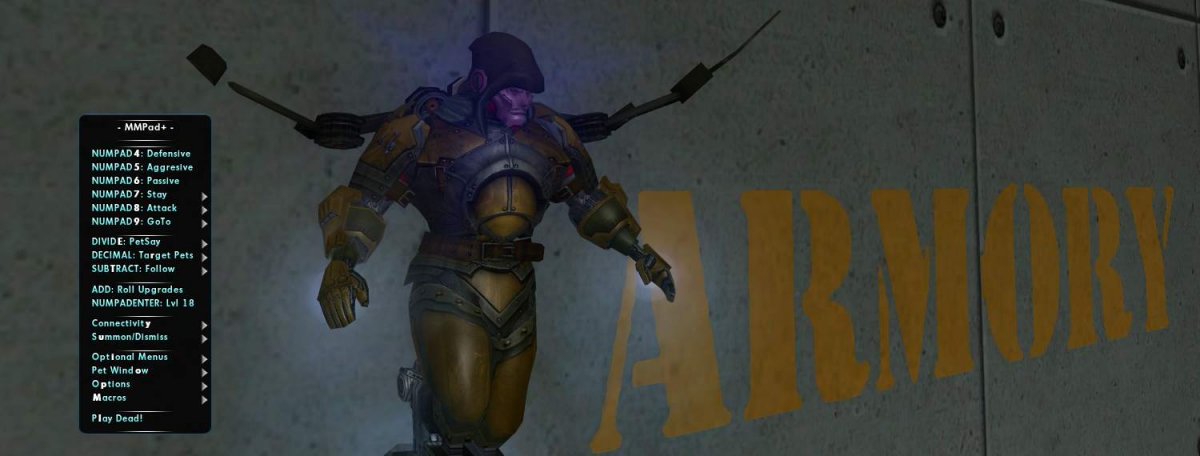
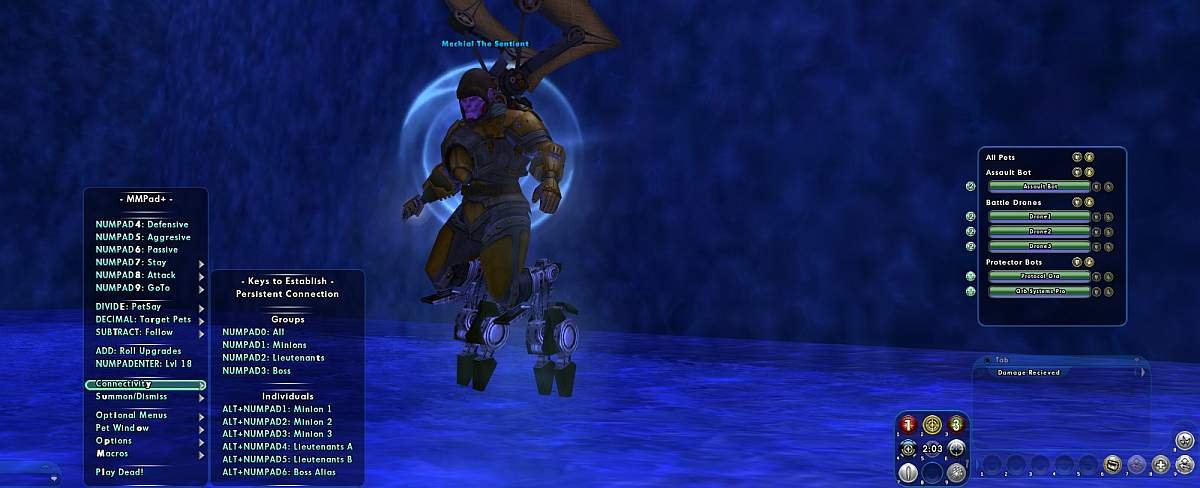
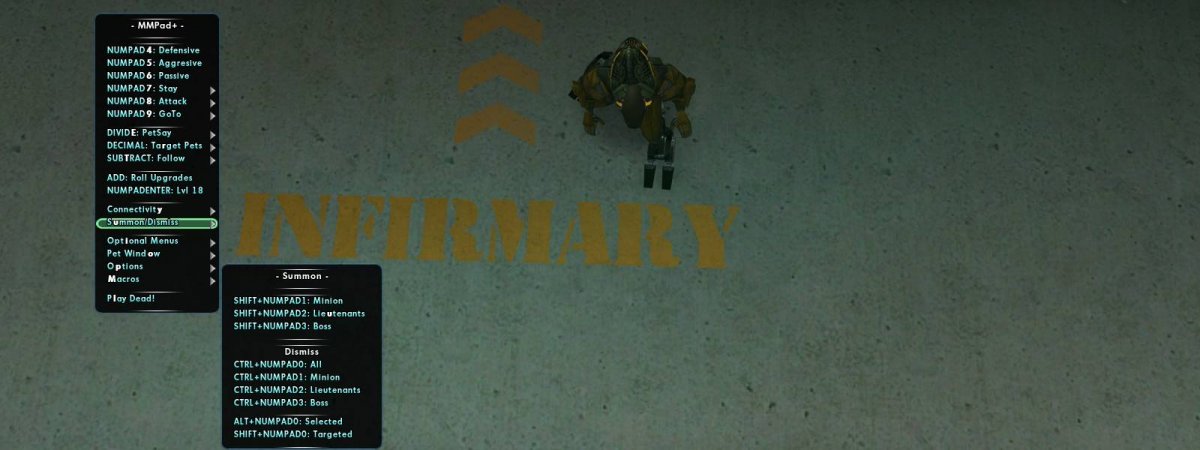
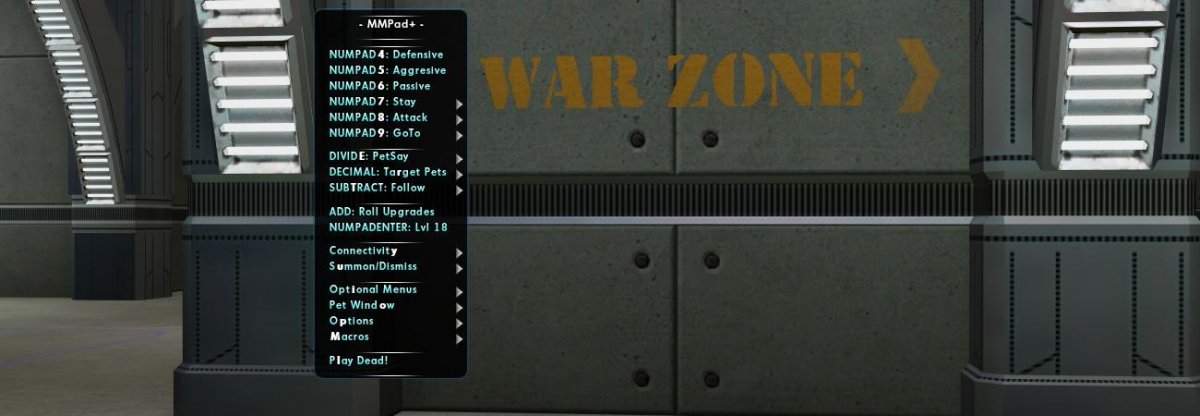
i26 Mastermind NumPad Controls+ MMPad+ by qwy QuickLinks Top | Beasts | Bots | Demons | Mercs | Necro | Ninjas | Thugs Preamble: I've only rolled one MM since coming back, Bots. It's fair to say, I might not have rolled an MM at all, if I hadn't seen the original Numpad Controls posted on the Homecoming forum. I had forgotten all about how much fun Masterminds are with them. Before I got out of Outbreak, the Sandolphan's original binds were installed and I was fully reacquainted. So fun! As I leveled up, I kept adding to it every time a new idea came to mind. This version represents my, most sincere, first step from the original. I'm trying to stick to the simple elegance of the original, scaling back some of the far off, or clunky additions for another time. What's new: Not straying too far from the original, here are the key additions; An easy selection method for controlling individual pets Can target a specific pet, cycle through a group of pets or cycle through all of them Added "Petsay" to the selection method Trigger both upgrades in 1 click. - only bots have been tested Follow modes, have been moved to SUBTRACT, for easy slap panic All commands can now change the selected pet/group strance, i.e. defensive follow, passive stay, aggresive attack Dismiss added to select method Added popmenu with some basic commands, control options of the pet window, generate a variety macros and a bind cheat sheet. Added a custom.window to load the file and generate macros with icons consistent with the primary to summon and load numpad controls. What's different: It should look pretty familiar, right out of the box. A few key difference; The All.txt file has been replaced with Pad.txt and, is specific to each primary . There are now, (11) files per primary. (5) for individual control of each minion and lieutenant. Additional editing required. (2) for the toggle upgrades to occur in a single click. (1) Pad.txt, this versions, "All.txt" (3) One for each tier group Disclaimer The folder hierarchy mirrors my own. It's stored in the Installations data folder and has, what may appear to be, superfurlous sub folders. This is in anticipation of additional bind sets, I'm planning on sharing in the near future. Editing paths and file names, to suit your needs, shouldn't be an issue. with exception to the custom.window and Popmenu paths, which are required by the interface. Help Me / Help You If there are any questions, please don't hesitate to ask. If any files were edited as part of your installation, please describe the new variables on any requests for assistance. Not having rolled other primaries, any help testing and correcting mistakes I might have made, would be very much appreciated. 1. Binds according to selected pets: 1.A Base Binds NUMPAD0: Select All Key No Chord +ALT +SHIFT +CTRL Defensive Key Aggressive Key Passive Key NUMLOCK: - - - - DIVIDE: all pet say all minions Say all lieutenants say boss says MULTIPLY: open popmenu toggle custom.window SUBTRACT: all follow all def follow all agg follow all pas follow NUMPAD9: all go to all def got all agg got all pas got NUMPAD8: all attack target all def att target all agg att target all pas att target NUMPAD7: all stay all def stay all agg stay all pas stay NUMPAD6: all passive select boss alias NUMPAD5: all aggressive select lieutenant B NUMPAD4: all defense select lieutenant A NUMPAD3: select boss select minion 3 summon boss dismiss boss NUMPAD2: select lieutenants select minion 2 summon lieutenants dismiss lieutenants NUMPAD1: select minions select minion 1 summon minions dismiss minions NUMPAD0: select all nop dismiss target dismiss all ADD: roll upgrades #PADENTER: pet heal targeted DECIMAL: cycle target next pet all cycle target next minions cycle target next lieutenants target boss 1.B Group Binds NUMPAD1-3: Select Group Key No Chord +ALT +SHIFT +CTRL Defensive Key Aggressive Key Passive Key NUMLOCK: - - - - DIVIDE: selected group say all minions say all lieutenants say boss says MULTIPLY: open MMPad+ popmenu toggle MMPad+ custom.window SUBTRACT: selected group follow selected group def fol selected group agg fol selected group pas fol NUMPAD9: selected group go to selected group def got selected group agg got selected pas got NUMPAD8: selected group attack target selected group def att target selected group agg att target selected group pas att target NUMPAD7: selected group stay selected group def sta selected group agg sta selected group pas sta NUMPAD6: selected group passive select boss alias NUMPAD5: selected group aggressive select lieutenant B NUMPAD4: selected group defense select lieutenant A NUMPAD3: select boss select minion 3 summon boss dismiss boss NUMPAD2: select lieutenants select minion 2 summon lieutenants dismiss lieutenants NUMPAD1: select minions select minion 1 summon minions dismiss minions NUMPAD0: select all nop dismiss targeted pet dismiss all ADD: roll upgrades, all #PADENTER: pet heal targeted DECIMAL: Selected group target next pet cycle target next minions cycle target next lieutenants target boss 1.C Individual Binds ALT+NUMPAD1-6: Select Pet Key No Chord +ALT +SHIFT +CTRL Defensive Key Aggressive Key Passive Key NUMLOCK: - - - -- DIVIDE: selected pet say all minions say all lieutenants say boss says MULTIPLY: open MMPad+ popmenu toggle MMPad+ custom.window SUBTRACT: selected pet follow selected pet def fol selected pet agg fol selected pet pas fol NUMPAD9: selected pet go to selected pet def got selected pet agg got selected pet pas got NUMPAD8: selected pet attack target selected pet def att target selected pet agg att target selected pet pas att target NUMPAD7: selected pet stay selected pet def sta selected pet agg sta selected pet pas sta NUMPAD6: selected pet passive select boss alias NUIMPAD5: selected pet aggressive select lieutenant B NUIMPAD4: selected pet defense select lieutenant A NUMPAD3: select boss select minion 3 summon boss dismiss boss NUMPAD2: select lieutenants select minion 2 summon lieutenants dismiss lieutenants NUMPAD1: select minions select minion 1 summon minions dismiss minions NUMPAD0: select all dismiss selected pet dismiss targeted pet dismiss all ADD: roll upgrades. all #PADENTER: pet heal targeted DECIMAL: target selected pet cycle target next minions cycle target next lieutenants target boss 2. The Files QuickLinks Top | Beasts | Bots | Demons | Mercs | Necro | Ninjas | Thugs 2.A Default File: @/!/MM/<Primary>/Pad.txt - This was originally the All.txt file. As I started adding commands to the original, it began to take a more primary specific turn. It's still the default stance and loads all the other files for it's primary. With this file selected, all pets respond to base commands. Editing shouldn't be necessary. 2.B Group Files: @/!/MM/<Primary>/<Groups>.txt - Carried over from the original, there are still (3) group files named after their summoning power. These files use the command, "PetComPow" and, "PetSayPow" which identifies the name of the command that summons them. Renaming pets doesn't impact this command at all. The way they're targeted is the only exception. The boss uses the command, "PetSelectName". Lieutenants and minions use; "TargetCustomNext". Both of these commands require a string of letters, numbers or symbols, unique to that group, for this to work. I used the first (3) characters of the pets default name to identify their group, as my group file default name (with exception to Bots). For example, I named one of my lieutenants, "Norad Protocol", the other, "Orb Systems Pro" and made sure, "Pro" was unique to their group. 2.C Pet Files: @/!/MM/<Primary>/<Individual>.txt - There are (6) pets but, the boss file from group is loaded, regardless of how a boss is selected. That leaves us (2) files for lieutenants and, (3) for minions. These files use, "PetComName", "PetSayName" and, "TargetCustomNext" so renaming a pet can impact every command line. My unique pet file default name uses the last (2) characters of the actual default pet name, followed by, "A" or "B" for lieutenants and 1-3 for minions. When renaming a pet, consider how that name will link to both, the pet file and the targeting command in the group file. The commands in question can be edited as well however, consider my example from above. The actual default name for a bot lieutenant is Protector (I ignored Bot). The names I used, above, linked to my default for the group file using, "Pro" and, my default for pets using, "orA" and, "orB" Each primary has unique considerations however, I tried to keep things as simple as possible. Now that you're aware of the guidelines I followed, with a little creativity, you should be able to come up with something that works for you. 2.D Bind Files In effort to appear organized, binds are available in the proceeding posts. With (11) bind files, (4) support docs and (2) menus, per primary, things got a little cramped here, on the first post. The .rar on this first post, includes everything. The following posts, have attached .rar files that are specific to that posts primary. QuickLinks Top | Beasts | Bots | Demons | Mercs | Necro | Ninjas | Thugs 3. Rolling Binds Bound to the, "ADD" key, the Pad.txt triggers the first step, on the first use and loads 2up.txt, the second half. 1up.txt takes responsibility off of pad.txt, mirroring the command. The +/-, after the commands opening quote, initiates the two step behavior. This has only been used with Bots but, it should work on, at least, a few others. Watch how the icons respond, if it's not working. This is usually a good indicator on what changes need to be made. Sometimes, it's just a matter of changing the key press, itself. Sometimes, a long hold or, a quick tap, will produce different results. If it's not coming together, edit the three files and use them as a rotating bind set. @/!/MM/<Primary>/Pad.txt | @/!/MM/<Primary>/1up.txt ADD "targetcustomnext alive mypet$$powexecname upgrade one$$bindloadfilesilent @/!/MM/<Primary>/2up.txt" @/!/MM/<Primary>/2up.txt ADD "targetcustomnext alive mypet$$powexecname upgrade two$$bindloadfilesilent @/!/MM/<Primary>/1up.txt" 4. Support Docs Includes: ReadMe.txt | Install.txt | Help.txt | LoadMMPad+.txt 5. Optional Menus custom.window & Popmenu The custom window is essentially an in-game version of the LoadMMPad.txt file. The Popmenu has some pet controls, pet window tools, a cheat sheet for the binds and also serves as an in-game version of LoadMMPad.txt Downloads MMPad+.rar This is all bind files, consolidated menus and support documents for all primaries. The posts to follow will include the binds for copying and pasting off the forum and .rar files for individual primaries. The optional windows and menus will be primary specific so, if you end up using more than one primary, I suggest going with the versions on this post or this download instead. * Only Bots thoroughly tested. - Testers Wanted! MMPad+v200703.rar
-
Fly Poses as selections for alternate fly?
qwy replied to Cradicias's topic in Suggestions & Feedback
The macro's a great option, if you're trays are packed, this might be an alternative. New poses would be nice, with animations for all directions. Like the macro, I use all four to keep me guessing. It's not the same but, it's got its merits. W "+forward$$e flypose3" or, W "+forward$$e flypose1$$e flypose2$$e flypose3$$e flypose4" -
i26 Guide: Load/Save Defaults; Navigating Absolute & Relative Paths with a little extra focus on buildsavefile (mApps 2.0, Chapter 1) by qwy The following guide's focus is to provide a single source reference on default paths when saving or loading a file. All paths, were determined using Windows10 64-bit. If your installation varies in anyway outside of, "C:/<RootInstall>/", please post, or message me, your findings, with relevant system information. It's intention is to both, provide the initiated an ability to scan for anything relevant to them and a, "How to" to anyone who may need it. Why a guide? An admission of ignorance I love alts! I love how binds and the flexibility of the interface, can make playing an alt, compared to another, can almost feel like playing a different game. Back on live, I took advantage and, every alts ui grew further and further apart until, I lost it all. I don't remember exactly how it happened. It was over 10 years ago. I probably did something stupid however, I've done so many stupid things since then, I can't remember everything. I learned a lesson. I guess I remember that. This was a little after the CoV release and, a Mastermind was my main dejour. I wouldn't say he had a lot of binds, he was BOUND! I rebuilt a shoddy, rush job, approximation but, he was never the same. Any commands added while I was still in the process of getting them from another player. Just gone. A little wiser now, when I was done, I hit optionsave, bindsave, all the saves. Save save save. When I finished rebuilding the second alt, I ran all those new-to-me save commands again, and learned my next lesson... Those weren't the commands I was looking for. There's a lot of scattered information out there. Most of this is the result of trial and error. I'm pretty bold with system files, and I like coming up with scenarios to see how much carnage I can create. Trying to blow up my interface is still, "playing" to me. I have more interesting projects I like to share and knowing there's a lot of people that don't like messing around with files at all so, reference material seemed like a great starting point. Why BuildSaveFile? Mostly, it's easy. I touch on the other save/load commands here but, I've got more on them in future guides. The emphasis here is more about default folders and navigating around them. Also, I thought this particular command was bugged. I was working on an unrelated project and, entered /buildsavefile, followed by random characters, expecting an error. It did not. I vaguely recall conversations, forum posts and general in game chat where other people seemed to be under the same impression. Anyone else think that? Anyway, adequately distracted from the original project, I kicked off a new error campaign. Turns out, as long as I wasn't trying to escape the installation root, relative paths are fine. Absolute paths failed across the board. Information on relative paths is a little murky. This might explain how the misconception the command didn't work, entered the zeitgeist. What's it do? /BuildSaveFile Function: Generates a fixed-format text document detailing the commanding character's, active build. The user specifies the filename and optional, relative path within the CoX installation folder. Contains Name / level / origin / class Powers / level selected Number of slots per power enhancements slotted OnSubmit: Simple logic test of valid syntax Is Invalid: Default channel, "Error" reports, "UnableBuildSave" Is Valid: Default channel, "System" reports, "BuildSave" Modifiers: None known. Not needed Arguments: (1) <OptionalRelativePath>/<NameFile> Origination Point: <System>/<RootInstall>/<NameAccount>/Builds/ Specify Path: Yes. Specified by valid system syntax and/or characters, followed by, at least one, forward or, backward slash. Can Name: Yes. Specified after the last optional forward slash by any valid system syntax and/or characters. What are absolute & relative paths? Absolute Paths: With Absolute paths, potentially set as, nop (joke), let's breeze through this. Your computer's hard drive. The one that the operating system is installed on. It's running the show so, it's top level folder, the one all other folders are within, is the system root. Absolute paths start there and apply to anywhere not there, within itself. Considering the breakdown above, for, "Defaults to:", I started with, "system". Your hard drive. Even with the absolute path, being partly responsible for my motivation to write a guide on using its counterpart, literal to its name, it is a definitive starting point, easily defined and recognized as "C:/", and leads away from itself. I had to shake my head using it for, "Defaults to", but, let's look at the alternative. Relative Paths: Relative paths are also literal, it can only be identified from a point other, than itself. For example, "", is the relative path counterpart for, "Defaults to:", above. I Feel like, it's trying as hard as a little path can. I just can't escape a sense that... something's a little off. Like, we're not getting the WHOLE story, huh? Ok, I'll keep moving. Visually, once the second half of the path is known, they're similar to other common folder structures. The key difference is this path doesn't concern itself with the system, as a whole, it's path to a destination is always relative to itself. An analogue simile might be flying in to a new city and using the airport to track a path to the hotel as a relative path. An absolute might be landing at the airport and tracking the path to the hotel from the, "Welcome to...." sign, on the outskirts of town. Maybe city hall.. Airports don't typically move around a lot.... I don't know. Something like that. It makes sense if you don't overthink it. Quick Reference Tables: Talking CIty of X, files spew from everywhere so, relative paths are relative to the file in question, which is nice. Not getting to into the weeds on this, here's a default folder cheat sheet. Command Fixed Default Path Fixed File Name BindSave: C:/<RootInstall>/ keybinds.txt BuildSave: C:/<RootInstall>/<NameAccount>/Builds/ build.txt ChatSave: C:/<RootInstall>/ chat.txt OptionSave: C:/<RootInstall>/ options.txt* WDWSave: C:/<RootInstall>/ wdw.txt * Keep an eye out for the, "s" that's only half-way-in, a committed relationship with the option command. Hiding in clumps of commands, optionsSave and option.txt, see you before you see them. Command Unmodified Default Path With User Generated "data" Folder BindSaveFile: C:/<RootInstall>/piggs*/ C:/<RootInstall>/data/ BuildSaveFile: C:/<RootInstall>/<NameAccount>/Builds/ ChatSaveFile: C:/<RootInstall>/piggs/ C:/<RootInstall>/data/ OptionSaveFile: C:/<RootInstall>/piggs/ C:/<RootInstall>/data/ WDWSaveFile: C:/<RootInstall>/piggs/ C:/<RootInstall>/data/ *One look inside the /piggs folder, is all it takes to know, it's not ideal. I haven't seen this anywhere so, grain of salt, I think of the data folder as the User Root. Things were encouraged to play with, default here. **File names must be specified by user or command will error. Navigating Relative Paths: I had said that Relative paths, require two points in order to be defined however, there's a third point to consider. They're commonly restricted within their environment, the installation root. How that affects us, simply put, the installation root is a brick wall. Indicated as, "CoX", on the graph below, saving to the left of that isn't an option. Considering the graph below, from the green BUILDS folder, if we wanted to move to the right, (referred to as "down"), entering a folder name, followed by ,"/" the forward slash moves us 1 step. To go back, (graph-left, "up" when talking to IT), instead of the folder name "../", two periods and a forward slash, takes us back 1 step. From the green BUILDS folder, moving right, we can take as many steps as we squeeze in to a single command but, if we're going the other direction, trying to save to a folder more than 2 steps back and our command errors. Folder Structure Puter Path to stumes CoX Build1 Data Build2 Yours Build3 Screens Build4 Account BUILDS Build5 Build6 Build7 * Unlike a board game, being, "in" a file, is represented as, to the right and one down . With that said, consider exhibit 11.C § 1.61 (1972). I'll go get those commands together. exhibit 11.C § 1.61 (1972) /buildsavefile "../../../CoX/BuildFileName.txt" /buildsavefile "../../../BuildFileName.txt" /buildsavefile "../../BuildFileName.txt" Anyways... Below, in the text editor, is our command with the paths to each of the 7 build folders mapped on the graph and, one for saving to the BUILDS folder. On other systems, common path options might be available but only up and down were recognized on my computer. (See notes) *if you've noticed the commands, don't exactly match the name, good eye! It's not a ruse. The table is just, whatever. Without function, I let form rule. The commands are here for easy editing. Parts with real world applications, I wanted to get right. NO GUARANTEES, NO REFUNDS! Commands: Comparing the binds to the graph, a pattern is probably starting to stand out. Forget what you heard Paula Abdul going on about, it's two steps back.... then, whatever number of steps forward, if you're navigating to another install root folder. Typically, these commands generate the folders you've specified if they don't already exist. If that isn't happening, it's possible, your security settings are getting in the way. I'd guess generating folders, the old fashioned way, through your operating system, is probably going to buff that out. The minor inconvenience isn't worth altering, otherwise, satisfactory security. /BindSave OnSubmit: Sorts active binds in a specific order*. Generates a fixed form document, resorted in an order I have yet to identify, to its default path. Is Invalid: Shouldn't be possible under normal circumstances. If it happens, default channel, "Error" Reports, "UnableKeybindSave" Is Valid: Default Channel, "System" Reports, " Keybinds saved to C:/<RootInstall>/keybinds.txt" Modifiers: N/A Arguments: N/A Defaults To: <System>/<RootInstall>/ Specify: No Name: Keybinds.txt *(Always the same. Some symbols as symbols and some as alpha, numerical, alpha with symbols as alpha.) keybinds.txt Preview: Link: Current Copy available through the wiki /BuildSave OnSubmit: Generates a fixed-format document illustrating the active builds powers, level selected and enhancements added, to the default path. Is Invalid: Shouldn't be possible under normal circumstances. If it happens, Default channel, "Error" Reports, "UnableBuildSave" Is Valid: Default Channel, "System" Reports, "BuildSaved" Modifiers: N/A Arguments: N/A Defaults To: <System>/<RootInstall>/<NameAccount>/Builds/ Specify: No. Name: build.txt build.txt Preview: /ChatSave OnSubmit: Generates a fixed-format* text document of all chat and window settings, to the default path. Is Invalid: Shouldn't be possible under normal circumstances. If it happens, default channel, "Error" Reports, "UnableChatSave" Is Valid: Default Channel, "System" Reports, " Chat file saved to C:/<RootInstall>/chat.txt" Modifiers: N/A Arguments: N/A Defaults To: <System>/<RootInstall>/ Specify: No Name: chat.txt *(Appears to be a mix of binary and CoH specific. Not easily edited.) chat.txt Preview: /OptionSave OnSubmit: Generates a simple fixed-format* list of a few menu options and some "remember" checkboxes encountered during standard play. Is Invalid: Shouldn't be possible under normal circumstances. If it happens, default channel, "Error" Reports, "UnableOptionSave" Is Valid: Default Channel, "System" Reports, " Options saved to C:/<RootInstall>/options.txt" Modifiers: N/A Arguments: N/A Defaults To: <System>/<RootInstall>/ Specify: No Name: options.txt *(Appears to be a mix of binary and CoH specific. Very easily edited.) options.txt Preview: Link: Current Default Structure available through the wiki /wdwSave OnSubmit: Generates a fixed-format* text document of most interface windows and some menu settings. Is Invalid: Shouldn't be possible under normal circumstances. If it happens, default channel, "Error" Reports, "UnableWdwSave" Is Valid: Default Channel, "System" Reports, " Windows saved to C:/<RootInstall>/wdw.txt" Modifiers: N/A Arguments: N/A Defaults To: <System>/<RootInstall>/ Specify: No Name: wdw.txt *(text variant of a table with repeating columns for each window line. The columns take a mix of binary, numerical values and RGB color. Not all options and settings are available and some shown are not valid) Very easily edited.) wdw.txt Preview: Link: Current Default Structure available through the wiki Prospects for keeping options on, or near, your person: Souvenir macros to help illustrate options, right for you, more than literal function. A little editing will go far. What was the deal with the exhibit thing? Weird... As mentioned, the default buildsave folder, from the install root, is two deep, <NameAccount>/Builds/. Therefore, (2) back steps back, ../../ is as far back as allowed. The first path is the bad boy of the bunch, going three steps back but, moving back up to the root. It would work however, technically, it escapes the root folder for a billionth of a second and should get slapped down for it. The second example would fail and, the third follows all the rules. SP, ultimately, it was just a dumb path joke. FInal thought on permissions vs bug: Not being a security guy, or even a strong computer guy. All I can do it speculate but considering the following two points, I'm not confident it's a bug. - The account folder may have additional restrictions the user generated data folder does not. - Build Absolute path error, mimics all file errors attempting to escape install root via relative Test Samples: There's nothing crazy but, the flexibility with extensions was unexpected. The pearls Passed - saves to <RootInstall>/data/ - /bindsavefile test.txt Passed - saves to <RootInstall>/<NameAccount>/Builds/ - /buildsavefile test.txt Passed - saves to <RootInstall>/data/ - /chatsavefile test.txt Passed - saves to <RootInstall>/data/ - /optionsavefile test.txt Passed - saves to <RootInstall>/data/ - /wdwsavefile test.txt Passed - Saves to <RootInstall>/data/ - /wdwsavefile ./test.txt Passed - Loads from <RootInstall>/data/ - /bindloadfile test.txt Passed - Loads from <RootInstall>/data/ - /chatloadfile test.txt Passed - Loads from <RootInstall>/data/ - /optionloadfile test.txt Passed - Loads from <RootInstall>/data/ - /wdwloadfile test.txt Interesting Passed - Saves to <RootInstall>/data/ - /bindsavefile test Passed - Saves to <RootInstall>/<NameAccount>/Builds/ - /buildsavefile test Passed - Saves to <RootInstall>/data/ - /chatsavefile test Passed - Saves to <RootInstall>/data/ - /optionsavefile test Passed - Saves to <RootInstall>/data/ - /wdwsavefile test Passed - Loads from <RootInstall>/data/ - /bindloadfile test.b Passed - Loads from <RootInstall>/data/ - /chatloadfile test.c Passed - Loads from <RootInstall>/data/ - /optionloadfile test.o Passed - Loads from <RootInstall>/data/ - /wdwloadfile test.w --- Passed - Saves to <RootInstall>/data/ - /bindsavefile test.b Passed - Saves to <RootInstall>/<NameAccount>/Builds/ - /buildsavefile test.qwy Passed - Saves to <RootInstall>/data/ - /chatsavefile test.c Passed - Saves to <RootInstall>/data/ - /optionsavefile test.o Passed - Saves to <RootInstall>/data/ - /wdwsavefile test.w Passed - Loads from <RootInstall>/data/ - /bindloadfile test.b Passed - Loads from <RootInstall>/data/ - /chatloadfile test.c Passed - Loads from <RootInstall>/data/ - /optionloadfile test.o Passed - Loads from <RootInstall>/data/ - /wdwloadfile test.w --- Passed - Generate folders, Saves to <RootInstall>/data/test/test/test/ - /optionsavefile test/test\test/test.txt Passed - Loads from <RootInstall>/data/test/test/test/ - /optionloadfile test\test/test\test.txt --- Passed - Generate folders, saves to <RootInstall>/New/ - /chatsavefile ../..\New/test.txt Passed - Loads from <RootInstall>/New/ - /chatloadfile ..\../New\test.txt --- Passed - Generate folder, saves to <System>/test/ - /chatsavefile c:/test/adobe.pdf Passed - Loads from <System>/test/ - /chatloadfile c:/test\adobe.pdf --- Passed - Saves to <RootInstall>/Costumes/ - /bindsavefile ../Costumes/ms.xls Passed - Loads from <RootInstall>/Costumes/ - /bindloadfile ..\Costumes/ms.xls --- The fails Error - buildsavefile Error - /buildsavefile . Error - /optionsavefile ./ Error - /chatsavefile /. Error - /wdwsavefile ../../../test.txt Error - /bindsavefile ../../../test/test.txt Error - /buildsavefile C:/coh/test.txt Error - /buildsavefile C:\coh\test.txt Error - /buildsavefile C:/<PathToWritePermissionsForUnknownUser>/test.txt -Control Passed - /optionsavefile C:/coh/test.txt Passed - /bindsavefile C:\coh\test1.txt Passed - /wdwsavefile C:/coh\test1.txt Passed - /chatsavefile C:/<PathToWritePermissionsForUnknownUser>/test.txt Passed - /chatloadfile C:/coh/test.txt Passed - /optionloadfile C:\coh\test1.txt Passed - /wdwloadfile C:/coh\test1.txt Passed - /bindloadfile C:/<PathToWritePermissionsForUnknownUser>/test.txt - Buildsavefile as an Absolute path is an absolute no. - Only buildsavefile has an issue surrounding Absolute. All others are good to go. - Client accepts and converts backslashes to forward, as part of a path - Error reports and rejects attempts to escape folder via relative path. Nothing escapes. Not nobody. Not no how. - No issues navigating installation folder via relative path or, generating new folders within - No logic test of file extension. Saves and loads viable files without extension or even, made up extensions. - No logic test to preserve existing files. Older instances always lost. It's a Wrap! Anyways... Hope this proves useful.