
Xandyr
-
Posts
718 -
Joined
-
Last visited
Content Type
Profiles
Forums
Store
Articles
Patch Notes
Posts posted by Xandyr
-
-
11 hours ago, The_Warpact said:
I actually took the /Nature route, tweaked the build for my purposes and started lvling him up.
Thanks for the guidance, your slotting helped in the final build. I believe I will do /rad down the road either troller or MM. Its just that nature looks more attractive for a team build at this time.
Welcome, glad to help. Nature is VERY team oriented, and being an MM, you're always a team.
-
 2
2
-
-
I'd still LOVE to see Serum replaced with Swap Ammo.
-
1
-
 1
1
-
-
8 minutes ago, The_Warpact said:
Nature has heals, + Resist, + Regen, + Absorb, + Heal Over Time, + Damage, + To Hit, + End Discount, -Damage, -To Hit debuff, - Regen, - Resist, and more -Damage.
Your total - Damage Debuff is -35.63%.
Your -Resist Debuff is 18.75%.
Regen Debuff is -150%.
The "big 3 buffs" in Nature are Wild Bastion, Wild Growth, and Overgrowth. The build I'm running I have Wild Growth perma, and the other 2 are off by 5 and 9 seconds. Nature works great with beasts because they love Melee, your heals are cone facing (no matter who you have targeted, only those in front of you(and yourself) will be healed. You do have to pay a little attention to where your pets are to ensure they get your heals. And Entangling Aura is just...cheating. Nothing better than just jumping into a mob and seeing them get wrapped up in vines and struggle to break free while your pets waylay on them.
It's a fun build, and thematic ( if that's your thing).
This Villain build was built using Mids Reborn 3.2.17
https://github.com/LoadedCamel/MidsRebornClick this DataLink to open the build!
Level 50 Magic Mastermind
Primary Power Set: Beast Mastery
Secondary Power Set: Nature Affinity
Power Pool: Leadership
Power Pool: Leaping
Power Pool: Speed
Ancillary Pool: Heat MasteryVillain Profile:
Level 1: Summon Wolves -- AchHee-ResDeb%(A), SvrRgh-PetResDam(5), BldMnd-Acc/Dmg(5), BldMnd-Acc/Dmg/EndRdx(7), SprMarofS-Acc/Dmg/EndRdx(7), SprMarofS-EndRdx/+Resist/+Regen(9)
Level 1: Corrosive Enzymes -- Acc-I(A), EndRdx-I(9)
Level 2: Regrowth -- NmnCnv-Heal(A), NmnCnv-Heal/EndRdx(11), NmnCnv-Heal/Rchg(11), NmnCnv-Heal/EndRdx/Rchg(33), HrmHln-Heal/Rchg(34), HrmHln-Heal/EndRdx/Rchg(34)
Level 4: Wild Growth -- GldArm-3defTpProc(A), GldArm-End/Res(34), UnbGrd-ResDam(36), UnbGrd-Rchg/ResDam(36), StdPrt-ResDam/EndRdx(36), StdPrt-ResDam/Def+(37)
Level 6: Train Beasts -- EndRdx-I(A)
Level 8: Maneuvers -- LucoftheG-Def/Rchg+(A), LucoftheG-Def/EndRdx(37), GifoftheA-Def(37), GifoftheA-Def/EndRdx(39), ShlWal-ResDam/Re TP(39)
Level 10: Spore Cloud -- DarWtcDsp-ToHitDeb(A), DarWtcDsp-ToHitDeb/EndRdx(39), DarWtcDsp-ToHitdeb/Rchg/EndRdx(40), DarWtcDsp-ToHitDeb/Rchg(40)
Level 12: Summon Lions -- CaltoArm-+Def(Pets)(A), ExpRnf-+Res(Pets)(13), SprCmmoft-Acc/Dmg(13), SprCmmoft-Dmg/EndRdx(15), SprCmmoft-Acc/Dmg/EndRdx/Rchg(15), SprCmmoft-Acc/Dmg/Rchg(17)
Level 14: Tactics -- AdjTrg-ToHit/EndRdx/Rchg(A), AdjTrg-ToHit/Rchg(31), AdjTrg-ToHit(31), AdjTrg-EndRdx/Rchg(33), AdjTrg-ToHit/EndRdx(33)
Level 16: Lifegiving Spores -- Pnc-Heal/+End(A), Pnc-Heal(17), Pnc-Heal/EndRedux(19), Pnc-Heal/Rchg(19), Pnc-Heal/EndRedux/Rchg(25)
Level 18: Fortify Pack -- LucoftheG-Def/Rchg+(A)
Level 20: Wild Bastion -- NmnCnv-Heal/EndRdx/Rchg(A), NmnCnv-Heal/Rchg(21), Mrc-Heal/EndRdx/Rchg(21), Mrc-Heal/Rchg(23), HrmHln-Heal/Rchg(23), HrmHln-Heal/EndRdx/Rchg(25)
Level 22: Assault -- EndRdx-I(A)
Level 24: Combat Jumping -- LucoftheG-Def/Rchg+(A)
Level 26: Summon Dire Wolf -- SlbAll-Build%(A), SlbAll-Dmg/EndRdx(27), EdcoftheM-PetDef(27), SprMarofS-Acc/EndRdx(29), SprMarofS-Acc/Dmg(29), BldMnd-Acc/Dmg/EndRdx(31)
Level 28: Super Jump -- BlsoftheZ-ResKB(A)
Level 30: Hasten -- RechRdx-I(A)
Level 32: Tame Beasts -- EndRdx-I(A)
Level 35: Entangling Aura -- Lck-%Hold(A), UnbCns-Hold(43), UnbCns-Acc/Rchg(43), UnbCns-Hold/Rchg(46), UnbCns-EndRdx/Hold(46), UnbCns-Acc/Hold/Rchg(46)
Level 38: Overgrowth -- AdjTrg-ToHit/EndRdx(A), AdjTrg-ToHit/EndRdx/Rchg(40), AdjTrg-ToHit/Rchg(42), AdjTrg-EndRdx/Rchg(42), AdjTrg-Rchg(43)
Level 41: Bonfire -- OvrFrc-Dam/KB(A), OvrFrc-Dmg/End/Rech(42)
Level 44: Char -- BslGaz-Acc/Hold(A), BslGaz-Acc/EndRdx/Rchg/Hold(45), BslGaz-EndRdx/Rchg/Hold(45), BslGaz-Acc/Rchg(45)
Level 47: Call Ravens -- PstBls-Dmg/Rng(A), PstBls-Dam%(48), PstBls-Acc/Dmg/EndRdx(48), PstBls-Acc/Dmg(48), PstBls-Dmg/EndRdx(50), Bmbdmt-+FireDmg(50)
Level 49: Rebirth -- Empty(A)
Level 1: Supremacy
Level 1: Brawl -- Empty(A)
Level 1: Sprint -- Empty(A)
Level 2: Rest -- Empty(A)
Level 1: Swift -- Empty(A)
Level 1: Hurdle -- Empty(A)
Level 1: Health -- NmnCnv-Regen/Rcvry+(A), Mrc-Rcvry+(50)
Level 1: Stamina -- PrfShf-End%(A), PrfShf-EndMod(3), PrfShf-EndMod/Acc(3)
Level 28: Double Jump
Level 1: Alpha Howler Wolf
Level 1: Howler Wolf
Level 26: Dire Wolf
Level 12: Lioness
Level 1: Pack Mentality
-------------
 1
1
-
-
Not sure if I wouldn't build a Beast/Rad like this...
This Villain build was built using Mids Reborn 3.2.17
https://github.com/LoadedCamel/MidsRebornClick this DataLink to open the build!
Level 50 Magic Mastermind
Primary Power Set: Beast Mastery
Secondary Power Set: Radiation Emission
Power Pool: Leaping
Power Pool: Leadership
Power Pool: Speed
Ancillary Pool: Leviathan MasteryVillain Profile:
Level 1: Summon Wolves -- SprCmmoft-Acc/Dmg(A), SprCmmoft-Dmg/EndRdx/Rchg(5), SprCmmoft-Acc/Dmg/EndRdx/Rchg(7), SprCmmoft-Dmg/EndRdx(7), CaltoArm-+Def(Pets)(9), CaltoArm-Acc/Dmg(9)
Level 1: Radiant Aura -- Prv-Absorb%(A), Prv-Heal/Rchg/EndRdx(37), Prv-Heal/Rchg(37), Prv-EndRdx/Rchg(37), Prv-Heal/EndRdx(40), Prv-Heal(40)
Level 2: Radiation Infection -- HO:Enzym(A), HO:Enzym(34), HO:Enzym(34), AchHee-ResDeb%(34)
Level 4: Accelerate Metabolism -- EffAdp-EndMod/Acc/Rchg(A), EffAdp-EndMod/Rchg(11), EffAdp-EndMod(11), EffAdp-EndMod/Acc(25), EffAdp-EndMod/EndRdx(25), EffAdp-Acc/Rchg(33)
Level 6: Train Beasts -- EndRdx-I(A)
Level 8: Super Jump -- BlsoftheZ-ResKB(A)
Level 10: Enervating Field -- EndRdx-I(A), EndRdx-I(23)
Level 12: Summon Lions -- SprMarofS-Acc/EndRdx(A), SprMarofS-Acc/Dmg(13), SprMarofS-Dmg/EndRdx(13), SprMarofS-Acc/Dmg/EndRdx(15), SprMarofS-EndRdx/+Resist/+Regen(15), EdcoftheM-PetDef(17)
Level 14: Maneuvers -- LucoftheG-Def/Rchg+(A), ShlWal-ResDam/Re TP(17), ShlWal-Def(19), ShlWal-Def/EndRdx(19), Rct-ResDam%(21), Rct-Def/EndRdx(21)
Level 16: Tactics -- GssSynFr--Rchg/EndRdx(A), GssSynFr--ToHit/Rchg/EndRdx(40), GssSynFr--ToHit/Rchg(43), GssSynFr--ToHit(43), GssSynFr--Build%(46), GssSynFr--ToHit/EndRdx(46)
Level 18: Fortify Pack -- LucoftheG-Def/Rchg+(A)
Level 20: Lingering Radiation -- TmpRdn-Acc/EndRdx(A), TmpRdn-EndRdx/Rchg/Slow(23)
Level 22: Assault -- EndRdx-I(A)
Level 24: Hasten -- RechRdx-I(A)
Level 26: Summon Dire Wolf -- SvrRgh-PetResDam(A), ExpRnf-+Res(Pets)(27), SvrRgh-Acc/Dmg/EndRdx(27), BldMnd-Acc/Dmg/EndRdx(29), SlbAll-Dmg/EndRdx(29), BldMnd-Acc/Dmg(31)
Level 28: Choking Cloud -- Lck-%Hold(A), BslGaz-Acc/Hold(31), BslGaz-Acc/EndRdx/Rchg/Hold(31), BslGaz-EndRdx/Rchg/Hold(33), BslGaz-Acc/Rchg(33)
Level 30: Combat Jumping -- LucoftheG-Def/Rchg+(A)
Level 32: Tame Beasts -- EndRdx-I(A)
Level 35: School of Sharks -- PstBls-Acc/Dmg(A), PstBls-Acc/Dmg/EndRdx(36), PstBls-Dam%(36), PstBls-Dmg/EndRdx(36)
Level 38: EM Pulse -- BslGaz-Acc/Rchg(A), BslGaz-Acc/EndRdx/Rchg/Hold(39), BslGaz-EndRdx/Rchg/Hold(39), BslGaz-Rchg/Hold(39)
Level 41: Knockout Blow -- Hct-Dam%(A), Hct-Acc/Dmg/Rchg(42), Hct-Acc/Rchg(42), Hct-Dmg/EndRdx(42), Hct-Dmg(43)
Level 44: Shark Skin -- UnbGrd-Max HP%(A), UnbGrd-ResDam/EndRdx(45), GldArm-3defTpProc(45), GldArm-End/Res(45), StdPrt-ResDam/Def+(46), StdPrt-ResDam/EndRdx(50)
Level 47: Call Ravens -- Bmbdmt-+FireDmg(A), Ann-ResDeb%(48), PstBls-Dam%(48), PstBls-Acc/Dmg/EndRdx(48), ShlBrk-%Dam(50), ShlBrk-Acc/EndRdx/Rchg(50)
Level 49: Mutation -- Empty(A)
Level 1: Brawl -- Empty(A)
Level 1: Sprint -- Empty(A)
Level 1: Supremacy
Level 2: Rest -- Empty(A)
Level 1: Swift -- Empty(A)
Level 1: Health -- Pnc-Heal/+End(A), NmnCnv-Regen/Rcvry+(5)
Level 1: Hurdle -- Empty(A)
Level 1: Stamina -- PrfShf-End%(A), PrfShf-EndMod(3), PrfShf-EndMod/Acc(3)
Level 1: Alpha Howler Wolf
Level 1: Howler Wolf
Level 1: Pack Mentality
Level 8: Double Jump
Level 12: Lioness
Level 26: Dire Wolf
------------ -
19 hours ago, The_Warpact said:
I still have to seriously run a beast mm...maybe I should reroll..take Tez advice and have a melee mm. All holds, puppies nipping ankles and me doing a Tyson on some baddies.
I have a few Beast MMs.... Might i add that /Nature has Entangling Aura...
Beasts are fun and can be built to be very sturdy.
-
1
-
1
-
-
56 minutes ago, Outrider_01 said:
it looks so savage!
I see what you did there 😎
-
 1
1
-
-
It's pretty awesome that the thread I started 2 ½ years ago is still going! 😁
As far as mine, I went Ill/Dark. He's a beast! I've solo'd numerous AVs/GMs. This combo works great whether solo or teamed up.
The only problem.....I have fun with this toon and it is so powerful, I haven't made any other trollers bc I am afraid I will be disappointed.
-
1
-
-
My WP/Staff tank is a beast
-
3 minutes ago, Hyperstrike said:
You're forgetting Savage is a "combo" set.
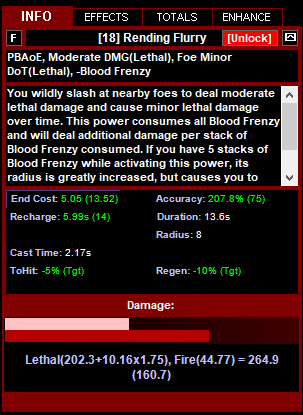
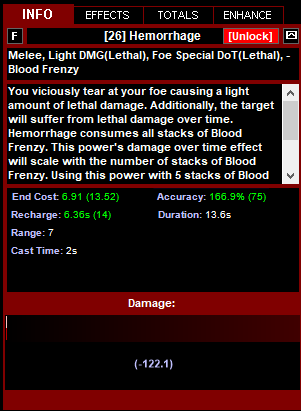
Hemorrhage is DOT. And the damage stacks up to 5 times with Blood Frenzy.
To see the variances, go down and lock Blood Frenzy.
Then fiddle the slider.Again, admittedly, I've not played Savage, so I don't know anything about it. But why does the damage for Hemorrhage just show (-122,1)? And with the Blood Frenzy bar slid over to 5, it shows (-152.9) ?
Does that mean that with 5 stacks of Blood Frenzy it will do a total of 152.9 pts of damage? Over time? I just don't understand why it shows the damage as (-152.9). Am I making any sense?
Take Rending Flurry...it's a DoT, but it shows up like this:

-
Here's a few thoughts for you.
- Invuln/Dark is a classic "you might hit me, and it won't hurt" tank. VERY survivable.
-Stone Armor can be built with soft capped Defenses to all Typed damage (S/L/F/C/E/N.E./Psi) with capped Resists to Fire/Cold). Decent resists to everything else, PLUS a decent amount of Regeneration to boot. All this WITHOUT Granite. I just hit 50 with my Stone/Rad Melee tank, and it's a BEAST. (very end hungry).
- Ice Armor is fun. Maybe because I don't see many other Ice tanks? Or maybe because without even trying you absorb ALL the aggro. Not a little. Not some. But ALL. Icicles and Chilling Embrace work together to make sure mobs stay focused on you. Pretty easy to cap your defenses to S/L/E/N.E. VERY hard to hit soft cap to F/C. it *is* possible depending on your secondary and if you want to chase those bonuses.
I've ran 1 tank that had Ice Melee. The slows are nice, but on a team, you don't really get to sit back and brag about how slow you made every enemy. It is a nice powerset, and does pack a decent amount of damage. I enjoyed it, but on teams, I really couldn't tell that my slows really impacted my, or my team's, survival.
I admit, I've never ran Stone Melee. So I can't comment on it.
I would ask yourself if you want a damage toggle or not. If the answer is yes, then that rules out Invuln.
Of your choices, and your goal of being survivable and being hit as little as possible, I would recommend either Invuln/Dark or Stone/Dark.
Invuln/Dark gets better with the more mobs around you....fueling Invincibility. A fully saturated Invincibilty would give you between +10-16 more Defense To All, and an additional +20% To Hit. This can get you soft capped defenses to S/L/F/C/E/N.E., all while having capped Resists to S/L, and VERY respectable resists to everything else (well, maybe not to Toxic/Psi, unless you specifically chase those bonuses thru IOs. Of course, you should also be able to stack 2 MotT Resist Procs, which would get you capped to all but Toxic/Psi). Couple this with Dull Pain, Siphon Life, and dark's -to hit, and well....you ain't dying.
Pretty much the same thought process goes for Stone/Dark. You can already build it with those soft capped Defenses (plus to Psi!). Decent Resists ( S/L around 60+, E/NE 30-35%, Toxic around 75%, Psi 15-20%, and capped F/C). You have Rooted which can give you an extra 10-16 HP regenerated every second, and Earth's Embrace (Heal/Increase Max HP), which furthers your regeneration rate. Stone Armor also has a Damage toggle.
Can't go wrong with either one of those combos.
Here's a quick build I threw together for invuln.
This is 4 mobs fueling Invincibilty, and 1 stack of MotT +Resistance Proc.
This Hero build was built using Mids Reborn 3.2.17
https://github.com/LoadedCamel/MidsRebornClick this DataLink to open the build!
Level 50 Magic Tanker
Primary Power Set: Invulnerability
Secondary Power Set: Dark Melee
Power Pool: Leaping
Power Pool: Fighting
Power Pool: Leadership
Power Pool: Speed
Ancillary Pool: Energy MasteryHero Profile:
Level 1: Resist Physical Damage -- ImpArm-ResPsi(A)
Level 1: Shadow Punch -- Hct-Acc/Dmg/Rchg(A), Hct-Dmg(42), Hct-Acc/Rchg(50), Hct-Dmg/EndRdx(50), Hct-Dam%(50)
Level 2: Temp Invulnerability -- ImpArm-ResPsi(A)
Level 4: Shadow Maul -- SprMghoft-Dmg/Rchg(A), SprMghoft-Acc/Dmg(5), SprMghoft-Acc/Dmg/Rchg(7), SprMghoft-Dmg/EndRdx/Rchg(48), SprMghoft-Acc/Dmg/EndRdx/Rchg(48), SprMghoft-Rchg/Res%(48)
Level 6: Dull Pain -- Mrc-Heal/EndRdx/Rchg(A), Mrc-Heal/Rchg(7)
Level 8: Resist Elements -- UnbGrd-Max HP%(A), UnbGrd-ResDam(9), UnbGrd-ResDam/EndRdx(9), UnbGrd-EndRdx/Rchg(46), UnbGrd-Rchg/ResDam(46), UnbGrd-ResDam/EndRdx/Rchg(46)
Level 10: Unyielding -- UnbGrd-ResDam(A), UnbGrd-ResDam/EndRdx(11), UnbGrd-Rchg/ResDam(11), UnbGrd-ResDam/EndRdx/Rchg(15)
Level 12: Resist Energies -- UnbGrd-ResDam(A), UnbGrd-ResDam/EndRdx(13), UnbGrd-Rchg/ResDam(13), UnbGrd-ResDam/EndRdx/Rchg(15)
Level 14: Super Jump -- Empty(A)
Level 16: Siphon Life -- SprBlsCol-Rchg/HoldProc(A), SprBlsCol-Dmg/EndRdx/Acc/Rchg(17), SprBlsCol-Acc/Dmg(17), SprBlsCol-Dmg/EndRdx(23), SprBlsCol-Acc/Dmg/EndRdx(43), SprBlsCol-Acc/Dmg/Rchg(43)
Level 18: Invincibility -- LucoftheG-Def/Rchg+(A), ShlWal-Def(19), ShlWal-Def/EndRdx(19), ShlWal-Def/Rchg(21), ShlWal-Def/EndRdx/Rchg(21), GssSynFr--Build%(23)
Level 20: Combat Jumping -- LucoftheG-Def/Rchg+(A)
Level 22: Kick -- Empty(A)
Level 24: Tough -- GldArm-3defTpProc(A), StdPrt-ResDam/Def+(25)
Level 26: Tough Hide -- LucoftheG-Def/Rchg+(A), ShlWal-Def(27), ShlWal-Def/EndRdx(27), ShlWal-Def/Rchg(40), ShlWal-Def/EndRdx/Rchg(43)
Level 28: Soul Drain -- SprAvl-Acc/Dmg/EndRdx/Rchg(A), SprAvl-Acc/Dmg(29), SprAvl-Rchg/KDProc(29), SprAvl-Dmg/EndRdx(31), SprAvl-Acc/Dmg/EndRdx(31), SprAvl-Acc/Dmg/Rchg(31)
Level 30: Weave -- LucoftheG-Def/Rchg+(A), ShlWal-Def(34), ShlWal-Def/EndRdx(37), ShlWal-Def/Rchg(37), ShlWal-Def/EndRdx/Rchg(37)
Level 32: Maneuvers -- LucoftheG-Def/Rchg+(A), ShlWal-ResDam/Re TP(33), ShlWal-Def(33), ShlWal-Def/EndRdx(33), ShlWal-Def/Rchg(34), Rct-ResDam%(34)
Level 35: Dark Consumption -- Erd-Acc/Rchg(A), Erd-Acc/Dmg/Rchg(36), Erd-Acc/Dmg/EndRdx/Rchg(36), Erd-Dmg/Rchg(36)
Level 38: Midnight Grasp -- SprGntFis-Dmg/EndRdx/Rchg(A), SprGntFis-Acc/Dmg/Rchg(39), SprGntFis-Dmg/Rchg(39), SprGntFis-Acc/Dmg(39), SprGntFis-Rchg/+Absorb(40), SprGntFis-Acc/Dmg/EndRdx/Rchg(40)
Level 41: Focused Accuracy -- AdjTrg-ToHit/EndRdx/Rchg(A), AdjTrg-ToHit(42), AdjTrg-ToHit/EndRdx(42)
Level 44: Physical Perfection -- RgnTss-Regen+(A), Prv-Absorb%(45), PrfShf-End%(45), PwrTrns-+Heal(45)
Level 47: Taunt -- PrfZng-Dam%(A)
Level 49: Hasten -- RechRdx-I(A)
Level 1: Brawl -- Empty(A)
Level 1: Gauntlet
Level 1: Sprint -- Empty(A)
Level 2: Rest -- Empty(A)
Level 1: Swift -- Empty(A)
Level 1: Health -- Pnc-Heal/+End(A), Pnc-Heal(5), Mrc-Rcvry+(25)
Level 1: Hurdle -- Empty(A)
Level 1: Stamina -- PrfShf-End%(A), PrfShf-EndMod(3), PrfShf-EndMod/Acc(3)
Level 14: Double Jump
------------ -
8 hours ago, Sovera said:
As Xandyr said you've somehow managed to skip both on your heal and your endurance clickies. Might of the Tanker works better in a single target power than on an aura.
Anyway, here is what I would do. Don't be put off by the 78% resists to S/L since it goes to 84% with a second stack from the tanker ATO in Radioactive Smash, and then 89% with Barrier and 90% when your HP drops to 90% HP. Any content you don't need Barrier is not hard enough to warrant 90% to begin with and the same with defenses that go to 45% with Barrier (same reasoning as above).
I sacrificed Combat Jumping and the 7.5% recharge that go with it for Physical Perfection to balance taking Focused Accuracy which is a must with any content that blinds and/or debuffs accuracy, but in practical terms in a team you might find being blinded or debuffed is not a problem since your team will deal with the things that would be a major roadblock if soloing. So Xandyr's option of using Gloom to improve the damage is also good.
I just prefer being self sufficient and three attacks are enough (Devastating, Radioactive Smash, Radiation Siphon, Radioactive Smash. Repeat. Pre-Devastating Blow it's Radiation Siphon, Contaminated Strike, Radioactive Smash, Contaminated Strike. Repeat), but Gloom is pretty strong so taking out Physical Perfection and FA to bring back Combat Jumping and Gloom just needs some reshuffling of slots.
This Hero build was built using Mids Reborn 3.2.17
https://github.com/LoadedCamel/MidsRebornClick this DataLink to open the build!
Level 50 Magic Tanker
Primary Power Set: Bio Armor
Secondary Power Set: Radiation Melee
Power Pool: Flight
Power Pool: Speed
Power Pool: Fighting
Ancillary Pool: Energy MasteryHero Profile:
Level 1: Hardened Carapace -- UnbGrd-ResDam(A), UnbGrd-Max HP%(3), UnbGrd-ResDam/EndRdx/Rchg(3), UnbGrd-ResDam/EndRdx(5), GldArm-3defTpProc(15), StdPrt-ResDam/Def+(21)
Level 1: Contaminated Strike -- SprBlsCol-Acc/Dmg(A), SprBlsCol-Dmg/EndRdx(5), SprBlsCol-Acc/Dmg/EndRdx(7), SprBlsCol-Acc/Dmg/Rchg(7), SprBlsCol-Dmg/EndRdx/Acc/Rchg(9)
Level 2: Radioactive Smash -- SprMghoft-Rchg/Res%(A), SprMghoft-Acc/Dmg/EndRdx/Rchg(9), SprMghoft-Acc/Dmg/Rchg(11), SprMghoft-Dmg/EndRdx/Rchg(11), TchofDth-Dam%(13), FrcFdb-Rechg%(13)
Level 4: Environmental Modification -- LucoftheG-Def/Rchg+(A), Rct-Def/EndRdx(17), Rct-Def(43)
Level 6: Adaptation
Level 8: Ablative Carapace -- Pnc-Heal/EndRedux(A), Pnc-EndRdx/Rchg(17), Pnc-Heal/Rchg(19), Pnc-Heal/EndRedux/Rchg(19), Pnc-Heal(21)
Level 10: Hover -- ShlWal-ResDam/Re TP(A), LucoftheG-Def/Rchg+(23), Rct-Def/EndRdx(23), Rct-ResDam%(45)
Level 12: Evolving Armor -- UnbGrd-Rchg/ResDam(A), UnbGrd-ResDam(25), UnbGrd-ResDam/EndRdx(25), UnbGrd-ResDam/EndRdx/Rchg(27)
Level 14: Hasten -- RechRdx-I(A), RechRdx-I(27)
Level 16: Radiation Siphon -- TchofDth-Acc/Dmg(A), TchofDth-Dmg/EndRdx(29), TchofDth-Dmg/Rchg(29), TchofDth-Acc/Dmg/EndRdx(31), TchofDth-Dmg/EndRdx/Rchg(31), TchofDth-Dam%(31)
Level 18: DNA Siphon -- ThfofEss-+End%(A), SynSck-EndMod(33), SynSck-Dam/Rech(37), SynSck-EndMod/Rech(47), SynSck-Dam/Rech/Acc(48), SynSck-EndMod/+RunSpeed(48)
Level 20: Fusion -- RctRtc-ToHit(A), RechRdx-I(37), RctRtc-ToHit/Rchg(39), GssSynFr--Build%(39)
Level 22: Fly -- WntGif-ResSlow(A)
Level 24: Evasive Maneuvers -- LucoftheG-Def/Rchg+(A)
Level 26: Genetic Contamination -- SprGntFis-Acc/Dmg(A), SprGntFis-Rchg/+Absorb(33), SprGntFis-Acc/Dmg/Rchg(33), SprGntFis-Dmg/EndRdx/Rchg(34), SprGntFis-Acc/Dmg/EndRdx/Rchg(34)
Level 28: Irradiated Ground -- Mlt-Acc/EndRdx(A), Arm-Dam%(34), FuroftheG-ResDeb%(36), Erd-%Dam(36), AchHee-ResDeb%(36), TchofLadG-%Dam(37)
Level 30: Inexhaustible -- PrfShf-End%(A)
Level 32: Boxing -- KntCmb-Acc/Dmg(A), KntCmb-Dmg/EndRdx(45), KntCmb-Dmg/Rchg(45), KntCmb-Dmg/EndRdx/Rchg(46)
Level 35: Devastating Blow -- Hct-Dam%(A), Hct-Dmg/Rchg(39), Hct-Acc/Dmg/Rchg(40), Hct-Acc/Rchg(40), Hct-Dmg/EndRdx(46), TchofDth-Dam%(46)
Level 38: Atom Smasher -- SprAvl-Rchg/KDProc(A), SprAvl-Dmg/EndRdx(40), SprAvl-Acc/Dmg/EndRdx(42), SprAvl-Acc/Dmg/Rchg(42), SprAvl-Acc/Dmg/EndRdx/Rchg(42)
Level 41: Focused Accuracy -- RctRtc-Pcptn(A), RctRtc-ToHit(43), EndRdx-I(43)
Level 44: Physical Perfection -- PrfShf-End%(A)
Level 47: Tough -- EndRdx-I(A)
Level 49: Weave -- LucoftheG-Def/Rchg+(A), Rct-Def(50), Rct-Def/EndRdx(50)
Level 1: Gauntlet
Level 1: Brawl -- Empty(A)
Level 1: Sprint -- Empty(A)
Level 2: Rest -- Empty(A)
Level 2: Swift -- Empty(A)
Level 2: Hurdle -- Empty(A)
Level 2: Health -- Pnc-Heal/+End(A), Mrc-Rcvry+(15)
Level 2: Stamina -- PrfShf-End%(A), PrfShf-EndMod(47)
Level 1: Prestige Power Dash -- Empty(A)
Level 1: Prestige Power Slide -- Empty(A)
Level 1: Prestige Power Quick -- Empty(A)
Level 1: Prestige Power Rush -- Empty(A)
Level 1: Prestige Power Surge -- Empty(A)
Level 4: Ninja Run
Level 50: Freedom Phalanx Reserve
Level 50: Portal Jockey
Level 50: Task Force Commander
Level 50: The Atlas Medallion
Level 6: Defensive Adaptation
Level 6: Efficient Adaptation
Level 6: Offensive Adaptation
Level 22: Afterburner
Level 50: Musculature Radial Paragon
------------Appreciate the shout out @Sovera.
Not only is Gloom a good ranged attack, it opens up for Darkest Night, which debuffs enemy damage by 30% and debuffs their To Hit by 22.79% (how I have it slotted). I figured To Hit Debuffs are always nice 😎
OTOH, I did run at one time Focused Accy and Physical Perfection. The added To Hit, ACCY, and +Perception is always welcomed. Physical Perfection also becomes a great spot to drop a few Procs in. Can't really go wrong with either way you go.
-
1
-
-
9 hours ago, Hyperstrike said:
This Villain build was built using Mids Reborn 3.2.17
https://github.com/LoadedCamel/MidsRebornClick this DataLink to open the build!
Level 50 Magic Brute
Primary Power Set: Savage Melee
Secondary Power Set: Shield Defense
Power Pool: Fighting
Power Pool: Leaping
Power Pool: Leadership
Ancillary Pool: Energy MasteryVillain Profile:
Level 1: Maiming Slash -- Mk'Bit-Acc/Dmg(A), Mk'Bit-Dmg/EndRdx(3), Mk'Bit-Dmg/Rchg(3), Mk'Bit-Acc/EndRdx/Rchg(5), Mk'Bit-Acc/Dmg/EndRdx/Rchg(5), Mk'Bit-Dam%(7)
Level 1: Deflection -- LucoftheG-Def/Rchg+(A), LucoftheG-Def(7), UnbGrd-ResDam(9), UnbGrd-ResDam/EndRdx(9), UnbGrd-Rchg/ResDam(11), UnbGrd-Max HP%(11)
Level 2: Shred -- SprBrtFur-Acc/Dmg(A), SprBrtFur-Dmg/Rchg(15), SprBrtFur-Acc/Dmg/Rchg(17), SprBrtFur-Dmg/EndRdx/Rchg(17), SprBrtFur-Acc/Dmg/EndRdx/Rchg(19), SprBrtFur-Rech/Fury%(19)
Level 4: Battle Agility -- LucoftheG-Def/Rchg+(A), LucoftheG-Def(21), ShlWal-ResDam/Re TP(21), Rct-ResDam%(23)
Level 6: Blood Thirst -- RechRdx-I(A), RechRdx-I(23), GssSynFr--Build%(25)
Level 8: True Grit -- UnbGrd-ResDam(A), UnbGrd-ResDam/EndRdx(25), UnbGrd-Rchg/ResDam(27), UnbGrd-ResDam/EndRdx/Rchg(27)
Level 10: Vicious Slash -- Mk'Bit-Acc/Dmg(A), Mk'Bit-Dmg/EndRdx(29), Mk'Bit-Dmg/Rchg(29), Mk'Bit-Acc/EndRdx/Rchg(31), Mk'Bit-Acc/Dmg/EndRdx/Rchg(31), Mk'Bit-Dam%(31)
Level 12: Active Defense -- RechRdx-I(A), RechRdx-I(33)
Level 14: Kick -- FrcFdb-Rechg%(A)
Level 16: Against All Odds -- PrfZng-Dam%(A)
Level 18: Rending Flurry -- OvrFrc-Acc/Dmg(A), OvrFrc-End/Rech(33), OvrFrc-Acc/Dmg/End(33), OvrFrc-Dmg/End/Rech(34), OvrFrc-Acc/Dmg/End/Rech(34), Arm-Dam%(34)
Level 20: Phalanx Fighting -- LucoftheG-Def/Rchg+(A), LucoftheG-Def(36)
Level 22: Tough -- UnbGrd-ResDam(A), UnbGrd-ResDam/EndRdx(36), UnbGrd-Rchg/ResDam(36), UnbGrd-ResDam/EndRdx/Rchg(37), StdPrt-ResDam/Def+(37), GldArm-3defTpProc(37)
Level 24: Weave -- ShlWal-Def(A), ShlWal-Def/EndRdx(39)
Level 26: Hemorrhage -- SprBlsCol-Acc/Dmg(A), SprBlsCol-Dmg/EndRdx(39), SprBlsCol-Acc/Dmg/EndRdx(39), SprBlsCol-Acc/Dmg/Rchg(40), SprBlsCol-Dmg/EndRdx/Acc/Rchg(40), SprBlsCol-Rchg/HoldProc(40)
Level 28: Grant Cover -- LucoftheG-Def/Rchg+(A), LucoftheG-Def(42)
Level 30: Combat Jumping -- LucoftheG-Def/Rchg+(A), LucoftheG-Def/EndRdx(42)
Level 32: Savage Leap -- SprUnrFur-Acc/Dmg(A), SprUnrFur-Dmg/Rchg(42), SprUnrFur-Acc/Dmg/Rchg(43), SprUnrFur-Dmg/EndRdx/Rchg(43), SprUnrFur-Acc/Dmg/EndRdx/Rchg(43), SprUnrFur-Rchg/+Regen/+End(45)
Level 35: Shield Charge -- SprAvl-Acc/Dmg(A), SprAvl-Dmg/EndRdx(45), SprAvl-Acc/Dmg/EndRdx(45), SprAvl-Acc/Dmg/Rchg(46), SprAvl-Acc/Dmg/EndRdx/Rchg(46), SprAvl-Rchg/KDProc(46)
Level 38: Maneuvers -- ShlWal-Def(A), ShlWal-Def/EndRdx(48)
Level 41: Superior Conditioning -- PwrTrns-+Heal(A)
Level 44: Laser Beam Eyes -- SprWntBit-Acc/Dmg(A), SprWntBit-Dmg/Rchg(48), SprWntBit-Acc/Dmg/EndRdx(48), SprWntBit-Acc/Dmg/Rchg(50), SprWntBit-Dmg/EndRdx/Acc/Rchg(50), SprWntBit-Rchg/SlowProc(50)
Level 47: Physical Perfection -- Prv-Absorb%(A)
Level 49: Assault -- EndRdx-I(A)
Level 1: Brawl -- Empty(A)
Level 1: Fury
Level 1: Sprint -- Empty(A)
Level 2: Rest -- Empty(A)
Level 1: Swift -- Empty(A)
Level 1: Health -- Pnc-Heal/+End(A), NmnCnv-Regen/Rcvry+(13), Mrc-Rcvry+(13)
Level 1: Hurdle -- Empty(A)
Level 1: Stamina -- PrfShf-EndMod(A), PrfShf-End%(15)
Level 1: Blood Frenzy
Level 50: Diamagnetic Core Flawless Interface
Level 50: Cardiac Core Paragon
------------| Copy & Paste this data into Mids Reborn : Hero Designer to view the build | |-------------------------------------------------------------------| |MxDz;1415;643;1286;HEX;| |78DA65934B6F125114C7EFC020528602F26E8196D20A88D2D6BDD168CBA216D3C4C| |42D21ED00A38412068DFD00EEB56ADCF8687D2452ABC6BD9FC0B77B5F5FA06AE27B| |85A773FE3725E90DC32FF79C7BCEF9F3E74EE9E28C56AD168F09C57DA25131CDF2F| |1F6F98EEE28556AC6A25DD072D213B582E592DED0F5C2E9CA854A0D9B382766F4AA| |DE34295537F4C692DC0ACFC2F272A350346AF58ED1AC69D66E5EAFB468E3959B25B| |D6DD68D969B8F36B6CFC6665BC66261B6A9B76B2BE552C5ECE8ED159615252D697A| |BA59FA52B6D5899E435409D3AAB0D5C03A5335C0B3CC3DE7982FB4FEE290C2C9207| |3EF4F3BF31773E00FF88FB941931559ACAC7170709DE9BB0BDE63EEBB0F3E60BEA4| |C97614DBED981CC4E4E0493E14FEC17C42931C386C73E4597B188C766D165F5147A| |7ECE884F628B40F41FBD05FE6A99C102EA9DD05D7E2702D0ED792702D09D79270ED| |354D72A3587143C62868A34BE2615B7AC27389B5BDA10AAF6239DD135E93839BF4A| |BFC5283FF030B1BFD087E62A63E835FC0235CFC963A06A48600FC4BC33F3B6908C9| |CE21589186156958310E2BC6237432413CCC7B958A23B273648E83FB8BCCA7A4392| |63BC72EAB9CBC02AE323357C16BE075E63BD23C2C3B0F43730E9AC3343621930999| |F4319FD1D811397644E376390FF3C020E8057DCC837EE67B1A3B268BC76E22790BB| |CCD3C74075C03D7997E923521654DC08D49B8E1F20B914552647F73859B8279392E| |FF9083935D708339FD08DC041F33352A2EC88E852DBC33A4614A06A752B8A4AA90A| |B471F5AA2A8EEBCCDBDF9DDF90555A629A458A1AD819D129CFAD617B289144BD0CE| |F01FA1CD1133AAF8BABBEE7B5F4811AB7C4D076F30F54C9F346B3D0F5042468EF66| |FFE0342F3DC21| |-------------------------------------------------------------------|
I've read Hemorrage isn't that good. When I look at your build it shows this... Am I missing something?
Also, does the Perfect Zinger proc in AAO fire fairly consistently/reliably?
-
Ablative and DNA Siphon are too good of powers to skip. With Ablative, not only is it a heal, but it gives you an Absorb "shield". DNA Siphon, likewise, is a Heal, a damaging power, adds End to you, and does -Regen to all it hits. IMO I wouldn't even think about running Bio without these 2 powers.
Here's the build I've used on mine forever.
This Hero build was built using Mids Reborn 3.2.17
https://github.com/LoadedCamel/MidsRebornClick this DataLink to open the build!
Level 50 Magic Tanker
Primary Power Set: Bio Armor
Secondary Power Set: Radiation Melee
Power Pool: Fighting
Power Pool: Leadership
Power Pool: Speed
Power Pool: Leaping
Ancillary Pool: Soul MasteryHero Profile:
Level 1: Hardened Carapace -- UnbGrd-ResDam(A), UnbGrd-ResDam/EndRdx(11), UnbGrd-Rchg/ResDam(15), UnbGrd-ResDam/EndRdx/Rchg(50)
Level 1: Contaminated Strike -- TchofDth-Acc/Dmg(A), TchofDth-Acc/Dmg/EndRdx(3)
Level 2: Inexhaustible -- NmnCnv-Regen/Rcvry+(A)
Level 4: Environmental Modification -- LucoftheG-Def/Rchg+(A), LucoftheG-Def(5), LucoftheG-Def/EndRdx(7), LucoftheG-Def/Rchg(7), LucoftheG-Def/EndRdx/Rchg(50)
Level 6: Adaptation
Level 8: Ablative Carapace -- Mrc-Heal/EndRdx/Rchg(A), Mrc-Heal/Rchg(9), NmnCnv-Heal/Rchg(9), NmnCnv-Heal/EndRdx/Rchg(11)
Level 10: Kick -- Empty(A)
Level 12: Evolving Armor -- UnbGrd-Max HP%(A), UnbGrd-ResDam(13), UnbGrd-ResDam/EndRdx(13), UnbGrd-Rchg/ResDam(15)
Level 14: Tough -- GldArm-3defTpProc(A), StdPrt-ResDam/Def+(17), ImpSki-Status(17)
Level 16: Radiation Siphon -- SprBlsCol-Dmg/EndRdx/Acc/Rchg(A), SprBlsCol-Rchg/HoldProc(19), SprBlsCol-Acc/Dmg(19), SprBlsCol-Dmg/EndRdx(21), SprBlsCol-Acc/Dmg/EndRdx(21), SprBlsCol-Acc/Dmg/Rchg(23)
Level 18: DNA Siphon -- Erd-Acc/Rchg(A), Erd-Acc/Dmg/Rchg(23), Erd-Acc/Dmg/EndRdx/Rchg(25), ScrDrv-Acc/Rchg(25), ScrDrv-Acc/Dmg/EndRdx(27), ScrDrv-Dmg/EndRdx(27)
Level 20: Weave -- LucoftheG-Def/Rchg+(A), LucoftheG-Def(29), LucoftheG-Def/EndRdx(29), LucoftheG-Def/Rchg(31), LucoftheG-Def/EndRdx/Rchg(50)
Level 22: Maneuvers -- LucoftheG-Def/Rchg+(A), ShlWal-ResDam/Re TP(31), ShlWal-Def(31), ShlWal-Def/EndRdx(33), Rct-ResDam%(33)
Level 24: Tactics -- GssSynFr--ToHit(A), GssSynFr--ToHit/EndRdx(33), GssSynFr--Build%(34)
Level 26: Genetic Contamination -- FuroftheG-ResDeb%(A), FuroftheG-Acc/Dmg(34), Arm-Dam%(34), Arm-Dmg/EndRdx(36), ScrDrv-Acc/Dmg(36), ScrDrv-Acc/Dmg/EndRdx(36)
Level 28: Irradiated Ground -- Arm-Dmg(A), SprAvl-Rchg/KDProc(37), SprAvl-Acc/Dmg(37), SprAvl-Dmg/EndRdx(37), SprAvl-Acc/Dmg/EndRdx(39), Arm-Acc/Dmg/Rchg(39)
Level 30: Hasten -- RechRdx-I(A)
Level 32: Parasitic Aura -- ThfofEss-Acc/Heal(A), ThfofEss-Acc/EndRdx/Heal(46), ThfofEss-Acc/EndRdx/Rchg(48), ThfofEss-Heal/Rchg(48), ThfofEss-+End%(48)
Level 35: Devastating Blow -- SprGntFis-Dmg/EndRdx/Rchg(A), SprGntFis-Acc/Dmg/Rchg(43), SprGntFis-Dmg/Rchg(43), SprGntFis-Acc/Dmg(45), SprGntFis-Rchg/+Absorb(46), SprGntFis-Acc/Dmg/EndRdx/Rchg(46)
Level 38: Atom Smasher -- SprMghoft-Dmg/Rchg(A), SprMghoft-Acc/Dmg(39), SprMghoft-Acc/Dmg/Rchg(40), SprMghoft-Dmg/EndRdx/Rchg(40), SprMghoft-Acc/Dmg/EndRdx/Rchg(40), SprMghoft-Rchg/Res%(43)
Level 41: Gloom -- CldSns-Acc/ToHitDeb(A), CldSns-Acc/Rchg(42), CldSns-Acc/EndRdx/Rchg(42), CldSns-%Dam(42)
Level 44: Darkest Night -- DmpSpr-ToHitDeb(A), DmpSpr-ToHitDeb/EndRdx(45), DmpSpr-ToHitDeb/Rchg/EndRdx(45)
Level 47: Combat Jumping -- LucoftheG-Def/Rchg+(A)
Level 49: Super Jump -- BlsoftheZ-ResKB(A)
Level 1: Gauntlet
Level 1: Brawl -- Empty(A)
Level 1: Sprint -- Empty(A)
Level 2: Rest -- Empty(A)
Level 1: Swift -- Empty(A)
Level 1: Hurdle -- Empty(A)
Level 1: Health -- Pnc-Heal/+End(A), Prv-Absorb%(5)
Level 1: Stamina -- PrfShf-EndMod(A), PrfShf-End%(3)
Level 49: Double Jump
Level 6: Defensive Adaptation
Level 6: Efficient Adaptation
Level 6: Offensive Adaptation
------------
-------------
1
-
-
Admittedly, I rolled my first Savage Melee toon tonight. So....I don't know much about it yet. Just playing around in Mid's, I came up with this build. Soft Capped defenses, a bit better S/L resists (but your other resists are better than mine), and I think this build regens a bit more. I have a Shield Tank, and I did not take Hasten. The reason is that I HATE having to click a mez power, so since only one power can be put on "auto", I have Active Defense set on auto. I know...I know...it would be easy to take Hasten and have it on Auto and just click Active Defense.
I *think* this build would do a bit better damage. Again, I am unfamiliar with Savage. Overall, your build looks pretty sturdy.
This Villain build was built using Mids Reborn 3.2.17
https://github.com/LoadedCamel/MidsRebornClick this DataLink to open the build!
Level 50 Magic Brute
Primary Power Set: Savage Melee
Secondary Power Set: Shield Defense
Power Pool: Fighting
Power Pool: Leadership
Power Pool: Leaping
Ancillary Pool: Energy MasteryVillain Profile:
Level 1: Maiming Slash -- Mk'Bit-Acc/Dmg(A), Mk'Bit-Acc/Dmg/EndRdx/Rchg(43), Mk'Bit-Dmg/EndRdx(45), Mk'Bit-Dmg/Rchg(48), Mk'Bit-Dam%(48), Mk'Bit-Acc/EndRdx/Rchg(50)
Level 1: Deflection -- Ksm-ToHit+(A), Ksm-Def/EndRdx(43), Ksm-Def/Rchg(43)
Level 2: Battle Agility -- GifoftheA-Def(A), GifoftheA-Def/EndRdx(42), RedFrt-Def(42), RedFrt-Def/EndRdx(50)
Level 4: Shred -- SprUnrFur-Dmg/EndRdx/Rchg(A), SprUnrFur-Acc/Dmg/Rchg(5), SprUnrFur-Dmg/Rchg(5), SprUnrFur-Acc/Dmg(7), SprUnrFur-Rchg/+Regen/+End(40), SprUnrFur-Acc/Dmg/EndRdx/Rchg(40)
Level 6: Blood Thirst -- AdjTrg-ToHit/EndRdx/Rchg(A), AdjTrg-ToHit/Rchg(7), AdjTrg-EndRdx/Rchg(46)
Level 8: Vicious Slash -- SprBlsCol-Acc/Dmg(A), SprBlsCol-Dmg/EndRdx(9), SprBlsCol-Acc/Dmg/EndRdx(9), SprBlsCol-Acc/Dmg/Rchg(15), SprBlsCol-Dmg/EndRdx/Acc/Rchg(17), SprBlsCol-Rchg/HoldProc(17)
Level 10: True Grit -- NmnCnv-Regen/Rcvry+(A), RctArm-ResDam/EndRdx(11), UnbGrd-ResDam(11), UnbGrd-ResDam/EndRdx(13), UnbGrd-Rchg/ResDam(13), RctArm-ResDam(15)
Level 12: Active Defense -- RechRdx-I(A)
Level 14: Kick -- Empty(A)
Level 16: Against All Odds -- EndRdx-I(A)
Level 18: Rending Flurry -- SprAvl-Acc/Dmg/EndRdx/Rchg(A), SprAvl-Acc/Dmg(19), SprAvl-Rchg/KDProc(19), SprAvl-Dmg/EndRdx(21), SprAvl-Acc/Dmg/EndRdx(21), SprAvl-Acc/Dmg/Rchg(23)
Level 20: Phalanx Fighting -- LucoftheG-Def/Rchg+(A)
Level 22: Tough -- UnbGrd-Max HP%(A), UnbGrd-ResDam/EndRdx(23), GldArm-3defTpProc(25), GldArm-End/Res(25), StdPrt-ResDam/Def+(27), ImpSki-Status(46)
Level 24: Weave -- LucoftheG-Def/Rchg+(A), ShlWal-Def(27), ShlWal-Def/EndRdx(29), ShlWal-Def/Rchg(29), Rct-ResDam%(39)
Level 26: Maneuvers -- LucoftheG-Def/Rchg+(A), LucoftheG-Def(39), LucoftheG-Def/EndRdx(39), LucoftheG-Def/Rchg(40), LucoftheG-Def/EndRdx/Rchg(50)
Level 28: Grant Cover -- LucoftheG-Def/Rchg+(A)
Level 30: Tactics -- GssSynFr--Rchg/EndRdx(A), GssSynFr--ToHit/Rchg/EndRdx(31), GssSynFr--ToHit/Rchg(31), GssSynFr--ToHit(31), GssSynFr--ToHit/EndRdx(34), GssSynFr--Build%(37)
Level 32: Savage Leap -- SprBrtFur-Dmg/Rchg(A), SprBrtFur-Acc/Dmg(33), SprBrtFur-Acc/Dmg/Rchg(33), SprBrtFur-Dmg/EndRdx/Rchg(33), SprBrtFur-Acc/Dmg/EndRdx/Rchg(34), SprBrtFur-Rech/Fury%(34)
Level 35: Shield Charge -- Arm-Dam%(A), Arm-Dmg/EndRdx(36), Arm-Dmg(36), Arm-Dmg/Rchg(36), Arm-Acc/Dmg/Rchg(37), Arm-Acc/Rchg(37)
Level 38: Superior Conditioning -- PrfShf-End%(A)
Level 41: Physical Perfection -- Prv-Absorb%(A), RgnTss-Regen+(42)
Level 44: Focused Accuracy -- AdjTrg-ToHit/EndRdx/Rchg(A), AdjTrg-ToHit(45), AdjTrg-ToHit/EndRdx(45)
Level 47: Combat Jumping -- LucoftheG-Def/Rchg+(A)
Level 49: Super Jump -- BlsoftheZ-ResKB(A)
Level 1: Brawl -- Empty(A)
Level 1: Fury
Level 1: Sprint -- Empty(A)
Level 2: Rest -- Empty(A)
Level 1: Swift -- Empty(A)
Level 1: Health -- Pnc-Heal/+End(A), Mrc-Rcvry+(48)
Level 1: Hurdle -- Empty(A)
Level 1: Stamina -- PrfShf-End%(A), PrfShf-EndMod(3), PrfShf-EndMod/Acc(3), PwrTrns-+Heal(46)
Level 1: Blood Frenzy
Level 49: Double Jump
------------ -
On 7/26/2022 at 10:59 AM, Marshal_General said:
I though about that, since I have a mod which gets rid of most of the graphics(need one for rad armor). I don't know enough about tanker bio to judge how it would compare though the extra damage would be nice.
Bio, on a Tank, is sturdy. VERY Sturdy. You can soft cap most of your defenses, especially if you are in Defensive Stance. Every power in Bio is pretty much a must have. You'll also wasnt to chase recharge so you can get your 3 main "clickie" powers back ASAP. Check my sig for a quick explanation for Bio I wrote up some time back.
-
Here's my WP/Staff Tank. I went with Staff for a few reasons, one of which is at combo level 3, in Form of the Body, if you use Sky Splitter you gain a fairly nice boost to your Resistances. I was able to softcap my Defenses to F/C/E/N.E. With 1 mob fueling RttC, I regen 103.54 HP/Sec. Fully saturated I'm at 161.13 HP/Sec. With these Defenses and Resists, and healing that much per second, it's hard to take down. Against AVs, you can drop Darkest Night to further your survivability.
This Hero build was built using Mids Reborn 3.2.17
https://github.com/LoadedCamel/MidsRebornClick this DataLink to open the build!
Level 50 Magic Tanker
Primary Power Set: Willpower
Secondary Power Set: Staff Fighting
Power Pool: Fighting
Power Pool: Leadership
Power Pool: Leaping
Ancillary Pool: Soul MasteryHero Profile:
Level 1: High Pain Tolerance -- NmnCnv-Heal/Rchg(A), NmnCnv-Heal(3), NmnCnv-Heal/EndRdx(9), Prv-Absorb%(11), Prv-Heal(11), Prv-Heal/EndRdx(13)
Level 1: Mercurial Blow -- PndSlg-Acc/Dmg(A), PndSlg-Dmg/EndRdx(13), PndSlg-Dmg/Rchg(50)
Level 2: Mind Over Body -- UnbGrd-ResDam(A), UnbGrd-ResDam/EndRdx(15)
Level 4: Fast Healing -- NmnCnv-Heal(A), NmnCnv-Heal/EndRdx(5), NmnCnv-Heal/Rchg(5), Mrc-Rcvry+(7), Mrc-Heal(7), RgnTss-Regen+(9)
Level 6: Indomitable Will -- LucoftheG-Def/Rchg+(A)
Level 8: Rise to the Challenge -- NmnCnv-Heal(A), NmnCnv-Heal/EndRdx(15), NmnCnv-Heal/Rchg(17), NmnCnv-Regen/Rcvry+(17), NmnCnv-EndRdx/Rchg(19), NmnCnv-Heal/EndRdx/Rchg(19)
Level 10: Guarded Spin -- SprMghoft-Dmg/Rchg(A), SprMghoft-Acc/Dmg(39), SprMghoft-Acc/Dmg/Rchg(39), SprMghoft-Dmg/EndRdx/Rchg(39), SprMghoft-Rchg/Res%(40), SprMghoft-Acc/Dmg/EndRdx/Rchg(40)
Level 12: Quick Recovery -- PrfShf-End%(A)
Level 14: Kick -- Empty(A)
Level 16: Eye of the Storm -- SprGntFis-Dmg/EndRdx/Rchg(A), SprGntFis-Acc/Dmg/Rchg(36), SprGntFis-Dmg/Rchg(36), SprGntFis-Acc/Dmg(37), SprGntFis-Rchg/+Absorb(37), SprGntFis-Acc/Dmg/EndRdx/Rchg(37)
Level 18: Heightened Senses -- LucoftheG-Def/Rchg+(A), ShlWal-Def(21), ShlWal-Def/EndRdx(21), ShlWal-Def/Rchg(23)
Level 20: Staff Mastery
Level 22: Tough -- UnbGrd-Max HP%(A), GldArm-3defTpProc(23), StdPrt-ResDam/Def+(34), ImpSki-Status(34)
Level 24: Weave -- LucoftheG-Def/Rchg+(A), ShlWal-Def(25), ShlWal-Def/EndRdx(25), ShlWal-Def/Rchg(33)
Level 26: Maneuvers -- LucoftheG-Def/Rchg+(A), ShlWal-ResDam/Re TP(27), ShlWal-Def(27), ShlWal-Def/EndRdx(33), Rct-ResDam%(33)
Level 28: Tactics -- GssSynFr--Rchg/EndRdx(A), GssSynFr--ToHit/Rchg/EndRdx(29), GssSynFr--ToHit/Rchg(29), GssSynFr--Build%(31), GssSynFr--ToHit(31), GssSynFr--ToHit/EndRdx(34)
Level 30: Assault -- EndRdx-I(A)
Level 32: Combat Jumping -- LucoftheG-Def/Rchg+(A)
Level 35: Innocuous Strikes -- Arm-Dam%(A), SprAvl-Acc/Dmg(40), Arm-Acc/Dmg/Rchg(42), Arm-Dmg(42), SprAvl-Acc/Dmg/EndRdx(42), SprAvl-Acc/Dmg/EndRdx/Rchg(43)
Level 38: Sky Splitter -- SprBlsCol-Rchg/HoldProc(A), SprBlsCol-Dmg/EndRdx/Acc/Rchg(43), SprBlsCol-Acc/Dmg(43), SprBlsCol-Dmg/EndRdx(45), SprBlsCol-Acc/Dmg/EndRdx(45), SprBlsCol-Acc/Dmg/Rchg(45)
Level 41: Gloom -- Apc-Dmg/EndRdx(A), Apc-Dmg/Rchg(46), Apc-Acc/Rchg(46)
Level 44: Darkest Night -- DarWtcDsp-ToHitDeb(A), DarWtcDsp-ToHitDeb/EndRdx(46)
Level 47: Serpent's Reach -- Apc-Acc/Dmg/Rchg(A), Apc-Dmg(48), Apc-Dam%(50)
Level 49: Super Jump -- BlsoftheZ-ResKB(A)
Level 1: Gauntlet
Level 1: Brawl -- Empty(A)
Level 1: Sprint -- Empty(A)
Level 2: Rest -- Empty(A)
Level 2: Swift -- Empty(A)
Level 2: Hurdle -- Empty(A)
Level 2: Health -- Pnc-Heal(A), NmnCnv-Heal/EndRdx(31), Pnc-Heal/EndRedux(36), Pnc-Heal/+End(48), Pnc-Heal/Rchg(48), NmnCnv-Heal(50)
Level 2: Stamina -- PwrTrns-+Heal(A), PwrTrns-EndMod(3)
Level 1: Combo Level 1
Level 1: Combo Level 2
Level 1: Combo Level 3
Level 49: Double Jump
Level 20: Form of the Body
Level 20: Form of the Mind
Level 20: Form of the Soul
------------ -
On 7/12/2022 at 5:09 AM, smnolimits41 said:
Your Royal Highness !!!
Thats right i'm making a character based on Leia Organa. I want to make a Titan Weapons Tank, but i can't decide on a Jedi Primary. I feel i've done Super Reflexes to death. Any thoughts ??
I think WP/Katana would work for a Jedi. Here's one that has soft capped Defenses to Lethal/F/C/E/NE/Melee, with capped Resists to S/L. All while having over 3k HP and regenerating right at 94 HP/Sec with one foe in range (a fully saturated RttC would yield amost 152 hp/Sec). Once you get the Freedom Phalanx, Portal Jockey, Task Force Commander, and Atlas Medallion Accolades, you'll be looking at 3389 HP, and a fully saturated RttC getting you 170.6 HP/Sec. That's pretty darn tough to beat.
This Hero build was built using Mids Reborn 3.2.17
https://github.com/LoadedCamel/MidsRebornClick this DataLink to open the build!
Level 50 Magic Tanker
Primary Power Set: Willpower
Secondary Power Set: Katana
Power Pool: Fighting
Power Pool: Leadership
Power Pool: Leaping
Ancillary Pool: Soul MasteryHero Profile:
Level 1: High Pain Tolerance -- NmnCnv-Heal(A), NmnCnv-Heal/EndRdx(25), NmnCnv-Heal/Rchg(27), UnbGrd-ResDam(27), UnbGrd-ResDam/EndRdx(33), NmnCnv-Heal/EndRdx/Rchg(33)
Level 1: Sting of the Wasp -- PndSlg-Acc/Dmg(A), PndSlg-Dmg/Rchg(23), PndSlg-Dmg/EndRdx(23), TchofDth-Dam%(25)
Level 2: Mind Over Body -- UnbGrd-Max HP%(A), UnbGrd-ResDam(19), UnbGrd-ResDam/EndRdx(21), UnbGrd-Rchg/ResDam(21)
Level 4: Flashing Steel -- Erd-Acc/Rchg(A), Erd-Acc/Dmg/Rchg(17), Erd-Acc/Dmg/EndRdx/Rchg(19)
Level 6: Fast Healing -- NmnCnv-Regen/Rcvry+(A), NmnCnv-Heal(7), NmnCnv-Heal/EndRdx(9), NmnCnv-EndRdx/Rchg(9), NmnCnv-Heal/Rchg(15), NmnCnv-Heal/EndRdx/Rchg(17)
Level 8: Indomitable Will -- LucoftheG-Def/Rchg+(A)
Level 10: Rise to the Challenge -- NmnCnv-Heal(A), NmnCnv-Heal/EndRdx(11), Prv-Absorb%(11), Prv-Heal(13), NmnCnv-Heal/Rchg(13), Prv-Heal/EndRdx(15)
Level 12: Quick Recovery -- PrfShf-End%(A)
Level 14: Kick -- Empty(A)
Level 16: Tough -- GldArm-3defTpProc(A), GldArm-End/Res(33), StdPrt-ResDam/Def+(34), ImpSki-Status(34)
Level 18: Heightened Senses -- LucoftheG-Def/Rchg+(A), ShlWal-Def(34), ShlWal-Def/EndRdx(37), ShlWal-Def/Rchg(40), ShlWal-Def/EndRdx/Rchg(43)
Level 20: Build Up -- AdjTrg-ToHit/EndRdx/Rchg(A), AdjTrg-ToHit/Rchg(43)
Level 22: Weave -- LucoftheG-Def/Rchg+(A), ShlWal-Def(43), ShlWal-Def/EndRdx(45), ShlWal-Def/Rchg(46)
Level 24: Maneuvers -- LucoftheG-Def/Rchg+(A), ShlWal-ResDam/Re TP(46), ShlWal-Def(46), ShlWal-Def/EndRdx(48), Rct-ResDam%(50)
Level 26: Tactics -- GssSynFr--ToHit(A), GssSynFr--ToHit/EndRdx(50), GssSynFr--Build%(50)
Level 28: The Lotus Drops -- SprMghoft-Dmg/Rchg(A), SprMghoft-Acc/Dmg(29), SprMghoft-Acc/Dmg/Rchg(29), SprMghoft-Dmg/EndRdx/Rchg(31), SprMghoft-Acc/Dmg/EndRdx/Rchg(31), SprMghoft-Rchg/Res%(31)
Level 30: Assault -- EndRdx-I(A)
Level 32: Combat Jumping -- LucoftheG-Def/Rchg+(A)
Level 35: Soaring Dragon -- SprBlsCol-Acc/Dmg(A), SprBlsCol-Dmg/EndRdx(36), SprBlsCol-Acc/Dmg/EndRdx(36), SprBlsCol-Acc/Dmg/Rchg(36), SprBlsCol-Dmg/EndRdx/Acc/Rchg(37), SprBlsCol-Rchg/HoldProc(37)
Level 38: Golden Dragonfly -- SprAvl-Acc/Dmg/EndRdx/Rchg(A), SprAvl-Rchg/KDProc(39), SprAvl-Acc/Dmg(39), SprAvl-Dmg/EndRdx(39), SprAvl-Acc/Dmg/EndRdx(40), SprAvl-Acc/Dmg/Rchg(40)
Level 41: Divine Avalanche -- Hct-Acc/Dmg/Rchg(A), Hct-Acc/Rchg(42), Hct-Dmg/EndRdx(42), Hct-Dam%(42)
Level 44: Gloom -- Apc-Acc/Dmg/Rchg(A), Apc-Acc/Rchg(45), Apc-Dmg/EndRdx(45)
Level 47: Darkest Night -- DarWtcDsp-ToHitDeb(A), DarWtcDsp-ToHitdeb/Rchg/EndRdx(48), DarWtcDsp-ToHitDeb/EndRdx(48)
Level 49: Super Jump -- BlsoftheZ-ResKB(A)
Level 1: Brawl -- Empty(A)
Level 1: Gauntlet
Level 1: Sprint -- Empty(A)
Level 2: Rest -- Empty(A)
Level 1: Swift -- Empty(A)
Level 1: Health -- Pnc-Heal/+End(A), Pnc-Heal(5), Pnc-Heal/EndRedux(5), RgnTss-Regen+(7)
Level 1: Hurdle -- Empty(A)
Level 1: Stamina -- PwrTrns-+Heal(A), PwrTrns-EndMod(3), PrfShf-End%(3)
Level 49: Double Jump
------------ -
On 7/15/2022 at 10:33 AM, muggtonp said:
For reference, here's the build from a couple years ago (literally)
That's solid. One thing that I see is it looks like you only have 4 pts of KB protection. If you are in Form of the Body, and at Level 3 fire off Sky Splitter, it gives you a boost to your damage resistance. This, coupled with the MotT proc will EASILY cap all your resistances. Your lowest resistance will be Toxic, and it's still at 96.12% . You might be able to swap out and put 3 pieces of Gladiator's Armor for the KB protection. Or Drop 1 Shield Wall (End/Recharge) from Cloak of Darkness and put in the Karma: Knockback Protection.
-
I'm not sure if I wouldn't build a Bio/Dark like this... I'd take Ageless for the DDR (on any Bio tank).
This Hero build was built using Mids Reborn 3.2.17
https://github.com/LoadedCamel/MidsRebornClick this DataLink to open the build!
Level 50 Magic Tanker
Primary Power Set: Bio Armor
Secondary Power Set: Dark Melee
Power Pool: Leaping
Power Pool: Fighting
Power Pool: Speed
Ancillary Pool: Soul MasteryHero Profile:
Level 1: Hardened Carapace -- StdPrt-ResDam/EndRdx(A), UnbGrd-ResDam(5), UnbGrd-ResDam/EndRdx(7), UnbGrd-Rchg/ResDam(7)
Level 1: Shadow Punch -- Hct-Dam%(A), Hct-Acc/Dmg/Rchg(9), Hct-Acc/Rchg(9), Hct-Dmg/EndRdx(11)
Level 2: Inexhaustible -- NmnCnv-Regen/Rcvry+(A)
Level 4: Shadow Maul -- SprMghoft-Dmg/Rchg(A), SprMghoft-Acc/Dmg(11), SprMghoft-Acc/Dmg/Rchg(13), SprMghoft-Dmg/EndRdx/Rchg(13), SprMghoft-Acc/Dmg/EndRdx/Rchg(39), SprMghoft-Rchg/Res%(39)
Level 6: Environmental Modification -- LucoftheG-Def/Rchg+(A), LucoftheG-Def(39), LucoftheG-Def/EndRdx(40), LucoftheG-Def/Rchg(40), LucoftheG-Def/EndRdx/Rchg(40)
Level 8: Adaptation
Level 10: Super Jump -- Empty(A)
Level 12: Ablative Carapace -- Mrc-Heal/EndRdx/Rchg(A), Prv-Heal/Rchg/EndRdx(25), Mrc-Heal/Rchg(42), Prv-Heal/Rchg(42)
Level 14: Evolving Armor -- UnbGrd-Max HP%(A), UnbGrd-ResDam(15), UnbGrd-ResDam/EndRdx(15), UnbGrd-Rchg/ResDam(37)
Level 16: Siphon Life -- SprBlsCol-Rchg/HoldProc(A), SprBlsCol-Dmg/EndRdx/Acc/Rchg(17), SprBlsCol-Acc/Dmg(17), SprBlsCol-Dmg/EndRdx(36), SprBlsCol-Acc/Dmg/EndRdx(36), SprBlsCol-Acc/Dmg/Rchg(37)
Level 18: DNA Siphon -- Erd-Acc/Rchg(A), Erd-Dmg(19), Erd-Dmg/Rchg(19), Erd-Acc/Dmg/Rchg(23), Erd-Acc/Dmg/EndRdx/Rchg(34), Erd-%Dam(36)
Level 20: Touch of Fear -- FuroftheG-ResDeb%(A), FuroftheG-Acc/Dmg(21), CldSns-Acc/ToHitDeb(21), CldSns-ToHitDeb/EndRdx/Rchg(23)
Level 22: Kick -- Empty(A)
Level 24: Tough -- GldArm-3defTpProc(A), GldArm-End/Res(25), ImpSki-Status(34)
Level 26: Genetic Contamination -- SprAvl-Acc/Dmg/EndRdx/Rchg(A), SprAvl-Acc/Dmg(27), SprAvl-Rchg/KDProc(27), SprAvl-Dmg/EndRdx(33), SprAvl-Acc/Dmg/EndRdx(33), SprAvl-Acc/Dmg/Rchg(33)
Level 28: Soul Drain -- Erd-Acc/Rchg(A), Erd-Dmg/Rchg(29), Erd-Acc/Dmg/Rchg(29), Erd-Dmg(31), Erd-%Dam(31), Erd-Acc/Dmg/EndRdx/Rchg(31)
Level 30: Weave -- LucoftheG-Def/Rchg+(A), ShlWal-ResDam/Re TP(43), ShlWal-Def(43), ShlWal-Def/EndRdx(43), Rct-ResDam%(45)
Level 32: Parasitic Aura -- TchoftheN-Acc/Heal(A), Mrc-Heal/Rchg(34), TchoftheN-Acc/EndRdx/Rchg(37), Mrc-Heal/EndRdx/Rchg(45)
Level 35: Dark Consumption -- Erd-Acc/Rchg(A), Erd-Acc/Dmg/EndRdx/Rchg(45), Erd-Acc/Dmg/Rchg(50)
Level 38: Midnight Grasp -- SprGntFis-Dmg/EndRdx/Rchg(A), SprGntFis-Acc/Dmg/Rchg(46), SprGntFis-Dmg/Rchg(46), SprGntFis-Acc/Dmg(48), SprGntFis-Rchg/+Absorb(48), SprGntFis-Acc/Dmg/EndRdx/Rchg(48)
Level 41: Gloom -- Thn-Acc/Dmg(A), Thn-Acc/Dmg/EndRdx(42), Thn-Dmg/EndRdx/Rchg(46)
Level 44: Darkest Night -- DarWtcDsp-ToHitDeb(A), DarWtcDsp-ToHitdeb/Rchg/EndRdx(50), DarWtcDsp-ToHitDeb/EndRdx(50)
Level 47: Hasten -- RechRdx-I(A)
Level 49: Combat Jumping -- LucoftheG-Def/Rchg+(A)
Level 1: Brawl -- Empty(A)
Level 1: Gauntlet
Level 1: Sprint -- Empty(A)
Level 2: Rest -- Empty(A)
Level 1: Swift -- Empty(A)
Level 1: Health -- Pnc-Heal/+End(A), RgnTss-Regen+(5)
Level 1: Hurdle -- Empty(A)
Level 1: Stamina -- PrfShf-End%(A), PwrTrns-+Heal(3), PwrTrns-EndMod(3)
Level 8: Defensive Adaptation
Level 8: Efficient Adaptation
Level 8: Offensive Adaptation
Level 10: Double Jump
-------------
1
-
-
1 hour ago, Infinitum said:
Not N E more. 😀 i just needed the light shown to me is all - then I re-made it my own way. Had to unlock willpower the same way.
WP is another strong powerset.
-
1
-
-
On 7/19/2022 at 2:17 PM, Infinitum said:
Awesome! Thanks, with some help collaborating with @Myrmidon i think i have a fairly durable Bio Armor framework now. Its probably going to take the #1 spot honestly. That is to say until it gets nerfed - which is likely. But we can delve into the awesomesauce until that day. 😎
If all goes as planned i should post tonight.
I've sung the praises of Bio since day 1, and people thought I was crazy. 🤪
-
1
-
-
The only scrapper I have is an Energy Melee/Ninjitsu. It is a solid choice. With Energy Melee, it's mainly ST damage, but WOW! The crits are insane! And while it's mainly ST, Ninjitsu gives you enough defense to dodge most attacks while you're slaughtering mobs one by one. The Heal and the +end recovery are Godsends, as they recharge just quick enough that you'll have them up when needed.
The most fun part about this combo is seeing when ET or TF crit, and you brag to your teammates about doing 1200-1500 points of damage (or more). It's flashy enough to keep your interest, but not a "I'm the absolute best ever and nothing will kill me". It's nice having a bit of a challenge. It keeps the blood pumping. Will you die? Maybe. But IF you do, you can guarantee that you made it difficult for the enemy to do so, and you took several baddies with you.
I've been thinking about making another scrapper. However I'm almost afraid I'll be disappointed in any other combo.
global name is Scarlett Angel
-
1
-
-
Does Irradiated Ground (Rad Melee) interact with Fury?
-
My main is a WP tank. If I were you, I'd try to fit in the Impervious Skin: Status Resistance/Regen. That alone will give you an extra 25% to your Regeneration rate. Also, the Unbreakable Guard: +Max HP greatly benefits WP also. You could drop Stamina down to just 2 slots (I have Power Transfer: Chance to Heal Self and Power Transfer:End in mine). This will give you a chance to heal some of your hit points, plus give you +6 % to your regen rate).
Strength of Will only had a duration of 120 seconds, and recharges in 300 seconds. I did not take it on my Tank. You could mule it and put the Unbreakable Guard: +Max HP and the Impervious Skin: Status Resistance/ Regeneration in it.
Soul Mastery works well with WP. Have you thought about taking it instead of Mu? Gloom is a solid attack, and when things get rough, you could drop Darkest Night on a target. If you slotted it with 3 pieces of Dark Watcher's Depair, that'd give you an extra 22.29 HP, +2.5% End Recovery, and debuff the enemies' damage by 21% and their To Hit by -15.95% ( which would really help WP out).
Just a few things I saw at first glance. On my tank, I focused on Max HP, Regen, Defenses. Off the top of my head, I believe he has soft capped Defenses to F/C/E/NG, close to capped S/L resists, and a fully saturated RttC gets my Regen rate up to 205 HP/Sec. WP definitely benefits from the accolades that give +Health.
- x
Whatever happened to Fire/Rad trollers???
in Controller
Posted
My main was a fire/rad troller on Live. I wrote a few guides on it. I solo'd every GM in the game back then. And when HC resurrected our city, i made her again.
It's a powerhouse for sure.