stryve
-
Posts
33 -
Joined
-
Last visited
Content Type
Profiles
Forums
Events
Store
Articles
Patch Notes
Everything posted by stryve
-
Focused Feedback: Various Power Updates
stryve replied to The Curator's topic in [Open Beta] Focused Feedback
I've been playing around with comparative testing with my Storm/SR Sentinel off and on since build one, just to get a feel for the proposed changes. Per Player-1 Sentinels were not affected by the Storm Cell bug, so that has not colored my experiences. The toon is level 50, with full IO sets and Tier 4 Incarnates for everything but Judgement. For context, I actually enjoy Storm Blast as it stands on Live, in spite of it's shortcomings. I realized early on just how much the set incentivizes using primarily it's own powers to increase the rate of Storm Cell and Cat 5 procs, so I went Sentinel with a non-clicky armor (in addition to just plain liking Sentinels in general and SR in particular). Things tend to scatter under Cat 5, , but the armor lets me dive into the middle of groups to keep their attention, and Sentinel Ancillary Pools have a good selection of AoE Immobilize powers to mitigate spread (I went with Chain Fences for theme, and also the fast animation). Finally, Storm Cell is slow and has unreliable target selection so I built for recharge to be able to recast it at need (this also lets me keep Cat 5 up almost constantly, and use Intensify often). Most of my comparative testing has been Peregrine Radios for equivalent groups, so Arachnos and Carnies. However, for a more controlled comparison I ran the first few missions in Levantera's "Join The Vanguard" arc at +4x8 this morning. I have found that the proposed changes are an improvement over Live in most every metric, with combat feeling smoother and groups being cleared more quickly. However, RC3 is a significant step back from previous builds. The Storm Cell strike lockout increasing from 1 to 2 seconds, and Cat 5 strike lockout increasing from 5 to 6 seconds, is very noticeable. Especially when a group starts getting down to just the surviving hard targets. The normalization of damage between Storm Cell procs may also have an effect here: it's a minor buff for the Spread proc, but a minor decrease for Split and a major reduction for Focused. Additionally, the increased odds for additional targets as a fight goes on is a little hard to parse out what is actually happening. How quickly do the odds increase? Do the odds reset when Storm Cell is recast? At least with the damage and lockout normalized between procs it won't matter if you have fewer than 4 targets, since it doesn't matter which hits them. As an anecdote, last week (RC1) I was running Carnie Radio missions on Live then comparing to Beta. At the time, it felt noticeably smoother and faster on Beta than Live, which was satisfying. Later I realized I had Notoriety set to +3x8 on Live, but +4x8 on Beta. After RC3 came out I tried again, and felt about the same or maybe a bit less effective on Beta compared to Live, but that time both were set to +3x8. The last thing I wanted to discuss is Chain Lightning. I'm not the best at picking individual effects out of the scrum, especially when things get as busy as Storm Blast does at high levels, so I don't often notice how well it's performing. There's lot less going on at low levels, so it was easier to see what was happening during the Posi 1 and 2 I ran on Live with some friends yesterday. I definitely noticed missing the first target several times, which does feel pretty bad. On the other hand, I also noticed several instances of the chain spreading through an entire group stung out along a passage, which was pretty amazing. A really well placed ranged cone might have been able to pull something similar off but not easily, and cones have a lower target cap anyway. That said, I'm pretty sure it wouldn't have happened at all with a 10ft jump radius; every time I saw it happen there were multiple gaps that would've been too wide. In summary the increased Accuracy is great to help prevent disheartening misses, and the reduced Recharge makes attack chains a little smoother, but the decreased Jump Distance is going to hurt a lot in anything but a tightly packed group (I'm not familiar enough with chain mechanics to comment on decay, delay, and fork changes). -
Focused Feedback: Arsenal Control
stryve replied to The Curator's topic in [Open Beta] Focused Feedback
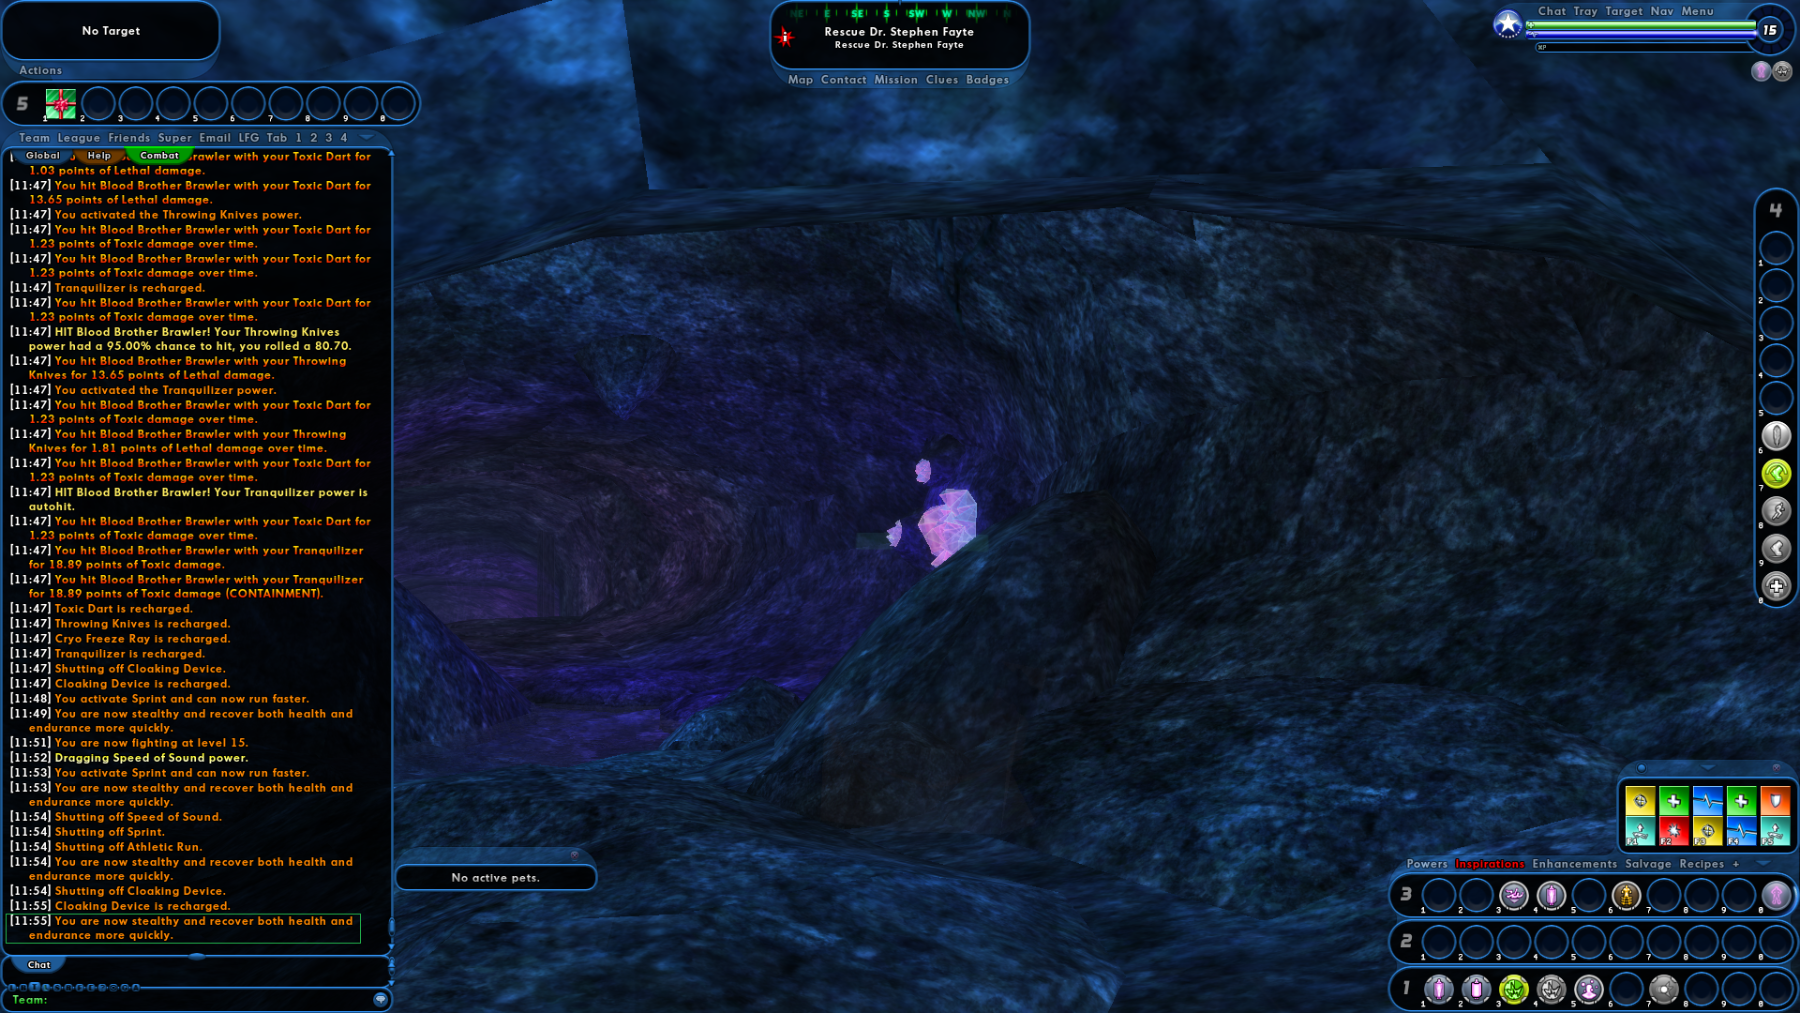
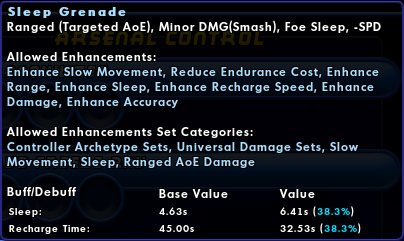
Did some more Sleep Grenade testing at both low and high levels on Release Candidate 2. First, I finally had the Combat Log open when Sleep Grenade failed to trigger: looks like there's a To Hit check when Sleep Grenade is fired, and if it misses nothing else happens. 95% chance to hit with one +3 Acc SO, so it's no wonder we weren't seeing it often. Also posted over in Bug Reports. Decided to see what Sleep Grenade looked like right out of the box, so I went Street Sweeping in Atlas Park at level 4. Only a single Acc SO slotted here. A little dicey on such a large group, but it worked. Next jumped to level 5 so I could slot one Sleep and one Recharge SO as well. This went a lot more smoothly. Still have to be wary of Bosses, or other Sleep resistant mobs, but still pretty smooth. Also at level 5, 0x4 Lost with Bosses. (not shown is the first try against this group, where Sleep Grenade missed and I didn't notice. Que frantic fleeing). Jump up to level 10 to see how things work with Liquid Nitrogen. I reiterate: still have to be wary of Bosses. Especially when there's two in a group. The rest of the group was held up enough to recover, though. 0x4 Hellions with Bosses. Last of the low level tests was my old nemesis (not to be confused with Nemesis), Vazhilok. Sleep Grenade really showcased it's improvements over Build 4 here, though Smoke Canister helped as well. Level 16 0x4 Vazhilok with bosses, though none in this group. On the high end, I started with a +1x8 Safeguard Mission. The Arachnos bank robbers were a bit too frantic of a fight to showcase Sleep Grenade, so I went and found a nice group of Carines outside. Deliberately restricted myself to just Smoke Canister, Liquid Nitrogen, and Sleep Grenade until most of the group was down. +1x8 Carnival of Shadows with bosses. Next I took on the new Council. Didn't restrict myself as much here, but still shows how much of a group can be shut down just with Arsenal Control. +1x8 Council with bosses. Finally, an unrestricted run against new Circle of Thorns at max difficulty. +4x8 Circle of Thorns with bosses. Overall I have to say Sleep Grenade is now in a pretty good place. With only minor slotting it's very reliable at low levels, and remains useful all the way to end game (though I still prefer slotting for Slow rather than Sleep at 50). This obviously will be subjective, depending on playstyle and player preference. I haven't tested things with a team yet, but I expect it to be at least as effective as Static Field from Electric Control, which I do consider worth using in teams. I saw some complaints early on about damaging sleeps, but personally I like that three of the five AoE powers in Arsenal Control can reliably trigger Smoke Canister's Confusion. Only Smoke Canister itself and Tear Gas can't. It wouldn't really make sense for the former, and the recharge is too long to pull it off anyway. For the later, there isn't much use for Confusion when the enemies are busy purging their last three meals. -
Pretty minor, but looks like some text was left over from "Devices - Field Operative" when Clocking Device is activated.

-
Finally remembered to have the Combat log open and caught it on video on RC2. Looks like there's a To Hit check when Sleep Grenade is fired, and if it misses everything else cancels. I had a single +3 Acc SO slotted today, which gave 95% chance to hit, and only saw it miss a handful of times this morning. I saw it more yesterday with no Acc slotted, but that may have just been bad rolls as I didn't think to check the combat logs..
-
Focused Feedback: Arsenal Control
stryve replied to The Curator's topic in [Open Beta] Focused Feedback
Aha, all my testing was done yesterday and earlier this morning; took me a while to get videos uploaded and the post written. Just ran the update and hopped back on: I am happy to report sleep is no longer suppressing KD and damage for Liquid Nitrogen. I can also report that Sleep Grenade is no longer taking several seconds on average to actually apply Sleep. I am still seeing the glitch where Sleep Grenade just kinda cancels itself without triggering anything, though. Won't be able to upload new video until tomorrow, but the visuals haven't changed from my post to the Bug Thread: Something I forgot to mention in my last post: I was seeing the double damage for Containment on targets in Sleep Grenade with Tranquilizer, Cryo Freeze Ray, and Toxic Dart even before todays update. Now I also saw a big "Containment" notification. I keep forgetting to check the Combat Logs, so that's just what displays onscreen. -
Focused Feedback: Arsenal Control
stryve replied to The Curator's topic in [Open Beta] Focused Feedback
I completely missed that patch note, and was going off experience with previous builds. This did inspire me to do some more dedicated testing of Sleep Grenade, and I'm afraid I have to report that it is currently suppressing KD and damage for Liquid Nitrogen. First, Sleep Grenade followed by Liquid Nitrogen, with my fully kitted level 50: Then, Liquid Nitrogen followed by Sleep Grenade on a level 17 with SOs: As can be seen, as long as the target is asleep Liquid Nitrogen has no effect. This is also true for Tranquilizer, though I didn't get video of that. I also tested general effectiveness against a wide variety of groups, with both my level 50 IO and level 15-17 SO builds. Overall, it seems to work better than I expected for the level 50, considering I have it slotted for Slow, with Intuition Radial Alpha. Possibly the extra -Run Speed keeps them from running out of the patch as much. As a disclaimer, I was deliberately pausing to see what happened after firing off Sleep Grenade in most of these videos. That said, it's still not a reliable opener. Some enemies are more resistant, or you just get a string of bad rolls. The level 15-17 was even less consistent, probably due to lack of available slots. I admit, the early encounters with Vazhilok loom large in my memory. More of an emotional response, but it definitely affected my opinion of Sleep Grenade. I also tried out combining Smoke Canister with Sleep Grenade. The combination does work, but there's more chance of leakers than Smoke Canister with Liquid Nitrogen, from what I've seen. I have an encounter with the new high level Council that demonstrates that clearly, with Warwolves just charging straight at me. Unfortunately I ran into my daily upload limit before getting to that video. @ShinMagmus: I can't blame you for feeling that way. Sleep Grenade had utility while leveling with SOs to help cover Recharge gaps in the other AoE controls, but it was relegated to backup as soon as Liquid Nitrogen became available. On my full IO build it's mostly there for the set bonuses; the only time I've used it in regular gameplay (not counting all the specific testing I just went over) was Exemplared down for Posi 1, and to stack Slow on Clamor at the end of Yin. -
Was playing around with Sleep Grenade, and finally caught this on video. Only noticed it once in 10-15 applications.
-
Focused Feedback: Arsenal Control
stryve replied to The Curator's topic in [Open Beta] Focused Feedback
I feel like my experience has been somewhat different than other frequent posters here, and after watching a few videos I think it's down to build and playstyle. So, rather than try to describe it in text, I finally took the time to figure out how to record and upload video. Here's my own test build running the first mission of Yin at 0x8. As I've mentioned before, if you can encourage flying enemies to stay close to the ground, they'll still be affected by Liquid Nitrogen; you can see a Super Stunner do flips a couple times in the first group. Otherwise, the Stun from Flash Bang combines fairly well with the Slow and KD from Liquid Nitrogen to keep things in the patches. The Confuse from Smoke Cannister helps too, since they are more likely to turn on each other than start running. That said, sometimes mobs just run, and flying mobs are the worst for that. First group I lead with Smoke Cannister, Liquid Nitrogen, Flash Bang, then cycled powers at range. Second and third groups I added Tear Gas in so I could close and use Traps. I didn't use Sleep Grenade here at all since it wasn't needed, and also because it turns off KD/Damage in Liquid Nitrogen. I did continue the TF, and didn't run into any major trouble until the Reactor Core ambushes. Had to eat a few greens and re-summon Tri-Cannon once during that, due to losing track of details in the crush. Once the adds were cleared I used every Slow I had to keep Clamor from running around too much (the combined -Run Speed was very noticeable) and eventually wore her down. Took 97 minutes to complete, which is pretty long for a TF that often takes 30 minutes with a PUG, but this has never been a fast set. I find that Smoke Cannister is a good opener, since it doesn't notify. Following up with Liquid Nitrogen, Flash Bang, or even Sleep Grenade tends to trigger the Confuse on everything but bosses immediately. Mobs on the leading edge sometimes start running towards you after triggering the follow up but before it impacts, which can get them out of the area, but Tri-Cannon usually takes care of them. As for Release Candidate 1, I didn't notice any real difference from Build 4. Possibly that's because I wasn't seeing the psuedo-pet accuracy issues others have reported, which again comes down to build style. I tend to favor set-bonuses over procs and hate missing, so I usually slot for accuracy anyway. Comments about psuedo-pets not inheriting Global Accuracy buffs (like Tactics) just reinforced that choice. I also agree that adding -Fly to a single target Hold is of limited utility; it works to keep individual mobs from hovering out reach for Melee powers, but generally by the time you manage to target and hit an escaping mob it's already out of the patches. Plus, it's often Held anyway. Sometimes between animation and travel times, it ends up Held out of range from your current position (though this is a more common problem with Teleporting mobs, which isn't limited to Arsenal Control). -
Focused Feedback: Arsenal Control
stryve replied to The Curator's topic in [Open Beta] Focused Feedback
Decided to try out a Posi 1 with my existing test build, so fully slotted. 0x4 because I wasn't sure how much I could handle at that level and didn't want to be at it all day. Quickly found that Sleep Grenade isn't very effective slotted for Slow when Exemplared down like that, as the Sleep pulse duration tends to be too short to keep most mobs asleep natively. Also, Attuned Slow sets don't enhance Slow enough at that level; the difference between -50% and -60% Run Speed is pretty negligible. Swapped Ice Mistral out for Call of the Sandman midway (both chosen for Global Recharge), and got a lot more utility. In retrospect SOs or plain IOs might have done better, since 15 is below the cutoff for most set bonuses. Did have trouble with runners in large groups, especially the ambushes at City Hall; fortunately they all came back. Oddly, the Shadow Simulacrum seemed to use a lot more Traps than Arsenal powers. Overall conclusion: Clockwork have annoying interactions with Knock, Ruin Mages suck, and 3 Eidolons at once is too many. Did notice some interesting interactions between Sleep Grenade and Smoke Canister, so I went back to PI and ran a few more Radios at +3x4, +4x4, and +4x8. Ended up with Council once and CoT twice. End Result: the initial damage from Sleep Grenade will consistently trigger Confusion on enemies in the Smoke cloud (Minions and Lieutenants; Bosses tend to have more Mez Protection). Many mobs start fighting each other before falling asleep, which results in them staying in the Gas long enough for the ~4 second delay on the first Sleep pulse. Some just fall asleep, but some get woken up by their own damage and attack each other in a chain reaction. Also doesn't matter so much if Tri-Cannon starts waking mobs up, since they tend to attack whatever is closest (each other). This can be effective, but I find I still prefer Liquid Nitrogen and Flash Bang for the extra damage. Also tested out Sleep Grenade by itself for thoroughness: just about anything that stays in the Gas long enough will eventually fall asleep. This obviously works better with ranged mobs, since they stand there shooting instead of charging out of the Gas. On another note, as best I can tell Liquid Nitrogen was pretty much a straight clone of Ice Slick in Build 1: 30 second duration with 151 ticks with each tick having 8% chance for KD and 75% chance for around .5 damage. Even checked City of Data to make sure, and that's what Ice Slick is doing on Live. Since Wet was rolled back, the only change to Liquid Nitrogen in Build 4 is greatly increasing the base damage per tick, but setting it to only trigger if the KD does. 8% chance to KD does seem low, until you consider the check happens 5 times per second. Generally should see around 12 flops over the duration for individual mobs (barring KB Protection; darn Shield Generator Shadow Simulacrum). Further thoughts on the set in general: Could use more Slow to help thing stay in patches. Flying mobs can zip off for parts unknown more or less at will without specific attention. Oddly, if they're near the ground they still take damage from Liquid Nitrogen; Stunned enemies tend to not go straight up, so Flash Bang helps there. Of the five AoE powers, only Sleep Grenade can reduce cool down enough to match duration without extensive Global Recharge bonuses. Tear Gas probably can't at all, but that's no different than other AoE holds on Control sets. In some ways it's better off, since it's a 45 second duration patch. Can be a very safe set when things go well, but that can turn very quickly with bad rolls or choosing the wrong time to use a power. When it does, there's a fair chance all AoE controls will be on cooldown. Secondary powers will have to fill the gaps there. I find Liquid Nitrogen to be safer than Arctic Air just because it can be used from beyond most mobs aggro range (at least it can with Cloaking Device). Seeds of Confusion isn't as clear a choice: more powerful Confuse in exchange for a 50 foot cone, as opposed to a 80 foot range ground patch. Damage potential is on the low end for Controllers, short of abusing procs. Which would likely lower the effectiveness of the various soft controls, and therefore general survivability. Not my usual build style, so I can only speculate here. Another argument for high Global Recharge. Solo large groups will probably take more than a minute to whittle down, requiring multiple casts of 30 second duration powers. In teams you'll probably need to stagger activations just to have SOMETHING available every group, much like Traps. -
Focused Feedback: Arsenal Control
stryve replied to The Curator's topic in [Open Beta] Focused Feedback
Ran through my usual testing cycle with a Arse/Traps Controller again. Normal leveling to 10, then skipping 5 levels between mission to 50. SOs only, except for the usual Endurance Management IOs in Health and Stamina (and a KB/BD in Temporal Bomb, eventually). First few levels are basically unchanged: the extra Slows don't make much difference against Minions and Lieutenants at very low levels. Not sure how much was the improvements in Build 4 and how much was my just getting better with the set, but I bumped difficulty to 0x4 with Bosses by Level 4. Sleep Grenade is back to doing negligible AoE damage as a patch, but the flexibility of placement is nice; easier to catch a whole group this way. Still taking up to 4 seconds before mobs start falling asleep, though. Other reviews here and my own previous experiences have brought me around on Liquid Nitrogen as a damage dealer in addition to soft control. It does work well to whittle down Minions. Except Clockwork, those either just go flying with a single tick or ignore it. At 15 I ran a Banished Pantheon mission and discovered they resist most everything I do at that level really well. At least the Husks are already slow, so they don't tend to run out of the patches. But doing barely any damage with Cold, Toxic, and Smash/Lethal made it quite a slog. 20 and 25 didn't see any major shifts, just slowly added capability with Flash Bang and Tear Gas. Still opening with Smoke Cannister, then Liquid Nitrogen, then cycling powers until the group is down. Can only get those two powers (and Flash Bang) to around 45 seconds recharge with SOs, so there's a gap. I compensated by watching the recharge numbers to fire off Sleep Grenade a little before they'd time out, moving to Tear Gas as available at 25. At 30 I had access to Tri-Cannon and suddenly things seemed to be going a lot faster. First run was 0x4 Council, so to be sure I took on Freakshow at 0x6 and still did fine. Between the added single target DPS and taking aggro off of me, Tri-Cannon made a very noticeable difference. I had all my desired Primary and Secondary powers by 30, so 35 to 40 were just picking up a few Pool Powers and filling out enhancement slots. 35 went about the same as 30, but by 40 the extra enhancements (plus Leadership Toggles) had added up enough that I tried 0x8 Carnies. I was riding the edge, but only died to the first group (two Master Illusionists summoned all their pets on top of me, and I didn't react fast enough). I continued at 0x8 for 45 and 50; enemies including the new Council and Arachnos. Definitely had to pay attention or things could go south very quickly, but it was doable. Sleep Grenade was the only Arsenal patch that didn't have a recharge gap, so cycling powers at an offset to cover those gaps was necessary. Traps was mostly defensive here, except for Acid Mortar and Seeker Drones. Warwolves and many Banes are functionally immune to Slow (Immobilize as well, so that wouldn't change things), so they often escaped the patches and ran up on me. Retreating behind Tri-Cannon usually resulted in them diverting off of me, which with the Traps made it manageable. Next I respeced and slotted IO sets, with a preference for Global Recharge bonuses. Managed to get Smoke Canister, Liquid Nitrogen, and Flash Bang to right around 30 seconds. That let me keep the patches up more or less permanently. Firing off all three in sequence will get most of a group thoroughly disrupted (mostly Confused, Stunned, and flopping with Containment). Tear Gas and Sleep Grenade get thrown in for extra debuffs when things start going wrong (or just because large groups of vomiting enemies are amusing). I ran several missions, culminating in +2x8 Carnies, which again was difficult but doable. Most trouble came from very hard hitting enemies killing me faster than I could react, or getting distracted and losing control of the fight. Finally, I slotted full Incarnates and turned things up to +4x8, but not solo Archvillains. First mission was a Safeguard, so Malta, Carnies, and Arachnos. Charged straight for the bank, and it turned out Ghost Widow had come out this time. Even as an EB she's pretty tough, especially with a mob of Boss Bane Spiders backing her up. Still, I managed to not die (barely). After I finished in the bank I took on a few Malta groups just to see; went pretty well, but I was targeting Sappers first. Exited after that and ran several more Radios, all Arachnos for maximum difficulty. The first was a save the hostage in blue caves, which went smoothly until the end when I couldn't finish the ambushes fast enough and got overwhelmed by multiple groups. That mass sent me back to the hospital several times before I cleared it out. Might have been able to do better with more caution, or just being more on the ball with power use. Continued on with Arachnos on an Office map, which keeps groups in more concentrated blocks. Had to be very careful, especially with hard hitting bosses, but I was able to wear them down consistently. That said, it wasn't anything close to fast; I was using Smoke Cannister and Liquid Nitrogen 2 or 3 times for every group, and usually ended up with at least some on top of me by the end. Overall this does seem to be the best version so far. Pretty sure the Slows have been increased in general, and adding Slow to Tranquilizer and Cryo Freeze Ray helps against harder targets. That said, flying enemies can just take off in open maps (Sky Raiders are especially bad for that), and Tear Gas is the only tool in the set that can do anything about it. I'll probably add more observations later, but I've lost track of things over the course of writing this up. -
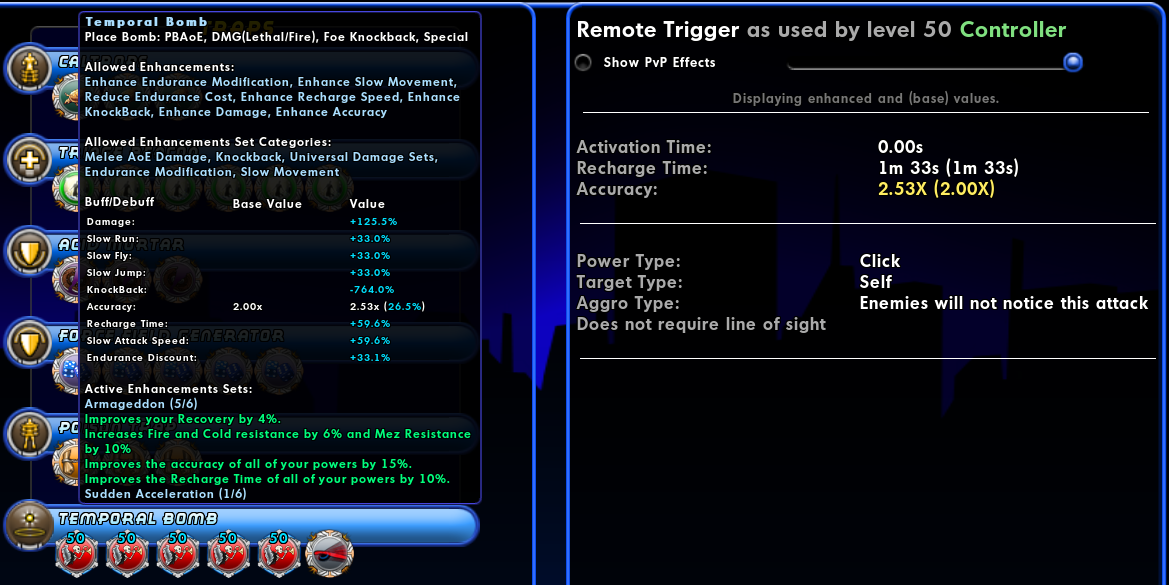
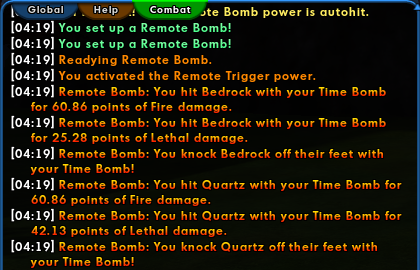
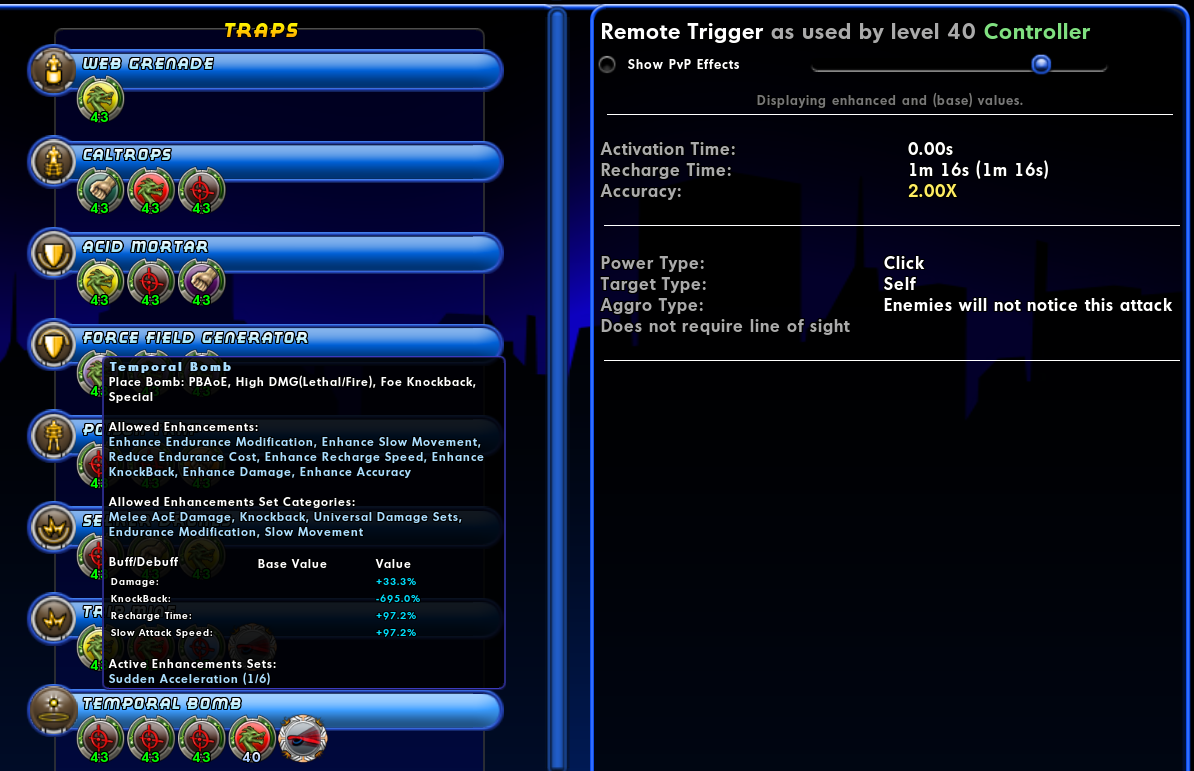
Temporal Bomb is lacking almost any details in the Power Details window, and the Enhancement Details mouseover only shows percentages for everything but Accuracy. Additionally, the Pet Combat Logs refer to Temporal Bomb as both Time Bomb and Remote Bomb.
-
fixed Tri-Cannon Not Following Between Floors
stryve replied to UrbanHound's topic in [Open Beta] Bug Reports
Tri-Cannon failed to follow me between floors on standard Office Maps a few times yesterday. It also didn't follow me into the bank on a Safeguard Mission, but I'm pretty sure it was just fighting all the Malta I ran past. -
Occasionally Sleep Grenade will impact, the cloud will come up, and then immediately fade. Looks almost like the cloud is sinking into the floor. As best I can tell, the Sleep and Slow effects are also ending early in these cases. Only happening maybe once in 10 uses of the power, I think. Harder to tell in higher levels due to Smoke Cloud, Tear Gas, etc. I have seen it happen with both manual selection of power/location and "powexec_location target" keybind.
-
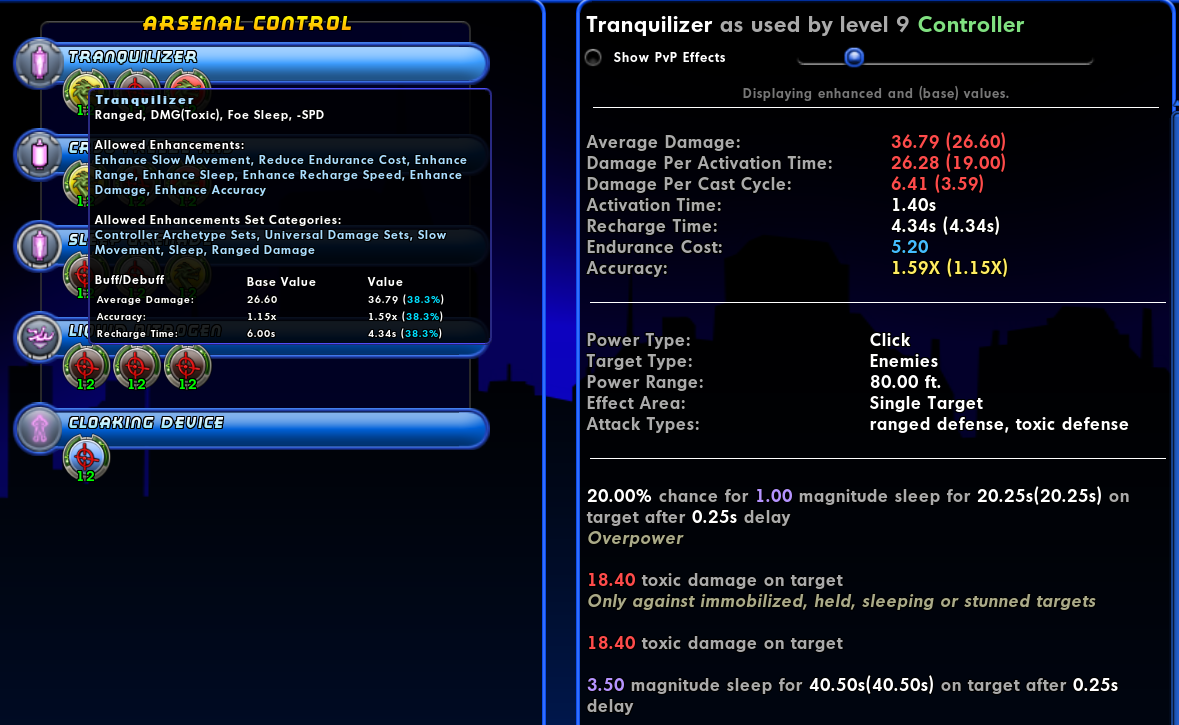
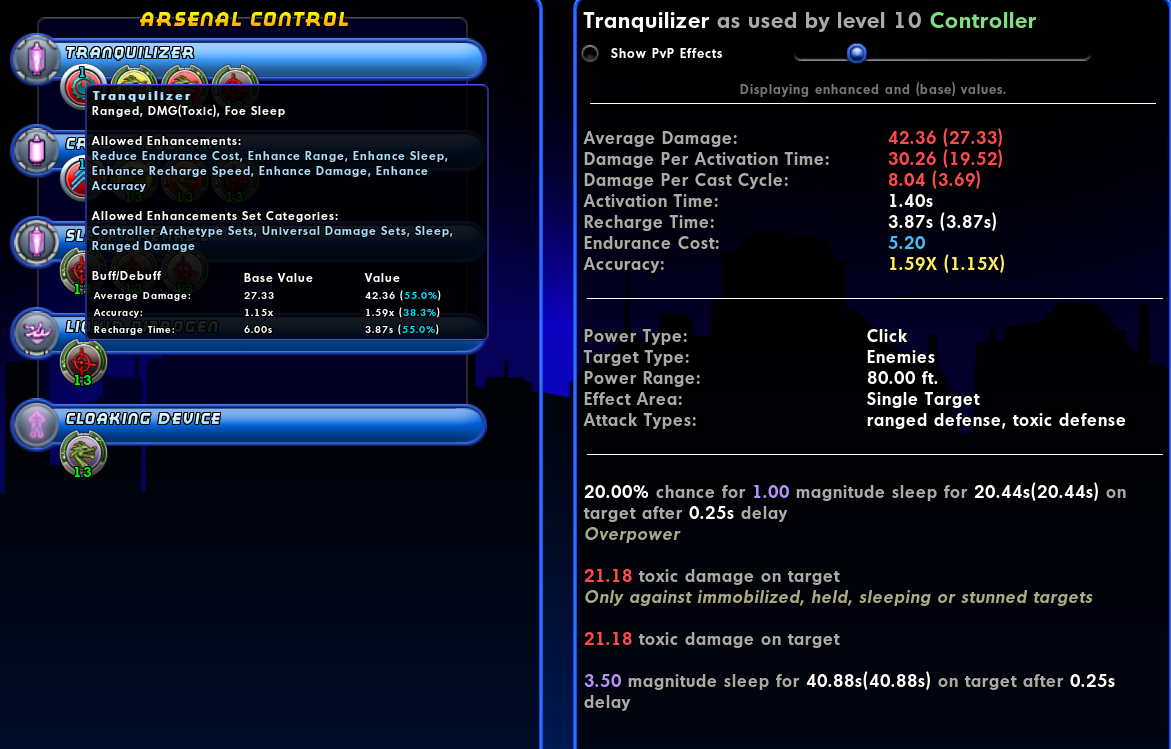
Controller - Arsenal Control - Tranquilizer Damage Values
stryve replied to stryve's topic in [Open Beta] Bug Reports
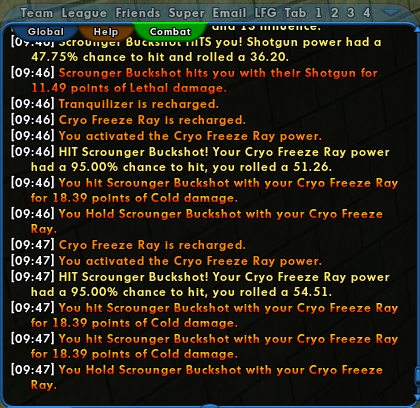
Still seeing this in Build 4. Combat Logs and Power Details for Tranquilizer: Compared to Combat Logs and Power Details for Cryo Freeze Ray:
-
Focused Feedback: Arsenal Control
stryve replied to The Curator's topic in [Open Beta] Focused Feedback
I jumped up to level 15 for continued testing, and am no longer concerned about the interaction between Liquid Nitrogen and Smoke Canister. Seems to be working just as well as in build 2. Also, and I feel like I should have already known this, Trolls tend to be resistant to many forms of mez. This includes Sleep, but thankfully not Confuse. -
Focused Feedback: Arsenal Control
stryve replied to The Curator's topic in [Open Beta] Focused Feedback
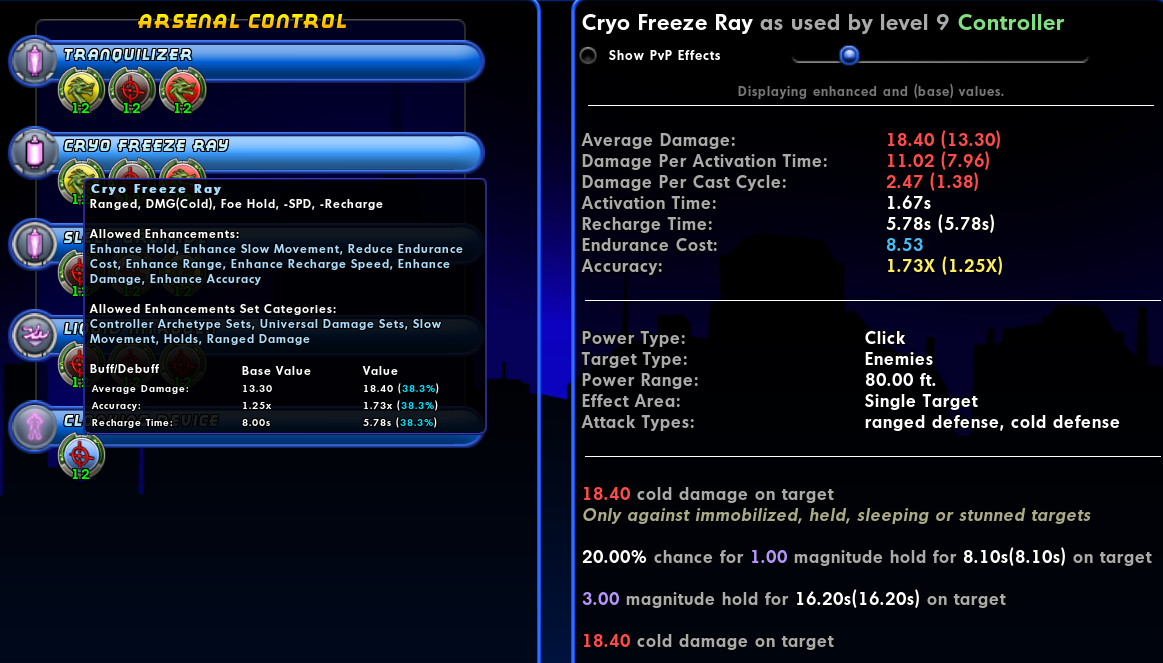
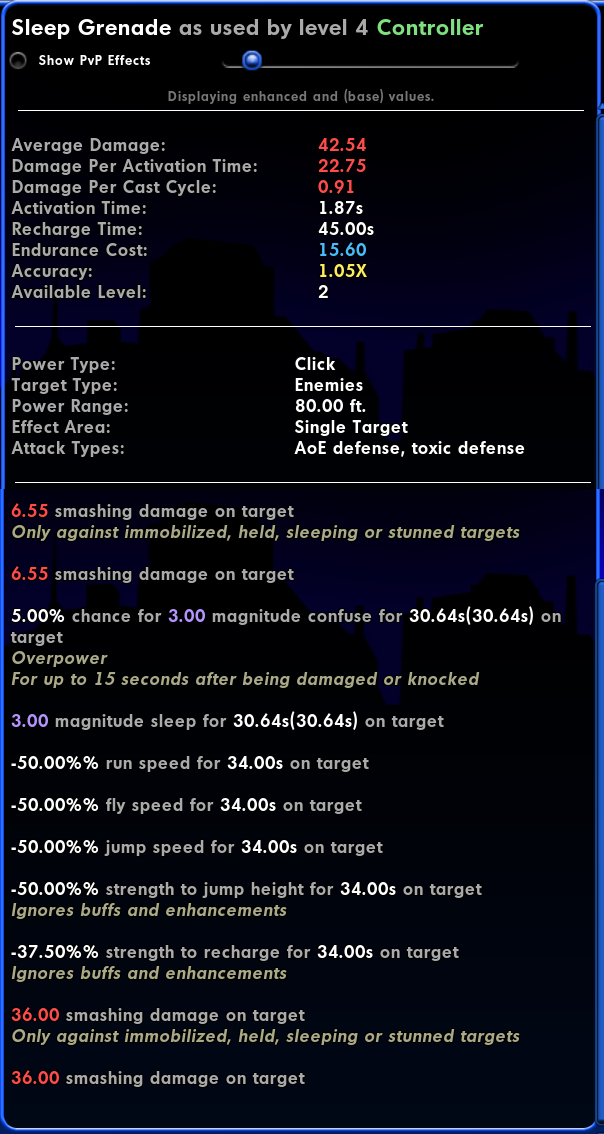
A third build, and a third toon taken from 1-10. Again, just the Prestige Enhancements and SOs, no 2XP, etc. The first few levels are pretty much the same as build 2: increasing the damage of Tranquillizer and moving Cryo Freeze Ray to T2 definitely feels like the right choice for very low levels. Tranquilizer is still showing the wrong damage numbers in Power Details, but I already reported that in Beta Bug Reports last build. Then I hit level 4 and could pick up that most controversial of powers, Sleep Grenade. It took me a while to parse what's going on with this power now, and the Power Details column wasn't a huge help. Here's the Details for the power a level 4 Controller, unenhanced: What I've managed to put together is that there are actually three separate areas of effect. First, the power must be targeted at a single enemy, and that target gets hit by a large amount of Smashing Damage (presumably to represent being clocked by the grenade). This really is a high damage attack, doing nearly four times the base damage of Tranquilizer and Cryo Freeze Ray, and does proc off of Containment. Next is a low radius (best guess is under 8 feet) AoE for a small amount of Smashing Damage, which does seem to also hit the initial target. This also procs off of Containment Third and last is the outer radius (maybe 15-20 feet? Seems to be less than Liquid Nitrogen, anyway) which creates Slow and pulsing Sleep patch. The total duration of the patch seems to be ~30 seconds, with the Slow lasting a little longer. The patch also has a chance of Confuse on subsequent hits, which I have seen be activated by the small radius damage AoE in a single cast of the power. I suspect the Sleep pulse is on a 4-second cycle, so one each of Recharge and Sleep SOs at +3 get it right to the edge of recasting before the patch times out, in theory. Unfortunately in practice, there is a hiccup. As mentioned by others, the patch seems to time out when the body of the initial target despawns. This happens even if the target has run out of the patch, though the patch itself remains stationary. I'm not certain this is intended, but I've started leaving the initial target alive to maximize patch uptime. The other problem is that it can take mobs in the cloud up to 4 seconds from the impact of the grenade to fall asleep (I timed it; this combined with the listed Base Sleep duration is why I think it's on 4-second pulse cycle). This is not a case of Sleep being canceled by Damage, as enemies outside the damage radius show the same behavior. Even with the Slow, 4 seconds is plenty of time for a significant chuck of a group to run out of the patch. Enhancing Accuracy and Sleep did seem to help with that a bit, and both the time to Sleep and the tendency to run varies by enemy type. Some types seem to be affected more quickly, and some are inclined to fire off a ranged attack before charging into melee, which leaves them in the patch longer. Next up is Liquid Nitrogen. I'm somewhat conflicted on this implementation. Thematically, it makes sense that enemies take Smashing Damage while falling over, and only while falling over. Mechanically, it's unreliable with only 8% chance to KD. On a very fast tick, sure, but still. The listed damage is quite misleading, since you're extremely unlikely to see anywhere near a full 151 ticks of damage. Really, Liquid Nitrogen is in an odd place (much like the obvious inspiration, Ice Slick). The main reason to take and use the power is for soft control through Slow and KD, which cannot be enhanced. The damage was always a nice bonus, but not worth investing into. Now the potential damage is a lot higher, and it might be worth it to boost it further just so things get hit harder in the brief moments damage procs, but anything with KB resistance is going to be affected a lot less overall. As is it's disproportionately effective against Minions, so I guess it works well to clear out chaff while you concentrate on the harder targets. There's also a certain amount of anti-synergy with other powers in the set. Generally Slows work better when stacked, but everything else about both Sleep Grenade and Liquid Nitrogen disincentives using them together. Traps lets me get around that a little with Caltrops if I have a tight grouping I want extra Slowed, and if a Boss happens to be Held/Slept the single target damage from Sleep Grenade with Containment can be worth it. The fact both Tranquilizer and Cryo Freeze Ray disable the KD, and therefore any extra damage on targets you're focusing on, is also a little annoying. I haven't gotten that far yet, but I have concerns on how things are going to interact with Smoke Cannister and Tear Gas. The last Arsenal Control power so far, taken at level 8, is Cloaking Device. I've seen complaints about this power being included in the set, and it does feel a little odd in a set very obviously skewed towards Natural Origins. On the other hand I've found it to give great utility for basically no investment as a solo Controller. Not having to worry about accidentally running around a corner into a big mob lurking just out of sight is nice, and even a small amount of Defense All is always welcome. Leave it a single slot with Endurance Reduction and it's fine until/unless you want another spot to stick Defense Sets. My level 10 pick was Toxic Dart from Experimentation to round out my single target rotation. Damage is about equal to Tranquilizer and Cryo Freeze Ray, and it is affected by Containment, but mostly chosen to stick closer to Natural theme.
-
Wentworth History Buff Badge message pane issue
stryve replied to Perfidy's topic in [Open Beta] Bug Reports
The same message popped up for Hero Corps Insider. The badge was awarded in the correct location.
-
Focused Feedback: Arsenal Control
stryve replied to The Curator's topic in [Open Beta] Focused Feedback
I completed my journey to level 10 on my Arsenal/Traps Controller, but two extra levels didn't see a lot of changes: playstyle is still the same and won't change significantly until Smoke Canister comes along. One thing I'd neglected to mention previously is the utility of Cloaking Device. Being able to look peek around corners without being immediately jumped helps a lot, as does being able to fully scout out a group to pick the best initial angle and target of attack. Or just bypassing 90% of the map in favor of heading straight to the objective. I've accidentally run into mobs without them noticing me. After hitting level 10, I shifted to skipping five levels, playing a mission or two to get a handle on things, then repeating. I did this all the way to 50 using mostly SOs with a handful of IOs (KB/KD for Trip Mine and Temporal Bomb in Traps, plus the usual Endurance management procs Health and Stamina. By the end I could manage +0x8 Radios without much trouble. Smoke Canister: Great power, full stop. The increased radius is helpful for mobs that aren't tightly clustered, which is common. Smoke Canister followed by Liquid Nitrogen was my best opener as soon as it became available and remained so all the way to 50, with the plethora of soft controls heavily mitigating enemy response. Still have to be aware of what you're fighting though: high perception mobs such as Rularuu Sentries, Rikti Drones, and most Sniper types are likely to spot you through the smoke and engage before you're ready. I had trouble with Nemesis in particular, since their Snipers are functionally immune to Stealth and Perception debuffs, while Jaegers are highly resistant to KD. At least the Slows worked. Flash Bang: Decent AoE Stun, good synergy with Smoke Canister for extra -To Hit as well as activating the Confuse. Works well as an alternate opener if Liquid Nitrogen is on recharge, otherwise just throw out as needed while working over a group. First source of enduring AoE Containment. Tear Gas: As mentioned elsewhere, it's a standard long-recharge AoE Hold. Good when it's available, which is never as often as I'd like. Occasionally I'd open with it followed by Cryo Freeze Ray to lock down a hard target. The -Damage is a nice bonus, but 20 seconds duration is too short to be worth much on a base 4 minute recharge. Tri-Cannon: Very straightforward and bare bones pet, but it does what it's designed to do and it does it very well. The only attack isn't especially hard hitting, but it recharges fast enough damage stacks up quickly. This in turn helps get, and hold, agro with it's built in taunt, which means fewer things shooting at the squishy Controller. Finally, a good HP pool and base 80% resist to everything from it's Auto Turret power lets it survive that attention without much trouble (admittedly Force Field Generator form Traps helped here as well). One thing I haven't seen mentioned elsewhere is the pretty comprehensive suite of Mez Protection, Mez Resist, and DeBuff Resist also included in the Auto Turret power. That doesn't cover Regen or Recovery debuffs, but everything else (including Recharge, To-Hit, and Defense debuffs) is pretty much maxed out. Plus some extra Perception tacked on, just because. Over all not enough to steal Best Pet from Singularity, but definitely a contender for second place. -
Noticed while testing that the mouse-over popup for enhancement details on Tranquilizer, as well as the Average Damage, seems to be displaying the total value with Containment.
-
Focused Feedback: Arsenal Control
stryve replied to The Curator's topic in [Open Beta] Focused Feedback
After the Build 2 update, I decided to ran another Arse/Traps Controller from 1-10 again, no Double XP or Prestige attacks. I did use the Prestige Enhancements this time, in addition to SOs. Only made it to level 8 so far, mostly running 0x3 with bosses. Overall, it's not nearly as safe a journey with the change to Sleep Grenade, since the set no longer has a reliable way to shut down large groups. On the other hand, it also doesn't feel like as much as a slog, with Cryo Freeze Ray moving to T2 and Tranq Dart increasing in damage (The Origin attack fall-off adjustment has helped as well). So you have to be ready to run, but as long as you're careful most groups go down faster. First, Tranq Dart is now reliably applying Sleep to targets. I even saw it Sleep bosses a few times, with that chance of extra magnitude. I usually open with Cryo Freeze Ray to more solidly lock a mob down, but if that misses or I'm just in that part of the rotation when I switch targets it's nice to get Containment on the next cycle. Just after picking up Sleep Grenade it lasted long enough to take out a single even or +1 con Minion before the rest wake up, and then recharged before I could finish off a second, whereupon I promptly putt the survivors back to sleep to continue whittling them down. This cycle is riskier with some enemies than others (looking at you, level 6 Vazhilok). By level 8, with two Recharge SOs and a Sleep SO, most mobs only get a shot or two off before Sleep Grenade can be applied again. Liquid Nitrogen remains very effective, but uptime is always going to be an issue at low levels. I don't think any Controller secondary brings enough AoE to take out largish groups before it times out, and there's just no way to get the recharge down far enough until later in the build. Plus, mobs sometimes manage to stay on their feet long enough to fire off an attack or two, which can be dicey with some groups (darn Cadaver swarms). Finally, if Liquid Nitrogen is out Sleep Grenade is only worth using for the extra Slow and a bit more damage spread around, everything is immediately woken. Personally I do find that worth it, but it's definitely subjective. -
Focused Feedback: Various Power Updates
stryve replied to The Curator's topic in [Open Beta] Focused Feedback
Finally got to try out Temporal Bomb on Controller, and overall I do like the power. Seems to be effective at everything it's suppose to do (buff, debuff, and damage). Placing it effectively can be tricky, but I have enough soft and hard control on the toon to pull it off consistently. The second click to detonate after placing is pretty fun too, though that's obviously subjective. I do have a couple questions, though. First, here does not seem to be any way to see what the actual values for the power are. In the Enhancement screen, you get percentage change on mouse over. and basically nothing but Recharge and base Accuracy in the Details column. On a related note, Slow Attack Speed is showing as being Enhanced by Recharge Enhancements. Is that intended? If so, awesome! If not, better to learn now than after it goes live.
-
Focused Feedback: Arsenal Control
stryve replied to The Curator's topic in [Open Beta] Focused Feedback
To be clear, I was not very excited by Arsenal Control on the first pass through the patch notes. But, after reading that Sleep Grenade is a long lasting patch that works like Static Field, I decided to give it a shot. I haven't had as much time to test as I had planned this week, but I did manage to work my way up to level 10 doing regular missions on a Arse/Traps Controller. Nothing from the P2W vendor, only using SOs, and nothing but Web Grenade from Traps so far. Overall, I've found this to be a very safe toon. Web Grenade from Traps helped a lot for Containment for the first few levels, I was able to bump my Notoriety to 0x3 without any major issues once I picked up Sleep Grenade, and Cryo Freeze Ray let me turn on Solo Bosses. That said, I definitely wouldn't recommend the set for beginners. Placement, target selection, and understanding the mechanics involved are pretty critical to success. Binds/macros help a lot too. Of course, that could be said for Controllers in general, but I think it's more pronounced here. The range on Sleep Grenade let's me hit a group before they've noticed me (Cloaking Device make this even better, and helps if you need to run), which so far has put almost everything to sleep immediately. From there, focus down targets until the group is finished, then repeat. A single Recharge SO gets Sleep Grenade to just over 30 seconds recharge, combined with one Sleep SO most things get off maybe one attack before going back to sleep. Initially Web Grenade was very useful to set up Containment and keep things from running out of the patch once woken, but once I had Cryo Freeze Ray I could just open with that. Bosses of course are priority targets; cycle powers at them until something stacks enough to stick. Of the enemies I've faced so far (Hellions, Skulls, Circle of Thorns, Lost, Council) the ones that have given the most trouble are Lost bosses and Council Marksmen: both are resistant to Sleep, and both have Slows in their attacks. Having an entire group wake up because Sleep Grenade took and extra 10-20 seconds to recharge is unpleasant. Liquid Nitrogen works pretty well as a backup though, or just for things that didn't get caught in the first place. At this point I could probably go to 0x4 or more without much trouble if I didn't risk running out of endurance in longer fights. Controllers in general are low on damage, but even my Ice/Cold didn't feel quite this anemic early on. Hopefully that will improve as I get more powers from both sets. -
Greetings, and (belated) welcome to CoH! In general I agree with what FupDup and drbuzzard have said, but I figured I could expand on that. First, the Homecoming Wiki is a great resource with lots of articles and general information. I recommend checking it out for more in depth questions, if you haven't been able to find answers here on the forums. Now, let's try to go over some terms. Alpha Power: As FupDup said, this is the first of the Incarnate Powers which can be unlocked after reaching level 50. The Incarnate System is... complex, so I'd recommend looking up a dedicated guide or visiting the Wiki. One thing to remember is that Incarnate Powers are only active at an effective level of 45 or higher. So if you join up with a lower level team for whatever reason (low level Task Force, Flashback Arc from Ouroboros, etc), your Incarnate Powers will be inactive. Procs: Many IO (Invention Origin) sets include an Enhancement that have a chance to produce an additional effect when the power they are slotted into activates. A lot of them cause extra damage (such as the Chance for Energy Damage in the Positron's Blast set), but there are many other effects as well. This isn't strictly limited to IO Enhancements either; basically anything that causes "Chance of X" on power activation can be considered a proc. Soft caps: As noted by FupDup, this refers to the point of diminishing returns for increasing Defense stats. Roughly 45% for normal content, 59% for Incarnate content, and possibly higher for Hard Mode content. Mule powers: Again, FupDup explained this clearly. Some powers aren't chosen to be used, but instead just to carry a particular enhancement/set of enhancements. X set vs. Y set: This is a very subjective topic. IO sets give bonuses for slotting more of the same set in the same power, but what bonuses varies wildly. Additionally, sets have a variety of level ranges: 10-50, 10-30, 20-40, 30-50, etc. Generally the higher the level the larger the enhancement given, but a slightly lower base enhancement might be worth it for the set bonuses, especially as total value of enhancement of a particular stat (Defense, Recharge, Damage, Endurance Reduction, etc) approaches the maximum. In the end it comes down to what you are looking for, and what you can afford to buy. On a related note, Set Bonuses are lost when a character exemplars more than three levels below the level of the Enhancement. Something to be aware of when playing lower level content. Uniques: Some IO sets have individual enhancements that can only be slotted once in a build. Generally slotting them gives a special bonus. Very Rare sets (Purples) can also only be slotted once, but aren't usually referred to in the same way. Mez: This refers to the various status effects that can be inflicted on a character. Hold, Immobilize, Disorient (Stun), Sleep, Confuse, Terrorize (Fear), Knock (Down, Up, Back), Repel, Teleport, Fly, Only Affect Self, Untouchable, Afraid (Fear), Taunt, Placate. Some crossover with Debuffs, especially Slow. Mez Protection: All mez powers include a Magnitude, most commonly between 1 and 3 though some are higher. Magnitude stacks with repeated application. If the total magnitude of mez is less than your Mez Protection (for instance, Sentinel Practiced Brawler grants 8.3 protection against most effects) you will completely ignore the effects. If the magnitude exceeds your Mez Protection, you will affected until it wears off. Mez Resistance: All mez powers include a duration. Resistance reduces the duration, so the effect will wear off sooner. This also makes it more difficult to stack Magnitude in order to overwhelm Mez Protection. Global Recharge: Anything that grants a recharge bonus across an entire build without actually counting as direct enhancement. Quickness from Super Reflexes, Haste from the Speed Power Pool, and Recharge Time set bonuses all count. Recharge Enhancement from Alpha Incarnate Powers do not, oddly. The Law Of Fives: While a character can slot the same (full or partial) set multiple times in different powers, they cannot benefit from more than five copies of each named set bonus of the exact same attribute and amount. The exclusion of more than five of the same bonuses is based on the name of the bonus and not its value. For example, a character can benefit from up to five global benefits of Luck of the Gambler: Defense/Increased Recharge Speed, which gives a global +7.5% bonus to Recharge Rate, as well as up to five set bonuses of +7.5% Recharge. That's because the first bonus is named "Luck of the Gambler: Recharge Speed" while the second is "Huge Recharge Bonus". One can find the magnitude and name of the bonus listed in the Combat Attributes window. (Pulled directly from the Wiki) Auto Fire: Under default control settings, holding the Shift Key while clicking on a power will set that power to automatically activate every time it recharges. This can only be done with a single power at a time. Not to be confused with Auto Powers, which are just always active without consuming Endurance and will not appear in your trays. I feel like there were few other things I wanted to include, but I've lost track of them at this point. Finally, some specific advice for a Water Blast / Super Reflexes Sentinel. I don't have much to add for Water Blast beyond what's already been said. I usually end up taking all but the first or second powers in a Sentinel Blast Set, but that's certainly not required. Super Reflexes on the other hand is probably my favorite armor set in general. In general I concur that only Elude is undesirable; it can be made into an 'o shit' button, but I don't find the trade offs to be worth it. I have seen some arguments for skipping Quickness, but can't put much stock in them. Flat 20% increase to Global Recharge plus a boost to Run and Fly speed, with no slot investment required, what's not to like? The set is a bit different on Sentinels than on other Archetypes, but consensus is the change is positive. The two main points of divergence are Master Brawler and Enduring (replacing Practiced Brawler and Lucky, respectively). Master vs Practiced: While I do recommend Master Brawler over Practiced Brawler, there are a few advantages to Practiced Brawler: Investment and total potential Mez Protection. Practiced Brawler is One Slot Wonder power, really only needing a single Recharge Enhancement for full value, which leaves more slots available for other powers. Additionally, Practice Brawler stacks with itself if the recharge is reduced enough (usually through sufficient Global Recharge bonuses) to activate again before the effect wears off. In extreme cases, it can even triple stack! The downside is that this only works because Practiced Brawler is a click power: you have to remember to take time out of your attack chain to activate it. Master Brawler on the other hand adds the same base level of Mez Protection/Resistance to your first two Defense Toggle, Focused Fighting and Focused Senses. This means that as long as those toggles are active you will have Mez Protection and Resistance, with no further power activation necessary. The Master Brawler click power instead grants you a variable level of Absorb Shield, which is a great 'oh shit' button and synergizes well with the rest of the set. The main downside is that if for some reason you drop your toggles (say, running out of Endurance, or accidentally selecting the wrong button), you lose your Mez Protection. On the mixed blessing side is that the Absorb Shield directly benefits from more Enhancement slots, and Heal/Absorb IO Sets have some good bonuses, which may mean fewer slots to allocate elsewhere. Enduring: Enduring is unique to Sentinel, more or less replacing Lucky from other Archetypes. It addresses two weaknesses of the Super Reflexes set: non-positional Psychic Defense and Endurance Recovery. Basically, there are few attacks that are not tagged for Positional Defense (Melee, Ranged, AoE) and will therefore completely bypass Super Reflexes defense values. Most of these attacks are Psychic, so the Psychic Defense from Enduring will cover that hole. However not all, or even most, Psychic attacks lack a Positional Defense; frankly it's pretty rare. Given the above, it may be more attractive to concentrate on enhancing the other side: Endurance Modification. Super Reflexes has three toggles you'll absolutely want, plus whatever others you pick up form Power Pools. Combined with with the costs of your attacks and such, your Endurance Recovery may not be able to keep up, especially when facing enemies that cause Endurance Drain (Malta Sappers, Freakshow, Arachnos Mu, etc). Running out of Endurance causes your toggles to drop, which is usually followed by a trip to the hospital. Just having the power is a pretty good boost, but is it enough? On the other hand, enhancing Defense also enhances Defense DeBuff Resistance, which means you shake off Defense Reduction debuffs a little faster. Your Mileage May Vary. The downside of Enduring verses Lucky is that you have no Auto power granting AoE Defense. The amount of AoE Defense granted by Evasion was increased to compensate, but that means you don't have any from SR until level 28. Additionally if you drop that toggle for any reason, all your AoE Defense goes with it. One often missed or misunderstood aspect of Super Reflexes is the Scaling Resist built into the three Auto Defense powers (for Sentinels Agile, Enduring, and Dodge). Each of these powers grants Damage Resistance to all except Toxic and Psychic, and the amount of Resistance granted increases as your HP declines (going from 0% to around +25% at maximum). This Resistance cannot be enhanced (you cannot slot Resistance enhancements or sets in those powers), but they do stack with each other, for a total of around 75% at maximum. Of course, the Sentinel Archetype has a hard cap of 75% Resist, so anything over that (due to set bonuses, Power Pools, buffs, etc) will be more or less wasted. Now, the tricky bit is that the Scaling Resist does not kick in until you are at 60% of Max HP, and doesn't max out until you are under 1% Max HP. That can mean that the upper limits don't help much, since you may not have enough HP left to take a hit even with the increased Resistance. There are two main ways around this. First is to get a base level of Resistance so you hit the hard cap before being quite so low on HP, which can usually be covered well enough by basic set bonuses without chasing it. Second is to to increase your Max HP since everything works on percentages, so you will have more total HP at the same percentage of Max HP. Unfortunately, Sentinel Max HP caps at 2088, and Super Reflexes doesn't include any easy way to increase your Max HP. This is where the synergy with Master Brawler comes in: Absorb Shields don't count towards current HP. So, you have a click power Absorb Shield that increases the amount granted the lower your HP is, combined with Damage Resistance that automatically increases the lower current HP is. It is entirely possible to have near max Damage Resistance ( 75% for Sentinel), soft capped Positional Defenses, and an ~1000 HP Absorb Shield. That won't make you invincible by any means, but it's a pretty potent combination. Master Brawler does have a base Recharge of 60 seconds and a duration of 30 seconds, but you shouldn't have much trouble getting the Recharge down to at under 30 seconds. Final random bit of advice. Super Reflexes has lots of spots to put Defense Enhancements, which means you have plenty of room for the special Defense Set Enhancements: Kismet 6% ToHit (Unique) Gift of the Ancients Def/7.5% Run Speed (stackable 5 times) Reactive Defenses Scaling Dam Res (3% - 13%) (Unique) Luck of the Gambler Def/7.5% Rech Time (stackable 5 times) Shield Wall TP Prot/5% Res(All) (Unique) Hope all this helps!
-
Ice Armor is generally considered to be the weakest of the Sentinel armor sets, and does have some glaring issues. That said, it can be made to work just fine, and I have an Energy/Ice Sent that I enjoy a lot. There is a pretty good overview of /Ice here, though I disagree on a couple points. Some highlights from my own experience are: Hoarfrost is great, but has a long recharge. If you can get the recharge to match the duration (120 seconds), it's even better. Wet Ice is your Mez Protection, so obviously take it as soon as possible. I do wish you could enhance the Def All portion, but on the other hand you don't have to invest any slots, so trade offs. Frigid Shield is a fast-cycling Absorb Shield like Instant Regeneration from Sentinel Regen, which should be great. Unfortunately it gives a very small amount of Absorb, even with heavy investment (89.6 at level 50 with Panacea 5 slotted). I have actually noticed it keeping me alive on multiple occasions, but I five-slotted it more as a mule than for the power itself. Moisture Absorption doesn't stack the Defense buff from multiple targets like Energy Absorption on other Archetypes. It does grab more Endurance from each target, so it's worth trying to hit a group anyway. I still slotted it for Def, since even a small boost to all Typed Def (except Psi) can help. Frost Protection is auto and gives +Max HP. Between this and Hoarfrost it doesn't take much to hit the Max HP cap, which of course means you'll survive longer. Icy Bastion is vastly preferable over Hibernate, in my opinion. It may make you Invulnerable, but it also doesn't lock you in block of ice. 35% Resist to all, 200% Recovery Rate, 400% Regeneration Rate, and more than doubling Mez Protection/Resistance for 30 seconds before any enhancement is pretty darn good. It cannot be made perma, but you can get around 33% uptime if you really try. Wet Ice, Permafrost, Frost Protection, and Frigid Shield all give Recharge Time Resistance; if you take all four, it adds up to 100% resistance. No Slows for you! You may want to invest in Power Pools that give extra survival. I always take at least Maneuvers from Leadership, but also went in for Tough and Weave from Fighting on this build which is much less common. Mitigation from your Primary can make a huge difference; Water Blast is decent for that with Hydro Blast and especially Water Burst at low levels, and Geyser later on. The enemy can't shoot you if they're picking themselves up off the ground. Similarly, Whirlpool can help keep them from closing to punch you in the face. I do also have a Water Blast Sentinel I've been playing up, so I'll probably add some about that later. For now, there's a pretty good overview of the current Sentinel set here.
-
Chiming in on the different power pools front, Teleport Target is a great one-slot utility power for getting Singularity where you want it to be. I never did manage to fit it into my own Grav/Time/Primal, but it works really well on my Grav/Kin/Psi. Teleport Target Singularity into position, Wormhole a group onto Singularity, then cycle your rotation into the fountain 'o mobs until they stop flopping. Just make sure both Wormhole and Singularity have KB-KD enhancements so mobs stay piled up instead of being tossed everywhere. Also be aware that the teleport Mag on Wormhole isn't high enough to effect a lot of +3/4 enemies, and the only way I know to get around that is an Ultimate Inspiration.