Makobola
-
Posts
40 -
Joined
-
Last visited
Content Type
Profiles
Forums
Events
Store
Articles
Patch Notes
Everything posted by Makobola
-
Looks like a Water/Cold Corrupter might fit your needs pretty well, AoE knockdowns, good debuffs and buffs with cold, and overall pretty strong for taking out enemy groups
-
Scrapper - AllDef - Stone Melee - Bio.mxd Softcapped defenses, procd fault
-
Electric Armor can cap Smash/Lethal/Fire/Cold/Energy resistances on a Brute, so it has that going for it; You could go Energy if you went scrapper
-
Are there any Brute builds that can solo AVs and GMs?
Makobola replied to meowkittyface's topic in Brute
You need to use things that have -REGEN, which, is usually the P2W store daggers that do -500% regen. It's a temporary power to help shunt their regen. The only one that might be able to counteract it with pure damage would be a Energy Melee since TF and ET hit so hard, but otherwise I don't think it's too easy without debuffs -
Chance for Increased Crit - Usually people use Jawbreaker or Crowd control, that way you can proc it for Shatter since that's the hardest hitting attack; The increased crit chance, doesn't matter as much since it raises by a flat rate; you could put that into your t1/t2
-
Where there's smoke
-
@Kodo From what Onlyasandwich said, there are other options that would be superior in terms of hoverblasting. Fire Manipulation tends to be best when you are playing a blapping playstyle that gets in close combat due to how good having two PBAoE auras and Burn is. Burn is literally one of the best damage aoes Tac has good self-buffs and oil slick, so you can have 3 area effect pits with Oil slick, bonfire, rain of fire
-
@Kodo You have to take ring of fire, it looks like you did something weird on the power selection, so that means you'll have to lose a power somewhere. You can basically just play fully ranged anyway though if hover blasting. You seem to be missing gladiator's armor +3% defense That would bring you to the 45% softcap I believe You could then add either more slow resistance or move those slots from Fire Sword into getting Numina's +Reg/Rec, Miracle +rec, and a Endurance Mod in Stamina
-
Blaster - DefR - Fire Blast - Fire Manipulation.mxd This is one with Ranged defenses; its sort of hard to go pure DPS because for that you want to proc slow some stuff, but for blaster specifically because your base damage is so high it's kind of better to get bonuses. Unless you plan on spamming enrages. Should have enough +recovery to not need to worry
-
Electric Armor lets you hit the resistance cap for S/L/E fairly easily, and F/C if you invest a bit more into it. So that could tend to push yourself more towards Tanker/Brute to take advantage of that EM has really good single target, and a brute with its inherent will definitely do more damage,(and AoE aura) but tanker just comes with a larger AoE, and that is sometimes nicer to use.
-
You're welcome. Enjoy! Titan Weapons was my favorite by far till the nerf hammer, but it still slaps pretty well
-
Scrapper - AllDef - TravelSS - End - TW - Bio.mxd Here she ish. I only do Arc - Whirling - Follow Through - Rend - Whirling - repeat for AoE; with bosses being targetted, Arc - Follow - Crush - Rend - Follow for single target. Moonbeam comes in between the momentum I made this with more endurance recovery, but they can all be siphoned off to get more recharge in Ablative and Parasitic.

-
You might have Parasitic aura turned on and that much haste seems like you have either ageless turned on or two force feedback procs set on Mids, which, it doesn't stack from what I recall and just refreshes the duration
-
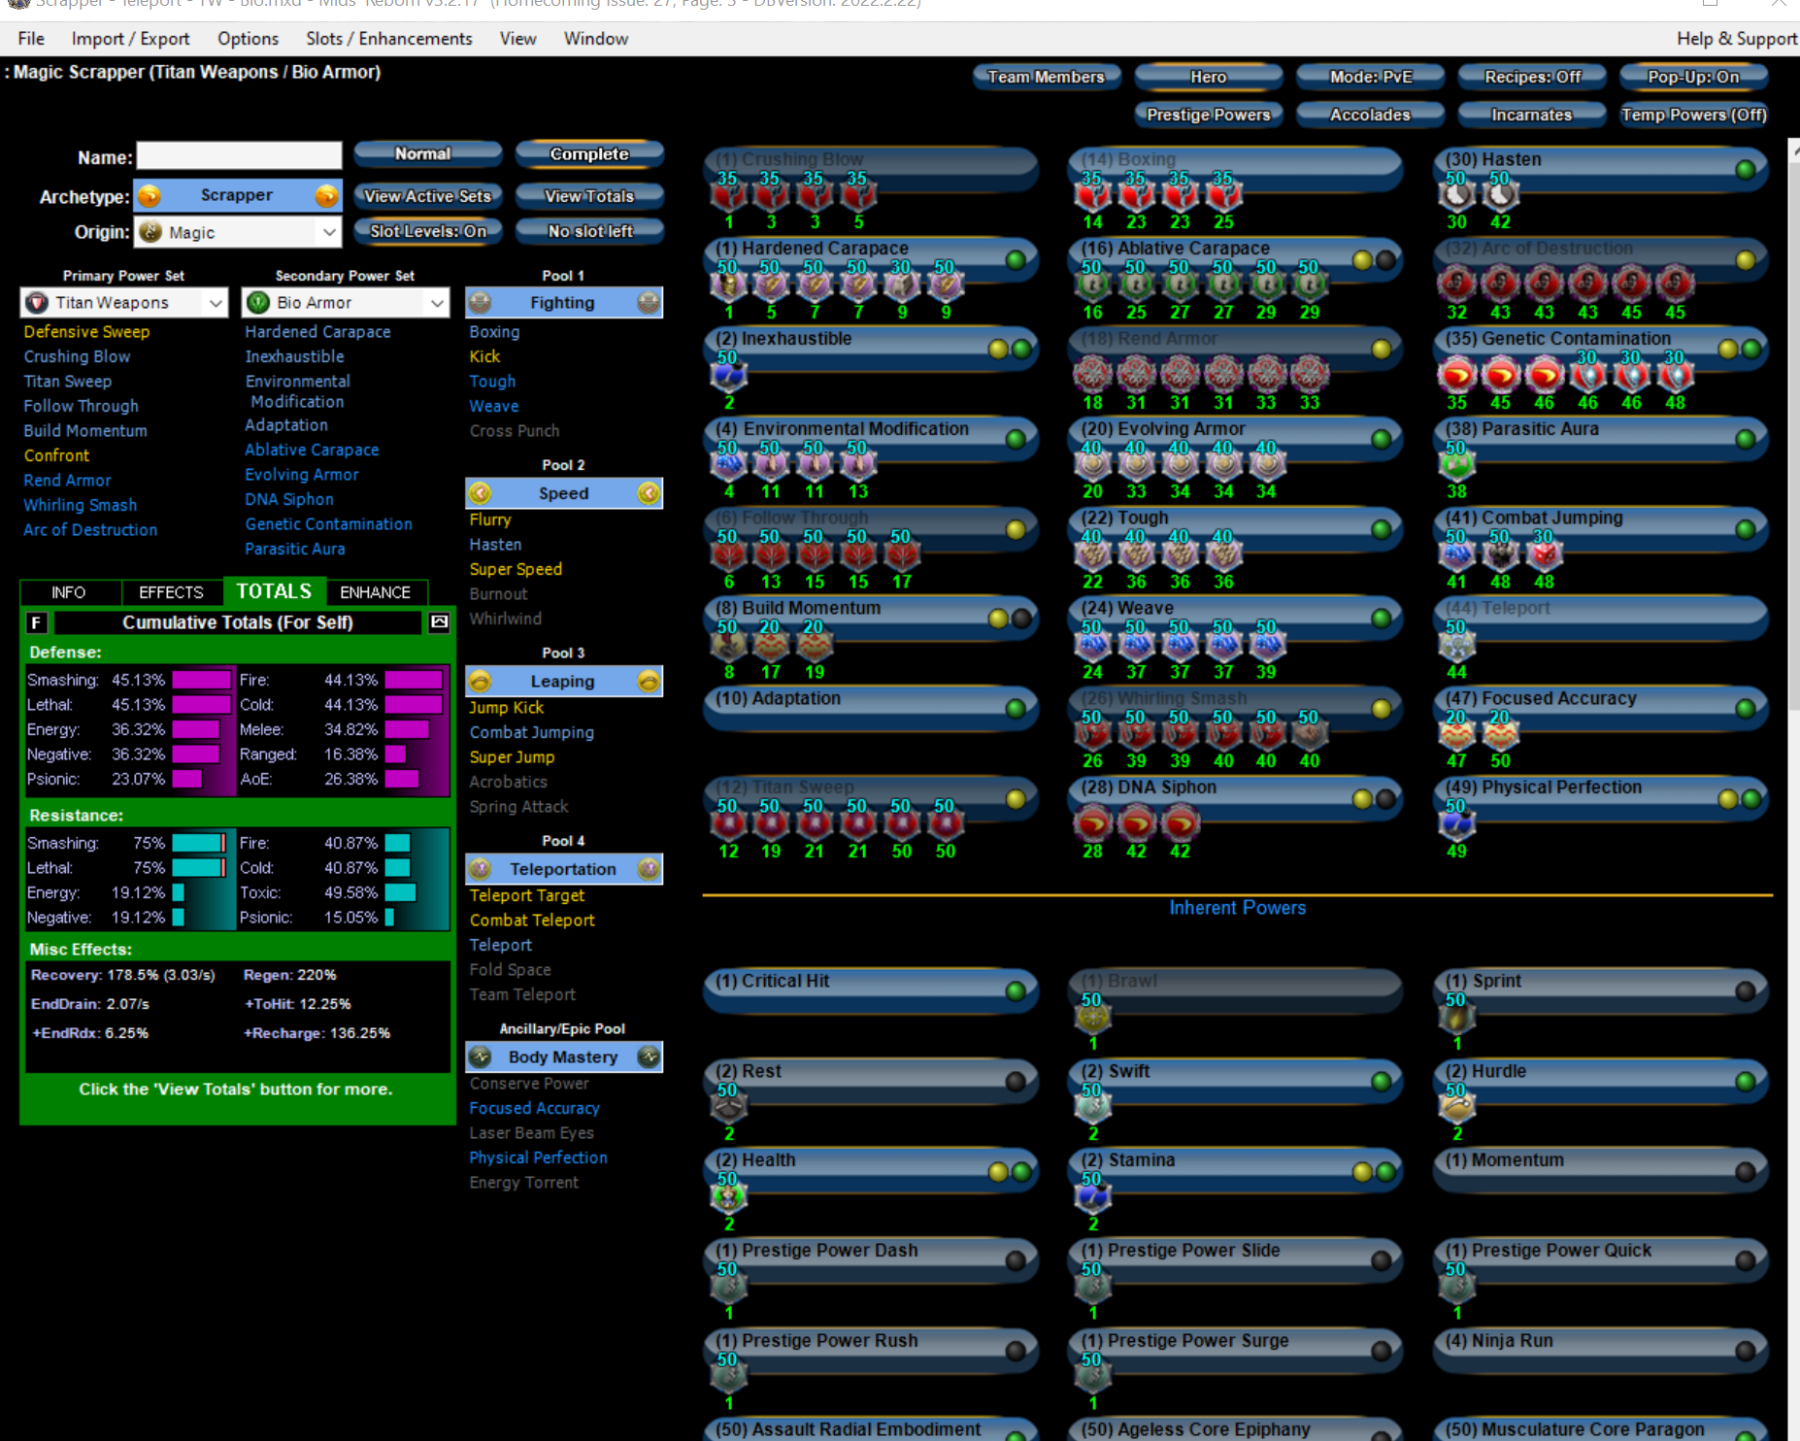
Scrapper - Teleport - TW - Bio.mxd This one should be really survivable Don't really think you need to use defensive sweep since in a usual rotation arc of destruction will be up already; and you can get defenses high enough. I have a variation that gets 45% energy defense also, but you wanted teleport, so the best set for energy defense is not available for it.
-
Brute - S-L - Radiation Melee - Fiery Aura.mxd Heres one with softcapped SLFC defense, and capped SLF resistances... the unfortunate thing is that it gives up a lot to get there..
-
I can dig up a build once I get to my computer; Capped S/L, softcap defenses, should function well for majority of content. I think about normal stuff as being survivable, since your damage is really high for AoE due to burn, IG, Atom, and patron aoe
-
Fire is what carries the farming, since burn is just so good. You can proc out thunder strike also; the main downside is that it doesn't have a second damage aura, which is why spines and rad are so good. However, it doesn't mean that it's bad, since it's enjoyable to do the teleport boom also.
-
What about some SS / Fly patrollers But they go at max speed when patrolling the area
-
@leeowensoas Found this one a while back and saved it. You need 4 power slots free to make the macros since there's a limit on how long of a macro text you can make; this converts small/med/larges and has a macro to just use reds. The macro name can be changed to whatever you want. Look up S/L maps on AE; I think I have one if you look up @makobo Small insp: /macro red "inspcombine Sturdy Enrage$$inspcombine Insight Enrage$$inspcombine Respite Enrage$$inspcombine Catch_A_Breath Enrage$$inspcombine Break_Free Enrage$$inspcombine Luck Enrage" Medium insp: /macro Red "Inspcombine Keen_Insight Focused_Rage$$inspcombine Dramatic_Improvement Focused_Rage$$inspcombine Take_A_Breather Focused_Rage$$inspcombine Good_Luck Focused_Rage$$inspcombine Emerge Focused_rage$$inspcombine Rugged Focused_Rage" Large insp: /macro RED "inspcombine Uncanny_Insight Righteous_Rage$$inspcombine Resurgence Righteous_Rage$$inspcombine Second_Wind Righteous_Rage$$inspcombine Phenomenal_Luck Righteous_Rage$$inspcombine Robust Righteous_Rage" Delete wakies: /macro del "inspdelete Awaken$$inspdelete Bounce_Back$$inspdelete" Use reds+: /macro use "inspexec_Name enrage$$Inspexec_name Focused Rage$$Inspexec_Name Righteous rage$$Inspexec_name Tactical$$inspexec_name Keen$$inspexec_name Rage Imbuement$$inspexec_name Precise$$inspexec_name Tactical imbuement"
-
Usually, you can cap S/L resistances, and softcap defenses as well with regeneration coming after that
-
Gaussian's in Invincibility seem decent; If you use Gloom then you can slot a +buildup from Decimation into it Proc slotting AoEs will help as well.
-
I feel like I've seen the other posts, but for scrappers, does that become the case mainly for EM / Claws for their melee?
-
You can use it as a follower, but a Fire/Rad Radiation Melee/Fire Armor brute with Burn on auto will be a lot better for clear times.
-
You also have Melt Armor, which is not as good as sleet, but does -res that can be stacked with a res proc Sleet is 90 rec Ice storm 120 rec Fireball 32 Rain of Fire 60 You can effectively have a permanent rain of fire with enough recharge; as well as being able to spam fireball. Sleet might help more while teaming or for AVs, but having the AoEs up more often per mob would be a faster clear time
-
Here's one that is softcapped to SLFCEN. Having defenses up for most damage types makes it incredibly survivable This Hero build was built using Mids Reborn 3.1.2.5 https://github.com/LoadedCamel/MidsReborn Click this DataLink to open the build! Level 50 Magic Scrapper Primary Power Set: Energy Melee Secondary Power Set: Bio Armor Power Pool: Speed Power Pool: Fighting Power Pool: Leaping Power Pool: Leadership Ancillary Pool: Soul Mastery Hero Profile: Level 1: Energy Punch -- KntCmb-Acc/Dmg(A), KntCmb-Dmg/Rchg(7), KntCmb-Dmg/EndRdx/Rchg(11), KntCmb-Dmg/EndRdx(29) Level 1: Hardened Carapace -- GldArm-3defTpProc(A), UnbGrd-Max HP%(3), UnbGrd-ResDam/EndRdx/Rchg(3), UnbGrd-ResDam(5), StdPrt-ResDam/Def+(23), UnbGrd-Rchg/ResDam(36) Level 2: Inexhaustible -- PrfShf-End%(A) Level 4: Environmental Modification -- LucoftheG-Def/Rchg+(A), Rct-Def/EndRdx(5), Rct-Def(11), Rct-ResDam%(13), Ksm-ToHit+(27), ShlWal-ResDam/Re TP(27) Level 6: Build Up -- RctRtc-ToHit/Rchg(A), RctRtc-ToHit(7) Level 8: Bone Smasher -- SprBlsCol-Rchg/HoldProc(A), SprBlsCol-Acc/Dmg(9), SprBlsCol-Dmg/EndRdx(9), SprBlsCol-Dmg/EndRdx/Acc/Rchg(13), SprBlsCol-Acc/Dmg/Rchg(15), SprBlsCol-Acc/Dmg/EndRdx(34) Level 10: Adaptation Level 12: Super Speed -- Qck-EndRdx/RunSpd(A) Level 14: Boxing -- KntCmb-Acc/Dmg(A), KntCmb-Dmg/EndRdx(15), KntCmb-Dmg/Rchg(21), KntCmb-Dmg/EndRdx/Rchg(21) Level 16: Ablative Carapace -- Prv-Heal(A), Prv-EndRdx/Rchg(17), Prv-Heal/EndRdx(17), Prv-Absorb%(19), Prv-Heal/Rchg(25), Prv-Heal/Rchg/EndRdx(33) Level 18: Whirling Hands -- Arm-Dam%(A), Arm-Dmg(19), Arm-Dmg/Rchg(37), Arm-Acc/Dmg/Rchg(37), Arm-Acc/Rchg(37), FuroftheG-ResDeb%(39) Level 20: Evolving Armor -- RctArm-ResDam(A), RctArm-ResDam/EndRdx/Rchg(23), RctArm-ResDam/EndRdx(29), RctArm-ResDam/Rchg(33) Level 22: Tough -- RctArm-ResDam/EndRdx/Rchg(A), RctArm-ResDam/Rchg(31), RctArm-ResDam(31), RctArm-ResDam/EndRdx(33) Level 24: Weave -- LucoftheG-Def/Rchg+(A), LucoftheG-Def(25) Level 26: Total Focus -- Hct-Dam%(A), Mk'Bit-Dam%(34), Hct-Dmg(39), Hct-Dmg/Rchg(39), Hct-Acc/Dmg/Rchg(40), Hct-Acc/Rchg(40) Level 28: DNA Siphon -- SprScrStr-Acc/Dmg/Rchg(A), SprScrStr-Rchg/+Crit(31), SprScrStr-Acc/Dmg/EndRdx/Rchg(34) Level 30: Hasten -- RechRdx-I(A), RechRdx-I(36) Level 32: Energy Transfer -- SprCrtStr-Acc/Dmg(A), SprCrtStr-Dmg/Rchg(42), SprCrtStr-Acc/Dmg/Rchg(43), SprCrtStr-Dmg/EndRdx/Rchg(43), SprCrtStr-Acc/Dmg/EndRdx/Rchg(43), SprCrtStr-Rchg/+50% Crit(45) Level 35: Genetic Contamination -- SprScrStr-Acc/Dmg(A), SprScrStr-Dmg/Rchg(36), Erd-Acc/Dmg/Rchg(40), SprScrStr-Dmg/EndRdx/Rchg(42), Erd-%Dam(42), Erd-Acc/Dmg/EndRdx/Rchg(48) Level 38: Parasitic Aura -- Pnc-Heal(A), Pnc-Heal/EndRedux(45), Pnc-EndRdx/Rchg(45), Pnc-Heal/Rchg(50), Pnc-Heal/EndRedux/Rchg(50) Level 41: Combat Jumping -- LucoftheG-Def/Rchg+(A) Level 44: Maneuvers -- LucoftheG-Def/Rchg+(A), LucoftheG-Def(48) Level 47: Moonbeam -- SprWntBit-Rchg/SlowProc(A), SprWntBit-Dmg/EndRdx/Acc/Rchg(46), SprWntBit-Dmg/Rchg(46), SprWntBit-Acc/Dmg(46), SprWntBit-Acc/Dmg/EndRdx(48), SprWntBit-Acc/Dmg/Rchg(50) Level 49: Shadow Meld -- LucoftheG-Def/Rchg+(A) Level 1: Critical Hit Level 1: Brawl -- Acc-I(A) Level 1: Sprint -- Clr-Stlth(A) Level 2: Rest -- IntRdx-I(A) Level 2: Swift -- Run-I(A) Level 2: Hurdle -- Jump-I(A) Level 2: Health -- Pnc-Heal/+End(A) Level 2: Stamina -- PrfShf-End%(A) Level 1: Energy Focus Level 12: Speed Phase Level 49: Quick Form Level 1: Prestige Power Dash -- Run-I(A) Level 1: Prestige Power Slide -- Run-I(A) Level 1: Prestige Power Quick -- Run-I(A) Level 1: Prestige Power Rush -- Run-I(A) Level 1: Prestige Power Surge -- Run-I(A) Level 4: Ninja Run Level 50: Assault Radial Embodiment Level 50: Ageless Core Epiphany Level 50: Agility Radial Paragon Level 10: Defensive Adaptation Level 10: Efficient Adaptation Level 10: Offensive Adaptation ------------