Oskmey
-
Posts
34 -
Joined
-
Last visited
-
My original SG mates. Miss them quite a bit.
-
Thought I would give this another bounce since I have seen a lot of new faces re-appearing on the servers. Anyone else from Shockfront come back to the game?
-
A couple of months in and I have not had the time to dedicate to this build that I would like. However, it is an easy one to play and I have quickly picked up on my rotation without much fuss. I have also recommended this thread to a few who asked about her build. I still rarely end up in melee when teaming because if i do not kill it from range (and my opening salvo rocks) then the others slaughter it.
-
I came up with an idea of an Ouro apprentice striking out on her own and was changed by an item she took from the Menders. Time/Fire - great solo and OMG in teams I had a couple of defenders on live, but never made it to 50 on any of them. This one I leveled over two weeks and still sign in on her for the occasional Hami/MSR/TF.
-
First blaster I ever had was Elec/Nrg/Elec. She was pretty awesome and I have mostly duplicated her on Torchbearer. MOF, Nemu replied to my request for help with the build (here in this forum) and the build has worked extremely well. I do not go in with the goal of draining enemies, but it can be a nice side effect especially if someone else on the team is also doing a drain. I did go Musculature Radial Paragon for alpha and picked up pre-emptive for the Interface slot. She is a beast and is a lot of fun to play.
-
My main ended up being a Time/Fire defender. I usually tell groups that I am not a healer bot but that if they stick close enough to get the buffs, they probably will not have to worry about heals anyway. For solo play I do almost the same chain and when it comes to attacks, I just lay down my two patches, fire off the hold, and then AOE everything to turn it into ash. I mean to knock the baddies unconscious and arrest them. Yeah, definitely that second one.
-
KM/Inv Stalker and I have her up to 47 at the moment with a few IO sets slotted. I prefer to run with teams and while she is a great solo character, when I am on teams I simply cannot deal my highest damage quickly enough. By the time my attack chain even starts most of the mob is down or heavily damaged. Then there are the corpse hits, a lot of those. This is due to two reasons: long animations and assassin's strike being extremely interruptible. It feels like if the character even has a light wind go through the area, she has to restart the long ass animation/attack all over again, if there is another target to hit. The last TF I went on, I ended up mostly hunting down glowies to click and helped hit the big bad at the end of the arc.
-
The build I am running has a thread here: I do not wade into melee range from the start. I do my ranged rotation and then, if anything reaches me, I punch it down and then punch it away from me. I recently was too far ahead of my group on a "rescue and lead out" mission and had both ambushes spawn on top of my location at the same time. Not much was left by the time the rest of the team caught up to me. I do not do melee often. I prefer to run with a team and most things melt before I can even get through my ranged rotation. But for the times when I need it, the blap force is there.
-
So I have managed to put the majority of this build together now with the exception of the Panacea set which I have replaced with a spare ATO'd set of Doctored Wounds I had on hand. Also I am using a Numina proc in health and dropped one of the shield wall IOs for a gift of the ancients proc, which is a net zero for defense numbers but a loss of 27 HP. I found I rarely get the chance to close in for melee, but the melee powers have been great for a few "unexpected" moments. I can take a lot of damage and the recharge on energize is good enough to work it into every other attack chain, keeping endurance down a bit and a small, but constant, healing effect going. Converting the necessary IOs has led to the build doing well on lower levels, such as when running with a TF team. Thanks again for the assistance.
-
I see what you did and why. Thank you, I really appreciate it. Too long out of practice making builds. 🙂 What you did to shocking bolt is similar to what I did with a patch power on my time/fire defender. Should work rather nicely. Now to respec to clean up my current build, start the push to 50 (currently at 39), and start collecting the IOs (and inf!) I will need.
-
OK. I tried reinventing the build and it turned out horribly. So I tried just tweaking with some of your suggestions and this is what I ended up with. Hero Plan by Mids' Reborn : Hero Designer 2.7.2.10 https://github.com/Crytilis/mids-reborn-hero-designer Level 50 Technology Blaster Primary Power Set: Electrical Blast Secondary Power Set: Energy Manipulation Power Pool: Flight Power Pool: Speed Power Pool: Fighting Power Pool: Leadership Ancillary Pool: Electrical Mastery Hero Profile: ------------ Level 1: Lightning Bolt (A) Thunderstrike - Accuracy/Damage (23) Thunderstrike - Accuracy/Damage/Recharge (37) Thunderstrike - Accuracy/Damage/Endurance (48) Thunderstrike - Damage/Recharge Level 1: Power Thrust (A) Kinetic Combat - Accuracy/Damage (3) Kinetic Combat - Damage/Endurance (3) Kinetic Combat - Damage/Recharge (5) Kinetic Combat - Damage/Endurance/Recharge Level 2: Ball Lightning (A) Artillery - Accuracy/Damage (5) Artillery - Damage/Endurance (7) Artillery - Damage/Recharge (7) Artillery - Accuracy/Damage/Recharge (9) Artillery - Accuracy/Recharge/Range (9) Artillery - Endurance/Recharge/Range Level 4: Hover (A) Luck of the Gambler - Defense/Increased Global Recharge Speed (11) Shield Wall - +Res (Teleportation), +5% Res (All) (13) Luck of the Gambler - Defense/Endurance (19) Blessing of the Zephyr - Knockback Reduction (4 points) (34) Blessing of the Zephyr - Run Speed, Jump, Flight Speed, Range/Endurance Level 6: Build Up (A) Rectified Reticle - To Hit Buff/Recharge (11) Rectified Reticle - To Hit Buff Level 8: Fly (A) Winter's Gift - Slow Resistance (20%) Level 10: Aim (A) Rectified Reticle - To Hit Buff/Recharge (13) Rectified Reticle - To Hit Buff Level 12: Zapp (A) Sting of the Manticore - Accuracy/Damage (15) Sting of the Manticore - Damage/Endurance (15) Sting of the Manticore - Accuracy/Interrupt/Range (17) Sting of the Manticore - Damage/Interrupt/Recharge (17) Sting of the Manticore - Damage/Endurance/Recharge Level 14: Hasten (A) Recharge Reduction IO Level 16: Energize (A) Preventive Medicine - Heal (19) Preventive Medicine - Heal/Endurance (21) Preventive Medicine - Endurance/RechargeTime (21) Preventive Medicine - Heal/RechargeTime (23) Preventive Medicine - Heal/RechargeTime/Endurance Level 18: Boxing (A) Kinetic Combat - Accuracy/Damage (25) Kinetic Combat - Damage/Endurance (25) Kinetic Combat - Damage/Recharge (31) Kinetic Combat - Damage/Endurance/Recharge Level 20: Tough (A) Aegis - Psionic/Status Resistance (33) Impervium Armor - Psionic Resistance (34) Gladiator's Armor - TP Protection +3% Def (All) (34) Impervious Skin - Status Resistance (37) Steadfast Protection - Resistance/+Def 3% Level 22: Maneuvers (A) Luck of the Gambler - Defense/Increased Global Recharge Speed (39) Luck of the Gambler - Defense/Endurance (39) Luck of the Gambler - Defense (39) Luck of the Gambler - Defense/Endurance/Recharge Level 24: Weave (A) Luck of the Gambler - Defense/Increased Global Recharge Speed (40) Reactive Defenses - Scaling Resist Damage (40) Reactive Defenses - Defense/Endurance (40) Luck of the Gambler - Defense/Endurance (50) Luck of the Gambler - Defense Level 26: Bone Smasher (A) Superior Blistering Cold - Accuracy/Damage (27) Superior Blistering Cold - Damage/Endurance (27) Superior Blistering Cold - Accuracy/Damage/Endurance (29) Superior Blistering Cold - Accuracy/Damage/Recharge (29) Superior Blistering Cold - Recharge/Chance for Hold Level 28: Tesla Cage (A) Basilisk's Gaze - Accuracy/Hold (31) Basilisk's Gaze - Accuracy/Recharge (31) Basilisk's Gaze - Accuracy/Endurance/Recharge/Hold (46) Basilisk's Gaze - Endurance/Recharge/Hold Level 30: Power Boost (A) Recharge Reduction IO Level 32: Tactics (A) Rectified Reticle - To Hit Buff/Recharge (33) Rectified Reticle - To Hit Buff (33) Adjusted Targeting - To Hit Buff/Endurance (50) Adjusted Targeting - To Hit Buff/Endurance/Recharge (50) Adjusted Targeting - To Hit Buff/Recharge Level 35: Thunderous Blast (A) Ragnarok - Damage (36) Ragnarok - Damage/Recharge (36) Ragnarok - Accuracy/Damage/Recharge (36) Ragnarok - Accuracy/Recharge (37) Ragnarok - Damage/Endurance Level 38: Total Focus (A) Kinetic Combat - Accuracy/Damage (43) Kinetic Combat - Damage/Endurance (46) Kinetic Combat - Damage/Recharge (46) Kinetic Combat - Damage/Endurance/Recharge Level 41: Shocking Bolt (A) Superior Entomb - Accuracy/Hold (42) Superior Entomb - Hold/Recharge (42) Superior Entomb - Endurance/Recharge (42) Superior Entomb - Accuracy/Hold/Endurance (43) Superior Entomb - Accuracy/Hold/Endurance/Recharge (43) Superior Entomb - Recharge/Chance for +Absorb Level 44: Charged Armor (A) Unbreakable Guard - Resistance (45) Unbreakable Guard - Resistance/Endurance (45) Unbreakable Guard - RechargeTime/Resistance (45) Unbreakable Guard - Resistance/Endurance/RechargeTime Level 47: EM Pulse (A) Efficacy Adaptor - Accuracy/Recharge (48) Efficacy Adaptor - EndMod/Accuracy/Recharge (48) Efficacy Adaptor - EndMod/Accuracy Level 49: Vengeance (A) Luck of the Gambler - Defense/Increased Global Recharge Speed Level 1: Brawl (A) Damage Increase IO Level 1: Defiance Level 1: Quick Form Level 1: Prestige Power Dash (A) Empty Level 1: Prestige Power Slide (A) Empty Level 1: Prestige Power Quick (A) Empty Level 1: Prestige Power Rush (A) Empty Level 1: Prestige Power Surge (A) Empty Level 1: Sprint (A) Celerity - +Stealth Level 2: Rest (A) Recharge Reduction IO Level 4: Ninja Run Level 2: Swift (A) Flight Speed IO Level 2: Health (A) Numina's Convalesence - +Regeneration/+Recovery Level 2: Hurdle (A) Jumping IO Level 2: Stamina (A) Performance Shifter - Chance for +End ------------ | Copy & Paste this data into Mids' Reborn : Hero Designer to view the build | |-------------------------------------------------------------------| |MxDz;1497;696;1392;HEX;| |78DA6594DB4E1351148667DA29A52D154A818250CEC722A5E5746BA2A231408260B| |C254D99B44DC699B12D895CFA028A1AE339A00FE03378BCF61C4DE4013C63A246EF| |EAEAFC7FB1492769BFD96BFF6BEFB5FF35334BE78F353C3871E1B0A2068F1AA9426| |1ED88FC17F5BCFFB49ECE9A9661653695F2E5955F0FE7D6565266465F8FCF1B7ABA| |98CFA55306B2062AF3AB1BB66DE58BF17953CF6736D7965266CEDE3052C59C65864| |E9A593DAF9BC578E526B06C5946FCB891CB648B7EE77ED5D6F5F520C2E568CECC34| |3AA3453DB5AEE70BD99C1D99B773E9EA02969C9D37DBA5CC61F94D2A95ABE456EE0| |A929AD2B6030EDE0327B7C1B3D5DA6541BFA6B84E912BA0B60A26042AB41ED5ED71| |F2350DACF3907560BD97AC077DE2A1DB492E69EE56D589F917DC0E1B9A306EDE753| |9ECFB005AA2F6603FD573476261C9B90D06BC688BCC29DE4EAC3325231FF53EEA1B| |A89F966800735AE039CE7EE005F9126C7A45BE06FB658320F7088E23764ED0C8733| |47EC4BECD9FC096CFE417B0ED2BA8CA3A217A1CA2C7EDF4B89D1E77D363B768C35C| |3F3C0B5F7AC78423E2CB14D6EB8BCA382ABD8C8021C969458EBB95DE0ED3D3E1163| |20C6AA28D70FD08B5233FB1EEC81EC9DC24736D5177D0BB8E2DCD891DBC4C5E01BB| |AE92D7C0195177F2CC9D6F5C4E9DDD6FC9F7E0C43BB020AA287D8ED2E7B0D4D9C33| |A7BD8CB5EF6B2F73E9E8FE40EB90DCE952D649DFD53880D4C9333E42C3838076E88| |7A88750EB13731F66682BD99606F6E883DA3A8C933FA10E71C7B443E269F80B1A7E| |433F0A6E48EB347E3BFE0F3A1DFE41FF22F784B10474DAEF825D4397991DC025BC4| |9F043D4BB08F5DDAFEBB0C43CBCF8A5679694BA585D8FE7C2956AD2DC9A5246A22C| |99AC8744D64A626B2F87F47791D51EDB2B6FFE5505476D8D7245F0456F3CD2FF3CC| |510730BF571D3B83137EAF8E8D42F7A33A761DFBFD03287AE007| |-------------------------------------------------------------------|

-
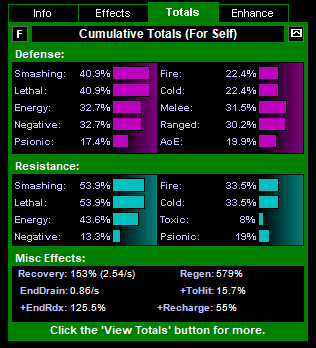
I settled in on this build, for now. 41.4% on S&L defense, 31.1% on Melee, and 20.2% ranged. Ton of resistance, enough that building just on resistance bonuses was tempting. Recharge is not as high as I would like it, but I think I can get a decent chain going on with this whether hanging back or charging in. Since I normally run with PUG teams, I opted to not go for the long buff chain or Stun or Tesla Cage. Hero Plan by Mids' Reborn : Hero Designer 2.7.2.10 https://github.com/Crytilis/mids-reborn-hero-designer Level 50 Technology Blaster Primary Power Set: Electrical Blast Secondary Power Set: Energy Manipulation Power Pool: Flight Power Pool: Speed Power Pool: Fighting Power Pool: Leadership Ancillary Pool: Electrical Mastery Hero Profile: ------------ Level 1: Lightning Bolt (A) HamiO:Nucleolus Exposure Level 1: Power Thrust (A) Kinetic Combat - Accuracy/Damage (3) Kinetic Combat - Damage/Endurance (3) Kinetic Combat - Damage/Recharge (5) Kinetic Combat - Damage/Endurance/Recharge Level 2: Ball Lightning (A) Annihilation - Accuracy/Damage (5) Annihilation - Damage/RechargeTime (7) Annihilation - Accuracy/Damage/RechargeTime (7) Annihilation - Accuracy/Damage/Endurance (9) Annihilation - Accuracy/Damage/Endurance/RechargeTime (9) Annihilation - Chance for Res Debuff Level 4: Hover (A) Luck of the Gambler - Defense/Increased Global Recharge Speed (11) Shield Wall - +Res (Teleportation), +5% Res (All) (13) Luck of the Gambler - Defense/Endurance Level 6: Build Up (A) Rectified Reticle - To Hit Buff/Recharge (11) Rectified Reticle - To Hit Buff Level 8: Fly (A) Winter's Gift - Slow Resistance (20%) Level 10: Aim (A) Rectified Reticle - To Hit Buff/Recharge (13) Rectified Reticle - To Hit Buff Level 12: Zapp (A) Sting of the Manticore - Accuracy/Damage (15) Sting of the Manticore - Damage/Endurance (15) Sting of the Manticore - Accuracy/Interrupt/Range (17) Sting of the Manticore - Damage/Interrupt/Recharge (17) Sting of the Manticore - Damage/Endurance/Recharge (19) Sting of the Manticore - Chance of Damage(Toxic) Level 14: Hasten (A) Recharge Reduction IO Level 16: Energize (A) Preventive Medicine - Heal (19) Preventive Medicine - Heal/Endurance (21) Preventive Medicine - Endurance/RechargeTime (21) Preventive Medicine - Heal/RechargeTime (23) Preventive Medicine - Heal/RechargeTime/Endurance Level 18: Boxing (A) Kinetic Combat - Accuracy/Damage (25) Kinetic Combat - Damage/Endurance (25) Kinetic Combat - Damage/Recharge (31) Kinetic Combat - Damage/Endurance/Recharge Level 20: Tough (A) Aegis - Psionic/Status Resistance (33) Impervium Armor - Psionic Resistance (34) Gladiator's Armor - TP Protection +3% Def (All) (34) Impervious Skin - Status Resistance (34) Steadfast Protection - Knockback Protection (37) Steadfast Protection - Resistance/+Def 3% Level 22: Maneuvers (A) Luck of the Gambler - Defense/Increased Global Recharge Speed (39) Luck of the Gambler - Defense/Endurance (39) Luck of the Gambler - Defense (39) Luck of the Gambler - Defense/Endurance/Recharge Level 24: Weave (A) Luck of the Gambler - Defense/Increased Global Recharge Speed (40) Reactive Defenses - Scaling Resist Damage (40) Reactive Defenses - Defense/Endurance (40) Luck of the Gambler - Defense/Endurance Level 26: Bone Smasher (A) Superior Blistering Cold - Accuracy/Damage (27) Superior Blistering Cold - Damage/Endurance (27) Superior Blistering Cold - Accuracy/Damage/Endurance (29) Superior Blistering Cold - Accuracy/Damage/Recharge (29) Superior Blistering Cold - Recharge/Chance for Hold Level 28: Voltaic Sentinel (A) Blood Mandate - Accuracy/Damage (31) Blood Mandate - Accuracy/Damage/Endurance (31) Blood Mandate - Damage Level 30: Power Boost (A) Recharge Reduction IO Level 32: Tactics (A) Rectified Reticle - To Hit Buff/Recharge (33) Rectified Reticle - To Hit Buff (33) Adjusted Targeting - To Hit Buff/Endurance (50) Adjusted Targeting - To Hit Buff/Endurance/Recharge (50) Adjusted Targeting - To Hit Buff/Recharge Level 35: Thunderous Blast (A) Ragnarok - Damage (36) Ragnarok - Damage/Recharge (36) Ragnarok - Accuracy/Damage/Recharge (36) Ragnarok - Accuracy/Recharge (37) Ragnarok - Damage/Endurance (37) Ragnarok - Chance for Knockdown Level 38: Total Focus (A) Kinetic Combat - Accuracy/Damage (43) Kinetic Combat - Damage/Endurance (46) Kinetic Combat - Damage/Recharge (46) Kinetic Combat - Damage/Endurance/Recharge Level 41: Shocking Bolt (A) Apocalypse - Damage (42) Apocalypse - Damage/Recharge (42) Apocalypse - Accuracy/Damage/Recharge (42) Apocalypse - Accuracy/Recharge (43) Apocalypse - Damage/Endurance (43) Apocalypse - Chance of Damage(Negative) Level 44: Charged Armor (A) Reactive Armor - Resistance/Endurance (45) Reactive Armor - Resistance (45) Reactive Armor - Resistance/Recharge (45) Reactive Armor - Resistance/Endurance/Recharge (46) Reactive Armor - Endurance Level 47: EM Pulse (A) Razzle Dazzle - Accuracy/Recharge (48) Razzle Dazzle - Accuracy/Stun/Recharge (48) Razzle Dazzle - Accuracy/Endurance (48) Razzle Dazzle - Endurance/Stun (50) Razzle Dazzle - Stun/Range Level 49: Vengeance (A) Luck of the Gambler - Defense/Increased Global Recharge Speed Level 1: Brawl (A) Damage Increase IO Level 1: Defiance Level 1: Quick Form Level 1: Prestige Power Dash (A) Empty Level 1: Prestige Power Slide (A) Empty Level 1: Prestige Power Quick (A) Empty Level 1: Prestige Power Rush (A) Empty Level 1: Prestige Power Surge (A) Empty Level 1: Sprint (A) Celerity - +Stealth Level 2: Rest (A) Recharge Reduction IO Level 4: Ninja Run Level 2: Swift (A) Flight Speed IO Level 2: Health (A) Preventive Medicine - Chance for +Absorb (23) Numina's Convalesence - +Regeneration/+Recovery Level 2: Hurdle (A) Jumping IO Level 2: Stamina (A) Performance Shifter - Chance for +End ------------ | Copy & Paste this data into Mids' Reborn : Hero Designer to view the build | |-------------------------------------------------------------------| |MxDz;1497;691;1382;HEX;| |78DA6594EB6E12511485CFC060058A2DA5156A4B29D02B2D147AF38F89895A8D699| |BD4D6F8B721740224388C5CD4FEF40DBCC4784D343E80AFE2F509BC5BAD35F10170| |336BD19230C9F0CDD97BED73CEACCD99F5DB17BA5F5FBA735669BEF3A56CB5BA7D4| |E7E6B46C573D5C815CC72A99CDF55CDAB4BEE0873DB9B59336FECA4564A46AE5629| |E6B22554C55BF9ADBA65952BB5D48A6954F2BBDBEB59B368D54BD95AB16CFA2F9B0| |5A36298B554EBC1BB512E9752174BC57CA1E6B19FB72CC3D8F121DC8C16CD7C8F3D| |5A33B23B46A55A285AC115AB986BDFC0BABDF26E48B63921F79C6A5D0DA5CE0874A| |7BA7E1473AA0D414C578E2BE426A86F81698106AD4BFBE4542A23B9CFE0B12FE457| |F0F837F23BE816AF9C7671C3E11CD0EC986715B9EE5E8CCB9275617ECDF5DCA1544| |034CF406F17EC6EEEBD6B0875F3327253EFA6BE9BFA05897AB957EF1B65EB4FBC25| |DF81BDEFC90F60DF4730260BF9B8966F06B11B821EEC5FEFF981F5FB7E82FD7BE42| |FF0E46F509379FCF4D64F6F43F436446F47E8AD53B401CCEF0A2CC18FD169E1A4AE| |A2F3982F1A9671581802C782A05F6A0750EB1CA0B713F474A29F0C80BA6883D406A| |99DFC87F9270F48D65AA21AC4FEF5C1BBBA1D3B758FBC0F0E3F201F824BA21E428D| |63680FDE8DEC9307605510A6BF61FA1B907D45E86F84BD1C652F475F396C4DE625F| |9025C6E5AC71EC7E6118B2F908BE41238B64C9E06EB5235CEDE8CB33709F626C9DE| |24D99BC762CB14D7999A45FD74924C917360224D66C027523BC3F79A19413F67636| |4848C82C938F8546A52F43D55458FE76E9175B206666E82FDE25F9A9EA6D9D761BD| |EDBC87E173546F1DE246633571986F24DAB50DB954BA2392E9882C7444163B226B4| |72BCA71852B1BFAE1974469FC07B87BE50BC1DDEC7B24CF1A2D8EFCC1514CD3F679| |D2AEE14DFFB4EBA7A0FFDB1E7B8475FF0313E2DBF3| |-------------------------------------------------------------------|
-
I started playing her a bit more today and found myself falling into more of a blapping style. Unless there was an AV up, the team would normally melt most of the mobs before I could do the aim+build up+power boost+blah+blah+more stuff and then powers. I have been playing around in Mids and I think my main issue was remembering or maybe, mis-remembering, how she played on Live. I normally start up with my snipe and a ranged attack and then swoop into the fray. One, to get buffs from the rest of the team and, two, be able to better utilize my attack chain. She is just under level 40 and is a mix of wonderful and "I cannot believe that missed". LOL With today's sessions in mind I am going to try and tweak the build I have in Mids currently.
-
Thanks for the feedback. I played her mostly as ranged on live (and no, that was not her build, I have not found any of my old builds for her), but she was more than capable at blapping. I need enough def/resist to not get downed right away and enough recharge just to have a nice, ranged attack chain going. She does not need to do "all the things", just be fun doing the pew, pew without being vengeance bait the entire time.
-
I have been trying to "re-capture" my build that I had for my main blaster from Live, but without much success. No Alpha or above selected on this one. I think I put this together from two other builds. Still a bit more End. hungry than I prefer and the defense is a bit low on S&L. I have not started exploring purples, but I could likely end up affording them for this character. Thanks for any help. Hero Plan by Mids' Reborn : Hero Designer 2.7.2.10 https://github.com/Crytilis/mids-reborn-hero-designer Level 50 Technology Blaster Primary Power Set: Electrical Blast Secondary Power Set: Energy Manipulation Power Pool: Flight Power Pool: Leadership Power Pool: Fighting Ancillary Pool: Electrical Mastery Hero Profile: ------------ Level 1: Lightning Bolt Dvs-Hold%(A), Dvs-Acc/Dmg(3), Dvs-Dmg/Rchg(3), Dvs-Acc/Dmg/EndRdx/Rchg(5) Level 1: Power Thrust Mk'Bit-Acc/Dmg(A), Mk'Bit-Dmg/EndRdx(5), Mk'Bit-Dmg/Rchg(7), Mk'Bit-Acc/EndRdx/Rchg(29), Mk'Bit-Acc/Dmg/EndRdx/Rchg(29), Mk'Bit-Dam%(31) Level 2: Ball Lightning SprBlsWrt-Acc/Dmg(A), SprBlsWrt-Rchg/Dmg%(7), SprBlsWrt-Acc/Dmg/Rchg(9), SprBlsWrt-Acc/Dmg/EndRdx/Rchg(9), SprBlsWrt-Acc/Dmg/EndRdx(11), SprBlsWrt-Dmg/Rchg(50) Level 4: Build Up AdjTrg-ToHit(A), AdjTrg-Rchg(31), AdjTrg-ToHit/EndRdx/Rchg(34), AdjTrg-ToHit/Rchg(37), AdjTrg-EndRdx/Rchg(37) Level 6: Hover Ksm-ToHit+(A), RedFrt-Def(11), RedFrt-Def/EndRdx(31) Level 8: Short Circuit Obl-%Dam(A), Obl-Dmg(17), Obl-Acc/Rchg(19), Obl-Acc/Dmg/Rchg(19), Obl-Acc/Dmg/EndRdx/Rchg(21), Obl-Dmg/Rchg(21) Level 10: Aim AdjTrg-ToHit(A), AdjTrg-ToHit/Rchg(36), AdjTrg-Rchg(36), AdjTrg-ToHit/EndRdx/Rchg(37), AdjTrg-ToHit/EndRdx(40) Level 12: Zapp Dvs-Acc/Dmg(A), Dvs-Dmg/EndRdx(13), Dvs-Dmg/Rchg(13), Dvs-Acc/Dmg/Rchg(15), Dvs-Acc/Dmg/EndRdx/Rchg(15), Dvs-Hold%(17) Level 14: Fly WntGif-ResSlow(A) Level 16: Energize Heal-I(A) Level 18: Tesla Cage Lck-%Hold(A), Lck-Acc/EndRdx/Rchg/Hold(23), Lck-Acc/Rchg(23), Lck-EndRdx/Rchg/Hold(25), Lck-Acc/Hold(43), Lck-Rchg/Hold(46) Level 20: Maneuvers LucoftheG-Def/Rchg+(A), LucoftheG-Def/EndRdx(25) Level 22: Tactics GssSynFr--Build%(A), GssSynFr--ToHit/EndRdx(36) Level 24: Vengeance LucoftheG-Def/Rchg+(A) Level 26: Voltaic Sentinel OvrFrc-Dam/KB(A), OvrFrc-Acc/Dmg/End/Rech(27), OvrFrc-Acc/Dmg(27) Level 28: Power Boost RechRdx-I(A) Level 30: Kick Empty(A) Level 32: Thunderous Blast PstBls-Acc/Dmg(A), PstBls-Dmg/EndRdx(33), PstBls-Dmg/Rchg(33), PstBls-Dmg/Rng(33), PstBls-Acc/Dmg/EndRdx(34), PstBls-Dam%(34) Level 35: Boost Range RechRdx-I(A) Level 38: Total Focus Mk'Bit-Acc/Dmg(A), Mk'Bit-Dmg/EndRdx(39), Mk'Bit-Dmg/Rchg(39), Mk'Bit-Acc/EndRdx/Rchg(39), Mk'Bit-Acc/Dmg/EndRdx/Rchg(40), Mk'Bit-Dam%(40) Level 41: Shocking Bolt EssofCrr-Acc/Rchg(A), EssofCrr-EndRdx/Hold(42), EssofCrr-Acc/EndRdx(42), EssofCrr-Hold/Rng(42), EssofCrr-Acc/Hold(43), EssofCrr-Acc/Hold/Rchg(43) Level 44: Charged Armor ImpArm-ResPsi(A), ImpArm-ResDam(45), ImpArm-ResDam/EndRdx/Rchg(45), ImpArm-ResDam/EndRdx(45), ImpArm-ResDam/Rchg(46), StdPrt-ResKB(46) Level 47: Tough Ags-ResDam/EndRdx(A), Ags-ResDam/Rchg(48), Ags-EndRdx/Rchg(48), Ags-ResDam/EndRdx/Rchg(48), Ags-ResDam(50), Ags-Psi/Status(50) Level 49: EM Pulse RechRdx-I(A) Level 1: Brawl Empty(A) Level 1: Defiance Level 1: Prestige Power Dash Empty(A) Level 1: Prestige Power Slide Empty(A) Level 1: Prestige Power Quick Empty(A) Level 1: Prestige Power Rush Empty(A) Level 1: Prestige Power Surge Empty(A) Level 1: Sprint UnbLea-Stlth(A) Level 2: Rest Heal-I(A) Level 4: Ninja Run Level 2: Swift Flight-I(A) Level 2: Health RgnTss-Regen+(A) Level 2: Hurdle Jump-I(A) Level 2: Stamina PrfShf-End%(A) Level 1: Quick Form ------------