

Drederik
-
Posts
52 -
Joined
-
Last visited
Content Type
Profiles
Forums
Store
Articles
Patch Notes
Posts posted by Drederik
-
-
I suppose I would also wonder how people are building this with Soul Drain getting the nerf bat
-
2 minutes ago, FupDup said:
I was wrong about Position - The 6 slot bonus is actually just toxic/psi resists, not recharge. I must've been thinking of a different set. I deleted that line from my previous post to avoid further confusion. It can stay at 5 slots.
I chose Lightning over Voltaic Sent because your first build didn't have VS, so I presumed that you didn't want it. I guess Lightning does also have some benefits in that it does AOE damage (and also helps a little bit with ST in close range) while Voltaic is purely single target. Also, depending on the clearing speed of your team, the VS might or might not be able to keep up all of the time. You can go either way with it really.
I see, I was just thinking this build may have enough AoE with 4 attacks that can at least hit more than one target. I know what you mean about it keeping up though, I have an Electric/Kin Corruptor and it always seems to be bringing up the rear
Thanks again, I will play around with this but the tweak is exactly the kind of thing I was looking for to build my knowledge
-
27 minutes ago, FupDup said:
Here is a revised variant, swapping some stuffs around and boosting whatever didn't benefit from staying attuned. I reordered some of the powers, but you can probably swap the positions of Boxing and Stealth (I didn't notice that until after posting this).

TYVM!! So why Lightning Field over VS? Also, where could I pull another slot to get the 6th Postiron?
-
12 minutes ago, FupDup said:
The first thing that sticks out is that it looks like Mids is giving you your defense values out of combat...Stealth's defense buff is heavily reduced in battle. Evasive Manuevers doesn't give you any defense in battle (but it does help with mobility). You can go into your options/configuration go to the Effects & Math tab, under the Suppression area you can click the checkboxes for attacked, ActivateAttackClick, and MissionObjectClick. This will display your true defenses.
Tesla Cage should be slotted as an attack power, because unlike other ATs, the Sentinel variant of this power does real damage. Charge Up should hold the Gaussian Build Up proc. Hasten should be 2-slotted with boosted 50+5 recharge IO's. Power Armor should be slotted for both Healing and Resistance, because it boosts your max HP as well as resists. I'm not sure if Chain Fences is really necessary here, and it might be getting smashed by the nerf hammer in the future so maybe consider swapping it for something else. Try to get a 6th slot into Ball Lightning because Positron's Blast has a good global recharge bonus at 6 slots.
I'll post a revised version of the build in a while, still running some missions in-game.
Thanks for the MIDS tip, still new at building these
So I count 7 attacks if I were to keep HP but drop Chain Fences so VS may be better there then. If I can take 1 slot from TC and to give to BL and 1 slot from CF and give to Hasten, I could just use VS with 4 procs?
-
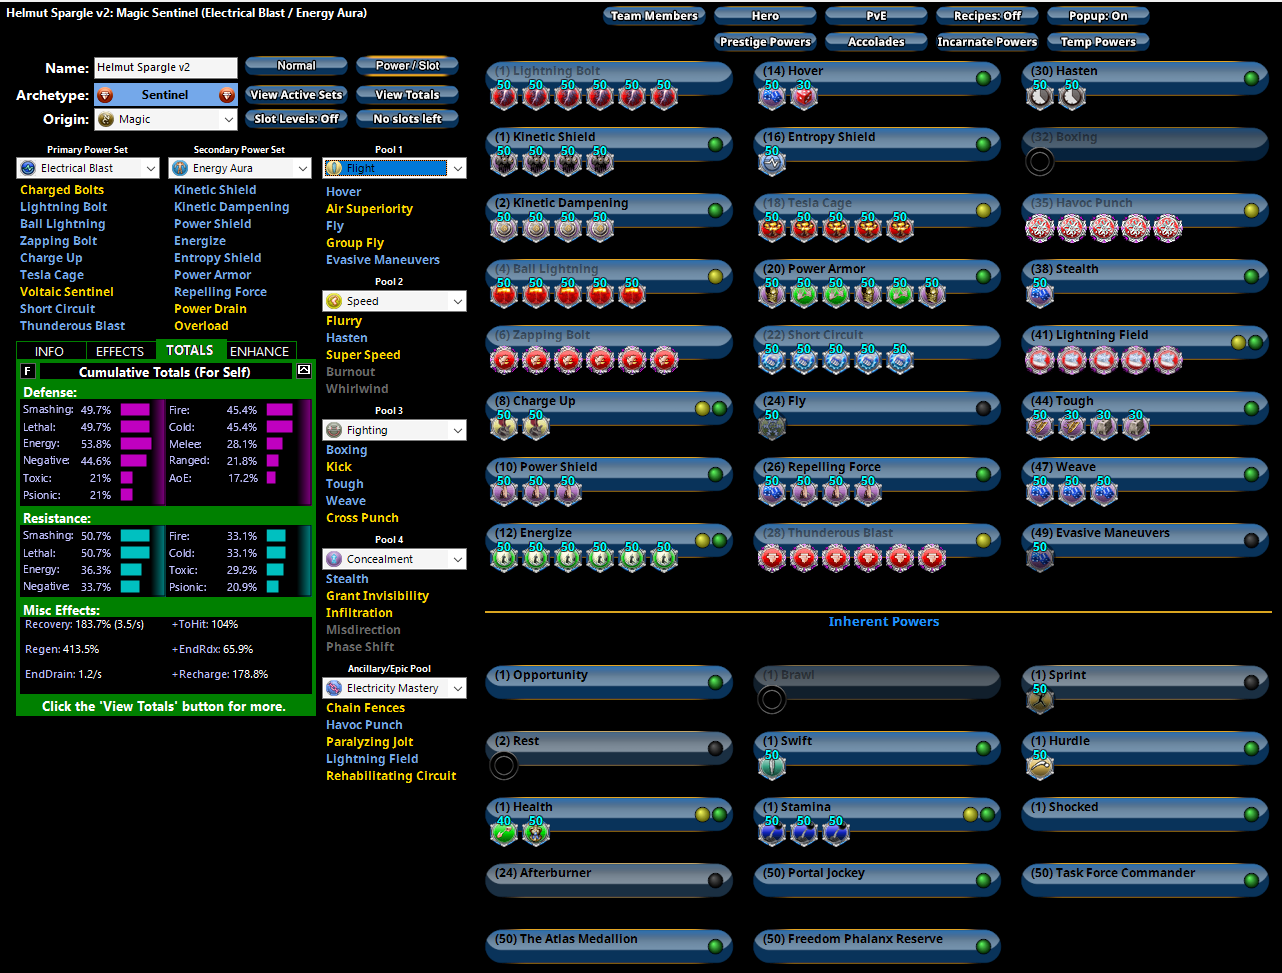
Here is the first version of my build. This is my first sentinel and my first shot of actually building one from the ground up. I used some guidelines from some other builds I have seen. I don't mind having to spend a little influence here as this is going to be with end of build in mind.
I could remove Stealth for Power Drain or Remove Stealth to get 3 powers from the EP (Electric or Psi) once I feel like I have the base of the build down. I could also remove Havoc Punch for Voltaic Sentinel and turn it into a proc attack as I think that is the trendy thing to do with VS these days. I feel like lots of options are open at the end of the build but really like how the powers sit early on
Any thoughts would be appreciated!!
-
5 hours ago, Voltak said:
for the Hybrid I always go for the one that does double dmg
In the end you will do more dmg than the other option
Kins are everywhere and they will nullify the other option
Pyro is very good and so is IONThanks for all the answers the past few days!!
-
On 12/4/2023 at 11:15 AM, Voltak said:
Reactive --
I have both -- Degen and the one that gives resistance debuff. Both are extremely useful
Destiny -- Barrier (now I have both, with Rez and without Rez)
Alpha - End Modifier, Defense, recharge
B P -- for the Lore , because of the greater resistance debuff to cold damageSo I am guessing Assault on Hybrid and Ion or Pyronic on Judgment?
-
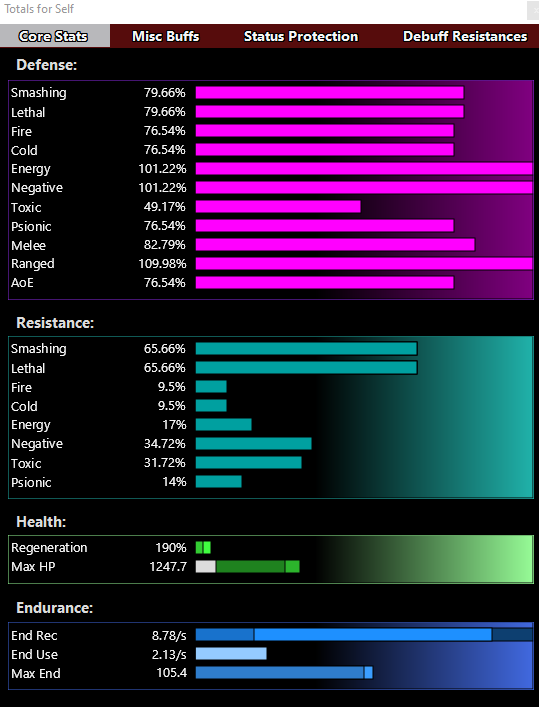
Ahh, yeah I have the same numbers you were able to get, just had the toggles on.
Also, do you see any reason not to get the powers earlier as in this version of the build?
-
11 minutes ago, Voltak said:
What matters is the range defense numbers, the recharge, the HPs, and the dmg resists.
If those are as good or better than mine, then go for it.
Range defense is kingI moved around the powers to get some things earlier since looking at this build. I am guessing they adjusted what you can get and when since I played last
Haste is 315%
I feel like I have a toggle off or something since my numbers are much higher than yours with the same enhancements
-
7 hours ago, Voltak said:
I took a screen shot of a build I have currently on one of my corruptors that has Elec as the blast set.
This is an efficient but still very economic build.
You can use this and adapt it for yourself for Elec blast set on your corruptor
Thanks so much for the quick replies!!
Yours came out a little different but I think I got all the pieces you had in your fire build. Anything I could tweak?
Helmut Spargle v2 - Corruptor (Electrical Blast - Kinetics).mbd
-
@VoltakAfter some discussion on Discord, I am wondering how you would do this if you were going to run it with Electric instead of fire. I think I can get pretty close but I am wondering what I may be leaving on the table by not using the king of DPS
-
@Voltak Loving this build (and your others btw)!!
Just wondering what incarnates you went with. Kinda up in the air at this point how I feel about them.
-
I have a Dark/Mental that is pretty fun. I didn't like it for a while and put it on the shelf until @KelvinKole helped me out. I dont think it is perfect but it made it more enjoyable. I would be happy to post if desired
-
9 hours ago, oedipus_tex said:
That's a holdover from playing sapper builds. I actually had to go reread one of my old posts to remember how I did it. The commands aren't in the Options windows, instead type:
- /optionset ShowVillainName 1
- /optionset ShowVillainBars 1
Turning those bars on is especially useful for Electric builds because it lets you visualize how much endurance enemies have remaining. You can read the rest of that old post (a bit outdated now, but still mostly relevant I hope) here:
Oh thats awesome!! Thanks so much, I remember seeing a video a while ago with it and just couldn't find out how to do it because there isn't any option to click. You are a lifesaver!!
Also, love the build 😄
-
@oedipus_texHow did you get the names above baddies on at all times?
-
On 2/6/2022 at 1:09 PM, Snarky said:
This is my "Blaster answer to the Sentinel problem" Sentinels are great. Meh. until you look at the damage, the damage caps, and the survivability. This build uses a Blaster platform and achieves greater damage than a Sentinel (much less than most Blasters though) and greater survivability than most Sentinels. While hitting tons more AoE.
This is done through being fully ranged, softcapped ranged defenses and THREE "Oh crap!" buttons. Phase Shift. Cannot even hit me. I am in a different universe. Personal Force Field. A defense bubble that would make a Paragon Protector jealous, and Force of Nature, jacking your resistance values up and boosting your end bar.
This Hero build was built using Mids Reborn 3.0.5.7
https://github.com/Reborn-Team/MidsRebornClick this DataLink to open the build!
Blanker: Level 50 Magic Blaster
Primary Power Set: Electrical Blast
Secondary Power Set: Temporal Manipulation
Power Pool: Concealment
Power Pool: Flight
Power Pool: Fighting
Power Pool: Speed
Ancillary Pool: Force MasteryHero Profile:
Level 1: Lightning Bolt -- Thn-Acc/Dmg(A), Thn-Dmg/EndRdx(3), Thn-Dmg/Rchg(3), Thn-Acc/Dmg/Rchg(5), Thn-Acc/Dmg/EndRdx(5), Thn-Dmg/EndRdx/Rchg(7)
Level 1: Time Wall -- TraoftheH-Acc/Rchg(A), TraoftheH-EndRdx/Immob(7), TraoftheH-Acc/EndRdx(9), TraoftheH-Acc/Immob/Rchg(9), TraoftheH-Dam%(11), TraoftheH-Immob/Acc(11)
Level 2: Ball Lightning -- Artl-Acc/Dam(A), Artl-Dam/End(13), Artl-Dam/Rech(15), Artl-Acc/Dam/Rech(15), Artl-Acc/Rech/Rng(17), Artl-End/Rech/Rng(17)
Level 4: Stealth -- LucoftheG-Def/Rchg+(A), LucoftheG-Def(19), ShlWal-ResDam/Re TP(19)
Level 6: Charged Bolts -- SprDfnBrr-Acc/Dmg(A), SprDfnBrr-Dmg/Rchg(21), SprDfnBrr-Acc/Dmg/Rchg(21), SprDfnBrr-Acc/Dmg/EndRdx(23), SprDfnBrr-Acc/Dmg/EndRdx/Rchg(23), SprDfnBrr-Rchg/+Status Protect(25)
Level 8: Aim -- GssSynFr--ToHit(A), GssSynFr--ToHit/Rchg(25), GssSynFr--ToHit/Rchg/EndRdx(27), GssSynFr--Rchg/EndRdx(27), GssSynFr--ToHit/EndRdx(29), GssSynFr--Build%(29)
Level 10: Chronos -- RechRdx-I(A), RechRdx-I(31)
Level 12: Zapp -- ExcCnt-Acc/Dmg(A), ExcCnt-Dmg/EndRdx(31), ExcCnt-Dmg/ActRdx(31), ExcCnt-Dmg/Rng(33), ExcCnt-Dmg/Rchg(33), ExcCnt-Stun%(33)
Level 14: Fly -- BlsoftheZ-ResKB(A), BlsoftheZ-Travel(34)
Level 16: Grant Invisibility -- Rct-ResDam%(A)
Level 18: Phase Shift -- RechRdx-I(A)
Level 20: Temporal Healing -- Prv-Absorb%(A), Prv-Heal(34), PrfShf-End%(34), PrfShf-EndMod(36), EndMod-I(36)
Level 22: Time Stop -- Lck-Acc/Hold(A), Lck-Acc/Rchg(36), Lck-Rchg/Hold(37), Lck-EndRdx/Rchg/Hold(37), Lck-Acc/EndRdx/Rchg/Hold(37), Lck-%Hold(39)
Level 24: Kick -- FrcFdb-Rechg%(A)
Level 26: Tough -- RctArm-ResDam/EndRdx(A), RctArm-ResDam/Rchg(39), RctArm-ResDam(40)
Level 28: Weave -- LucoftheG-Def/Rchg+(A), LucoftheG-Def/EndRdx(40), LucoftheG-Def/Rchg(40), LucoftheG-Def/EndRdx/Rchg(42), LucoftheG-Def(42), Ksm-ToHit+(42)
Level 30: Hasten -- RechRdx-I(A), RechRdx-I(43)
Level 32: Thunderous Blast -- SprBlsWrt-Acc/Dmg(A), SprBlsWrt-Dmg/Rchg(43), SprBlsWrt-Acc/Dmg/Rchg(43), SprBlsWrt-Acc/Dmg/EndRdx(45), SprBlsWrt-Acc/Dmg/EndRdx/Rchg(45), SprBlsWrt-Rchg/Dmg%(45)
Level 35: Personal Force Field -- LucoftheG-Def/Rchg+(A)
Level 38: Time Lord -- StdPrt-ResDam/Def+(A)
Level 41: Repulsion Bomb -- Bmbdmt-Dam(A), Bmbdmt-Dam/Rech(46), Bmbdmt-Acc/Dam/Rech(46), Bmbdmt-Acc/Dam/Rech/End(48), Bmbdmt-+FireDmg(48), SuddAcc--KB/+KD(48)
Level 44: Temp Invulnerability -- RctArm-ResDam/EndRdx(A), RctArm-ResDam/Rchg(50), RctArm-ResDam(50)
Level 47: Time Shift -- ImpSwf-Acc/Slow(A), ImpSwf-Dam%(50)
Level 49: Force of Nature -- GldArm-3defTpProc(A)
Level 1: Defiance
Level 1: Brawl -- Empty(A)
Level 1: Sprint -- Empty(A)
Level 2: Rest -- Empty(A)
Level 1: Swift -- Flight-I(A)
Level 1: Hurdle -- Empty(A)
Level 1: Health -- Pnc-Heal/+End(A), NmnCnv-Regen/Rcvry+(13), Mrc-Rcvry+(39)
Level 1: Stamina -- PrfShf-End%(A), PrfShf-EndMod(46)
Level 49: Quick Form
Level 14: Afterburner
------------| Copy & Paste this data into Mids Reborn : Hero Designer to view the build | |-------------------------------------------------------------------| |MxDz;1383;656;1312;HEX;| |78DA65934B4F13511886CF5C4A8152A0DC916B8BDC65A098B835CA4511498818B7A| |496499D38B64D2946962EFC032E4441408CA2C6C09FF0FA1B8C3B376E5013E33521| |E3D7795F0A8993B4CF99EF3EEF3967E6D678C5EEB9DBA795161E73138B8BF367E53| |F6FE7023389949354F204C592BE6EE782B2EEA077FE52229DB217AC09D74EE6734E| |32E122AFFBC03FB794CD667279EBB27D4328EE9944DAC92EB989BC9349ABC86C26E| |35A53E99BCEA273D5719DFC72C8B74CBA4EEA5A3E8C7561E9A453E5FEDB5CD6B617| |6A26B24ED29ACCE492B6D42BF4596E92A1A2F21B56078F1750EB82B8A9F40D72133| |41F915B60C963F04CFF91DC7B1A7C2B60E97D72152C5F231F802392A531573302BE| |ADC2042B036409581D244BC1B0286AF8C99E6ED4A35E4D1D396DF8B4C41B408C543| |37D5B9D46EA6083419A6053001C2D6C1E670B3ED1E17B0A1EDB269F81ADCFC917E0| |B86852865CAD6C103AB593270521CE147A45DF6BF20DD8F9967C47BE07433250987| |5C31FD12BFA01AC145F157CAAEABB41CD948AD01661FF4999AD16FDCDDA3DC4453F| |932BA8D57597EC44CE98E4D473E6FA1FF4FD048FFF227F937FC09EBFA02E3334225| |735DE81CD105B33F7AEB95D166D12DF21EC35556F0C3425A6853D5BB8BFBDD56404| |ECAF25B9EFFDFBCAAF1593DC36EAD4C6EF1E204F152E22EB76ACE2BB07D6C887E08| |9757283DC045F0A62D433C699A6449B6E7E5F7723BE654736A98F67A76F1FE769C8| |2315CEEFB046EAE427F877A4C720B5196C8716716A13A736E7A5A78518CDDA42CFF| |836B82BF9239C716494FB6A1E5C34CF6B358BF7B5F0EA79EAE27F9659B3782F95E6| |5BF6CA8B1594EA82925F8EDAFCA8AF87165D45D1BBE20A74EAB980D9BF1DC6688AE| |76D88E76D7AA038BBA71A8A67DDFB07C955CD84| |-------------------------------------------------------------------|
Any reason why Electric here? Would Seismic be okay as well?
-
After this was resurrected and I made my comment, I actually started playing him a bit more. It is a very strong combo if you dont mind going between melee and cone range. I am struggling between mez protection and end when it comes to incarnates but I am really having a lot more fun with the build
-
 1
1
-
-
25 minutes ago, Nemu said:
There's athletes run from P2W and it's variants, and you can buy temp jet packs from P2W, They are slower than pool travel powers but they'll get you around just the same.
At the time I made this build, the changes to stone armor hasn't taken place yet, so keep that context for my comments below:
I look at synergies. If I wanted a high recharge DB build that can skip the combos I have to have a few things in place:
A secondary that offers a recharge boost - that narrows my candidates to electric armor, super reflexes, rad armor and energy aura
A secondary that offers some sort of endurance management tool, high recharge builds mean that I will burn through end quicker, and high recharge builds also lend themselves to procs which further compounds the endurance issue - that narrows my choices down to electric armor, rad armor and energy aura
A secondary that is easy to build for survival, which gives me the option to slot powers not for survival but for recharge/procs - that narrows my choices down to energy aura, because I would have had to dedicate an inordinate amount of resources to electric or rad armor to shore up survival. Since DB doesn't have any mitigation my survival depends entirely on the armor set, rad might do a little better than electric but it's far easier to just softcap Energy aura and call it a day.
So do i like the build? Of course. I saw the synergies, set my expectations accordingly and the build does what I expect it to do.
I would have stuck with EA even with the stone armor changes. EA has superior endurance management tools and that matters to me since I don't spend all my time playing at 50 spamming ageless. There's no doubt that stone armor will do more damage though. EA also has a proper taunt aura.
People that frown at the fact that the build doesn't have 75% S/L resist will probably not like the build, but like I said, don't be a scrub. man the $#%@ up! 😁
Yeah, those just make me feel sad because I am not going fast enough 😞
I guess you can get the mission TP and others to get around and save time too but ugh, so slow
-
41 minutes ago, Nemu said:
If you wanted to continue using ROP the build doesn't change much, take a lot out for ROP and put the final ATO into nimble slash for a easy 6% resist, change the 3 slots in ROP to 3 unbreakable guard for some end discount and energy resist and max HP from the unique. That's a quick and dirty edit.
I went back to tough/weave though, stayed on the semi-glass cannon route by electing not to throw slots to hardcapping S/L resists. Got even more recharge, and this is what I respecced into:
This Hero build was built using Mids Reborn 3.1.2.5
https://github.com/LoadedCamel/MidsRebornClick this DataLink to open the build!
Captain Scissa: Level 50 Natural Scrapper
Primary Power Set: Dual Blades
Secondary Power Set: Energy Aura
Power Pool: Leaping
Power Pool: Fighting
Power Pool: Speed
Power Pool: Leadership
Ancillary Pool: Soul MasteryHero Profile:
Level 1: Nimble Slash -- SprScrStr-Acc/Dmg(A), SprScrStr-Acc/Dmg/Rchg(3), SprScrStr-Dmg/EndRdx/Rchg(3), SprScrStr-Acc/Dmg/EndRdx/Rchg(5), SprScrStr-Rchg/+Crit(5), SprScrStr-Dmg/Rchg(40)
Level 1: Kinetic Shield -- LucoftheG-Def/Rchg+(A), LucoftheG-Def(7)
Level 2: Ablating Strike -- SprBlsCol-Acc/Dmg(A), SprBlsCol-Acc/Dmg/EndRdx(9), Dmg-I(11), GldStr-%Dam(11), Hct-Dam%(13), AchHee-ResDeb%(13)
Level 4: Combat Jumping -- LucoftheG-Def/Rchg+(A), WntGif-ResSlow(7), Ksm-ToHit+(15)
Level 6: Typhoon's Edge -- Arm-Dmg(A), Arm-Dmg/Rchg(9), Arm-Acc/Dmg/Rchg(15), Arm-Acc/Rchg(17), Arm-Dmg/EndRdx(19)
Level 8: Blinding Feint -- SprBlsCol-Dmg/EndRdx/Acc/Rchg(A), SprBlsCol-Rchg/HoldProc(19), SprBlsCol-Dmg/EndRdx(21), HO:Nucle(21), SprCrtStr-Rchg/+50% Crit(23), GssSynFr--Build%(23)
Level 10: Entropic Aura -- MckBrt-Taunt(A), MckBrt-Taunt/Rchg(27), MckBrt-Taunt/Rchg/Rng(33), MckBrt-Acc/Rchg(34), MckBrt-Taunt/Rng(34), MckBrt-Rchg(40)
Level 12: Kick -- Empty(A)
Level 14: Power Shield -- LucoftheG-Def/Rchg+(A), LucoftheG-Def/EndRdx(25), LucoftheG-Def(25)
Level 16: Tough -- UnbGrd-ResDam/EndRdx(A), UnbGrd-Max HP%(17)
Level 18: Weave -- Rct-Def(A), Rct-Def/EndRdx(27), Rct-EndRdx/Rchg(29), Rct-Def/Rchg(29), Rct-Def/EndRdx/Rchg(31), Rct-ResDam%(31)
Level 20: Energy Cloak -- LucoftheG-Def/Rchg+(A), ShlWal-Def/EndRdx(31), ShlWal-Def(33), ShlWal-ResDam/Re TP(33)
Level 22: Energy Protection -- StdPrt-ResDam/Def+(A)
Level 24: Hasten -- RechRdx-I(A), RechRdx-I(34)
Level 26: Sweeping Strike -- SprAvl-Acc/Dmg/EndRdx(A), SprAvl-Acc/Dmg/EndRdx/Rchg(36), SprAvl-Rchg/KDProc(36), Dmg-I(36), Arm-Dam%(37), FuroftheG-ResDeb%(37)
Level 28: Energize -- Prv-Heal(A), Prv-Heal/EndRdx(37), Prv-EndRdx/Rchg(39), Prv-Heal/Rchg(39), Prv-Heal/Rchg/EndRdx(39), Prv-Absorb%(42)
Level 30: Maneuvers -- LucoftheG-Def/Rchg+(A), LucoftheG-Def/EndRdx(40)
Level 32: Tactics -- HO:Cyto(A)
Level 35: Energy Drain -- SynSck-EndMod/+RunSpeed(A), SynSck-Dam/Rech(42), SynSck-EndMod/Rech(43), SynSck-Dam/Rech/Acc(43), SynSck-Dam/Acc/End(43)
Level 38: Moonbeam -- Apc-Dmg/Rchg(A), Apc-Acc/Dmg/Rchg(45), Apc-Acc/Rchg(45), Apc-Dmg/EndRdx(45), Apc-Dmg(46)
Level 41: Shadow Meld -- HO:Membr(A)
Level 44: Soul Storm -- UnbCns-Dam%(A), Apc-Dam%(46), GhsWdwEmb-Dam%(46), GldJvl-Dam%(47), Dcm-Build%(47), HO:Nucle(48)
Level 47: Vengeful Slice -- Hct-Dmg(A), Hct-Dmg/Rchg(48), Hct-Acc/Dmg/Rchg(48), Hct-Acc/Rchg(49), Hct-Dmg/EndRdx(49)
Level 49: Dampening Field -- GldArm-3defTpProc(A)
Level 1: Critical Hit
Level 1: Brawl -- Empty(A)
Level 1: Sprint -- UnbLea-Stlth(A)
Level 2: Rest -- Empty(A)
Level 2: Swift -- Run-I(A)
Level 2: Hurdle -- Jump-I(A)
Level 2: Health -- Pnc-Heal/+End(A)
Level 2: Stamina -- PrfShf-End%(A)
Level 49: Quick Form
Level 1: Prestige Power Dash -- Empty(A)
Level 1: Prestige Power Slide -- Empty(A)
Level 1: Prestige Power Quick -- Empty(A)
Level 1: Prestige Power Rush -- Empty(A)
Level 1: Prestige Power Surge -- Empty(A)
Level 4: Ninja Run
Level 50: Musculature Radial Paragon
Level 50: Void Radial Final Judgement
Level 50: Cognitive Core Flawless Interface
Level 50: Portal Jockey
Level 50: The Atlas Medallion
Level 50: Task Force Commander
Level 50: Freedom Phalanx Reserve
------------| Copy & Paste this data into Mids Reborn : Hero Designer to view the build | |-------------------------------------------------------------------| |MxDz;1624;779;1558;HEX;| |78DA6594DB4FD36014C0BFAE1D65638C8DC1C66D0C10D8D8A56C5E124588172E090| |28664CF66A9F0C12A6534EB48C4A8D1FF408DC61763F4D13FC357AFFF86CA558D89| |3E9879D6733E195993E6D773BE73EF69976ECFF8D6D6E62E33C93F6DEAB65DC8AF9| |475CBE265F5BA5ED92EEB2683CB3FAD5B15DD280DE4570CDBD65550F508BBC21237| |39D766B675B370D5D457B9DDF7FF6886AFF192CDB5D9122FAFEF14AE40BCE07CA9C| |8CBBC54D1C4836F796BCBD416B96E19A5F556479833D68B1590BC8E94B7385F6D13| |56ABBC6C170DAB7BD63256B47C45373720517E6BDB2C2CE976859777BAA0BA0CDC7| |76A65E25575B37732633985B93E103F22954FC4CFC8F87B92C3E026A1B3C43A2547| |D9D481BCAB8A33882C3D521C65F313A4370AEA9C87791318C9977221DF02430A0B8| |3B34C915DB288DC8BC6FEBFA08E2AEC1E18B92983E23E5F8BA0B2E60B48FF043270| |11D93E89BC0F4E2A935C4E59EA532CA7FD19B2E33171128E55998539CAE137589E0| |A0D7BA82CB7A788CA1E0339700B39B8413491F14DA40B32B750B9ACA50A176B8278| |ADA2CD56A74D957505B0DD2E1AA40C7E6DE427B5FDC21904FED02B80C3A0A828788| |0CA9E4364DF11F13BB2FF07F127D203E943E42C8768CAFD73B2F36A06AE1117D0B8| |198C3BC9987546E029AAB221481F111B104931A78141E24338EC161BD0FD124779E| |A15F135913661780AA7347C09D379215DAF68ACF70B2A87BF2247BF1177897BC8B1| |7D64103247C5C8A234D7B833570F0BC1614C34123B07804A5A20DD10635E6797860| |EB1B6B15D64728FB84F3C40D6AA1A110B38927139E1D31A719C984566D2D8E06F1F| |6309B10689895A7A99D5FA4A8951A5E6D13293236EE29BD1D2D89DF602CCE20A1B7| |7B694B107706BA20C6D149DC6E3C404323B464C22DDD070564C217B1A23C794E30F| |BADAA71CFF1A6A32ECEB62DD397CA018695939FED099E4D8EDC31C256127D5FE336| |07770429940E5E109E52096717442F91CD32C24A1604A534D36D6966D54E51A5567| |1A55671B559E007427722D8620BF10D21D2088094D45EA841BDE3AB39BF5825E2F2| |CD70BFF0092E3FCE9| |-------------------------------------------------------------------|
There are people that seemingly can't play a anything without softcap defenses and hardcap resists. Don't be a scrub, man the $#@% up. 😁
@NemuLove the comment on the end and thanks so much for reposting!!
I guess I will take a look but I just cant do it without a travel power so flight with ROP is more ideal I suppose
-
Looks like your build is a little out of date. Would you mind editing to add the forum upload or repost in the new Mids? I would like to check it out for sure!!
Thanks
-
17 hours ago, Darkir said:
That is with siphon speed. I often don't take travel powers on my builds because I find sprint+ninja run works just fine.
If you want super speed on the cold build just switch out vengeance or benumb
Thanks!!
-
4 minutes ago, Darkir said:
yeah, 92.5 mph is fine for me
sorry, but is that without the syphon speed? as in why you didn't take one on your water/cold corr?
-
1 minute ago, Darkir said:
I wouldn't get a travel power with kinetics, but if I had to suggest one I would get super speed because we already need hasten and its very fast especially now with the 120 mph cap.
So just use run, sprint, and jet pack along with syphon whenever possible?
-
On 1/8/2022 at 1:49 AM, Darkir said:
Ok, so I am experimenting with a new build with a new powerset for my Kintank. Going elec/kin for the shock damage effect, soft end control, and good aoe dmg. I have also found that I can use clarion with repel on if I just use transference occasionally due to the small end transfer mechanic. So, you are all welcome to try this, but know it is a work in progress:
This Villain build was built using Mids Reborn 3.1.2.5
https://github.com/LoadedCamel/MidsRebornClick this DataLink to open the build!
Level 50 Mutation Corruptor
Primary Power Set: Electrical Blast
Secondary Power Set: Kinetics
Power Pool: Leadership
Power Pool: Fighting
Power Pool: Speed
Power Pool: Leaping
Ancillary Pool: Psychic MasteryVillain Profile:
Level 1: Lightning Bolt -- SprMlcoft-Acc/Dmg(A), SprMlcoft-Dmg/Rchg(3), SprMlcoft-Acc/Dmg/Rchg(3), SprMlcoft-Dmg/EndRdx/Rchg(5), SprMlcoft-Acc/Dmg/EndRdx/Rchg(5), SprMlcoft-Rchg/Dmg%(7)
Level 1: Transfusion -- NmnCnv-Heal/EndRdx(A), NmnCnv-EndRdx/Rchg(11), NmnCnv-Heal/Rchg(11), NmnCnv-Heal/EndRdx/Rchg(13), NmnCnv-Heal(13), NmnCnv-Regen/Rcvry+(15)
Level 2: Ball Lightning -- SprScrBls-Acc/Dmg/Rchg(A), SprScrBls-Acc/Dmg/EndRdx/Rchg(7), SprScrBls-Rchg/+End(9), Rgn-Dmg/EndRdx(9)
Level 4: Maneuvers -- LucoftheG-Def(A), LucoftheG-Def/Rchg+(15), Ksm-ToHit+(43)
Level 6: Short Circuit -- Obl-Dmg(A), Obl-Acc/Rchg(17), Obl-Dmg/Rchg(17), Obl-Acc/Dmg/Rchg(19), Obl-Acc/Dmg/EndRdx/Rchg(19), Obl-%Dam(21)
Level 8: Boxing -- TchofDth-Acc/Dmg(A), TchofDth-Dmg/EndRdx(39), TchofDth-Dmg/Rchg(40), TchofDth-Acc/Dmg/EndRdx(40), TchofDth-Dmg/EndRdx/Rchg(40), TchofDth-Dam%(43)
Level 10: Siphon Speed -- Acc-I(A)
Level 12: Zapp -- StnoftheM-Acc/Dmg(A), StnoftheM-Dmg/EndRdx(21), StnoftheM-Dmg/ActRdx/Rchg(23), StnoftheM-Dmg/EndRdx/Rchg(23), StnoftheM-Dam%(25)
Level 14: Tactics -- GssSynFr--ToHit(A), GssSynFr--ToHit/Rchg(31), GssSynFr--ToHit/Rchg/EndRdx(31), GssSynFr--Rchg/EndRdx(31), GssSynFr--ToHit/EndRdx(33), GssSynFr--Build%(33)
Level 16: Tough -- UnbGrd-ResDam(A), UnbGrd-ResDam/EndRdx(25), UnbGrd-EndRdx/Rchg(27), UnbGrd-ResDam/EndRdx/Rchg(27), GldArm-3defTpProc(34)
Level 18: Weave -- LucoftheG-Def(A), LucoftheG-Def/Rchg+(34)
Level 20: Speed Boost -- BlsoftheZ-ResKB(A)
Level 22: Hasten -- RechRdx-I(A)
Level 24: Combat Jumping -- LucoftheG-Def/Rchg+(A)
Level 26: Increase Density -- UnbGrd-ResDam(A), UnbGrd-ResDam/EndRdx(36), UnbGrd-Rchg/ResDam(36), UnbGrd-Max HP%(36)
Level 28: Voltaic Sentinel -- SprScrBls-Acc/Dmg(A), SprScrBls-Dmg/Rchg(29), SprScrBls-Dmg/EndRdx/Rchg(29)
Level 30: Repel -- SuddAcc--KB/+KD(A), FrcFdb-Rechg%(33)
Level 32: Thunderous Blast -- Artl-Acc/Dam(A), Artl-Dam/End(37), Artl-Dam/Rech(37), Artl-Acc/Dam/Rech(37), Artl-Acc/Rech/Rng(39), Artl-End/Rech/Rng(39)
Level 35: Transference -- PrfShf-EndMod/Acc(A)
Level 38: Fulcrum Shift -- Acc-I(A)
Level 41: Dominate -- BslGaz-Acc/Hold(A), BslGaz-Rchg/Hold(42), BslGaz-Acc/Rchg(42), BslGaz-EndRdx/Rchg/Hold(42)
Level 44: Mind Over Body -- UnbGrd-ResDam(A), UnbGrd-ResDam/EndRdx(45), UnbGrd-EndRdx/Rchg(45), UnbGrd-ResDam/EndRdx/Rchg(45), StdPrt-ResDam/Def+(46)
Level 47: World of Confusion -- CrcPrs-Conf(A), CrcPrs-Conf/Rchg(47), CrcPrs-Acc/Conf/Rchg(47), CrcPrs-Acc/Rchg(48), CrcPrs-Conf/EndRdx(48), CrcPrs-Conf%(48)
Level 49: Cross Punch -- SprAvl-Dmg/EndRdx(A), SprAvl-Acc/Dmg/EndRdx(49), SprAvl-Acc/Dmg/Rchg(49), SprAvl-Acc/Dmg/EndRdx/Rchg(50), SprAvl-Rchg/KDProc(50)
Level 1: Brawl -- Empty(A)
Level 1: Scourge
Level 1: Sprint -- Empty(A)
Level 2: Rest -- Empty(A)
Level 1: Swift -- Empty(A)
Level 1: Health -- Pnc-Heal/+End(A), Mrc-Rcvry+(34)
Level 1: Hurdle -- Empty(A)
Level 1: Stamina -- PrfShf-End%(A)
Level 1: Shocked
Level 49: Quick Form
Level 50: Invader
Level 50: High Pain Threshold
Level 50: Marshal
Level 50: Born In Battle
Level 50: Agility Core Paragon
------------| Copy & Paste this data into Mids Reborn : Hero Designer to view the build | |-------------------------------------------------------------------| |MxDz;1467;702;1404;HEX;| |78DA6594594F135114C7EFED4C2985968AA51BA5420B2D85E2487DF0D9809028901| |4700B02B5994E6192A66DA643221FC0379FF5C92D714D5CBF871194A22FBEF9EC92| |B82F381EE69CB1639874FACB3D73CEBDFFB3CCCC5C38E62995268F32EE1B2F17EAF| |5FC7855D3D66A7A556B9D59D30BBA5AAD080C2E17DCF17FCFF27385CA8A529426CA| |8AAC6BAA5C28E7C7205A0F353DC6D64A25694AAD28BA2AD7992F57AD96A569A5505| |4B4FAAA5AF39AEB49756555572B2B6DE66ABEA628458FE558037BD7444D95A55C7D| |5D5E55E5FC0C1CA068EB615092823BE0803FBEAB8D194EF600546645E678487C841| |41F139F205B9E229F717BF02C378D6D73C479A4E724F114B2E33432E8B0629921F0| |94883BA791AD43C423E09575B34EA89C402739842E6E1A3B02C8E11D30C74416025| |FA725C7F9CB61EEB0EF377107B9FF0FD1407631CC85C3092E2BD8B500181459EA1C| |727091B8445C460EE7911B10E8E6663A067377335356040E68A71DC5F60D86C76D2| |2832F895BC87003E907195ECE5186F7166A3C709B78877817D9778F781F2940B0CF| |3AD1F719130B7F41767F257E47C60F535321A89382782795364EA57D01F0539398F| |F0D1E9380880045B04006B30D823164194314BE098890518890A07E12D4FF8DF803| |1985DDA3568FA30338003D49E220F23938C4706E0C1E7B8BC6BE8B28AC07D04B6A9| |DBD82D3340E884427B1059972115B915BB069C24A357119E7AE01C624A3C626A9B1| |5BA0376D4D6EBAE130876FE815719BF81AB90DCE19AB27192AC1089560847A32423| |D39B85BC1989B7DF2302659C3282D6276D212711979284F3C4F2C202F81E0519227| |8E5EC5128D5E235E47666F106F527D45665D06FCE062C745F3ED2EEE9A8CE9BDCF7| |362F30566DC34BD6B6B7E10C8EB83CDC4599C66EF0437DF9BF77BFD3FFE67BA8229| |8533362953C3CDFC8CB3E09E2577E38C7DB1605FCCDA173F83B6C55F75D5E4C9| |-------------------------------------------------------------------|
What would you suggest if you were going to choose a travel power? Whether its IR / SS / SJ


Most Overpowered Builds?
in Archetypes
Posted
did you play on pinnacle?