The reason I'm writing this is because Stalker is probably my favorite class and I wanted to have a build that would be diverse and satisfying to play in any in-game content (TFs, Missions, AE Farms, Events) as well as be built relatively cheap but have you feeling strong and powerful. A key point I was trying to achieve this flexibility of play styles to be fun for all players and affordability of IO sets to get you there without having to sink all your Inf into the build if you just want to try it out.
My primary 3 others stalkers are Elec/Shield, STJ/Bio and Psi/Energy and my biggest comparison of this build is really vs Elec/Shield which according to recent server statistics is the most popular Stalker build out there. I do think that Elec/Bio can surpass that with the right setup but I haven't seen much content on the forums on it so I will do an introductory build here!
My Elec Themed Stalker:
About the Build:
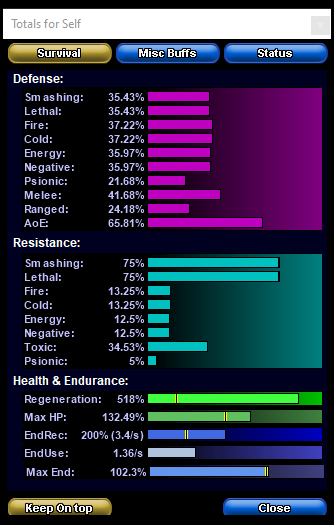
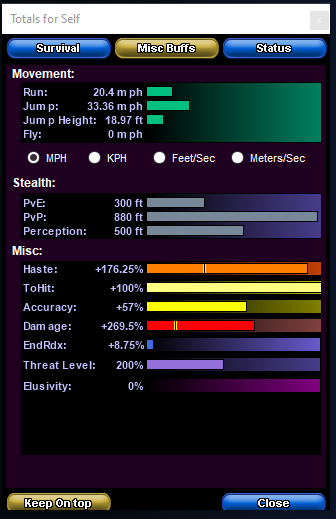
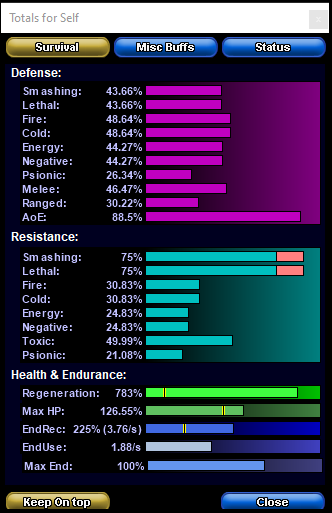
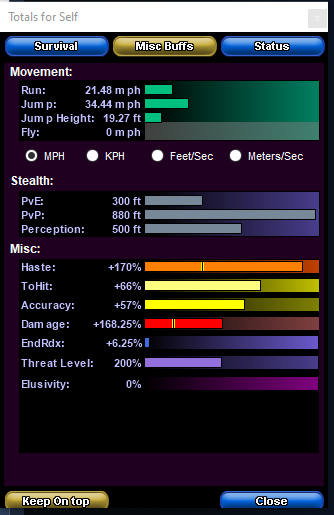
This build has near capped melee defense and s/l resistances, you can hit caps by either eating a small purple Insp or using Incarnates (Barrier and Agility Cores) for the extra boost. Although defenses are extremely helpful the reason this build shines is because of the Regen and Self Heals that Bio provides to survive the hard content. Though its harder to hit your Def caps with Bio vs other secondaries, once you do you get an additional 3 strong self sustaining clickies (DNA Siphon, Ablative Carapace, Parasitic Aura) to keep you going that other secondaries don't (especially /Shield) and therefore you can face tougher challenges without needing to run away. This build is capable of handling most content solo at +4/x8 including AE S&L farms including bosses (though Elite Bosses are tough fights). Another advantage is that you will be sitting in Offensive Adaptation mode 99.9% of the time with this build and that adds a consistent +20-25% damage to you.
The build also takes 3 ranged powers from Mu Mastery (Mu Bolts, Zapp, Ball Lightning). I enjoy having the extra ranged rotation and its excellent for those annoying runners near death especially in solo content/farms. It also provides the build a strong ST, AoE and Ranged rotation to play with so going back to the diversity and play style of the build you can do it all! If you are not a fan of the Ranged element, I suggest drop Mu Bolts and pick up Genetic Corruption (1 Self Heal IO) and spread the extra slots to Weave / Maneuvers / Combat Jump and you will get closer to that 45% def cap.
Build Costs:
I run a lot of TFs and Missions that provide me Reward Merits and Empyrean Merits throughout the game therefore a lot of the "expensive" IOs can be purchased through the conversion of Merits to cut down the total cost of the build. As a rule I used Merits to purchase most items that cost over 10m whenever possible and most of the IOs I bought with Inf were kept to the cheaper equivalents like Doctored Wounds, Obliteration, Decimation, each IO costing between 1M - 3M on my server (you can also found them in Merit Rewards for 50 Merits each but I feel these are more worth paying the Inf to get then wasting merits). You can replace each one of those with a Purple equivalent (Numinas, Apocalypse, etc.) to gain more Recharge/Accuracy/Dmg and can free up slots but that will cost you more so make sure you enjoy the build before proceeding.
In order of priority while leveling a playing I found the +procs are the most important IOs you should pick up first and they provide you the greatest benefit for your investment.
Panacea +HitPoints/Endurance (This is always my first buy) -- 100 Reward Merits
Performance Shifter +Chance for End / Miracle +Recovery
Gladiators Armor +3% Def / Shield Wall +5% Res -- 100 Reward Merits each & Reactive Defenses / Steadfast Protection +3% Res/Def
5X LOTG -- 250 Reward Merits or about 6M each on AH
Stalker Sets x12 -- This is the more expensive items in the build around 100M for the ATOs. You can buy the non Superior ones and use 12x Enhancement Catalyst to make them into Superiors saving you a lot of Inf. The stalker set +Procs are really powerful so I don't suggest you skip these even if you only buy the +Procs at lower levels first.
Then for the remainder I focused on Def/Res IOs > Recharge/Attack IOs > Heal IOs but order can be changed based on Inf you want to spend
Note: All my IOs are purchased Attuned or are Attuned after crafting so the build becomes really strong for running lower level TFs and Missions.
Incarnates:
Alpha: Musculature 45% Dmg I found worked best for me and gave me the greatest overall performance gain. Agility endurance gain is unnecessary for Bio since worst case you can drop to Efficient Adaptation mode but I've never needed to do so with all the +Procs and DNA Siphon that restores Endurance for you but it can be useful for the +Recharge to hit Perma Hasten and +Defense Buff to get you closer to Soft Cap Def. I usually alternate between the 2 depending on the content and team I am running.
Destiny: Barrier T4 Core is my favorite overall for the +5% Def/Res it provides to get you near capped. Ageless is also an alternative for the extra +Recovery if you really need the extra Endurance (I expect this will only come up when you are soloing content as in teams you will almost always have someone running Ageless for you).
Hybrid: I run Assault Core for the +extra dmg boost most of the time but if you are doing a lot of tanking/farming you can run Melee for the +Res or +Def instead. Again here I will alternate between the two depending on the content.
Interface: I use Degenerative -HP as I find that works best for bringing down big bosses but this one is pretty open I'm not sure what is best here.
Lore: I use Seers Pet for the Fortitude Buff that boosts your Defenses and Damage Output and the pet is immortal so it won't die when pulling large packs of mobs. You can really get anything you want here its for fun.
Judgement: Another fun power, I like Ion Core as it fits into the whole Electric theme the character has going on and it can hit those runners easily since it chains across the map but you can pick anything you enjoy here.
Finally! The Build:
I'm not an expert so I'm sure the community has suggestions and ways of improving on this build to achieve the same objective so I would be happy to hear any comments and feedback. It will also be very interesting to see a more expensive build that can surpass this if Inf wasn't a concern and we wanted to MinMax everything. I know there is some possibility around using +DMG/-Res Procs to boost overall performance but I don't enough about that to add it into my build.
Main Build: Musculature, Assault and Mu Ranged Rotation Build
Villain Plan by Mids' Reborn : Hero Designer 2.7.2.10 https://github.com/Crytilis/mids-reborn-hero-designer
Click this DataLink to open the build!
Level 50 Magic Stalker Primary Power Set: Electrical Melee Secondary Power Set: Bio Armor Power Pool: Speed Power Pool: Fighting Power Pool: Leadership Power Pool: Leaping Ancillary Pool: Mu Mastery
Villain Profile: Level 1: Havoc Punch -- SprAssMar-Acc/Dmg(A), SprAssMar-Dmg/Rchg(3), SprAssMar-Acc/Dmg/Rchg(3), SprAssMar-Dmg/EndRdx/Rchg(5), SprAssMar-Acc/Dmg/EndRdx/Rchg(5), SprAssMar-Rchg/Rchg Build Up(7) Level 1: Hide -- LucoftheG-Def/Rchg+(A) Level 2: Hardened Carapace -- UnbGrd-ResDam/EndRdx/Rchg(A), UnbGrd-ResDam(15), UnbGrd-ResDam/EndRdx(17), UnbGrd-Rchg/ResDam(17), GldArm-3defTpProc(23) Level 4: Boundless Energy -- NmnCnv-Heal/EndRdx(A), NmnCnv-Regen/Rcvry+(13), NmnCnv-Heal(15), NmnCnv-Heal/Rchg(46), NmnCnv-Heal/EndRdx/Rchg(48) Level 6: Assassin's Shock -- SprStlGl-Acc/Dmg(A), SprStlGl-Dmg/Rchg(7), SprStlGl-Acc/Dmg/Rchg(9), SprStlGl-Dmg/EndRdx/Rchg(9), SprStlGl-Acc/Dmg/EndRdx/Rchg(11), SprStlGl-Rchg/Hide%(11) Level 8: Build Up -- GssSynFr--Build%(A) Level 10: Environmental Modification -- LucoftheG-Def/Rchg+(A), ShlWal-ResDam/Re TP(46) Level 12: Hasten -- RechRdx-I(A), RechRdx-I(13), RechRdx-I(50) Level 14: Super Speed -- Run-I(A) Level 16: Adaptation Level 18: Chain Induction -- TchofDth-Acc/Dmg(A), TchofDth-Dmg/EndRdx(19), TchofDth-Dmg/Rchg(19), TchofDth-Acc/Dmg/EndRdx(21), TchofDth-Dmg/EndRdx/Rchg(21), TchofDth-Dam%(23) Level 20: Ablative Carapace -- Prv-Heal(A), Prv-Heal/EndRdx(25), Prv-EndRdx/Rchg(25), Prv-Heal/Rchg/EndRdx(31), Prv-Heal/Rchg(31), Prv-Absorb%(34) Level 22: Boxing -- Acc-I(A) Level 24: Tough -- StdPrt-ResDam/Def+(A), UnbGrd-ResDam/EndRdx(37), UnbGrd-Max HP%(40), UnbGrd-Rchg/ResDam(43), UnbGrd-ResDam(43) Level 26: Thunder Strike -- Obl-Dmg(A), Obl-Acc/Rchg(27), Obl-Dmg/Rchg(27), Obl-Acc/Dmg/Rchg(29), Obl-Acc/Dmg/EndRdx/Rchg(29), Obl-%Dam(31) Level 28: DNA Siphon -- DctWnd-Heal/EndRdx(A), DctWnd-EndRdx/Rchg(36), DctWnd-Heal(36), DctWnd-Heal/Rchg(36), DctWnd-Heal/EndRdx/Rchg(37) Level 30: Weave -- LucoftheG-Def/Rchg+(A) Level 32: Lightning Rod -- Obl-Dmg(A), Obl-Acc/Rchg(33), Obl-Dmg/Rchg(33), Obl-Acc/Dmg/Rchg(33), Obl-Acc/Dmg/EndRdx/Rchg(34), Obl-%Dam(34) Level 35: Zapp -- StnoftheM-Acc/Dmg(A), StnoftheM-Dmg/EndRdx/Rchg(40), StnoftheM-Dmg/ActRdx/Rchg(45), StnoftheM-Dmg/EndRdx(48), StnoftheM-Acc/ActRdx/Rng(48) Level 38: Parasitic Aura -- DctWnd-Rchg(A), DctWnd-EndRdx/Rchg(39), DctWnd-Heal/EndRdx/Rchg(39), DctWnd-Heal/Rchg(39), DctWnd-Heal/EndRdx(40) Level 41: Ball Lightning -- PstBls-Acc/Dmg(A), PstBls-Dmg/EndRdx(42), PstBls-Dmg/Rchg(42), PstBls-Dmg/Rng(42), PstBls-Acc/Dmg/EndRdx(43) Level 44: Mu Bolts -- Dcm-Acc/Dmg(A), Dcm-Build%(45), Dcm-Acc/Dmg/Rchg(45), Dcm-Dmg/EndRdx(50), Dcm-Dmg/Rchg(50) Level 47: Maneuvers -- LucoftheG-Def/Rchg+(A) Level 49: Combat Jumping -- LucoftheG-Def/Rchg+(A) Level 1: Assassination Level 1: Brawl -- Empty(A) Level 1: Quick Form Level 1: Prestige Power Dash -- Empty(A) Level 1: Prestige Power Slide -- Empty(A) Level 1: Prestige Power Quick -- Empty(A) Level 1: Prestige Power Rush -- Empty(A) Level 1: Prestige Power Surge -- Empty(A) Level 1: Sprint -- Empty(A) Level 2: Rest -- Empty(A) Level 4: Ninja Run Level 2: Swift -- Empty(A) Level 2: Health -- Mrc-Rcvry+(A), Pnc-Heal/+End(37) Level 2: Hurdle -- Empty(A) Level 2: Stamina -- PrfShf-End%(A), PrfShf-EndMod(46) Level 16: Defensive Adaptation Level 16: Efficient Adaptation Level 16: Offensive Adaptation Level 50: Barrier Core Epiphany Level 50: Degenerative Core Flawless Interface Level 50: Ion Core Final Judgement Level 50: Musculature Core Paragon Level 50: Assault Core Embodiment ------------
| Copy & Paste this data into Mids' Reborn : Hero Designer to view the build |
|-------------------------------------------------------------------|
|MxDz;1551;707;1414;HEX;|
|78DA6594C94F13611887BFA153B0D0B258A0ECD0B2140B1DA87A372A6062A960500|
|F6ECDA48C6562A5CDB426E072F06C34CA058D1E3CEAC58BDB9F219B7F8146D9D144|
|83C6657C3BEF0F4A32934C9F777EDFF6CCF7B58D4D0DB85F9EB87344489EE329359|
|B8D8FE5D4D455CD70C6D4A49E7008BA4AE86E411C8F69294D5306535A2267E80935|
|C5817FA77940BBA24D6635E5989E8E8F184975524FC48F1AD7D286281D4DA753CA5|
|846D3C63D5639A4272772FA64B2C27A1AD6D471CDC84EE819F7CE73861A7D83193D|
|A1EC2E7E3D1E53B339CD98AE232785EEBB2EFA90F296A6534CC942446451340DDE6|
|0CA37C15BCCE2DBCCCFEDBB6385A891ACEC0B651267B2F4D36165E5DF99953FC06D|
|66ED41E6328D71608CE334CFE33EC72C3FCB0C8F31FBCE30EF91B713DECE399EA77|
|89EB96F015C64962E811F98F7696C09BC4B5E1459D90A39B838935C78977094FB07|
|E800CBB8ADA8AC47B01F1801DBA98F47F09C9E3067AB3467058F331FD09A55DCEEA|
|C3A4F08CA62FF05F022B3FA127899591B676ED23C5EBCAB77999DEA56C05566CB3A|
|B8C6F46F3025F2AA81574D037B3928F361BF7DF9A259161D389BE02F66086714C2D|
|93D24FF7AF8D7FFE63D6BF803FE6536FD034D668BE0B15BE4DF88F51AA3BCB7EDC3|
|E0081863769C62CAE4D88C336AC679CC90432B1C5AE1D006873638B4C1C10F073F1|
|C3E11023C560EBCE77D082E327B17987D73E03CF31B7977C2BB73941DBAE0DD05CF|
|2E7807F15EDB6E21BAB14EF72B9EE7C06BF00DF896197AC7FC486E3D58A76796CFB|
|CF729F8841979043E6656D1FE28D81F05FB534B593FB27E648DB2C0659A4D853AFF|
|689A221A2AB4866CADFDB624624B0ED992C3B664D8968CCAF8E3A044B21257A5100|
|E986C94EEFE87A075AB9048D249C9DA810E3F9FECA6ADF7D7BDBD67F97B109E61AE|
|E77F9358676D4FBDB1A77EE6A5AEA8877C54E3375C5F5DA8A3DE42FD3C50A8FF03E|
|26E116A|
|-------------------------------------------------------------------|
Alternative Build: Agility, Melee and Dropped Bolts in favor of Genetic Corruption for Closer Combat Build
Villain Plan by Mids' Reborn : Hero Designer 2.7.2.10 https://github.com/Crytilis/mids-reborn-hero-designer
Click this DataLink to open the build!
Level 50 Magic Stalker Primary Power Set: Electrical Melee Secondary Power Set: Bio Armor Power Pool: Speed Power Pool: Fighting Power Pool: Leadership Power Pool: Leaping Ancillary Pool: Mu Mastery
Villain Profile: Level 1: Havoc Punch -- SprAssMar-Acc/Dmg(A), SprAssMar-Dmg/Rchg(3), SprAssMar-Acc/Dmg/Rchg(3), SprAssMar-Dmg/EndRdx/Rchg(5), SprAssMar-Acc/Dmg/EndRdx/Rchg(5), SprAssMar-Rchg/Rchg Build Up(7) Level 1: Hide -- LucoftheG-Def/Rchg+(A), LucoftheG-Def(46) Level 2: Hardened Carapace -- Ags-ResDam/EndRdx(A), Ags-ResDam(15), Ags-ResDam/Rchg(17), Ags-EndRdx/Rchg(17), GldArm-3defTpProc(23) Level 4: Boundless Energy -- NmnCnv-Heal/EndRdx(A), NmnCnv-Regen/Rcvry+(13) Level 6: Assassin's Shock -- SprStlGl-Acc/Dmg(A), SprStlGl-Dmg/Rchg(7), SprStlGl-Acc/Dmg/Rchg(9), SprStlGl-Dmg/EndRdx/Rchg(9), SprStlGl-Acc/Dmg/EndRdx/Rchg(11), SprStlGl-Rchg/Hide%(11) Level 8: Build Up -- GssSynFr--Build%(A) Level 10: Environmental Modification -- LucoftheG-Def/Rchg+(A), Ksm-ToHit+(15), ShlWal-ResDam/Re TP(46) Level 12: Hasten -- RechRdx-I(A), RechRdx-I(13) Level 14: Super Speed -- Run-I(A) Level 16: Adaptation Level 18: Chain Induction -- TchofDth-Acc/Dmg(A), TchofDth-Dmg/EndRdx(19), TchofDth-Dmg/Rchg(19), TchofDth-Acc/Dmg/EndRdx(21), TchofDth-Dmg/EndRdx/Rchg(21), TchofDth-Dam%(23) Level 20: Ablative Carapace -- Prv-Heal(A), Prv-Heal/EndRdx(25), Prv-EndRdx/Rchg(25), Prv-Heal/Rchg/EndRdx(31), Prv-Heal/Rchg(31), Prv-Absorb%(34) Level 22: Boxing -- KntCmb-Knock%(A), KntCmb-Acc/Dmg(45), KntCmb-Dmg/EndRdx(50), KntCmb-Dmg/Rchg(50) Level 24: Tough -- StdPrt-ResDam/Def+(A), UnbGrd-ResDam/EndRdx(37), UnbGrd-Max HP%(40), UnbGrd-Rchg/ResDam(43), UnbGrd-ResDam(43) Level 26: Thunder Strike -- Obl-Dmg(A), Obl-Acc/Rchg(27), Obl-Dmg/Rchg(27), Obl-Acc/Dmg/Rchg(29), Obl-Acc/Dmg/EndRdx/Rchg(29), Obl-%Dam(31) Level 28: DNA Siphon -- DctWnd-Heal/EndRdx(A), DctWnd-EndRdx/Rchg(36), DctWnd-Heal/Rchg(36), DctWnd-Heal/EndRdx/Rchg(36), DctWnd-Heal(37) Level 30: Weave -- LucoftheG-Def/Rchg+(A), LucoftheG-Def(45) Level 32: Lightning Rod -- Obl-Dmg(A), Obl-Acc/Rchg(33), Obl-Dmg/Rchg(33), Obl-Acc/Dmg/Rchg(33), Obl-Acc/Dmg/EndRdx/Rchg(34), Obl-%Dam(34) Level 35: Zapp -- StnoftheM-Acc/Dmg(A), StnoftheM-Dmg/EndRdx/Rchg(40), StnoftheM-Dmg/ActRdx/Rchg(45), StnoftheM-Dmg/EndRdx(48), StnoftheM-Acc/ActRdx/Rng(48) Level 38: Parasitic Aura -- DctWnd-Heal/EndRdx(A), DctWnd-EndRdx/Rchg(39), DctWnd-Heal/Rchg(39), DctWnd-Heal/EndRdx/Rchg(39), DctWnd-Heal(40) Level 41: Ball Lightning -- PstBls-Acc/Dmg(A), PstBls-Dmg/EndRdx(42), PstBls-Dmg/Rchg(42), PstBls-Dmg/Rng(42), PstBls-Acc/Dmg/EndRdx(43) Level 44: Genetic Corruption -- CaloftheS-Heal%(A) Level 47: Maneuvers -- LucoftheG-Def/Rchg+(A), LucoftheG-Def(48) Level 49: Combat Jumping -- LucoftheG-Def/Rchg+(A), LucoftheG-Def(50) Level 1: Assassination Level 1: Brawl -- Empty(A) Level 1: Quick Form Level 1: Prestige Power Dash -- Empty(A) Level 1: Prestige Power Slide -- Empty(A) Level 1: Prestige Power Quick -- Empty(A) Level 1: Prestige Power Rush -- Empty(A) Level 1: Prestige Power Surge -- Empty(A) Level 1: Sprint -- Empty(A) Level 2: Rest -- Empty(A) Level 4: Ninja Run Level 2: Swift -- Empty(A) Level 2: Health -- Mrc-Rcvry+(A), Pnc-Heal/+End(37) Level 2: Hurdle -- Empty(A) Level 2: Stamina -- PrfShf-End%(A), PrfShf-EndMod(46) Level 16: Defensive Adaptation Level 16: Efficient Adaptation Level 16: Offensive Adaptation Level 50: Barrier Core Epiphany Level 50: Degenerative Core Flawless Interface Level 50: Ion Core Final Judgement Level 50: Agility Core Paragon Level 50: Melee Core Embodiment ------------
| Copy & Paste this data into Mids' Reborn : Hero Designer to view the build |
|-------------------------------------------------------------------|
|MxDz;1566;719;1438;HEX;|
|78DA6594CB4F135114C6EF3053B0D0F21068419E2D8F6281D2227BA302264205C4B|
|8F0D54CCA582656DA4C6B023E16AE8D46D9B875EBC68DAFC4FFC0953CE43F30CAAB|
|808986F8C0F174CE0725CE2433BF73BF73EF3DDFBD7766A2B383AE97671F9C1492F|
|B4C52CD64629359357953331C5135A1C765415709DDCD9063512DA969A1A1A416CF|
|1A7A5C4DB2E0DB4F0F6A37B4998C163AADA7626346429DD1E3B153C6AD94214AC75|
|3A9646832AD69536E2B1CD613D3597D265161B54635754A3332D37ADAB5DF4E53D2|
|3B94D6E3A183E2B763513593D58CB93AF214A1FBA1931E52DEA5E910B30A898A289|
|A03EF3095BBE03D66F17DE697B683B192A8952CADB786F9957212E71429CC5AF900|
|B33202F6333DFDB2C5551A23633E798273AE4BCC47E4D3019F8E05EE5FBCC83CB20|
|42E334B3F812BCCC734B684C78A92174596B646B59CAC1539E1BD7C8F9A4DB48611|
|1EE7A7832B839FB26EC17EC036CAB905CFE9EE656D9DE6ACE0FEE613AA59C57947D|
|56542401147AF80579935D7C0EB4C4F8CB945F35463ADD5ABECA56E0D5C67366F82|
|1B4C5F8E2991AF5AAE2BD75E24F815D133CE8C4C80179832F5F5E28CBCF980D6DEF|
|E83E709FC640677C1EFCCA7B4AE7AACABFE37EFE5B13FE01EB3F12F68329B058FDD|
|A67535A05EC308EF79DB281805CF33DBC7980A796CC21934E19C7AF08ECD9397167|
|869819756786985975678F1C18B0F5E3E13FC3C56F17FE4F30B2C337B96987D0BE0|
|22F31BF9EF80FF0EF8EF84FF4EF8EF84FF00FCEFBA84E8429DAE573CCFF1D7E01BF|
|02D33F88EB94375BAF1BE767FE079AA681F42D88710F6A10FFBE0A15C18B9307211|
|E41A1481CB341B0B71BE699A622458C8066DD9B04D89D894133665C0A68CDA94710|
|53F0E52244B71560A21C349AEF4E0DF81EC764191A47392F595B4FBF824B76CBD77|
|0EF77EC6E7DE3BCFDCCC7FA3A8B37128CE1D8A9F57F3BF311F0F7B29C6375D5F538|
|80BD72FCF7FEA7B7F41F80724521D36|
|-------------------------------------------------------------------|