thorasaurus
-
Posts
19 -
Joined
-
Last visited
-
Elec/nin obviously. Force chokes, light sabers, and sith lightning... oh my! Refer to this sturdy as nails shocked/critical sith lord. I have an elec/nin as well, and confirm, it's hella fun.
-
Thanks!! Going by the last build, I did an update on Redlynne's crazy elude build to bring it in line with the ability to skip t1 powers on the secondary and came up with this silliness. It has taunt unlike the original. It's just softcapped defense without storm kick, but you can alternate Elude and Unleash potential with unrelenting to cover the crash. Swapped crane kick for cobra strike to get a force feedback proc for silliness. This Hero build was built using Mids Reborn 3.4.7 https://github.com/LoadedCamel/MidsReborn Click this DataLink to open the build! Level 50 Natural Tanker Primary Power Set: Super Reflexes Secondary Power Set: Martial Arts Power Pool: Force of Will Power Pool: Leadership Power Pool: Presence Power Pool: Speed Hero Profile: Level 1: Focused Fighting (A) Red Fortune - Defense/Endurance (9) Red Fortune - Defense/Recharge (9) Red Fortune - Defense/Endurance/Recharge (13) Red Fortune - Defense (15) Red Fortune - Endurance (15) Luck of the Gambler - Defense/Increased Global Recharge Speed Level 1: Storm Kick (A) Superior Might of the Tanker - Accuracy/Damage (11) Superior Might of the Tanker - Accuracy/Damage/Recharge (11) Superior Might of the Tanker - Damage/Endurance/Recharge (13) Superior Might of the Tanker - Accuracy/Damage/Endurance/Recharge (33) Superior Might of the Tanker - Damage/Recharge (40) Superior Might of the Tanker - Recharge/Chance for +Res(All) Level 2: Focused Senses (A) Luck of the Gambler - Defense/Increased Global Recharge Speed (3) Red Fortune - Defense/Endurance (3) Red Fortune - Defense (5) Red Fortune - Defense/Recharge (5) Red Fortune - Endurance/Recharge (7) Red Fortune - Defense/Endurance/Recharge Level 4: Mighty Leap (A) Blessing of the Zephyr - Run Speed, Jump, Flight Speed, Range (46) Blessing of the Zephyr - Run Speed, Jump, Flight Speed, Range/Endurance (48) Blessing of the Zephyr - Knockback Reduction (4 points) Level 6: Practiced Brawler (A) Recharge Reduction IO Level 8: Maneuvers (A) Reactive Defenses - Scaling Resist Damage Level 10: Warrior's Provocation (A) Recharge Reduction IO Level 12: Evasion (A) Red Fortune - Defense/Endurance (17) Red Fortune - Defense/Recharge (19) Red Fortune - Defense (19) Red Fortune - Defense/Endurance/Recharge (21) Red Fortune - Endurance (27) Luck of the Gambler - Defense/Increased Global Recharge Speed Level 14: Dodge (A) Red Fortune - Defense (39) Red Fortune - Defense/Recharge (43) Red Fortune - Defense/Endurance (45) Kismet - Accuracy +6% Level 16: Agile (A) Red Fortune - Defense (39) Red Fortune - Defense/Recharge (45) Red Fortune - Defense/Endurance (46) Luck of the Gambler - Defense/Increased Global Recharge Speed Level 18: Lucky (A) Shield Wall - +Res (Teleportation), +5% Res (All) (40) Shield Wall - Defense (40) Shield Wall - Defense/Recharge (46) Luck of the Gambler - Defense/Increased Global Recharge Speed Level 20: Dragon's Tail (A) Superior Gauntleted Fist - Accuracy/Damage (21) Superior Gauntleted Fist - Damage/RechargeTime (23) Superior Gauntleted Fist - Accuracy/Damage/RechargeTime (23) Superior Gauntleted Fist - Damage/Endurance/RechargeTime (25) Superior Gauntleted Fist - Accuracy/Damage/Endurance/RechargeTime (25) Superior Gauntleted Fist - RechargeTime/+Absorb Level 22: Crane Kick (A) Mako's Bite - Damage/Recharge (33) Mako's Bite - Accuracy/Damage (34) Mako's Bite - Damage/Endurance (34) Mako's Bite - Accuracy/Damage/Endurance/Recharge (34) Force Feedback - Chance for +Recharge Level 24: Focus Chi Hamidon Origin:Membrane Exposure Level 26: Tactics (A) Gaussian's Synchronized Fire-Control - Chance for Build Up (42) Gaussian's Synchronized Fire-Control - To Hit Buff/Endurance (42) Gaussian's Synchronized Fire-Control - To Hit Buff (42) Gaussian's Synchronized Fire-Control - To Hit Buff/Recharge (43) Gaussian's Synchronized Fire-Control - To Hit Buff/Recharge/Endurance (43) Gaussian's Synchronized Fire-Control - Recharge/Endurance Level 28: Unrelenting (A) Panacea - Heal/Endurance (29) Panacea - Endurance/Recharge (29) Panacea - Heal/Recharge (31) Panacea - Heal/Endurance/Recharge (31) Panacea - Heal Level 30: Hasten (A) Recharge Reduction IO (31) Recharge Reduction IO Level 32: Elude (A) Recharge Reduction IO (33) Recharge Reduction IO Level 35: Crippling Axe Kick (A) Crushing Impact - Accuracy/Damage/Endurance (36) Crushing Impact - Damage/Endurance (36) Crushing Impact - Accuracy/Damage/Recharge (36) Crushing Impact - Accuracy/Damage (45) Crushing Impact - Damage/Recharge Level 38: Project Will Hamidon Origin:Nucleolus Exposure Level 41: Provoke Hamidon Origin:Endoplasm Exposure Level 44: Intimidate Hamidon Origin:Endoplasm Exposure Level 47: Unleash Potential (A) Preventive Medicine - Heal (48) Preventive Medicine - Heal/Endurance (48) Preventive Medicine - Endurance/RechargeTime (50) Preventive Medicine - Heal/RechargeTime (50) Preventive Medicine - Heal/RechargeTime/Endurance (50) Preventive Medicine - Chance for +Absorb Level 49: Quickness Hamidon Origin:Microfilament Exposure Level 1: Gauntlet Level 1: Brawl
-
Hi! I know I saw a build somewhere for SR/MA once upon a time, but I can't find it. I know SR/MA is an overkill defense dependent build and shield is probably better once tricked out (plus it gives DDR to your team) but it doesn't fit my character concept! This is the SchroedingerCat, escaped from the deathtrap box and seeking revenge on her former owner, Erwin, for attempted murder. The goal is to softcap defense outside of storm kick (easy) and then try and get resists to 30s across the board outside of the tanker ATO proc. I also sought out hp and recovery where available. I picked up unrelenting as an oh crap power. I don't have gloom in the build, instead it is just pure melee and only 3 ST attacks + one AOE. I feel like this is enough granted the other things i typically have to do in an average fight (position, taunt, keep up storm kick, and look fabulous doing eagle's claw). So in hopes someone can find a better build, this is what I've got put together. Any expensive purples are in here simply because I already have them, but mostly I chased resistance bonuses with cheaper frankenslotting. This Hero build was built using Mids Reborn 3.4.7 https://github.com/LoadedCamel/MidsReborn Click this DataLink to open the build! Level 50 Magic Tanker Primary Power Set: Super Reflexes Secondary Power Set: Martial Arts Power Pool: Flight Power Pool: Fighting Power Pool: Presence Ancillary Pool: Energy Mastery Hero Profile: Level 1: Focused Fighting (A) Shield Wall - +Res (Teleportation), +5% Res (All) (3) Shield Wall - Defense (3) Shield Wall - Defense/Endurance (5) Shield Wall - Defense/Recharge (5) Reactive Defenses - Defense (7) Reactive Defenses - Scaling Resist Damage Level 1: Storm Kick (A) Superior Might of the Tanker - Recharge/Chance for +Res(All) (7) Superior Might of the Tanker - Accuracy/Damage (9) Superior Might of the Tanker - Accuracy/Damage/Endurance/Recharge (9) Superior Might of the Tanker - Damage/Recharge (11) Superior Might of the Tanker - Accuracy/Damage/Recharge (11) Superior Might of the Tanker - Damage/Endurance/Recharge Level 2: Focused Senses (A) Luck of the Gambler - Defense/Increased Global Recharge Speed (13) Luck of the Gambler - Defense (13) Luck of the Gambler - Defense/Endurance (15) Luck of the Gambler - Defense/Recharge (15) Luck of the Gambler - Endurance/Recharge (17) Luck of the Gambler - Defense/Endurance/Recharge Level 4: Agile (A) Reactive Defenses - Defense (17) Reactive Defenses - Defense/Endurance (19) Reactive Defenses - Defense/RechargeTime (19) Reactive Defenses - Defense/Endurance/RechargeTime Level 6: Practiced Brawler (A) Recharge Reduction IO (21) Recharge Reduction IO Level 8: Fly (A) Hypersonic - Flying (21) Hypersonic - Flying / Increased Fly Protection Level 10: Dodge (A) Shield Wall - Defense/Endurance (23) Shield Wall - Defense (23) Shield Wall - Defense/Recharge (25) Shield Wall - Defense/Endurance/Recharge Level 12: Warrior's Provocation (A) Perfect Zinger - Chance for Psi Damage (25) Perfect Zinger - Threat/Placate/Recharge Level 14: Evasion (A) Shield Wall - Defense/Endurance (27) Shield Wall - Defense (27) Shield Wall - Defense/Recharge (29) Shield Wall - Defense/Endurance/Recharge (29) Perfect Zinger - Threat/Placate (31) Perfect Zinger - Chance for Psi Damage Level 16: Cobra Strike (A) Hecatomb - Damage (34) Hecatomb - Damage/Recharge/Accuracy (34) Hecatomb - Damage/Endurance (34) Mako's Bite - Accuracy/Damage (36) Mako's Bite - Accuracy/Endurance/Recharge (36) Superior Blistering Cold - Recharge/Chance for Hold Level 18: Lucky (A) Luck of the Gambler - Defense/Increased Global Recharge Speed (36) Luck of the Gambler - Defense/Endurance (37) Luck of the Gambler - Defense (37) Luck of the Gambler - Defense/Recharge (37) Luck of the Gambler - Endurance/Recharge (39) Luck of the Gambler - Defense/Endurance/Recharge Level 20: Dragon's Tail (A) Superior Gauntleted Fist - RechargeTime/+Absorb (39) Superior Gauntleted Fist - Accuracy/Damage (39) Superior Gauntleted Fist - Damage/RechargeTime (40) Superior Gauntleted Fist - Accuracy/Damage/RechargeTime (40) Superior Gauntleted Fist - Damage/Endurance/RechargeTime (40) Superior Gauntleted Fist - Accuracy/Damage/Endurance/RechargeTime Level 22: Quickness (A) Run Speed IO Level 24: Focus Chi (A) Gaussian's Synchronized Fire-Control - Chance for Build Up Level 26: Boxing (A) Empty Level 28: Crippling Axe Kick (A) Gravitational Anchor - Chance for Hold (42) Mako's Bite - Accuracy/Damage (42) Mako's Bite - Accuracy/Damage/Endurance/Recharge (42) Mako's Bite - Damage/Endurance (43) Mako's Bite - Damage/Recharge (43) Mako's Bite - Accuracy/Endurance/Recharge Level 30: Tough (A) Steadfast Protection - Resistance/+Def 3% (31) Impervium Armor - Psionic Resistance (31) Unbreakable Guard - +Max HP (33) Unbreakable Guard - Resistance (33) Unbreakable Guard - Resistance/Endurance (33) Unbreakable Guard - RechargeTime/Resistance Level 32: Eagles Claw (A) Hecatomb - Damage/Recharge (46) Hecatomb - Chance of Damage(Negative) (46) Hecatomb - Recharge/Accuracy (48) Focused Smite - Accuracy/Damage (48) Focused Smite - Damage/Endurance (48) Focused Smite - Accuracy/Endurance/Recharge Level 35: Hover (A) Luck of the Gambler - Defense/Increased Global Recharge Speed Level 38: Conserve Power (A) Recharge Reduction IO Level 41: Physical Perfection (A) Panacea - +Hit Points/Endurance (43) Numina's Convalesence - Heal (45) Numina's Convalesence - Heal/Endurance (45) Numina's Convalesence - Heal/Recharge Level 44: Provoke (A) Accuracy IO Level 47: Intimidate (A) Accuracy IO Level 49: Unrelenting (A) Recharge Reduction IO (50) Recharge Reduction IO (50) Preventive Medicine - Chance for +Absorb Level 1: Brawl (A) Empty Level 1: Gauntlet Level 1: Sprint
-
I usually tell people to stay under my bubble for status resist and end drain resist and then I stay a little bit behind melee. I try to avoid running off to support solo cowboys on teams as any defender regardless. Usually people see everyone with constantly full endurance bars near me and figure it out. 🙂
-
I am preferential to elec/elec for small group or itrials both. I have enough drain and -regen and absorbs for my team to handle anything. Amp up will also give everyone on your team power boost. You get all the resist of thermal and all the heal of thermal plus end refills, recharge and you become an absolute tank
-
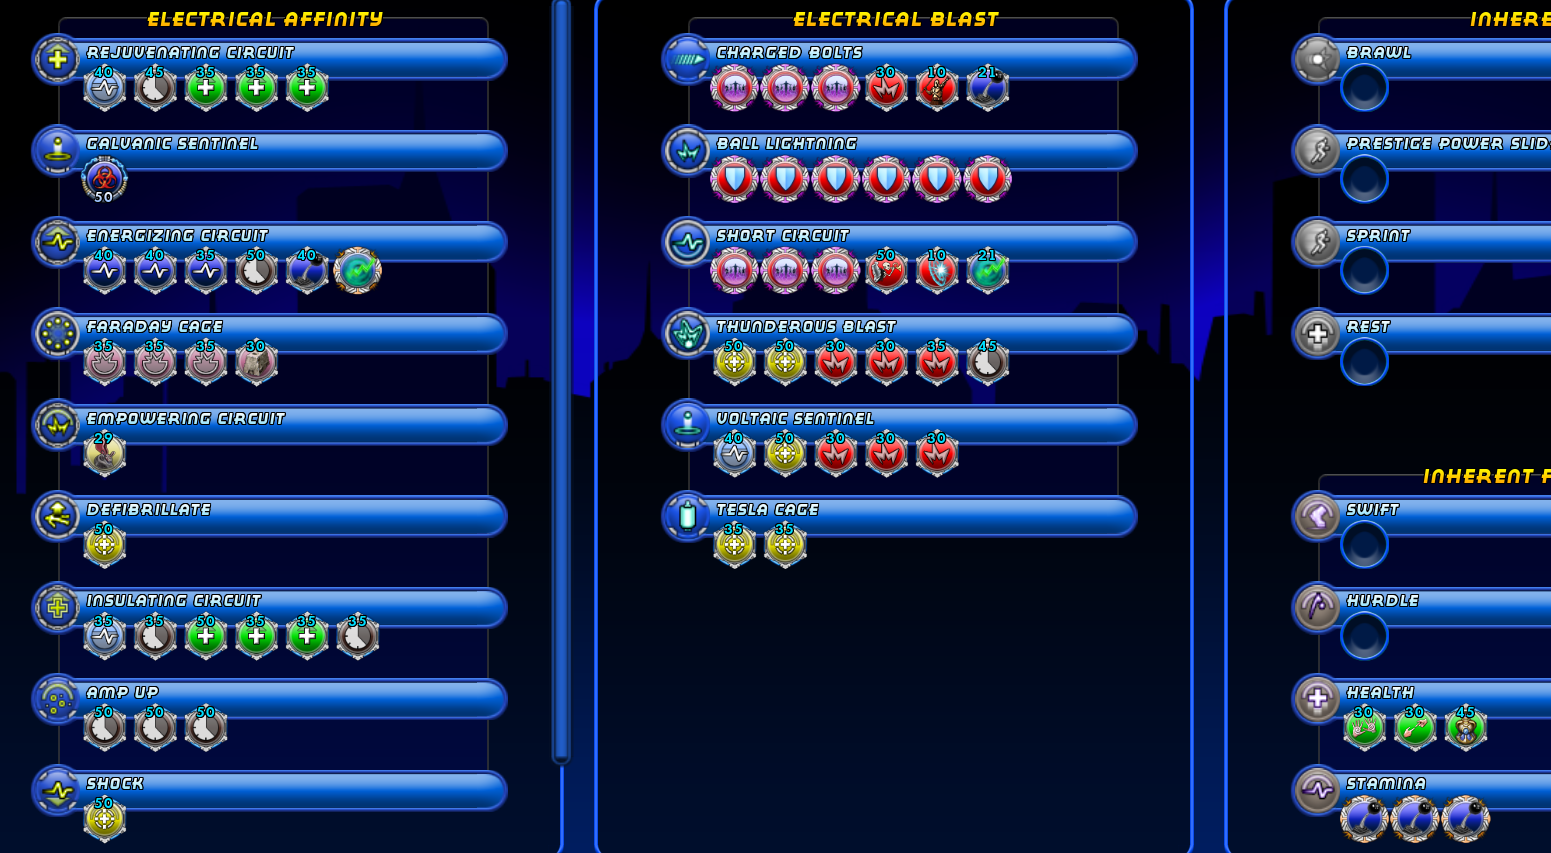
This is me at vet level 15. I solo on +1/+8 by flying in to packs of mobs, dropping faraday cage, summoning sparky if he is too far for bouncing, and aoe'ing away. I have a macro to bounce buffs on him in combat, but I am usually pre-buffed with amp up + insulating circuit, so once I have capped resists from the cage, I don't get hurt too badly. I haven't even used sets yet as you can see and it runs just fine without any trickery. One thing you'll notice is the performance shifter + multiple power transfer: chance to heal. With energizing circuit, you get 10% of your endurance + the full end recovery with one cast. The chance to heal triggers off each person it hits. So this is an enormous self-heal and end recovery move every 10 seconds. I am also incredibly attack-light for single target attacks. Usually, this is fine though, since I am busy casting buffs + aoe. I may swap in zapp or hasten someday instead of thunder strike though. I use agility and amp up and between those two powers, everything that isnt an AV is within shock/low end range within 2 hits. I might also swap the gaussian out into tactics - i had it there initially to see if i could get multiple applications per bounce like energizing circuit, but i couldnt. Galvanic sentinel doesn't proc the stun from what i've seen, sadly.

-
I would just reply "scrappers shouldn't be so squishy LoL" because I am a petty, petty trash talker.
-
trick arrow/sonic is just gross and unfair to the mobs.
-
honoroitisfantastic Imma healer, honest - Pain Dom heal toggle bubble procs
thorasaurus replied to honoroit's topic in Defender
I just wanted to say that is one badass drawing! -
They must have missed poor staff in the redraw pass. It has no redraw option 😞
-
YES I wish I had the cool Titan weapon looks available. we need more of them for sure! I am super interested if you can get this to work!
-
if TW is like Staff, and iirc it is on this one aspect, you have to redraw your sword after using any attack that isnt TW. So gloom breaks momentum and forces a redraw. FWIW Your dark armor heal should NOT do this with TW if you spam a TW attack during the animation, since i am able to redraw staff mid-heal (DA/staff) i personally don't like TW on tank because i need to manuver mobs facing away from my team to avoid cones/aoe from hitting my team. I also have a bigger cap of targets i can hit and most of my sets have expanded arcs. so all the goodies TW naturally gets, every other set gets too, but without the drawbacks that TW has (momentum mechanics).
-
I am disappointed that you werent able to call yourself Rocky Road!
-
Is Fire/ Ninja viable for late game? Need build tips
thorasaurus replied to marcoiron's topic in Blaster
I don't know about anyone else, but I had an issue with ninja not proccing Shinobi as much with Fire and Ice as it did with other primaries (water, sonic). Shinobi especially only procs off the fire primary damage part (not the dot) and does not give credit for most of the dot portions of Ice damage's hold attack (tired, I forget the name, bitter ice blast? not the bad slow one that replaces a snipe). With Water (excepting whirlpool, which cannot proc it) it procced a lot. This was on test with characters I bumped up to 50 with SO's, so nothing super fancy IO wise, just a test drive to see how they "felt". Sonic and water felt the most fun and water seemed to do the most damage, especially when I got the occasional double shinobi water jet.- 21 replies
-
- 1
-

-
- build
- fire blast
- (and 1 more)
-
can you share your invuln/dm tank with me? I just rolled up Wally Funk as an Invuln/DM and wanted a peep at your build 🙂