Tomgreen1
-
Posts
30 -
Joined
-
Last visited
Content Type
Profiles
Forums
Events
Store
Articles
Patch Notes
Everything posted by Tomgreen1
-
This is out of date come this new update (in a week). Force field becoming way more viable though so it can be updated pretty similar and be decent.
-
Thermal Defender or Corruptor: Pair with Elec Blast or Ice Blast!
Tomgreen1 replied to StriderIV's topic in Archetypes
Ice blast has some of the best proc chance slotting/cast animations in the game so ice blast will outdamage elec if proc slotted. So if you aren't going to sap at all with the elec and just are going pure damage ice will be the min max choice. -
Thermal Defender or Corruptor: Pair with Elec Blast or Ice Blast!
Tomgreen1 replied to StriderIV's topic in Archetypes
There is no dispel power in the game so you cast heat exhaustion and can run around for a bit and they lose end it's very hard to deal with. -
Thermal Defender or Corruptor: Pair with Elec Blast or Ice Blast!
Tomgreen1 replied to StriderIV's topic in Archetypes
Thermal in pve isn't top tier but it has some stuff going for it. Melt armor is good vs mobs or boss. Heat exhaustion is good vs boss to reduce their damage. Forge is a good teammate buff, and thermal has a good low cooldown aoe heal spam + another heal which combines well if you target bind combat teleport with 2 ranged IO's in it then you just click your teammates name on the team bar press the key and your right next to them to heal them. (combat teleport is undervalued in support classes for purposes like that, but it's only good if you make a target bind for it then it's really fun) So thermal has lots of healing capabilities for the team if you are ontop that with combat teleport or getting near teammates. That's it's main boon over something like empathy because then it still has melt armor and heat exhaustion for bosses. My build for thermal was a very greedy pvp single target style though. -
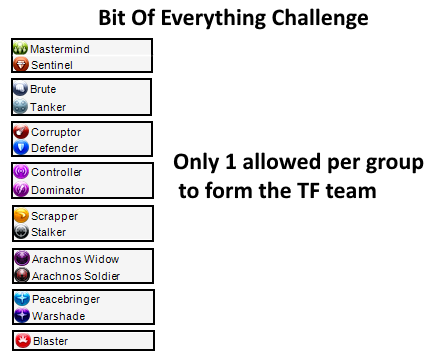
Bit Of Everything Hard Mode Task Force CHALLENGE!
Tomgreen1 replied to Tomgreen1's topic in General Discussion
Most hardmodes consist of half corruptors and most of those are /cold. That's the point of a challenge like this because this would really be the true hardmode. Imagine if homecoming devs released a hardmode TF option that limited class composition stacking. Expert mode. -
Thermal Defender or Corruptor: Pair with Elec Blast or Ice Blast!
Tomgreen1 replied to StriderIV's topic in Archetypes
Epoch has a high end elec/kin corruptor that works well and he solo fire farms with it. You really only need to worry about -recovery if you are trying to endurance sap gms/avs/pvp. In basic pve 54 mobs you can just sap their end (with thunderous/shortcircuit) and not worry about recovery really because your team will kill before they regain it or you can follow up with just a short circuit 7 seconds later to keep them at 0. The -recovery is moreso for trying to let really strong opponents never be able to attack. Some of those AV's/GM's have 0 endurance attacks even if you fully sap them but they arent as strong as their other attacks and only about half have those. My elec/thermal sapper is really fun to mess with vs gms. You could go ice blast just for damage I don't really see how ice blast's -recharge secondary would combo with thermal if you were trying to do something besides just damage though. That elec/thermal build I posted is a pvp build though it does work in pve and it does do decent damage and I played it a lot in pve and it did well but there is room for pve improvement because some of those choices are just for pvp (you wouldn't need teleport and fly ect). Shocked adds 20% damage or so and has a higher chance to go off the lower their end is. Mid's can't really calculate that, but with powerboost thunderous the entire 54 mob if slotted like the pvp build will have 0 end. Short circuit same deal but its aoe can't hit an entire mob it can hit half and you just do it twice. Clarion + Special incarnate works also besides power boost. -
This build saps with chargeup+powerboost (or clarion incarnate when power boost is down if not taking barrier) then thunderous blast will 100% sap any 54 mob. When thunderous is down use short circuit and same deal. Rotate powerboost with the clarion incarnate +special side when the other is down. Power boost then bubble your teammates for massive defense boosts. Make sure to powerboost before buffing them every 2minutes when the shields wear off it will make them 80% better defense. Basically this build provides insanely strong defense bubbles with use of powerboosted shield buffing and also will sap entire mobs with powerboosted thunderous blast/shortciruit. It also does moderate damage with a decent attack chain. Cast repulsion bomb every time it is up on mobs to get the Force Feedback to proc and you will have utterly insane cooldowns on this build and be able to sap every other mob with powerboosted thunderous blast so they can't attack your party. Lightingbolt>repulsionbomb>zap does decent damage once you are done sapping the enemies. This build is very rare, this build is extremely good and lots of skill level difference based on how good a player is playing it. There is a lot they can do with it. The powerboosted bubbles plus sapping will really make it hard for your team to die. If you want to do Hardmode task forces maybe take the barrier destiny over clarion and just lose that sapping alternative when powerboost is down, because teams will like it more if you have barrier every 2 minutes for them as well. Barrier is all around the better choice to give you and teammates an insanely strong change of not getting hit with your bubbles on top. If you really like the sapping side then take Clarion +special. The repulsion field will drain your endurance quickly if you use it on large mobs, but with the knockdown conversion in it, it won't bug teammates throwing enemies around and it's an extra way to contribute knockdowns. Not needed though just fun extra thing if soloing ect.. Your powerboost is up half the time thanks to repulsion bomb hitting mobs proc'ing force feedback (Absolutely use this everytime on mobs when it is up FF is insane). When powerboost is up you are hard to hit. Personal force field is good if you are getting focused especially when powerboost is down. You don't want to run this all the time because you can't damage enemies so bind it to a panic key if you start getting hit press it move away then turn it off and hop back in the combat. /bind P powexec_name personal force field Just tap P every time you are focused then to toggle it on or off! With powerboost Force field this build way outperforms /cold in terms of defense. This is very viable for hardmode TF's. When power boosted bubbles on teammates plus your aoe bubble hovering on them + maneuvers you are giving them all +50% defense all. This defense on top of barrier incarnate means nobody is getting hit. The FF in repulsion bomb keeps you power boosted half the time. The sapping of every other mob with powerboost+thunderous also makes every other mob just sit there not able to attack. Then you have a nice damage chain to lay out moderately high damage. This Villain build was built using Mids Reborn 3.4.6 https://github.com/LoadedCamel/MidsReborn Click this DataLink to open the build! Level 50 Magic Corruptor Primary Power Set: Electrical Blast Secondary Power Set: Force Field Power Pool: Leadership Power Pool: Flight Power Pool: Speed Power Pool: Fighting Ancillary Pool: Soul Mastery Villain Profile: Level 1: Charged Bolts (A) Superior Scourging Blast - RechargeTime/PBAoE +End (3) Superior Scourging Blast - Damage/RechargeTime (3) Superior Scourging Blast - Accuracy/Damage/RechargeTime (5) Superior Scourging Blast - Damage/Endurance/RechargeTime (5) Superior Scourging Blast - Accuracy/Damage/Endurance/RechargeTime (7) Superior Scourging Blast - Accuracy/Damage Level 1: Personal Force Field (A) Luck of the Gambler - Defense/Increased Global Recharge Speed Level 2: Lightning Bolt (A) Superior Malice of the Corruptor - Accuracy/Damage (7) Superior Malice of the Corruptor - Recharge/Chance for Negative Energy Damage (15) Superior Malice of the Corruptor - Damage/Recharge (17) Superior Malice of the Corruptor - Accuracy/Damage/Recharge (17) Superior Malice of the Corruptor - Damage/Endurance/Recharge (19) Superior Malice of the Corruptor - Accuracy/Damage/Endurance/Recharge Level 4: Maneuvers (A) Luck of the Gambler - Defense/Increased Global Recharge Speed Level 6: Fly (A) Blessing of the Zephyr - Knockback Reduction (4 points) Level 8: Charge Up (A) Gaussian's Synchronized Fire-Control - Chance for Build Up (9) Gaussian's Synchronized Fire-Control - To Hit Buff/Recharge/Endurance (9) Gaussian's Synchronized Fire-Control - Recharge/Endurance (11) Gaussian's Synchronized Fire-Control - To Hit Buff/Endurance (19) Gaussian's Synchronized Fire-Control - To Hit Buff/Recharge (21) Gaussian's Synchronized Fire-Control - To Hit Buff Level 10: Deflection Shield (A) Luck of the Gambler - Defense/Increased Global Recharge Speed (48) Luck of the Gambler - Defense (48) Luck of the Gambler - Defense/Endurance (50) Luck of the Gambler - Defense/Endurance/Recharge Level 12: Hasten (A) Recharge Reduction IO (25) Recharge Reduction IO Level 14: Insulation Shield (A) Luck of the Gambler - Defense/Increased Global Recharge Speed (23) Luck of the Gambler - Defense/Endurance/Recharge (50) Luck of the Gambler - Defense (50) Luck of the Gambler - Defense/Endurance Level 16: Tactics (A) To Hit Buff IO Level 18: Hover (A) Luck of the Gambler - Defense/Increased Global Recharge Speed (23) Blessing of the Zephyr - Knockback Reduction (4 points) (25) Shield Wall - +Res (Teleportation), +5% Res (All) (27) Reactive Defenses - Scaling Resist Damage (27) Kismet - Accuracy +6% Level 20: Short Circuit D-Sync Origin:D-Sync Conduit Level 22: Zapp (A) Gladiator's Javelin - Chance of Damage(Toxic) (33) Sting of the Manticore - Chance of Damage(Toxic) (33) Apocalypse - Damage (34) Apocalypse - Damage/Recharge/Accuracy (34) Apocalypse - Chance of Damage(Negative) (34) Apocalypse - Damage/Recharge Level 24: Boxing (A) Empty Level 26: Voltaic Sentinel (A) Expedient Reinforcement - Resist Bonus Aura for Pets (29) Expedient Reinforcement - Accuracy/Damage/Recharge (29) Expedient Reinforcement - Accuracy/Recharge (36) Expedient Reinforcement - Damage/Endurance (37) Expedient Reinforcement - Endurance/Damage/Recharge (37) Expedient Reinforcement - Accuracy/Damage Level 28: Vengeance (A) Luck of the Gambler - Defense/Increased Global Recharge Speed Level 30: Dispersion Bubble (A) Luck of the Gambler - Defense/Increased Global Recharge Speed (36) Luck of the Gambler - Defense (36) Luck of the Gambler - Defense/Endurance (43) Luck of the Gambler - Defense/Endurance/Recharge Level 32: Thunderous Blast D-Sync Origin:D-Sync Conduit Level 35: Tough (A) Steadfast Protection - Resistance/+Def 3% (42) Reactive Armor - Resistance (42) Reactive Armor - Resistance/Endurance (42) Reactive Armor - Resistance/Endurance/Recharge Level 38: Dark Embrace (A) Gladiator's Armor - Resistance (40) Gladiator's Armor - End/Resist (40) Gladiator's Armor - TP Protection +3% Def (All) Level 41: Weave (A) Luck of the Gambler - Defense/Increased Global Recharge Speed (43) Luck of the Gambler - Defense (43) Luck of the Gambler - Defense/Endurance Level 44: Repulsion Bomb (A) Ragnarok - Damage (45) Ragnarok - Damage/Recharge (45) Ragnarok - Damage/Recharge/Accuracy (45) Ragnarok - Recharge/Accuracy (46) Ragnarok - Chance for Knockdown (46) Force Feedback - Chance for +Recharge Level 47: Power Boost (A) Recharge Reduction IO (48) Recharge Reduction IO Level 49: Repulsion Field (A) Endurance Reduction IO (46) Sudden Acceleration - Knockback to Knockdown Level 1: Scourge Level 1: Brawl
-
This is what they didn't want you to find out. It is Vanilla Ice. The likeness is exact. Here he is even seen hanging with a superpowered turtle.

-
Bit Of Everything Hard Mode Task Force CHALLENGE!
Tomgreen1 replied to Tomgreen1's topic in General Discussion
It would be fun to see this attempted. It would make the developers happy to see everything used lol. -
Complete Hardmode TF with the following mixture composition for bragging rights.
-
Well going more recharge means more powerboost which means more defense/-tohit. It's a tradeoff of consistency vs spike usage with yours being the consistent. The recharge has the added benefit of more aoe attack spam and oil slick ect. So this build has 15 second uptime of powerboost followed by 21 seconds of downtime. Depends on how you are mob hopping because the powerboost+flash arrow nearly doubles the -tohit and that lasts 60 seconds on the same mob. Ideally you would have the bubble incarnate and Eye of the Magus accolade to trade off on down times of powerboost as well to add defense. So it would require a more thinking playstyle but it comes with higher damage than the consistent route. Powerboost plus flash arrow is just an amazing combo and feels good.
-
Here is a fire/trick arrow build that is pretty fun. It relies on powerboost + flash arrow to make mobs miss. Flash arrow is an insane skill that debuffs to hit for 60 seconds in a massive aoe and only needs to be cast once. (It wont stack so don't cast more than once per mob) That -tohit plus some defense slotting and powers makes the mob not able to hit you well on this build. Power boost ups the -tohit debuff and ups your defense for 15 seconds. The build also has a lot of aoe options fireball/rain of fire/oil slick arrow(ignite this with fireball). Disruption arrow for aoe -resistances and then acid and entangling arrow if you want single target boss -resistances for tougher enemies. Take the muscular Partial Radial Revamp alpha incarnate to add to the -tohit of flash arrow. Make sure to run hover+maneuvers+weave while fighting for the added defense. Lead versus all mobs with a flash arrow in the center. And ideally with powerboost first then flash arrow. This Villain build was built using Mids Reborn 3.4.6 https://github.com/LoadedCamel/MidsReborn Click this DataLink to open the build! Level 50 Magic Corruptor Primary Power Set: Fire Blast Secondary Power Set: Trick Arrow Power Pool: Speed Power Pool: Fighting Power Pool: Flight Power Pool: Leadership Ancillary Pool: Soul Mastery Villain Profile: Level 1: Fire Blast (A) Superior Winter's Bite - Accuracy/Damage (3) Superior Winter's Bite - Damage/RechargeTime (3) Superior Winter's Bite - Accuracy/Damage/Endurance (5) Superior Winter's Bite - Accuracy/Damage/Recharge (5) Superior Winter's Bite - Damage/Endurance/Accuracy/RechargeTime (7) Superior Winter's Bite - Recharge/Chance for -Speed & -Recharge Level 1: Entangling Arrow (A) Gravitational Anchor - Immobilize (7) Gravitational Anchor - Recharge/Accuracy (9) Gravitational Anchor - Immobilize/Recharge/Accuracy (9) Gravitational Anchor - Immobilize/Endurance (11) Gravitational Anchor - Immobilize/Recharge Level 2: Flash Arrow (A) To Hit Debuff IO (21) To Hit Debuff IO (21) Recharge Reduction IO (23) Accuracy IO Level 4: Hasten (A) Recharge Reduction IO (23) Recharge Reduction IO Level 6: Boxing (A) Absolute Amazement - Stun (25) Absolute Amazement - Stun/Recharge (25) Absolute Amazement - Stun/Endurance (27) Absolute Amazement - Stun/Recharge/Accuracy (27) Absolute Amazement - Recharge/Accuracy Level 8: Rain of Fire (A) Ragnarok - Damage (29) Ragnarok - Damage/Recharge (29) Ragnarok - Damage/Recharge/Accuracy (33) Ragnarok - Recharge/Accuracy (45) Ragnarok - Damage/Endurance Level 10: Fly (A) Blessing of the Zephyr - Run Speed, Jump, Flight Speed, Range (31) Blessing of the Zephyr - Run Speed, Jump, Flight Speed, Range/Endurance (31) Blessing of the Zephyr - Knockback Reduction (4 points) Level 12: Hover (A) Luck of the Gambler - Defense/Increased Global Recharge Speed (31) Luck of the Gambler - Defense Level 14: Glue Arrow (A) Slow IO Level 16: Tough (A) Gladiator's Armor - TP Protection +3% Def (All) Level 18: Fire Ball (A) Superior Scourging Blast - Damage/RechargeTime (33) Superior Scourging Blast - Damage/Endurance/RechargeTime (33) Superior Scourging Blast - Accuracy/Damage/Endurance/RechargeTime (34) Artillery - Accuracy/Damage (34) Artillery - Accuracy/Recharge/Range (34) Artillery - Accuracy/Damage/Recharge Level 20: Aim (A) Gaussian's Synchronized Fire-Control - Chance for Build Up (36) Gaussian's Synchronized Fire-Control - To Hit Buff/Recharge Level 22: Blaze (A) Superior Malice of the Corruptor - Accuracy/Damage (36) Superior Malice of the Corruptor - Damage/Recharge (36) Superior Malice of the Corruptor - Accuracy/Damage/Recharge (37) Superior Malice of the Corruptor - Damage/Endurance/Recharge (37) Superior Malice of the Corruptor - Accuracy/Damage/Endurance/Recharge (37) Superior Malice of the Corruptor - Recharge/Chance for Negative Energy Damage Level 24: Acid Arrow (A) Achilles' Heel - Chance for Res Debuff (39) Annihilation - Chance for Res Debuff Level 26: Blazing Bolt (A) Gladiator's Javelin - Chance of Damage(Toxic) (39) Apocalypse - Chance of Damage(Negative) (39) Sting of the Manticore - Chance of Damage(Toxic) (40) Superior Scourging Blast - RechargeTime/PBAoE +End (40) Superior Scourging Blast - Accuracy/Damage (40) Superior Scourging Blast - Accuracy/Damage/RechargeTime Level 28: Disruption Arrow (A) Recharge Reduction IO Level 30: Evasive Maneuvers (A) Luck of the Gambler - Defense/Increased Global Recharge Speed Level 32: Inferno D-Sync Origin:D-Sync Empowerment Level 35: Oil Slick Arrow D-Sync Origin:D-Sync Optimization Level 38: Maneuvers (A) Luck of the Gambler - Defense/Increased Global Recharge Speed (43) Shield Wall - +Res (Teleportation), +5% Res (All) (45) Luck of the Gambler - Defense/Endurance (48) Reactive Defenses - Scaling Resist Damage (48) Luck of the Gambler - Defense Level 41: Dark Embrace (A) Unbreakable Guard - +Max HP (46) Steadfast Protection - Resistance/+Def 3% Level 44: EMP Arrow (A) Accuracy IO (45) Recharge Reduction IO Level 47: Power Boost (A) Recharge Reduction IO (48) Recharge Reduction IO Level 49: Weave (A) Luck of the Gambler - Defense/Increased Global Recharge Speed (50) Luck of the Gambler - Defense (50) Luck of the Gambler - Defense/Endurance (50) Luck of the Gambler - Defense/Endurance/Recharge Level 1: Scourge Level 1: Brawl
-
Yeah my version is fubar if you are trying to play alone too glass cannon. If you aren't taking hits such as just team playing then the full lean in towards damage is fine lol. Making a more tanky water/kin variant because seismic animations although extremely high damage and low cast times are just the worst looking set in the game.
-
If the ai in pve doesn't run from the poison trap aoe then that would be insanely good alongside a sapper elec setup. I have to cast heat exhaustion and use the sentinel and keep attacking with elec to keep gm's from getting above 0 end and attacking again. That poison gas numbers if they don't run from it probably could have you just go afk and they stay sapped. Defender sapper is stronger at sapping but my corruptor already saps the 54's fully so wasn't needed in the elec sense. But yeah if the secondary sets gains are worth losing the corruptors damage and if you wanted to go full support then defender makes more sense.
-
Epoch's version above is much less squishy and can be solo played.
-
Nope! Seismic shock stacks won't form if you are flying. Must be on the ground. (Not updated/written in Mids) Seismic shock stacks do a knockdown aoe around you in a 12 radius or so and they are consumed by either rock throw to make it's cone and dmg x2 or seismic force (aim of the set) to make you have 100% cd reduction for 5seconds or so(only cd for seismic abilities), or stalagmite to make it from minor damage to extreme single target (used for boss killing). Do not want to miss out on those so don't fly with it. Every attack you do adds a seismic pressure on hit (just 1 per attack) and after getting about 3-5 those have a chance to turn into seismic shocks which then can be used to buff the abilities above. This is why I swapped to the lower damage encase because of it's low cast time but same rate of building seismic pressure so it's better for feeding into either of the 3 above for whichever purpose you need. That's whats cool about this set you can get a nice buff for aoe, singletarget, or cooldown reduction(only cools down seismic abilities not other sets so helps get meteor faster) depending on what you need. Here is an updated version that I swapped some skills to spam encase instead of entomb to get seismic shocks faster either for rock throw if mob is still alive or stalagmite if you are killing a boss. This build is very squishy and really is a glass cannon. It relys on others to take aggro and then you just lay in the damage. If you are looking for something solo then you will have to drop a lot of the damage slotting choices for resistance or defense choices instead and a different mastery. Still feeling it out in team play and may post another updated build of it later. There are so many keys to press and the cast times are insanely fast this is a build that really needs keybindings past just the main bar. I am firing off 5 skills outside of my main bar binded to letter keys to really make good use of how active it is. This Villain build was built using Mids Reborn 3.2.17 https://github.com/LoadedCamel/MidsReborn Click this DataLink to open the build! Level 50 Magic Corruptor Primary Power Set: Seismic Blast Secondary Power Set: Kinetics Power Pool: Speed Power Pool: Concealment Power Pool: Teleportation Power Pool: Fighting Ancillary Pool: Leviathan Mastery Villain Profile: Level 1: Encase -- Apc-Dmg(A), Apc-Dmg/Rchg(46), Apc-Acc/Dmg/Rchg(48), Apc-Acc/Rchg(48), Apc-Dmg/EndRdx(50) Level 1: Transfusion -- Pnc-Heal/EndRedux(A), Acc-I(25), Pnc-Heal/Rchg(25), Pnc-Heal/EndRedux/Rchg(27), Pnc-Heal(27), Pnc-Heal/+End(29) Level 2: Rock Shards -- Rgn-Dmg(A), Rgn-Dmg/Rchg(3), Rgn-Acc/Dmg/Rchg(3), Rgn-Acc/Rchg(5), Rgn-Knock%(5), Rgn-Dmg/EndRdx(7) Level 4: Hasten -- RechRdx-I(A), RechRdx-I(23) Level 6: Stealth -- LucoftheG-Def/Rchg+(A) Level 8: Seismic Force -- GssSynFr--Build%(A), GssSynFr--ToHit(9), GssSynFr--ToHit/Rchg(29) Level 10: Teleport -- Wrp-Range(A), Wrp-End/Range(40), Wrp-+Special(42), Wrp-End(42), BlsoftheZ-ResKB(42) Level 12: Upthrust -- SprScrBls-Acc/Dmg(A), SprScrBls-Dmg/Rchg(13), SprScrBls-Acc/Dmg/Rchg(13), SprScrBls-Acc/Dmg/EndRdx/Rchg(15), FrcFdb-Rechg%(15), OvrFrc-Dam/KB(17) Level 14: Combat Teleport -- Range-I(A), Range-I(40) Level 16: Siphon Speed -- Acc-I(A), RechRdx-I(37) Level 18: Tombstone -- StnoftheM-Dam%(A), GldJvl-Dam%(19), Apc-Dam%(19), SprMlcoft-Rchg/Dmg%(21), SprMlcoft-Acc/Dmg(21), SprMlcoft-Acc/Dmg/Rchg(23) Level 20: Fold Space -- Acc-I(A) Level 22: Repel -- FrcFdb-Rechg%(A), SuddAcc--KB/+KD(7), EndRdx-I(9) Level 24: Infiltration -- LucoftheG-Def/Rchg+(A) Level 26: Stalagmite -- GldJvl-Acc/Dmg(A), GldJvl-Dam/Rech(31), GldJvl-Acc/Dmg/End/Rech(31), GldJvl-Dam%(11), GldJvl-Acc/End/Rech(11), GldJvl-Dam/End/Rech(17) Level 28: Boxing -- AbsAmz-Stun(A), AbsAmz-Stun/Rchg(43), AbsAmz-Acc/Stun/Rchg(45), AbsAmz-Acc/Rchg(45), AbsAmz-EndRdx/Stun(45) Level 30: Tough -- GldArm-3defTpProc(A) Level 32: Meteor -- DS:DSyncDamRech(A), DS:DSyncDamRech(33), DS:DSyncAccDam(33), PstBls-Dam%(33), FrcFdb-Rechg%(34), SuddAcc--KB/+KD(34) Level 35: Shark Skin -- UnbGrd-ResDam(A), UnbGrd-ResDam/EndRdx(36), UnbGrd-EndRdx/Rchg(40), UnbGrd-Rchg/ResDam(43), UnbGrd-ResDam/EndRdx/Rchg(46), UnbGrd-Max HP%(50) Level 38: Weave -- LucoftheG-Def/Rchg+(A), ShlWal-ResDam/Re TP(43), Rct-ResDam%(46), Ksm-ToHit+(48) Level 41: Transference -- Acc-I(A), EndMod-I(50) Level 44: Speed Boost -- BlsoftheZ-ResKB(A) Level 47: Fulcrum Shift -- RechRdx-I(A), RechRdx-I(39), Acc-I(39) Level 49: Hibernate -- Prv-Absorb%(A) Level 1: Scourge Level 1: Brawl -- Hct-Dmg(A), Hct-Dmg/Rchg(31), Hct-Acc/Dmg/Rchg(34), Hct-Acc/Rchg(36), Hct-Dmg/EndRdx(36) Level 1: Sprint -- Clr-Stlth(A) Level 2: Rest -- Empty(A) Level 1: Swift -- Run-I(A) Level 1: Hurdle -- Jump-I(A) Level 1: Health -- Mrc-Rcvry+(A), NmnCnv-Regen/Rcvry+(37) Level 1: Stamina -- PrfShf-End%(A), PrfShf-EndMod(37), PrfShf-EndMod/Acc(39) Level 1: Seismic Shockwaves Level 49: Quick Form ------------
-
Take the 2 slot tax and revel in the insane cooldown reduction times to feed your secondary powerset by using Knockback to Knockdown IO then Force Feedback. This is how energy isn't the worst. Slot the hell out of Force feedback and don't look at the 2 slots per knockback power as a loss.
-
Damage could be way improved in inferno and blazing bolt if you gave up some set bonuses for procs. I feel like Aim would be worth it over rain of fire. I like gaussian's build up in aim as well because you can guarantee time it with your nuke. You would be giving up defense to gain damage though basically you have to think about how much you are getting hit versus others in your team. Nuke went up by 180 damage blazing bolt went up by 450 damage. It's hard to really take a look at the build without a pasted mids link to view the rest. Set up blaze with the superior malice like below gives you defense like you want and it's at least near a 45% proc chance for its chance for negative energy damage at least in there. Stick the entire superior scouring blast in fireball probably will give you nice defense bonuses while giving the power good flat damage. +5 the armageddon damage in inferno atleast will give big difference for the $. Get hasten, inferno should not be a slower cd than at least 70 seconds if you have hasten. (2 recharge IO's in hasten +5) This way you get to inferno much more often. Once you 50 nothing should need more than 2 lvl 50 IO recharges in it to reach the cap basically. 3 in it like you have above is just for leveling. Lot's of slots to open up there. This Villain build was built using Mids Reborn 3.2.17 https://github.com/LoadedCamel/MidsReborn Click this DataLink to open the build! Level 49 Magic Corruptor Primary Power Set: Fire Blast Secondary Power Set: Cold Domination Villain Profile: Level 1: [Empty] Level 1: Infrigidate -- Empty(A) Level 2: [Empty] Level 4: [Empty] Level 6: [Empty] Level 8: [Empty] Level 10: [Empty] Level 12: Aim -- GssSynFr--Build%(A), GssSynFr--ToHit(13), GssSynFr--ToHit/Rchg(13) Level 14: [Empty] Level 16: [Empty] Level 18: Blaze -- SprMlcoft-Acc/Dmg(A), SprMlcoft-Dmg/Rchg(19), SprMlcoft-Acc/Dmg/Rchg(19), SprMlcoft-Dmg/EndRdx/Rchg(21), SprMlcoft-Acc/Dmg/EndRdx/Rchg(21), SprMlcoft-Rchg/Dmg%(23) Level 20: [Empty] Level 22: [Empty] Level 24: [Empty] Level 26: Blazing Bolt -- Apc-Dmg(A), Apc-Acc/Dmg/Rchg(27), Apc-Dmg/Rchg(27), StnoftheM-Dam%(29), Apc-Dam%(29), GldJvl-Dam%(31) Level 28: [Empty] Level 30: [Empty] Level 32: Inferno -- ScrDrv-Dam%(A), Obl-%Dam(33), Erd-%Dam(33), Arm-Acc/Dmg/Rchg(33), Arm-Dmg(34), Arm-Dam%(34) Level 35: [Empty] Level 38: [Empty] Level 41: [Empty] Level 44: [Empty] Level 47: [Empty] Level 49: [Empty] Level 1: Scourge Level 1: Brawl -- Empty(A) Level 1: Sprint -- Empty(A) Level 2: Rest -- Empty(A) Level 1: Swift -- Empty(A) Level 1: Hurdle -- Empty(A) Level 1: Health -- Empty(A) Level 1: Stamina -- Empty(A) Level 49: Quick Form ------------
-
Newer versions in comments bellow. Here is an alternative to fire/kin that is also an aoe extremely high damage build. The build has massive amounts of knockdown on top the mass aoe to let you get in close to heal with transfusion and to prevent enemies from attacking. Pros - Very high damage will out damage blasters. - Tons of AOE and tons of knockdown. - Very quick recharges due to knockdown and force feedback slotting. - Very quick cast times/animations. Feels good! - Works well in a team giving them fulcrum+speedboost. - Very active build can be exceptionally good based on the player using it because how much they can do with the low cool downs amount of abilities and positioning. I find playing active builds much more entertaining. Cons - Pricy - Very active build, some people don't like this and don't want to press many buttons to take the toon to it's limits. - Is squishy. Not for hard mode solo play. You must make good use of the knockdown because this toon does not rely on high defenses or resistances and is a glass cannon. Knockdown and pure speed of clearing is the main thing keeping damage off you. Really needs a team if setup like so which is fully leaning into damage instead of defense/resists. Non necessary skills - Repel: It's just hilarious slotted this way. It will do decent knockdown to anything in your immediate smaller radius but it will also spam a very loud noise because of the knockback to knockdown slotting and how this power was originally designed to throw them away from you. Probably don't use this too much in teamplay to not drive them nuts. The Force Feedback proc in here only will fire off at 16% chance every 10 seconds so you will not be getting that recharge often. This skill also drains the most end especially when it hits enemies. - Fold Space: Not needed not used often just a way to bring scattered mobs back on you so the knockdown aoe you have keeps you alive. Notes on teleport - I use to never take teleport because it felt weird but after trying binds for it my viewpoint has 180'ed. It's by far the fastest travel power you will arrive twice as fast to any mission or travel through zones than your teammates. It is extremely useful when teaming if bound to teleport to target you can click your teammates name in the team list and press a key and go through tons of caves/walls right to them. - Combat Teleport is an extremely slept on ability. The game feels completely different when you have combat teleport bound to target making it so you instantly appear next to them instead of moving up to them. This usually prevents what would be 2 attacks at you from a mob down to 1 attack. Also an often unknown bonus is you get a 10% tohitbuff which is no joke each time you combat teleport so leading into close combat with this is great. This will help you position your rock throw knockdown and get near them with your passive seismic shock knockdowns+repel. /bind T powexec_location target combat teleport Binding this and pressing T will teleport you if in range instantly to your target friendly or foe. /bind G powexec_location target teleport Same as above but for long range teleport useful for getting to teammates in missions. /bind V powexec_name teleport This allows you to cast the skill by pressing V instead of it taking up one of your main row numbers. This is easier to press and makes traveling around maps way less annoying with teleport. /bind C powexec_name combat teleport Ground targeting of combat teleport without it taking up one of your main row numbers. Also helps move around mission maps with multiple levels. Obviously you can change the keybindings above these are just ones easy to reach that felt good to me. Using these binds allows you to put all your damage abilities and fulcrum, aim, heal into your main bar without the need to click other rows during combat allowing everything to be done with key presses on the fly. Once you have a good fulcrum shift damage buff going you can go up to every other mob and drop a meteor and they will all die. On the every other mob your meteor is down keep fulcrum going > Upthrust aoe at center targets > build up seismic shock stacks > line up a rock throw cone through the mob > upthrust and so on. Tombstone/entomb are both going to do tons of damage with fulcrum for killing whatever the aoe's don't such as bosses. Make good use of the combat teleport not only to setup rock throw but to get near them for transfusion heals. Do not skimp out on the upthrust use that will proc the forcefeedback IO and lower your cooldowns. This Villain build was built using Mids Reborn 3.2.17 https://github.com/LoadedCamel/MidsReborn Click this DataLink to open the build! Level 50 Magic Corruptor Primary Power Set: Seismic Blast Secondary Power Set: Kinetics Power Pool: Speed Power Pool: Concealment Power Pool: Teleportation Power Pool: Fighting Ancillary Pool: Leviathan Mastery Villain Profile: Level 1: Shatter -- Apc-Dmg(A), Apc-Dmg/Rchg(46), Apc-Acc/Dmg/Rchg(48), Apc-Acc/Rchg(48), Apc-Dmg/EndRdx(50) Level 1: Transfusion -- Pnc-Heal/EndRedux(A), Pnc-EndRdx/Rchg(25), Pnc-Heal/Rchg(25), Pnc-Heal/EndRedux/Rchg(27), Pnc-Heal(27), Pnc-Heal/+End(29) Level 2: Rock Shards -- Rgn-Dmg(A), Rgn-Dmg/Rchg(3), Rgn-Acc/Dmg/Rchg(3), Rgn-Acc/Rchg(5), Rgn-Knock%(5), Rgn-Dmg/EndRdx(7) Level 4: Hasten -- RechRdx-I(A), RechRdx-I(23) Level 6: Stealth -- LucoftheG-Def/Rchg+(A) Level 8: Seismic Force -- GssSynFr--Build%(A), GssSynFr--ToHit(9), GssSynFr--ToHit/Rchg(29) Level 10: Teleport -- Wrp-Range(A), Wrp-End/Range(40), Wrp-+Special(42), Wrp-End(42), BlsoftheZ-ResKB(42) Level 12: Upthrust -- SprScrBls-Acc/Dmg(A), SprScrBls-Dmg/Rchg(13), SprScrBls-Acc/Dmg/Rchg(13), SprScrBls-Acc/Dmg/EndRdx/Rchg(15), FrcFdb-Rechg%(15), OvrFrc-Dam/KB(17) Level 14: Combat Teleport -- Range-I(A), Range-I(40) Level 16: Siphon Speed -- Acc-I(A), RechRdx-I(37) Level 18: Tombstone -- StnoftheM-Dam%(A), GldJvl-Dam%(19), Apc-Dam%(19), SprMlcoft-Rchg/Dmg%(21), SprMlcoft-Acc/Dmg(21), SprMlcoft-Acc/Dmg/Rchg(23) Level 20: Fold Space -- Acc-I(A) Level 22: Repel -- FrcFdb-Rechg%(A), SuddAcc--KB/+KD(7), EndRdx-I(9) Level 24: Infiltration -- LucoftheG-Def/Rchg+(A) Level 26: Entomb -- GldJvl-Acc/Dmg(A), GldJvl-Dam/Rech(31), GldJvl-Acc/Dmg/End/Rech(31), GldJvl-Dam%(11), GldJvl-Acc/End/Rech(11), GldJvl-Dam/End/Rech(17) Level 28: Boxing -- AbsAmz-Stun(A), AbsAmz-Stun/Rchg(43), AbsAmz-Acc/Stun/Rchg(45), AbsAmz-Acc/Rchg(45), AbsAmz-EndRdx/Stun(45) Level 30: Tough -- GldArm-3defTpProc(A) Level 32: Meteor -- DS:DSyncDamRech(A), DS:DSyncDamRech(33), DS:DSyncAccDam(33), PstBls-Dam%(33), FrcFdb-Rechg%(34), SuddAcc--KB/+KD(34) Level 35: Shark Skin -- UnbGrd-ResDam(A), UnbGrd-ResDam/EndRdx(36), UnbGrd-EndRdx/Rchg(40), UnbGrd-Rchg/ResDam(43), UnbGrd-ResDam/EndRdx/Rchg(46), UnbGrd-Max HP%(50) Level 38: Weave -- LucoftheG-Def/Rchg+(A), ShlWal-ResDam/Re TP(43), Rct-ResDam%(46), Ksm-ToHit+(48) Level 41: Transference -- Acc-I(A), EndMod-I(50) Level 44: Speed Boost -- BlsoftheZ-ResKB(A) Level 47: Fulcrum Shift -- RechRdx-I(A), RechRdx-I(39), Acc-I(39) Level 49: Hibernate -- Prv-Absorb%(A) Level 1: Scourge Level 1: Brawl -- Hct-Dmg(A), Hct-Dmg/Rchg(31), Hct-Acc/Dmg/Rchg(34), Hct-Acc/Rchg(36), Hct-Dmg/EndRdx(36) Level 1: Sprint -- Clr-Stlth(A) Level 2: Rest -- Empty(A) Level 1: Swift -- Run-I(A) Level 1: Hurdle -- Jump-I(A) Level 1: Health -- Mrc-Rcvry+(A), NmnCnv-Regen/Rcvry+(37) Level 1: Stamina -- PrfShf-End%(A), PrfShf-EndMod(37), PrfShf-EndMod/Acc(39) Level 1: Seismic Shockwaves Level 49: Quick Form ------------
-
I actually first had planned it as a defender in mids. Basically the defender will get 20% more sapping/buffing/debuffing but a loss of like 90% damage compared to a corruptor. That just wouldn't work in pvp even if you had them drained it was brutally slow at killing. First thing to do on this build always is to drain them first in pve or pvp then worry about damaging after. If you went kinetics then you could make up the damage in pve. Honestly I already am sapping everything faster then i've ever seen anyone in the game so I didn't need that extra 20% if you want to go pure teamplay in pve and pick a different secondary maybe the defender would make more sense with those 20% gains. It is a huge damage tradeoff though for 20% more def/resist/buff/debuff basically. I do think there are likely some better pve setups even with the -recovery such as poison which has Poison trap aoe -recovery which has some insane -recovery numbers x8 heat exhaustion so if the GM/AV stood in it and didn't run from it that would be better overall in pve that would make GMs/AVs never get any end back if they stood in it after your elec sapped them. I'm not sure if ai will run from that though, if not poison has some far better pve mob abilities than thermal. The heat exhaustion is just an insanely applicable pvp skill for zoning vs 1 target. So in short yes I think it's more optimal on corruptor than defender. I don't really like playing any class that does less then medium damage. You will be able to contribute to killing in 54x8 TF's with that build on corruptor. It's not high damage but it's more than supports will be doing. Pve sapping is extremely rare to see but I have had tons of fun playing it in pve as well when GM's/AVs/big mobs just sit there not able to attack is really hilarious. It's like a reverse tank the mobs just can't attack your team anymore.
-
I was probably the guy running the elec/therm sapper you saw. It's a pvp build that also pve's extremely well. I compared lots of sapping powers and it came up the best. Things like Kin can sap as well but when facing GM's AV's and especially in pvp vs players sapping them is the first half but if they get a centimeter of end back they will attack so -recovery and keeping them at 0 once they are sapped is the second half and heat exhaustion is top tier for that. My drain numbers are nutty in pvp and x3 as nutty in Pve due to incarnates. I can sap most GM's end in 1 shot and almost all by 2 shots. The therm side of it is mostly a pvp thing though and you could play kin or cold instead but you may run into the issue of GM's and such getting a bit of end and doing their attacks. In a lot of TF's I've played this on the main bad guy just sort of sits there confused not able to attack and becomes your friend. Here is the build which can kill anything but elec/rad armor in pvp and also works extremely well in pve. If you don't plan to pvp or don't care about the single target drain vs GM's/AV's then don't pick thermal. If you are going to use short circuit consider getting combat teleport and binding it to target like so /bind T powexec_location target combat teleport you can instant teleport in and drain them. Take the 45% end drain alpha. Clarion +special incarnate gives you an 80% end drain boost, soul mastery power boost 80% also, charge up like 30% or so. If facing a GM pop all 3 and thunderousstrike and they will likely be at 0 end. If facing 54 mobs just use 1 at a time alternating. Short circuit with either clarion or power boost will 100% drain 54's. Thunderous blast + short circuit will drain 54's without the boost on down times. Damage isn't bad either has an attack chain that can kill players in PVP and does moderate damage more than most supports but if you went kin you could really up the pve damage at the cost of GM's and such being able to attack. It's actually extremely powerful in TF's when entire mobs just sit there confused not able to attack but like I said you don't need the therm for that only for strong single targets. This has enough mob sapping alone just on the elec side so I wouldn't worry about getting more aoe saps from secondary just consider -recover if you want that funny 0 attacking gm but otherwise just pick whatever for secondary could do a lot of damage with fulcrum. You are squishy but I can do farm maps if you thunderous the mob to start or short circuit they wont even be able to attack. There is a lot of picks in there for pvp so take pieces from it if you are pve only. Such as tactics not needed fly not needed with the teleport. But must picks are that binded combat teleport with short circuit complete playstyle changer and feels amazing, power boost from soul is a must have with sapping builds, shortcircuit/thunderous kitted for end drain must have. This Villain build was built using Mids Reborn 3.2.17 https://github.com/LoadedCamel/MidsReborn Click this DataLink to open the build! Level 50 Magic Corruptor Primary Power Set: Electrical Blast Secondary Power Set: Thermal Radiation Power Pool: Leadership Power Pool: Flight Power Pool: Teleportation Power Pool: Speed Ancillary Pool: Soul Mastery Villain Profile: Level 1: Charged Bolts -- GldJvl-Acc/Dmg(A), GldJvl-Dam/Rech(3), GldJvl-Acc/Dmg/End/Rech(3), GldJvl-Dam%(5), GldJvl-Acc/End/Rech(5), GldJvl-Dam/End/Rech(7) Level 1: Warmth -- Pnc-Heal/EndRedux(A), Pnc-EndRdx/Rchg(7), Pnc-Heal/Rchg(9), Pnc-Heal/EndRedux/Rchg(9), Pnc-Heal(11), Pnc-Heal/+End(11) Level 2: Lightning Bolt -- SprScrBls-Acc/Dmg(A), SprScrBls-Dmg/Rchg(17), SprScrBls-Acc/Dmg/Rchg(17), SprScrBls-Acc/Dmg/EndRdx/Rchg(19), GldJvl-Dam%(19), Tmp-EndDrn%(21) Level 4: Maneuvers -- LucoftheG-Def/Rchg+(A) Level 6: Fly -- WntGif-RunSpd/Jump/Fly/Rng(A), WntGif-RunSpd/Jump/Fly/Rng/EndRdx(21), WntGif-ResSlow(23) Level 8: Charge Up -- GssSynFr--Build%(A), GssSynFr--ToHit/Rchg(29), GssSynFr--ToHit/Rchg/EndRdx(31) Level 10: Teleport -- Wrp-Range(A), Wrp-End/Range(25), Wrp-End(27), Wrp-+Special(27) Level 12: Hasten -- RechRdx-I(A), RechRdx-I(33) Level 14: Combat Teleport -- Range-I(A), Range-I(29) Level 16: Tactics -- RctRtc-Pcptn(A) Level 18: Hover -- LucoftheG-Def/Rchg+(A), ShlWal-ResDam/Re TP(31), Rct-ResDam%(33), Ksm-ToHit+(33) Level 20: Evasive Maneuvers -- LucoftheG-Def/Rchg+(A), DefBuff-I(31) Level 22: Short Circuit -- Arm-Dmg(A), DS:DSyncEndModRech(34), FuroftheG-ResDeb%(34), Arm-Acc/Dmg/Rchg(34), DS:DSyncEndModAcc(36), DS:DSyncEndModRech(36) Level 24: Zapp -- GldJvl-Dam%(A), StnoftheM-Dam%(36), SprMlcoft-Rchg/Dmg%(37), SprMlcoft-Acc/Dmg(37), Apc-Dam%(37), Tmp-EndDrn%(39) Level 26: Voltaic Sentinel -- ExpRnf-+Res(Pets)(A), PrfShf-End%(39), EndMod-I(39), ExpRnf-Dmg/EndRdx(40), ExpRnf-EndRdx/Dmg/Rchg(40), ExpRnf-Acc/Dmg(40) Level 28: Vengeance -- LucoftheG-Def/Rchg+(A) Level 30: Thaw -- UnbGrd-Max HP%(A) Level 32: Thunderous Blast -- JvlVll-Acc/Dmg(A), JvlVll-Acc/End/Rech(42), JvlVll-Acc/Dmg/End/Rech(43), DS:DSyncEndModAcc(43), DS:DSyncEndModRech(43), DS:DSyncEndModRech(45) Level 35: Heat Exhaustion -- RechRdx-I(A), RechRdx-I(45), Acc-I(45) Level 38: Dark Embrace -- GldArm-ResDam(A), GldArm-End/Res(42), GldArm-3defTpProc(46) Level 41: Soul Storm -- DS:DSyncAccDam(A), GldJvl-Dam%(46), NrnSht-Dam%(46), GhsWdwEmb-Dam%(48), UnbCns-Dam%(48), GldNet-Dam%(48) Level 44: Power Boost -- RechRdx-I(A), RechRdx-I(50) Level 47: Melt Armor -- AchHee-ResDeb%(A), RechRdx-I(50) Level 49: Fire Shield -- StdPrt-ResKB(A) Level 1: Scourge Level 1: Brawl -- Hct-Dmg(A), Hct-Dmg/Rchg(23), Hct-Acc/Dmg/Rchg(25), Hct-Acc/Rchg(42), Hct-Dmg/EndRdx(50) Level 1: Sprint -- Clr-Stlth(A) Level 2: Rest -- Empty(A) Level 1: Swift -- Flight-I(A) Level 1: Hurdle -- Jump-I(A) Level 1: Health -- Prv-Absorb%(A), NmnCnv-Regen/Rcvry+(13), Mrc-Rcvry+(13) Level 1: Stamina -- PrfShf-End%(A), PrfShf-EndMod(15), PrfShf-EndMod/Acc(15) Level 1: Shocked Level 49: Quick Form Level 50: Agility Total Core Revamp Level 6: Afterburner ------------
-
Hi I'm a complete noob that played 18 years ago and I want to make a very high spike damage bs/fiery scrapper. I tried to duct tape some builds together of both archetypes but this is as far as I got. Please any help improving/completing this to make it viable would be appreciated! Need budget kept in mind as I know nothing about what these costs but I am only playing casually for a bit and don't want to spend weeks, thank you. https://www.midsreborn.com/builds/download.php?uc=1306&c=617&a=1234&f=HEX&dc=78DA5D935B73D24014C73710A4A5508A40A1DCAF054BCB585A6F4FDE6A67B4305387195F6380A5CDC8402649ABFD0EFAEC175047BF874F5E3F89D4CBA33AF19073B6147726F925FF3DFFB3E7EC26AD673BFE7E7FF7169316EF0E54D354DA5D43D5756ECCB58E2CD5D2464336195EB812624A69F101E7F53BC648ED29EDA723A3973C9BDAE17D3E34797D57E3C68972FBC850997F7F341AD49B5CD5B5E14150BCF4B8611E6ABACF796FEB9CF742CEE3FDE1B1666A1D6DA05927997BBAD6ADB72D75F0045237F9B1A65A87EA5069A9A605E9E350541E2E65529DE4D4697B58D1CDD8A6CC5C25621929AF122BC80B5564E39C596697259CDC42CE6D131B18EC8BC17B5A665B6092C8C4241B06DB06C92DF2B873149F462E658919E4C514B203268F30795EB91C31F29AF806B9FC96F80ED9059357726AB63D5E6A374EEDC6A9BD04B59D886007A9287219CCF362AFE6494CED6170E617714C3C45E67E2063605E60D4F682D3761CA480D889C0E434202E046250B415A44572E3D964F99F445AE40A98422253C8497E15A4B0C813A6B3C96F228B0D229D5591CE2A0CA6A82832EAE489801413A963544F01C415125D2B35ACBCF41F03109414CE2439FB20A6C51EA63F60F9A58FC8D54FC4CFC42FC8CA57E4353067E9F4589696B9016281324A05122BC4204C96450D65AAE100C4AAA8A1FA5876C44B2AB143EC22D77A448EBC0EE69A30D71816B6FE1B3FAFF53F441BB9F1977813E39C1DAD3BF7C9CDCECAD31FC84EC94C0C9B61687346DAC09EF665E199FC402514BFF9A699CE22C7336215C5D373A28B3DC22DF13F005680792CF4FB4CD073EC62F105F125F2FDDAF493B61F864113ADFC036755CA42
-
Thank you.
-
I played 18 years ago casually and I remember having a bs/fire scrapper for pvp. I want to make a pve version of that for nostalgia but honestly I see 0 guides fore anything like this and could use some help with the slotting/enhancements. I know scrapper fire is not optimal but any help would be appreciated. Idea is to take slash/whirling on bs and probably forgo blazingaura/burn to keep them from running. Thank you.