Malinkadink
-
Posts
9 -
Joined
-
Last visited
-
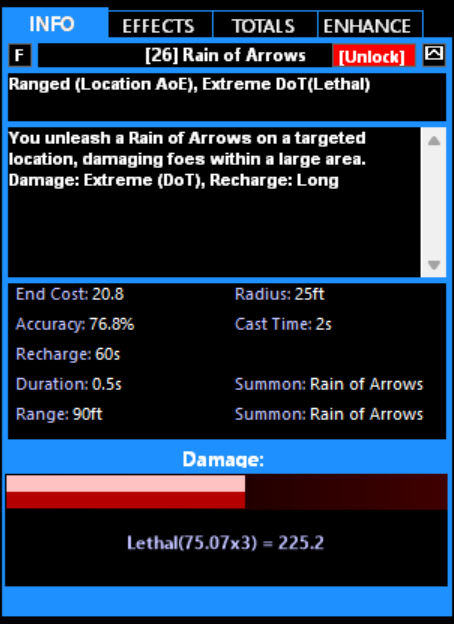
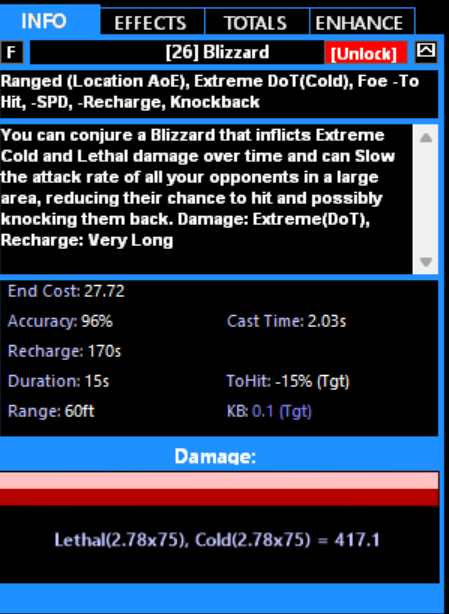
417 vs 225

-
Ice nuke is 170s base recharge, archery nuke is 60 sec base, my archery blaster can toss out a nuke every 15 seconds, for a fast moving team thats a nuke on every pack, the ice blaster will do 1 nuke for every 3 an archer can.
-
To add to the above question, how exactly did you calculate those effective dps numbers, seems dropping a -20% res from IG and AS for an extra damage proc is going to actually be worse, also losing 2 power transfer heal procs to gain 4hp/s also appears to be a net loss. if taking the extra 4hp/s in a minute that 240hp, vs a power transfer assuming 3 ppm of 94hp each thats 282hp. Having two extra power transfers proccing thats 564hp per minute, way better than 240hp per minute from an extra 4hps.....
-
Soldiers just do the most damage overall then spec ops, then commando and with build up slotted into soldiers thats 3 targets that can each proc it to up their damage vs just two or one commando. There's little point in slotting serum for resistance after using it all the mercs have capped resistances for about 5 seconds then it starts to pretty quickly drop off. Slotting resistance into serum would just slightly extend that window where they would remain at cap but its really not worth spending slots on unless your secondary and epic pool doesn't demand a lot of slotting.
-
Build up proc from soulbound goes into soldiers not commando, you also definitely want to have achilles heel in soldiers and spec ops, though i put one into commando as well. Here is my merc/time. Because of the heavy defense nature of FF you can probably drop the two 5% def auras for pets and put in procs instead. With clarion + power boost you can get 34% def from the bubbles + 12% from dispersion then tac upgrade and maneuvers will get them to their softcaps. Serum is also overslotted you only want 2 slots for recharge. With time i was able to make serum perma. With the changes to mercs serum had its cooldown reduced enough to make it permanently available with enough recharge and its totally worth it. Also not sure why you went into fighting pool unless you're planning to tank and want the extra resistance from tough, but if you're getting weave too then you may as well drop the m30 grenade and get cross punch and proc it out as its significantly better and will give you more + recharge. I picked up the m30 grenade and burst as each ability will add a 3.33% damage buff to pets for 30 seconds so you can cast 1 grenade into a group, then spam burst which also takes an Achilles heel for more -res
-
 Malinkadink changed their profile photo
 -
Flooring mobs END does very little as soon as they get an end tick they can use any attack regardless of its actual cost, its perhaps more useful in pvp, but for pve times -recharge would do more to mitigate damage since enemies couldn't fire abilities as often. That said I spent a couple hours coming up with what I would consider a very strong build for merc/time. Care was taken to ensure enough accuracy for +4 mobs once getting the +1 from incarns. soldiers are procced out, but commando and spec ops only got achilles heel as it provides the largest increase in damage since everyone does more damage to the target when debuffing -res. I'm going to be leveling a merc/time shortly and because of the absurd defenses provided by power boost + far sight + clarion for good measure I will be able to drop one or even both 5% defense aura IOs which will let me put both 10% resists into commando and give commando and spec ops a lady grey proc.
-
Now upon doing some research I realize that rage crash means defenses exposed which is bad with a defense primary but I think theres a build that actually has enough melee def to still be above 45% even with the crash. Reason I'm considering this pairing is that idea of shield charge to initiate and then footstomp sounds like a heck of a fun opener, lots of FF procs that can be slotted as well as cross punch in fighting tree. Thoughts?
-
After playing in multitudes of groups supportive powers that buff survivability seem a bit wasted because everything just dies to fast and if i really wanted to be a buffer I'd go thermal defender or sonic. Damage is king so dropping a sleet and letting everyone throw AOEs just makes sense in the current game. Even for single hard targets cold lets me put out a lot of -res coupled with burnout as well as -def and -dmg in the event the group lacks a real tank it still will likely not matter in anything but the hardest content where you'd make sure to have a single tank at the least.
-
Was trying to put together an all rounder, anything you would change? Ignore the order of power picks I just picked it arbitrarily I will obviously rearrange some power picks for exemp considerations. This Villain build was built using Mids Reborn 3.2.17 https://github.com/LoadedCamel/MidsReborn Click this DataLink to open the build! FireColdCorr: Level 49 Magic Corruptor Primary Power Set: Fire Blast Secondary Power Set: Cold Domination Power Pool: Flight Power Pool: Leadership Power Pool: Speed Power Pool: Fighting Ancillary Pool: Power Mastery Villain Profile: Level 1: Fire Blast (A) Superior Scourging Blast - Accuracy/Damage (3) Superior Scourging Blast - Damage/RechargeTime (3) Superior Scourging Blast - RechargeTime/PBAoE +End (5) Thunderstrike - Accuracy/Damage (5) Thunderstrike - Damage/Endurance (7) Thunderstrike - Accuracy/Damage/Endurance Level 1: Infrigidate (A) Achilles' Heel - Chance for Res Debuff (47) Impeded Swiftness - Accuracy/Endurance (48) Impeded Swiftness - Accuracy/Slow Level 2: Fire Ball (A) Superior Scourging Blast - Accuracy/Damage/Endurance/RechargeTime (15) Superior Scourging Blast - Accuracy/Damage/RechargeTime (15) Superior Scourging Blast - Damage/Endurance/RechargeTime (17) Bombardment - Accuracy/Damage/Recharge/Endurance (17) Bombardment - Chance for Fire Damage (19) Bombardment - Accuracy/Damage/Recharge Level 4: Fly (A) Hypersonic - Flying / Increased Fly Protection Level 6: Hover (A) Luck of the Gambler - Defense/Increased Global Recharge Speed (19) Luck of the Gambler - Defense/Endurance (21) Blessing of the Zephyr - Knockback Reduction (4 points) (21) Kismet - Accuracy +6% Level 8: Rain of Fire (A) Ragnarok - Damage (23) Ragnarok - Damage/Recharge (23) Ragnarok - Accuracy/Damage/Recharge (25) Ragnarok - Accuracy/Recharge (25) Ragnarok - Damage/Endurance (27) Endurance Reduction IO Level 10: Maneuvers (A) Luck of the Gambler - Defense/Endurance (27) Luck of the Gambler - Defense/Increased Global Recharge Speed Level 12: Hasten (A) Recharge Reduction IO (29) Recharge Reduction IO Level 14: Super Speed (A) Winter's Gift - Slow Resistance (20%) Level 16: Burnout (A) Recharge Reduction IO (29) Recharge Reduction IO Level 18: Kick (A) Empty Level 20: Tough (A) Steadfast Protection - Resistance/+Def 3% (31) Steadfast Protection - Resistance/Endurance (31) Gladiator's Armor - TP Protection +3% Def (All) (31) Gladiator's Armor - End/Resist Level 22: Weave (A) Luck of the Gambler - Defense/Increased Global Recharge Speed (33) Luck of the Gambler - Defense/Endurance Level 24: Evasive Maneuvers (A) Luck of the Gambler - Defense/Increased Global Recharge Speed (33) Luck of the Gambler - Defense (33) Luck of the Gambler - Defense/Endurance Level 26: Aim (A) Recharge Reduction IO (34) Gaussian's Synchronized Fire-Control - Chance for Build Up (48) Recharge Reduction IO Level 28: Blaze (A) Decimation - Chance of Build Up (34) Apocalypse - Chance of Damage(Negative) (34) Apocalypse - Damage (36) Apocalypse - Accuracy/Damage/Recharge (36) Apocalypse - Damage/Endurance (36) Apocalypse - Accuracy/Recharge Level 30: Blazing Bolt (A) Superior Malice of the Corruptor - Recharge/Chance for Negative Energy Damage (37) Sting of the Manticore - Accuracy/Damage (37) Sting of the Manticore - Damage/Endurance (37) Sting of the Manticore - Chance of Damage(Toxic) (39) Sting of the Manticore - Damage/Endurance/Recharge (39) Sting of the Manticore - Damage/Interrupt/Recharge Level 32: Inferno (A) Armageddon - Chance for Fire Damage (39) Armageddon - Damage/Endurance (40) Armageddon - Damage/Recharge (40) Armageddon - Accuracy/Damage/Recharge (40) Armageddon - Accuracy/Recharge (42) Fury of the Gladiator - Chance for Res Debuff Level 35: Sleet (A) Achilles' Heel - Chance for Res Debuff (42) Annihilation - Chance for Res Debuff (42) Endurance Reduction IO (43) Recharge Reduction IO Level 38: Heat Loss (A) Recharge Reduction IO (43) Recharge Reduction IO (43) Accuracy IO Level 41: Benumb (A) Recharge Reduction IO (45) Recharge Reduction IO (45) Accuracy IO Level 44: Arctic Fog (A) Luck of the Gambler - Defense/Increased Global Recharge Speed (45) Luck of the Gambler - Defense/Endurance (46) Reactive Defenses - Scaling Resist Damage (46) Unbreakable Guard - +Max HP (46) Shield Wall - +Res (Teleportation), +5% Res (All) Level 47: Power Build Up (A) Recharge Reduction IO (47) Recharge Reduction IO Level 49: Temp Invulnerability (A) Aegis - Resistance (49) Aegis - Psionic/Status Resistance (49) Aegis - Resistance/Endurance (49) Aegis - Resistance/Endurance/Recharge Level 1: Brawl (A) Empty Level 1: Scourge Level 1: Sprint