drake0699
-
Posts
5 -
Joined
-
Last visited
-
Focused Feedback: Travel Power Updates (Build 1)
drake0699 replied to Arcanum's topic in [Open Beta] Focused Feedback
OK that is good to know, thank you. I haven't looked yet, but someone might want to check to see if there will be any clashes between current and new slot-allowed enhancement types if they haven't already. -
Focused Feedback: Travel Power Updates (Build 1)
drake0699 replied to Arcanum's topic in [Open Beta] Focused Feedback
When it goes live, what will happen to enhancements that are in powers that become un-enhanceable? For example, if I have a LotG in Afterburner, where will it go? -
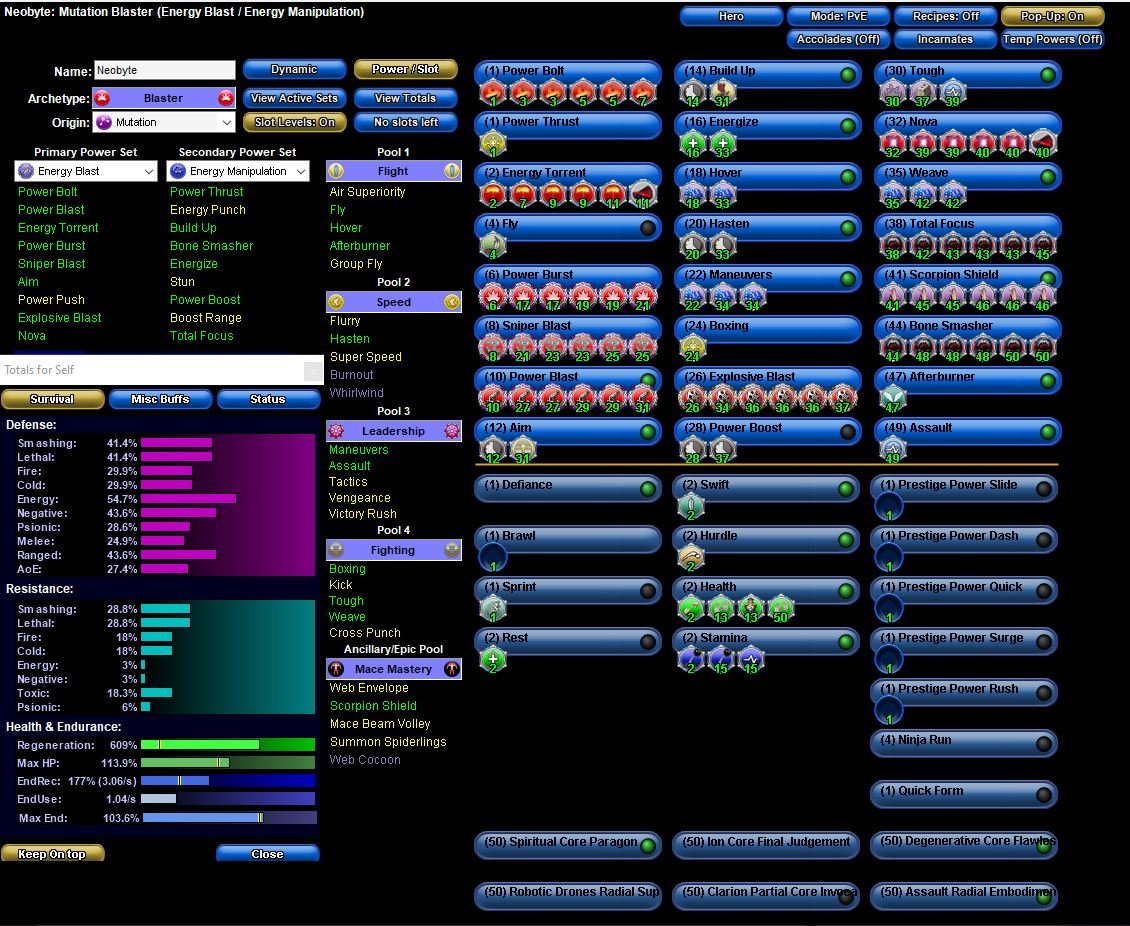
Hey all, Working on improving my first toon I did on live. The build is below. I think I overdid the defense at the expense of resistance. This is intended to be a blapper when needed, solo-friendly. The defense goes above the numbers below as Power Boost is active, which can be 100% of the time with the recharge. Any thoughts on improving it? I don't need to min/max, just something fun for solo and team. Hero Plan by Mids' Reborn : Hero Designer 2.6.0.7 https://github.com/ImaginaryDevelopment/imaginary-hero-designer Neobyte: Level 50 Mutation Blaster Primary Power Set: Energy Blast Secondary Power Set: Energy Manipulation Power Pool: Flight Power Pool: Speed Power Pool: Leadership Power Pool: Fighting Ancillary Pool: Mace Mastery Hero Profile: Level 1: Power Bolt -- Dvs-Acc/Dmg(A), Dvs-Dmg/EndRdx(3), Dvs-Dmg/Rchg(3), Dvs-Acc/Dmg/Rchg(5), Dvs-Acc/Dmg/EndRdx/Rchg(5), Dvs-Hold%(7) Level 1: Power Thrust -- Acc-I(A) Level 2: Energy Torrent -- PstBls-Acc/Dmg(A), PstBls-Dmg/Rchg(7), PstBls-Dmg/EndRdx(9), PstBls-Dmg/Rng(9), PstBls-Acc/Dmg/EndRdx(11), SuddAcc--KB/+KD(11) Level 4: Fly -- BlsoftheZ-ResKB(A) Level 6: Power Burst -- SprBlsWrt-Acc/Dmg(A), SprBlsWrt-Dmg/Rchg(17), SprBlsWrt-Acc/Dmg/Rchg(17), SprBlsWrt-Acc/Dmg/EndRdx(19), SprBlsWrt-Acc/Dmg/EndRdx/Rchg(19), SprBlsWrt-Rchg/Dmg%(21) Level 8: Sniper Blast -- SprWntBit-Acc/Dmg(A), SprWntBit-Dmg/Rchg(21), SprWntBit-Acc/Dmg/EndRdx(23), SprWntBit-Acc/Dmg/Rchg(23), SprWntBit-Dmg/EndRdx/Acc/Rchg(25), SprWntBit-Rchg/SlowProc(25) Level 10: Power Blast -- SprDfnBrr-Acc/Dmg(A), SprDfnBrr-Dmg/Rchg(27), SprDfnBrr-Acc/Dmg/Rchg(27), SprDfnBrr-Acc/Dmg/EndRdx(29), SprDfnBrr-Acc/Dmg/EndRdx/Rchg(29), SprDfnBrr-Rchg/+Status Protect(31) Level 12: Aim -- RechRdx-I(A), ToHit-I(31) Level 14: Build Up -- RechRdx-I(A), GssSynFr--Build%(31) Level 16: Energize -- Heal-I(A), Heal-I(33) Level 18: Hover -- LucoftheG-Def/Rchg+(A), LucoftheG-Def(33) Level 20: Hasten -- RechRdx-I(A), RechRdx-I(33) Level 22: Maneuvers -- LucoftheG-Def(A), LucoftheG-Def/Rchg(34), LucoftheG-Def/EndRdx(34) Level 24: Boxing -- Acc-I(A) Level 26: Explosive Blast -- OvrFrc-Acc/Dmg(A), OvrFrc-End/Rech(34), OvrFrc-Acc/Dmg/End(36), OvrFrc-Dmg/End/Rech(36), OvrFrc-Acc/Dmg/End/Rech(36), OvrFrc-Dam/KB(37) Level 28: Power Boost -- RechRdx-I(A), RechRdx-I(37) Level 30: Tough -- ResDam-I(A), StdPrt-ResDam/Def+(37), EndRdx-I(39) Level 32: Nova -- Obl-Dmg(A), Obl-Acc/Rchg(39), Obl-Dmg/Rchg(39), Obl-Acc/Dmg/Rchg(40), Obl-Acc/Dmg/EndRdx/Rchg(40), SuddAcc--KB/+KD(40) Level 35: Weave -- LucoftheG-Def/Rchg(A), LucoftheG-Def(42), LucoftheG-Def/EndRdx(42) Level 38: Total Focus -- Mk'Bit-Acc/Dmg(A), Mk'Bit-Dmg/EndRdx(42), Mk'Bit-Dmg/Rchg(43), Mk'Bit-Acc/EndRdx/Rchg(43), Mk'Bit-Acc/Dmg/EndRdx/Rchg(43), Mk'Bit-Dam%(45) Level 41: Scorpion Shield -- Rct-Def(A), Rct-Def/EndRdx(45), Rct-EndRdx/Rchg(45), Rct-Def/Rchg(46), Rct-Def/EndRdx/Rchg(46), Rct-ResDam%(46) Level 44: Bone Smasher -- Mk'Bit-Acc/Dmg(A), Mk'Bit-Dmg/EndRdx(48), Mk'Bit-Dmg/Rchg(48), Mk'Bit-Acc/EndRdx/Rchg(48), Mk'Bit-Acc/Dmg/EndRdx/Rchg(50), Mk'Bit-Dam%(50) Level 47: Afterburner -- Frb-Stlth(A) Level 49: Assault -- EndRdx-I(A) Level 1: Brawl -- Empty(A) Level 1: Defiance Level 1: Prestige Power Dash -- Empty(A) Level 1: Prestige Power Slide -- Empty(A) Level 1: Prestige Power Quick -- Empty(A) Level 1: Prestige Power Rush -- Empty(A) Level 1: Prestige Power Surge -- Empty(A) Level 1: Sprint -- Run-I(A) Level 2: Rest -- Heal-I(A) Level 2: Swift -- Flight-I(A) Level 2: Health -- Mrc-Rcvry+(A), NmnCnv-Regen/Rcvry+(13), Pnc-Heal/+End(13), NmnCnv-Heal(50) Level 2: Hurdle -- Jump-I(A) Level 2: Stamina -- PrfShf-End%(A), PrfShf-EndMod(15), EndMod-I(15) Level 50: Ion Core Final Judgement Level 50: Degenerative Core Flawless Interface Level 50: Robotic Drones Radial Superior Ally Level 50: Clarion Partial Core Invocation Level 50: Assault Radial Embodiment Level 1: Quick Form Level 4: Ninja Run Level 50: Spiritual Core Paragon ------------

-
Personally, I just use DOs and then SOs up until 50, then start investing in basic IOs across the board. There is certainly an argument to be made to IO sooner since those bonuses don't go away as you level. I just don't usually bother. Rule of thumb - two enhancements gets most of what you are going to get for that enhancement. So 2x Acc and 2x Dam gives you most of what you need for accuracy and damage. For some higher powers it might end up being 2x Acc, 2x Rchg, 2x whatever effect I want boosted. Once you get into the IO sets it is a different world, since now you need to consider set bonuses to eke out some extra performance. but once you are IO'ed with basics at 50 you can delve into that world! You can do some neat stuff with sets or frankenslotting.
-
Apparently Haste had just fired, because when I downloaded the client with Tequila I put it right in my Documents folder. How do I move the files and point Tequila to them? Thanks! So happy to be back in!