Celtic_Tiger_Champ
-
Posts
4 -
Joined
-
Last visited
Content Type
Profiles
Forums
Events
Store
Articles
Patch Notes
Everything posted by Celtic_Tiger_Champ
-
Here is what makes this build great, quick snapshot of the numbers: This is without Incarnates. The recharge rate is a bit of overkill, but it helps to always have options and never waiting long for the heavy hitters. I love the use of Burst of Speed as a quick entry to mobs, Tail of the Dragon, then pick off enemies. The damage overall is incredible even before incarnate, but with incarnate is kind of borderline ridiculous, but just a blast! This Hero build was built using Mids Reborn 3.0.4.7 https://github.com/Reborn-Team/MidsReborn Click this DataLink to open the build! Mando Cando: Level 50 Technology Blaster Primary Power Set: Beam Rifle Secondary Power Set: Martial Combat Power Pool: Speed Power Pool: Leaping Ancillary Pool: Cold Mastery Hero Profile: Level 1: Single Shot -- Dcm-Acc/Dmg(A), Dcm-Dmg/EndRdx(3), Dcm-Dmg/Rchg(3), Dcm-Acc/EndRdx/Rchg(5), Dcm-Acc/Dmg/Rchg(5) Level 1: Ki Push -- CrsImp-Acc/Dmg(A), CrsImp-Dmg/EndRdx(7), CrsImp-Dmg/Rchg(7), CrsImp-Acc/Dmg/Rchg(9), CrsImp-Acc/Dmg/EndRdx(9) Level 2: Charged Shot -- Dcm-Acc/Dmg(A), Dcm-Dmg/EndRdx(11), Dcm-Dmg/Rchg(11), Dcm-Acc/EndRdx/Rchg(13), Dcm-Acc/Dmg/Rchg(13) Level 4: Reach for the Limit Level 6: Disintegrate -- Dcm-Acc/Dmg(A), Dcm-Dmg/EndRdx(15), Dcm-Dmg/Rchg(15), Dcm-Acc/EndRdx/Rchg(17), Dcm-Acc/Dmg/Rchg(17) Level 8: Aim -- HO:Membr(A), HO:Membr(19), HO:Membr(19) Level 10: Storm Kick -- CrsImp-Acc/Dmg(A), CrsImp-Dmg/EndRdx(21), CrsImp-Dmg/Rchg(21), CrsImp-Acc/Dmg/Rchg(23), CrsImp-Acc/Dmg/EndRdx(23) Level 12: Lancer Shot -- Dcm-Acc/Dmg(A), Dcm-Dmg/EndRdx(25), Dcm-Dmg/Rchg(25), Dcm-Acc/EndRdx/Rchg(27), Dcm-Acc/Dmg/Rchg(27) Level 14: Hasten -- RechRdx-I(A), RechRdx-I(29), RechRdx-I(29) Level 16: Burst of Speed -- Acc-I(A) Level 18: Penetrating Ray -- Dcm-Acc/Dmg(A), Dcm-Dmg/EndRdx(31), Dcm-Dmg/Rchg(31), Dcm-Acc/EndRdx/Rchg(31), Dcm-Acc/Dmg/Rchg(33) Level 20: Super Speed -- Clr-EndRdx(A), Clr-Stlth(33) Level 22: Reaction Time -- SynSck-EndMod(A), SynSck-Dam/Rech(33), SynSck-EndMod/Rech(34), SynSck-Dam/Rech/Acc(34), SynSck-Dam/Acc/End(34) Level 24: Dragon's Tail -- SprDfnBrr-Acc/Dmg(A), SprDfnBrr-Dmg/Rchg(36), SprDfnBrr-Acc/Dmg/Rchg(36), SprDfnBrr-Acc/Dmg/EndRdx(36), SprDfnBrr-Rchg/+Status Protect(37) Level 26: Piercing Beam -- OvrFrc-Acc/Dmg(A), OvrFrc-End/Rech(37), OvrFrc-Acc/Dmg/End(37), OvrFrc-Dam/KB(39), OvrFrc-Dmg/End/Rech(39) Level 28: Inner Will -- DctWnd-Heal/EndRdx(A), DctWnd-EndRdx/Rchg(39), DctWnd-Heal/Rchg(40), DctWnd-Heal/EndRdx/Rchg(40), DctWnd-Heal(40) Level 30: Super Jump -- Jump-I(A) Level 32: Overcharge -- PstBls-Acc/Dmg(A), PstBls-Dmg/EndRdx(42), PstBls-Dmg/Rchg(42), PstBls-Dmg/Rng(42), PstBls-Acc/Dmg/EndRdx(43) Level 35: Combat Jumping -- LucoftheG-Def/Rchg+(A), Krm-ResKB(43) Level 38: Snow Storm -- PcnoftheT-EndRdx/Rchg/Slow(A) Level 41: Eagles Claw -- CrsImp-Acc/Dmg(A), CrsImp-Dmg/EndRdx(43), CrsImp-Dmg/Rchg(46), CrsImp-Acc/Dmg/Rchg(46), CrsImp-Acc/Dmg/EndRdx(48) Level 44: Frozen Armor -- LucoftheG-Def/EndRdx(A), LucoftheG-Def/Rchg(45), LucoftheG-Def/EndRdx/Rchg(45), LucoftheG-Def(45), LucoftheG-Def/Rchg+(46) Level 47: Hoarfrost -- StdPrt-ResKB(A), UnbGrd-Max HP%(48) Level 49: Hibernate -- Heal-I(A) Level 1: Brawl -- Empty(A) Level 1: Defiance Level 1: Sprint -- Run-I(A) Level 2: Rest -- Empty(A) Level 2: Swift -- Run-I(A) Level 2: Health -- Mrc-Rcvry+(A), NmnCnv-Regen/Rcvry+(48) Level 2: Hurdle -- Jump-I(A) Level 2: Stamina -- PrfShf-EndMod(A), PrfShf-EndMod/Rchg(50), PrfShf-EndMod/Acc(50), PrfShf-End%(50) Level 1: Disintegrating Level 49: Quick Form ------------

-
Yeah, I will post. I have two builds, one is a really expensive build that’s not very realistic. The other more doable. I think my old “live brain” was feeling possessive, but that time is long gone.😃
-
So I’ve been loving my Beam Rifle/Martial Combat/Ice Blaster! If you love to have a great options for ranged and melee damage and if you’re smart about taking advantage of set bonuses you will have a great balance of damage and survivability. I’m on my mobile at the moment so it’s not the greatest mode to post so I’ll be brief. Essentially, I’ve built this two ways. One with a mindset on ranged damage and only a couple of melee selections, and one build with a balanced mindset...and the latter has made all the difference. As I thought about this build from the very start I was inspired by The Mandolorian, I was looking for power sets that might emulate that “archetype”. What is a mandolorian? Well, kind of a ‘jack of all trades’. So I was toying with various options and went from stalker to scrapper, and settled on Blaster. The different primaries I kept a going back and forth on were Assault Rifle and Beam Rifle. As I played around with character creator Beam Rifle just seemed perfect. Got a great looking weapon and the attacks seemed very “galactic”. As for a secondary, there are many fitting options to choose from. One could make great arguments for Ninjitsu, Devices, Energy...but when I saw Martial Combat I was really intrigued. This could be the perfect balance...so far it’s been amazing! Some highlights.. I’m mostly a PvE soloist, so my build is all about high damage and focus on survival. Perma-Hasten High DPS Powerful melee attacks, with great escape/retreat functionality when necessary. (Playing plus 2/3 combat level regularly, no A/V). Max Defense I have an awesome travel bind that I’ve worked into an attack chain which is the primary mode of attack using Burst of Speed. So fun! Just needed to get these thoughts out and share. I may share the Mids Build, have to think about that. Ciao! CT
-

Homecoming Launcher Public Beta
Celtic_Tiger_Champ replied to Number Six's topic in Homecoming Launcher
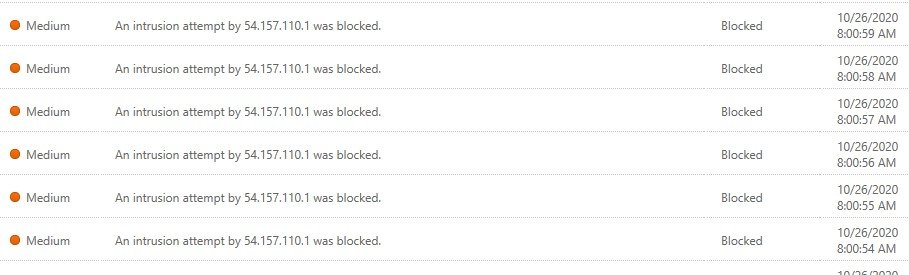
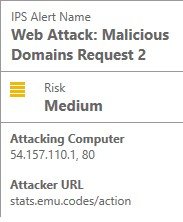
Norton 360 appears to be blocking HC Installer. I've gone through permissions and "allowed" but each time I try to open HC Installer it blocks it again. Anyone know of a work around? Also, it appears that after attempting to install, there were several intrusion attempts (attached).