Papaschtroumpf
-
Posts
596 -
Joined
-
Last visited
Content Type
Profiles
Forums
Events
Store
Articles
Patch Notes
Everything posted by Papaschtroumpf
-
But I made the mistake in REpel. I does Repel (duh), not knockback, so the Sudden Acceleration IO is useless
-
I'm of two minds on the repel effect of Jet Stream. Solo it's nice crowd control but in teams it too often pushes does a away from the tank. This is why is slotted a KB-to-KB enhancement even though the power already does Knockback and not Knockdown. According to the wiki it suppresses the Repel: While repel effects usually do not interact with KB-to-KD enhancements (eg. 1, 2), Jet Stream's repel is disabled if one is slotted. Note that this does not convert it to a knockdown. The ability will still have a knockdown effect on enemies within a Storm Cell, regardless of the enhancement being slotted or not.
-
at lvl21, I find the damage on this build lacking, although the only damage boost power I have so far is Siphon Power. Here's an attempt at a build, I haven't tried it yet. I'm going for defense first, then accuracy bonus (do they affect Storm Cell?), then damage boost. I don't know if I need all the recharge in the build yet. I have 4 LoTGs, Hastem and Siphon Speed, without a specific power to perma, but with transference getting "unlimited" endurance it should be good to have most attacks recharging fast I think, but if there is better slotting I'm likely willing to give up some speed. Ignore what level slots were added, I haven't optimized for that yet. Repel is more for fun than anything else, I could swap if for Vengeance or Burnout if I need the slot for example. Storm Accelerator - Villain Corruptor Build plan made with Mids' Reborn v3.6.6 rev. 3 ────────────────────────────── Primary powerset: Storm Blast Secondary powerset: Kinetics Pool powerset (#1): Flight Pool powerset (#2): Fighting Pool powerset (#3): Leadership Pool powerset (#4): Speed Ancillary powerset: Mace Mastery ────────────────────────────── Powers taken: Level 1: Hailstones A: Thunderstrike: Accuracy/Damage/Recharge 21: Thunderstrike: Accuracy/Damage/Endurance 27: Thunderstrike: Damage/Endurance/Recharge 46: Thunderstrike: Damage/Endurance 48: Thunderstrike: Accuracy/Damage 48: Thunderstrike: Damage/Recharge Level 1: Transfusion A: Numina's Convalesence: Heal/Endurance 5: Numina's Convalesence: Endurance/Recharge 23: Numina's Convalesence: Heal/Recharge 23: Numina's Convalesence: Heal/Endurance/Recharge 25: Numina's Convalesence: Heal 25: Numina's Convalesence: +Regeneration/+Recovery Level 2: Jet Stream A: Superior Scourging Blast: Accuracy/Damage 3: Superior Scourging Blast: RechargeTime/PBAoE +End 3: Superior Scourging Blast: Accuracy/Damage/RechargeTime 5: Force Feedback: Chance for +Recharge 48: Overwhelming Force: Damage/Chance for Knockdown/Knockback to Knockdown Level 4: Siphon Power A: Invention: Accuracy Level 6: Storm Cell A: Superior Scourging Blast: Damage/RechargeTime 7: Superior Scourging Blast: Damage/Endurance/RechargeTime 7: Superior Scourging Blast: Accuracy/Damage/Endurance/RechargeTime 9: Positron's Blast: Chance of Damage(Energy) 9: Bombardment: Chance for Fire Damage 11: Javelin Volley: Chance of Damage(Lethal) Level 8: Hover A: Luck of the Gambler: Defense/Increased Global Recharge Speed 11: Luck of the Gambler: Defense 39: Shield Wall: +Res (Teleportation), +5% Res (All) 43: Luck of the Gambler: Defense/Endurance 43: Luck of the Gambler: Endurance/Recharge Level 10: Siphon Speed A: Ice Mistral's Torment: Accuracy/Damage/Endurance Level 12: Direct Strike A: Sting of the Manticore: Chance of Damage(Toxic) 13: Sting of the Manticore: Damage/Endurance/Recharge 13: Sting of the Manticore: Accuracy/Damage 15: Sting of the Manticore: Damage/Endurance 37: Sting of the Manticore: Accuracy/Interrupt/Range Level 14: Intensify A: Gaussian's Synchronized Fire-Control: To Hit Buff/Recharge 15: Gaussian's Synchronized Fire-Control: To Hit Buff/Recharge/Endurance 17: Gaussian's Synchronized Fire-Control: Recharge/Endurance 17: Gaussian's Synchronized Fire-Control: To Hit Buff 19: Gaussian's Synchronized Fire-Control: To Hit Buff/Endurance 19: Gaussian's Synchronized Fire-Control: Chance for Build Up Level 16: Boxing (Empty) Level 18: Chain Lightning A: Superior Malice of the Corruptor: Accuracy/Damage 21: Superior Malice of the Corruptor: Damage/Recharge 34: Superior Malice of the Corruptor: Accuracy/Damage/Recharge 36: Superior Malice of the Corruptor: Damage/Endurance/Recharge 36: Superior Malice of the Corruptor: Accuracy/Damage/Endurance/Recharge 36: Superior Malice of the Corruptor: Recharge/Chance for Negative Energy Damage Level 20: Speed Boost A: Blessing of the Zephyr: Knockback Reduction (4 points) Level 22: Tough A: Gladiator's Armor: TP Protection +3% Def (All) 37: Steadfast Protection: Resistance/+Def 3% Level 24: Weave A: Luck of the Gambler: Defense/Increased Global Recharge Speed 37: Luck of the Gambler: Defense/Endurance 39: Luck of the Gambler: Defense 39: Luck of the Gambler: Endurance/Recharge 45: Luck of the Gambler: Defense/Recharge 45: Luck of the Gambler: Defense/Endurance/Recharge Level 26: Maneuvers A: Luck of the Gambler: Defense/Increased Global Recharge Speed 27: Luck of the Gambler: Defense/Endurance 46: Luck of the Gambler: Defense 46: Luck of the Gambler: Endurance/Recharge Level 28: Transference A: Synapse's Shock: Damage/Rechage 31: Synapse's Shock: EndMod/Recharge 31: Synapse's Shock: EndMod/Increased Run Speed 40: Synapse's Shock: Damage/Accuracy/Endurance 42: Synapse's Shock: Damage/Recharge/Accuracy 42: Power Transfer: Chance to Heal Self Level 30: Fulcrum Shift A: Invention: Accuracy Level 32: Category Five A: Artillery: Accuracy/Damage 33: Artillery: Damage/Endurance 33: Artillery: Damage/Recharge 33: Artillery: Accuracy/Damage/Recharge 34: Artillery: Accuracy/Recharge/Range 34: Artillery: Endurance/Recharge/Range Level 35: Scorpion Shield A: Luck of the Gambler: Defense/Increased Global Recharge Speed 40: Luck of the Gambler: Defense 40: Luck of the Gambler: Defense/Endurance/Recharge 42: Luck of the Gambler: Endurance/Recharge Level 38: Assault A: Invention: Endurance Reduction Level 41: Hasten A: Invention: Recharge Reduction 43: Invention: Recharge Reduction Level 44: Fly A: Hypersonic: Flying / Increased Fly Protection Level 47: Tactics A: Rectified Reticle: To Hit Buff 50: Rectified Reticle: To Hit Buff/Recharge 50: Rectified Reticle: Increased Perception Level 49: Repel A: Sudden Acceleration: Knockback to Knockdown 50: Invention: Endurance Reduction ────────────────────────────── Inherents: Level 1: Scourge Level 1: Brawl (Empty) Level 1: Sprint A: Invention: Run Speed Level 2: Rest (Empty) Level 1: Swift A: Invention: Flight Speed Level 1: Hurdle A: Invention: Jumping Level 1: Health A: Panacea: +Hit Points/Endurance 29: Miracle: +Recovery 45: Preventive Medicine: Chance for +Absorb Level 1: Stamina A: Performance Shifter: Chance for +End 29: Performance Shifter: EndMod 31: Power Transfer: Chance to Heal Self Level 2: Lightning Aura Mode Level 49: Quick Form Level 44: Afterburner G29mACwK7IbjC46wJipUr2Ys4G+PRnqUziYp+2kyt19oKRwo/XmltjaX8lNL9oDx7RG3fTSGKSZH2vyAnjyhuAAxVa2q1tCHLPcuP5Sf0QtcaXZNHE0KFLV3/uD/t9dmFEWi0RyPrROLkCiEz8yfeVvqT2ilvzR6UxxUcPFIolYi3WqKQorcR5tHnV2HROKKwlswjsfIRcN+LesLUBEVOX+U3smwyBoVPUXqBfSeQuE2Xg2ByBUJcN4jhePTp40J+D1E5IGUjAn8PPZ91hPnsft0FB6skIph22kBmbuc+rx9UeY+e5gn8Ka0LAWbsmUJzM/2PaCRgoVhD2Pnit+SwPs2xwK1QuB0LV6aFMOyaYXscspvxEj9cFu9xbqq1PJV5AW5fnVyEf9jArTLiRXBdSRXttwke20KMcEeK9wxU6xw5355E63AdK75JrYXqiiemCafaa3Vl0N2Q0rG23sTKz70vZGe6rrp2JY9sWTnRSMx/UDe4KDwcFVKedjb2N1qtF+7W7B5c+77Ri5uBN3h0PgtFsPazD3cj+cFzaV/uBjHm2OwMIyrolvzrsCypDrPG7UMsmd8v3megW2j4H2r86zlK6GoLkvwK7yYGqrpgmA3vNF7w8zPR58Ec4cmsLPz6IzyP1jh3tHwsMJw0X+ERKawxGiLGztanwp7qlGAlyJJufc4+5gmP0n6CFWSu/auqhCtLel7s312fp31l9QC9H9enQcrvTpleifBgFZsHiRZPo4iA1fupKNMDvH3wGkST4HA2N+1EJoEC9dlRgSoWK2tl66PiOLpdDq9AsMKRgFP4GrTb6y3hULYCjmaJCW82cbqv+K1fwT7MovRRlJ1lZuTKFkN6Ib3wyyevu0XCeA6htQtCrfhqTB/cDSR6seftya1+tAV0bt+FTpq6CwhtMN9mftuWi7OngrigtOwaV4fFRFJqgv/tZ0zyHZ6G6JpAJJH1ZH7M4IHi8DPiotLjsgO60jnRGdidbwke6Ikl4mdhE2HPRreNt0Gh5u+Oi5STbz8dV2e+l474Vf9pgxLw8C90Y4LeYup1GCsjWOGMzLnPMvsS2qk97eZPDyjSHcI63I1EZyZ7heZETsJkNToQP5VVxX4iEueVaYqR4lhyoHeAcNjjaq9JcAJjo6LwDefdoOriXBmchR47db/hKL1p0OSh9Mqvtwbtu4MaevBcr0qe49lFggGhF3fyr5vfJbzNWd+LyDyhqSUnBmNSrKwhNQUQ7K0EkNx9buxywi3mxFexRVL4RFO8urE/IAqkZI0IrPNQdkux7n4AYoZLjuDNS4I5eDxCmlwNYdu8MOIPXGVTCkwKQIYUkZ5ge0QTpOVMji1eGwnQdYFDQgO0lvFkFsWw2YdfD1llmKDYe/taI7B1GxewaeuCWTZH7SWX/8HC7qjN7HFcywVKF5xV1LEIRaiJHnIlJu0xlMPhqbYF1hqyU8d709yc2jH2KWL80rjzzUZ7elTLrxnbOIAxtOctKetMyow58Wxt3gUPI9yQ/FUY1dq+tAPKiRcoVUQD2BVvOREmkCtatNNpxEqcdE1ALSV4J4o2V5TyPTEVBpABMcO2ViST2QhOrVcb1bLgmYjLLcUR7jMEZpRMEYT8ZQn+n76ZnZCW90rz6ftaah+o1o0i83bznvFAsMayQk1pjB/deBHUbhKfkwRX7ocr65p6lcXrJNhKahNEeNEnLUt5zZfF2pu9njdR6+sM+8NdIdiw8eJh8nG+zyDM+nkEiIv+sBzmSKqRJCfDvSRvqoTOgdzJifxpril68dJwwdfMD67IXk34M/2ewQOrQVb8YDh2ZtPpT7QdfqQ3epDpw7Q8UqTgmmMtq/WPsgeuED9tmiqEE3EkZWofwZPkMakMnG2UyUZLc7HURBVNPpR+tuERbtqeCEk6jF2SvV5lO0vsaA4DaBmkdJPkglecpqL5Tv4XRAVPgyL7ItxZ1HWEQAmgmBjT7JRyEf8UZ5ZG2AiAjYRNbV7RNOquj0rtclczTubFhtvLi8VF3ycVPs9IQcIjT60kyQFasjjdcj5hZ7xQq144MqNsklsZoORiE9OZOTZy1DuBEmxw50zOUzykB5xZr9Iin8DU/GutmKlrNhg2mV/Oszcm+tm5TQMGNwuzKcYzYd4wWWdXzogZ7viA4bPy4VQg6+MthCCq8DkNiZCUhUEUK0oKyU837OtWte9A+pSaiZ0SM5XvGB4W/BsDeqY1kl0QD83lRlIeF0lUDCYv3gQnR5zjGaaYJ/JY+NkZx4+rjT8VN4xxl3D6DrH1a9RSXQ3YVCtWBCrwP//X0/hR74K6DX1zD9mi7GUcl99iKktKVXQtniO3yEnoFNqw7uusJMq07DPS+1p8lTq/lf5DGuBqOLZ76cMl2F+OTWeuefb9CYQvTj/XnPQwUqBb0zHjcJeA89hUI48E9CS4Q0qcMxAAMbq0RRlmqL3F11gOpViDVpKo5iP0tKIwsodLUJ8jBlWE76UhYdurSgtL9MVHjQa8n0=

-
I'm taking every power on the way up to learn the Storm Blast set, but does anyone has a good build I could respec into after 32?
-
Very well considered response and costume
-
I rolled a Water/Mental because I've never seen one in game and why not. Both sets are awesome, although I don't know that synergize very well though, but if they do I'm guessing it's gotta be as a blapper-ish build. World of Confusion and Whirpool at my feet style. I just need to figure out survivability, it's a lot easier to only wirry about ranged (and AoE) def when you stay at a distance, but now I have so much to slot for. anyone running this build, or build guru up to the challenge of those requirements? "Money is no object" (I'll likely regret saying that)
-
I've been looking at Sentinel builds, I kinda like this one, I like procs 🙂 I wonder if Weave at lvl 49 is too little too late? that's still only 13% defense, just short of a small blue insp. I'm thinking about getting stealth instead so slot for a LoTG +rechg, and if I slot flight for stealth I have full stealth, albeit late in the game. Still nice for WSF speeding for example. Similarly I think I'd want Tough earlier, so maybe move the ancillary down a slot. (not done in the build below, I may play it by ear when I get to 41) Like the previous poster, my Sentinel is a hoverer so I switched travel powers, and I switched the order of Hover and Aim to get Hover earlier Here is what I came up with. Reusing the freed slots for 5-slotting AIM for +2.5% damage may have been a better option too. Hero Plan by Mids' Reborn : Hero Designer 2.6.1.25 https://github.com/Crytilis/mids-reborn-hero-designer Click this DataLink to open the build! Neutrino Genesis: Level 50 Technology Sentinel Primary Power Set: Radiation Blast Secondary Power Set: Radiation Armor Power Pool: Flight Power Pool: Speed Power Pool: Fighting Power Pool: Concealment Ancillary Pool: Psionic Mastery Hero Profile: Level 1: X-Ray Beam -- SprSntWar-Acc/Dmg/Rchg(A), SprSntWar-Rchg/+Absorb(27) Level 1: Alpha Barrier -- TtnCtn-ResDam/EndRdx(A), TtnCtn-ResDam(3), TtnCtn-ResDam/EndRdx/Rchg(5), TtnCtn-EndRdx(5), UnbGrd-Max HP%(23) Level 2: Irradiate -- SprSntWar-Dmg/Rchg(A), SprSntWar-Acc/Dmg/EndRdx/Rchg(7), Obl-%Dam(7), TchofLadG-%Dam(9), FuroftheG-ResDeb%(9), AchHee-ResDeb%(21) Level 4: Gamma Boost -- PrfShf-End%(A), NmnCnv-Regen/Rcvry+(50) Level 6: Cosmic Burst -- SprSntWar-Acc/Dmg/EndRdx(A), SprSntWar-Acc/Dmg(39), GldJvl-Dam%(39), ShlBrk-%Dam(40), TchofLadG-%Dam(40) Level 8: Hover -- LucoftheG-Def/Rchg+(A), Ksm-ToHit+(25), ShlWal-ResDam/Re TP(25), Rct-ResDam%(50) Level 10: Proton Armor -- TtnCtn-ResDam(A), TtnCtn-ResDam/EndRdx(11), TtnCtn-ResDam/EndRdx/Rchg(11), TtnCtn-EndRdx(15) Level 12: Fallout Shelter -- TtnCtn-ResDam(A), TtnCtn-ResDam/EndRdx(13), TtnCtn-ResDam/EndRdx/Rchg(13), TtnCtn-EndRdx(15) Level 14: Aim -- GssSynFr--Build%(A), GssSynFr--ToHit/Rchg(39) Level 16: Proton Therapy -- Prv-Heal(A), Prv-Heal/EndRdx(17), Prv-EndRdx/Rchg(17), Prv-Heal/Rchg(19), Prv-Heal/Rchg/EndRdx(19), Prv-Absorb%(21) Level 18: Proton Stream -- Dmg-I(A), Dmg-I(40), GldJvl-Dam%(43), ShlBrk-%Dam(46), TchofLadG-%Dam(48), AchHee-ResDeb%(48) Level 20: Particle Acceleration -- Flight-I(A) Level 22: Hasten -- RechRdx-I(A), RechRdx-I(23) Level 24: Fly -- Frb-Stlth(A) Level 26: Neutron Bomb -- Bmbdmt-+FireDmg(A), Bmbdmt-Acc/Rech/End(27), Bmbdmt-Acc/Dam/Rech(31), Bmbdmt-Acc/Dam/Rech/End(33), Bmbdmt-Dam(33), SprOppStr-Rchg/+Opportunity(33) Level 28: Particle Shielding -- Pnc-Heal/EndRedux(A), Pnc-EndRdx/Rchg(29), Pnc-Heal/Rchg(29), Pnc-Heal/EndRedux/Rchg(31), Pnc-Heal(31) Level 30: Boxing -- Empty(A) Level 32: Atomic Blast -- Arm-Dmg/Rchg(A), Arm-Acc/Dmg/Rchg(34), Arm-Dam%(34), Obl-%Dam(34), Erd-%Dam(37), TchofLadG-%Dam(48) Level 35: Ground Zero -- Obl-%Dam(A), ScrDrv-Dam%(36), TchoftheN-%Dam(36), Erd-%Dam(36), ShlBrk-%Dam(37), RechRdx-I(37) Level 38: Meltdown -- GldArm-3defTpProc(A) Level 41: Mind Probe -- Hct-Dmg/Rchg(A), Hct-Acc/Dmg/Rchg(42), Hct-Dam%(42), Mk'Bit-Dam%(42), GldStr-%Dam(43), TchofDth-Dam%(43) Level 44: Dominate -- UnbCns-Dam%(A), GhsWdwEmb-Dam%(45), NrnSht-Dam%(45), GldNet-Dam%(45), Apc-Dam%(46), GldJvl-Dam%(46) Level 47: Tough -- StdPrt-ResDam/Def+(A), HO:Ribo(47), HO:Ribo(47) Level 49: Stealth -- LucoftheG-Def/Rchg+(A) Level 1: Opportunity Level 1: Brawl -- Empty(A) Level 1: Sprint -- Empty(A) Level 2: Rest -- Empty(A) Level 2: Swift -- Flight-I(A) Level 2: Hurdle -- Empty(A) Level 2: Health -- Pnc-Heal/+End(A), Mrc-Rcvry+(3) Level 2: Stamina -- PrfShf-End%(A), PrfShf-EndMod(50) Level 50: Musculature Core Paragon Level 1: Prestige Power Dash -- Empty(A) Level 1: Prestige Power Slide -- Empty(A) Level 1: Prestige Power Quick -- Empty(A) Level 1: Prestige Power Rush -- Empty(A) Level 1: Prestige Power Surge -- Empty(A) Level 4: Ninja Run ------------ | Copy & Paste this data into Mids' Reborn : Hero Designer to view the build | |-------------------------------------------------------------------| |MxDz;1504;727;1454;HEX;| |78DA65544B4F135114BE773A05FB024A8116A1B4BCFA66A0EA4613252A481031048| |CDBA6C25846CB0CE9542371E55F70E32F70E1C644FF817BF1F103DC69A23C35AE5C| |603D33DFA1A2BD49F3F59CF39D73CFF9EEBDB3F86826F872EEC9B4901D57AB65DB2| |EADE866DD30F5AAFF96BEBA6E5A55ABB2256875DDD41FD46B866925E77453B70DBB| |9D9C89637269B96C56F4356DB9BC6694EB866596AE50B17AB2199FD1EFEAA6AD9F2| |05CAE6D58351158B2ACAA76AD6A54D6EB7EF7FFCAA6AEAF85E076BC865909BBD6BC| |F9D0B08D3B46D5A86FF5CF6E1AAB5AB3FA926D9416693FBDB615A3B652F40B6404A| |F8614EF54218AAA38FD11B8E3C4A41B53454EBA3E4503AA138C93C0BE5F1E178394| |2391E395DBA8D3F6815180736A5B014E931D5745CF1BB223AA789515C2835CE9790| |64EF136EA87A8AE177DAADEF7A8977ACB5840DD741BEAA5B9BE8FB46F473D4F7B2F| |EAC48E84CB892D20A7F813B84BF57DCCF5F18C7E9ED9CFB376F0AC7BC40D3037C0D| |C207383FF713B881B627D432FD057EA39F007C53A11F3767E451F5DDF187780DDBB| |8C7BC09E7D8E536E98750EC705E667CCB11E13ACC724EB31C93ABF269D23C815915| |1E48C9056BDAC7D6FDEF1F9441F63806251E6478F305798F6EFE7DEFB152FEECD6F| |9CC790809D948C47F0273F01F7297780EFD5C0207A1D8C330E0187128C49A0A41EE| |2D84FC41BB444375549700789F38ADBE9F005C68B9878986FDCD881F28F1207943B| |C2B923CC197D0C2546636C73CE18AB38C66A1C52EE3877327E06B1CFA468864F239| |3460FD90C631E7B66EFF3E964503F57223BAD8A2F949BE7DCFC3CB8850DA85C284B| |B77E61964FB488F8049FB08754D190AB685170B54B64AA9E26868833C5FD4EF12BB| |897755EB6F39E1A8D41B5F905704C52F6468B6749E50F0179A4EBD9F737DFB9907C| |870E4EFA5CD6E15F8F94C3E859B92EDDB9BF9F8C1DBFF6A7C0850801628D5C4B375| |32D9E628BE76C8BE75C8BC7D7259CB37777F903B96BF482| |-------------------------------------------------------------------|
-
I never got back to mine, but it's still around, i never deleted it either
-
Anyone playing Electric Melee / Dark Armor?
Papaschtroumpf replied to Papaschtroumpf's topic in Brute
Yes that it definitely a nice synergy. Elec Melee always feels a bit slow to develop for me, but I'm enjoying the combo. I think mine is in the mid-teens, i don't tend to slot IOs till the 20s which is when the combo will start picking up speed... -
Anyone playing Electric Melee / Dark Armor?
Papaschtroumpf replied to Papaschtroumpf's topic in Brute
that looks pretty good, the slotting order is not quite what I would usually go for, survivability over damage for sure! -
I'm not finding aby threads on this combo, I was thinking about trying it out for a thematic reason (electron cloud concept) Any advice or build?
-
Lol I like it. There is a side "ear vent" kinda piece that works well for monkey types too, can't remember what it's called and no game access atm.
-
Looking for a macro that lets me pull out Phantom Army and say something at the same time. OK if I still need to click for hte target to drop PA on help?
-
Pure Ranged Fortunata / Soul Mastery Build
Papaschtroumpf replied to Draeth Darkstar's topic in Arachnos Soldier & Widow
As much as I love the concept of an all mental (more than all range) fortunata, I keep coming back to sottocamp's build above -
damn! I'm stealing this! I love it
-
I think IO sets just allow you to do so much more
-
I often run repell continuously, especially solo. Knockdown only of course, it's not as bad on end as I remembered from Live
-
< Hmm, maybe I'm doing something wrong, or I don't understand the numbers in Mid's The only click powers that don't require active targeting are Spine Burst and Burn on my build Mids says Burn does 265 damage every 12.77s, Spine Burst does 120 every 7.2s Is the damage reported per target? so Burn would be 5x265 = 1325 every 12.7 or 104/s vs Spine Burst = 10x120/7.2 or 166/s? I'll try spine burts on auto so see how it goes As long as I have 10 targets then maybe it makes sense, and I am at aggro cap most of the time: where does Mids' show the target cap for each power?
-
>Also, if you're afk, you're not getting value from Burn Can you explain? if you put Burn on auto it is definitely a good contributor to you afk damage. It also is the only power affected by your recharge rate when AFK, and since you can't put Hasten on afk too, you have to rely on recharge bonuses. So I'm guessing I could ATO, WO and Purple my build to eek out some +dmg and decent +rechg. It's likely not worth the investment but an interesting exercise. What I did not think at looking at it whether you are better off putting Build Up or Fire Embrace on auto instead of Burn. You obviously want your incarnate level shift and passive incarnates for the added damage/debuff/recharge Regarding not all mobs wandering into range, I think it's OK, there is no map or objective completion that I know of, so restarting the map with some mobs left is OK. when I afk farm I usually do missions on the other computer, so I often swith to the next map when I exit missions, regardless of whether it's complete or not
-
my cheapie build is different but very similar in numbers 12s Burn
-
I started running afk AE farming while I play my regular characters on a different computer. I have expensive tastes and altitis both, so the farmer helps me afford fully purpled builds for all my alts. My regular farmer started on a pretty cheap build (no purples, winters or ATOs) and is capped for res and def. Afk is perfectly fine but on the slowish side, I have Burn on auto, about 12s recharge, can't remember is I have price in it to be honest. So, is there a great build for afk and/or follow? My farmer is spine/fire but I don't mind starting a whole new character.
-
Also I think the "ally" cop on the map is supposed to help bring enemies to you faster by drawing aggro all over the map. It seems to only work some times, but it helps cleaning rather than wait fo mobs to wander to the center.
-
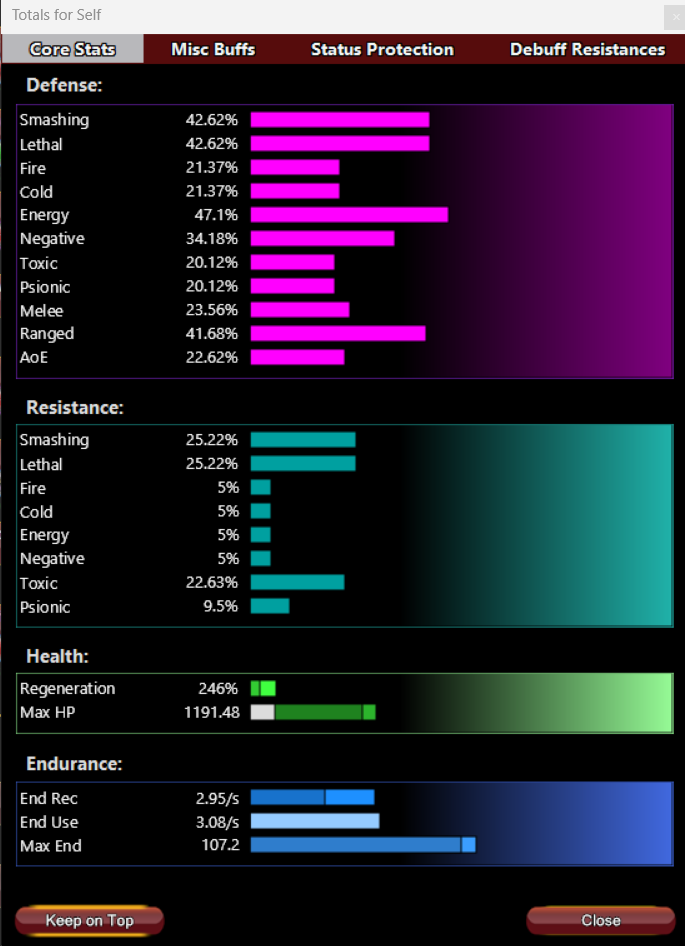
I find that once while my afk farmer build (both 90% fire res and 45.46% def) dies without the heal on auto. It's a but luck of the draw, but with minions dying so fast you end up with a large posse of bosses grinding at you, and once in a while the regen doesn't keep up. Putting the heal on auto solves it but now can't put Burn on auto. For the same reason I can't put Hasten on auto, but I still have decent recharge, burn goes off every 12s or so... EDIT: tried it and completed teh comic con arc 5 times (26 missions and never got close to dying on afk, so it is rare than I remembered) Right now I have a pretty cheap build, maybe I'll upgrade for mode speed, for more auto burn. I'll check with thread for better builds
-
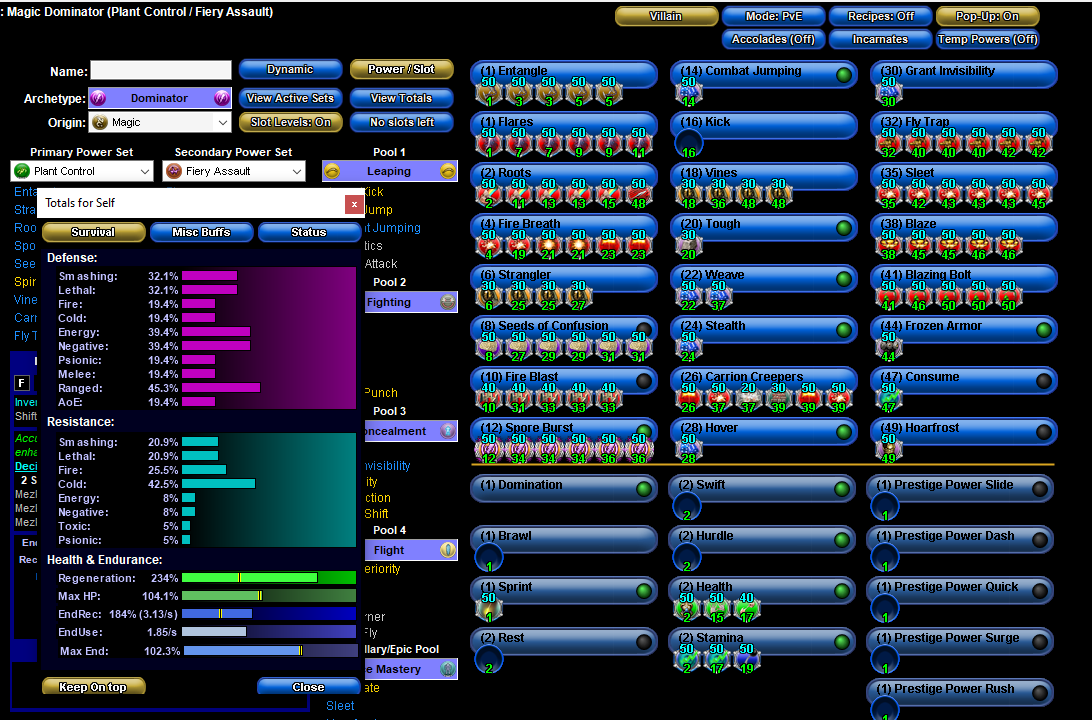
Wow really hard to keep the core of that Hasten-less build intact without dropping the numbers. I can't find a way to drop Spores and maintain the +Rchg because you end up over the cap on the +10% bonuses otherwise. On my Plan/Storm I'm not in love with the flytrap, but again I can't seem to find away to keep the defense numbers up without it (or at least without making the build very different) In the end I came up with this. The goal was to get Vines and its set bonus earlier. that's done at the expense of Fly, but it lets me introduce Consume late in the build although I don;t really know that I'll need it. you could take Fly instead, but I'm not a fan of late travel powers. I think the tradeoff are worth the extra +7.5% recharge at lvl18 I moved the spare slot into Roots for a Gladiator Javelin Proc, or you could put that same proc in the snipe I also need to work on the slotting order
-
Oedipus_tex, as always thorough and helpful answer and followup tip!