
Cenozoic
-
Posts
101 -
Joined
-
Last visited
Content Type
Profiles
Forums
Events
Store
Articles
Patch Notes
Everything posted by Cenozoic
-
Much answer. Very like! WoC sure is pretty though. I put in on AE Psi farm NPCs because it is easy to find the stragglers.
-
Yes. Get them both.
-
OP, Fire/Dev here. I use: Hover/Fly/Evasive —Fly prot, Immob, -KB% CJ/SJ/Acrobatics —Immob, Hold, KB Maneuvers/Tactics/Veng —Confuse, Perception, veng is awesome Clarion!!! The 120sec version Defense & Smoke Grenade (can’t mez you if they can’t hit you) Defiant Barrage in your best AoE (mine is Fireball) My biggest weakness is Stun, so yeah definitely slot mez resistance Hover negates close AoE & Melee mezzes so positional defense
-

Focused Feedback: Dr. Aeon Strike Force
Cenozoic replied to Booper's topic in [Open Beta] Focused Feedback
The ASF is a great addition to the lineup! The whole thing is over-the-top in a very entertaining way. Ran into one frustrating caveat: Zoe can fly away while Held. So I'm soloing the ASF, and I am fighting Princess Zoe. She is held (mag80 steady state using Power Analyzer) and then she gets up and runs away. That is ... not realistic toward the game mechanic of being held. Otherwise she would have gotten up much earlier. Respectfully requesting her "run away, spawn baddies" mechanism is suppressed while Held so that mez is recognized correctly. Otherwise the whole "use support to win" mechanism ignores the Mind Controllers like me whose only contribution is mez. Thanks for reading, and this SF is a blast! -
zones that are never used ( for the most part)
Cenozoic replied to MikeEmike's topic in Suggestions & Feedback
Mike, I really like your idea. Let me know what you think about this expansion: Zone Levels remain as set Ex. Talos Island is 20-27 Level Scalar system for zones (this may or may not affect missions, TF/SF/Trials, or unique encounters like Hami, MSR, zone events) 1-10 --> adds -4 to player level shift (ex. a Level 4 toon in Peregrine Island will encounter +4 enemies) 11-20 --> adds -3 to player level shift (ex. Level 14 toon in PI encounters +3 enemies) 21-30 --> adds -2 31-40 --> adds -1 41-50 --> adds 0 50+1 --> adds +1 (ex. Level 50+1 toon in Peregrine Island encounters -1 enemies) 50+2 --> adds +2 50+3 --> adds +3 Enemy levels adjust per player; the color/con system can remain mostly intact Ex. a player is in Talos Island Level 1-10 player in Talos --> enemies are +2 to the player Level 11-19 player in Talos --> enemies are +1 to the player Level 20-30 player in Talos --> enemies are +0 to the player (default level range 20-27) Level 31-40 player in Talos --> enemies are -1 to the player Level 41-50 player in Talos --> enemies are -2 to the player Level 50+1 to 50+3 player in Talos --> enemies are -2 to the player Keep in mind that unslotting incarnate powers can influence this shift (like driving a manual transmission - pick the gear you want, and therefore the XP that drops) Incarnate Notes Incarnates will not cause the enemies spawned to be below -4, i.e. smashing Skulls in Kings Row, a 50+3 will still see -4 enemies (not -7) Any zone tagged as "50" should include the Incarnate system - ex. Rikti War Zone, Shadow Shard, Grandville, etc. What good is Incarnate power if it has a limited application? At least make the 50+ missions instances con to the Incarnate Level But why did you do that, Cen? EVERYTHING SHOULD DROP XP - Maybe I want to go shoot Wailers in St. Martial. Maybe I wanna pick a fight with Sky Raiders in Terra Volta. It should all have measurable value to my development as a hero, villain, or comedian. Let's keep the powers we worked hard to achieve!!!! Just scale the XP accordingly and have fun. Badging - I am not convinced that massacring level 8 Hellions with my 51 Fire Blaster is the best use of badge time. I'd like some (even low) XP for my troubles. Keeps the pulse alive when they can shoot back effectively. Nomadic Murder - I like cruising through zones just killing stuff, so again, why not be compensated for roaming free? Yeah, but what are the ... Cons? It is kind of nice to be ridiculously OP in Perez Park and smashing everything The first time I zoned into Independence Port from Steel Canyon, I was a level 11 Mind/Rad Controller. The year was 2004. I ran straight into a mob of level 23 enemies and got smeshed. I learned a lot during that ambulance ride. The first time I saw Devouring Earth, I was near (helmeted) Positron in Steel Canyon. It was a purple con Bladegrass, and it ran right by me, no doubt an ambush for some other player. I shot at it, missed, and it kept running toward its target. It was that moment that I was hooked on CoH (and later CoX). A plant monster ran downtown through I think those moments can still be captured using the level system proposed. Do the Pros outweigh the Cons? I think so. Not many of us are new players. This is kind of a niche world where most of the CoX universe is quantified and explored. I am not sure that the old gray/purple system needs to stay as broad as it once did, so I would like to marry the idea of everything dropping XP while keeping the zones uniquely engaging. Heck, even some zones like Night Ward are going to be fun because they are dangerous even to +3/+4 toons. Fun! Anyway, thanks for reading. I am sure there are lots of these types of ideas floating around, and your feedback is much appreciated. -
Heya Dez! Stone is pretty tough to kill. I run a Stone/Spines AFK Psionic Farm, which is fun. Not the most efficient thing in the world, but it's fun to do. For your question, here is a tank similar to mine. Everyone, feel free to posit stuff, just throwing this out as an idea response. POWERSETS Stone Armor Stone Skin, Granite Armor, Rooted, Earth's Embrace Dark Melee -ToHit and a Heal Soul Epic Darkest Night and Dark Obliteration INCARNATES Alpha - Agility Core Paragon (EndMod, Def, Rech) Judgment - Void Radial Final Judgement (50% -DMG effect) Interface - Paralytic Radial Flawless Interface (5% -DMG effect - stackable) Lore - Storm Elemental Radial Superior Ally Destiny - Ageless Radial Epiphany (for Debuff Resistances) Hybrid - Melee Radial Embodiment (for Defense & Regen bonuses) RESISTANCE + "-DMG" STACKING Get to Resistance cap 90% Add -DMG attacks (Darkest Night, Paralytic stacking) to further floor damage output before resistance kicks in DEFENSE + "-TOHIT" STACKING Get defense pretty high, ~45-50% (non-Psi) Dark Melee and Soul Epic add lots of -ToHit HEAL & REGEN Rooted, Earth's Embrace, Life Drain Melee Radial for tanking nasty mobs MEZ & DEBUFFS Granite + Rooted = very protected Pool Powers like Tactics help as well IO Set Bonuses and Uniques help also Ageless Radial can be used as a "get out debuff free" card Anyway, fun question. Hope I contributed.
-
Focused Feedback: Stone Armor - Revamp and Proliferation
Cenozoic replied to Booper's topic in [Open Beta] Focused Feedback
Amazing updates! Respectfully request that this is changed the following: The following stats were moved to Stone Skin from Granite: Added Resistance against Fire, Cold, Energy, Negative and Toxic damage. +10%/7.5% for Tankers and Brutes respectively. Added Defense to all but Psionic and Toxic. +5%/3.75% for Tankers and Brutes respectively. This power should now accept Defense enhancements and sets. -
Good points! I generally use Burn > Ripper > Dark Obliteration/Ball Lightning > Throw Spines or click buffs Throw Spines is good for procs and mid-ranged enemies (Augurs and Drones) and is range enhanceable like Frost. If Spine Burst’s cast was closer to 2.5 sec that would be ideal for dpa balance, but it’s a fun set, so yay.
-
Hah! Thanks bro!
-
Spines might not be #1, though the pairing of Burn and Ripper eats through bosses. Much fun!
-
Fire/Spines
-
My pleasure, Dez! In the end, it's about fun, so I hope we brought you to the Dominator team with that spirit. Mind Control is one of the harder sets to master, and it's important to embrace the adventure of discovering enemy weaknesses and new build tweaks based on playstyle. Like @Voltak said, the fun of a Dom is that one level 50 Dom can have 2-3 totally unique builds for different occasions, and you picked an outstanding Primary/Secondary combo to build upon. Happy hunting! Let me know if you need mind control tips or want to modify a build.
-
@MoonSheep Thank you for following up, and happy to see that we both have experienced perspectives. What fun is a game if we don't play with it and share our differences and similarities in a respectful manner? I am also a lifetime Mind Controller/Dominator (2004 launch and CoV beta), and am versed in attack mechanics and enemy group nuances. My main is a Mind/Psionic Dominator. To clarify my initial post's intentions, I created a custom build for a player's first Dominator. We shared ideas on the goals and best approach for a first Dominator, followed by a detailed AV training session in which I delivered some key ideas around how to attack and plan using Domination, and listened to their needs and playstyle goals and expectations. There were several points of their request which contradict your recommendations, which makes sense from both perspectives: The player wants a non-solo, team-oriented dominator which can perma-confuse Mind or Dark primary; Mind was chosen and the above build supports this function The player wanted an exclusively ranged character (no PBAoE or melee) Fire secondary was chosen The player wanted strong survivability where possible With ranged hover, the two concerns are Range and AoE Ranged defense >45% to mitigate the majority of distance attacks S/L/E defense >45% to mitigate the majority of AoE attacks (Rad, Elec, Arch, Energy, AR, Beam, etc) Energy Defense is the reason for Scorpion Shield. I agree that Cold Mastery is quite acceptable for similar application, and either Sleet or Poisonous Ray are effective. To your points in the post above, hopefully these replies help: Mesmerize is a great tool, and can definitely be slotted over other powers for damage. I noted this specifically with the player (as stated, there is a lot of room to test and adjust). This is the first build. Experiment to find the fit. There are definitely some instances where Psionic damage output can outperform Fire (MoG is a good example), however, many of those powers can be mitigated by mez, time, or def/res debuffs, such as Poisonous Ray or Sleet. Perma-Confuse - yes, I did clearly state that this toon was capable of perma-confuse. Also, I showed the player how to use Power Analyzer to identify Purple Triangle uptime, cycling, and special conditions for some AVs. The player was a terrific student and I think we had a blast examining the Hold, Sleep, and Confuse mechanics. TP/Assault for Veng - These are viable options, and I chose to recommend different powers. Vengeance has a 60ft power range with a 100ft bonus radius, so hovering near the body and casting is realistic. Assault's 10.5% damage boost is nice, though it didn't factor into the current build. Tough/Weave - This does seem to be a polarizing topic. I agree that there are great slotting alternatives, however, I disagree that slotting for defense bonuses is not valuable. Enclosed areas, large AoE radii, enemy spawns outside of aggro control numbers, PUGs, exemplaring, and ambushes can certainly lend credit to the viability of defense. Part of the adventure in this game is building a character that is fun and effective. I believe that I accomplished this intent for the player with the given build, and I support your opposition to my assertion. Thanks for reading!
-
Right on! Looking forward to it!
-
Thanks for the feedback @MoonSheep! Could you elaborate a bit so I can understand your perspective?
-
@BurningDezire Hope this helps! MAJOR ITEMS 45% SLR Near perma-Hasten Perma-Dom Perma-Confuse (all standard AVs) 95% Accuracy against the vast majority of stuff AV Debuffing (Poisonous Ray w/Proc) NOTES There are a lot of tweaks that can be done on this build ... lots of room to move stuff around AV ST Attack Chain should include Mesmerize and Poisonous Ray to detoggle and -Res Team-friendly Maneuvers and Tactics to keep the party rolling This Hero build was built using Mids Reborn 3.0.5.6 https://github.com/Reborn-Team/MidsReborn Click this DataLink to open the build! Dez's Mind Fire Concept: Level 50 Mutation Dominator Primary Power Set: Mind Control Secondary Power Set: Fiery Assault Power Pool: Flight Power Pool: Fighting Power Pool: Leadership Power Pool: Speed Ancillary Pool: Mace Mastery Hero Profile: Level 1: Mesmerize (A) Fortunata Hypnosis - Sleep/Recharge (5) Fortunata Hypnosis - Accuracy/Sleep/Recharge (7) Fortunata Hypnosis - Accuracy/Recharge (45) Fortunata Hypnosis - Sleep/Endurance (45) Fortunata Hypnosis - Chance for Placate Level 1: Flares (A) Accuracy IO Level 2: Dominate (A) Unbreakable Constraint - Hold/Recharge (7) Unbreakable Constraint - Endurance/Hold (9) Unbreakable Constraint - Chance for Smashing Damage (43) Unbreakable Constraint - Accuracy/Hold/Recharge (43) Unbreakable Constraint - Accuracy/Recharge Level 4: Hover (A) Luck of the Gambler - Defense/Increased Global Recharge Speed (31) Kismet - Accuracy +6% Level 6: Confuse (A) Coercive Persuasion - Confused (9) Coercive Persuasion - Confused/Recharge (17) Coercive Persuasion - Accuracy/Confused/Recharge (17) Coercive Persuasion - Accuracy/Recharge (19) Coercive Persuasion - Confused/Endurance (19) Coercive Persuasion - Contagious Confusion Level 8: Boxing (A) Kinetic Combat - Accuracy/Damage (46) Kinetic Combat - Damage/Endurance (48) Kinetic Combat - Damage/Recharge (48) Kinetic Combat - Damage/Endurance/Recharge Level 10: Fire Blast (A) Superior Winter's Bite - Accuracy/Damage (11) Superior Winter's Bite - Damage/RechargeTime (11) Superior Winter's Bite - Accuracy/Damage/Endurance (13) Superior Winter's Bite - Accuracy/Damage/Recharge (13) Superior Winter's Bite - Damage/Endurance/Accuracy/RechargeTime Level 12: Maneuvers (A) Luck of the Gambler - Defense/Increased Global Recharge Speed (37) Luck of the Gambler - Defense (40) Luck of the Gambler - Defense/Endurance (40) Luck of the Gambler - Defense/Endurance/Recharge Level 14: Tough (A) Steadfast Protection - Resistance/+Def 3% (15) Gladiator's Armor - TP Protection +3% Def (All) (15) Unbreakable Guard - +Max HP Level 16: Embrace of Fire (A) Recharge Reduction IO Level 18: Total Domination (A) Basilisk's Gaze - Accuracy/Recharge (31) Basilisk's Gaze - Recharge/Hold (34) Basilisk's Gaze - Endurance/Recharge/Hold (37) Basilisk's Gaze - Accuracy/Endurance/Recharge/Hold Level 20: Weave (A) Red Fortune - Defense/Endurance (21) Red Fortune - Defense/Recharge (21) Red Fortune - Endurance/Recharge (23) Red Fortune - Defense/Endurance/Recharge (23) Red Fortune - Defense (25) Red Fortune - Endurance Level 22: Tactics (A) Gaussian's Synchronized Fire-Control - To Hit Buff (43) Gaussian's Synchronized Fire-Control - To Hit Buff/Recharge (46) Gaussian's Synchronized Fire-Control - To Hit Buff/Recharge/Endurance (46) Gaussian's Synchronized Fire-Control - Recharge/Endurance (50) Gaussian's Synchronized Fire-Control - To Hit Buff/Endurance (50) Gaussian's Synchronized Fire-Control - Chance for Build Up Level 24: Hasten (A) Recharge Reduction IO (25) Recharge Reduction IO Level 26: Terrify (A) Artillery - Accuracy/Damage (27) Artillery - Damage/Endurance (27) Artillery - Damage/Recharge (29) Artillery - Accuracy/Damage/Recharge (29) Artillery - Accuracy/Recharge/Range (31) Artillery - Endurance/Recharge/Range Level 28: Super Speed (A) Winter's Gift - Slow Resistance (20%) Level 30: Vengeance (A) Luck of the Gambler - Defense/Increased Global Recharge Speed Level 32: Mass Confusion (A) Superior Ascendency of the Dominator - Accuracy/Control Duration (33) Superior Ascendency of the Dominator - Control Duration/Recharge (33) Superior Ascendency of the Dominator - Endurance/Recharge (33) Superior Ascendency of the Dominator - Accuracy/Control Duration/Endurance (34) Superior Ascendency of the Dominator - Accuracy/Control Duration/Endurance/Recharge (34) Superior Ascendency of the Dominator - Recharge/Chance for +Damage Level 35: Blazing Bolt (A) Sting of the Manticore - Accuracy/Damage (36) Sting of the Manticore - Damage/Endurance (36) Sting of the Manticore - Damage/Interrupt/Recharge (36) Sting of the Manticore - Damage/Endurance/Recharge (37) Sting of the Manticore - Chance of Damage(Toxic) (48) Recharge Reduction IO Level 38: Blaze (A) Apocalypse - Damage/Recharge (39) Apocalypse - Accuracy/Damage/Recharge (39) Apocalypse - Accuracy/Recharge (39) Apocalypse - Damage/Endurance (40) Apocalypse - Chance of Damage(Negative) Level 41: Scorpion Shield (A) Luck of the Gambler - Defense/Increased Global Recharge Speed (42) Luck of the Gambler - Defense (42) Luck of the Gambler - Defense/Endurance (42) Luck of the Gambler - Defense/Endurance/Recharge Level 44: Poisonous Ray (A) Achilles' Heel - Chance for Res Debuff (45) Accuracy IO Level 47: Fly (A) Blessing of the Zephyr - Knockback Reduction (4 points) (50) Blessing of the Zephyr - Run Speed, Jump, Flight Speed, Range Level 49: Evasive Maneuvers (A) Luck of the Gambler - Defense/Increased Global Recharge Speed Level 1: Brawl (A) Empty Level 1: Domination Level 1: Sprint
-
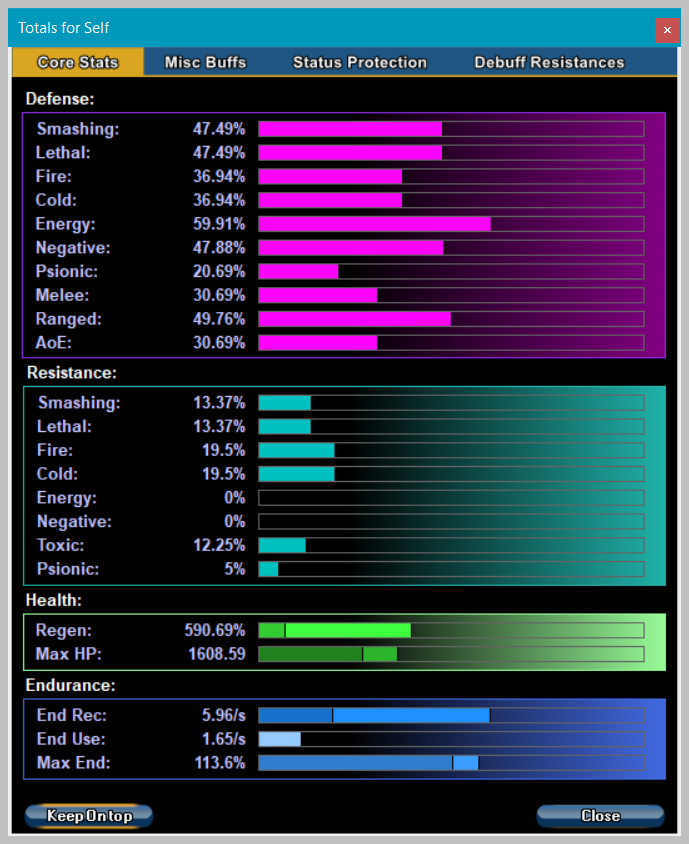
Hello team! Wanted to share some of my builds in case folks are looking for similar ideas. This one is for a Fire/Dev that is my favorite toon, Los Infiernos (Excelsior server). TOON BASICS Hover blaster 45% SLENR with 30-35% FCMA Mez protection & resistance A feeling of "tankiness" and "sneakiness" when hopping in for Inferno Outrageous Accuracy/ToHit No Pets. No bombs. Where we're going, we don't need ... roads pets. ATTACK CHAINS Alpha: Smoke Grenade > Aim > Inferno or Judgment > Fireball > Caltrops (optional) > ST Damage & Fireball Beta: Smoke Grenade >Caltrops (underneath me) > Fireball & ST AVs: Same stuff, but also use Toxic Web Grenade and Envenomed Dagger SNEAKY BAHSTAHD Mission Clicking: Field Operative + Smoke Grenade = no one gonna see me click stuff right in front of them 😄 Except Rikti Drones and a few others ... much respect to them MEZ PROTECTION & RESISTANCE Generally, this guy can handle some adversity, even without Defiant Barrage +Status, Clarion, and Melee Core: Alternate Clarion & Melee Core, bolster with BFs and Fireball as needed Hold +2 (gotta hit me twice ... GL with that) Stun/Sleep/Fear are key weaknesses, mostly Stun Immob +8.3 KB Prot +17 (above the KB for Nemesis staff) Confuse +3.63 DEBUFF RESISTANCE Perception 96% - nobody can out-Smoke Grenade me 😄 ToHit Debuff 55% - Can hit Carnies even through a couple layers of Master Ill's Fluffy (Chill of the Night) Recharge/Speed 45% - I am hard to slow down FIRE BLAST Fireball - Superior Defiant Barrage (6-slot for bonuses & "Status Protection" proc) Aim - Inferno's best friend Fire Blast / Blaze / Blazing Bolt - ST attack chain (sprinkle in Fireball and the party is nonstop) Inferno - why else does one "Fire Blast" ? DEVICES Toxic Web Grenade - because they make me take it and it has -Fly & Immob so hover blasting AVs got a whole lot easier Caltrops - positional control. Drop these underneath and hover above for maximum security Targeting Drone - good lord, this is OP ... 80% Damage Buff for Alpha (Inferno) Smoke Grenade - Stealthy, -Per, -THDB autohit power!? Yes please. Field Operative - imho, the most OP of the blaster survivability buffs. 15ft stealth even when clicking or attacking!!! So helpful. MACE MASTERY Scorpion Shield - Could also use Cold Mastery (Snow Storm + Frozen Armor is pretty great) POWER POOLS Fighting - You know the drill. Boxing/Tough/Weave I slotted Aegis Mez & Impervious Skin Mez protections ... really helps for -Stun/Disorient mitigation Flight - Hover/Fly/Evasive Maneuvers EM is very helpful for its -KB% and flight protection (stacks with Hover) Leaping - CJ / SJ / Acrobatics Acrobatics for the +2 Mag Hold protection. The KB stuff helps too, but the big deal is I don't get held from the first hold attempt, and my hold resistance is pretty ludicrous, so it gets hard to enemies to actually lock me down. Leadership - Maneuvers / Tactics / Vengeance Cen, bro ... why do you have Tactics + Targeting Drone + Kismet ?? Tactics = Confuse Protections ~35% ToHit Buff + THDB Resistance = all these punches are gonna land ! INCARNATE STUFF Note: These are the ones I use most of the time. Notice that not everything involves damage...gotta survive to thrive Alpha - Agility Core Paragon (Rech/Def/EndMod) Since I slotted for defense IOs, I needed a little boost in recharge - this toons cranks out ~5.9 end/sec so I can leave most of the power pool toggles on to keep mez protection/resistance at bay Judgment - Pyronic Core Final Judgment (alternate with Inferno for your partystarters) Interface - Reactive Radial Flawless (75% fire DoT, 25% -Res) There seems to be a pattern... something something fire... Lore - Storm Elemental Core Superior Ally Shadow Shard fan here, gotta stick with Lanaru's neurons Destiny - Clarion Core Epiphany MEZ PROTECTION Hybrid - Melee Radial Embodiment (Melee Core Embodiment works just fine, too!) MEZ PROTECTION Regen can hit 1000% (or 72 HP/sec) which stacks very well with defenses CENOZOIC, BRO, YOU SHOULD TAKE MY ADVICE IN THE COMMENTS SECTION Before you tell me that I need more damage or procs or recharge, how about sending me an invite on Excelsior. I promise this toon has enough horsepower. @Cenozoic This Hero build was built using Mids Reborn 3.0.5.6 https://github.com/Reborn-Team/MidsReborn Click this DataLink to open the build! Los Infiernos v1.2: Level 50 Magic Blaster Primary Power Set: Fire Blast Secondary Power Set: Devices Power Pool: Flight Power Pool: Fighting Power Pool: Leaping Power Pool: Leadership Ancillary Pool: Mace Mastery Hero Profile: Level 1: Fire Blast (A) Thunderstrike - Accuracy/Damage (3) Thunderstrike - Damage/Endurance (3) Thunderstrike - Damage/Recharge (5) Thunderstrike - Accuracy/Damage/Recharge (5) Thunderstrike - Accuracy/Damage/Endurance (7) Thunderstrike - Damage/Endurance/Recharge Level 1: Toxic Web Grenade (A) Superior Winter's Bite - Accuracy/Damage (7) Superior Winter's Bite - Damage/RechargeTime (9) Superior Winter's Bite - Accuracy/Damage/Endurance (9) Superior Winter's Bite - Accuracy/Damage/Recharge (11) Superior Winter's Bite - Damage/Endurance/Accuracy/RechargeTime (11) Superior Winter's Bite - Recharge/Chance for -Speed & -Recharge Level 2: Fire Ball (A) Superior Defiant Barrage - Accuracy/Damage (13) Superior Defiant Barrage - Damage/RechargeTime (13) Superior Defiant Barrage - Accuracy/Damage/RechargeTime (19) Superior Defiant Barrage - Accuracy/Damage/Endurance (19) Superior Defiant Barrage - Accuracy/Damage/Endurance/RechargeTime (21) Superior Defiant Barrage - RechargeTime/+Status Level 4: Caltrops (A) Artillery - Accuracy/Damage (31) Artillery - Damage/Endurance (31) Artillery - Damage/Recharge (34) Artillery - Accuracy/Damage/Recharge (37) Artillery - Accuracy/Recharge/Range (37) Artillery - Endurance/Recharge/Range Level 6: Hover (A) Luck of the Gambler - Defense/Increased Global Recharge Speed Level 8: Boxing (A) Superior Blistering Cold - Accuracy/Damage (45) Superior Blistering Cold - Damage/Endurance (46) Superior Blistering Cold - Accuracy/Damage/Endurance (46) Superior Blistering Cold - Accuracy/Damage/Recharge (46) Superior Blistering Cold - Damage/Endurance/Accuracy/RechargeTime (48) Superior Blistering Cold - Recharge/Chance for Hold Level 10: Targeting Drone (A) Endurance Reduction IO Level 12: Aim (A) Gaussian's Synchronized Fire-Control - To Hit Buff (43) Gaussian's Synchronized Fire-Control - To Hit Buff/Recharge (43) Gaussian's Synchronized Fire-Control - To Hit Buff/Recharge/Endurance (43) Gaussian's Synchronized Fire-Control - Recharge/Endurance (45) Gaussian's Synchronized Fire-Control - To Hit Buff/Endurance (45) Gaussian's Synchronized Fire-Control - Chance for Build Up Level 14: Tough (A) Steadfast Protection - Resistance/+Def 3% (15) Gladiator's Armor - TP Protection +3% Def (All) (15) Aegis - Psionic/Status Resistance (17) Unbreakable Guard - +Max HP (17) Impervious Skin - Status Resistance Level 16: Weave (A) Luck of the Gambler - Defense/Increased Global Recharge Speed (21) Luck of the Gambler - Defense (23) Luck of the Gambler - Defense/Endurance (23) Luck of the Gambler - Defense/Endurance/Recharge Level 18: Blaze (A) Thunderstrike - Accuracy/Damage (27) Thunderstrike - Damage/Endurance (27) Thunderstrike - Damage/Recharge (29) Thunderstrike - Accuracy/Damage/Recharge (29) Thunderstrike - Accuracy/Damage/Endurance (31) Thunderstrike - Damage/Endurance/Recharge Level 20: Field Operative (A) Endurance Modification IO (37) Endurance Modification IO (39) Healing IO (39) Healing IO Level 22: Smoke Grenade (A) Recharge Reduction IO Level 24: Fly (A) Blessing of the Zephyr - Run Speed, Jump, Flight Speed, Range (48) Blessing of the Zephyr - Knockback Reduction (4 points) Level 26: Blazing Bolt (A) Superior Blaster's Wrath - Accuracy/Damage (40) Superior Blaster's Wrath - Damage/Recharge (40) Superior Blaster's Wrath - Accuracy/Damage/Recharge (40) Superior Blaster's Wrath - Accuracy/Damage/Endurance (42) Superior Blaster's Wrath - Accuracy/Damage/Endurance/Recharge (42) Superior Blaster's Wrath - Recharge/Chance for Fire Damage Level 28: Evasive Maneuvers (A) Luck of the Gambler - Defense/Increased Global Recharge Speed Level 30: Combat Jumping (A) Kismet - Accuracy +6% Level 32: Inferno (A) Superior Avalanche - Accuracy/Damage (33) Superior Avalanche - Damage/Endurance (33) Superior Avalanche - Accuracy/Damage/Endurance (33) Superior Avalanche - Accuracy/Damage/Recharge (34) Superior Avalanche - Accuracy/Damage/Endurance/Recharge (34) Superior Avalanche - Recharge/Chance for Knockdown Level 35: Scorpion Shield (A) Red Fortune - Defense/Endurance (36) Red Fortune - Defense/Recharge (36) Red Fortune - Endurance/Recharge (36) Red Fortune - Defense/Endurance/Recharge (50) Red Fortune - Defense (50) Red Fortune - Endurance Level 38: Maneuvers (A) Luck of the Gambler - Defense/Increased Global Recharge Speed Level 41: Tactics (A) Endurance Reduction IO Level 44: Super Jump (A) Blessing of the Zephyr - Run Speed, Jump, Flight Speed, Range (50) Blessing of the Zephyr - Knockback Reduction (4 points) Level 47: Acrobatics (A) Endurance Reduction IO Level 49: Vengeance (A) Luck of the Gambler - Defense/Increased Global Recharge Speed Level 1: Defiance Level 1: Brawl

-
Agreed, better recharge and/or additional effects.
-
Ranged, Concept for an Edgar Allen Poe Mind/Savage build critique/help
Cenozoic replied to Echo Night's topic in Dominator
No advice here. Awesome concept! -
If you want. With Earth’s -Def, doesn’t make much difference.
-
Here is the one I use in-game. Note that I didn't choose Stalagmites so that I could use Hover. This Hero build was built using Mids Reborn 3.0.5.6 https://github.com/Reborn-Team/MidsReborn Click this DataLink to open the build! Cryovolcanic v1.1: Level 50 Mutation Controller Primary Power Set: Earth Control Secondary Power Set: Cold Domination Power Pool: Fighting Power Pool: Leaping Power Pool: Flight Power Pool: Speed Ancillary Pool: Mace Mastery Hero Profile: Level 1: Fossilize (A) Lockdown - Accuracy/Hold (7) Lockdown - Accuracy/Recharge (9) Lockdown - Recharge/Hold (9) Lockdown - Endurance/Recharge/Hold (11) Lockdown - Accuracy/Endurance/Recharge/Hold (11) Lockdown - Chance for +2 Mag Hold Level 1: Infrigidate (A) Accuracy IO (48) Impeded Swiftness - Chance of Damage(Smashing) (48) Achilles' Heel - Chance for Res Debuff (48) Touch of Lady Grey - Chance for Negative Damage (50) Shield Breaker - Chance for Lethal Damage Level 2: Stone Cages (A) Superior Will of the Controller - Accuracy/Control Duration (3) Superior Will of the Controller - Control Duration/Recharge (3) Superior Will of the Controller - Endurance/Recharge (5) Superior Will of the Controller - Accuracy/Control Duration/Endurance (5) Superior Will of the Controller - Accuracy/Control Duration/Endurance/Recharge (7) Superior Will of the Controller - Recharge/Chance for Psionic Damage Level 4: Ice Shield (A) Luck of the Gambler - Defense/Increased Global Recharge Speed Level 6: Quicksand (A) Recharge Reduction IO Level 8: Snow Storm (A) Endurance Reduction IO Level 10: Glacial Shield (A) Luck of the Gambler - Defense/Increased Global Recharge Speed Level 12: Boxing (A) Accuracy IO Level 14: Tough (A) Steadfast Protection - Resistance/+Def 3% (15) Gladiator's Armor - TP Protection +3% Def (All) (15) Unbreakable Guard - +Max HP Level 16: Weave (A) Red Fortune - Defense/Endurance (17) Red Fortune - Defense/Recharge (17) Red Fortune - Endurance/Recharge (19) Red Fortune - Defense/Endurance/Recharge (19) Red Fortune - Defense (25) Red Fortune - Endurance Level 18: Earthquake (A) Dark Watcher's Despair - To Hit Debuff/Recharge (27) Dark Watcher's Despair - To Hit Debuff/Recharge/Endurance (27) Dark Watcher's Despair - Recharge/Endurance (29) Dark Watcher's Despair - To Hit Debuff Level 20: Arctic Fog (A) Red Fortune - Defense/Endurance (21) Red Fortune - Defense/Recharge (21) Red Fortune - Endurance/Recharge (23) Red Fortune - Defense/Endurance/Recharge (23) Red Fortune - Defense (25) Red Fortune - Endurance Level 22: Combat Jumping (A) Luck of the Gambler - Defense/Increased Global Recharge Speed Level 24: Hover (A) Luck of the Gambler - Defense/Increased Global Recharge Speed Level 26: Volcanic Gasses (A) Superior Entomb - Accuracy/Hold (29) Superior Entomb - Hold/Recharge (31) Superior Entomb - Endurance/Recharge (31) Superior Entomb - Accuracy/Hold/Endurance (34) Superior Entomb - Accuracy/Hold/Endurance/Recharge (37) Superior Entomb - Recharge/Chance for +Absorb Level 28: Benumb (A) Recharge Reduction IO (40) Recharge Reduction IO (43) Accuracy IO Level 30: Hasten (A) Recharge Reduction IO (31) Recharge Reduction IO Level 32: Animate Stone (A) Blood Mandate - Accuracy/Damage (33) Blood Mandate - Damage/Endurance (33) Blood Mandate - Accuracy/Endurance (33) Blood Mandate - Accuracy/Damage/Endurance (34) Blood Mandate - Accuracy (34) Blood Mandate - Damage Level 35: Sleet (A) Superior Frozen Blast - Accuracy/Damage (36) Superior Frozen Blast - Damage/Endurance (36) Superior Frozen Blast - Accuracy/Damage/Endurance (36) Superior Frozen Blast - Accuracy/Damage/Recharge (37) Superior Frozen Blast - Damage/Endurance/Accuracy/RechargeTime (37) Superior Frozen Blast - Recharge/Chance for Immobilize Level 38: Heat Loss (A) Preemptive Optimization - Accuracy/Recharge (39) Preemptive Optimization - EndMod/Endurance (39) Preemptive Optimization - EndMod/Recharge (39) Preemptive Optimization - EndMod/Accuracy/Endurance (40) Preemptive Optimization - EndMod/Accuracy/Recharge (40) Preemptive Optimization - EndMod/Endurance/Recharge Level 41: Scorpion Shield (A) Red Fortune - Defense/Endurance (42) Red Fortune - Defense/Recharge (42) Red Fortune - Endurance/Recharge (42) Red Fortune - Defense/Endurance/Recharge (43) Red Fortune - Defense (43) Red Fortune - Endurance Level 44: Poisonous Ray (A) Accuracy IO (45) Apocalypse - Chance of Damage(Negative) (45) Gladiator's Javelin - Chance of Damage(Toxic) (45) Achilles' Heel - Chance for Res Debuff (46) Touch of Lady Grey - Chance for Negative Damage (46) Shield Breaker - Chance for Lethal Damage Level 47: Fly (A) Blessing of the Zephyr - Run Speed, Jump, Flight Speed, Range (50) Blessing of the Zephyr - Run Speed, Jump, Flight Speed, Range/Endurance (50) Blessing of the Zephyr - Knockback Reduction (4 points) Level 49: Evasive Maneuvers (A) Luck of the Gambler - Defense/Increased Global Recharge Speed Level 1: Brawl (A) Empty Level 1: Containment Level 1: Sprint
-
For solo, don’t skip Mass Hypnosis. Putting things to sleep is great for ST sets like Energy, and is like a -100% TAoE tohit debuff.
-
Lies. Fire/Dev/Mace Hover blast and location control. Pets and weird stuff if you want it. Lots of build options in one slick package. Rad/Fire/Mace is a ridiculously good PBAoE toon if you wanted to let go of the fotm bonfire silliness and get to melting mobs. Great rad animations too (Irradiate is a favorite across the whole game).
-
Seconding @Mezmera I really like the combo of Mass Hypnosis and ST attacks. Mob dies one by one as they slumber. Creepy.