Retroman
-
Posts
82 -
Joined
-
Last visited
Recent Profile Visitors
253 profile views


-
So I possess a Minion (a Wolf Spider Enforcer, I think), and he starts attacking the Base Commander (conning orange to me). I keep spamming the Possess power, and notice that, while the WSE is attacking and hurting the BC, the BC isn't retaliating at all. He just stood there and took it. When he got down to about 100 HP, I jumped in and finished him. Did the game glitch or do baddies not attack a possessed 'teammate'?
-
Hey @Voltak, I've been following your build (it's awesome, btw 😈). I'm currently at L19 running through the Faultline story arcs. I realize that I'm not gonna solo any TFs any time soon but I was wondering what the optimal attack chain is at this level? Should I have Hasten or Domination on auto-fire? In a mob, who should I possess? Any help is greatly appreciated. 😄
-
Here's the Brute build that I came up with based on UI's Shield Defense / Electric Melee Tank: This Hero build was built using Mids Reborn 3.0.5.6 https://github.com/Reborn-Team/MidsReborn Click this DataLink to open the build! MegaWatt Molly: Level 50 Science Brute Primary Power Set: Electrical Melee Secondary Power Set: Shield Defense Power Pool: Leaping Power Pool: Speed Power Pool: Leadership Power Pool: Fighting Ancillary Pool: Energy Mastery Hero Profile: Level 1: Charged Brawl -- SprBlsCol-Acc/Dmg(A), SprBlsCol-Acc/Dmg/EndRdx(5), SprBlsCol-Acc/Dmg/Rchg(11), SprBlsCol-Dmg/EndRdx(15), SprBlsCol-Dmg/EndRdx/Acc/Rchg(29), SprBlsCol-Rchg/HoldProc(43) Level 1: Deflection -- UnbGrd-EndRdx/Rchg(A), UnbGrd-Rchg/ResDam(7), UnbGrd-ResDam(11), UnbGrd-ResDam/EndRdx(17), UnbGrd-ResDam/EndRdx/Rchg(34), ImpArm-ResPsi(43) Level 2: Battle Agility -- ShlWal-Def(A), ShlWal-Def/EndRdx(7), ShlWal-Def/EndRdx/Rchg(13), ShlWal-Def/Rchg(17), ShlWal-EndRdx/Rchg(34), ShlWal-ResDam/Re TP(45) Level 4: True Grit -- UnbGrd-EndRdx/Rchg(A), UnbGrd-Rchg/ResDam(9), UnbGrd-ResDam(13), UnbGrd-ResDam/EndRdx(25), UnbGrd-ResDam/EndRdx/Rchg(34), UnbGrd-Max HP%(45) Level 6: Combat Jumping -- LucoftheG-Def/Rchg+(A) Level 8: Thunder Strike -- Arm-Acc/Dmg/Rchg(A), Arm-Acc/Rchg(9), Arm-Dmg(15), Arm-Dmg/EndRdx(25), Arm-Dmg/Rchg(37), SuddAcc--KB/+KD(45) Level 10: Active Defense -- EndRdx-I(A) Level 12: Super Jump -- BlsoftheZ-ResKB(A) Level 14: Hasten -- RechRdx-I(A), RechRdx-I(48) Level 16: Against All Odds -- EndRdx-I(A) Level 18: Chain Induction -- SprBrtFur-Acc/Dmg(A), SprBrtFur-Acc/Dmg/EndRdx/Rchg(19), SprBrtFur-Acc/Dmg/Rchg(19), SprBrtFur-Dmg/EndRdx/Rchg(27), SprBrtFur-Dmg/Rchg(37), SprBrtFur-Rech/Fury%(46) Level 20: Phalanx Fighting -- ShlWal-Def(A), ShlWal-Def/EndRdx(21), ShlWal-Def/EndRdx/Rchg(21), ShlWal-Def/Rchg(27), ShlWal-EndRdx/Rchg(37), Rct-ResDam%(46) Level 22: Build Up -- GssSynFr--Rchg/EndRdx(A), GssSynFr--ToHit(23), GssSynFr--ToHit/EndRdx(23), GssSynFr--ToHit/Rchg(29), GssSynFr--ToHit/Rchg/EndRdx(39), GssSynFr--Build%(46) Level 24: Maneuvers -- LucoftheG-Def/Rchg+(A) Level 26: Kick -- FrcFdb-Rechg%(A) Level 28: Grant Cover -- LucoftheG-Def/Rchg+(A) Level 30: Tough -- UnbGrd-EndRdx/Rchg(A), UnbGrd-Rchg/ResDam(31), UnbGrd-ResDam(31), UnbGrd-ResDam/EndRdx(31), UnbGrd-ResDam/EndRdx/Rchg(40), ImpArm-ResPsi(48) Level 32: Lightning Rod -- SprUnrFur-Acc/Dmg(A), SprUnrFur-Acc/Dmg/EndRdx/Rchg(33), SprUnrFur-Acc/Dmg/Rchg(33), SprUnrFur-Dmg/EndRdx/Rchg(33), SprUnrFur-Dmg/Rchg(40), SprUnrFur-Rchg/+Regen/+End(50) Level 35: Shield Charge -- SprAvl-Acc/Dmg(A), SprAvl-Acc/Dmg/EndRdx(36), SprAvl-Acc/Dmg/EndRdx/Rchg(36), SprAvl-Acc/Dmg/Rchg(36), SprAvl-Dmg/EndRdx(40), SprAvl-Rchg/KDProc(50) Level 38: One with the Shield -- StdPrt-ResDam/Def+(A), ImpArm-ResPsi(39), GldArm-3defTpProc(39) Level 41: Weave -- ShlWal-Def(A), ShlWal-Def/EndRdx(42), ShlWal-Def/EndRdx/Rchg(42), ShlWal-Def/Rchg(42), ShlWal-EndRdx/Rchg(43), LucoftheG-Def/Rchg+(50) Level 44: Focused Accuracy -- GssSynFr--ToHit/EndRdx(A) Level 47: Physical Perfection -- PrfShf-End%(A), Prv-Absorb%(48) Level 49: Superior Conditioning -- PrfShf-End%(A) Level 1: Fury Level 1: Brawl -- Acc-I(A) Level 1: Sprint -- Run-I(A) Level 2: Rest -- Empty(A) Level 1: Swift -- Run-I(A) Level 1: Hurdle -- Jump-I(A) Level 1: Health -- Mrc-Rcvry+(A), NmnCnv-Regen/Rcvry+(3), Pnc-Heal/+End(5) Level 1: Stamina -- PrfShf-EndMod(A), PrfShf-End%(3) Level 12: Double Jump Level 50: Agility Radial Paragon Level 50: Mighty Radial Final Judgement Level 50: Diamagnetic Radial Flawless Interface Level 50: Ageless Radial Epiphany Level 50: Assault Radial Embodiment Level 50: Portal Jockey Level 50: Task Force Commander Level 50: The Atlas Medallion Level 50: Freedom Phalanx Reserve ------------ ------------ Set Bonus Totals: 18% DamageBuff(Smashing) 18% DamageBuff(Lethal) 18% DamageBuff(Fire) 18% DamageBuff(Cold) 18% DamageBuff(Energy) 18% DamageBuff(Negative) 18% DamageBuff(Toxic) 18% DamageBuff(Psionic) 26.94% Defense(Smashing) 26.94% Defense(Lethal) 17.25% Defense(Fire) 17.25% Defense(Cold) 7.25% Defense(Energy) 7.25% Defense(Negative) 6% Defense(Psionic) 32.88% Defense(Melee) 8.5% Defense(Ranged) 13.5% Defense(AoE) 15% Enhancement(Accuracy) 7.5% Enhancement(Max EnduranceDiscount) 50% Enhancement(RechargeTime) 15% SpeedFlying GrantPower Preventive Medicine (when PreventiveMedicine, if Scourge) 286.7 HP (19.13%) HitPoints 15% JumpHeight 15% SpeedJumping Knockback (Mag -4) Knockup (Mag -4) MezResist(Confused) 137.5% MezResist(Held) 137.5% MezResist(Immobilized) 137.5% MezResist(Sleep) 137.5% MezResist(Stunned) 137.5% MezResist(Terrorized) 137.5% MezResist(Teleport) 100% (20% chance) 18.5% (0.31 End/sec) Recovery 46% (2.87 HP/sec) Regeneration 30% ResEffect(SpeedFlying) 30% ResEffect(RechargeTime) 30% ResEffect(SpeedRunning) 20% Resistance(Smashing) 37.25% Resistance(Fire) 37.25% Resistance(Cold) 34.25% Resistance(Energy) 34.25% Resistance(Negative) 23% Resistance(Toxic) 41% Resistance(Psionic) 20% Resistance(Lethal) 15% SpeedRunning 1 Null | Copy & Paste this data into Mids Reborn : Hero Designer to view the build | |-------------------------------------------------------------------| |MxDz;1486;713;1426;HEX;| |78DA5D93C94F13511CC7DFB483D8D285CA0E65AB6C2DB48027B7C4440115694242A| |22743C6F26C279994A6AD891C3D7857D4E8C10514542EFE07DE3CB9EBD99B67D4C4| |3DC6D437F3FDD24E9CA4FDBCF9CEEFFBDE6F99495F9C0A3C397EE988D01A8E5946A| |9B478B478A12CEB1732A6CC67A45057282DB3C619A35CEE4B2F5BD64ABD92A24ED0| |625A5A52A6A62D992917CD8C6141E0C329795EE64B32B59033A5B5B4732B02F3CBC| |B566A4E1A05339FF53B370B052997C23BFA922C96726621E8DCCF98D95C5905764C| |17CC4C6A3A2F8BD995C5B4512ACBE20A326D57E9C4D5EFAF9DAA66FF55EAC4155D8| |8499FD05741FF353074158C5E071337C0E70197F787D7D176FD04FDDFC0C6EF60FF| |2F30115786615DBC505E8D5E6D96DE19307092DEE3F49E00C74ED9D4C54BE5F5D2E| |BE5B9BB796E80E7B6FF77EED86F785BD51CEAE015752D9AA3D979D8E3B1F7AB3FE8| |C17E87C0D07EB0FD303870001CFBA83BDE572A171FBCC2D72F9C676D6AB3066A0D1| |F3C4E5C4C6941685A701471E3E46BB547D869464584B9875D5F843546D650C39E0D| |F23ED8F9001C5807939BE01BB55F13BD4DEC6D337BDBCCDE76B2B703EC6DF22BFA6| |3CFB385DE9647A8B575837C0C4637C1A18760720B3546548D6DEC6D1B7BEB515A07| |B58ECB887BABF2EBA2D6C538AF8AEBE6B9DD9C690F67DAC399F670A6C39CE938DF2| |57B9EBDF4F606F06EF6359221320C0E07C1C908F84EE512A337761BDADEBBE41A79| |8FDE3BF4AE83EF9577105ECFA05D78B72E8698D3D03EF45357758D70FF11CE22CE5| |9C4398B386791E02C26D9137F448851BE47A3EC7D406929ECA7A56EA29FE3DB38CB| |A79E4DB0AF137C36A357BFD14A5417BC2A4274E23D9B736B4968F33A2D4AD32AEA1| |2DBFEEA2ED5A84F6E6D04DAE79AE611B3E884E734AAD1FB91E5975A8C2656519587| |D93E4B54BF9CCA9F562531F35CBCB67EDA545BDF72ADB762B5F5597F6D6DB8D6E75| |CEB79D7FA1F57C8E26F| |-------------------------------------------------------------------| Any thoughts or critiques on this build?
-
Apologies if this has already been answered. I'm rolling up a toon to run the Praetorian content (never done the Gold side). I downloaded Ultra Infinitum from @Infinitum's OP. UI is a Shield Defense / Electric Melee Tank. Somehow (and please don't ask how I did this), while going through the Character Creator, I clicked 'Brute' instead of 'Tank'. According to MIDs, Tankers have Excellent Defenses and Good Melee while Brutes have Excellent Melee, Good Defenses and Rage. The questions are: Since UI's build took the first power in each Power Set, can I still just follow the Tanker build for my Brute? Or is the build compromised in some way? And if the build is compromised, @Infinitum, would you happen to have a build for an Electric Melee / Shield Defense Brute? Any and all help is greatly appreciated. 👍
-
 Retroman changed their profile photo
 -
Any critiques on the build? Did I miss something obvious? 🤷♂️
-
Good to know! I'll keep that in mind.
-
I've never really been a fan of Hurl so I played around with the build a bit. First, I replaced Hurl with Cross Punch and put the Armageddon Set in it. Secondly, I rearranged some things. Here's the build: This Villain build was built using Mids Reborn 3.0.5.6 https://github.com/Reborn-Team/MidsReborn Click this DataLink to open the build! Lady Amethyst: Level 50 Magic Brute Primary Power Set: Super Strength Secondary Power Set: Invulnerability Power Pool: Speed Power Pool: Leaping Power Pool: Fighting Power Pool: Leadership Ancillary Pool: Energy Mastery Villain Profile: Level 1: Punch -- OvrFrc-Acc/Dmg(A), OvrFrc-Acc/Dmg/End(3), OvrFrc-Acc/Dmg/End/Rech(11), OvrFrc-Dmg/End/Rech(25), OvrFrc-End/Rech(43), SprBrtFur-Rech/Fury%(46) Level 1: Resist Physical Damage -- StdPrt-ResDam/Def+(A), RctArm-ResDam(3), RctArm-ResDam/EndRdx(13), RctArm-ResDam/EndRdx/Rchg(27), RctArm-ResDam/Rchg(43), GldArm-3defTpProc(48) Level 2: Temp Invulnerability -- UnbGrd-Rchg/ResDam(A), UnbGrd-ResDam(5), UnbGrd-ResDam/EndRdx(15), UnbGrd-ResDam/EndRdx/Rchg(29) Level 4: Haymaker -- SprUnrFur-Acc/Dmg(A), SprUnrFur-Acc/Dmg/EndRdx/Rchg(5), SprUnrFur-Acc/Dmg/Rchg(17), SprUnrFur-Dmg/EndRdx/Rchg(34), SprUnrFur-Dmg/Rchg(45), SprUnrFur-Rchg/+Regen/+End(48) Level 6: Dull Pain -- NmnCnv-Heal/Rchg(A), Prv-Absorb%(7) Level 8: Knockout Blow -- SprBlsCol-Acc/Dmg(A), SprBlsCol-Acc/Dmg/EndRdx(9), SprBlsCol-Acc/Dmg/Rchg(19), SprBlsCol-Dmg/EndRdx(34), SprBlsCol-Dmg/EndRdx/Acc/Rchg(45), SprBlsCol-Rchg/HoldProc(48) Level 10: Resist Elements -- RctArm-ResDam(A), RctArm-ResDam/EndRdx(11), RctArm-ResDam/EndRdx/Rchg(21), RctArm-ResDam/Rchg(34) Level 12: Hasten -- RechRdx-I(A), RechRdx-I(13) Level 14: Combat Jumping -- ShlWal-Def(A), ShlWal-Def/EndRdx(15), ShlWal-Def/EndRdx/Rchg(23), ShlWal-Def/Rchg(36) Level 16: Unyielding -- UnbGrd-Rchg/ResDam(A), UnbGrd-ResDam(17), UnbGrd-ResDam/EndRdx(23), UnbGrd-Max HP%(37) Level 18: Rage -- RechRdx-I(A), RechRdx-I(19) Level 20: Resist Energies -- RctArm-ResDam(A), RctArm-ResDam/EndRdx(21), RctArm-ResDam/EndRdx/Rchg(25), RctArm-ResDam/Rchg(37) Level 22: Super Jump -- WntGif-ResSlow(A) Level 24: Kick -- SuddAcc--KB/+KD(A) Level 26: Tough -- UnbGrd-Rchg/ResDam(A), UnbGrd-ResDam(27), UnbGrd-ResDam/EndRdx(31), UnbGrd-ResDam/EndRdx/Rchg(37) Level 28: Invincibility -- ShlWal-Def(A), ShlWal-Def/EndRdx(29), ShlWal-Def/Rchg(31), ShlWal-Def/EndRdx/Rchg(39) Level 30: Weave -- Ksm-ToHit+(A), Rct-ResDam%(31), ShlWal-Def(33), ShlWal-Def/EndRdx(40), ShlWal-Def/Rchg(45), ShlWal-Def/EndRdx/Rchg(50) Level 32: Foot Stomp -- SprAvl-Acc/Dmg(A), SprAvl-Acc/Dmg/EndRdx(33), SprAvl-Acc/Dmg/EndRdx/Rchg(33), SprAvl-Acc/Dmg/Rchg(40), SprAvl-Dmg/EndRdx(46), SprAvl-Rchg/KDProc(50) Level 35: Tough Hide -- ShlWal-Def(A), ShlWal-Def/EndRdx(36), ShlWal-Def/EndRdx/Rchg(36), ShlWal-ResDam/Re TP(40) Level 38: Maneuvers -- ShlWal-Def(A), ShlWal-Def/EndRdx(39), ShlWal-Def/EndRdx/Rchg(39), ShlWal-Def/Rchg(42) Level 41: Cross Punch -- Arm-Acc/Dmg/Rchg(A), Arm-Acc/Rchg(42), Arm-Dmg(42), Arm-Dmg/EndRdx(43), Arm-Dmg/Rchg(46), Arm-Dam%(50) Level 44: Superior Conditioning -- PrfShf-End%(A) Level 47: Assault -- RechRdx-I(A) Level 49: Physical Perfection -- RgnTss-Regen+(A) Level 1: Fury Level 1: Brawl -- Acc-I(A) Level 1: Sprint -- Run-I(A) Level 2: Rest -- Empty(A) Level 1: Swift -- Run-I(A) Level 1: Hurdle -- Jump-I(A) Level 1: Health -- Mrc-Rcvry+(A), NmnCnv-Regen/Rcvry+(7), Pnc-Heal/+End(9) Level 1: Stamina -- PrfShf-End%(A) Level 22: Double Jump Level 50: Agility Core Paragon Level 50: Mighty Radial Final Judgement Level 50: Diamagnetic Radial Flawless Interface Level 50: Barrier Core Epiphany Level 50: Melee Radial Embodiment ------------ | Copy & Paste this data into Mids Reborn : Hero Designer to view the build | |-------------------------------------------------------------------| |MxDz;1434;696;1392;HEX;| |78DA5594C96F925114C51F054A4B414A07E8042D74A0A5851657CE466D695A4BD28| |4C42DC1F6092448097C35B274EFC2316E1CEAC2ADFF8071AEFF8553E2BA6AA2C621| |3178E11C0A92C0EF7DF7DD73DFB9EF7B8FC4E545C7E3E52B2795A9EB4C3E5D2EA74| |E97B60D6D4DA433B90DB352CAB996DEAC8C9DBAA88D6CA56CD8243254CF4825745E| |EB6872BBA84BA9A451D2858C91F5616A515FD085B28EAE142E6DE70BBA943E9FCBE| |78C8AB2AF6F6DE5A3C9A2D69B8EFA704DA78BB942C6597F88E73259439E5C8DA94D| |5D2A6773C5C1A5626E23BA2475329554225D3674A9029703E26652BE4193FCD4BEA| |A6A556FC575CCA2DADE83F68FE0C00730FC0E8C3C029FA916AD57063ED1D60A862C| |CAE10787026078149C3F08EDF39A145AB3E9276296EFE0811FE0C82F705CF2CC5CC| |7ECB020B71BEC3E00065CE09C139C77832F446585D6644D9AEAB1F63DD49D94471B| |EBDAAE21BFE306D8739375AFB3EE2DD6BD0DBE145527FD77B2673B7BEE63CF01F61| |C9457DFA5E0A16B56D5F50ED223734ECC999DABEC3F0E7A56D8FF32F84AB25C5CD3| |C53DEBE69E79B86713BFC190E4B9EB1B5C35B9B9560FF95AD0CB3ABDF4DE47EF03F| |43E41EF5EF1D70F7FAA7F98E743625EC6BC9FB01F66890DB2E620BD0DD19BBFE18D| |EF7357B286993BCC9E47D8B39FBD4EB1778BD4F5F11DF9FEAAFA19F37FC3DC18B52| |16AE7A88D513B23BA516A47EFC2E7D87D72070C3D0023F7C0D843F04DE36E88C720| |D719E73AE3AC1F3A0BBA6DB84BB5DC49E64EC5FFEF6386DEAE4AE2343D4D1F69C3D| |C51F210183E06460E83B1E360A75BA95968D5EC1DC47A64ED28DF45B471B6246F81| |790B27702FE396FDBB5A1DB1287EAAF29704CD5A6B2C82D8BA85128999AAF2517BF| |6FD2AFB599F5B63D3887D69C6DAD42A4E52FB39DCBE8E0076E26BAB8EDDEC86F74F| |5BF58F4742749C9D698E9FF636C73B2DE327C1E6F81F51A5CE52| |-------------------------------------------------------------------| I'm undecided on the Lore Slot right now, but I'll figure it out. 🤷♂️ Any suggestions or critiques?
-
Thanks to both of you for your quick answers. 😁 👍
-
I'm enjoying this build very much (currently at L15) but I like to plan ahead. What is the best selection for each Incarnate slot?
-
Yup. I've already got it. 👍
-
OK. Here we go: Against +4s (Base = 39): Thunder Kick = 114.1% Storm Kick = 88.12% Cobra Strike - 94.38% Crane Kick = 88.12% Crippling Axe Kick = 121.1% Dragon's Tail = 121.1% Eagle's Claw = 114,1% Rise to the Challenge (WP) = 72*% Kick (Fighting Pool) = 82.32 Not too shabby! Only a couple under 90%. I can live with the 94,38% on Cobra Strike and I never use Kick anyways. 72% on RttC is a bit worrisome though. Against +3s (Base = 48): Thunder Kick = 136.9% Storm Kick = 105,7% Cobra Strike = 113.3% Crane Kick = 105.7% Crippling Axe Kick = 145.4% Dragon's Tail = 145.4% Eagle's Claw = 136.9% Rise to the Challenge (WP) = 86.4% Kick (Fighting Pool) = 98.79% Looks pretty sweet! Should I look for another Acc Bonus (+6%) to get Storm Kick and Crane Kick up to 94.12% vs. +4s?
-
So which will give me more bang for my buck? ToHit Buffs Bonuses or Accuracy Bonuses? Or should I go for a balance between the two so I'm getting a bonus on each side of the equation?
-
Don't To-Hit and Accuracy basically mean the same thing? 😕
-
Mids Reborn is a fantastic tool and I'd like to learn how to use it properly and work the numbers in my favor. I've been trying to figure out what's the 'best' balance amongst Set Bonuses. I open Mids and am a bit overwhelmed about what I'm seeing. I'm building a Martial Arts / Willpower Scrapper (Heroside). I look at all of the Set Bonuses available. The problem is: I want them all. (I'm a pig!) I'm hoping that you good people on the Forums here can point me in the right direction for a proper balance of Set Bonuses between the following (in order of importance): Accuracy DmgBuff (Smash / Melee) (#2 because w/o Accuracy, DmgBuffs are useless). DefBuff / ResDmg / MezRes (as many as possible but definitely Smash / Lethal / Melee and maybe Ranged and AoE). Regeneration Recovery For example, when I click the 'View Active Set' button: Would an aggregate Accuracy Set Bonus of +25% hit all targets 95% of the time? If not, what's the number? I've heard that there's a softcap and a hardcap for Def and DmgRes. On a scrapper, what are these values? How much DefBuff and ResDmg Set Bonuses would I need to softcap (or hypothetically) even hardcap)? Is there such a thing too much Regeneration? (not counting having more than 5 of the same bonuses, of course). There's a lot going on and I know that I can't have everything that I want but once again, I'm trying to strike a powerful yet efficient balance. I'd like my hero to make Hamidon piss himself just thinking about me. 😈 I know that's not realistic but it's fun to think about, isn't it? 😁
-
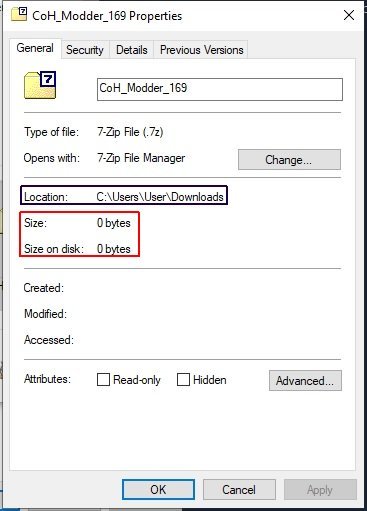
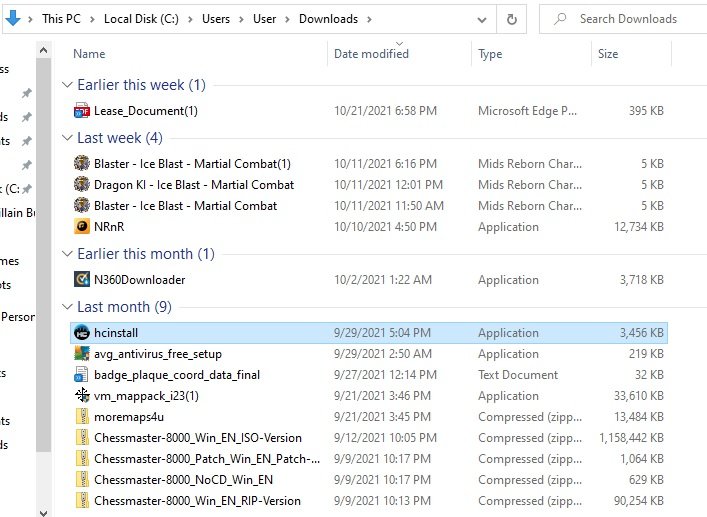
Sure do. Here's a pic: I'll show you the file location in a sec. but WTH?!! In the red box, Size and Size on Disk is 0 bytes. That's probably the problem. There's nothing there. Here's the C:\Users\User\Download pic: The Modder is not on the list. I'll keep trying but I'm beginning to wonder if it's meant to be or not. 😉