

Terenos
-
Posts
44 -
Joined
-
Last visited
Content Type
Profiles
Forums
Events
Store
Articles
Patch Notes
Posts posted by Terenos
-
-
10 minutes ago, lemming said:
It doesn't prompt you if you have it active, you just rez. It will work as a rez otherwise though.
Which feels a little weird at first, since, if you're not expecting the rez (especially with the delay), it's just very suddenly you in the midst of whatever just killed you. However the untouchable period is actually pretty generous - it was enough that I was able to activate my toggles and effectively flee to safety from the mobs during my test, so you're very unlikely to just chain together deaths instantly if you need an escape from whatever killed you. 🙂
-
 2
2
-
-
52 minutes ago, WuTang said:
I will check again today to make sure I understand what happened better.
But you are saying that if I have the buff active and on CD then I'm supposed to get a rez but if I've let the buff lapse then I won't?
I was curious, too, so I went and checked thinking there may be a secondary portion to the power not recorded in mids that represents the rez that is shorter than the power duration, so I put it on, waited thirty seconds, then rushed myself into a group and let myself die. It took about another 30 seconds for the group to kill me after rushing in. I got the death screen, the "go to hospital/base" buttons and then after about 4-5 seconds I suddenly just rezzed. I did it again with the same time-frame, same results. Then I did it again, this time waiting about 1.5 minutes before jumping to my death (what can I say, I'm working on a debt badge so perfect timing 🙂). Same result, same delay.
So overall about a minute between activation and death passed with the rez protection still intact, it just takes a couple seconds delay for that part of the power to kick in once you're downed apparently.
-
 1
1
-
-
40 minutes ago, WuTang said:
Are PvP sets out of your price range? 3 5-piece Panacea sets would help with global recharge. I would sacrifice your Taunt slotting for this. You could get 7.5% x3 over the 5% you get from the Perfect Zinger 4 piece.
I have one 3 piece set of Panacea slotted in now, although it was 4 before, so one 5-slot isn't out of the question. Honestly, taunt is largely there as a set mule for that recharge bonus anyway (and because taunt is actually super useful even solo, to the point I miss it if I don't have it). Selling off the IOs in that would probably fund most of the fifth PvP IO and dropping two of the saved slots into Integration wouldn't be much of a change to the build as a whole.
-
53 minutes ago, Nemu said:
If you are looking for a bit more recharge, consider 4 piece basalisk gaze + 2 dam IOs in greater psi blade
If you are looking for more late game mitigation, consider soul mastery for darkest night. Gloom is also a good ST attack that diversifies your damage type
Good call on both, I always forget about Basilisk Gaze and how bonkers the low-hanging set bonuses are on it.
One of the reasons Spirit Shark is in there right now is that I actually tend to take the Soul Mastery pool on my Brutes and wanted to check out Spirit Shark after the changes to it quite a few issues ago (since it has the stacking buff that ups its damage that I can't find a way to actually reflect in Mids). In testing it out in-game, it's a pretty hefty chunk of damage at 3-5 stacks (plus it's another spot to throw a Force Feedback into), but that 2s cast time is really awful to deal with.
I've found that in practice having a range attack from one of the pools is a huge help, so I'm likely going to jump back to Soul Mastery for at least Gloom and use a Cloud Senses set to pick up another recharge bonus. Another option I'm looking at is to dip into Mu Mastery and grab Mu Lightning as a ranged attack and use it to pull in another 3-set of Synapse's Shock (plus a one-off accuracy/damage IO at +5) to shore up -recharge debuff resistance.
45 minutes ago, WuTang said:A small concern may also be that you don't have Second Wind on perma. It's off by 14 seconds. That's a 600+ point hit that could come at the wrong time.
I noticed this, too, and what's weird is that there's something going on with my Mids that's causing recharge times in powers (but not the global recharge value, which remains static. because I started obsessively checking to make sure I wasn't accidentally activating the force feedback procs) to change seemingly randomly (Second Wind, for example, somehow loses about 20 seconds) after making a minor tweak to completely unrelated things. I'm not sure which number to trust, so overkill on the number is probably the correct option.
My normal inclination is to preserve set bonuses through exemping by attuning most of my set enhancements, even if it means that my final numbers might not be as high as they could be. But for Second Wind specifically I think I'm going to +5 two of the */recharge IOs in it to try to eke out a bit more recharge to bring it back into perma-range.
-
7 hours ago, Nemu said:
Recharge slotting in powers cuts down proc chances.
Yep, it's another one of the reasons why I personally don't tend to go proc heavy with my Brute builds - I love my
endurance issuesrecharge too much 🙂7 hours ago, Nemu said:Your are focusing set bonuses on the wrong things on a regen build. If you think passive regen and a smattering of S/L resist is going to carry you through tougher content, then you are in for a rude awakening.
Regen's survival depends on clicks. The focus for a regen build should be recharge, and the bane of regen has and still is -recharge debuffs. This is not a new revelation, this has been discussed long ago. If you don't believe me, look at the posts from Betty who's the current champion of all things regen.
----
----
Obviously Betty and I have evolved our outlook on softcap defenses on a regen since 2022, but the fundamental core of -recharge debuff resist and +recharge for a regen build persist today even after the most recent regen revamp.
If you were to pivot and build with an emphasis on +recharge you can offset your 10 second GPB recharge with those global recharge bonuses + hasten, and do more damage with it as well, while still keeping a streamlined attack chain.
Before I get into my main points, I want to emphasize that I do not disagree with anything you're presenting here. I trust that your experience is correct that in some of the toughest content available, I will run into problems with my build as presented for survival. I also agree that -recharge debuffs kill; I've experienced that pain on every Brute I've had that runs a click heavy survival build. I also agree that Hasten is, objectively, a top tier power pick when you're chasing recharge bonuses.
I think there is definitely a far more optimized build that can be created with the information you've presented.
Now I'm going to get into the caveats (and again, I don't disagree with you on how best to optimize a top tier Regen Brute) for some of my choices and for this specific build I'm making
On 6/23/2025 at 6:07 PM, Terenos said:For budget limits, I'm avoiding Very Rare set recipes, and limiting myself to one partial pvp set in Panacea.
-Recharge Debuff Resistance is expensive since it's found for PVE exclusively on Winter Sets (and also for some reason in Synapse's Shock (End Mod - 3 set), Ice Mistral's Torment (Slow Movement - 4 set) and Thrust (Run (no sprint) - 4 set)). You need 8 total Superior Winter enhancements (spread across 4 powers for just the 2-set bonus in each) to max out the -recharge debuff resistance for Regen, which is beyond the resource budget I'm personally allotting this build. I should probably have included Winter Sets in the Very Rare set disclaimer, but in my mind they tend to overlap as "these are super expensive."
If the resources for them are available in a build, they're totally worth it for kitting out your character and pretty easy to make space for since they're not just cluttering up slots in mule powers.
Alright, with that major one out of the way, let's talk Hasten. As I said above, it is objectively the correct choice in this build. Were I going for the most optimized version, I would probably cut out the Teleportation pool and replace it with Super Speed as my main travel pool with Hasten taking over from Combat Teleport. There's also some (less optimized) arguments in my head that I could eat the loss of one LotG and cut either Combat Jumping or Maneuvers to fit in Hasten if I desperately wanted to keep teleportation in.
The "But" that's been building here is a completely stupid, non-profound one. I don't really like Hasten in my builds - I don't particularly enjoy its play pattern of chasing perma and then keeping it as an auto power. Also the sound makes my teeth hurt. That's it, that's the only reason it's not in the build. Nothing exciting, just personal preference. Again, objectively the correct choice for it to be there, and I know how I would change the build to make it fit.
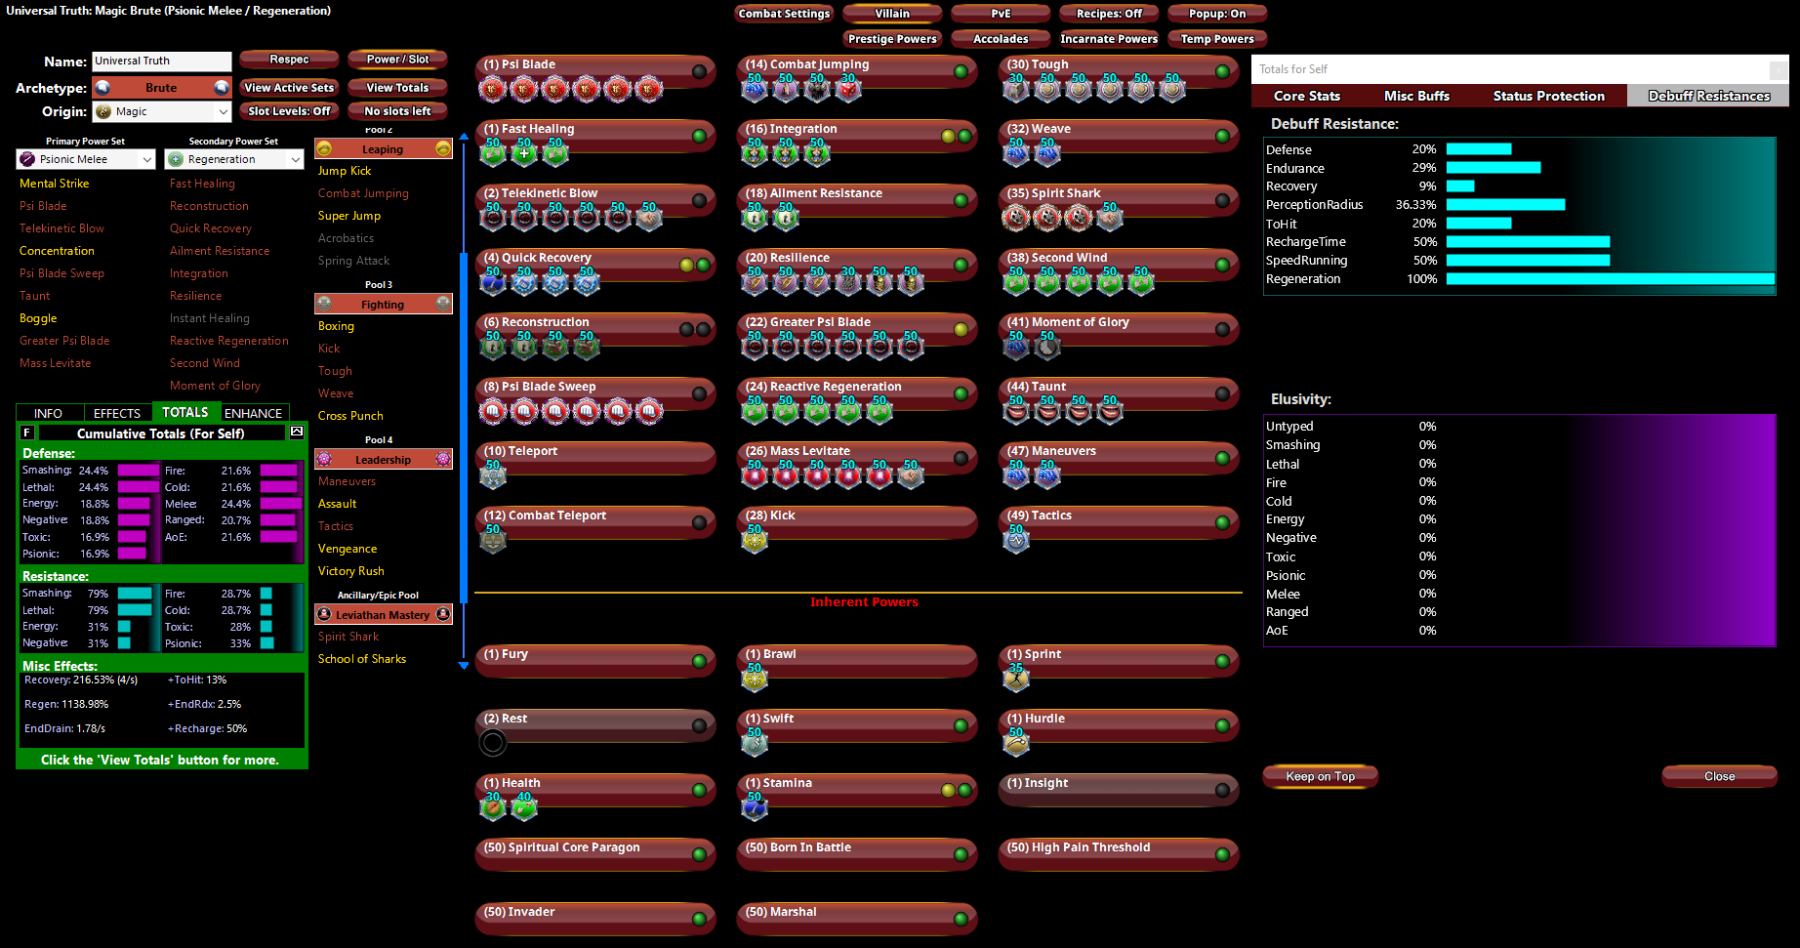
So, with all the feedback it's clarified a few things in the build for me and I've refined it to this version:
Spoiler
Universal Truth - Villain Brute
Build plan made with Mids Reborn v3.7.14 rev. 3
──────────────────────────────
Primary powerset: Psionic MeleeSecondary powerset: RegenerationPool powerset (#1): TeleportationPool powerset (#2): LeapingPool powerset (#3): FightingPool powerset (#4): LeadershipAncillary powerset: Leviathan Mastery──────────────────────────────
Powers taken:
Level 1: Psi Blade
A: Superior Unrelenting Fury: Accuracy/Damage3: Superior Unrelenting Fury: Damage/RechargeTime5: Superior Unrelenting Fury: Accuracy/Damage/RechargeTime9: Superior Unrelenting Fury: Damage/Endurance/RechargeTime36: Superior Unrelenting Fury: Accuracy/Damage/Endurance/RechargeTime36: Superior Unrelenting Fury: RechargeTime/+Regen/+EndLevel 1: Fast Healing
A: Numina's Convalesence: Heal3: Invention: Healing43: Numina's Convalesence: +Regeneration/+RecoveryLevel 2: Telekinetic Blow
A: Mako's Bite: Accuracy/Damage9: Mako's Bite: Damage/Endurance11: Mako's Bite: Damage/Recharge11: Mako's Bite: Accuracy/Endurance/Recharge34: Mako's Bite: Chance of Damage(Lethal)36: Force Feedback: Chance for +RechargeLevel 4: Quick Recovery
A: Performance Shifter: Chance for +End5: Synapse's Shock: EndMod/Increased Run Speed45: Synapse's Shock: EndMod47: Synapse's Shock: EndMod/RechargeLevel 6: Reconstruction
A: Preventive Medicine: Chance for +Absorb7: Preventive Medicine: Heal/RechargeTime7: Doctored Wounds: Recharge39: Doctored Wounds: Heal/RechargeLevel 8: Psi Blade Sweep
A: Superior Brute's Fury: Accuracy/Damage13: Superior Brute's Fury: Damage/Recharge13: Superior Brute's Fury: Accuracy/Damage/Recharge15: Superior Brute's Fury: Damage/Endurance/RechargeTime21: Superior Brute's Fury: Accuracy/Damage/Endurance/Recharge34: Superior Brute's Fury: Recharge/Fury BonusLevel 10: Teleport
A: Winter's Gift: Slow Resistance (20%)Level 12: Combat Teleport
A: Invention: To Hit BuffLevel 14: Combat Jumping
A: Luck of the Gambler: Defense/Increased Global Recharge Speed15: Reactive Defenses: Scaling Resist Damage19: Shield Wall: +Res (Teleportation), +5% Res (All)43: Kismet: Accuracy +6%Level 16: Integration
A: Panacea: +Hit Points/Endurance17: Panacea: Heal/Endurance17: Panacea: HealLevel 18: Ailment Resistance
A: Preventive Medicine: Heal19: Preventive Medicine: Heal/EnduranceLevel 20: Resilience
A: Unbreakable Guard: +Max HP21: Unbreakable Guard: Resistance27: Unbreakable Guard: Resistance/Endurance40: Impervious Skin: Status Resistance/Regeneration42: Gladiator's Armor: TP Protection +3% Def (All)42: Gladiator's Armor: ResistanceLevel 22: Greater Psi Blade
A: Mako's Bite: Accuracy/Damage23: Mako's Bite: Damage/Endurance23: Mako's Bite: Damage/Recharge25: Mako's Bite: Accuracy/Endurance/Recharge37: Mako's Bite: Accuracy/Damage/Endurance/Recharge37: Mako's Bite: Chance of Damage(Lethal)Level 24: Reactive Regeneration
A: Numina's Convalesence: Heal/Endurance25: Numina's Convalesence: Heal/Recharge33: Numina's Convalesence: Heal/Endurance/Recharge33: Numina's Convalesence: Endurance/Recharge34: Numina's Convalesence: HealLevel 26: Mass Levitate
A: Obliteration: Damage27: Obliteration: Accuracy/Recharge29: Obliteration: Accuracy/Damage/Recharge29: Obliteration: Accuracy/Damage/Endurance/Recharge31: Obliteration: Chance for Smashing Damage37: Force Feedback: Chance for +RechargeLevel 28: Kick
A: Invention: AccuracyLevel 30: Tough
A: Steadfast Protection: Resistance/+Def 3%31: Aegis: Resistance/Recharge31: Aegis: Psionic/Status Resistance40: Aegis: Resistance/Endurance42: Aegis: Resistance45: Aegis: Resistance/Endurance/RechargeLevel 32: Weave
A: Luck of the Gambler: Defense/Increased Global Recharge Speed33: Luck of the Gambler: DefenseLevel 35: Spirit Shark
A: Overwhelming Force: Accuracy/Damage39: Overwhelming Force: Endurance/Recharge39: Overwhelming Force: Damage/Chance for Knockdown/Knockback to Knockdown40: Force Feedback: Chance for +RechargeLevel 38: Second Wind
A: Numina's Convalesence: Heal/Recharge45: Numina's Convalesence: Endurance/Recharge46: Numina's Convalesence: Heal/Endurance/Recharge50: Numina's Convalesence: Heal/Endurance50: Numina's Convalesence: HealLevel 41: Moment of Glory
A: Luck of the Gambler: Defense/Increased Global Recharge Speed43: Invention: Recharge ReductionLevel 44: Taunt
A: Perfect Zinger: Chance for Psi Damage46: Perfect Zinger: Threat/Placate46: Perfect Zinger: Threat/Placate/Recharge48: Perfect Zinger: Threat/Placate/Recharge/RangeLevel 47: Maneuvers
A: Luck of the Gambler: Defense/Increased Global Recharge SpeedA: Luck of the Gambler: Defense/EnduranceLevel 49: Tactics
A: Invention: Endurance Reduction
──────────────────────────────Inherents:
Level 1: Fury
Level 1: Brawl
A: Invention: AccuracyLevel 1: Sprint
A: Unbounded Leap: +StealthLevel 2: Rest
(Empty)Level 1: Swift
A: Invention: Run SpeedLevel 1: Hurdle
A: Invention: JumpingLevel 1: Health
A: Regenerative Tissue: +Regeneration48: Miracle: +RecoveryLevel 1: Stamina
A: Performance Shifter: Chance for +EndLevel 1: Insight
My goals have largely remained the same in the build, but I now know the reason I'm chasing the numbers I am on both positional defense and s/l resistance. That is, inspirations.
In most content that I'm going to be routinely soloing, I'm going to be dealing with the normal defense softcap of 45%. At 20% for the three positional defenses, it means I'm only two small purples (or one medium) away from hitting that number. It's not perfect insurance because I don't have the DDR to sustain against certain mob types, but it's a good pro-active step I can take to minimizing the damage the alpha strike of a mob does to me and helps stagger early damage by giving me time to start juggling mobs with Mass Levitate and Telekinetic Blow so that the high regen numbers can keep up.
Smashing and Lethal damage are the two most common damage types in the game, and also the easiest to find resist for outside of sets (mostly due to Tough). I would love to push it to a flat 80% so that one orange could max out my resistance numbers there, but 79% is... fine. There are places I could look to eke out that final 1% but I think that's too nitpicky for this iteration. Chasing other resists would require a complete overhaul of the build, and frankly I don't think it's worth it (but I'm always glad to be proven wrong).
The last thing that's been on my mind has been recharge bonuses in sets, and I think this relates to the Very Rare problem. Significant sources of recharge in sets are either consigned purely to Very Rare sets (the 10%) or buried as 5% to 8% in the 5/6 set bonus slot. I'm actually debating swapping the 5 slot Mako set in Telekinetic Blow to Crushing Impact to pick up the extra 5% recharge speed. The basic trade-off is 3% s/l resist for the additional recharge, and it's very tempting.
For normal content, I think these choices and the tools I have available both in the build and on my inspiration bar are enough that I can confidently approach most situations. For harder content, I'm going to have to rely on Incarnate Powers and (shudder) team mates to help.
Destiny and Hybrid slots are something I haven't given a huge amount of thought to yet in terms of the build, and with what thought I have given it, regen is new enough to me that I'm not sure that my previous experience on other Brutes is necessarily a good guide for what works best as solo picks, team picks, and league picks on those.
So, all this to say, thank you (everyone) for the feedback so far, and if the mood strikes keep it coming! It helps me clarify and improve this build, and, even if I don't embrace some of it right now, I hope that it'll help someone in the future with these sorts of questions.
-
19 hours ago, zenijos10 said:
Proc damage does not get modified. But consider that with 1 dam + 1 dam/acc Greater Psi Blade can get to 76% dam enhancment (217 damage), with a full set of Mako it gets to 93.5% (288 damage). Fury affects BOTH of those. At 85 fury, 408 and 479 respectively. You can put 4 procs on top of that 408 to get to average damage of 689.
- With Musculature core (and 85 Fury), it closes the distance even more boosting the 76% damage enhancement to 119% (ed 122%) and meanwhile 6 slot Mako is at 127% (ed 143%). This put average damage between the two at 746 for 1 dam + 1 dam/acc + 4 procs versus 516 for 6 slot Mako's.
- With musc + 85 Fury + INSIGHT it is 750 damage for 6 slot and 974 damage for 1 dam + 1 dam/acc + 4 procs.
- If you add in concentration + Gaussian's Build up it goes to 1020 (6 slot) vs 1244.
The tradeoff is real. Give up the set bonuses in exchange for an extra 220 ST damage every 8 seconds or so?
To give the survability comparison, changing to Musculature Core and switching out the Mako slotting you lose out about 17.3 hp/s (143.1 > 125.8) and 3.8% S/L resist (79 > 75.2).
For Brutes specifically, though, I don't think procs are necessarily as impactful due to the way Fury boosts our base damage but not our proc damage. Recharge can actually be a stronger buff by making our high damage powers available more often (so you end up using high damage/activation powers more often than filling in with weaker hits).
On the damage side, because we've removed recharge both from the power slotting and incarnates, the recharge time goes from 4.35s > 10s, losing potentially half the activations of Greater Psi Blade. While not 1 to 1, because while it is on cooldown, you're filling in with other attacks from your attack chain, none of the other attacks even approach the damage of Greater Psi Blade. If we assume that you would be doing a Telekinetic Blow (the next highest damaging attack) to fill in on occasion, you're still losing at least a little under 100-200 damage per activation of a not GPB power.
This sort of math is a little more complicated with Psionic Melee, though, since it ignores the effects of Insight and Insight Lockout periods (damage starts to become much more comparable between Telekinetic Blow w/Insight vs. GPB without Insight). But assuming that you're always going to be clicking the most damaging power in a given situation, having GBP up more often means the damage difference is much lower between proc/musculature and set/Spritual on a Brute.
All that being said, I do think there's a strong case for removing one of the Mako's Bite enhancements from GPB (probably the Acc/Dam/End/Recharge one) and replacing it with another proc to bring the damage up just a little bit on a couple of the hits from it, or slotting in a pure damage IO for a more consistent damage increase to the power (since with my current slotting and Incarnate choices it's only barely dipping into ED for damage enhancements).
-
12 minutes ago, zenijos10 said:
Terenos, I understand your build philosophy, just wanted to show there are always tradeoffs and ways to make useful changes. Maximizing defense means giving up some offense.
Totally, I appreciate the feedback. It's good to step back and think through my choices on the build, which is why having other perspectives like yours only makes it better!
-
10 hours ago, WuTang said:
This build.... HAHAHA
I admit my adjustments may have been detrimental to the build...but I also only have SO's equipped right now. Just hit ~23. So, I'll find out soon. Also will be able to confirm if RoP is needed or not LOL
I have face planted so so so many times. I do OK, like really really good, until I don't. Gonna get some gear on him tonight, hopefully get my recharge up a bit.
I'm wondering if Fast Healing is needed when leveling, but then it looks to help so little.
May just put him a farm and get past all the low levels...
There's definitely a huge difference between a level 50 build and a 1-20 leveling build with SOs. Here's one that may offer slightly more survivability as you level up. I've picked powers through 24, but only slotted powers through level 20 so that it more represents what you'll be looking at now.
SpoilerVillain Brute
Build plan made with Mids Reborn v3.7.14 rev. 3
──────────────────────────────
Primary powerset: Super StrengthSecondary powerset: RegenerationPool powerset (#1): FlightPool powerset (#2): LeapingPool powerset (#3): ExperimentationPool powerset (#4): FightingAncillary powerset: Dark Mastery──────────────────────────────
Powers taken:
Level 1: Punch
A: Accuracy3: Endurance Reduction3: Recharge ReductionLevel 1: Reconstruction
A: Recharge Reduction5: Recharge Reduction9: HealingLevel 2: Haymaker
A: Accuracy5: Endurance Reduction7: Recharge ReductionLevel 4: Quick Recovery
A: Endurance Modification7: Endurance ModificationLevel 6: Fast Healing
A: Healing9: HealingLevel 8: Knockout Blow
A: Accuracy11: Endurance Reduction11: Recharge Reduction13: Damage IncreaseLevel 10: Ailment Resistance
A: Healing13: HealingLevel 12: Air Superiority
A: Accuracy15: Endurance Reduction15: Recharge ReductionLevel 14: Super Jump
A: JumpingLevel 16: Integration
A: Endurance Reduction17: Healing17: HealingLevel 18: Rage
A: Recharge Reduction19: Recharge ReductionLevel 20: Resilience
A: Resist DamageLevel 22: Hurl
(Empty)Level 24: Reactive Regeneration
(Empty)
──────────────────────────────Inherents:
Level 1: Brawl
(Empty)Level 1: Fury
Level 1: Sprint
(Empty)Level 2: Rest
(Empty)Level 1: Swift
(Empty)Level 1: Health
A: HealingLevel 1: Hurdle
(Empty)Level 1: Stamina
A: Endurance Modification19: Endurance ModificationLevel 14: Double Jump
This build relies a lot on juggling your targets - while it may seem an odd pick, Air Superiority is an all star power in these early levels as its knockup is both fast and reliable, giving you time for your regen to actually tick up when facing harder targets. Combined with Punch/Haymaker/Knockout Blow, you should be able to pretty consistently keep at least one enemy locked down while you kill it. You'll eventually respec out of it (probably around level 26 when you can finally pick up Foot Stomp) but until that point it's great.
If you have the START vendor IOs, I would recommend replacing the recharge SOs in Punch, Haymaker, Air Superiority and Knockout Blow (along with its damage one) for those.
Edit: Oh, and the travel power is up to your preference. I used Super Jump just because it's often a good thematic Super Strength one to leap tall buildings.
-
1
-
-
1 hour ago, Erratic1 said:
He has Fury set to 0. Move it up to 85 and Greater Psi Blade hits for 471.
TIL that was a slider. Thank you!
-
1
-
-
1 hour ago, zenijos10 said:
Looks pretty sturdy! To throw a wrench in it, or perhaps to just give a alternative view. Many level 50 regen brutes and now tanks swap out some survivability for more offensive power via procs. Killing faster can help survive a lot of things too!
For example Greater Psi Blade could go from about 280 average damage to 379 with 4 procs and 2 acc/damage. Also just as a note, in most cases as a brute you will not get a lot of use out of enhancing taunt (many people skip it entirely), so weigh those set bonuses carefully. Additionally, you have a lot of endurance (though not a lot of endurance debuff resistance). You can probrably afford to lose the slot holding miracle in health (one of the quick recovery slots). Finally, the concentration second slot isnt doing much either. So those slots might be better elsewhere, or allow you to lose some set in attacks and gain them in defenses. Also, your accuracy still isn't great against +4 enemies. The kismet +acc enhancement would do a lot of good.
I've tried the playstyle of heavy procs on brutes before, and it's never really my cup of tea for them - I've found that pushing fury through recharge and sustain provides a faster route to damage. I also prefer to over-emphasize survivability and sustain over extra damage (when it's a trade-off I have to consider). I've found that, when teaming, the team is either blasting through enemies so quickly the little bit of extra damage I could bring with procs doesn't really make a heavy impact or I'm acting as the key tank, where soaking alphas and living is the most important aspect I bring. My playstyle tends to favor preparing for the latter than optimizing for the former.
I like the idea of bringing in Kismet, and dropping the slot in concentration and moving it over to mule that enhancement in combat jumping is probably where I'll end up. There's also a part of me that likes the idea of just dropping concentration entirely and switching it over to Tactics out of Leadership to provide that extra high level accuracy and provide a layer of confuse/fear protection when solo. While the damage bonus of Concentration is really nice for bursting with Insight/Greater Psi Blade, the utility of Tactics might just be a better QOL addition.
-
Thanks for the feedback, especially on the max HP thing. I definitely get a bit of set blindness when I'm placing things and just think, "Well, may as well just put another one in." This is especially true for +hp bonuses, as I'm not used to the amount that Regen has just baked into the base powers.
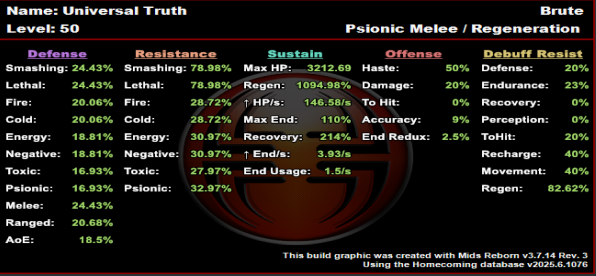
This new build is both more survivable and easier to put together (dropping a PVP IO is pretty big budget-wise). HP is still overcapped, but by a significantly reduced amount,
SpoilerUniversal Truth - Villain Brute
Build plan made with Mids Reborn v3.7.14 rev. 3
──────────────────────────────
Primary powerset: Psionic MeleeSecondary powerset: RegenerationPool powerset (#1): TeleportationPool powerset (#2): LeapingPool powerset (#3): FightingPool powerset (#4): LeadershipAncillary powerset: Leviathan Mastery──────────────────────────────
Powers taken:
Level 1: Psi Blade
A: Superior Unrelenting Fury: Accuracy/Damage3: Superior Unrelenting Fury: Damage/RechargeTime5: Superior Unrelenting Fury: Accuracy/Damage/RechargeTime9: Superior Unrelenting Fury: Damage/Endurance/RechargeTime36: Superior Unrelenting Fury: Accuracy/Damage/Endurance/RechargeTime36: Superior Unrelenting Fury: RechargeTime/+Regen/+EndLevel 1: Fast Healing
A: Invention: Healing3: Numina's Convalesence: Heal43: Numina's Convalesence: +Regeneration/+RecoveryLevel 2: Telekinetic Blow
A: Mako's Bite: Accuracy/Damage9: Mako's Bite: Damage/Endurance11: Mako's Bite: Damage/Recharge11: Mako's Bite: Accuracy/Endurance/Recharge34: Mako's Bite: Chance of Damage(Lethal)36: Force Feedback: Chance for +RechargeLevel 4: Quick Recovery
A: Performance Shifter: Chance for +End5: Power Transfer: EndMod45: Power Transfer: Damage/EndModLevel 6: Reconstruction
A: Preventive Medicine: Chance for +Absorb7: Preventive Medicine: Heal/RechargeTime7: Doctored Wounds: Recharge39: Doctored Wounds: Heal/RechargeLevel 8: Psi Blade Sweep
A: Superior Brute's Fury: Accuracy/Damage13: Superior Brute's Fury: Damage/Recharge13: Superior Brute's Fury: Accuracy/Damage/Recharge15: Superior Brute's Fury: Damage/Endurance/RechargeTime21: Superior Brute's Fury: Accuracy/Damage/Endurance/Recharge34: Superior Brute's Fury: Recharge/Fury BonusLevel 10: Teleport
A: Winter's Gift: Slow Resistance (20%)Level 12: Combat Teleport
A: Invention: To Hit BuffLevel 14: Combat Jumping
A: Luck of the Gambler: Defense/Increased Global Recharge Speed15: Reactive Defenses: Scaling Resist Damage19: Shield Wall: +Res (Teleportation), +5% Res (All)Level 16: Integration
A: Panacea: +Hit Points/Endurance17: Panacea: Heal/Endurance17: Panacea: HealLevel 18: Ailment Resistance
A: Preventive Medicine: Heal19: Preventive Medicine: Heal/EnduranceLevel 20: Resilience
A: Unbreakable Guard: +Max HP21: Unbreakable Guard: Resistance27: Unbreakable Guard: Resistance/Endurance40: Impervious Skin: Status Resistance/Regeneration42: Gladiator's Armor: TP Protection +3% Def (All)42: Gladiator's Armor: ResistanceLevel 22: Greater Psi Blade
A: Mako's Bite: Accuracy/Damage23: Mako's Bite: Damage/Endurance23: Mako's Bite: Damage/Recharge25: Mako's Bite: Accuracy/Endurance/Recharge37: Mako's Bite: Accuracy/Damage/Endurance/Recharge37: Mako's Bite: Chance of Damage(Lethal)Level 24: Reactive Regeneration
A: Numina's Convalesence: Heal/Endurance25: Numina's Convalesence: Heal/Recharge33: Numina's Convalesence: Heal/Endurance/Recharge33: Numina's Convalesence: Endurance/Recharge34: Numina's Convalesence: HealLevel 26: Mass Levitate
A: Obliteration: Damage27: Obliteration: Accuracy/Recharge29: Obliteration: Accuracy/Damage/Recharge29: Obliteration: Accuracy/Damage/Endurance/Recharge31: Obliteration: Chance for Smashing Damage37: Force Feedback: Chance for +RechargeLevel 28: Kick
A: Invention: AccuracyLevel 30: Tough
A: Steadfast Protection: Resistance/+Def 3%31: Steadfast Protection: Resistance/Endurance31: Aegis: Psionic/Status Resistance40: Aegis: Resistance/Endurance42: Aegis: Resistance45: Aegis: Resistance/Endurance/RechargeLevel 32: Weave
A: Luck of the Gambler: Defense/Increased Global Recharge Speed33: Luck of the Gambler: DefenseLevel 35: Spirit Shark
A: Overwhelming Force: Accuracy/Damage39: Overwhelming Force: Endurance/Recharge39: Force Feedback: Chance for +Recharge40: Overwhelming Force: Damage/Chance for Knockdown/Knockback to KnockdownLevel 38: Second Wind
A: Numina's Convalesence: Heal/Recharge45: Numina's Convalesence: Endurance/Recharge46: Numina's Convalesence: Heal/Endurance/Recharge50: Numina's Convalesence: Heal/Endurance50: Numina's Convalesence: HealLevel 41: Moment of Glory
A: Luck of the Gambler: Defense/Increased Global Recharge Speed43: Invention: Recharge Reduction43: Invention: Recharge ReductionLevel 44: Taunt
A: Perfect Zinger: Chance for Psi Damage46: Perfect Zinger: Threat/Placate46: Perfect Zinger: Threat/Placate/Recharge48: Perfect Zinger: Threat/Placate/Recharge/RangeLevel 47: Concentration
A: Gaussian's Synchronized Fire-Control: Chance for Build UpA: Gaussian's Synchronized Fire-Control: To Hit Buff/RechargeLevel 49: Maneuvers
A: Luck of the Gambler: Defense/Increased Global Recharge SpeedA: Luck of the Gambler: Defense/Endurance
──────────────────────────────Inherents:
Level 1: Fury
Level 1: Brawl
A: Invention: AccuracyLevel 1: Sprint
A: Unbounded Leap: +StealthLevel 2: Rest
(Empty)Level 1: Swift
A: Invention: Run SpeedLevel 1: Hurdle
A: Invention: JumpingLevel 1: Health
A: Regenerative Tissue: +Regeneration48: Miracle: +RecoveryLevel 1: Stamina
A: Performance Shifter: Chance for +EndLevel 1: Insight
-
4 hours ago, Sarrate said:
3) It's all in on Regen, if you ever run into a fight with -Regen, its possible it won't help at all (if your regen gets floored). While having a "god mode" button get completely stuffed isn't unheard of (Elude vs DE Quartz, Unstoppable vs Longbow -Res Grenades), it's really awkward that IH's alternative, RR, has scaling regen (and recovery) resistance, and it's always on.
Totally agree with your points, but one thing I will say is that the new regen makes it very, very hard for your regen to get floored - they added a lot of -regen debuff resistance at all levels of the set (making it less volatile as a mitigation option, even at early levels in places like Praetoria where it can feel like it rains regen debuffs on lowbies).
So while IH being floored is less likely, this still makes RR a better choice because it provides a stacking -regen debuff resistance buff as part of its main function, where IH doesn't add any to it.
-
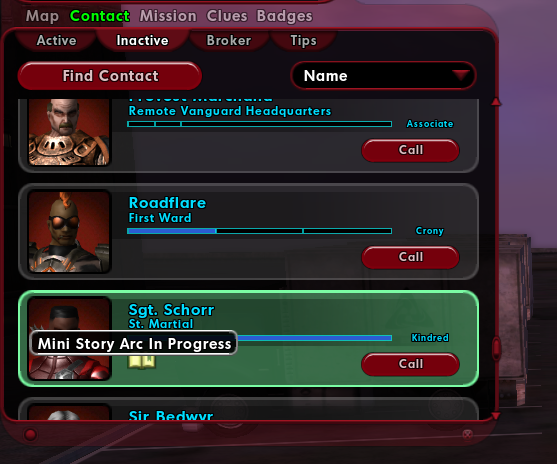
Necro bumping this rather than making a new report thread for it. I was on mission 7/9 for his arc when I hit level 41 and he immediately went inactive on me and would no longer offer missions to complete his arc, despite still having the "mini-story arc in progress" badge on him in my inactive contacts.
-
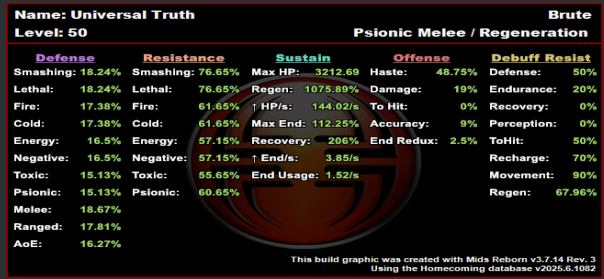
Howdy! I'm looking for feedback from any build masters out there for what I'm thinking of as the "final" form for my Psionic/Regen Brute.
My main goals for this guild are to prioritize solo content against a wide variety of enemy types, hopefully pushing up the difficulties to at least +2/8 in the end. Based on other regen builds, my own experience solo to 37 (and playing many other Brutes), and random bits of chatter, I'm focusing on capping HP, getting additional regen bonuses, and trying layer in resistance as far as I can via set bonuses. Defense is a tertiary concern for me, as without any sort of significant DDR it will tend to fail quickly in melee. For budget limits, I'm avoiding Very Rare set recipes, and limiting myself to one partial pvp set in Panacea.
SpoilerUniversal Truth - Villain Brute
Build plan made with Mids Reborn v3.7.14 rev. 3
──────────────────────────────
Primary powerset: Psionic MeleeSecondary powerset: RegenerationPool powerset (#1): TeleportationPool powerset (#2): LeapingPool powerset (#3): FightingPool powerset (#4): LeadershipAncillary powerset: Leviathan Mastery──────────────────────────────
Powers taken:
Level 1: Psi Blade
A: Unrelenting Fury: Accuracy/Damage3: Unrelenting Fury: Damage/RechargeTime5: Unrelenting Fury: Accuracy/Damage/RechargeTime9: Unrelenting Fury: Damage/Endurance/RechargeTime36: Unrelenting Fury: Accuracy/Damage/Endurance/RechargeTime36: Unrelenting Fury: RechargeTime/+Regen/+EndLevel 1: Fast Healing
A: Invention: Healing3: Invention: HealingLevel 2: Telekinetic Blow
A: Mako's Bite: Accuracy/Damage9: Mako's Bite: Damage/Endurance11: Mako's Bite: Damage/Recharge11: Mako's Bite: Accuracy/Endurance/Recharge34: Mako's Bite: Chance of Damage(Lethal)36: Force Feedback: Chance for +RechargeLevel 4: Quick Recovery
A: Performance Shifter: Chance for +End5: Performance Shifter: EndMod45: Performance Shifter: EndMod/AccuracyLevel 6: Reconstruction
A: Preventive Medicine: Chance for +Absorb7: Preventive Medicine: Heal/RechargeTime7: Preventive Medicine: Heal/RechargeTime/EnduranceLevel 8: Psi Blade Sweep
A: Brute's Fury: Accuracy/Damage13: Brute's Fury: Damage/Recharge13: Brute's Fury: Accuracy/Damage/Recharge15: Brute's Fury: Damage/Endurance/RechargeTime21: Brute's Fury: Accuracy/Damage/Endurance/Recharge34: Brute's Fury: Recharge/Fury BonusLevel 10: Teleport
A: Winter's Gift: Slow Resistance (20%)Level 12: Combat Teleport
A: Invention: To Hit BuffLevel 14: Combat Jumping
A: Luck of the Gambler: Defense/Increased Global Recharge Speed15: Reactive Defenses: Scaling Resist Damage19: Shield Wall: +Res (Teleportation), +5% Res (All)Level 16: Integration
A: Panacea: +Hit Points/Endurance17: Panacea: Heal/Endurance17: Panacea: Heal45: Panacea: Heal/RechargeLevel 18: Ailment Resistance
A: Preventive Medicine: Heal19: Preventive Medicine: Heal/Endurance48: Preventive Medicine: Heal/RechargeTimeLevel 20: Resilience
A: Unbreakable Guard: +Max HP21: Unbreakable Guard: Resistance27: Unbreakable Guard: Resistance/Endurance40: Impervious Skin: Status Resistance/Regeneration42: Gladiator's Armor: TP Protection +3% Def (All)42: Gladiator's Armor: ResistanceLevel 22: Greater Psi Blade
A: Mako's Bite: Accuracy/Damage23: Mako's Bite: Damage/Endurance23: Mako's Bite: Damage/Recharge25: Mako's Bite: Accuracy/Endurance/Recharge37: Mako's Bite: Accuracy/Damage/Endurance/Recharge37: Mako's Bite: Chance of Damage(Lethal)Level 24: Reactive Regeneration
A: Numina's Convalesence: Heal/Endurance25: Numina's Convalesence: Heal/Recharge33: Numina's Convalesence: Heal34: Numina's Convalesence: +Regeneration/+RecoveryLevel 26: Mass Levitate
A: Obliteration: Damage27: Obliteration: Accuracy/Recharge29: Obliteration: Accuracy/Damage/Recharge29: Obliteration: Accuracy/Damage/Endurance/Recharge31: Obliteration: Chance for Smashing Damage37: Force Feedback: Chance for +RechargeLevel 28: Kick
A: Invention: AccuracyLevel 30: Tough
A: Steadfast Protection: Resistance/+Def 3%31: Steadfast Protection: Resistance/Endurance31: Aegis: Psionic/Status Resistance40: Aegis: Resistance/Endurance42: Aegis: ResistanceLevel 32: Weave
A: Luck of the Gambler: Defense/Increased Global Recharge Speed33: Luck of the Gambler: Defense33: Luck of the Gambler: Defense/EnduranceLevel 35: Spirit Shark
A: Devastation: Accuracy/Damage39: Devastation: Damage/Endurance39: Devastation: Damage/Recharge39: Devastation: Accuracy/Damage/Recharge40: Devastation: Accuracy/Damage/Endurance/RechargeLevel 38: Second Wind
A: Numina's Convalesence: Heal/Recharge45: Numina's Convalesence: Endurance/Recharge46: Numina's Convalesence: Heal/Endurance/RechargeLevel 41: Moment of Glory
A: Luck of the Gambler: Defense/Increased Global Recharge Speed43: Invention: Recharge Reduction43: Invention: Recharge Reduction43: Invention: Recharge ReductionLevel 44: Taunt
A: Perfect Zinger: Chance for Psi Damage46: Perfect Zinger: Threat/Placate/Recharge46: Perfect Zinger: Threat/Placate/Recharge/Range48: Perfect Zinger: Threat/Placate/Range48: Perfect Zinger: Accuracy/RechargeLevel 47: Concentration
A: Gaussian's Synchronized Fire-Control: Chance for Build UpA: Gaussian's Synchronized Fire-Control: To Hit Buff/RechargeLevel 49: Maneuvers
A: Luck of the Gambler: Defense/Increased Global Recharge SpeedA: Luck of the Gambler: Defense/Endurance
──────────────────────────────Inherents:
Level 1: Fury
Level 1: Brawl
(Empty)Level 1: Sprint
(Empty)Level 2: Rest
(Empty)Level 1: Swift
(Empty)Level 1: Hurdle
(Empty)Level 1: Health
A: Regenerative Tissue: +RegenerationLevel 1: Stamina
A: Performance Shifter: Chance for +End47: Performance Shifter: EndModLevel 1: Insight
Any feedback is appreciated! Thanks!
-
1 hour ago, Andreah said:
I keep a lot of buttons and macros out, and use custom windows quite a lot too. This is my set-up for running pick-up teams.
Despite all this, I'm not a clicker in combat, I have a lot of key binds for things that aren't on my main command bar 1.
The chat macros are a really good idea for teams. Do you have those up all the time, or is there a way you can call the windows when you need them?
-
My own UI is probably slightly more crowded, partially because the UI scale is at 120% because my old eyes couldn't read things at any smaller. I use a lot of extra buttons for keybinds, including "qer" for my basic attack chain, "gfv" for slower or aoe attacks, "xv" for build-up style abilities (or self-heals), and then "c" is always to toggle sprint on/off. I try my best to keep these general setups the same across characters so I can jump back into an alt with at least a rough idea of what the various buttons will do when I press them.
I swapped the positions of the target and navigation bar because I hated how pulling down a map during a mission would obscure my entire field of vision, and I found it more helpful to be able to glance up and see my target details at center of vision. The health/etc. bar is pulled down to the right because I want to be able to see it without moving my eyes too much. The combat attributes window will vary on what's displayed (for some reason "Gravity" is stuck on a bunch of my brute characters after I came back instead of fury which I usually tracked on a lot of them). My UI choices have often been described as "cluttered" in other games, but it works for me.
-
 1
1
-
 1
1
-
-
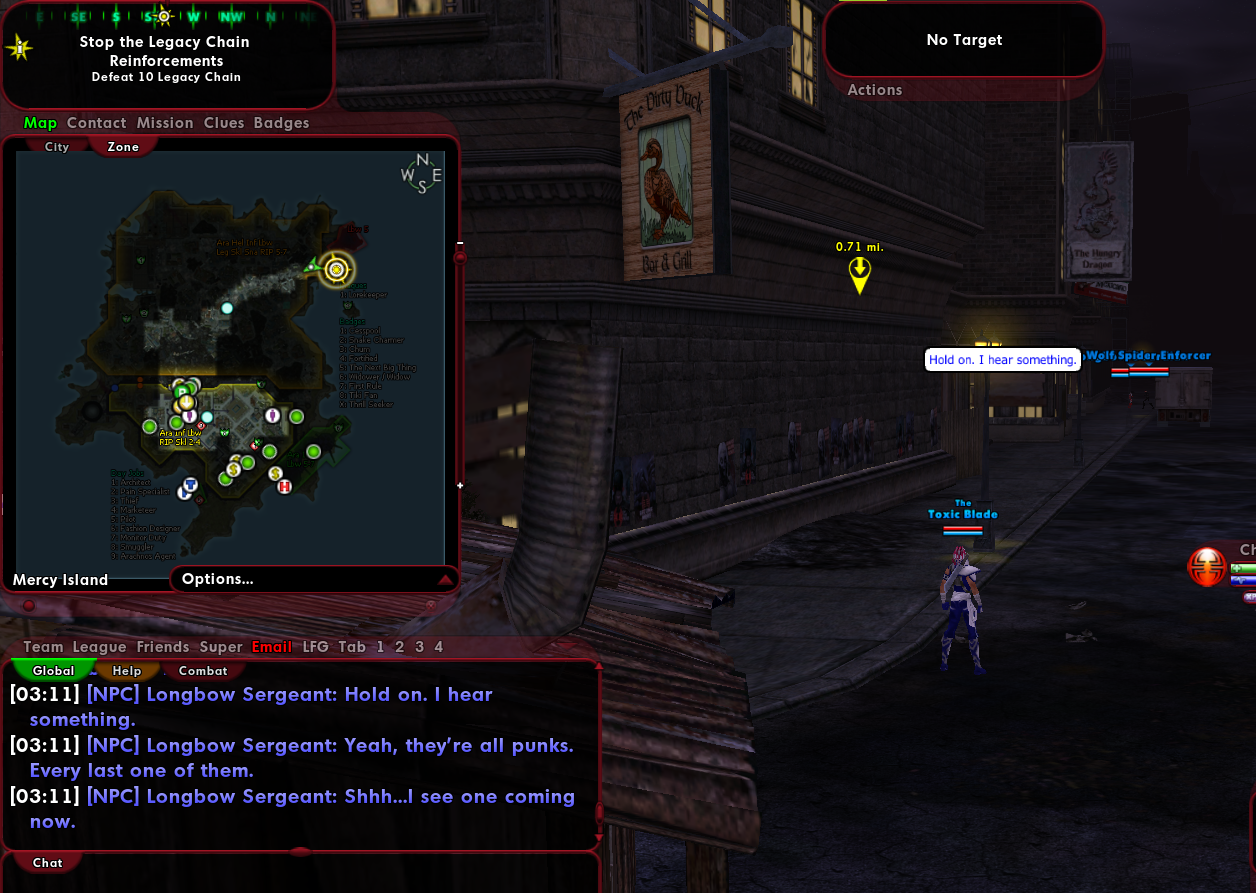
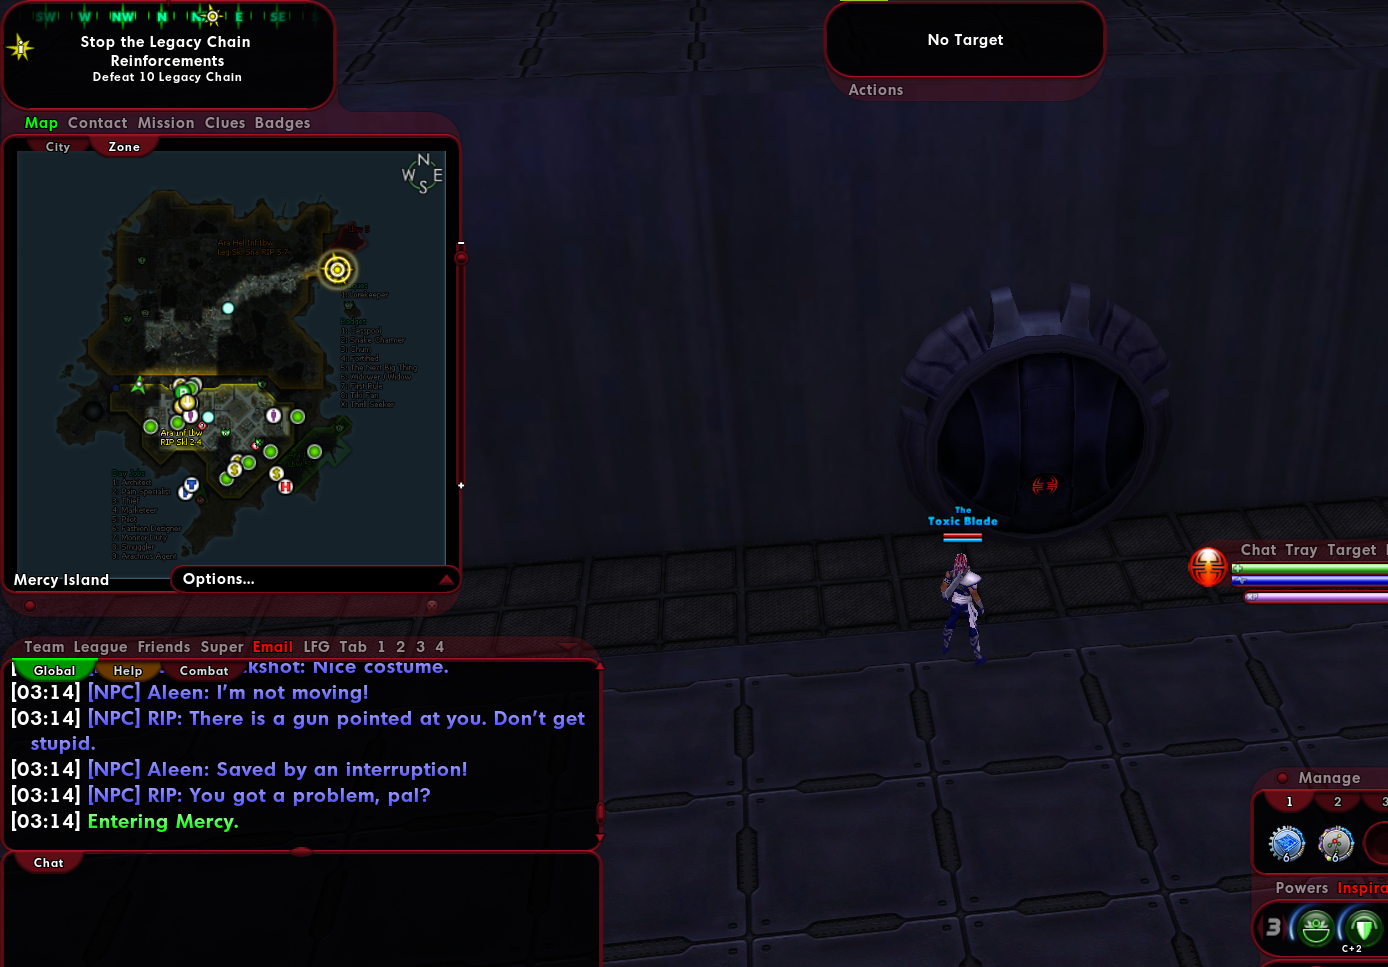
Had a weird bug where the open world mission "Stop the Legacy Chain Reinforcements" from Lt. Harris decided to throw a navigation point to one of the doors in Mercy that leads back down to Darwin's Landing rather than just around the corner from the previous objective. Two screenshots below, the first one showing the distance and direction it had me going for the bug, the second one being the door it took me to (although I'd already used the door I was being directed to when I thought to take the second one it set itself to the correct spot afterwards, even after going back into the door).

-
I'm a life-long Red Side player, it's where I started and it's where I default to with new characters (Just to add unnecessarily - I dislike Blue Side, it's boring and zone travel is confusing) I hated the change to allow Civilians to be targeted and attacked in Mayhem Missions. The main reason? Now when I'm trying to target things, they get in the way; they take up target slots for AoEs. They're just annoying as all get out and it feels like the change was made for no other reason than people wanted a mechanic way to feel more villainous or edgy in the least interesting way possible.
I would be in full support of just reverting that change and making them NPCs in the mission again who just kind of bump you a little bit as they run away. I don't want a badge for avoiding killing them, because it's just as boring and pointless not hitting them as it is hitting them. They're just annoying, and not in any way that makes me feel more or less like a villain.
-
2
-
-
One of Ashley McKnight's greetings has a "PlayerName" set wrong.
-
Both of the doors for the mayhem missions in Port Oakes are way out on the edges of the zone map, often requiring you to go through some of the more dangerous areas of those zones to get through. The second one is minor, but the first one (especially at sub level-10 where players may not have travel powers beyond those on the P2W vendor) feels excruciating - especially because you then have to make the trip back to whoever your broker is.
This would be a good QoL change, as there doesn't seem to be anything particularly special about those doors (except the submarine, which has the villain choose-your-own Mayhem contact next to it, which I expect he's there more because that's near where one of the doors is than because he needs to be out there) beyond being "a ship" and "a submarine."
-
1
-
-
To be honest, the AT descriptors need a more complete editing pass to bring them all in line with a single voice. Some of them talk about the AT mostly in the third person, some of them talk about them in the second person, and some switch back and forth indiscriminately. My edits were mostly just to address a low-hanging fruit problem.
-
There are a couple of places in the archetype descriptions where it still genders the AT. Here are the ones I was able to catch, along with fixes:
Blaster
The Blaster is an offensive juggernaut. This hero can deal a ton of damage from a distance. But the Blaster must be careful, because
he'sthey're somewhat fragile compared to other heroes. The Blaster can't stand toe to toe with most opponents at melee for long.HisA Blaster's best defense is a great offense!Defender
The Defender tends to help
histheir allies, and attackhis(no pronoun needed here) foes, from a distance. The Defender excels at powers that assist friends, but can also hinderhistheir enemies. The Defender is able to attack at quite a range, however, the Defender is not built for hand to hand.HeThey might be able to dodge a few attacks, but the Defender won't last for long.Dominator
As a Dominator, you control a devastating combination of control and assault powers. A Dominator can freeze foes in place, render them unconscious, or cause them to flee in terror. Dominators can also smite their foes with a selection of single-target melee and ranged attacks, with devastating effectiveness. Additionally, each time a Dominator attacks,
he comesthey come closer to unleashinghistheir true sadistic power of Domination. With so much emphasis on diverse offensive powers, Dominators lack in defenses and work best with teammates who can provide protection.-
6
-
1
-
-
1 hour ago, Rudra said:
You want an extra crutch for new players? I can agree with a slightly improved DO origin matching from drops.
I think this is the difference in our opinions that probably won't be reconciled. I don't see making the early game slightly easier as providing a crutch. I see it as making sure we're not breaking people's legs right out the gate. I've enjoyed discussing this with you, but I think we're just going in circles now.
-
37 minutes ago, Rudra said:
Introduce them to IOs. Not even set IOs, I'm just talking the generic IOs. We can even see about having IOs mentioned in the tutorials. (Both the game introduction tutorials and the level 6+ ones.) My best guess is that what is turning them off from "keeping up on gear" is they are mentally stuck on gear from games like WoW. Where your gear never stopped working as long as you kept it from breaking. The best thing I can say for those players is to point out that they aren't equipping gear as evidenced by the lack of changes to their characters, they get to keep their characters looking how they wanted because of that, and they can still get gear-like enhancements starting at level 7 if they craft IOs.
Okay, this is disputing the frame of my argument, not the point of it: not everyone has a "me" they can feel comfortable with reaching out to to ask questions.
Let's take another analogy to try to get to the heart of the matter. There is a room that is really cool, but to get into the room, you have to walk through a door. The top of the door frame is a little too short and the first time people come in to the room they will often hit their head on it on the way in. It's not a serious hit, no one is injured, but wow is it annoying to clip your head when you enter the room for the first time. Now, if I'm there at the entrance or if they call me, I can warn them about how they might hit their head on the door if they don't duck a little bit. There's also a whole bunch of reviews online advising that, if you want to enter the really cool room, you should duck when you get to the door.
But the really cool room isn't private, so there's people who end up going in without seeing any of those warnings or who don't have a friend who can warn them that the door is like that. And then they hit their head on that door frame - not because they don't understand how doors work, or because there's something wrong with them. It's just because this particular door is a little too short and a little too unlike other doors they've seen recently, and it's a little annoying, but that's okay because the room is really cool.
Except this is just one door that leads into the room. There are a bunch of other doors with varying height problems that aren't quite like other doors they've seen. And they have to pass through all of them to get fully into the really cool room. Some people will get frustrated and look up the reviews online, and see where they have to duck and make it to the really cool room a little flustered but wiser. Some people will soldier on, hit all the doors, and eventually get to the cool room and ask others, "hey, did you hit those doors on the way in, too?" and get the answers they need. Other people will hit some section of those doors and decide the really cool room can't be worth all this hassle and leave without ever getting to see what makes the really cool room really cool.
When we hear enough people complain about hitting their head on one of the doors to the really cool room, our response shouldn't be, "well why didn't you look this information up." It should be "why aren't we making the door easier to get through?"
57 minutes ago, Rudra said:(Edit: Can maybe even ask that when the player is sent to the university as part of the tutorial, it includes sending them to the IO tutorial contact with an introduction of sorts explaining he is the one that will tell them about IOs at level 10. Or maybe instead just includes a statement as part of the 'this is a university' popup that names the contact and his minimum level.)
Good news! This is one of the changes being made with the next issue (which I'm very happy about). I think it's a big step in the right direction, but I honestly feel like some of the options we've discussed here would also go a long way to helping out new players just beyond this change without significantly impacting the game for vets.


MA/PSI build notes, Kilty Pleasures!!!
in Brute
Posted
Mids has the wrong values compared to in-game. Psychic Wall actually looks like this for resistance values in game (Psychic/Smashing then Lethal)