

The_Traveler
-
Posts
17 -
Joined
-
Last visited
Content Type
Profiles
Forums
Events
Store
Articles
Patch Notes
Posts posted by The_Traveler
-
-
Has anyone experimented with this combo? i Just started one and it seems like it has promise. chose Rad armor for the gimmicks and because i have this Orc idea in mind.
Spoiler Pic
Pic
Load up the Axe attacks with force feedbacks... party heal, lots of AOE, solid single target...
rad armor seems solid by the looks of it... not sure if i would lean into resists or try to add defenses as im new to the set.
any opinions from this wonderful group?
-
If I may sum up the idea for fire farming... you want caps on fire defense and fire resist. There is a really great thread about farming AE that even gives the way you should build the mobs for maxing out inf/hour. From playhing Rad Melee/Fire Armor for a long while, here are a few things i notice immediately.
1. sciroccos dervish sets... 5 slot gives 1.5% fire defense and leaves a slot open for procs... P.S. 5 Slot aegis also adds 1.5% fire defense.
2. Shouldnt need multistrikes if you are taking temp protection... it gives less Fire defense than above.
2.1 Temp protection doesnt really need a bump to the resists so its great for taking uniques.
3. Pull slots from melt armor and char and the kismet in combat jumping and use those slots to get the uniques you still need. Melt armor with Recharge is fine (or use procs and drop it altogether). Char you really shouldnt be using.
4. Consume... may be controversial, but i dont use it. I went Energy Epic pool for accuracy buff and baby stamina, which i threw another PS:+end proc in.
4.1 RadSiphon... i used 5 slot hecatomb and the theft of essence +end proc (which brought me up to 3 endurance heals and allowed consume to be optional... meaning you can use it for another PBAOE attack or ditch it.
5. burn is better with dmg procs.
6. Another debatable... I like how devastating blow looks... but its agonizingly slow. my single target rotation is (T1 T2 T5, respectively). i prefer the mobility and faster activation of the T1.
7. You have Fireball, which is great for alternating with Atom smasher. i just found with all the recharge that atom smasher had around a 4 sec CD which allows for you to use you other powers between casts. atom smasher, cast(burn), atom smasher, cast(heal), etc. i just never felt lacking with AOE in this combo.
8. finally! you said you dont like pheonix buuuuuut, with so much aoe dmg "taunting" (i dont use taunt) pheonix is just nice, and you can stop those pesky revives from showing up on your inspi bar if you havent already.
and just a tip, which im sure you know already, IG and AS typically make a few mobs contaminated... use those fast cycle single target attacks on the contaminated for bonus aoe (which feels like more overall dmg than devastating blow>RSiphon . its typically good for a CS>Rsmash>RSiphon chain. it would fall off after the 3rd attack anyway. i NEVER attack minions... they die while fighting bosses. i will punch a LT if there isnt a boss though, these typically melt away also.
I hope this helped mate. YMMV +) Cheers!
-
 1
1
-
-
8 hours ago, Sovera said:
The Performance shifters are not for the speed bonus. It's just the Performance Shifter proc + a +5 endurance mod IO which is the best bang for the buck. Not sure why you'd bother slotting for heal procs when you already have Radiation Siphon on an already very defensive build.
i see. i figured the 2 slot of the set was for something a little extra you cant get from an enhance, and therefore more valuable.
I slot for heal procs as a way to "increase regen" and there really isnt anything better to put in the slot. contaminated on bosses/ebs/avs/gms can be unreliable without fusion. im still a pretty fresh 50 on this set and i could see those slots being used elsewhere eventually.
i use teleport for travel (with macros). hover on my build is for theme, and its just there for the defense slotting. i do need to occasionally FLY DOWN to use atom smasher, but thats only after using the elevation to lazy pull with fold space (think council base maps). Then as im coming down with the mobs i pop fusion, que atom smasher. Combat jumping saves you some endurance and has immob res on it, so its better.
-
 1
1
-
-
i did update a few things in my stone/rad build... itsa beast for sure. i run FA all the time with no issues... no incarnates yet either. i left the -res debuff in the auras because i team primarily and it's something extra i can bring since my damage is lower (although i dont have much trouble joining farms and holding my own or soloing +3x8)
The Build - may adjust a bit once i start trying hardmode stuff.
SpoilerHero Tanker
Build plan made with Mids' Reborn v3.6.6 rev. 3
──────────────────────────────- Primary powerset: Stone Armor
- Secondary powerset: Radiation Melee
- Pool powerset (#1): Teleportation
- Pool powerset (#2): Fighting
- Pool powerset (#3): Flight
- Pool powerset (#4): Speed
- Epic powerset: Energy Mastery
──────────────────────────────
Powers taken:
Level 1: Rock Armor
- A: Shield Wall: Defense/Endurance/Recharge
- 3: Shield Wall: Defense
- 5: Shield Wall: Defense/Endurance
- 5: Shield Wall: Defense/Recharge
- 17: Luck of the Gambler: Defense/Increased Global Recharge Speed
Level 1: Contaminated Strike
- A: Gladiator's Strike: Chance for Smashing Damage
- 3: Gladiator's Strike: Accuracy/Damage/End/Rech
- 7: Gladiator's Strike: Accuracy/Damage
- 7: Gladiator's Strike: Damage/Recharge
- 27: Gladiator's Strike: Damage/Endurance/Recharge
Level 2: Radioactive Smash
- A: Might of the Tanker: Accuracy/Damage
- 42: Might of the Tanker: Damage/Recharge
- 43: Might of the Tanker: Accuracy/Damage/Recharge
- 43: Might of the Tanker: Damage/Endurance/Recharge
- 43: Might of the Tanker: Accuracy/Damage/Endurance/Recharge
- 46: Might of the Tanker: Recharge/Chance for +Res(All)
Level 4: Combat Teleport
- (Empty)
Level 6: Mud Pots
- A: Ice Mistral's Torment: Chance for Cold Damage
- 11: Ice Mistral's Torment: Endurance/Slow
- 11: Ice Mistral's Torment: Damage/Slow
- 13: Ice Mistral's Torment: Accuracy/Damage/Endurance
- 13: Ice Mistral's Torment: Accuracy/Damage/Endurance/Recharge
- 15: Fury of the Gladiator: Chance for Res Debuff
Level 8: Rooted
- A: Preventive Medicine: Heal
- 9: Preventive Medicine: Heal/Endurance
- 9: Preventive Medicine: Endurance/RechargeTime
- 21: Preventive Medicine: Heal/RechargeTime
- 21: Preventive Medicine: Heal/RechargeTime/Endurance
- 23: Preventive Medicine: Chance for +Absorb
Level 10: Stone Skin
- A: Unbreakable Guard: +Max HP
- 19: Unbreakable Guard: Resistance
- 19: Unbreakable Guard: Resistance/Endurance
- 15: Luck of the Gambler: Defense/Increased Global Recharge Speed
- 31: Steadfast Protection: Resistance/+Def 3%
Level 12: Crystal Armor
- A: Shield Wall: Defense/Endurance
- 29: Shield Wall: Defense/Recharge
- 29: Shield Wall: Defense
- 31: Shield Wall: Defense/Endurance/Recharge
- 31: Performance Shifter: Chance for +End
- 39: Power Transfer: Chance to Heal Self
Level 14: Teleport
- A: Blessing of the Zephyr: Knockback Reduction (4 points)
Level 16: Radiation Siphon
- A: Hecatomb: Chance of Damage(Negative)
- 23: Theft of Essence: Chance for +Endurance
- 47: Hecatomb: Damage/Recharge
- 47: Hecatomb: Damage/Recharge/Accuracy
- 48: Hecatomb: Recharge/Accuracy
- 48: Hecatomb: Damage/Endurance
Level 18: Minerals
- A: Reactive Defenses: Defense
- 33: Reactive Defenses: Defense/Endurance
- 39: Reactive Defenses: Scaling Resist Damage
- 45: Luck of the Gambler: Defense/Increased Global Recharge Speed
Level 20: Fold Space
- A: Invention: Recharge Reduction
- 40: Invention: Recharge Reduction
Level 22: Brimstone Armor
- A: Unbreakable Guard: Resistance
- 39: Unbreakable Guard: Resistance/Endurance
- 40: Unbreakable Guard: RechargeTime/Resistance
- 45: Gladiator's Armor: TP Protection +3% Def (All)
Level 24: Irradiated Ground
- A: Scirocco's Dervish: Accuracy/Damage
- 25: Scirocco's Dervish: Damage/Endurance
- 25: Scirocco's Dervish: Damage/Recharge
- 27: Scirocco's Dervish: Accuracy/Damage/Endurance
- 34: Scirocco's Dervish: Chance of Damage(Lethal)
- 36: Achilles' Heel: Chance for Res Debuff
Level 26: Earth's Embrace
- A: Impervious Skin: Status Resistance/Regeneration
Level 28: Kick
- (Empty)
Level 30: Atom Smasher
- A: Gauntleted Fist: Accuracy/Damage
- 33: Gauntleted Fist: Damage/RechargeTime
- 34: Gauntleted Fist: Accuracy/Damage/RechargeTime
- 36: Gauntleted Fist: Damage/Endurance/RechargeTime
- 36: Gauntleted Fist: Accuracy/Damage/Endurance/RechargeTime
- 37: Gauntleted Fist: RechargeTime/+Absorb
Level 32: Tough
- A: Aegis: Psionic/Status Resistance
- 33: Aegis: Resistance
- 34: Aegis: Resistance/Endurance
- 37: Aegis: Resistance/Recharge
Level 35: Weave
- A: Luck of the Gambler: Defense/Increased Global Recharge Speed
- 37: Luck of the Gambler: Defense
Level 38: Focused Accuracy
- A: Gaussian's Synchronized Fire-Control: Chance for Build Up
Level 41: Physical Perfection
- A: Performance Shifter: Chance for +End
Level 44: Hover
- A: Luck of the Gambler: Defense/Increased Global Recharge Speed
- 45: Shield Wall: +Res (Teleportation), +5% Res (All)
- 46: Shield Wall: Defense/Endurance
- 48: Shield Wall: Defense
- 50: Shield Wall: Defense/Recharge
Level 47: Fusion
- A: Invention: Recharge Reduction
Level 49: Hasten
- A: Invention: Recharge Reduction
- 50: Invention: Recharge Reduction
──────────────────────────────Inherents:
Level 1: Gauntlet
Level 1: Brawl- (Empty)
Level 1: Sprint
- (Empty)
Level 2: Rest
- (Empty)
Level 1: Swift
- (Empty)
Level 1: Hurdle
- (Empty)
Level 1: Health
- A: Panacea: +Hit Points/Endurance
- 40: Miracle: +Recovery
- 42: Numina's Convalesence: +Regeneration/+Recovery
Level 1: Stamina
- A: Power Transfer: EndMod
- 17: Power Transfer: Chance to Heal Self
- 42: Performance Shifter: Chance for +End
──────────────────────────────
Incarnates:Musculature Radial Paragon
some things ive noticed...
Having multiple sustain procs makes a big difference. i have 4 endurance procs and 2 health procs. so every 10 seconds i am getting anywhere from 10-30%(40%) endurance bar and 90 or 180 healing. this fixes the end issue early (put peformance shifter in stamina, crystal armor and theft of essense in rad siphon (which i have come to appreciate). also going 2 slot bonus with power transer instead of performance shifter gives regen instead of movement speed... i would consider the movement speed late game or if doing Granite builds.
at this point i have a few hundred mill invested (just working on merits for Tanker AT sets now) and its been a blast... I FLEW to 50 in a couple days. the defensiveness of stone fits my aggressive playstyle (its forgiving). I typically find a central spot on mission maps and fold space to pull multiple groups to me. (fold space, fusion, smasher, single target rotation on contaminated boss to finish off trash... it goes quick)
-
i ended up testing a bit more on dark armor trying to slot 2 Theft of essence end procs (in rad siphon and dark regen) and 2 performance shifter procs (one in stamina and the other in physical perfection)... still not enough to keep blue bar up. maybe with incarnates... so its def a late game build, which kinda sucks.
I switched over to test out rad/stone and actually enjoyed it more so ive been playing that char lately. ill stop back in when i do get my rad/dark his incarnates.
-
This was the build i have worked out
SpoilerHero Tanker
Build plan made with Mids' Reborn v3.6.6 rev. 3
──────────────────────────────- Primary powerset: Stone Armor
- Secondary powerset: Radiation Melee
- Pool powerset (#1): Teleportation
- Pool powerset (#2): Fighting
- Pool powerset (#3): Leaping
- Pool powerset (#4): Speed
- Epic powerset: Energy Mastery
──────────────────────────────
Powers taken:
Level 1: Stone Skin
- A: Unbreakable Guard: +Max HP
- 3: Unbreakable Guard: Resistance
- 5: Unbreakable Guard: Resistance/Endurance
- 5: Luck of the Gambler: Defense/Increased Global Recharge Speed
Level 1: Contaminated Strike
- A: Gladiator's Strike: Chance for Smashing Damage
- 3: Gladiator's Strike: Accuracy/Damage/End/Rech
- 7: Gladiator's Strike: Accuracy/Damage
- 7: Gladiator's Strike: Damage/Recharge
- 27: Gladiator's Strike: Damage/Endurance/Recharge
Level 2: Radioactive Smash
- A: Might of the Tanker: Accuracy/Damage
- 42: Might of the Tanker: Damage/Recharge
- 43: Might of the Tanker: Accuracy/Damage/Recharge
- 43: Might of the Tanker: Damage/Endurance/Recharge
- 43: Might of the Tanker: Accuracy/Damage/Endurance/Recharge
- 46: Might of the Tanker: Recharge/Chance for +Res(All)
Level 4: Combat Teleport
- A: Gaussian's Synchronized Fire-Control: Chance for Build Up
Level 6: Mud Pots
- A: Ice Mistral's Torment: Chance for Cold Damage
- 11: Ice Mistral's Torment: Endurance/Slow
- 11: Ice Mistral's Torment: Damage/Slow
- 13: Ice Mistral's Torment: Accuracy/Damage/Endurance
- 13: Ice Mistral's Torment: Accuracy/Damage/Endurance/Recharge
- 15: Fury of the Gladiator: Chance for Res Debuff
Level 8: Rooted
- A: Preventive Medicine: Heal
- 9: Preventive Medicine: Heal/Endurance
- 9: Preventive Medicine: Endurance/RechargeTime
- 21: Preventive Medicine: Heal/RechargeTime
- 21: Preventive Medicine: Heal/RechargeTime/Endurance
- 23: Preventive Medicine: Chance for +Absorb
Level 10: Rock Armor
- A: Shield Wall: Defense/Endurance
- 19: Shield Wall: Defense/Recharge
- 19: Shield Wall: Defense
- 15: Shield Wall: +Res (Teleportation), +5% Res (All)
- 31: Luck of the Gambler: Defense/Increased Global Recharge Speed
Level 12: Crystal Armor
- A: Shield Wall: Defense/Endurance
- 29: Shield Wall: Defense/Recharge
- 29: Shield Wall: Defense
- 31: Shield Wall: Defense/Endurance/Recharge
- 31: Performance Shifter: Chance for +End
- 39: Power Transfer: Chance to Heal Self
Level 14: Teleport
- A: Blessing of the Zephyr: Knockback Reduction (4 points)
Level 16: Radiation Siphon
- A: Hecatomb: Chance of Damage(Negative)
- 23: Theft of Essence: Chance for +Endurance
- 47: Hecatomb: Damage/Recharge
- 47: Hecatomb: Damage/Recharge/Accuracy
- 48: Hecatomb: Recharge/Accuracy
- 48: Hecatomb: Damage/Endurance
Level 18: Minerals
- A: Reactive Defenses: Defense
- 33: Reactive Defenses: Defense/Endurance
- 39: Reactive Defenses: Scaling Resist Damage
- 45: Luck of the Gambler: Defense/Increased Global Recharge Speed
Level 20: Fold Space
- A: Invention: Recharge Reduction
- 40: Invention: Recharge Reduction
Level 22: Brimstone Armor
- A: Unbreakable Guard: Resistance
- 39: Unbreakable Guard: Resistance/Endurance
- 40: Unbreakable Guard: RechargeTime/Resistance
- 45: Gladiator's Armor: TP Protection +3% Def (All)
Level 24: Irradiated Ground
- A: Scirocco's Dervish: Accuracy/Damage
- 25: Scirocco's Dervish: Damage/Endurance
- 25: Scirocco's Dervish: Damage/Recharge
- 27: Scirocco's Dervish: Accuracy/Damage/Endurance
- 34: Scirocco's Dervish: Chance of Damage(Lethal)
- 36: Achilles' Heel: Chance for Res Debuff
Level 26: Kick
- (Empty)
Level 28: Tough
- A: Aegis: Psionic/Status Resistance
- 33: Aegis: Resistance
- 34: Aegis: Resistance/Recharge
- 37: Aegis: Resistance/Endurance
Level 30: Atom Smasher
- A: Gauntleted Fist: Accuracy/Damage
- 33: Gauntleted Fist: Damage/RechargeTime
- 34: Gauntleted Fist: Accuracy/Damage/RechargeTime
- 36: Gauntleted Fist: Damage/Endurance/RechargeTime
- 36: Gauntleted Fist: Accuracy/Damage/Endurance/RechargeTime
- 37: Gauntleted Fist: RechargeTime/+Absorb
Level 32: Weave
- A: Luck of the Gambler: Defense/Increased Global Recharge Speed
- 37: Luck of the Gambler: Defense
Level 35: Focused Accuracy
- A: Invention: Endurance Reduction
Level 38: Earth's Embrace
- A: D-Sync Reconstruction
Level 41: Physical Perfection
- A: Performance Shifter: Chance for +End
- 46: Power Transfer: Chance to Heal Self
Level 44: Combat Jumping
- A: Luck of the Gambler: Defense/Increased Global Recharge Speed
- 45: Shield Wall: Defense
- 46: Shield Wall: Defense/Endurance
- 48: Shield Wall: Defense/Recharge
- 50: Shield Wall: Defense/Endurance/Recharge
Level 47: Fusion
- (Empty)
Level 49: Hasten
- A: Invention: Recharge Reduction
- 50: Invention: Recharge Reduction
──────────────────────────────Inherents:
Level 1: Gauntlet
Level 1: Brawl- (Empty)
Level 1: Sprint
- (Empty)
Level 2: Rest
- (Empty)
Level 1: Swift
- (Empty)
Level 1: Hurdle
- (Empty)
Level 1: Health
- A: Panacea: +Hit Points/Endurance
- 40: Miracle: +Recovery
- 42: Numina's Convalesence: +Regeneration/+Recovery
Level 1: Stamina
- A: Power Transfer: EndMod
- 17: Power Transfer: Chance to Heal Self
- 42: Performance Shifter: EndMod
──────────────────────────────
Incarnates:Musculature Radial Paragon
Link
SpoilerG3ZkAKwK7Ma7bbK4CYRweLufYrVGzdSoFOnas2wu5avQQfwhzrYPxjBVeqSND9CSv9BxVVlNWdIEdyFb231KIzzCkCAidaZqVtUGarzZu7N7F/09X03Q0sQiQosGKe3+/uPed1IjLG7muTpPbkbnGPkzzK2K+zgk2DUk0iAM0p/UJF+9B6oO2zrYQug6TIauOHf1lXsSVkPA0TAUi/iHCvHu/th5ppCkxPQ6QHYlcPOcFLZPL4cF0ENqTwGK+CeY9xl/x01xbuRnwvighbQhhf0AzN2Yul5OmnCT8ASmlDpSUCjrSKB7RvWR+CsugFsCwZsKw4pgQwwgvtj0Fz1SX09aRT2GJA2vbcT8ME8esCJBgVn1TAxrTJ5vvulMULAFPULdoVSw1Gx3BJ9zUtbalECdkmc7TZVkcWn8NR1od5Fbh1JKZ0urYWc3lQ+UGLOEIW/zD6NC/2uX5gOdux2rhpQdveHqlgdLCa1Os42E9B2peLhW4Wj9rwgO/B/K5kEYmyPbg4eZrjZd0OziqfSrSYNfwp8u8B/UgbOJAI+33m8Ge1ktiV8u9hfQzTs2hWwNTc5ea9j30N9TPMU15LjuXXcCJTrpik/8BK1ynigvv+K36if3Ry9Duw9p41PRD+CiWhkOhhdTy7TVFsPHpvC1lmDNUugqMnGNHXk8ktR8IuRalnlEV34rU6qzD3uq51Y1jqgPadxRCN3lDgFvMApx0nwaQJXrO+KmFM4mHBxV2v52uLGE3v5JaStXLEBIdsoXNkPa+jeIHAxE+oYUdqipR1yosBgBk4Wgy6xgUUGSbezDJTEmKf+rKEUgh5YNDwwF+hAry0fcj8mCuDMQuifho/OhSWE4d0nL/LuXjnhgqldgGUPnTFlVPeRe0paGDNfE2vN5RAi3edNra2Gy/Q2lmyRV38pjUlOVpFSR2POMJjPn15+QRqFqPZbhNjHud7uMS5LozjoNmd+X6gNcewcvkoxHJiYjuOJ1Cx2NhfwC8OiDKNu4ZI8BCzMlU8JZw3r461znX1LDg9aOmB8u2MbtFh4/ppt1lGW4S4y3ofoX/KCqFX+XVhas3OPLOd+QBRcDySDL++ufHOUPvqS37EHAYDJbHKiFGdL+uCxsC/Ntbd42i7ADjsUVjsU8VIGWXmKpsQqoCREfDoQUCRdvsZweYVERwfWXMZO+4Oq1HO+EEhUeIMFKqHJEG34YJVvKSr8KmFTMScWcVIRJsVLyjvIE56Ex9UjJ+NMN4OmkfaVaOTI+CilU3/E0ioa/JWN5F/GyRoJXxGyGngGbGHsbV0RI2yO2sSfO+jofD83yXT1WV8VrHG1jtwhdR8DKYQ0Qi7+mzwTcxLjbLbLKac0mBE2vW3Fm9YMVtGJ3zbyNU8Wtu182J5vmmHMc7RvpLnk8BWAEMoL7q5eSWCggka3DEWRfjA+fMZCtPx8/4CXG29RRD0RCDTNSp94IgOYfLCjR31JkVmm7pm2AF3UiNB1b/HQrt4VaQdZUL0JJ2OQyqIQZ2jyvETcYiVaoHQAG1FMBdzlimMk9AZOKOKsufBXoFnFwoDFHV2F6zV106TGToOxa0S9zAO3L9o45qNTbOXnpDue+6kShZvtNSQ/YxNj/oZHFLWebRsKfJKom811nIQHITADscGsqWJ9Z0NLyLenqS0wylTwdsIheeSwd4/4Ms1xFFTE9C6hGlqdJqRVny+dGJ8zw9cRWeEF2Z9aEzBLmQrKx1wVwoQJrfohhl1jVEGuSF9vxoCnHqyIYqO6O0rjj5q76ANDxg2sSgLydG1F97Rr4KrmKxZ1X1JuYaF3Rq0okNnrCj2BELTriKlfGRvYNdEzRdvrEuON32pPcgS7qSS1ayFFzNAgmBwtv4CeEuQGTQmIBOSQ32YcIGJVnNKxDb2ulG4WE2OSqgIuuXpWOq0DIWTtqyu4pQerYnLM8B7p5O9ox3nr5ra5pmg50ZJ1tzmL+zf2rDlZXbfpVUUegyIHqlFwnhW/1Pe0FdnZfADfZ56RUC2XPmoUdG3fy4xhkck/ApnAc84JxVQClWQwvDdnvwFAEujrp9rdeVb0lADhWCmIeoEdEawFPMiKOnuJh+jY/HrEcHZADvrA4iNPkwJcYfBCZ2UTtauYbKk+PbA8wV9cWcudnXQMLsU85zwy7AnZ591CLeztiGTDJV5L8eVMfhniWWzfHaX/7k8kOL4qp6F2jCylzVvSF3DiDV4uV/qFgoibAGccrkjhnxWrp10G2LvdPxJgflcchjacR1p5YEWgZh2Gq/bIXVCxtMVQTxobdcLBc9HKwVCvfLYuftJxCI3zmz1yGJ30Ck9M3ZPbGHfM3wvPMNCIP5T4clOPk5acPsfO+Tn5Felr3h6OC7nlhzCxnUy6IuW+pP5rkLd/x6njeNY+VpM0zqIMg7sRwJFpBrCsHJRRWFd6RLQttpVpZub1Qn2DBT/X3AQ==
been pretty happy with it and im still filling in the expensive stuff... earths embrace late ill prolly end up moving into kicks spot for exempt purposes, and push weave to 38. Energy resist is kinda low but still have defense capped. been running missions and stuff on +1 x8 with next to zero issues. would like to find that last bump for hasten to be perma, but didnt know what to give up for it. cant have everything i suppose... any recharge buff in party makes it perma.
Let me know what you think
-
yeah probably why devastating blow feels bad. that makes sense. I didnt know about arcana time 😃
do you think the 2nd -res procs makes up for the loss of damage between rad melee and other tanker secondaries?
-
devastating blow feels bad... it might not be actually?!? but it feels that way. i run contaminated strike, rad smash and rad siphon for ST rotation and it feels fine.
Atom Smasher has 2.93 activation not 3.1. feels good with lower cooldown; it feels like the only aoe you need imo (maybe due to extra targets for being tanker?!) i just fill in the recharge with ST attacks on contaminated. *edit* also just looked and see that FSC is 2.67 activation, and does have higher base dmg but not by much*
Early level Aoe does feel "bad", but i buy grenades from START vendor and the issue goes away. But the survivability.... i think you could solo some things fire never could (not saying its better, just feels more generically useful... if that makes sense). I remember vaz taking my lunch early on with my fire armor chars; didnt feel that way with stone armor.
i know its gimmicky, but fold spaces feels like a champion on a tanker due to more targets...
I havent noticed end issues at all, but i have the 3 health procs and 2 perf shifter procs.
-
1
-
-
nice breakdown. id be interested to see your take on Stone/Rad Tanker compared to your brute. Stone/Rad is def my favorite tanker and i based my build loosely on your brute (i like fold space gimmick cuz i dont take taunt and im lazy lol). 0/x8 started WAAAAY earlier on this combo than any other tanker combo ive played...had bosses on too. 😃
*edit* also... Ice mistrals in mudpots! (fold space everything into the supa slow mudpots and atom smasher everything to death while using single rotation on contaminated boss to act like a 3rd aura... its bonkers how "easy" it feels)
-
9 hours ago, Unerring_Fool said:
Are there other sets that offer -regen? I'm not by the computer to look.
not in primary sets, but in secondaries you have drain psyche and then temp manipulation, both of which offer another 200%-ish to the debuff. this basically totals you close to the main rad or dark debuffs for corruptor.
If you go Corrupter, the secondaries open up to actual buff/debuff/heal sets, (like rad and dark both have a 500+% hp degen debuff or buff master Kinetics... then you can pick whatever primary you like) which fits because you are really just losing the blapper powers from secondary and gaining a lot in return since you are ranged anyway.
sentinel is very forgiving, but hover blasting you are staying out of harms way for the most part (caves and offices defeat this tactic) so the defense sets just feel kinda selfish and funnel you into lower damage than a blaster but more self survivability. Ninjitsu(def+invis+tricks)/SR(easy def capping)/Bio (good all around with +dmg and absorbs) feel good here, but like blaster beam rifle is the only primary with -hp regen debuff.
dont let me sway you, it is just how i like to play. i like the rifle powers, and i build my ranged chars in this type of way. minions and Lts are whatever, so i focus on the boss and up game. -hp regen is damage without attacking technically and scales the harder the mob. sure i see smaller numbers, but that background -hp regen on AVs, GMs... low glory, highly effective.
-
1
-
-
all very good input and much appreciated!
i did NOT know that's how FF worked but it makes sense that it would work that way.
i like the spoiler to keep the posts cleaner for scrolling 😃
I more or less like cloak of fear for the accuracy debuff, but it is rather weak for the investment. i do like the idea of OG with the immobilize and could just add 1 more slot for the amazement acc debuff proc if i still wanted. Phlushot, your build has given me some ideas on how to tweak. I also have been playing with teleport powers. i was trying to see if spring could replace combat teleport, but even with high recharge on FF procs, its still not frequent enough for my liking (and now i know id have to align it with FF procs to get the most use makes it a no go.
i didnt grab rad siphon because the heal isnt really needed b/c dark regen is so good. playing with it feels better than devastating blow though.
I stuck with the lower tier single targets due to lower end cost and dpa and figured it would free me up to keep things in check. (another reason i like the CoF/OG toggles... extra taunt).
I slotted heavy into stamina for more end, but looking at phlushots build, there is better ways to get more, so i can fix that.
I do appreciate the advice and ima test some things then make another attempt at it. Rad/Fire was much easier for me to get a handle on... Dark just has that allure if you can make it work. Who doesnt want 90% psi resist?
-
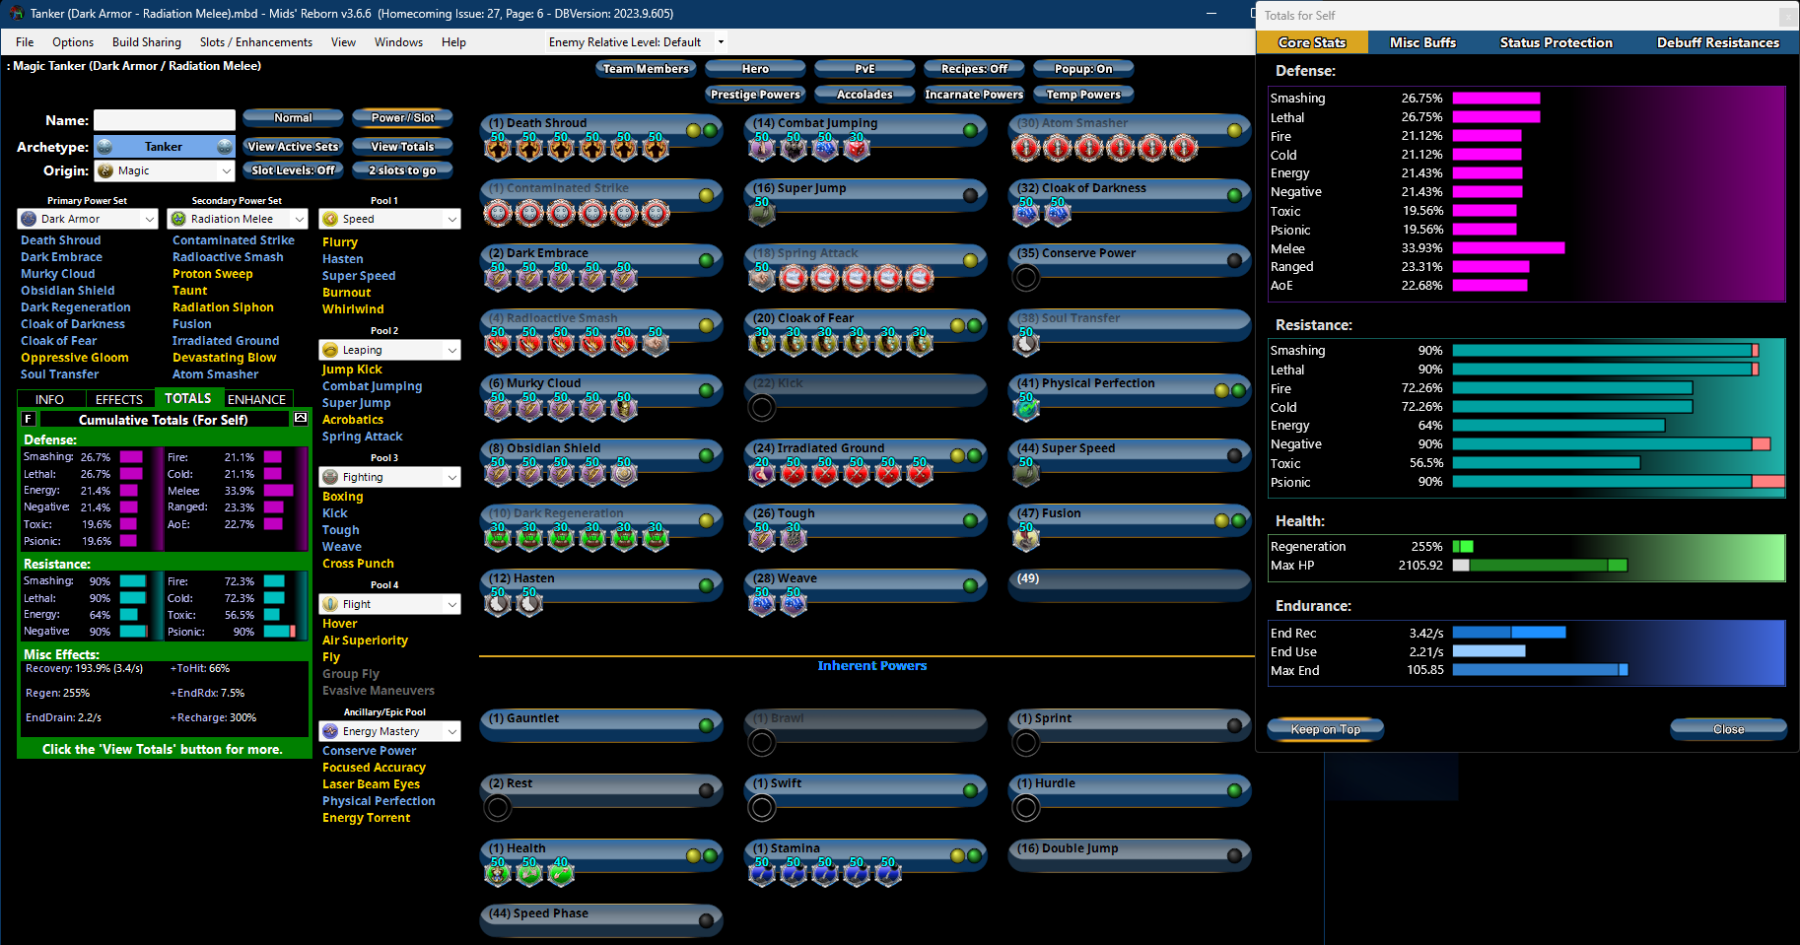
Spoiler
Spoiler
Hero Tanker
Build plan made with Mids' Reborn v3.6.6 rev. 3
──────────────────────────────- Primary powerset: Dark Armor
- Secondary powerset: Radiation Melee
- Pool powerset (#1): Speed
- Pool powerset (#2): Leaping
- Pool powerset (#3): Fighting
- Pool powerset (#4): Flight
- Epic powerset: Energy Mastery
──────────────────────────────
Powers taken:
Level 1: Death Shroud
- A: Fury of the Gladiator: Chance for Res Debuff
- 15: Fury of the Gladiator: Accuracy/Damage
- 15: Fury of the Gladiator: Damage/Recharge
- 17: Fury of the Gladiator: Damage/Endurance/Recharge
- 17: Fury of the Gladiator: Accuracy/Endurance/Recharge
- 19: Fury of the Gladiator: Accuracy/Damage/End/Rech
Level 1: Contaminated Strike
- A: Might of the Tanker: Recharge/Chance for +Res(All)
- 19: Might of the Tanker: Accuracy/Damage
- 21: Might of the Tanker: Damage/Recharge
- 21: Might of the Tanker: Accuracy/Damage/Recharge
- 23: Might of the Tanker: Damage/Endurance/Recharge
- 23: Might of the Tanker: Accuracy/Damage/Endurance/Recharge
Level 2: Dark Embrace
- A: Unbreakable Guard: Resistance
- 3: Unbreakable Guard: Resistance/Endurance
- 3: Unbreakable Guard: +Max HP
- 5: Unbreakable Guard: RechargeTime/Resistance
- 5: Unbreakable Guard: Resistance/Endurance/RechargeTime
Level 4: Radioactive Smash
- A: Gladiator's Strike: Chance for Smashing Damage
- 25: Gladiator's Strike: Accuracy/Damage
- 25: Gladiator's Strike: Damage/Recharge
- 27: Gladiator's Strike: Damage/Endurance/Recharge
- 27: Gladiator's Strike: Accuracy/Damage/End/Rech
- 29: Force Feedback: Chance for +Recharge
Level 6: Murky Cloud
- A: Unbreakable Guard: Resistance
- 7: Unbreakable Guard: Resistance/Endurance
- 7: Unbreakable Guard: RechargeTime/Resistance
- 9: Unbreakable Guard: Resistance/Endurance/RechargeTime
- 9: Gladiator's Armor: TP Protection +3% Def (All)
Level 8: Obsidian Shield
- A: Unbreakable Guard: Resistance
- 11: Unbreakable Guard: Resistance/Endurance
- 11: Unbreakable Guard: RechargeTime/Resistance
- 13: Unbreakable Guard: Resistance/Endurance/RechargeTime
- 13: Aegis: Psionic/Status Resistance
Level 10: Dark Regeneration
- A: Theft of Essence: Healing
- 29: Theft of Essence: Healing/Recharge
- 33: Theft of Essence: Accuracy/Healing
- 34: Theft of Essence: Accuracy/Endurance/Healing
- 34: Theft of Essence: Accuracy/Endurance/Recharge
- 34: Theft of Essence: Chance for +Endurance
Level 12: Hasten
- A: Invention: Recharge Reduction
- 36: Invention: Recharge Reduction
Level 14: Combat Jumping
- A: Reactive Defenses: Scaling Resist Damage
- 36: Shield Wall: +Res (Teleportation), +5% Res (All)
- 36: Luck of the Gambler: Defense/Increased Global Recharge Speed
- 37: Kismet: Accuracy +6%
Level 16: Super Jump
- A: Blessing of the Zephyr: Knockback Reduction (4 points)
Level 18: Spring Attack
- A: Force Feedback: Chance for +Recharge
- 37: Avalanche: Recharge/Chance for Knockdown
- 37: Avalanche: Accuracy/Damage
- 39: Avalanche: Damage/Endurance
- 39: Avalanche: Accuracy/Damage/Endurance
- 39: Avalanche: Accuracy/Damage/Recharge
Level 20: Cloak of Fear
- A: Cloud Senses: ToHit Debuff
- 40: Cloud Senses: Accuracy/ToHitDebuff
- 40: Cloud Senses: Accuracy/Recharge
- 40: Cloud Senses: ToHit Debuff/Endurance/Recharge
- 42: Cloud Senses: Accuracy/Endurance/Recharge
- 42: Cloud Senses: Chance for Negative Energy Damage
Level 22: Kick
- (Empty)
Level 24: Irradiated Ground
- A: Achilles' Heel: Chance for Res Debuff
- 42: Scirocco's Dervish: Chance of Damage(Lethal)
- 43: Scirocco's Dervish: Accuracy/Damage
- 43: Scirocco's Dervish: Damage/Endurance
- 43: Scirocco's Dervish: Accuracy/Damage/Endurance
- 45: Scirocco's Dervish: Damage/Recharge
Level 26: Tough
- A: Unbreakable Guard: Resistance/Endurance
- 45: Impervious Skin: Status Resistance/Regeneration
Level 28: Weave
- A: Luck of the Gambler: Defense/Increased Global Recharge Speed
- 45: Luck of the Gambler: Defense
Level 30: Atom Smasher
- A: Gauntleted Fist: RechargeTime/+Absorb
- 31: Gauntleted Fist: Accuracy/Damage
- 31: Gauntleted Fist: Damage/RechargeTime
- 31: Gauntleted Fist: Accuracy/Damage/RechargeTime
- 33: Gauntleted Fist: Damage/Endurance/RechargeTime
- 33: Gauntleted Fist: Accuracy/Damage/Endurance/RechargeTime
Level 32: Cloak of Darkness
- A: Luck of the Gambler: Defense/Increased Global Recharge Speed
- 50: Luck of the Gambler: Defense/Endurance
Level 35: Conserve Power
- (Empty)
Level 38: Soul Transfer
- A: Invention: Recharge Reduction
Level 41: Physical Perfection
- A: Power Transfer: Chance to Heal Self
Level 44: Super Speed
- A: Blessing of the Zephyr: Knockback Reduction (4 points)
Level 47: Fusion
- A: Gaussian's Synchronized Fire-Control: Chance for Build Up
──────────────────────────────Inherents:
Level 1: Gauntlet
Level 1: Brawl- (Empty)
Level 1: Sprint
- (Empty)
Level 2: Rest
- (Empty)
Level 1: Swift
- (Empty)
Level 1: Hurdle
- (Empty)
Level 1: Health
- A: Panacea: +Hit Points/Endurance
- 46: Numina's Convalesence: +Regeneration/+Recovery
- 46: Miracle: +Recovery
Level 1: Stamina
- A: Performance Shifter: Chance for +End
- 46: Performance Shifter: EndMod
- 48: Performance Shifter: EndMod/Recharge
- 48: Performance Shifter: EndMod/Accuracy/Recharge
- 48: Performance Shifter: EndMod/Accuracy
I am not a pro builder by any means. i tried to build this on a brute first and couldnt figure out how to push past like 75% on S/L. it was MUCH easier on Tanker.
What I'd like to accomplish (IF possible) is... figure out which incarnates to use, push up energy resist and max hp, try to maintain high recharge (it shows 300% because both FFprocs are active... trying to have spring attack as the main engager, if not i can go back to combat TP). there is an extra power slot and 2 enhance slots available and the epic pool power is not set in stone as im pretty sure the blue bar is fine without it.
any help is appreciated.
thanks
-
You will want something with -hp regen%... Like Beam Rifle. My first 50 Blaster was Beam/Dev (which i loved), followed up with a Beam/Temp... which is even better. stacking the regen debuff goes a long way on EBs and AVs, plus it fits hover blaster like a glove.
-
1
-
-
Thanks! Ill def tool around more. I wanted to see what kind of potential im looking at as im not super familiar with set IO slotting (this is my 2nd 50). I appreciate your time.
Cheers!
-
Scrolling through I don't believe i have seen DP/Fire Blaster. i think i have to powers set how id like it. I'm awful at set IOs if you would be so kind. The idea is Blapper oriented, Combat teleport in fire off PBAOEs combat teleport out(if needed) rinse repeat. Id like to have Hail of Bullets on as low a CD as possible and all 3 Positional Defenses at or near caps (I'm ok with chewing purple candies to reach it however) so i can reap maximum benefit from PBAOE Toggles. I chose the range attacks with KB/KD for Force Feedback procs... Beyond that I'm at a loss
Attached is the powers I'd like with 1 Caveat... I'm ok with Consume being dropped for Rise of the Phoenix if you can make endurance a non-issue. Just move Burn to Consume's slot and grab ROTP last.
Thanks in advance oh master of builds!
-
Never been a blaster guy... buuuuuut. I love Beam Rifle. corrupters/defenders... decided to try a Beam/Dev... Devices is AWESOME. My play style is Single Target from the air (I team mostly). Targeting Drone (easy insta-snipe, plus 80% dmg bonus on first attack, +20% dmg bonus always), Field Op (2x better base than stamina and invis and defense... it's amazing), Turrets (focus CDR and watch, some have posted having 3 perma and 4 out at once), Munitions epic... It is an absolute blast. I stayed away from the short range stuff (although im looking into caltrops as a proc hog). Point is, it is VERY versatile set.
-
1
-
1
-

Different Axe builds, but which to choose?
in Scrapper
Posted
the caveat here is that i havent done much solo with this combo, so YMMV.
I have been playing an Axe/Bio scrapper (originally had him as a rad armor figuring i could also bring a group heal to the party, but i died...alot... and it felt bad) it is surprisingly good. with offensive adapt and evolving armor, axe hits... so hard. you can accidently delete mobs with crits and weaken your dna siphon (use it first). blue bar hasnt been too big an issue since low levels thanks to using dna siphon, and FFbs in axe powers helps with keeping up shielding and siphon and parasitic. id say the weakest power is the dmg aura... but it also lowers incoming damage by 15% soooo.
bottom line, they have paired surprisingly well together.