

eugee
-
Posts
10 -
Joined
-
Last visited
Content Type
Profiles
Forums
Events
Store
Articles
Patch Notes
Posts posted by eugee
-
-
So this is the final fire farm I settled on after all of this knowledge I picked up here. I call it Burninator: Burnination, and I think it's grand! It's a standard shiva fragment patrol map (like Bloody Rainbow or others), with some tweaks:
-
Buffing Ally: Burninator is on the map solo at first. He will buff you with Fortitude, Painbringer, World of Pain, Accelerate Metabolism, Forge, and Temporal Selection (108.5% dmg, 45% to-hit, 15% def, 15% res, 60% rech, 800% rec, 150% reg, and 30% spd). As he has no powers that target foes, he won't freak out and run around when surrounded. He also has 90/45 fire def/res so he won't die, and while he doesn't summon pets (which would steal some xp/inf) he does double your melee limit by staying next to him. He takes no XP/Inf.
-
Clicky-to-Start: There is a chest on the ground to click which spawns in the patrols (and also completes the mission). This means you can let your ally buff you up, or get your alt securely stashed away in a safe spot, etc, before spawning in the patrols. You can even get the ally right in the middle of the map and run away to turn him blue again, then return to him after spawning, if that's your bag.
-
100% XP Enemies: At x8 each of the 16 patrols that spawn in will contain 4xBoss, 4xLieutenant, and 4xMinion, all of which give 100% xp. When running +4 the minions give me 5,664 inf, the Lts give 19,144, and the Bosses give 59,562. That's 5,147,160 influence per mission, or 25,735,800 per story arc cleared, plus whatever ehancements, recipies, and salvage drops.
-
High-Visibility Targets: Minions are tiny and solid white, Lts are medium and solid yellow, Bosses are large and solid orange.
-
All-Fire, All-the-Time: The foes all do fire damage, and fire damage only. No debuffs, no other damage. If you have 90% fire resist and 45% fire defense you are as safe as you're going to get.
So that's my fire farm I've been working on for some time now. I initially built it so I could have a leveling version of a fire farm with the ally, then as I got stronger I started turning the knobs to see what I could manage. I'm pretty proud of it, and want to share it with the community.
Burninator: Burnination by @ eugii #59930
-
-
I've really been fascinated with the AE stuff. This one is for a farm buff NPC for sure, but I've learned so much about mission building doing this, I've got some cool ideas cooking up that I'm excited to try!

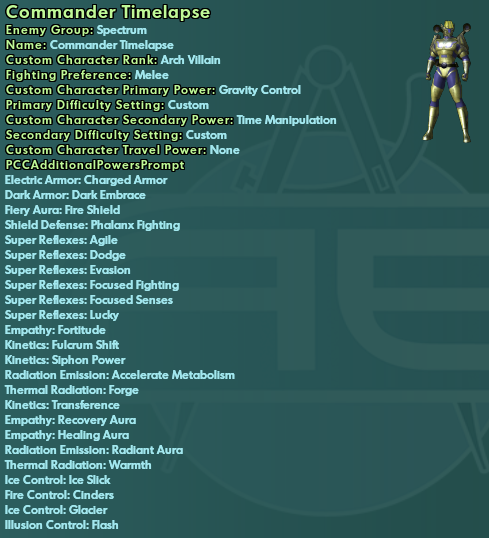
This monster here was the final result. His primary is gravity control (just the aoe hold) and time manipulation (it was the toggle I wanted most, plus saved the most non-toggle picks). Defensively he has 90% resist to smashing, lethal, and fire, plus 31% defense to melee/ranged/aoe. Then he has six +dmg powers (which give +end/rech/spd/etc also), four aoe heals, 4 aoe holds, and ice slick for hilarious knockdown fun.
He runs with all the self toggles just fine, and spams his click powers one after another, plus uses his time toggle. I can stick him an any S/L/F farm I make and he'll basically ensure you don't die (and won't die himself, either). Now to start planning an actual story arc!
-
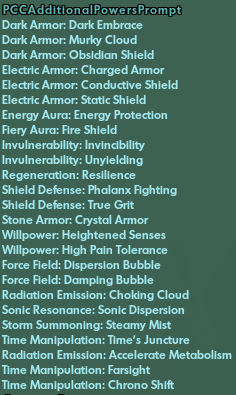
Weird replying to myself but in case someone is following this, so far it seems like he's using every one of the defensive powers I gave him. I went through and started a test mission with just one power added at a time and I could see the effects for them (all 3 dark armor, all 3 electric armor, by the time I got through invulnerability I got impatient and just loaded them all, and the massive overlap of sparkles, smoke, glinting armor, and crystals leads me to believe they are all loading).
Then I tried adding just Force_Field.Dispersion_Bubble and after he stood there letting a boss swing at him for about 60 seconds he FINALLY turned it on. I thought maybe it was just too many powers to pick from, so I removed all his powers in game, and left him with just Dispersion Bubble... same thing, he still let a guy attack him over and over and eventually he MIGHT turn it on. Next I tried giving him Dispersion Bubble in-game, and he immediately turned it on. Seems like it does not use Toggle Powers very well when added this way.
I noticed him using Accel Metab, Farsight, and Chrono Shift pretty regularly so maybe it's just clicks he will use reliably?
-
Wow thanks so much! This is fantastic! Would you share what the full power list for the ally in Dr. Meinst has?
EDIT - I got it working on my guy, though I probably went a little overboard:
The idea was that this guy will have 90%+ resist to almost all damage (75% toxic), and 30%+ defense to everything, then every PBAOE defender toggle, plus 3 extra PBAOEs (acc met, farsight, and chrono shift).
In testing him however he definitely wasn't using many if any of the defender toggles. It looked like he had at least Temp Invulnerability going so I'm going to apply toggles one at a time and see if he uses them, and hopefully find the limit of toggles he will run.
-
In the Dr. Meinst EB Farm by @TheZag, the ally has a ton of powers that he buffs you with, but it seems like they are from three or four different sets! How did he do that?
-
On 2/3/2024 at 2:28 AM, kelika2 said:
Those Stamina and Regeneration procs only effect you and only when you use said powers. So whenever you resummon your repair drone only you get the +regen. or if you use upgrade robots only you get +rec/regen
Mark of Supremacy's regen will be for your pets
Assault can be taken later. people praise it because they think they are adding like 15-200% damage because so many pets and team members but in reality its basically adding a DO's worth of damage, and for pets that have a low base damage is not much. maybe a travel power?
Force Bombs radius is smaller than other aoes. it sounds great on paper but you wont always hit max targets
Your epic pool can be switched to Mace Mastery for +smash/lethal defense and power boosted bubbles
Are you possibly thinking of Panacea & Preventive Medicine? Those are the procs and they are in Health. Tissue Regen, Numina's, and Miracle are all passive bonuses according to the planner.
I understand SMoS (plus SCotMM, ER, and CtA) all affect the pets only.
Assault is a relatively free 11% damage buff for everyone and every thing for the low cost of 0.27 end/s. I'm realistic about what it's doing. I did end up dropping Fighting to take Evasive Maneuvers (15% base defense) and a late Repulsion Bolt (3-slotted Overwhelming for 3% damage & KB2KD) for the -15% resist debuff.
Force Bomb is something to do with my endurance for the 4 minutes between bubbles, mostly.
I might change the epic pool down the road but right now I like the Force Field theme and I'm tight on power slots anyway lolThanks for the feedback!
-
 1
1
-
-
8 hours ago, Swiftly said:
I want to try this for sure. Anyway to fit Hover and fly in earlier for leveling?
Yeah you can push back Leaping or Leadership to pick them up earlier. At one point I had group fly by 16 and it was fun but I wanted to try out the buffs earlier and I use a rocket board to travel instead. -
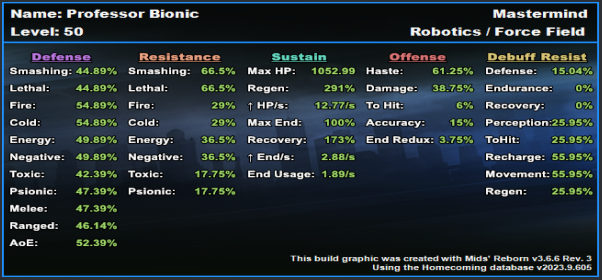
I think I got this fixed finally! So this is my first attempt in over a decade to plan/build a full character out completely, while also learning as much of the new stuff as I could!
I do tend to play mostly solo or with just a couple buddies on weekends so I was interested in picking up the direct powers to supplement something to do between bubbling. I spent a long time examining and experimenting with the set bonuses (and then discovered the >cap 5< issue after spamming Shield Wall (5)'s +2.5% damage all over the place, lol!
This is about as much +DMG as I could pack on the build, while also picking up every unique enhance that seemed important. Main goals were to pick up all for pet boosts (SCotMM, SMoS, CtA, Exp.Rein.), all 5 healing uniques (plus another heal with Numina for the extra 2-piece regen), the 3 Defense uniques, and the 3 Resist Damage uniques I liked.
-
Professor Bionic - Hero Mastermind
Build plan made with Mids' Reborn v3.6.6 rev. 3
──────────────────────────────- Primary powerset: Robotics
- Secondary powerset: Force Field
- Pool powerset (#1): Flight
- Pool powerset (#2): Leaping
- Pool powerset (#3): Leadership
- Pool powerset (#4): Fighting
- Epic powerset: Field Mastery
──────────────────────────────
Powers taken:
Level 1: Pulse Rifle Blast
- A: Superior Winter's Bite: Accuracy/Damage
- 19: Superior Winter's Bite: Damage/RechargeTime
- 19: Superior Winter's Bite: Accuracy/Damage/Endurance
- 21: Superior Winter's Bite: Accuracy/Damage/Recharge
- 21: Superior Winter's Bite: Damage/Endurance/Accuracy/RechargeTime
- 27: Superior Winter's Bite: Recharge/Chance for -Speed & -Recharge
Level 1: Deflection Shield
- A: Shield Wall: Defense/Endurance
- 34: Shield Wall: Defense/Recharge
- 36: Shield Wall: Endurance/Recharge
- 36: Shield Wall: Defense/Endurance/Recharge
- 36: Shield Wall: Defense
- 50: Luck of the Gambler: Defense/Increased Global Recharge Speed
Level 2: Battle Drones
- A: Superior Command of the Mastermind: Accuracy/Damage
- 3: Superior Command of the Mastermind: Damage/Endurance
- 3: Superior Command of the Mastermind: Accuracy/Damage/Recharge
- 5: Superior Command of the Mastermind: Damage/Endurance/Recharge
- 5: Superior Command of the Mastermind: Accuracy/Damage/Endurance/Recharge
- 7: Superior Command of the Mastermind: Recharge/Pet +AoE Defense Aura
Level 4: Pulse Rifle Burst
- A: Apocalypse: Damage
- 33: Apocalypse: Damage/Recharge
- 33: Apocalypse: Damage/Recharge/Accuracy
- 33: Apocalypse: Recharge/Accuracy
- 34: Apocalypse: Damage/Endurance
- 34: Apocalypse: Chance of Damage(Negative)
Level 6: Equip Robot
- A: Steadfast Protection: Resistance/+Def 3%
Level 8: Photon Grenade
- A: Superior Frozen Blast: Accuracy/Damage
- 9: Superior Frozen Blast: Damage/Endurance
- 9: Superior Frozen Blast: Accuracy/Damage/Endurance
- 11: Superior Frozen Blast: Accuracy/Damage/Recharge
- 11: Superior Frozen Blast: Damage/Endurance/Accuracy/RechargeTime
- 17: Superior Frozen Blast: Recharge/Chance for Immobilize
Level 10: Insulation Shield
- A: Shield Wall: Defense/Endurance
- 37: Shield Wall: Defense/Recharge
- 37: Shield Wall: Endurance/Recharge
- 37: Shield Wall: Defense/Endurance/Recharge
- 39: Shield Wall: Defense
Level 12: Protector Bots
- A: Soulbound Allegiance: Damage
- 13: Soulbound Allegiance: Damage/Recharge
- 13: Soulbound Allegiance: Damage/Endurance
- 15: Soulbound Allegiance: Damage/Recharge/Accuracy
- 15: Expedient Reinforcement: Resist Bonus Aura for Pets
- 17: Call to Arms: Defense Bonus Aura for Pets
Level 14: Maneuvers
- A: Shield Wall: Defense/Endurance
- 42: Shield Wall: Defense/Recharge
- 42: Shield Wall: Endurance/Recharge
- 42: Shield Wall: Defense/Endurance/Recharge
- 43: Shield Wall: Defense
- 50: Luck of the Gambler: Defense/Increased Global Recharge Speed
Level 16: Assault
- A: Invention: Endurance Reduction
Level 18: Maintenance Drone
- A: Regenerative Tissue: +Regeneration
Level 20: Dispersion Bubble
- A: Shield Wall: Defense/Endurance
- 39: Shield Wall: Defense/Recharge
- 39: Shield Wall: Endurance/Recharge
- 40: Shield Wall: Defense/Endurance/Recharge
- 40: Shield Wall: Defense
- 43: Shield Wall: +Res (Teleportation), +5% Res (All)
Level 22: Assault Bot
- A: Superior Mark of Supremacy: Damage
- 23: Superior Mark of Supremacy: Damage/Endurance
- 23: Superior Mark of Supremacy: Accuracy/Damage
- 25: Superior Mark of Supremacy: Accuracy/Endurance
- 25: Superior Mark of Supremacy: Accuracy/Damage/Endurance
- 27: Superior Mark of Supremacy: Endurance/Pet +Resist +Regen
Level 24: Combat Jumping
- A: Reactive Defenses: Defense
- 46: Reactive Defenses: Defense/Endurance
- 48: Reactive Defenses: Endurance/RechargeTime
- 48: Reactive Defenses: Defense/RechargeTime
- 48: Reactive Defenses: Defense/Endurance/RechargeTime
- 50: Reactive Defenses: Scaling Resist Damage
Level 26: Upgrade Robot
- A: Numina's Convalesence: +Regeneration/+Recovery
- 40: Numina's Convalesence: Heal
Level 28: Force Bomb
- A: Overwhelming Force: Accuracy/Damage
- 29: Overwhelming Force: Endurance/Recharge
- 29: Overwhelming Force: Accuracy/Damage/Endurance
- 31: Overwhelming Force: Damage/Endurance/Recharge
- 31: Overwhelming Force: Accuracy/Damage/Endurance/Recharge
- 31: Overwhelming Force: Damage/Chance for Knockdown/Knockback to Knockdown
Level 30: Damping Bubble
- A: Luck of the Gambler: Defense/Increased Global Recharge Speed
Level 32: Kick
- A: Superior Blistering Cold: Recharge/Chance for Hold
Level 35: Temp Invulnerability
- A: Gladiator's Armor: TP Protection +3% Def (All)
Level 38: Tough
- A: Unbreakable Guard: +Max HP
Level 41: Weave
- A: Shield Wall: Defense/Endurance
- 45: Shield Wall: Defense/Recharge
- 45: Shield Wall: Endurance/Recharge
- 46: Shield Wall: Defense/Endurance/Recharge
- 46: Shield Wall: Defense
Level 44: Hover
- A: Kismet: Accuracy +6%
Level 47: Fly
- A: Blessing of the Zephyr: Knockback Reduction (4 points)
Level 49: Group Fly
- A: Freebird: Endurance
──────────────────────────────Inherents:
Level 1: Supremacy
Level 1: Brawl- (Empty)
Level 1: Sprint
- (Empty)
Level 2: Rest
- (Empty)
Level 1: Swift
- (Empty)
Level 1: Hurdle
- (Empty)
Level 1: Health
- A: Miracle: +Recovery
- 43: Panacea: +Hit Points/Endurance
- 45: Preventive Medicine: Chance for +Absorb
Level 1: Stamina
- A: Performance Shifter: EndMod
- 7: Performance Shifter: Chance for +End
Level 16: Afterburner
Level 2: Battle Drone
Level 12: Protector Bot
Level 22: Assault Bot
Energy/Energy/Force Build Plan
in Blaster
Posted · Edited by eugee
I'm planning out my E/E/F blaster build and this is what I'm looking at. Anything I'm missing that's important?
Doctor Hadron - Hero Blaster
Build plan made with Mids' Reborn v3.6.6 rev. 3
──────────────────────────────
──────────────────────────────
Powers taken:
Level 1: Power Blast
Level 1: Power Thrust
Level 2: Energy Torrent
Level 4: Build Up
Level 6: Power Burst
Level 8: Sniper Blast
Level 10: Hover
Level 12: Aim
Level 14: Fly
Level 16: Energize
Level 18: Hasten
Level 20: Evasive Maneuvers
Level 22: Explosive Blast
Level 24: Kick
Level 26: Nova
Level 28: Tough
Level 30: Weave
Level 32: Maneuvers
Level 35: Tactics
Level 38: Personal Force Field
Level 41: Temp Invulnerability
Level 44: Force of Nature
Level 47: Group Fly
Level 49: Assault
──────────────────────────────
Inherents:
Level 1: Defiance
Level 1: Brawl
Level 1: Sprint
Level 2: Rest
Level 1: Swift
Level 1: Hurdle
Level 1: Health
Level 1: Stamina
Level 49: Quick Form
Level 32: Afterburner
Reaches 46.27% ranged defense, 30 melee and 32 aoe as incidentals. Has lots of +dmg in set bonuses.