

Senkan
-
Posts
28 -
Joined
-
Last visited
Content Type
Profiles
Forums
Events
Store
Articles
Patch Notes
Posts posted by Senkan
-
-
2 hours ago, Thrax said:
I still farm on my ss/fire brute form when this fired back up. It still does fine. Get killed a bit here and there if not paying attention just a bit more than before the "nerfs", which I still don't get what it does with farming. Also, very rarely ever farm anymore at all. Only if I make a new toon and wanna skip to 27 or something for IO slots. I'm sure a fire/ or /rad SS tank would be just fine too.
The difference that I see is that you now have 20 or so foes firing ranged attacks at you while the normal 16 or so are in melee. Tanks are better farmers now. Lot of brutes don't have the regen to survive and their max damaged buff was nerfed. The go to farmers get defeated when they run into the middle of an AFK farm (Spine/Fire, Rad/Fire Brutes).
-
After getting a Rad/Stone Brute up to veteran level 50+ and a Stone/Rad tank up to almost veteran level 20 it's obvious the tank is better at AFK farming. I thought Fury would make the difference but it didn't.. I was able to build in Musculature Alpha and added Hasten. Hasten might only work for 2 minutes but on a 5 minute farm that's +28% more recharge on average (14% for 10 minute farm). Biggest problem with this build is endurance and with end modification in Musculature Alpha, 3 Performance +END IO's, and conserve power things seem to work.
I'd like everyone to look over this build and let me know if you see anything that can be improved. Also if you have a build that you think is better please post it.
-
Here's a Stone/Rad fire farm build. Turn off your auto on Atom Smasher when not in the mission or it can crash the end after awhile.
-
9 minutes ago, SeraphimKensai said:
You're welcome to try, although you won't need to if you give it decent slotting. Besides, I have quite a bit of real-life PvP experience, but I'm usually always up for an MMA sparring match.
My first thought was Ill/Earth for more control but savage should get the job done.
BTW I have zero real life PVP experience. It's a benefit of being 6'5" 270. I'm usually the one breaking up the fights.
-
8 hours ago, SeraphimKensai said:
I personally rolled Ill/Savage/Ice and it works wonders. You get Recharge from Savage which makes PA easier to Perma, and sleet debuffs mobs resistances making PA hit harder.
As I've said before, I considered Ill/sonic/ice for more -res as well.
Alright Seraphimsensai...I just made an Illusion/Savage Dom named Under the Bed. Better be good or I'm comin for ya.
-
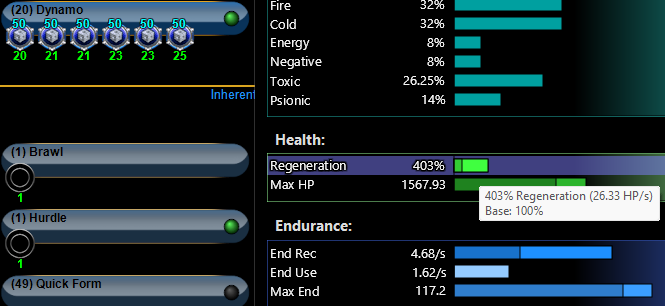
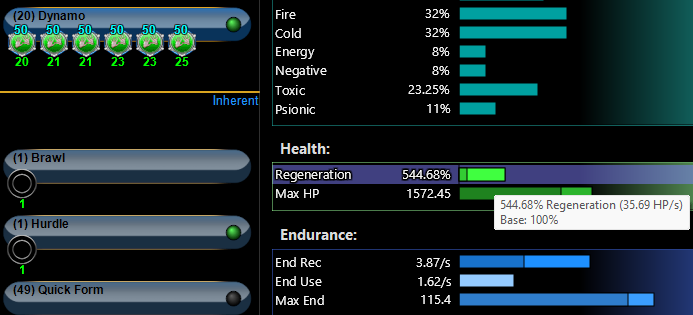
1 hour ago, Nemu said:
Let's run through the numbers. Screenshots reflect all 4 accolades

With Preemptive you get 26.33 hp/s and 4.68 end/s, and 3.75% more global recharge
With Numina you get 35.69 HP/s and 3.87 end/s and 5 more max HP
In the end I favored pre-emptive because I don't think the extra 10hp/sec regen will help me on a high defense/low resist build, because those moments when I really need regen are the moments I'm most likely to just pop a green. Whereas the extra recovery and recharge helps me more offensively so I don't have to use powersink as often.
However, there's nothing wrong with trying that Numina configuration out. If it works for you great! If you change your mind you can always use those unslotters.
I see your point. But alternatively you could pop a blue just as easy as a green. I'm going to have to play the build to see what works best for me. Thanks for the build and the reply.
-
8 hours ago, Nemu said:
I had a few people ping me for page 5 updates. It's a slight update with power pick shuffles. Getting Inferno at level 26 makes this build even more exemp friendly. I still kept Electric Fence for an immob vs AVs that love to run. so no major changes other than moving some stuff up earlier in the progression.
This Hero build was built using Mids Reborn 3.4.7
https://github.com/LoadedCamel/MidsRebornClick this DataLink to open the build!
Jezebel Delias i27 P5: Level 49 Mutation Blaster
Primary Power Set: Fire Blast
Secondary Power Set: Electricity Manipulation
Power Pool: Leaping
Power Pool: Speed
Power Pool: Fighting
Power Pool: Leadership
Ancillary Pool: Mace MasteryHero Profile:
Level 1: Flares- (A) Superior Defiant Barrage - Accuracy/Damage
- (40) Superior Defiant Barrage - Damage/RechargeTime
- (42) Superior Defiant Barrage - Accuracy/Damage/RechargeTime
- (42) Superior Defiant Barrage - Accuracy/Damage/Endurance
- (42) Superior Defiant Barrage - Accuracy/Damage/Endurance/RechargeTime
- (43) Superior Defiant Barrage - RechargeTime/+Status
Level 1: Charged Brawl
- (A) Superior Blistering Cold - Accuracy/Damage
- (9) Superior Blistering Cold - Damage/Endurance
- (9) Superior Blistering Cold - Accuracy/Damage/Endurance
- (11) Superior Blistering Cold - Damage/Endurance/Accuracy/RechargeTime
- (11) Superior Blistering Cold - Recharge/Chance for Hold
Level 2: Fire Ball
- (A) Artillery - Accuracy/Damage
- (3) Artillery - Damage/Endurance
- (3) Artillery - Damage/Recharge
- (5) Artillery - Accuracy/Damage/Recharge
- (7) Artillery - Accuracy/Recharge/Range
- (7) Artillery - Endurance/Recharge/Range
Level 4: Combat Jumping
- (A) Luck of the Gambler - Defense/Increased Global Recharge Speed
- (5) Kismet - Accuracy +6%
Level 6: Super Speed
- (A) Blessing of the Zephyr - Knockback Reduction (4 points)
- (13) Winter's Gift - Slow Resistance (20%)
Level 8: Hasten
- (A) Recharge Reduction IO
- (13) Recharge Reduction IO
Level 10: Kick
- (A) Empty
Level 12: Aim
- (A) Gaussian's Synchronized Fire-Control - Chance for Build Up
Level 14: Tough
- (A) Steadfast Protection - Resistance/+Def 3%
- (15) Gladiator's Armor - TP Protection +3% Def (All)
Level 16: Thunder Strike
- (A) Superior Avalanche - Accuracy/Damage
- (17) Superior Avalanche - Damage/Endurance
- (17) Superior Avalanche - Accuracy/Damage/Endurance/Recharge
- (48) Armageddon - Chance for Fire Damage
- (48) Sudden Acceleration - Knockback to Knockdown
- (49) Force Feedback - Chance for +Recharge
Level 18: Blaze
- (A) Superior Winter's Bite - Accuracy/Damage
- (19) Superior Winter's Bite - Accuracy/Damage/Endurance
- (19) Superior Winter's Bite - Accuracy/Damage/Recharge
- (25) Superior Winter's Bite - Damage/Endurance/Accuracy/RechargeTime
- (27) Superior Winter's Bite - Recharge/Chance for -Speed & -Recharge
Level 20: Dynamo
- (A) Preemptive Optimization - Accuracy/Recharge
- (21) Preemptive Optimization - EndMod/Endurance
- (21) Preemptive Optimization - EndMod/Recharge
- (23) Preemptive Optimization - EndMod/Accuracy/Endurance
- (23) Preemptive Optimization - EndMod/Accuracy/Recharge
- (25) Preemptive Optimization - EndMod/Endurance/Recharge
Level 22: Blazing Bolt
- (A) Sting of the Manticore - Accuracy/Damage
- (39) Sting of the Manticore - Damage/Endurance
- (39) Sting of the Manticore - Accuracy/Interrupt/Range
- (39) Sting of the Manticore - Damage/Endurance/Recharge
- (40) Sting of the Manticore - Chance of Damage(Toxic)
Level 24: Weave
- (A) Luck of the Gambler - Defense/Increased Global Recharge Speed
- (27) Shield Wall - Defense/Endurance
- (47) Shield Wall - Defense
- (48) Shield Wall - +Res (Teleportation), +5% Res (All)
Level 26: Inferno
- (A) Superior Blaster's Wrath - Accuracy/Damage
- (31) Superior Blaster's Wrath - Damage/Recharge
- (34) Superior Blaster's Wrath - Accuracy/Damage/Recharge
- (37) Superior Blaster's Wrath - Accuracy/Damage/Endurance
- (37) Superior Blaster's Wrath - Accuracy/Damage/Endurance/Recharge
- (37) Superior Blaster's Wrath - Recharge/Chance for Fire Damage
Level 28: Power Sink
- (A) Preemptive Optimization - Accuracy/Recharge
- (29) Preemptive Optimization - EndMod/Endurance
- (29) Preemptive Optimization - EndMod/Recharge
- (31) Preemptive Optimization - EndMod/Accuracy/Endurance
- (34) Preemptive Optimization - EndMod/Accuracy/Recharge
- (34) Preemptive Optimization - EndMod/Endurance/Recharge
Level 30: Maneuvers
- Hamidon Origin:Cytoskeleton Exposure
Level 32: Force of Thunder
- (A) Absolute Amazement - Stun/Recharge/Accuracy
- (33) Absolute Amazement - Recharge/Accuracy
- (33) Sudden Acceleration - Knockback to Knockdown
- (33) Force Feedback - Chance for +Recharge
Level 35: Scorpion Shield
- (A) Luck of the Gambler - Defense/Increased Global Recharge Speed
- (36) Reactive Defenses - Defense
- (36) Reactive Defenses - Defense/Endurance
- (36) Reactive Defenses - Scaling Resist Damage
Level 38: Shocking Grasp
- (A) Hecatomb - Damage/Recharge/Accuracy
- (40) Hecatomb - Damage/Endurance
- (43) Hecatomb - Chance of Damage(Negative)
- (43) Unbreakable Constraint - Chance for Smashing Damage
- (46) Ghost Widow's Embrace - Chance of Damage(Psionic)
- (47) Neuronic Shutdown - Chance of Damage(Psionic)
Level 41: Tactics
- (A) Endurance Reduction IO
Level 44: Rain of Fire
- (A) Artillery - Accuracy/Damage
- (45) Artillery - Damage/Endurance
- (45) Artillery - Damage/Recharge
- (45) Artillery - Accuracy/Damage/Recharge
- (46) Artillery - Accuracy/Recharge/Range
- (46) Artillery - Endurance/Recharge/Range
Level 47: Electric Fence
- Hamidon Origin:Endoplasm Exposure
Level 49: Build Up
- (A) Rectified Reticle - To Hit Buff/Recharge
- (49) Rectified Reticle - To Hit Buff
Level 1: Brawl
- (A) Empty
Level 1: Defiance
Level 1: Sprint| Copy & Paste this data into Mids Reborn : Hero Designer to view the build | |-------------------------------------------------------------------| |MxDz;1673;753;1506;HEX;| |78DA65945B4F134114C7FFDBDD5A402A60B95F5B10AD2D5D90047D32215CAA429B1| |0F900A4B62BACD6B6694B22BEFBAE466322A03E7AFD14BE6AD4E8A36F3E0B263E78| |41B39EEDD92383DD64777F33E73233FF9933E9EB73CD6F5EA7A6A10567F3994A656| |586BE55ABDC905EAF66AA76B1007A3A16AC1BD6252B1F9EB3F276A612B627CF8497| |A60264E9F1DC572E660AAB56CE4CDA658B5344C5B2BC5E2A15CB55733E6F65AB653| |B6B573756D299825D5ACFF300CD4BC562DE4C5999925D586DAA35964B96950BD630| |69AFAE55C9D0225E39AB5C59B34B3DF3253B6BCA20E94CD6A28FCB1BDD34AF08BDD| |3EED435C8E3F8E96300A70C9C80C670123E015DC06088C1CF60FD97867A6FB1A501| |B705EE3034E1AEC03D861937589D8406DD5FB3F86008F8190C1C623884804003432| |789AD2B69341D1D9A17F4873A060C8C908B5F75F1E393AFE6D28C3EBD06C3E41250| |5D0288C373F1C0472E8DD877A186430FE6A971785F06871A4F297BBB019D22826AD| |220BAB4DA8C8E6092C7BD42FD2DFB2A38FE166CB13CADD81678CC308EB33E0F3E73| |CF046E724F9262DBD49D68C31376398A6702CF19BAF182A1172F192E534848DD891| |0BEB3A51D3F047E3274E297C09EE4FBCD70CEAD0775121D78CBD21DC73B81F7021F| |E01DB88F0C0689D5A544EB5DB28FBD48BA6235C2C402C3381659BEF36EA1A933EFC| |103B60C629321822D8663D8167828F088E12AC5F669FFF6D0F1F78900FD2240BF08| |3028024444808808D0464B1850F77B4096308829EA08E8B0E937A41C167D0829DEC| |230D202DEEE866577F75A8161559A61C93B821D566404BB02DF784D79F21C55A519| |45D4E7491EF379851C17B8C090C0354E6C22C32735446B8A2A6910ADDD20E4324BB| |FB83A405CEA774CEA774CEA774CEA3721F59B90FACD51ACA90E60E2B47B1DE958A3| |DF845270DA04B6689A21F7DC6F32F41B501FC77DDD9A8C18076F262755EFD8C84B5| |E32544FB2689CE24BD3C114F42678E1BBF596086BBE536F8972CCD77ACB7D1EFF55| |8C2E27657C67317670D9CE5FCA47D2DF| |-------------------------------------------------------------------|
@nemu I'm thinking of replacing the Preemptive Optimization set in Dynamo and replacing it a Numina Convalescence set. I haven't played the build yet but it seems that endurance won't be a problem with Power Sink. So this change trades a little recharge for a good bit of regeneration. This makes sense to me (on paper) but do you think it's a good trade off?
-
After thinking of making an illusion/Martial range focused build and hearing Phantasm was dying a lot I thought maybe more crowd control secondary could keep him alive so I'm going with /Earth.
Problem is I've been looking for a build for reference and can't find any and would appreciate directing me to any already posted. If there's nothing out there maybe we can start a discussion on a build that works.
I'm probably going Ice mastery for Hibernate and sleet.
-
Ya know...some people have different reasons for playing this game. Min-maxers are a part of the community. If someone comes on a forum and asks for help don't you think it's better to offer help or just not respond instead of directing that person to do what you want to do or think should be done? That's making his/her game experience worse not better.
-
 1
1
-
-
Old thread but I can't find the answer to can Enflame be used on Phantom Army. My guess is no but I'd like to know before I invest in the power.
-
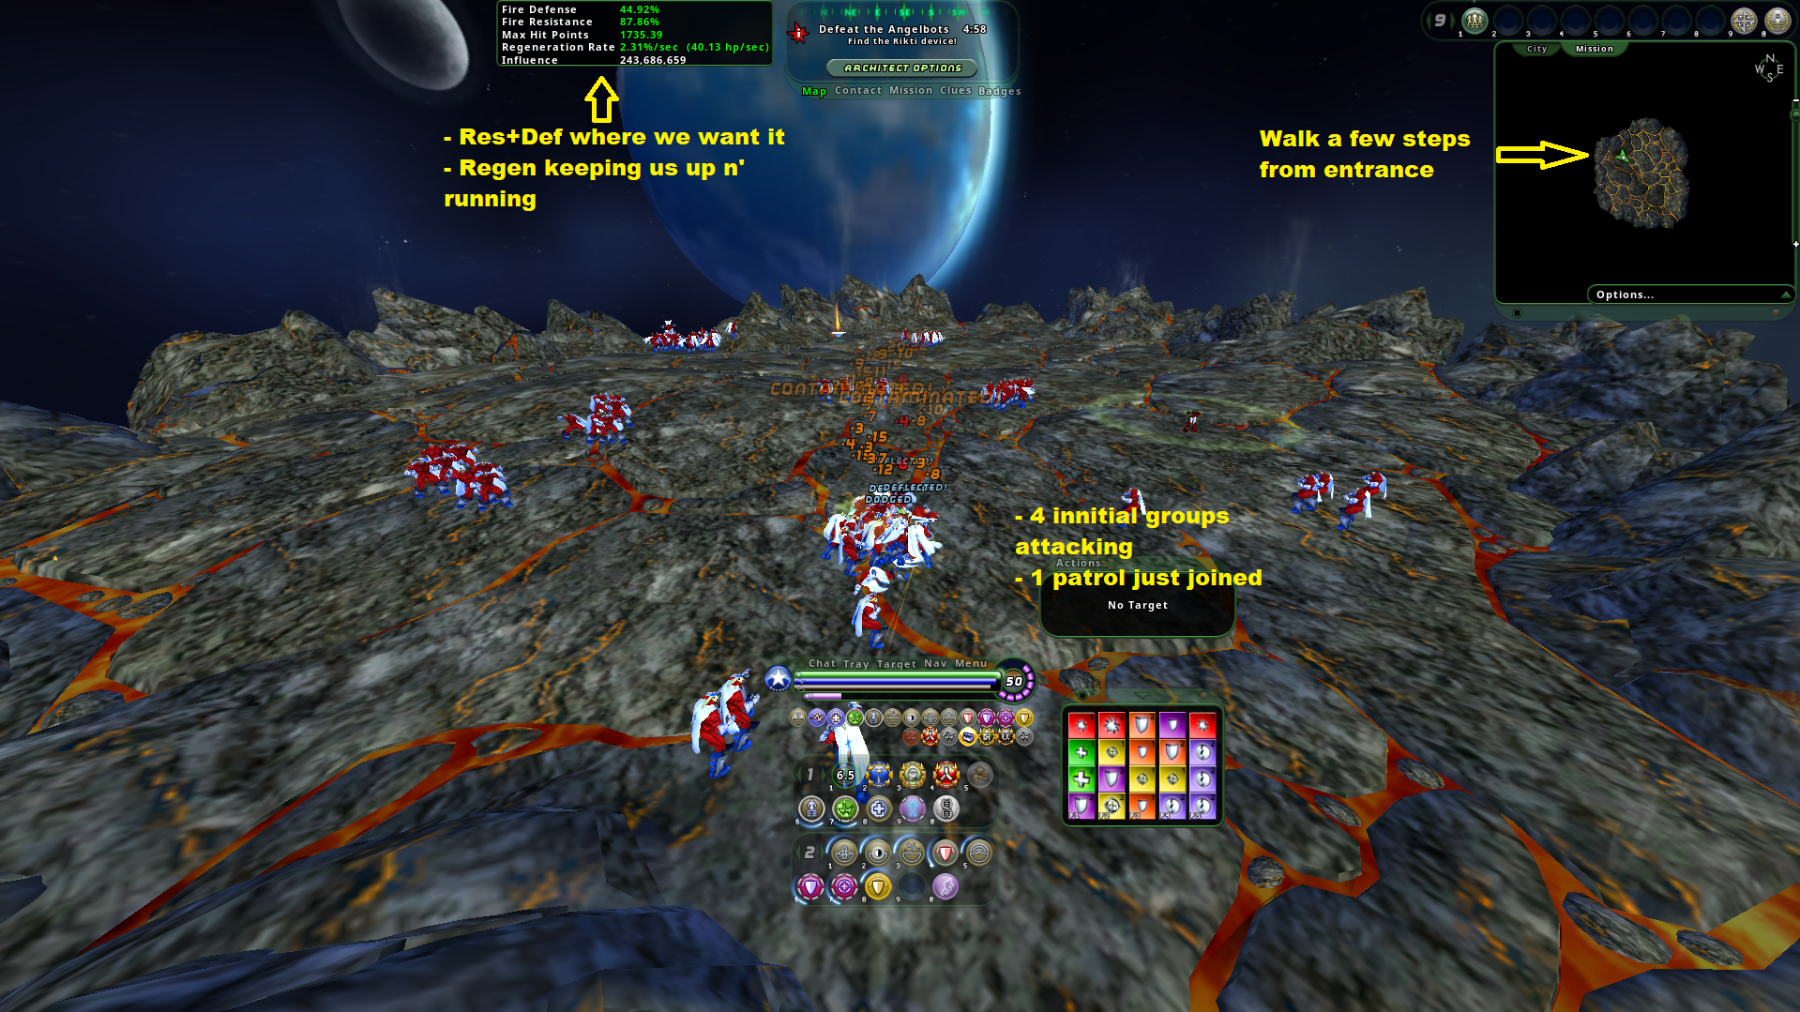
On 3/1/2023 at 5:23 AM, Crowcus Pocus said:
That's odd. Even without incarnates my brutes do just fine (although getting to T3 asap does make things smoother). Two things come to mind:
1) Check your fire defense and resistance before you jump in. You should have ~45% and 88% respectively. If not, then you might be missing a toggle or maybe didn't upgrade your winter set to superior.2) Don't jump to the middle of the map right away. What I typically do is I enter the mission and then I just walk a bit forward or to the sides. By doing this I get the attention of 3-4 groups but not overaggro to the point where my regen/heal procs can't keep me alive. As things die, other patrols will join the party but not to the point of getting you killed.
Hope this helps.
Not going to far into the mission was the key. My spine/fire brute can even AFK farm when doing this.
-
On 2/22/2023 at 10:14 AM, Crowcus Pocus said:
UPDATE: Made a few corrections to the build:
- Numina's +Reg/Recovery moved to an auto-power
- Added Unbreakable Guard +7,5% HP for slightly better hp/s
- Traded Hasten for Concealment Pool for more efficient mule slotting
Updated build attached to this post.
I took the Imperium Armor Psi resistance slot and put it on Crystal armor and put a Power Transfer Chance to heal. I then took out the Power Transfer end mod out off Stamina and put that slot into Physical Perfection and put another Power Transfer Chance to heal. Hoping since this is an AFK build end use won't be a problem. And you get an additional 150 HP ever 20 seconds. I'm hoping the T3 alpha with level increase will make the difference.
-
 2
2
-
14 hours ago, Crowcus Pocus said:
That's odd. Even without incarnates my brutes do just fine (although getting to T3 asap does make things smoother). Two things come to mind:
1) Check your fire defense and resistance before you jump in. You should have ~45% and 88% respectively. If not, then you might be missing a toggle or maybe didn't upgrade your winter set to superior.2) Don't jump to the middle of the map right away. What I typically do is I enter the mission and then I just walk a bit forward or to the sides. By doing this I get the attention of 3-4 groups but not overaggro to the point where my regen/heal procs can't keep me alive. As things die, other patrols will join the party but not to the point of getting you killed.
Hope this helps.
I took all the IOs off the Brute and put them on the Tanker. Maybe I'll do another respec and try out the Brute again. I only had T2 Alpha when I ran it. My build is a little different than yours so I'll look into updating it. Maybe I'll try Agility Alpha like with the tank.
-
1
-
-
On 11/7/2022 at 7:04 AM, Zepp said:
My first toon and main since live is Ill/Storm...
Same here. I made my Ill/Storm in June of 2004. Dark Oasis. Glad he's back.
-
On 2/22/2023 at 11:40 AM, Crowcus Pocus said:
Yeah, that too! Just noticed I left it off in my tank build as well.Crowcus Pocus I tried the Rad/Stone Brute hoping it would live in a solo farm. It's didn't. I had tier 2 Alpha when I gave it a try. It worked OK with another farmer but solo it was tough. I'm farming up a Stone/Rad tank with the same hope.
-
I tweaked your stone/rad build. Not much of a change.
This Hero build was built using Mids Reborn 3.4.6
https://github.com/LoadedCamel/MidsRebornClick this DataLink to open the build!
Comet Empire: Level 50 Magic Tanker
Primary Power Set: Stone Armor
Secondary Power Set: Radiation Melee
Power Pool: Fighting
Power Pool: Leaping
Power Pool: Leadership
Power Pool: Speed
Ancillary Pool: Energy MasteryHero Profile:
Level 1: Stone Skin -- LucoftheG-Def/Rchg+(A), GldArm-3defTpProc(3), Ags-EndRdx/Rchg(3), Ags-ResDam/EndRdx(5), Ags-ResDam/Rchg(5), UnbGrd-Max HP%(50)
Level 1: Contaminated Strike -- SprMghoft-Acc/Dmg(A), SprMghoft-Dmg/Rchg(7), SprMghoft-Acc/Dmg/Rchg(7), SprMghoft-Dmg/EndRdx/Rchg(9)
Level 2: Rock Armor -- LucoftheG-Def/Rchg+(A)
Level 4: Earth's Embrace -- Pnc-Heal/EndRedux(A), Pnc-EndRdx/Rchg(19), Pnc-Heal/Rchg(21), Pnc-Heal/EndRedux/Rchg(21), Pnc-Heal(23)
Level 6: Mud Pots -- Erd-%Dam(A), ScrDrv-Dam%(23), Obl-%Dam(25), ImpSwf-Dam%(25), IceMisTrmt-+ColdDmg(27), FuroftheG-ResDeb%(27)
Level 8: Rooted -- Prv-Heal(A), Prv-Heal/EndRdx(29), Prv-EndRdx/Rchg(29), Prv-Heal/Rchg(31), Prv-Heal/Rchg/EndRdx(31), Prv-Absorb%(31)
Level 10: Boxing -- AbsAmz-Stun(A), AbsAmz-Stun/Rchg(33), AbsAmz-Acc/Stun/Rchg(33), AbsAmz-Acc/Rchg(33), AbsAmz-EndRdx/Stun(34)
Level 12: Crystal Armor -- PwrTrns-+Heal(A)
Level 14: Combat Jumping -- Ksm-ToHit+(A)
Level 16: Tough -- Ags-ResDam/Rchg(A), Ags-EndRdx/Rchg(34), Ags-ResDam/EndRdx/Rchg(34)
Level 18: Minerals -- LucoftheG-Def/Rchg+(A)
Level 20: Weave -- Rct-ResDam%(A), Rct-Def(36), Rct-Def/EndRdx(36), Rct-Def/EndRdx/Rchg(36), Rct-EndRdx/Rchg(37), Rct-Def/Rchg(37)
Level 22: Proton Sweep -- Arm-Dmg/EndRdx(A), Arm-Dmg(37), Arm-Dmg/Rchg(39), Arm-Acc/Dmg/Rchg(39), Arm-Acc/Rchg(39)
Level 24: Maneuvers -- LucoftheG-Def/Rchg+(A)
Level 26: Brimstone Armor -- Ags-ResDam/EndRdx(A), Ags-EndRdx/Rchg(40), Ags-ResDam/EndRdx/Rchg(40), StdPrt-ResDam/Def+(40)
Level 28: Irradiated Ground -- AchHee-ResDeb%(A), TchofLadG-%Dam(42), ShlBrk-%Dam(42), Erd-%Dam(42), Obl-%Dam(43), ScrDrv-Dam%(43)
Level 30: Tactics -- GssSynFr--Build%(A)
Level 32: Granite Armor -- ImpSki-Status(A)
Level 35: Conserve Power -- Empty(A)
Level 38: Atom Smasher -- PrfZng-Dam%(A), Arm-Dam%(43), Erd-%Dam(45), Obl-%Dam(45), ScrDrv-Dam%(45), AchHee-ResDeb%(46)
Level 41: Physical Perfection -- PwrTrns-+Heal(A), PwrTrns-EndMod(46), PrfShf-End%(46)
Level 44: Vengeance -- LucoftheG-Def/Rchg+(A)
Level 47: Energy Torrent -- SprFrzBls-Acc/Dmg/Rchg(A), SprFrzBls-Rchg/ImmobProc(48), SprFrzBls-Dmg/EndRdx/Acc/Rchg(48), SprFrzBls-Acc/Dmg/EndRdx(48), SprFrzBls-Dmg/EndRdx(50), SprFrzBls-Acc/Dmg(50)
Level 49: Hasten -- RechRdx-I(A)
Level 1: Gauntlet
Level 1: Brawl -- Hct-Dmg(A), Hct-Dmg/Rchg(9), Hct-Acc/Dmg/Rchg(11), Hct-Acc/Rchg(11), Hct-Dmg/EndRdx(13)
Level 1: Sprint -- Empty(A)
Level 2: Rest -- Empty(A)
Level 1: Swift -- Empty(A)
Level 1: Hurdle -- Empty(A)
Level 1: Health -- Pnc-Heal/+End(A), Mrc-Rcvry+(13), NmnCnv-Regen/Rcvry+(15), NmnCnv-Heal(15), NmnCnv-Heal/Rchg(17)
Level 1: Stamina -- PwrTrns-+Heal(A), PwrTrns-EndMod(17), PrfShf-End%(19)
Level 50: Degenerative Radial Flawless Interface
Level 50: Ageless Core Epiphany
Level 50: Assault Radial Embodiment
Level 50: Banished Pantheon Radial Superior Ally
Level 50: Agility Core Paragon
-------------
1
-
-
This can be used to farm. Believe it or not.
Hero Plan by Mids' Hero Designer 1.962
Click this DataLink to open the build!
Woe: Level 50 Magic Blaster
Primary Power Set: Archery
Secondary Power Set: Mental Manipulation
Power Pool: Speed
Power Pool: Leaping
Power Pool: Fighting
Power Pool: Flight
Ancillary Pool: Cold Mastery
Hero Profile:
Level 1: Aimed Shot -- Dcm-Acc/Dmg/Rchg(A), Dcm-Acc/EndRdx/Rchg(19), Dcm-Dmg/Rchg(27), Dcm-Dmg/EndRdx(39), Dcm-Acc/Dmg(42)
Level 1: Subdual -- EnfOpr-Acc/EndRdx(A)
Level 2: Fistful of Arrows -- PstBls-Dam%(A), PstBls-Acc/Dmg(3), PstBls-Dmg/Rng(3), PstBls-Dmg/EndRdx(9), PstBls-Acc/Dmg/EndRdx(29)
Level 4: Telekinetic Thrust -- KntCmb-Acc/Dmg(A), KntCmb-Dmg/EndRdx(5), KntCmb-Dmg/Rchg(5), KntCmb-Dmg/EndRdx/Rchg(7)
Level 6: Hasten -- RechRdx-I(A), RechRdx-I(7), RechRdx-I(37)
Level 8: Blazing Arrow -- Apc-Dmg/EndRdx(A), Apc-Acc/Rchg(9), Apc-Dam%(11), Apc-Dmg/Rchg(29), Apc-Acc/Dmg/Rchg(34), GldJvl-Dam%(46)
Level 10: Combat Jumping -- LucoftheG-Rchg+(A)
Level 12: Explosive Arrow -- PstBls-Dam%(A), PstBls-Dmg/Rchg(13), PstBls-Acc/Dmg(13), PstBls-Dmg/EndRdx(15), PstBls-Acc/Dmg/EndRdx(17), FrcFdb-Rechg%(19)
Level 14: Super Speed -- BlsoftheZ-ResKB(A)
Level 16: Concentration -- RechRdx-I(A), RechRdx-I(25), RctRtc-ToHit/Rchg(25), RctRtc-ToHit(36)
Level 18: Aim -- RechRdx-I(A), RechRdx-I(31), RctRtc-ToHit(31), RctRtc-ToHit/Rchg(31)
Level 20: Drain Psyche -- DctWnd-Heal/Rchg(A), TchoftheN-Acc/Heal(21), TchoftheN-Acc/EndRdx/Heal/HP/Regen(21), NmnCnv-Heal/Rchg(23), PrfShf-EndMod/Rchg(23), PrfShf-EndMod/Acc/Rchg(27)
Level 22: Boxing -- KntCmb-Knock%(A), KntCmb-Dmg/EndRdx(36), KntCmb-Dmg/Rchg(36), KntCmb-Acc/Dmg(37)
Level 24: Tough -- StdPrt-ResDam/Def+(A), GldArm-3defTpProc(39)
Level 26: Weave -- LucoftheG-Rchg+(A), LucoftheG-Def(48)
Level 28: World of Confusion -- CrcPrs-Conf/EndRdx(A), CrcPrs-Conf%(34), CrcPrs-Acc/Rchg(40), CrcPrs-Acc/Conf/Rchg(43), CrcPrs-Conf/Rchg(45)
Level 30: Hover -- LucoftheG-Rchg+(A), Flight-I(37)
Level 32: Rain of Arrows -- SprBlsWrt-Rchg/Dmg%(A), SprBlsWrt-Acc/Dmg/EndRdx/Rchg(33), SprBlsWrt-Acc/Dmg/EndRdx(33), SprBlsWrt-Acc/Dmg/Rchg(33), SprBlsWrt-Dmg/Rchg(34), PstBls-Dam%(50)
Level 35: Psychic Scream -- Rgn-Dmg/EndRdx(A), Rgn-Dmg/Rchg(40), Rgn-Acc/Dmg/Rchg(40), Rgn-Acc/Rchg(45), Rgn-Dmg(46)
Level 38: Psychic Shockwave -- Obl-Acc/Dmg/Rchg(A), Obl-%Dam(39), Obl-Acc/Rchg(42), Obl-Acc/Dmg/EndRdx/Rchg(42), Obl-Dmg(45), Arm-Dam%(50)
Level 41: Flash Freeze -- FrtHyp-Sleep/EndRdx(A), FrtHyp-Plct%(43), FrtHyp-Sleep/Rchg(43), FrtHyp-Acc/Sleep/Rchg(46), FrtHyp-Acc/Rchg(50)
Level 44: Hoarfrost -- DctWnd-Heal/Rchg(A)
Level 47: Frozen Armor -- LucoftheG-Rchg+(A), LucoftheG-Def(48), LucoftheG-Def/EndRdx(48)
Level 49: Hibernate -- RechRdx-I(A)
Level 1: Brawl -- KntCmb-Knock%(A), KntCmb-Acc/Dmg(11), KntCmb-Dmg/EndRdx(15), KntCmb-Dmg/Rchg(17)
Level 1: Sprint -- UnbLea-Stlth(A)
Level 2: Rest -- Empty(A)
Level 1: Defiance
Level 4: Ninja Run
Level 2: Swift -- Flight-I(A)
Level 2: Hurdle -- Jump-I(A)
Level 2: Health -- Heal-I(A)
Level 2: Stamina -- EndMod-I(A)
Level 1: Prestige Power Slide -- Empty(A)
Level 1: Prestige Power Dash -- Empty(A)
Level 1: Prestige Power Quick -- Empty(A)
Level 1: Prestige Power Surge -- Empty(A)
Level 1: Prestige Power Rush -- Empty(A)
Level 50: Musculature Core Paragon
------------
-
i know before this NA ppl were affected
See that's where you're wrong mate, it didn't affect me at all, the only lag I ever felt was felt as result of overloaded servers, not ping, this isn't an FPS, people used to play this on dialup back in the day <56k! :)
I used to play it on dial up. It was worse than early game Hami raids.
-
I used to use Statesman in a Peregrine mission with a kinetic defender. Those where the days.
-
Hero Plan by Mids' Hero Designer 1.962
Click this DataLink to open the build!
Hardness: Level 50 Natural Tanker
Primary Power Set: Stone Armor
Secondary Power Set: Stone Melee
Power Pool: Speed
Power Pool: Teleportation
Power Pool: Fighting
Power Pool: Leadership
Ancillary Pool: Soul Mastery
Hero Profile:
Level 1: Rock Armor -- LucoftheG-Rchg+(A), LucoftheG-Def(5), LucoftheG-Def/EndRdx(13), ShlWal-ResDam/Re TP(46)
Level 1: Stone Fist -- KntCmb-Acc/Dmg(A), KntCmb-Dmg/EndRdx(13), KntCmb-Dmg/Rchg(17), KntCmb-Dmg/EndRdx/Rchg(19)
Level 2: Earth's Embrace -- NmnCnv-Heal(A), NmnCnv-Heal/Rchg(3), NmnCnv-Heal/EndRdx/Rchg(3), NmnCnv-Heal/EndRdx(5), DctWnd-Heal/EndRdx/Rchg(36)
Level 4: Heavy Mallet -- KntCmb-Dmg/EndRdx(A), KntCmb-Dmg/EndRdx/Rchg(15), KntCmb-Acc/Dmg(15), KntCmb-Dmg/Rchg(17)
Level 6: Mud Pots -- SprMghoft-Acc/Dmg/EndRdx/Rchg(A), SprMghoft-Dmg/EndRdx/Rchg(7), SprMghoft-Acc/Dmg(7), SprMghoft-Rchg/Res%(11), FuroftheG-ResDeb%(25), EndRdx-I(50)
Level 8: Rooted -- NmnCnv-Heal(A), NmnCnv-Heal/EndRdx(9), NmnCnv-Heal/Rchg(9)
Level 10: Super Speed -- WntGif-ResSlow(A)
Level 12: Teleport -- Jnt-EndRdx/Rng(A)
Level 14: Taunt -- MckBrt-Taunt(A), MckBrt-Taunt/Rchg/Rng(21), MckBrt-Taunt/Rchg(23), MckBrt-Acc/Rchg(23), MckBrt-Taunt/Rng(31), MckBrt-Rchg(34)
Level 16: Kick -- Acc(A)
Level 18: Tough -- GldArm-3defTpProc(A), StdPrt-ResDam/Def+(45)
Level 20: Weave -- LucoftheG-Rchg+(A), LucoftheG-Def(21), LucoftheG-Def/EndRdx(37)
Level 22: Fault -- AbsAmz-EndRdx/Stun(A), AbsAmz-Stun/Rchg(25), AbsAmz-Acc/Rchg(29), AbsAmz-ToHitDeb%(40), AbsAmz-Acc/Stun/Rchg(43), RopADop-Acc/EndRdx(50)
Level 24: Crystal Armor -- LucoftheG-Def(A), LucoftheG-Def/EndRdx(40), LucoftheG-Rchg+(45)
Level 26: Minerals -- LucoftheG-Rchg+(A), LucoftheG-Def/EndRdx(31)
Level 28: Maneuvers -- RedFrt-Def/EndRdx(A)
Level 30: Hasten -- RechRdx-I(A), RechRdx-I(31)
Level 32: Granite Armor -- ResDam-I(A), ResDam-I(33), ResDam-I(33), LucoftheG-Rchg+(33), DefBuff-I(34), DefBuff-I(34)
Level 35: Tremor -- FrcFdb-Rechg%(A), Arm-Dam%(36), Arm-Dmg/EndRdx(36), Arm-Acc/Dmg/Rchg(37), Arm-Acc/Rchg(37), Arm-Dmg/Rchg(40)
Level 38: Seismic Smash -- UnbCns-Dam%(A), UnbCns-EndRdx/Hold(39), UnbCns-Hold/Rchg(39), UnbCns-Acc/Hold/Rchg(39), UnbCns-Acc/Rchg(43)
Level 41: Soul Tentacles -- GrvAnc-Immob(A), GrvAnc-Hold%(42), GrvAnc-Acc/Rchg(42), GrvAnc-Immob/EndRdx(42), GrvAnc-Acc/Immob/Rchg(43)
Level 44: Darkest Night -- DarWtcDsp-ToHitDeb/EndRdx(A), DarWtcDsp-ToHitDeb(45), DarWtcDsp-ToHitdeb/Rchg/EndRdx(46), DarWtcDsp-Slow%(46)
Level 47: Dark Obliteration -- CldSns-ToHitDeb/EndRdx/Rchg(A), CldSns-Acc/EndRdx/Rchg(48), CldSns-Acc/ToHitDeb(48), CldSns-Acc/Rchg(48)
Level 49: Tactics -- GssSynFr--ToHit/EndRdx(A), GssSynFr--ToHit/Rchg/EndRdx(50)
Level 1: Brawl -- Empty(A)
Level 1: Sprint -- Empty(A)
Level 2: Rest -- Empty(A)
Level 1: Gauntlet
Level 4: Ninja Run
Level 0: Freedom Phalanx Reserve
Level 0: Portal Jockey
Level 2: Swift -- Run-I(A)
Level 2: Hurdle -- Jump-I(A)
Level 2: Health -- RgnTss-Regen+(A), NmnCnv-Heal/Rchg(19), NmnCnv-Regen/Rcvry+(27), NmnCnv-Heal(29)
Level 2: Stamina -- PrfShf-End%(A), PrfShf-EndMod(11), EndMod-I(27)
Level 1: Prestige Power Slide -- Empty(A)
Level 1: Prestige Power Dash -- Empty(A)
Level 1: Prestige Power Quick -- Empty(A)
Level 1: Prestige Power Surge -- Empty(A)
Level 1: Prestige Power Rush -- Empty(A)
Level 50: Agility Radial Paragon
------------
-
Been awhile since I've posted a build.
Hero Plan by Mids' Hero Designer 1.962
Click this DataLink to open the build!
Make: Level 50 Magic Controller
Primary Power Set: Illusion Control
Secondary Power Set: Radiation Emission
Power Pool: Flight
Power Pool: Speed
Power Pool: Leaping
Power Pool: Leadership
Ancillary Pool: Primal Forces Mastery
Hero Profile:
Level 1: Blind -- FrtHyp-Plct%(A), FrtHyp-Sleep/EndRdx(3), FrtHyp-Sleep/Rchg(13), FrtHyp-Acc/Sleep/Rchg(17), FrtHyp-Acc/Rchg(23), GhsWdwEmb-Dam%(43)
Level 1: Radiant Aura -- DctWnd-Heal/EndRdx(A), DctWnd-EndRdx/Rchg(3), DctWnd-Heal/Rchg(11), DctWnd-Heal(15), DctWnd-Heal/EndRdx/Rchg(43)
Level 2: Deceive -- CrcPrs-Conf/EndRdx(A), CrcPrs-Acc/Rchg(5), CrcPrs-Conf%(9), CrcPrs-Conf/Rchg(9), CrcPrs-Acc/Conf/Rchg(17), Range-I(48)
Level 4: Radiation Infection -- DarWtcDsp-ToHitDeb(A), DarWtcDsp-Rchg/EndRdx(5), DarWtcDsp-ToHitDeb/EndRdx(11), DarWtcDsp-ToHitdeb/Rchg/EndRdx(13), AchHee-ResDeb%(21), TchofLadG-%Dam(50)
Level 6: Accelerate Metabolism -- EffAdp-EndMod/Rchg(A), EffAdp-EndMod/EndRdx(7), PrfShf-EndMod/Rchg(7), PrfShf-EndMod/Acc/Rchg(23)
Level 8: Hover -- LucoftheG-Rchg+(A)
Level 10: Spectral Wounds -- Dcm-Acc/EndRdx/Rchg(A), Dcm-Acc/Dmg/Rchg(15), Dcm-Acc/Dmg(29), Dcm-Dmg/Rchg(34), Dcm-Dmg/EndRdx(39), Dvs-Hold%(46)
Level 12: Hasten -- RechRdx-I(A)
Level 14: Super Speed -- EndRdx-I(A)
Level 16: Combat Jumping -- LucoftheG-Rchg+(A), Ksm-ToHit+(39), Krm-ResKB(45)
Level 18: Phantom Army -- ExpRnf-Acc/Rchg(A), ExpRnf-Acc/Dmg(19), ExpRnf-Acc/Dmg/Rchg(19), ExpRnf-EndRdx/Dmg/Rchg(21), SlbAll-Dmg/Rchg(25), SlbAll-Build%(43)
Level 20: Lingering Radiation -- TmpRdn-EndRdx/Rchg/Slow(A), Acc-I(25), RechRdx-I(31), PcnoftheT-EndRdx/Rchg/Slow(34), TmpRdn-Acc/EndRdx(36)
Level 22: Maneuvers -- LucoftheG-Rchg+(A)
Level 24: Group Invisibility -- LucoftheG-Rchg+(A)
Level 26: Spectral Terror -- GlmoftheA-Acc/Fear/Rchg(A), GlmoftheA-Acc/EndRdx(27), GlmoftheA-EndRdx/Fear(27), GlmoftheA-Acc/Rchg(31), GlmoftheA-Dam%(34)
Level 28: Enervating Field -- EndRdx-I(A), EndRdx-I(36)
Level 30: Flash -- BslGaz-Acc/Hold(A), BslGaz-Acc/Rchg(36), BslGaz-EndRdx/Rchg/Hold(37), BslGaz-Acc/EndRdx/Rchg/Hold(39), EssofCrr-Acc/Hold/Rchg(42)
Level 32: Phantasm -- ExpRnf-EndRdx/Dmg/Rchg(A), ExpRnf-Acc/Dmg(33), ExpRnf-Dmg/EndRdx(33), ExpRnf-Acc/Rchg(33), SlbAll-Acc/Dmg/Rchg(37), ExpStr-Dam%(42)
Level 35: Tactics -- AdjTrg-ToHit/EndRdx/Rchg(A), AdjTrg-ToHit/EndRdx(48)
Level 38: EM Pulse -- UnbCns-EndRdx/Hold(A), UnbCns-Hold/Rchg(40), UnbCns-Acc/Hold/Rchg(40), UnbCns-Acc/Rchg(40), UnbCns-Dam%(42)
Level 41: Conserve Power -- RechRdx-I(A)
Level 44: Energy Torrent -- PstBls-Dam%(A), PstBls-Acc/Dmg(45), PstBls-Acc/Dmg/EndRdx(45), PstBls-Dmg/EndRdx(46), PstBls-Dmg/Rchg(46), ExpStr-Dam%(50)
Level 47: Temp Invulnerability -- StdPrt-ResDam/Def+(A), ResDam-I(48)
Level 49: Power Boost -- RechRdx-I(A), RechRdx-I(50)
Level 1: Brawl -- Empty(A)
Level 1: Sprint -- UnbLea-Stlth(A)
Level 2: Rest -- Empty(A)
Level 1: Containment
Level 4: Ninja Run
Level 2: Swift -- Flight-I(A)
Level 2: Hurdle -- Jump-I(A)
Level 2: Health -- NmnCnv-Regen/Rcvry+(A), Mrc-Rcvry+(29)
Level 2: Stamina -- PrfShf-End%(A), PrfShf-EndMod(31), EndMod-I(37)
Level 1: Prestige Power Slide -- Empty(A)
Level 1: Prestige Power Dash -- Empty(A)
Level 1: Prestige Power Quick -- Empty(A)
Level 1: Prestige Power Surge -- Empty(A)
Level 1: Prestige Power Rush -- Empty(A)
Level 50: Spiritual Total Core Revamp
------------
-
Would be nice to make this build again.
Villain Plan by Mids' Villain Designer 1.962
Click this DataLink to open the build!
Zordar: Level 50 Technology Mastermind
Primary Power Set: Robotics
Secondary Power Set: Traps
Power Pool: Fighting
Power Pool: Speed
Power Pool: Leadership
Power Pool: Presence
Ancillary Pool: Mu Mastery
Villain Profile:
Level 1: Battle Drones -- BldMnd-Acc/Dmg(A), BldMnd-Dmg/EndRdx(3), BldMnd-Acc/EndRdx(3), BldMnd-Acc/Dmg/EndRdx(5), BldMnd-Acc(5), BldMnd-Dmg(7)
Level 1: Web Grenade -- EnfOpr-Acc/EndRdx(A)
Level 2: Caltrops -- ImpSwf-Dam%(A), PstBls-Dam%(13), Rgn-Knock%(15), TmpRdn-EndRdx/Rchg/Slow(46), JvlVll-Dam%(50)
Level 4: Triage Beacon -- DctWnd-Heal/Rchg(A), DctWnd-Heal/EndRdx(7), DctWnd-Rchg(9), DctWnd-Heal(9), DctWnd-Heal/EndRdx/Rchg(11), Pnc-Heal/+End(46)
Level 6: Equip Robot -- EndRdx-I(A)
Level 8: Kick -- Acc(A)
Level 10: Acid Mortar -- AchHee-ResDeb%(A), PstBls-Dam%(11), TchofLadG-%Dam(21), JvlVll-Dam%(21), ShlBrk-%Dam(34), AnlWkn-Acc/Rchg/EndRdx(43)
Level 12: Protector Bots -- DefBuff-I(A), EdcoftheM-PetDef(13), SlbAll-Acc/Dmg/Rchg(15), SlbAll-Dmg/EndRdx(19), SlbAll-Acc/Rchg(43), HO:Nucle(43)
Level 14: Hasten -- RechRdx-I(A), RechRdx-I(25), RechRdx-I(25)
Level 16: Force Field Generator -- LucoftheG-Def(A), LucoftheG-Rchg+(17), LucoftheG-Def/EndRdx(17)
Level 18: Super Speed -- BlsoftheZ-Travel(A), BlsoftheZ-ResKB(19)
Level 20: Poison Trap -- UnbCns-Acc/Rchg(A), UnbCns-Hold/Rchg(31), UnbCns-Dam%(34), UnbCns-EndRdx/Hold(37), UnbCns-Acc/Hold/Rchg(37), Lck-%Hold(50)
Level 22: Tough -- GldArm-3defTpProc(A)
Level 24: Maneuvers -- LucoftheG-Def/EndRdx(A), LucoftheG-Rchg+(36)
Level 26: Assault Bot -- OvrFrc-Dam/KB(A), SlbAll-Build%(27), SprCmmoft-Acc/Dmg/EndRdx/Rchg(27), SprCmmoft-Acc/Dmg/Rchg(29), SprCmmoft-Acc/Dmg(29), SprCmmoft-Dmg/EndRdx/Rchg(31)
Level 28: Seeker Drones -- AbsAmz-ToHitDeb%(A), AbsAmz-EndRdx/Stun(40), AbsAmz-Stun/Rchg(42), AbsAmz-Acc/Stun/Rchg(42), AbsAmz-Acc/Rchg(42)
Level 30: Tactics -- GssSynFr--Rchg/EndRdx(A), GssSynFr--ToHit/Rchg/EndRdx(31), GssSynFr--ToHit/Rchg(33), GssSynFr--Build%(33), GssSynFr--ToHit/EndRdx(33), GssSynFr--ToHit(34)
Level 32: Upgrade Robot -- EndRdx-I(A)
Level 35: Weave -- LucoftheG-Rchg+(A), LucoftheG-Def(36), LucoftheG-Def/EndRdx(36)
Level 38: Trip Mine -- Obl-Acc/Dmg/EndRdx/Rchg(A), Obl-%Dam(39), Obl-Acc/Rchg(39), Obl-Dmg(39), Obl-Dmg/Rchg(40), Obl-Acc/Dmg/Rchg(40)
Level 41: Provoke -- MckBrt-Acc/Rchg(A), MckBrt-Taunt/Rchg/Rng(45), MckBrt-Taunt/Rng(45), MckBrt-Taunt(46)
Level 44: Charged Armor -- StdPrt-ResDam/Def+(A), ResDam-I(45)
Level 47: Electrifying Fences -- Rgn-Dmg/EndRdx(A), Rgn-Dmg(48), Rgn-Dmg/Rchg(48), Rgn-Acc/Dmg/Rchg(48), Rgn-Acc/Rchg(50)
Level 49: Vengeance -- LucoftheG-Rchg+(A)
Level 1: Brawl -- Empty(A)
Level 1: Sprint -- UnbLea-Stlth(A)
Level 2: Rest -- EndMod-I(A)
Level 1: Supremacy
Level 6: Ninja Run
Level 1: Prestige Power Dash -- Empty(A)
Level 1: Prestige Power Slide -- Empty(A)
Level 1: Prestige Power Quick -- Empty(A)
Level 1: Prestige Power Rush -- Empty(A)
Level 1: Prestige Power Surge -- Empty(A)
Level 2: Swift -- Run-I(A)
Level 2: Health -- NmnCnv-Regen/Rcvry+(A), Mrc-Rcvry+(37)
Level 2: Hurdle -- Jump-I(A)
Level 2: Stamina -- PrfShf-End%(A), PrfShf-EndMod(23), EndMod-I(23)
Level 50: Agility Core Paragon
------------
-
Having a hard time with people saying "if you don't like it then do...". KS has been a bad part of this game since I joined in May 2004. Some don't realize this is CHEATING and should be looked at as cheating. People who cheat shouldn't be able to dictate how a person of character plays.
If the person doesn't understand how KS works let them know what they did is wrong. if they do it again I would report them to the server admin and see what he/has to say.
One thing people can do is ask if they can help....
-
I still have XML files of my old heroes. Can these be used in game? They do state my old name and original server. I have no idea how to use an XML file. I tried to view content with an online viewer and all that shows are red dots.
Hamidon Raids - Role Guide
in Guides
Posted
Keen...here is a Bio/Dark Hami tank build for your review. Please look it over for any holes.
Keen - Tanker (Bio Armor).mxd