

Yournameonrice
-
Posts
11 -
Joined
-
Last visited
Content Type
Profiles
Forums
Events
Store
Articles
Patch Notes
Posts posted by Yournameonrice
-
-
Looking for some critique for this build. I am a casual, mostly team player who enjoys endgame stuff but also all the TFs/SFs/Trials throughout the game. I never solo except for the very rare occasion.
Just looking to have a fairly solid toon that is fun to play, which I think I have mostly accomplished. But I am wondering if there is anything really obvious that I am missing.
My defenses are mostly capped with a small purple (Neg needs work/slight hole in Psi), but while teaming there is almost always someone else with Maneuvers so... Resistances are between 20 and 30% (not great but serviceable).
Toon will be mostly ranged with the ability to stand my ground against melee mobs if need be. Which fits my playstyle.
Edit: Also I forgot I have 3 slots to play with. Thinking either maybe more +def in the defensive toggles but wondering if I can accomplish anything else worthwhile if I use those slots elsewhere.Edit2: Forgot to slot for -KB so I now only have 1 slot to spare. Check my reply for the updated build.
This is what I have so far. Inf is not a concern. Any ideas?
Hero Plan by Mids' Reborn : Hero Designer 2.6.1.25
https://github.com/Crytilis/mids-reborn-hero-designerClick this DataLink to open the build!
Level 50 Magic Blaster
Primary Power Set: Beam Rifle
Secondary Power Set: Atomic Manipulation
Power Pool: Fighting
Power Pool: Speed
Power Pool: Concealment
Power Pool: Leadership
Ancillary Pool: Mace MasteryHero Profile:
Level 1: Charged Shot -- SprBlsWrt-Acc/Dmg(A), SprBlsWrt-Dmg/Rchg(3), SprBlsWrt-Acc/Dmg/Rchg(3), SprBlsWrt-Acc/Dmg/EndRdx(5), SprBlsWrt-Acc/Dmg/EndRdx/Rchg(5), SprBlsWrt-Rchg/Dmg%(7)
Level 1: Electron Shackles -- EnfOpr-Acc/Immob(A), EnfOpr-Acc/Rchg(36), EnfOpr-Immob/Rng(40), EnfOpr-Acc/Immob/Rchg(42)
Level 2: Cutting Beam -- SprFrzBls-Acc/Dmg(A), SprFrzBls-Dmg/EndRdx(7), SprFrzBls-Acc/Dmg/EndRdx(9), SprFrzBls-Acc/Dmg/Rchg(9), SprFrzBls-Dmg/EndRdx/Acc/Rchg(11), SprFrzBls-Rchg/ImmobProc(11)
Level 4: Positron Cell -- Thn-Acc/Dmg(A), Thn-Dmg/Rchg(45), Thn-Acc/Dmg/Rchg(45), Tmp-Acc/Dmg(45), Tmp-Dmg/Rchg(46)
Level 6: Boxing -- Empty(A)
Level 8: Disintegrate -- SprWntBit-Acc/Dmg(A), SprWntBit-Dmg/Rchg(13), SprWntBit-Acc/Dmg/EndRdx(13), SprWntBit-Acc/Dmg/Rchg(15), SprWntBit-Dmg/EndRdx/Acc/Rchg(15), SprWntBit-Rchg/SlowProc(17)
Level 10: Ionize -- RctRtc-ToHit(A), RctRtc-ToHit/Rchg(50)
Level 12: Hasten -- RechRdx-I(A), RechRdx-I(43)
Level 14: Tough -- GldArm-3defTpProc(A), StdPrt-ResDam/Def+(25), UnbGrd-Max HP%(25)
Level 16: Lancer Shot -- SprDfnBrr-Acc/Dmg(A), SprDfnBrr-Dmg/Rchg(17), SprDfnBrr-Acc/Dmg/Rchg(19), SprDfnBrr-Acc/Dmg/EndRdx(19), SprDfnBrr-Acc/Dmg/EndRdx/Rchg(21), SprDfnBrr-Rchg/+Status Protect(21)
Level 18: Aim -- RctRtc-ToHit(A), RctRtc-ToHit/Rchg(23), RctRtc-Pcptn(50)
Level 20: Stealth -- LucoftheG-Def/Rchg+(A), LucoftheG-Def(23)
Level 22: Maneuvers -- LucoftheG-Def/Rchg+(A), LucoftheG-Def(42)
Level 24: Metabolic Acceleration -- HO:Golgi(A), Prv-Absorb%(40)
Level 26: Penetrating Ray -- MlsFur-Dmg/EndRdx(A), MlsFur-Acc/Dmg(27), MlsFur-Dmg/Rchg(27), MlsFur-Dmg/EndRdx/Rchg(29)
Level 28: Weave -- LucoftheG-Def/Rchg+(A), ShlWal-Def(36), ShlWal-Def/EndRdx(37), ShlWal-Def/Rchg(37), ShlWal-ResDam/Re TP(37)
Level 30: Piercing Beam -- Bmbdmt-Acc/Rech/End(A), Bmbdmt-Dam(31), Bmbdmt-Dam/Rech(31), Bmbdmt-Acc/Dam/Rech(33), Bmbdmt-Acc/Dam/Rech/End(33), Bmbdmt-+FireDmg(33)
Level 32: Overcharge -- PstBls-Acc/Dmg(A), PstBls-Dmg/Rchg(34), PstBls-Dmg/Rng(34), PstBls-Acc/Dmg/EndRdx(34), PstBls-Dam%(36)
Level 35: Scorpion Shield -- LucoftheG-Def/Rchg+(A)
Level 38: Radioactive Cloud -- UnbCns-Hold(A), UnbCns-Hold/Rchg(39), UnbCns-Acc/Hold/Rchg(39), UnbCns-Acc/Rchg(39), UnbCns-EndRdx/Hold(40)
Level 41: Tactics -- GssSynFr--Build%(A)
Level 44: Positronic Fist -- SprBlsCol-Acc/Dmg(A), SprBlsCol-Acc/Dmg/EndRdx(46), SprBlsCol-Acc/Dmg/Rchg(46), SprBlsCol-Dmg/EndRdx/Acc/Rchg(48), SprBlsCol-Rchg/HoldProc(48), SprBlsCol-Dmg/EndRdx(48)
Level 47: Beta Decay -- AchHee-ResDeb%(A)
Level 49: Vengeance -- LucoftheG-Def/Rchg+(A)
Level 1: Brawl -- Empty(A)
Level 1: Defiance
Level 1: Quick Form
Level 1: Prestige Power Dash -- Empty(A)
Level 1: Prestige Power Slide -- Empty(A)
Level 1: Prestige Power Quick -- Empty(A)
Level 1: Prestige Power Rush -- Empty(A)
Level 1: Prestige Power Surge -- Empty(A)
Level 1: Sprint -- Empty(A)
Level 2: Rest -- Empty(A)
Level 4: Ninja Run
Level 2: Swift -- Empty(A)
Level 2: Health -- Pnc-Heal/+End(A), Mrc-Rcvry+(42), NmnCnv-Regen/Rcvry+(43)
Level 2: Hurdle -- Empty(A)
Level 2: Stamina -- PrfShf-End%(A), PrfShf-EndMod(43)
------------ -
19 hours ago, Psylenz0511 said:
I have an EA/fire. He isn't level 50 yet, but I can tell you EA is a powerhouse on a defender. There are signature powers in every defender primary. I would point out one salient power in Electric Affinity that will define your build, imho. Faraday Cage is the game changer. I run in with the tank, or scrapper, or brute for that matter, drop the Faraday Cage first, proceed to buff, recharge, health, absorb, and tohit. The one feature, heal, is the one that comes up the fastest, but if you do it right, you don't need it as much as the energizing circuit which is +recharge, +end, Faraday Cage is a bundle of buffs, +resistance, mezz protection, endurance drain protection, knockback protection, and recharge debuffs (slows). You cast FC, you stay in FC, you invite squishies to FC. "Keep all arms and legs inside the Faraday Cage until the fighting comes to a complete stop."
With that in mind, I suggest boosting your damage resistance attributes, slotting for recharge, and modest +defense as defenders go. I personally take all the EA abilities. Amp Up is lackluster to some. I get it. It's not Fulcrum shift, it's not Tactics, it's certainly not Fortitude, But, it does well with damage dealers, and the status effects and debuffs of your controller type characters are buffed as well.. Fire does synergize well with EA. The only one I find awkward to use is fire breath, and I might add, well worth using, but the other attacks are really good with staying in the FC. Proc it up, you have targetted AOE abilities and there are procs for those. Fire doesn't have -resistance or -defense to tack procs on, but fire itself seems to do more damage innately than other defender blasts. Plus, inferno, inferno, inferno to your hearts content in the FC.
Do I sound over the top high on Faraday Cage? Perhaps, I am. But I have experienced on an ITF where Faraday Cage has resisted the 'rez stun' when Romulus is defeated and absorbs one of his nicti, and that resistance is higher than the resistance in Dispersion Bubble for Forcefield and Sonic Resonance. Plus it stacks with other mezz resistance powers especially of the incarnate variety. You won't have to hide when Romulus dies on your squishy defender. I have also experienced that the mezz resistance for the Romulus stun is not as potent on a corruptor or mastermind -- Rommie will stun you!
Thank you Psy! That is great info! I did not know of FC's true potency! I have several of the AOE procs already waiting for this toon!
7 hours ago, Linea said:And thank you Linea! These are great starting points for my build. And I am seeing several things I would not have thought of. One question though...does the Gaussian Build Up Proc in Empowering Circuit give the BU to my toon or to allies?
Thanks again to both of you!
-
I rolled an EA/Fire Defender as my first attempt at the AT. I'm not new to the game, just never rolled one for some reason. And I chose those sets as a bit of a concept so I want to stick with them.
But before i start working through a Mid's build, I was hoping to get some guidance on a few key questions.
What is reasonable to aim for with these 2 powersets? Soft capped DEF? Just S/L?
Should I get as much global RCH as possible or just go for DEF/RES?
What about procs? (specifically DMG procs) Any powers that really excel with them? I would love to get as much DMG as possible out of this toon and from what I have read it seems procs are a good way for Defenders to do so.
Thanks in advance!
-
Guessing this is a small typo as July 3rd is a Friday. 😜
On Excelsior: Saturday, July 3rd at 5pm Eastern (9pm UTC)
Also this sounds totally awesome. Great idea for an event!
-
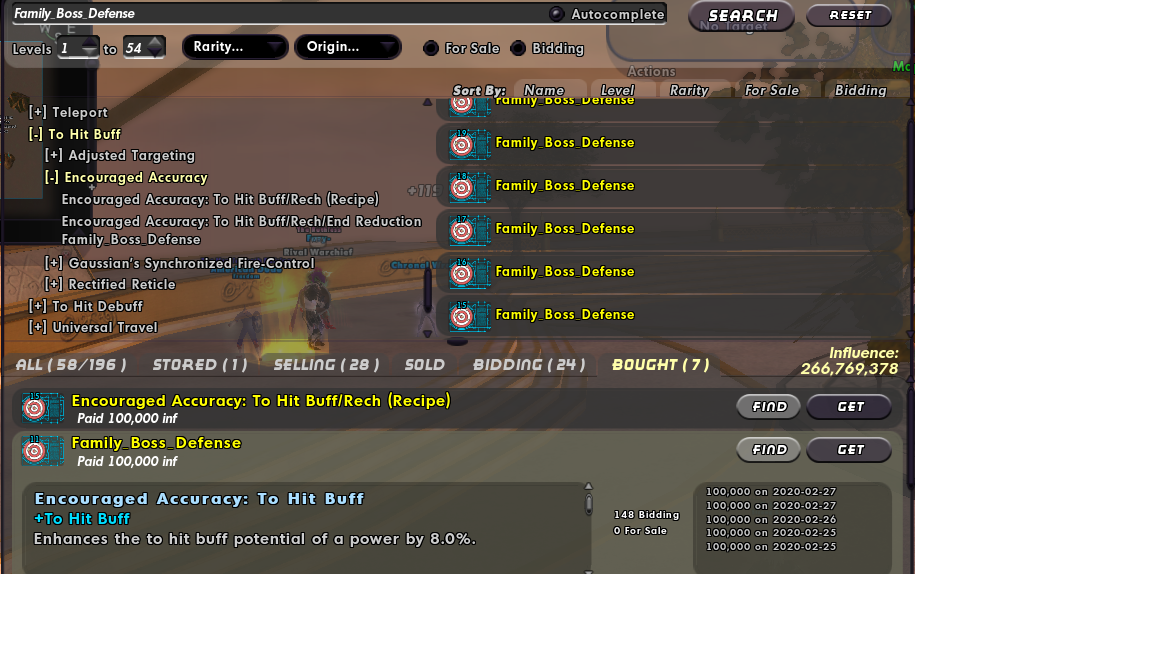
Encouraged Accuracy: To Hit Buff Recipes are labeled Family_Boss_Defense. Pop-up info is correct.

-
Yeah it IS a bunch of toggles. I'm at 48 with E Absorption 6 slotted and I still have occasional END problems. Thanks for posting. Your build made me realize a few things and gives me some great ideas.
-
Any advice or suggestions would be greatly appreciated. I know I have a few issues (Psi Def, Res not capped) but I am kind of at a loss on how to fix them.
Hero Plan by Mids' Reborn : Hero Designer 2.6.0.7
https://github.com/ImaginaryDevelopment/imaginary-hero-designerClick this DataLink to open the build!
Level 50 Magic Tanker
Primary Power Set: Ice Armor
Secondary Power Set: War Mace
Power Pool: Leaping
Power Pool: Speed
Power Pool: Fighting
Power Pool: ConcealmentHero Profile:
Level 1: Frozen Armor- (A) Kismet - Defense/Endurance
- (33) Kismet - Defense/Recharge
- (33) Kismet - Defense/Endurance/Recharge
- (34) Red Fortune - Defense/Endurance
- (34) Red Fortune - Defense
- (34) Luck of the Gambler - Defense/Increased Global Recharge Speed
Level 1: Bash
- (A) Superior Gauntleted Fist - Accuracy/Damage
- (3) Superior Gauntleted Fist - Damage/RechargeTime
- (3) Superior Gauntleted Fist - Accuracy/Damage/RechargeTime
- (5) Superior Gauntleted Fist - Damage/Endurance/RechargeTime
- (5) Superior Gauntleted Fist - Accuracy/Damage/Endurance/RechargeTime
- (7) Superior Gauntleted Fist - RechargeTime/+Absorb
Level 2: Hoarfrost
- (A) Numina's Convalesence - Heal/Endurance
- (13) Numina's Convalesence - Endurance/Recharge
- (13) Numina's Convalesence - Heal/Recharge
- (15) Numina's Convalesence - Heal/Endurance/Recharge
- (15) Numina's Convalesence - Heal
Level 4: Jawbreaker
- (A) Superior Blistering Cold - Accuracy/Damage
- (7) Superior Blistering Cold - Damage/Endurance
- (9) Superior Blistering Cold - Accuracy/Damage/Endurance
- (9) Superior Blistering Cold - Accuracy/Damage/Recharge
- (11) Superior Blistering Cold - Damage/Endurance/Accuracy/RechargeTime
- (11) Superior Blistering Cold - Recharge/Chance for Hold
Level 6: Wet Ice
- (A) Endurance Reduction IO
Level 8: Super Jump
- (A) Empty
Level 10: Hasten
- (A) Recharge Reduction IO
- (17) Recharge Reduction IO
- (33) Recharge Reduction IO
Level 12: Chilling Embrace
- (A) Pacing of the Turtle - Chance of -Recharge
Level 14: Kick
- (A) Touch of Death - Accuracy/Damage
Level 16: Build Up
- (A) Adjusted Targeting - To Hit Buff
- (40) Adjusted Targeting - To Hit Buff/Recharge
- (40) Adjusted Targeting - Recharge
Level 18: Glacial Armor
- (A) Shield Wall - +Res (Teleportation), +5% Res (All)
- (19) Shield Wall - Defense/Endurance
- (19) Shield Wall - Defense/Recharge
- (25) Shield Wall - Defense/Endurance/Recharge
- (27) Shield Wall - Defense
- (31) Shield Wall - Endurance/Recharge
Level 20: Clobber
- (A) Superior Might of the Tanker - Accuracy/Damage
- (21) Superior Might of the Tanker - Damage/Recharge
- (21) Superior Might of the Tanker - Accuracy/Damage/Recharge
- (23) Superior Might of the Tanker - Damage/Endurance/Recharge
- (23) Superior Might of the Tanker - Accuracy/Damage/Endurance/Recharge
- (25) Superior Might of the Tanker - Recharge/Chance for +Res(All)
Level 22: Icicles
- (A) Multi-Strike - Accuracy/Damage
Level 24: Taunt
- (A) Accuracy IO
Level 26: Energy Absorption
- (A) Luck of the Gambler - Defense/Endurance/Recharge
- (40) Luck of the Gambler - Defense/Increased Global Recharge Speed
- (42) Luck of the Gambler - Defense/Recharge
- (43) Luck of the Gambler - Defense
- (46) Luck of the Gambler - Endurance/Recharge
Level 28: Tough
- (A) Aegis - Resistance/Endurance/Recharge
- (29) Aegis - Resistance/Endurance
- (29) Aegis - Resistance
- (37) Aegis - Psionic/Status Resistance
- (46) Gladiator's Armor - TP Protection +3% Def (All)
Level 30: Weave
- (A) Red Fortune - Defense
- (31) Red Fortune - Defense/Endurance
- (31) Red Fortune - Defense/Endurance/Recharge
- (39) Luck of the Gambler - Defense/Increased Global Recharge Speed
Level 32: Whirling Mace
- (A) Superior Avalanche - Accuracy/Damage
- (43) Superior Avalanche - Damage/Endurance
- (43) Superior Avalanche - Accuracy/Damage/Endurance
- (45) Superior Avalanche - Accuracy/Damage/Recharge
- (45) Superior Avalanche - Accuracy/Damage/Endurance/Recharge
- (45) Superior Avalanche - Recharge/Chance for Knockdown
Level 35: Shatter
- (A) Scirocco's Dervish - Damage/Endurance
- (36) Scirocco's Dervish - Damage/Recharge
- (36) Scirocco's Dervish - Accuracy/Damage
- (36) Scirocco's Dervish - Accuracy/Recharge
- (37) Scirocco's Dervish - Accuracy/Damage/Endurance
- (37) Scirocco's Dervish - Chance of Damage(Lethal)
Level 38: Stealth
- (A) Luck of the Gambler - Defense/Endurance
- (39) Luck of the Gambler - Defense
- (39) Luck of the Gambler - Defense/Increased Global Recharge Speed
Level 41: Combat Jumping
- (A) Luck of the Gambler - Defense
- (42) Luck of the Gambler - Defense/Increased Global Recharge Speed
- (42) Reactive Defenses - Scaling Resist Damage
Level 44: Permafrost
- (A) Impervium Armor - Psionic Resistance
- (46) Unbreakable Guard - +Max HP
Level 47: Crowd Control
- (A) Scirocco's Dervish - Accuracy/Damage
- (48) Scirocco's Dervish - Damage/Recharge
- (48) Scirocco's Dervish - Accuracy/Damage/Endurance
- (48) Scirocco's Dervish - Damage/Endurance
- (50) Scirocco's Dervish - Accuracy/Recharge
Level 49: Spring Attack
- (A) Scirocco's Dervish - Accuracy/Damage
- (50) Scirocco's Dervish - Damage/Recharge
- (50) Scirocco's Dervish - Accuracy/Damage/Endurance
Level 1: Brawl
- (A) Empty
Level 1: Gauntlet
Level 1: Prestige Power Dash -
Wow many thanks Falsey! This looks good for a starting build for him. The +RCH proc you mentioned in Electron Haze wasn't actually there in Mid's. There was a empty slot in that power so I am assuming you meant to put the Force Feedback proc in there.
And thanks but no worries on the Gladiator proc, I have plenty of inf to help him out plus I am teaching him some ways to make more on the AH. But nonetheless a very kind offer indeed.
And once he gets on the inf train I can use this build to help with a very expensive version with all the bells and whistles now that I know what to aim for. Thanks again!
-
I am helping a friend build out his 50 Rad/Rad Def (Radiation Emission/Radiation Blast) . He's just learning about IO sets and even though I have had a few lower lvl Defs , I've never taken one to 50. Even after perusing the Defender forums for several days, I am still kinda lost. Anyone have a not-necessarily insanely priced build they would share to help me figure out what to aim for?
Beam Rifle/Atomic build advice
in Blaster
Posted
OK jeez I have already changed it. Just added KB protection which I forgot. So now only have 1 slot to play with.
Hero Plan by Mids' Reborn : Hero Designer 2.6.1.25
https://github.com/Crytilis/mids-reborn-hero-designer
Click this DataLink to open the build!
Level 50 Magic Blaster
Primary Power Set: Beam Rifle
Secondary Power Set: Atomic Manipulation
Power Pool: Fighting
Power Pool: Speed
Power Pool: Concealment
Power Pool: Leadership
Ancillary Pool: Mace Mastery
Hero Profile:
Level 1: Charged Shot -- SprBlsWrt-Acc/Dmg(A), SprBlsWrt-Dmg/Rchg(3), SprBlsWrt-Acc/Dmg/Rchg(3), SprBlsWrt-Acc/Dmg/EndRdx(5), SprBlsWrt-Acc/Dmg/EndRdx/Rchg(5), SprBlsWrt-Rchg/Dmg%(7)
Level 1: Electron Shackles -- EnfOpr-Acc/Immob(A), EnfOpr-Acc/Rchg(36), EnfOpr-Immob/Rng(40), EnfOpr-Acc/Immob/Rchg(42)
Level 2: Cutting Beam -- SprFrzBls-Acc/Dmg(A), SprFrzBls-Dmg/EndRdx(7), SprFrzBls-Acc/Dmg/EndRdx(9), SprFrzBls-Acc/Dmg/Rchg(9), SprFrzBls-Dmg/EndRdx/Acc/Rchg(11), SprFrzBls-Rchg/ImmobProc(11)
Level 4: Positron Cell -- Thn-Acc/Dmg(A), Thn-Dmg/Rchg(45), Thn-Acc/Dmg/Rchg(45), Tmp-Acc/Dmg(45), Tmp-Dmg/Rchg(46)
Level 6: Boxing -- Empty(A)
Level 8: Disintegrate -- SprWntBit-Acc/Dmg(A), SprWntBit-Dmg/Rchg(13), SprWntBit-Acc/Dmg/EndRdx(13), SprWntBit-Acc/Dmg/Rchg(15), SprWntBit-Dmg/EndRdx/Acc/Rchg(15), SprWntBit-Rchg/SlowProc(17)
Level 10: Ionize -- RctRtc-ToHit(A), RctRtc-ToHit/Rchg(50)
Level 12: Hasten -- RechRdx-I(A), RechRdx-I(43)
Level 14: Tough -- GldArm-3defTpProc(A), StdPrt-ResDam/Def+(25), StdPrt-ResKB(25), UnbGrd-Max HP%(29)
Level 16: Lancer Shot -- SprDfnBrr-Acc/Dmg(A), SprDfnBrr-Dmg/Rchg(17), SprDfnBrr-Acc/Dmg/Rchg(19), SprDfnBrr-Acc/Dmg/EndRdx(19), SprDfnBrr-Acc/Dmg/EndRdx/Rchg(21), SprDfnBrr-Rchg/+Status Protect(21)
Level 18: Aim -- RctRtc-ToHit(A), RctRtc-ToHit/Rchg(23), RctRtc-Pcptn(50)
Level 20: Stealth -- LucoftheG-Def/Rchg+(A), LucoftheG-Def(23), Krm-ResKB(31)
Level 22: Maneuvers -- LucoftheG-Def/Rchg+(A), LucoftheG-Def(42)
Level 24: Metabolic Acceleration -- HO:Golgi(A), Prv-Absorb%(40)
Level 26: Penetrating Ray -- MlsFur-Dmg/EndRdx(A), MlsFur-Acc/Dmg(27), MlsFur-Dmg/Rchg(27), MlsFur-Dmg/EndRdx/Rchg(29)
Level 28: Weave -- LucoftheG-Def/Rchg+(A), ShlWal-Def(36), ShlWal-Def/EndRdx(37), ShlWal-Def/Rchg(37), ShlWal-ResDam/Re TP(37)
Level 30: Piercing Beam -- Bmbdmt-Acc/Rech/End(A), Bmbdmt-Dam(31), Bmbdmt-Dam/Rech(31), Bmbdmt-Acc/Dam/Rech(33), Bmbdmt-Acc/Dam/Rech/End(33), Bmbdmt-+FireDmg(33)
Level 32: Overcharge -- PstBls-Acc/Dmg(A), PstBls-Dmg/Rchg(34), PstBls-Dmg/Rng(34), PstBls-Acc/Dmg/EndRdx(34), PstBls-Dam%(36)
Level 35: Scorpion Shield -- LucoftheG-Def/Rchg+(A)
Level 38: Radioactive Cloud -- UnbCns-Hold(A), UnbCns-Hold/Rchg(39), UnbCns-Acc/Hold/Rchg(39), UnbCns-Acc/Rchg(39), UnbCns-EndRdx/Hold(40)
Level 41: Tactics -- GssSynFr--Build%(A)
Level 44: Positronic Fist -- SprBlsCol-Acc/Dmg(A), SprBlsCol-Acc/Dmg/EndRdx(46), SprBlsCol-Acc/Dmg/Rchg(46), SprBlsCol-Dmg/EndRdx/Acc/Rchg(48), SprBlsCol-Rchg/HoldProc(48), SprBlsCol-Dmg/EndRdx(48)
Level 47: Beta Decay -- AchHee-ResDeb%(A)
Level 49: Vengeance -- LucoftheG-Def/Rchg+(A)
Level 1: Brawl -- Empty(A)
Level 1: Defiance
Level 1: Quick Form
Level 1: Prestige Power Dash -- Empty(A)
Level 1: Prestige Power Slide -- Empty(A)
Level 1: Prestige Power Quick -- Empty(A)
Level 1: Prestige Power Rush -- Empty(A)
Level 1: Prestige Power Surge -- Empty(A)
Level 1: Sprint -- Clr-Stlth(A)
Level 2: Rest -- Empty(A)
Level 4: Ninja Run
Level 2: Swift -- Empty(A)
Level 2: Health -- Pnc-Heal/+End(A), Mrc-Rcvry+(42), NmnCnv-Regen/Rcvry+(43)
Level 2: Hurdle -- Empty(A)
Level 2: Stamina -- PrfShf-End%(A), PrfShf-EndMod(43)
------------