

NiteCloak
-
Posts
23 -
Joined
-
Last visited
Content Type
Profiles
Forums
Events
Store
Articles
Patch Notes
Posts posted by NiteCloak
-
-
Is this a bug I just witnessed in Ouro? (server is Excelsior)

-
2 hours ago, SeraphimKensai said:
Yes and no. Caps are different, so if you're not necessarily min-maxing, I guess. ATOs are also different. Brutes have Taunt, Scrappers have Confront.
You'll likely want to change the slotting based on hitting your individual goals for the character though as well.
OK appreciate the feedback. I'm not a min/maxer but I definitely like my toons to perform well. I've been trying to put off diving too deep in to Mids. I guess I will have to.
-
Can a solid Scrapper Mids build be used as the template for a Brute build with exactly the same primary/secondary?
-
Ah got it. It is indeed the Archetype Origin Enhancements, such as Ascendancy of the Dominator or Defender's Bastion which have a minimum level requirement of level 10.
-
6 minutes ago, Marine X said:
The description seems to fit either a purple set or superior set for the set bonus, but you have to be 50 to slot them. Unless of course they were exemplared on a team, but I would think if you were looking at their set bonuses you would have noticed their actual level there.
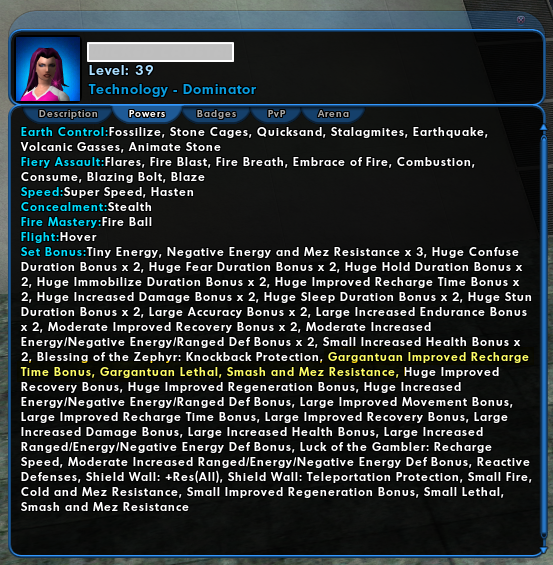
No it was definitely a level 22.
Here's another on a level 39.
-
59 minutes ago, ZemX said:
Might be the +10% recharge available in some purple I/O and superior ATO sets.
Interesting. Thank you.
-
I saw a level 22 Corruptor with "Gargantuan Improved Recharge Time Bonus". Anyone tell me what gives this? It certainly isn't LotG's
-
Thanks guys. Appreciate the feedback!
-
4 hours ago, Psyonico said:
Defenders with power boost and Force Field is the winner for handing out +Defense.
'Power Boost' ?
-
Can someone tell me what archetype/powerset/power provide the highest +Def buff to an ally? (not a self buff but one you can give to a teammate)
I was thinking Electrical Affinity's Faraday Cage might be up there but its a static location buff and I was thinking more along the lines of a buff that an ally can receive and still move about freely.
-
4 hours ago, Supertanker said:
I'm surprised you'd have Accuracy problems, I think the +ToHit from Rage is one of the best parts of Super Strength. I still take Focused Accuracy though, for the +Perception and ToHit Debuff resistance, but generally only need it running fighting Arachnos.
Turns out I wasn't using Rage. I kept forgetting about it and didn't realize how useful it was. Thanks for the heads up.
-
3 hours ago, PLVRIZR said:
Howdy, @NiteCloak
Like many questions in the forums, much depends on your personal definition of "definitive" and what your personal goals are. I built that toon, so I'll give you some of my personal insights. Lemme start with playstyle and (as a retail 2004 player) I consider myself more of a purist, than a hard core min/maxxer. Not to say I don't maximize when it fits, but it's not about eeking out the last .00001 of something. (P.S. If you want the tankiest version, you'll need to find @Hyperstrike and the "Mo Durable" build).
Very much appreciate the reply and as I didn't know your in-game @name or forum name I hope calling you NUTCRCKR was alright lol.
I ended up studying your build in a lot more detail after posting and decided to build it! Took me over 3 hours if I am honest and almost 600 mil inf.
As a personal preference I chose to veer away from Char and Molten Armor (even though I know how good Molten Armor is) and instead went with Focused Accuracy and Physical Perfection. I put Power Transfer: Chance to Heal Self in to single slotted Physical Perfection and in two-slotted stamina I used Performance Shifter +End and IO:End Mod+4
I ran about a dozen PI 54 Radios and my health didn't budge at all which was amazing (to me) and Endurance was no issue at all. I had some Endurance loss fighting some Malta and during a prolonged fight with Scirroco but otherwise the build was rock solid. I am very happy with it and I must compliment you on it. -
1 hour ago, tidge said:Quote
I didn't mean to cause sticker shock!
LoL. I left the game for almost 3 years, came back recently and its like I missed the 'big giveaway' or some such. I am not account rich on influence so have to pick and choose my way through. I have a farmer but I noticed that the inf gain (and xp) since I last used him 3 years ago has been dramatically nerfed so I guess there are other canny ways to earn money these days. I just don't know what they are.
QuoteI usually force the new character to pay for its own boosters and common IOs. I'm all over the place when it comes to "where do HamiO/DSyncs come from?" in any given build... could be I earned and kept them, could be I bought them. My market habits have become "wasteful" in terms of Inf and Merits, but that's me. ¯\_(ツ)_/¯
I love the honesty!
-
Does anyone have any alternative end-game builds for Invul that differ from the one made by NUTCRCKR (provided below)
For a start I want to use Punch and not Jab as he has done (unless someone can tell me why Jab works better?) but also there are two factors that leave me a little reticent to commit to NUTCRCKR's build.
i) Global Recharge. Not sure that the build offers enough to keep Foot Stomp up as often as possible but I am not a min/maxer-theory-crafter so not sure how to measure this. I think I am reading it correctly that the attached build has a 5.16 second recharge for Foot Stomp (presumably with Hasten active). Can it be reduced further I wonder?
ii) Playing from level 24 to level 50 two things I noticed about my build using basic IO's were that I was struggling with endurance and had to keep stocked up on Recovery Serum and later also take Conserver Power from Energy Mastery EPP. Secondly was accuracy, I found I would miss on attacks occasionally and also ended up taking Focused Accuracy which is a massive end hog.
Any tips from Invul enthusiasts with end-game builds appreciated. -
3 hours ago, tidge said:
Here is my Water/Nature Corruptor.
I wouldn't say it is the greatest possible build, but I found myself trying to thread many different needles with respect to enhancement set choices and power picks.
Level 50 Science Corruptor
Primary Power Set: Water Blast
Secondary Power Set: Nature Affinity
Power Pool: Speed
Power Pool: Sorcery
Power Pool: Concealment
Ancillary Pool: Dark Mastery
Villain Profile:
------------
Level 1: Corrosive Enzymes
(A) Accuracy IO: Level 50+5
Level 1: Hydro Blast
(A) Superior Malice of the Corruptor - Accuracy/Damage: Level 50
(*) Superior Malice of the Corruptor - Damage/Recharge: Level 50
(*) Superior Malice of the Corruptor - Accuracy/Damage/Recharge: Level 50
(*) Superior Malice of the Corruptor - Damage/Endurance/Recharge: Level 50
(*) Superior Malice of the Corruptor - Accuracy/Damage/Endurance/Recharge: Level 50
(*) Superior Malice of the Corruptor - Recharge/Chance for Negative Energy Damage: Level 50
Level 2: Water Burst
(*) Superior Frozen Blast - Accuracy/Damage/Endurance: Level 50
(*) Javelin Volley - Chance of Damage (Lethal)
(*) Bombardment - Chance of Damage (Fire)
(*) Positron's Blast - Chance of Damage(Energy)
(*) Impeded Swiftness - Chance of Damage(Smashing)
(*) Force Feedback - Chance for +Recharge
Level 4: Mystic Flight
(A) Blessing of the Zephyr - Run Speed, Jump, Flight Speed, Range/Endurance: Level 50+5
Level 6: Whirlpool
(A) Undermined Defenses - Defense Debuff/Recharge/Endurance: Level 50+5
(*) Tempered Readiness - Endurance/Recharge/Slow: Level 50+5
(*) Ragnarok - Damage/Recharge: Level 50+5
Level 8: Arcane Bolt
(A) Apocalypse - Damage/Recharge: Level 50+5
(*) Apocalypse - Accuracy/Damage/Recharge: Level 50+5
(*) Apocalypse - Accuracy/Recharge: Level 50+5
(*) Apocalypse - Damage/Endurance: Level 50+5
(*) Apocalypse - Chance of Damage (Negative): Level 50
Level 10: Regrowth
(A) Panacea - Hea/Recharge: Level 50+5
(*) Panacea - Heal/Endurance: Level 50+5
(*) Panacea - Endurance/Recharge: Level 50+5
(*) Panacea - Heal/Endurance/Recharge: Level 50+5
(*) Panacea - Heal: Level 50+5
Level 12: Dehydrate
(A) Superior Scourging Blast - Damage/RechargeTime: Level 50
(*) Superior Scourging Blast - Accuracy/Damage/Endurance/RechargeTime: Level 50
(*) Superior Scourging Blast - Accuracy/Damage/RechargeTime: Level 50
(*) Touch of the Nictus - Accuracy/Healing
(*) Touch of the Nictus - Healing
(*) Touch of the Nictus - Chance for Negative Energy Damage
Level 14: Wild Growth
(A) Unbreakable Guard - Endurance/RechargeTime
(*) Unbreakable Guard - RechargeTime/Resistance
(*) Unbreakable Guard - Resistance/Endurance/RechargeTime
(*) Unbreakable Guard - Resistance
(*) Doctored Wounds - Heal/Endurance/Recharge: Level 50+5
Level 16: Enflame
(A) Superior Frozen Blast - Damage/Endurance: Level 50
Level 18: Tidal Forces
(A) Gaussian's Synchronized Fire-Control - Chance for Build Up
(*) Recharge Reduction IO: Level 50+5
Level 20: Wild Bastion
(A) Preventive Medicine - Heal
(*) Preventive Medicine - Heal/Endurance
(*) Preventive Medicine - Endurance/RechargeTime
(*) Preventive Medicine - Heal/RechargeTime
(*) Preventive Medicine - Heal/RechargeTime/Endurance
(*) Preventive Medicine - Chance for +Absorb
Level 22: Steam Spray
(A) Superior Scourging Blast - Accuracy/Damage: Level 50
(*) Superior Scourging Blast - Damage/Endurance/RechargeTime: Level 50
(*) Superior Scourging Blast - RechargeTime/PBAoE +End: Level 50
(*) Touch of Lady Grey - Chance for Negative Damage
(*) Javelin Volley - Chance for Lethal Damage
(*) Positron's Blast - Chance of Damage(Energy)
Level 24: Spore Cloud
(A) Endurance Reduction IO: Level 50+5
Level 26: Geyser
(A) Annihilation - Accuracy/Damage
(*) Annihilation - Damage/RechargeTime
(*) Annihilation - Accuracy/Damage/RechargeTime
(*) Annihilation - Accuracy/Damage/Endurance
(*) Annihilation - Accuracy/Damage/Endurance/RechargeTime
(*) Annihilation - Chance for Res Debuff
Level 28: Infiltration
(A) Shield Wall - +Res (Teleportation), +5% Res (All)
(*) Luck of the Gambler - Recharge Speed
(*) Reactive Defenses - Scaling Resist Damage
(*) Kismet - ToHit +6%
(*) Blessing of the Zephyr - Knockback Protection (4 points)
(*) Blessing of the Zephyr - Run Speed, Jump, Flight Speed, Range/Endurance
Level 30: Overgrowth
(A) Adjusted Targeting - Endurance/Recharge: Level 50+5
(*) Adjusted Targeting - Recharge: Level 50+5
Level 32: Rune of Protection
(A) Gladiator's Armor - TP Protection +3% Def (All)
(*) Steadfast Protection - Resistance/+Def 3%
Level 35: Dark Consumption
(A) Recharge Reduction IO: Level 50+5
(*) D-Sync Conduit (EndMod/Recharge): Level 53
(*) D-Sync Drain (EndMod/Accuracy): Level 53
(*) Obliteration - Chance for Smashing Damage
(*) Eradication - Chance for Energy Damage
Level 38: Hasten
(A) Recharge Reduction IO: Level 50+5
(*) Recharge Reduction IO: Level 50+5
Level 41: Dark Embrace
(A) Unbreakable Guard - +Max HP
(*) Unbreakable Guard - Resistance
(*) Unbreakable Guard - Resistance/Endurance
(*) Unbreakable Guard - Endurance/RechargeTime
Level 44: Soul Drain
(A) Armageddon - Chance for Fire Damage: Level 50
(*) Armageddon - Accuracy/Recharge: Level 50+5
(*) Armageddon - Accuracy/Damage/Recharge: Level 50+5
(*) Armageddon - Damage/Recharge: Level 50+5
(*) Armageddon - Damage/Endurance: Level 50+5
(*) Eradication - Chance for Energy Damage
Level 47: Grant Invisibility
(A) Luck of the Gambler - Recharge Speed
Level 49: Stealth
(A) Luck of the Gambler - Recharge Speed
Level 1: Brawl
(A) Empty
Level 1: Scourge
Level 1: Sprint
(A) Quickfoot – Endurance/Running Speed: Level 50+5
Level 2: Rest
(A) Empty
Level 4: Ninja Run
Level 2: Swift
(A) Flight Speed IO: Level 50+5
Level 2: Health
(A) Miracle - +Recovery
(*) Panacea - +Hit Points/Endurance
Level 2: Hurdle
(A) Jumping IO: Level 50+5
Level 2: Stamina
(A) Performance Shifter - Chance for +End
(*) Performance Shifter - EndMod
That's an expensive build. I noticed +5 on set IO's. I didn't even know you combine Set IO's?
-
3 hours ago, Uun said:
This is my Nature/Seismic defender, but slotting would be the same on a corruptor.
Uungnome - Defender (Nature Affinity).mbd 45.94 kB · 1 download
Interesting. Is Overgrowth perma on your build?
-
1 hour ago, Psyonico said:
Bloom is nature's uniqueness. Basically, you build stacks of it by using nature abilities and it decays over time. Each stack of Bloom that an ally has increases their healing received by any power.
Also, assuming you're using SOs or common IOs, the 4th slot in stamina is basically wasted due to Enhancement Diversification, which you can learn more about in the link below.
That makes sense re: Bloom. Thank you.
Yeah I understand ED and usually slot appropriately. At the lower levels, when I have extra slots to assign I'll typically slap an extra one in Stamina even though the gain is marginal. -
Excellent feedback and I appreciate the lengths you went to explain things power by power with examples of how they might be slotted. This is a huge help for someone like me that cannot get their head around theory-crafting and the math behind it or min/maxing without a template to work from.
The only thing I still don't get with this powerset is the stacks of bloom. I really have no idea what the point of them is. -
Would someone be kind enough to post a screenshot (full mids build nice but not necessary) of their fully slotted Nature Affinity secondary?
Also any tips on how to play it well in a fast moving group.
I am struggling to make the best of this powerset, the heals seem weak at my level (imo) and I'd be interested to see what others feel makes this a good secondary.
Also, I am finding it is very endurance hungry and that's with 4 slotted stamina (current toon level is 33) -
18 hours ago, biostem said:
The GUI for the game imparts a much heavier strain than it should. That being said, the only piece of advice I can offer is to systematically turn the various graphical features to their lowest, (or off), until you find which specific one was the culprit...
Well I did as you suggested and, ironically, it was the last thing I decided to change (naturally) and it appears to have fixed the issue.
I have been running the game at a Refresh Rate of 165 in line with my monitors' refresh rate. After reducing the Refresh Rate to 120, the problem seems to have gone away. In all other respects the graphics 'appear' to be the same.
Thanks for the suggestion!Edit: Actually no. The problem manifested itself again although not as prevalent as before. Still, some improvement is better than no improvement.
-
 1
1
-
-
Exactly that! Except in my case, entirely only when I use a travel power.
-
Issue
Since returning to the game recently, I have had to systematically turn off the Power Popup Tray with Null the Gull on every single character because if I do not, it activates and slides up normally when using a travel power but then takes an eternity to slide back down once the travel power is toggled off at a rate of what looks like 1 pixel per second.
My PC is a high-end gaming rig running an NVidia RTX 4090 running the latest drivers so its not an issue of performance on my end.
The game is utilizing the NVidia card and not the on-board intel graphics.
Any insight gratefully received.
p.s. Game graphics and effects are maxed out and everything runs flawlessly. Only issue experienced is this popup tray.

Temp Pet Bug?
in Bug Reports
Posted
Well I never. Now I know. Thanks.