Hi! First post here and well, my first toon which I'm going to IO - I've played CoH until shortly after IO's came out and never really managed to play around with the system. I suffer from severe altoholism and this is the first toon to hit 50 soon (*cough*) since the revival 🙂
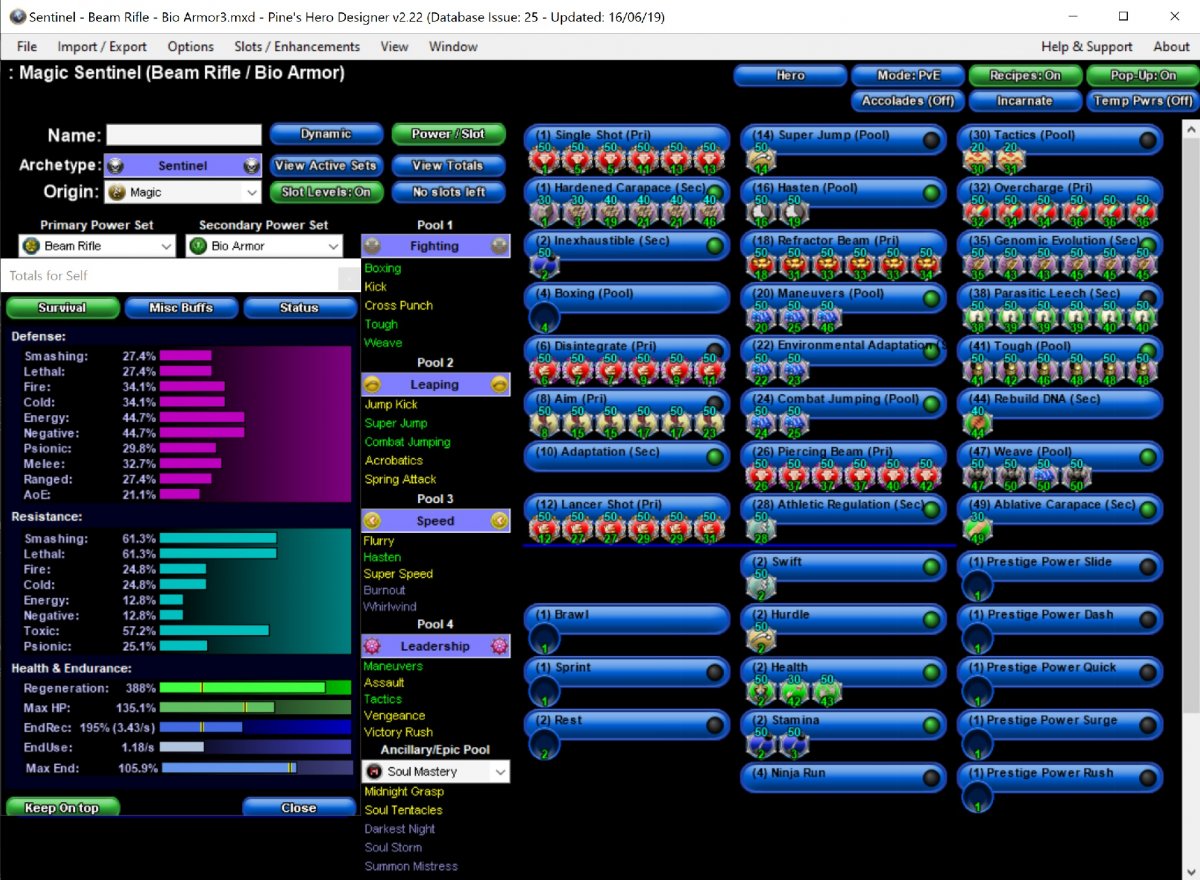
Now, as for the build - the overall idea is to have a blasterish level damage (Offensive Adaptation) with extra team utility coming from -res (with both +opportunity sets, I hope it will proc like crazy) . Other objective is near-perma hasten. (And yes, I'm pondering whether I shouldn't simply roll BR/TA blaster 😄). I'm not religious about soft-capped defenses as I don't really solo.
Powers removed:
- Charged Shot - Single Shot is perma, so it's not really needed and Defensive is a bit meh currently
- Cutting Beam - I don't use it that much and 6-target limit is a bit low (and I was running low on slots, so)
Potential questions:
- tactics can be replaced with something better - thoughts, ideas? currently frankenslotted for extra +def from Rectified Reticle
- rebuild dna - I think I can drop it and replace as well (but, I'm low on slots...)
- kismet - skipped it, not enough slots and I think I should be fine without
Again, this is my first IO build, so looking forward to your feedback! 🙂
---
---
Hero Plan by Mids' Hero Designer 2.22 http://www.cohplanner.com/
Level 50 Magic Sentinel
Primary Power Set: Beam Rifle
Secondary Power Set: Bio Armor
Power Pool: Fighting
Power Pool: Leaping
Power Pool: Speed
Power Pool: Leadership
Hero Profile:
------------
Level 1: Single Shot
(A) Sentinel's Ward - Accuracy/Damage
(5) Sentinel's Ward - Damage/RechargeTime
(5) Sentinel's Ward - Accuracy/Damage/RechargeTime
(11) Sentinel's Ward - Accuracy/Damage/Endurance
(13) Sentinel's Ward - Accuracy/Damage/Endurance/RechargeTime
(13) Sentinel's Ward - RechargeTime/Chance for +Absorb
Level 1: Hardened Carapace
(A) Steadfast Protection - Resistance/+Def 3%
(3) Reactive Armor - Resistance/Endurance
(19) Reactive Armor - Resistance/Recharge
(21) Reactive Armor - Endurance/Recharge
(21) Reactive Armor - Resistance/Endurance/Recharge
(46) Reactive Armor - Resistance
Level 2: Inexhaustible
(A) Performance Shifter - Chance for +End
Level 4: Boxing
(A) Empty
Level 6: Disintegrate
(A) Superior Opportunity Strikes - Accuracy/Damage
(7) Superior Opportunity Strikes - Damage/RechargeTime
(7) Superior Opportunity Strikes - Accuracy/Damage/RechargeTime
(9) Superior Opportunity Strikes - Accuracy/Damage/Endurance
(9) Superior Opportunity Strikes - Accuracy/Damage/Endurance/RechargeTime
(11) Superior Opportunity Strikes - RechargeTime/Chance for Opportunity
Level 8: Aim
(A) Gaussian's Synchronized Fire-Control - To Hit Buff
(15) Gaussian's Synchronized Fire-Control - To Hit Buff/Recharge
(15) Gaussian's Synchronized Fire-Control - To Hit Buff/Recharge/Endurance
(17) Gaussian's Synchronized Fire-Control - Recharge/Endurance
(17) Gaussian's Synchronized Fire-Control - To Hit Buff/Endurance
(23) Gaussian's Synchronized Fire-Control - Chance for Build Up
Level 10: Adaptation
Level 12: Lancer Shot
(A) Opportunity Strikes - Accuracy/Damage
(27) Opportunity Strikes - Damage/RechargeTime
(27) Opportunity Strikes - Accuracy/Damage/RechargeTime
(29) Opportunity Strikes - Accuracy/Damage/Endurance
(29) Opportunity Strikes - Accuracy/Damage/Endurance/RechargeTime
(31) Opportunity Strikes - RechargeTime/Chance for Opportunity
Level 14: Super Jump
(A) Jumping IO
Level 16: Hasten
(A) Recharge Reduction IO
(19) Recharge Reduction IO
Level 18: Refractor Beam
(A) Apocalypse - Damage
(31) Apocalypse - Damage/Recharge
(33) Apocalypse - Accuracy/Damage/Recharge
(33) Apocalypse - Accuracy/Recharge
(33) Apocalypse - Damage/Endurance
(34) Apocalypse - Chance of Damage(Negative)
Level 20: Maneuvers
(A) Luck of the Gambler - Recharge Speed
(25) Luck of the Gambler - Defense/Endurance
(46) Luck of the Gambler - Defense
Level 22: Environmental Adaptation
(A) Luck of the Gambler - Recharge Speed
(23) Luck of the Gambler - Defense
Level 24: Combat Jumping
(A) Luck of the Gambler - Recharge Speed
(25) Luck of the Gambler - Defense
Level 26: Piercing Beam
(A) Superior Sentinel's Ward - Accuracy/Damage
(37) Superior Sentinel's Ward - Damage/RechargeTime
(37) Superior Sentinel's Ward - Accuracy/Damage/RechargeTime
(37) Superior Sentinel's Ward - Accuracy/Damage/Endurance
(40) Superior Sentinel's Ward - Accuracy/Damage/Endurance/RechargeTime
(42) Superior Sentinel's Ward - RechargeTime/Chance for +Absorb
Level 28: Athletic Regulation
(A) Run Speed IO
Level 30: Tactics
(A) Rectified Reticle - To Hit Buff/Recharge
(31) Rectified Reticle - To Hit Buff
Level 32: Overcharge
(A) Ragnarok - Damage
(34) Ragnarok - Damage/Recharge
(34) Ragnarok - Accuracy/Damage/Recharge
(36) Ragnarok - Accuracy/Recharge
(36) Ragnarok - Damage/Endurance
(36) Ragnarok - Chance for Knockdown
Level 35: Genomic Evolution
(A) Unbreakable Guard - Resistance
(43) Unbreakable Guard - Resistance/Endurance
(43) Unbreakable Guard - Endurance/RechargeTime
(45) Unbreakable Guard - RechargeTime/Resistance
(45) Unbreakable Guard - +Max HP
(45) Unbreakable Guard - Resistance/Endurance/RechargeTime
Level 38: Parasitic Leech
(A) Preventive Medicine - Heal
(39) Preventive Medicine - Heal/Endurance
(39) Preventive Medicine - Endurance/RechargeTime
(39) Preventive Medicine - Heal/RechargeTime
(40) Preventive Medicine - Heal/RechargeTime/Endurance
(40) Preventive Medicine - Chance for +Absorb
Level 41: Tough
(A) Gladiator's Armor - TP Protection +3% Def (All)
(42) Gladiator's Armor - Recharge/Resist
(46) Gladiator's Armor - Recharge/Endurance
(48) Gladiator's Armor - Resistance
(48) Gladiator's Armor - Resistance/Rech/End
(48) Gladiator's Armor - End/Resist
Level 44: Rebuild DNA
(A) Harmonized Healing - Heal/Recharge
Level 47: Weave
(A) Shield Wall - +Res (Teleportation), +5% Res (All)
(50) Shield Wall - Defense
(50) Luck of the Gambler - Recharge Speed
(50) Shield Wall - Defense/Endurance
Level 49: Ablative Carapace
(A) Triage - Heal/Recharge
Level 1: Defensive Adaptation
Level 1: Brawl
(A) Empty
Level 1: Prestige Power Dash
(A) Empty
Level 1: Prestige Power Slide
(A) Empty
Level 1: Prestige Power Quick
(A) Empty
Level 1: Prestige Power Rush
(A) Empty
Level 1: Prestige Power Surge
(A) Empty
Level 1: Sprint
(A) Empty
Level 2: Rest
(A) Empty
Level 4: Ninja Run
Level 2: Swift
(A) Run Speed IO
Level 2: Health
(A) Panacea - +Hit Points/Endurance
(42) Miracle - +Recovery
(43) Numina's Convalesence - +Regeneration/+Recovery
Level 2: Hurdle
(A) Jumping IO
Level 2: Stamina
(A) Performance Shifter - Chance for +End
(3) Performance Shifter - EndMod
Level 10: Efficient Adaptation
Level 10: Offensive Adaptation
------------