

Jaremaru
-
Posts
5 -
Joined
-
Last visited
Content Type
Profiles
Forums
Events
Store
Articles
Patch Notes
Posts posted by Jaremaru
-
-
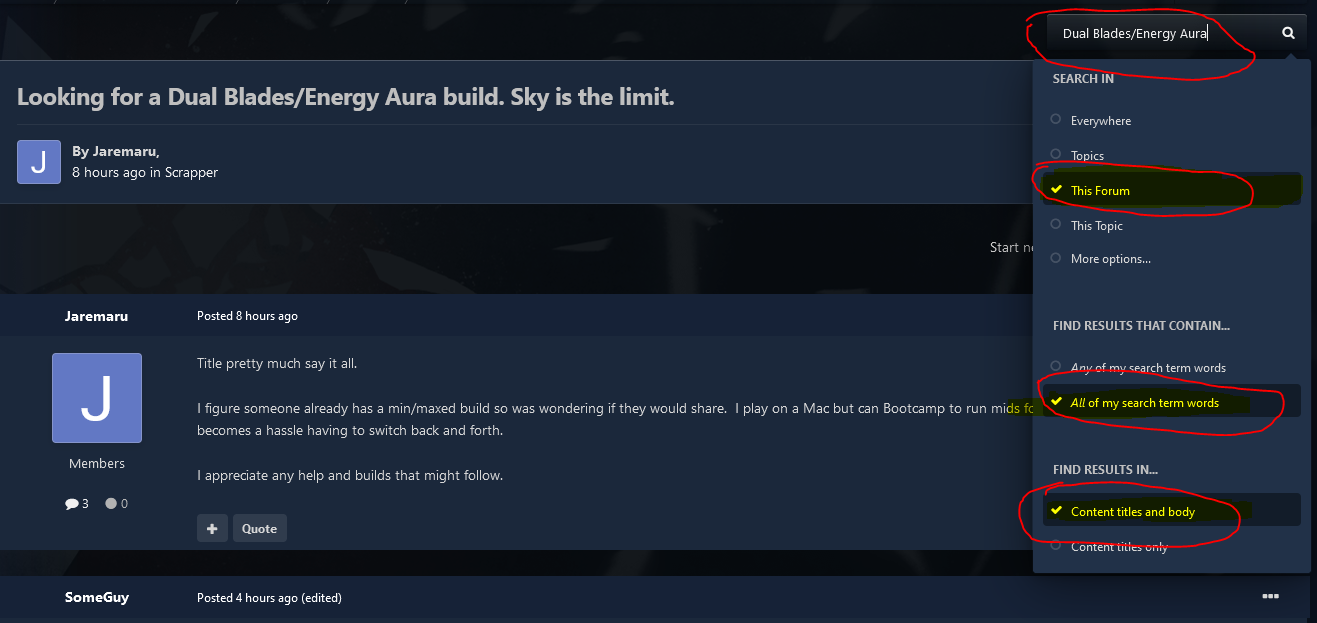
7 hours ago, Nemu said:
There are a few posts about this combo. Here's how to search for them:

This is one of the first hits on the results page. It's still quite relevant.
I see your build is the most up to date on that forum post. Is this what you would recommend?
-
1 hour ago, SomeGuy said:
Everyone's interpretation of min/max is gonna be different, but here is my take (and I LOVE this build):
For clarification, I like to make things dead. Making something go to zero HP is the best CC and mitigation. Obviously, you want enough mitigation to do that. ENA does that is spades.
This Hero build was built using Mids Reborn 3.1.2.5
https://github.com/LoadedCamel/MidsReborn
Click this DataLink to open the build!
Sir Leeford: Level 50 Natural Scrapper
Primary Power Set: Dual Blades
Secondary Power Set: Energy Aura
Power Pool: Leaping
Power Pool: Speed
Power Pool: Fighting
Power Pool: Leadership
Ancillary Pool: Mu Mastery
Hero Profile:
Level 1: Nimble Slash -- HO:Nucle(A), Dmg-I(3), Mk'Bit-Dam%(5), TchofDth-Dam%(5), GldStr-%Dam(46)
Level 1: Kinetic Shield -- LucoftheG-Def/Rchg+(A), ShlWal-Def/EndRdx(7), ShlWal-Def/EndRdx/Rchg(7), ShlWal-Def(9), Ksm-ToHit+(43)
Level 2: Ablating Strike -- Hct-Dmg(A), Hct-Dmg/EndRdx(11), Hct-Dam%(11), TchofDth-Dam%(13), GldStr-%Dam(13), AchHee-ResDeb%(15)
Level 4: Dampening Field -- Ags-ResDam/Rchg(A), Ags-ResDam/EndRdx(15), Ags-ResDam(17)
Level 6: Typhoon's Edge -- SprScrStr-Dmg/Rchg(A), SprScrStr-Acc/Dmg/Rchg(19), SprScrStr-Dmg/EndRdx/Rchg(21), SprScrStr-Acc/Dmg/EndRdx/Rchg(21), SprScrStr-Rchg/+Crit(23)
Level 8: Blinding Feint -- SprCrtStr-Acc/Dmg(A), SprCrtStr-Dmg/Rchg(23), SprCrtStr-Rchg/+50% Crit(25), TchofDth-Dam%(25), GssSynFr--Build%(27), GldStr-%Dam(27)
Level 10: Entropic Aura -- EndRdx-I(A)
Level 12: Power Shield -- Rct-ResDam%(A), Rct-Def(17), Rct-Def/EndRdx(19), Rct-EndRdx/Rchg(29), Rct-Def/Rchg(31), Rct-Def/EndRdx/Rchg(39)
Level 14: Combat Jumping -- LucoftheG-Def/Rchg+(A)
Level 16: Energy Protection -- GldArm-3defTpProc(A), GldArm-End/Res(31), GldArm-ResDam(31), StdPrt-ResDam/Def+(39)
Level 18: Hasten -- RechRdx-I(A), RechRdx-I(40)
Level 20: Energy Cloak -- LucoftheG-Def/Rchg+(A), LucoftheG-Def(48)
Level 22: Super Jump -- WntGif-ResSlow(A)
Level 24: Kick -- SprBlsCol-Rchg/HoldProc(A), SprBlsCol-Acc/Dmg/EndRdx(29)
Level 26: Sweeping Strike -- Arm-Dmg(A), Arm-Dmg/EndRdx(34), Arm-Dam%(34), FuroftheG-ResDeb%(34), Erd-%Dam(36), Obl-%Dam(36)
Level 28: Energize -- Prv-Absorb%(A), Prv-Heal(36), Prv-Heal/EndRdx(37), Prv-EndRdx/Rchg(40), Prv-Heal/Rchg(42), Prv-Heal/Rchg/EndRdx(42)
Level 30: Tough -- UnbGrd-Max HP%(A), UnbGrd-ResDam(33), UnbGrd-ResDam/EndRdx(33), UnbGrd-ResDam/EndRdx/Rchg(33)
Level 32: Weave -- LucoftheG-Def/Rchg+(A), ShlWal-Def/EndRdx(37), ShlWal-Def/EndRdx/Rchg(37), ShlWal-Def(49)
Level 35: Energy Drain -- ShlWal-ResDam/Re TP(A), ShlWal-Def/Rchg(40), ShlWal-Def/EndRdx/Rchg(47)
Level 38: Zapp -- Apc-Dmg(A), Apc-Dmg/EndRdx(43), Apc-Dam%(45), Dcm-Build%(46), StnoftheM-Dam%(47), GldJvl-Dam%(48)
Level 41: Ball Lightning -- Rgn-Dmg/EndRdx(A), Rgn-Dmg(42), Rgn-Dmg/Rchg(43), Rgn-Acc/Dmg/Rchg(45), Rgn-Acc/Rchg(46)
Level 44: Maneuvers -- ShlWal-Def/EndRdx(A), ShlWal-Def/EndRdx/Rchg(45), ShlWal-Def(48)
Level 47: Assault -- EndRdx-I(A)
Level 49: Overload -- LucoftheG-Def/Rchg+(A)
Level 1: Critical Hit
Level 1: Brawl -- SprBlsCol-Acc/Dmg(A), SprBlsCol-Dmg/EndRdx(3)
Level 1: Sprint -- Run-I(A)
Level 2: Rest -- Empty(A)
Level 1: Swift -- Run-I(A)
Level 1: Hurdle -- Jump-I(A)
Level 1: Health -- Pnc-Heal/+End(A), NmnCnv-Regen/Rcvry+(9)
Level 1: Stamina -- PrfShf-End%(A), PwrTrns-+Heal(39)
Level 18: Double Jump
Level 49: Quick Form
Level 50: Musculature Core Paragon
Level 50: Degenerative Core Flawless Interface
Level 50: Ion Core Final Judgement
Level 50: Banished Pantheon Radial Superior Ally
Level 50: Assault Radial Embodiment
------------
why did you not choose vengeful strike for the chain?
-
Title pretty much say it all.
I figure someone already has a min/maxed build so was wondering if they would share. I play on a Mac but can Bootcamp to run mids for the build file but making one myself becomes a hassle having to switch back and forth.
I appreciate any help and builds that might follow.
-
I got two heal and one endurance insp for the first few. One sells for 100 and the two heals are selling for 5k but nobody is buying mine at 1inf. Is there a way to start this method without sitting and waiting for the auction house? Also this will only net me 10k which seems much lower then 24k
Looking for a Dual Blades/Energy Aura build. Sky is the limit.
in Scrapper
Posted
whats your reason though? I appreciate the help, but saying I wouldn't use it doesn't help me decide on a build. I am torn whether or not I should be going for the attack vitals chain or not. So far anyone that has recommended DB has said thats your bread and butter, and you are the only one that doesn't. I would like to know why you decided that? I am very interested in your build but going full gusto on it without knowing your reason. Simply saying the uppercut animation is the reason why doesn't really convince me to not take the power. I have a titan weapon tanker so animations arent really a make or break for me.