

Hobbes
-
Posts
49 -
Joined
-
Last visited
Content Type
Profiles
Forums
Events
Store
Articles
Patch Notes
Posts posted by Hobbes
-
-
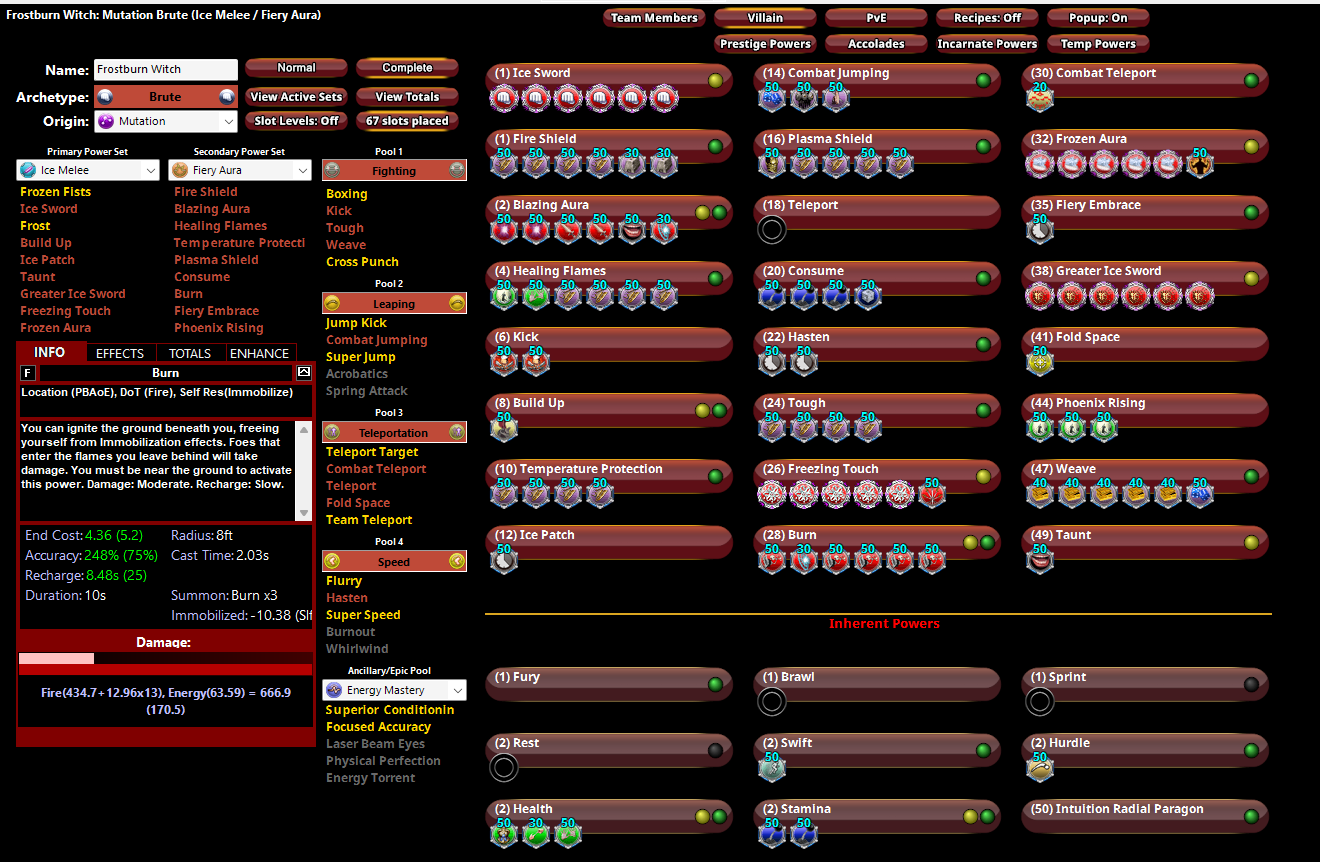
Version with Frost and more proctacular Burn. Probably the way to go. Le-sigh. *contemplates dropping Weave for Phoenix Rising*

-
Frost is a good cone, but I don't currently miss it. Had it for the first 27 levels, and respec'd out of it. Still leveling so haven't dialed it up to +4 yet, at +1 Burn/Frozen Aura/Blazing Aura clear out the riff raff just fine. I'll see how it plays at 50, +4/*8. I can always drop Phoenix Rising for Frost, but a two minuet self rez on a Brute makes me giggle.
I currently value the additional resists over more proc damage in Burn, and I don't know where else to stick Unrelenting Fury. If the Brute ATs sucked less, that would be nice, but here we are.
Drop Phoenix rising, take Frost, put Unrelenting Fury in Frost, Proc out Burn? Will tinker, thank you.
Here is the Frostless version after some more small improvements.
-
Thank you, I have not been keeping up on proc math changes.
Minor tweaks made:
-
-
I couldn't decide which way to go and now I've got a muddled mess. What should an Ice/Fire be building to?
My current unsatisfactory attempt.
-
Heat Loss, Victory Rush, and Power Sink for End Management tools, but mid levels will probably be a lot of selective toggle running until those get slotted right. 2 Slotted Stamina and Health with the standard health and endurance procs. At this point slot shuffling is just moving bonuses from column A to column B, I'll play a bit and see what works best. At 5 LoTGs, Hasten is 14 seconds away from Perma, which is close enough for government work.
-
 1
1
-
-
Thanks all! Lifelong scrapper player so skipping the fighting pool feels very wrong but I'll give it a whirl. This character will have a consistent team to play with and through 15 levels we've only had a couple of faceplants (mostly mine when I play too aggressive) so I'm going to skip on the Vengeance. But Victory Rush could be dropped to add it for a more PUGtastic build.
And agreed on the Power Boost/Electric Blast combo, I have a friend that plays that regularly. Would swap out Electric Mastery pics if this were a PUGging build, but the other Defender in the regular team is also /Electric. Two Short Circuits should pretty well clear out most mobs blue bars.
This Hero build was built using Mids Reborn 3.4.6
https://github.com/LoadedCamel/MidsRebornClick this DataLink to open the build!
Auger: Level 50 Magic Defender
Primary Power Set: Cold Domination
Secondary Power Set: Electrical Blast
Power Pool: Leadership
Power Pool: Speed
Power Pool: Experimentation
Power Pool: Leaping
Ancillary Pool: Electricity MasteryHero Profile:
Level 1: Ice Shield- (A) Luck of the Gambler - Defense/Increased Global Recharge Speed
- (3) Luck of the Gambler - Defense
- (3) Steadfast Protection - Knockback Protection
- (5) Steadfast Protection - Resistance/+Def 3%
- (5) Gladiator's Armor - TP Protection +3% Def (All)
- (7) Luck of the Gambler - Defense/Endurance
Level 1: Lightning Bolt
- (A) Superior Defender's Bastion - Accuracy/Damage
- (7) Superior Defender's Bastion - Damage/Recharge
- (9) Superior Defender's Bastion - Damage/Endurance/Recharge
- (9) Superior Defender's Bastion - Accuracy/Damage/Endurance
- (11) Superior Defender's Bastion - Accuracy/Damage/Endurance/Recharge
- (11) Superior Defender's Bastion - Recharge/Chance for Minor PBAoE Heal
Level 2: Infrigidate
- (A) Analyze Weakness - Accuracy/Defense Debuff
- (48) Achilles' Heel - Chance for Res Debuff
- (48) Shield Breaker - Accuracy/Defense Debuff
Level 4: Ball Lightning
- (A) Superior Vigilant Assault - RechargeTime/PBAoE +Absorb
- (15) Superior Vigilant Assault - Accuracy/Damage/Endurance/RechargeTime
- (15) Superior Vigilant Assault - Damage/RechargeTime
- (17) Overwhelming Force - Accuracy/Damage/Endurance
- (17) Overwhelming Force - Damage/Chance for Knockdown/Knockback to Knockdown
- (19) Bombardment - Chance for Fire Damage
Level 6: Glacial Shield
- (A) Luck of the Gambler - Defense/Increased Global Recharge Speed
- (19) Reactive Defenses - Scaling Resist Damage
- (21) Shield Wall - +Res (Teleportation), +5% Res (All)
- (21) Reactive Defenses - Defense
- (50) Unbreakable Guard - +Max HP
- (50) Luck of the Gambler - Defense
Level 8: Frostwork
- (A) Miracle - Heal/Recharge
- (46) Doctored Wounds - Heal/Recharge
- (48) Preventive Medicine - Heal/RechargeTime
Level 10: Short Circuit
- (A) Power Transfer - EndMod
- (23) Power Transfer - Damage/Recharge
- (23) Power Transfer - Damage/EndMod
- (25) Power Transfer - Damage/Accuracy/Endurance
- (25) Power Transfer - Damage/Accuracy/Recharge/Endurance
- (27) Power Transfer - Chance to Heal Self
Level 12: Arctic Fog
- (A) Luck of the Gambler - Defense/Increased Global Recharge Speed
- (27) Luck of the Gambler - Defense
- (29) Luck of the Gambler - Defense/Endurance
- (29) Aegis - Resistance/Endurance
- (31) Aegis - Resistance
- (31) Aegis - Resistance/Recharge
Level 14: Maneuvers
- (A) Luck of the Gambler - Defense/Increased Global Recharge Speed
- (31) Luck of the Gambler - Defense
- (33) Luck of the Gambler - Defense/Endurance
Level 16: Charge Up
- (A) Recharge Reduction IO
- (33) Gaussian's Synchronized Fire-Control - Chance for Build Up
Level 18: Benumb
- (A) Recharge Reduction IO
- (33) Recharge Reduction IO
- (34) Accuracy IO
Level 20: Tactics
- (A) Endurance Reduction IO
Level 22: Zapp
- (A) Sting of the Manticore - Accuracy/Damage
- (34) Sting of the Manticore - Accuracy/Interrupt/Range
- (34) Sting of the Manticore - Damage/Endurance
- (36) Apocalypse - Chance of Damage(Negative)
- (36) Gladiator's Javelin - Chance of Damage(Toxic)
- (36) Sting of the Manticore - Chance of Damage(Toxic)
Level 24: Assault
- (A) Endurance Reduction IO
Level 26: Sleet
- (A) Annihilation - Chance for Res Debuff
- (37) Touch of Lady Grey - Defense Debuff/Recharge
- (37) Touch of Lady Grey - Defense Debuff/Recharge/Endurance
Level 28: Hasten
- (A) Recharge Reduction IO
- (37) Recharge Reduction IO
Level 30: Victory Rush
- (A) Endurance Modification IO
Level 32: Heat Loss
- (A) Preemptive Optimization - EndMod/Endurance/Recharge
- (39) Efficacy Adaptor - EndMod/Accuracy/Recharge
- (39) Synapse's Shock - EndMod/Recharge
- (39) Performance Shifter - EndMod/Recharge
- (40) Preemptive Optimization - EndMod/Accuracy/Endurance
Level 35: Thunder Strike
- (A) Superior Avalanche - Accuracy/Damage
- (40) Superior Avalanche - Damage/Endurance
- (40) Superior Avalanche - Accuracy/Damage/Endurance
- (42) Superior Avalanche - Accuracy/Damage/Recharge
- (42) Superior Avalanche - Accuracy/Damage/Endurance/Recharge
- (50) Sudden Acceleration - Knockback to Knockdown
Level 38: Thunderous Blast
- (A) Superior Vigilant Assault - Accuracy/Damage
- (42) Superior Vigilant Assault - Accuracy/Damage/Endurance
- (43) Superior Vigilant Assault - Damage/Endurance/RechargeTime
- (43) Bombardment - Chance for Fire Damage
- (43) Annihilation - Chance for Res Debuff
- (45) Javelin Volley - Chance of Damage(Lethal)
Level 41: Charged Armor
- (A) Aegis - Resistance
- (45) Aegis - Resistance/Endurance
- (45) Aegis - Resistance/Recharge
Level 44: Power Sink
- (A) Preemptive Optimization - EndMod/Recharge
- (46) Preemptive Optimization - EndMod/Endurance/Recharge
- (46) Performance Shifter - EndMod/Recharge
Level 47: Experimental Injection
- (A) Recharge Reduction IO
Level 49: Combat Jumping
- (A) Luck of the Gambler - Defense/Increased Global Recharge Speed
Level 1: Vigilance
Level 1: Brawl| Copy & Paste this data into Mids Reborn : Hero Designer to view the build | |-------------------------------------------------------------------| |MxDz;1655;731;1462;HEX;| |78DA7594CF4F134114C75FA7BB62CB6F0AB4FC860A82B49416F1AEFC888950444CB| |C364DBBD44D4ADBB425817FC2831EBC007A32F1E20F143D7BD468D0C4B389F1E041| |450C6A8231599FF3E6D501E226DBFDCCCC77BEEFCDDBD78DAF4CD5BC7A397B165C7| |593D964A99498B216AD5CDA2A9AF164C64E015EE6B9E58C55AC42EAE2C5C4C4F2E2| |6264329F4D27A6F24B762E59B6F3B9DECAEA423297B1D291E9AC952A17ED54329B9| |840EF32D4CFE7F3D9C8AC954451E9AA5DF0CAF1E58265A59B254EAF14ACA2BD64E5| |CAD2B186F5053B97094C17EC54C5D32EAF26E2E86915570398591FDE33027F5CC09| |76302B4E03066808066860042970106F819C6DC72E9183490E6DE519B4D963C2238| |0E8F19B608BCF084E129C105A1BB80235CB02D64C8517886E0FB0BC22D67EEE3D8A| |D694D379C31A44B1D8C33C4081AE09D5BC17B822610A68438DA987AE62617A009F6| |48DB0C330C3B0431D86750459A439B2ACD4654C1791C0E1A300271928CC227DAF40| |0B51E3DA4077629CF56F8C6B0471080EF0C3F08DAE127C145B4A9D66DAA39F376CE| |AA93DF4F274409BA619C2146D0884D5AAB675ECB36DD6CD3CB360F3164BDA675D54| |30894E4AE90308F8F46DDAEF19F44411F2628C187A17D9A167CB227716553501F56| |CED602DBBCF90DC36B821310130AC26E056F69A90903F8F5007E0E7009B7B4E969B| |6C147DADC0FCF858217044174E9D04FDDC127E967B8338C3DA907EAC2E3CA9505F4| |E87155BADA317AE037BDBF93704D28F8CC33376866107ED1CC1AE614D49B3C086B8| |692AC336C109C825B0CB70DD59D1F08B6D07640B71980286B4F130CC31883FA670C| |7345C2102458C7C7905EB421EEA630F75798DB6A03B521EDDC2204FB1460840B30C| |2C79DC3EA45F4EA45B8AEAD58FAA8BE12E5E69C330E7E719C4E03F4CB91938E03B3| |8784787B54AB1A07BF3638903BBE788FEC90F33BFF99FF7A681EB18F0A56035728D| |BDDA3929B4249AE1304425292AE1C6806AB12D5D273FE001DC0D492| |-------------------------------------------------------------------|
-
First Defender since live, not sure if I'm missing any tips or tricks. Not going to solo with this one often, if ever. Any recommendations?
This Hero build was built using Mids Reborn 3.4.6
https://github.com/LoadedCamel/MidsRebornClick this DataLink to open the build!
Auger: Level 50 Magic Defender
Primary Power Set: Cold Domination
Secondary Power Set: Electrical Blast
Power Pool: Leadership
Power Pool: Speed
Power Pool: Fighting
Power Pool: Leaping
Ancillary Pool: Mu MasteryHero Profile:
Level 1: Ice Shield- (A) Luck of the Gambler - Defense/Increased Global Recharge Speed
- (3) Luck of the Gambler - Defense
- (3) Steadfast Protection - Knockback Protection
- (5) Steadfast Protection - Resistance/+Def 3%
- (5) Gladiator's Armor - TP Protection +3% Def (All)
- (7) Unbreakable Guard - +Max HP
Level 1: Lightning Bolt
- (A) Superior Defender's Bastion - Accuracy/Damage
- (7) Superior Defender's Bastion - Damage/Recharge
- (9) Superior Defender's Bastion - Damage/Endurance/Recharge
- (9) Superior Defender's Bastion - Accuracy/Damage/Endurance
- (11) Superior Defender's Bastion - Accuracy/Damage/Endurance/Recharge
- (11) Superior Defender's Bastion - Recharge/Chance for Minor PBAoE Heal
Level 2: Infrigidate
- (A) Defense Debuff IO
Level 4: Ball Lightning
- (A) Ragnarok - Chance for Knockdown
- (15) Ragnarok - Damage/Endurance
- (15) Ragnarok - Damage/Recharge
- (17) Ragnarok - Damage/Recharge/Accuracy
- (17) Ragnarok - Recharge/Accuracy
- (19) Bombardment - Chance for Fire Damage
Level 6: Glacial Shield
- (A) Luck of the Gambler - Defense/Increased Global Recharge Speed
- (19) Reactive Defenses - Scaling Resist Damage
- (21) Shield Wall - +Res (Teleportation), +5% Res (All)
- (21) Reactive Defenses - Defense
- (50) Luck of the Gambler - Defense
Level 8: Frostwork
- (A) Miracle - Heal/Recharge
- (46) Doctored Wounds - Heal/Recharge
- (48) Preventive Medicine - Heal/RechargeTime
Level 10: Short Circuit
- (A) Superior Avalanche - Accuracy/Damage/Endurance/Recharge
- (23) Superior Avalanche - Recharge/Chance for Knockdown
- (23) Superior Avalanche - Accuracy/Damage
- (25) Superior Avalanche - Accuracy/Damage/Endurance
- (25) Superior Avalanche - Damage/Endurance
- (27) Superior Avalanche - Accuracy/Damage/Recharge
Level 12: Arctic Fog
- (A) Luck of the Gambler - Defense/Increased Global Recharge Speed
- (27) Luck of the Gambler - Defense
- (29) Luck of the Gambler - Defense/Endurance
- (29) Aegis - Resistance/Endurance
- (31) Aegis - Resistance
- (31) Aegis - Resistance/Recharge
Level 14: Maneuvers
- (A) Luck of the Gambler - Defense/Increased Global Recharge Speed
- (31) Luck of the Gambler - Defense
- (33) Luck of the Gambler - Defense/Endurance
Level 16: Charge Up
- (A) Recharge Reduction IO
- (33) Recharge Reduction IO
Level 18: Benumb
- (A) Recharge Reduction IO
- (33) Recharge Reduction IO
- (34) Accuracy IO
Level 20: Tactics
- (A) Endurance Reduction IO
Level 22: Zapp
- (A) Sting of the Manticore - Accuracy/Damage
- (34) Sting of the Manticore - Accuracy/Interrupt/Range
- (34) Sting of the Manticore - Damage/Endurance
- (36) Apocalypse - Chance of Damage(Negative)
- (36) Gladiator's Javelin - Chance of Damage(Toxic)
- (36) Sting of the Manticore - Chance of Damage(Toxic)
Level 24: Assault
- (A) Endurance Reduction IO
Level 26: Sleet
- (A) Superior Vigilant Assault - RechargeTime/PBAoE +Absorb
- (37) Touch of Lady Grey - Defense Debuff/Recharge
- (37) Touch of Lady Grey - Defense Debuff/Recharge/Endurance
Level 28: Hasten
- (A) Recharge Reduction IO
- (37) Recharge Reduction IO
Level 30: Kick
- (A) Empty
Level 32: Heat Loss
- (A) Preemptive Optimization - EndMod/Endurance/Recharge
- (39) Efficacy Adaptor - EndMod/Accuracy/Recharge
- (39) Synapse's Shock - EndMod/Recharge
- (39) Performance Shifter - EndMod/Recharge
- (40) Preemptive Optimization - EndMod/Accuracy/Endurance
Level 35: Power Sink
- (A) Preemptive Optimization - EndMod/Recharge
- (40) Synapse's Shock - EndMod/Recharge
- (40) Performance Shifter - EndMod/Recharge
- (42) Efficacy Adaptor - EndMod/Recharge
- (42) Endurance Reduction IO
- (50) Power Transfer - Chance to Heal Self
Level 38: Thunderous Blast
- (A) Superior Frozen Blast - Accuracy/Damage
- (42) Superior Frozen Blast - Accuracy/Damage/Endurance
- (43) Superior Frozen Blast - Damage/Endurance
- (43) Bombardment - Chance for Fire Damage
- (43) Annihilation - Chance for Res Debuff
- (45) Javelin Volley - Chance of Damage(Lethal)
Level 41: Charged Armor
- (A) Aegis - Resistance
- (45) Aegis - Resistance/Endurance
- (45) Aegis - Resistance/Endurance/Recharge
- (50) Aegis - Psionic/Status Resistance
Level 44: Tough
- (A) Aegis - Resistance
- (46) Aegis - Resistance/Endurance
- (46) Aegis - Resistance/Endurance/Recharge
Level 47: Weave
- (A) Luck of the Gambler - Defense/Increased Global Recharge Speed
- (48) Luck of the Gambler - Defense
- (48) Luck of the Gambler - Defense/Endurance
Level 49: Combat Jumping
- (A) Luck of the Gambler - Defense/Increased Global Recharge Speed
Level 1: Brawl
- (A) Empty
Level 1: Sprint
- (A) Celerity - +Stealth
Level 1: Vigilance
Level 2: Rest| Copy & Paste this data into Mids Reborn : Hero Designer to view the build | |-------------------------------------------------------------------| |MxDz;1647;720;1440;HEX;| |78DA75945B4F135110C7FFDDEE8ADCEF50EE504190964205F455B948221411135F9| |BA65DCA26B56DB66DA21F421FF4C117AF5FC00B027E068D464DFC0E3E8868626282| |31A9C3991D72A471936D7FE7CCCC7FE6CC99367673A1EEFDBB950BF035CC6712854| |27CC1DEB0B329DBB56289B493043DD6C552DA76AB88FAC4189F2B6D6C44E6739954| |7C2177C3C9268A4E2E3B78645D4F64D3762AB298B19345D7492632F139D22EA2712| |D97CB4456EC043915369D7C8D5A5FCBDB76AA5EE12527BD5974B2E93A71CCD3A26B| |31EF242999EB96F2C59C1B8F95E23152B3DD5B01AA6988DE65833E7C90A76C01EDB| |48C9A30D0261020E83361A253E0AC5F994EE080E159A5CC96B8BC6238896D811D86| |1AEC0ABC66B84C323E4D862407A02CCFC9E28796C08FF386B234E09CC0344313660| |466195A60580A62B4B6B404A625C76DC14FAEA10DCB02FB0C51E9C42A455769D146| |159668396A6202317699C4570E7A41BED57AC1D578622A4B079E0A3C6008E091C04| |3866E3C66B84232B57A636BA5E06EA9AA174D02530CFD9811883234D30CD6EB95D7| |8B4CBFC80C8ACC4B4AD9A8F9FA1A1182E7E2C11AB934EB72CD152E4354A082564AD| |DAADF69AB1A3CB26C914ABBDEA2767C90E04F021F194E216A7810F67BF0994D2D94| |A0534FD02909AE52489796C0E8C22CB775186F0C0FDE320449A5473F758F9C64588| |0AE1B7D9A1C2DCAF4609D14067C47E35F3607F087D39CC61DC3833DD9B9C73BA3F8| |CD3B053A4E508BB68238303D973D012FE80C6E0B78478CE217FBEC9061441F94116| |C9B9EEF2EC3387604BC9FC338BE7033C3083214E96B4C93F18FC92C8565BAC298F6| |79B96719FCD498903E0E21099A90A0090932C937A2FB4664122765122765123BC87| |74ABFD929F1ED35A13FE5C3F7F02A56CC7FFF87E8ADE68EAD1EB394D74C7DADFE6B| |94C4B79A0A09B5FFFDD83EE110F7AC0ED7B9AAFDFF84FEA80CBD6F78A177190221E| |5923A2A6F799CCEAE9557FE0B433ECDA5| |-------------------------------------------------------------------|
-
This is the finalized build I went with. My thanks to AustinSmith off the Homecoming Discord as well as several others for their input.
Got my Alpha unlocked and it plays solo very well at +0/*6 or *8, depending on the mob faction. Teams are lulzy. I use Seismic Force with Shockwaves to knock about 10 seconds off Meteor cooldown, Chronos reduces cooldown about 5 more seconds. When it's all clicking right I drop a Meteor on 2 out of 3 Spawns. Bonfire is perma'd without any recharge slotting and is a great panic button vs anything with legs. Going for Agility and Ageless for more recharge because giant rocks from space solve a lot of problems.
Downsides, no hard controls so if the mobs can't be knocked down you need to kill 'em fast. This particular build is about as tough as some un-IO'd scrappers though, so you can handle quite a bit of incoming damage. Until you very suddenly can't. ; )
This Hero build was built using Mids Reborn 3.4.6
https://github.com/LoadedCamel/MidsRebornClick this DataLink to open the build!
Aspect of Bast: Level 50 Magic Blaster
Primary Power Set: Seismic Blast
Secondary Power Set: Temporal Manipulation
Power Pool: Speed
Power Pool: Fighting
Power Pool: Leaping
Power Pool: Leadership
Ancillary Pool: Flame MasteryHero Profile:
Level 1: Shatter- (A) Superior Defiant Barrage - Accuracy/Damage
- (3) Superior Defiant Barrage - Accuracy/Damage/RechargeTime
- (3) Superior Defiant Barrage - Damage/RechargeTime
- (5) Superior Defiant Barrage - Accuracy/Damage/Endurance/RechargeTime
- (5) Superior Defiant Barrage - RechargeTime/+Status
- (7) Superior Defiant Barrage - Accuracy/Damage/Endurance
Level 1: Time Wall
- (A) Accuracy IO
Level 2: Rock Shards
- (A) Superior Blaster's Wrath - Accuracy/Damage
- (11) Superior Blaster's Wrath - Damage/Recharge
- (11) Superior Blaster's Wrath - Accuracy/Damage/Recharge
- (13) Superior Blaster's Wrath - Accuracy/Damage/Endurance
- (13) Superior Blaster's Wrath - Accuracy/Damage/Endurance/Recharge
- (15) Superior Blaster's Wrath - Recharge/Chance for Fire Damage
Level 4: Hasten
- (A) Recharge Reduction IO
Level 6: Entomb
- (A) Apocalypse - Damage
- (15) Apocalypse - Damage/Recharge/Accuracy
- (17) Apocalypse - Damage/Endurance
- (17) Achilles' Heel - Chance for Res Debuff
- (19) Touch of Lady Grey - Chance for Negative Damage
- (19) Shield Breaker - Chance for Lethal Damage
Level 8: Super Speed
- (A) Blessing of the Zephyr - Knockback Reduction (4 points)
Level 10: Chronos
- (A) Gaussian's Synchronized Fire-Control - Chance for Build Up
Level 12: Upthrust
- Hamidon Origin:Nucleolus Exposure
- (21) Positron's Blast - Chance of Damage(Energy)
- (23) Bombardment - Chance for Fire Damage
- (23) Annihilation - Chance for Res Debuff
- (25) Touch of Lady Grey - Chance for Negative Damage
Level 14: Boxing
- (A) Empty
Level 16: End of Time
- (A) Armageddon - Damage
- (25) Armageddon - Damage/Recharge/Accuracy
- (27) Armageddon - Recharge/Accuracy
- (27) Armageddon - Damage/Endurance
- (29) Armageddon - Chance for Fire Damage
- (29) Superior Avalanche - Recharge/Chance for Knockdown
Level 18: Tombstone
- Hamidon Origin:Nucleolus Exposure
- (31) Apocalypse - Chance of Damage(Negative)
- (31) Gladiator's Javelin - Chance of Damage(Toxic)
- (33) Sting of the Manticore - Chance of Damage(Toxic)
- (33) Decimation - Chance of Build Up
Level 20: Temporal Healing
- (A) Preventive Medicine - Heal
- (33) Preventive Medicine - Heal/Endurance
- (34) Preventive Medicine - Endurance/RechargeTime
- (34) Preventive Medicine - Heal/RechargeTime
- (34) Preventive Medicine - Heal/RechargeTime/Endurance
- (36) Preventive Medicine - Chance for +Absorb
Level 22: Tough
- (A) Aegis - Psionic/Status Resistance
- (36) Aegis - Resistance
- (36) Aegis - Resistance/Endurance
- (37) Aegis - Resistance/Endurance/Recharge
Level 24: Combat Jumping
- (A) Kismet - Accuracy +6%
- (37) Luck of the Gambler - Defense/Increased Global Recharge Speed
- (37) Reactive Defenses - Scaling Resist Damage
Level 26: Weave
- (A) Shield Wall - Defense/Endurance
- (39) Shield Wall - Defense/Endurance/Recharge
- (39) Shield Wall - Defense
- (39) Shield Wall - Defense/Recharge
- (40) Luck of the Gambler - Defense/Increased Global Recharge Speed
Level 28: Future Pain
- Hamidon Origin:Nucleolus Exposure
- (40) Hecatomb - Chance of Damage(Negative)
- (42) Touch of Death - Chance of Damage(Negative)
- (42) Mako's Bite - Chance of Damage(Lethal)
- (42) Glimpse of the Abyss - Chance of Damage(Psionic)
Level 30: Maneuvers
- (A) Shield Wall - Defense/Endurance
- (43) Shield Wall - Defense/Recharge
- (43) Shield Wall - +Res (Teleportation), +5% Res (All)
- (43) Shield Wall - Defense
- (45) Luck of the Gambler - Defense/Increased Global Recharge Speed
Level 32: Meteor
- (A) Ragnarok - Damage
- (45) Ragnarok - Damage/Recharge
- (45) Ragnarok - Damage/Recharge/Accuracy
- (46) Ragnarok - Recharge/Accuracy
- (46) Ragnarok - Damage/Endurance
- (46) Sudden Acceleration - Knockback to Knockdown
Level 35: Bonfire
- (A) Sudden Acceleration - Knockback to Knockdown
Level 38: Time Lord
- (A) Steadfast Protection - Resistance/+Def 3%
- (48) Steadfast Protection - Knockback Protection
Level 41: Fire Shield
- (A) Unbreakable Guard - +Max HP
- (48) Gladiator's Armor - TP Protection +3% Def (All)
- (48) Unbreakable Guard - Resistance
- (50) Unbreakable Guard - Resistance/Endurance
- (50) Unbreakable Guard - Resistance/Endurance/RechargeTime
Level 44: Seismic Force
- (A) Recharge Reduction IO
Level 47: Rise of the Phoenix
- (A) Miracle - +Recovery
Level 49: Tactics
- (A) Rectified Reticle - Increased Perception
Level 1: Defiance
Level 1: Brawl-
1
-
Pretty much alternating Bonfire and Meteor every other spawn would be my goal. Rise of the Phoenix for when that doesn't work out. Debt is just another badge. Anubis just sends me back each time, pretty quick.
But, yeah, my first pass was similar to yours. Stuffed in as many Winter sets as possible to drag defense up, but it felt like I was ignoring a fair amount of damage potential. I've got several Scrappers for "Safe DPS". 18% to 25% defense is a bit more than 0. Two small purples gets you soft capped if you're solo. And in a team setting Def buffs are fairly common so building for Resistance has some upside.
Your build is likely more survivable though. I'll keep it tucked away if I decide to live the solo blaster +4/*8 lifestyle. Thanks!
-
The cat goddess Bast has sent an aspect of herself through time to bring back Bobcat. Because Bobcat is the real catgirl, not that copy Mynx. : )
Anyway, need a little build help on my quest. This is what I have so far. Not really attached to anything specific other than Seismic / Temporal.
This Hero build was built using Mids Reborn 3.4.6
https://github.com/LoadedCamel/MidsRebornClick this DataLink to open the build!
Aspect of Bast: Level 50 Magic Blaster
Primary Power Set: Seismic Blast
Secondary Power Set: Temporal Manipulation
Power Pool: Speed
Power Pool: Fighting
Power Pool: Leaping
Power Pool: Leadership
Ancillary Pool: Flame MasteryHero Profile:
Level 1: Shatter- (A) Touch of Lady Grey - Chance for Negative Damage
- (3) Superior Blaster's Wrath - Damage/Recharge
- (3) Superior Blaster's Wrath - Accuracy/Damage/Recharge
- (5) Achilles' Heel - Chance for Res Debuff
- (5) Thunderstrike - Accuracy/Damage
- (7) Superior Blaster's Wrath - Accuracy/Damage/Endurance/Recharge
Level 1: Time Wall
- (A) Superior Defiant Barrage - Accuracy/Damage
- (7) Superior Defiant Barrage - Damage/RechargeTime
- (9) Superior Defiant Barrage - Accuracy/Damage/RechargeTime
- (9) Superior Defiant Barrage - Accuracy/Damage/Endurance
- (11) Superior Defiant Barrage - RechargeTime/+Status
- (11) Superior Defiant Barrage - Accuracy/Damage/Endurance/RechargeTime
Level 2: Rock Shards
- (A) Bombardment - Chance for Fire Damage
- (13) Ragnarok - Chance for Knockdown
- (13) Bombardment - Accuracy/Damage/Recharge
- (15) Bombardment - Accuracy/Damage/Recharge/Endurance
- (15) Artillery - Accuracy/Damage
- (17) Artillery - Accuracy/Damage/Recharge
Level 4: Time Stop
- (A) Basilisk's Gaze - Accuracy/Recharge
- (50) Basilisk's Gaze - Accuracy/Hold
Level 6: Entomb
- (A) Touch of Lady Grey - Chance for Negative Damage
- (17) Thunderstrike - Accuracy/Damage/Endurance
- (19) Thunderstrike - Accuracy/Damage/Recharge
- (19) Thunderstrike - Accuracy/Damage
- (21) Gladiator's Javelin - Chance of Damage(Toxic)
- (21) Apocalypse - Chance of Damage(Negative)
Level 8: Seismic Force
- (A) Gaussian's Synchronized Fire-Control - Chance for Build Up
- (23) Gaussian's Synchronized Fire-Control - To Hit Buff/Recharge
Level 10: Chronos
- (A) Rectified Reticle - Increased Perception
- (23) Rectified Reticle - To Hit Buff/Recharge
Level 12: Upthrust
- (A) Annihilation - Chance for Res Debuff
- (25) Annihilation - Accuracy/Damage/RechargeTime
- (25) Artillery - Accuracy/Damage/Recharge
- (27) Bombardment - Accuracy/Damage/Recharge
- (27) Bombardment - Chance for Fire Damage
- (29) Bombardment - Damage
Level 14: Hasten
- (A) Recharge Reduction IO
- (29) Recharge Reduction IO
Level 16: End of Time
- (A) Armageddon - Chance for Fire Damage
- (31) Scirocco's Dervish - Chance of Damage(Lethal)
- (31) Scirocco's Dervish - Accuracy/Damage
- (31) Superior Avalanche - Recharge/Chance for Knockdown
- (33) Armageddon - Damage/Recharge/Accuracy
- (33) Obliteration - Accuracy/Damage/Recharge
Level 18: Tombstone
- (A) Sting of the Manticore - Chance of Damage(Toxic)
- (33) Sting of the Manticore - Accuracy/Damage
- (34) Sting of the Manticore - Accuracy/Interrupt/Range
- (34) Superior Blaster's Wrath - Recharge/Chance for Fire Damage
- (34) Superior Blaster's Wrath - Accuracy/Damage
- (36) Superior Blaster's Wrath - Accuracy/Damage/Endurance
Level 20: Temporal Healing
- (A) Endurance Modification IO
Level 22: Super Speed
- (A) Celerity - +Stealth
Level 24: Kick
- (A) Empty
Level 26: Tough
- (A) Unbreakable Guard - +Max HP
- (40) Gladiator's Armor - TP Protection +3% Def (All)
- (42) Steadfast Protection - Resistance/+Def 3%
- (46) Steadfast Protection - Knockback Protection
- (46) Steadfast Protection - Resistance/Endurance
- (48) Gladiator's Armor - Resistance
Level 28: Future Pain
- (A) Kinetic Combat - Accuracy/Damage
- (39) Kinetic Combat - Damage/Recharge
- (39) Kinetic Combat - Damage/Endurance/Recharge
- (39) Kinetic Combat - Damage/Endurance
- (40) Hecatomb - Recharge/Accuracy
- (40) Hecatomb - Damage/Recharge/Accuracy
Level 30: Weave
- (A) Luck of the Gambler - Defense/Increased Global Recharge Speed
- (45) Luck of the Gambler - Defense
- (45) Luck of the Gambler - Defense/Endurance
Level 32: Meteor
- (A) Annihilation - Accuracy/Damage/RechargeTime
- (42) Bombardment - Accuracy/Damage/Recharge
- (42) Artillery - Accuracy/Damage/Recharge
- (43) Annihilation - Chance for Res Debuff
- (43) Bombardment - Chance for Fire Damage
- (43) Sudden Acceleration - Knockback to Knockdown
Level 35: Bonfire
- (A) Force Feedback - Chance for +Recharge
- (36) Bombardment - Chance for Fire Damage
- (36) Annihilation - Chance for Res Debuff
- (37) Bombardment - Accuracy/Damage/Recharge
- (37) Annihilation - Accuracy/Damage/RechargeTime
- (37) Sudden Acceleration - Knockback to Knockdown
Level 38: Time Lord
- (A) Resist Damage IO
Level 41: Fire Shield
- (A) Aegis - Resistance/Endurance
- (48) Aegis - Resistance
- (48) Aegis - Psionic/Status Resistance
Level 44: Combat Jumping
- (A) Luck of the Gambler - Defense/Increased Global Recharge Speed
Level 47: Maneuvers
- (A) Luck of the Gambler - Defense/Increased Global Recharge Speed
- (50) Luck of the Gambler - Defense
- (50) Luck of the Gambler - Defense/Endurance
Level 49: Rise of the Phoenix
- (A) Recharge Reduction IO
Level 1: Brawl
- (A) Empty
Level 1: Defiance
Level 1: Sprint| Copy & Paste this data into Mids Reborn : Hero Designer to view the build | |-------------------------------------------------------------------| |MxDz;1667;729;1458;HEX;| |78DA75944B4F535110C7FFF75190477953DEF2165AA0B446636262224F638404A97| |14B9A722D3729ED0D2D46E3DA2FE0C6444165610C7E0BE3564414FC029AB8F2B175| |A1757AE78C1C20DCA4EDEFCCCC99F9CF9C733B7F6FBA7AE7DDDC5518C1A94C329F5| |F9AA4EF82B316984FA6DD14E8A999C87B4EAAD093BBD33349AE723275AAA0A5C564| |36ED2C47138E9B5F7553BC77509C8975CFCBAD15A2B79C55FA4D6696E69359D75BC| |F240B6E2E8BCA855C2E134D788EB31CF471D64DAF14DC6CBADA5FCD39498F16B5B2| |5876D6F22BAED730E3B9A9E86C26B9EA50BA5299FBAD24A88F3EEF23D09F6200D83| |181B80D134F2D051B0C36DE90ABB1049BF02D6578C6AE89F0893414C52106C31998| |02164325020236C32EA931F43406CC80EFA9C6255301D8520343C062A84319C314A| |9B10EF3140D0B07B4BBCB461CFB0C1FA852400B0904A4EF3A6C71730D7821A0DA6D| |C2A8A520CEC17B94A65CAF548E6DF684F092619AC454E82115D8E43186B0C1F091B| |254E96D57E11B176AC55701D55BBBF4DF2EA3E9C41F9E5E1FDDB2A05E298811A810| |053324A6566FBB165758E6593C8082BB025B9CB707974D057F193E91E07A5D703DF| |6A14276197AB127F0DC52F084A11F9B0CB3A4A651538346DACF21D44AB3EE694685| |BA96E469D14AD3A2480F2CB2B7E99DB5E1375719C27986305A0CFFF0C7D02A10621| |8C738C75C23491D7A9A0E2C945E151BE7B0289010B8C93084B0A94A0D33D8A4A64B| |4B6376F9ED9067144D02750C0734CC6E7D98DD72E86139EBB09C7E442E46444E3F8| |22F7C4AAFACD21B6D1CA6E9C34353CD5BC5F6CBEE01493C20A50624CD752A3AA84F| |7E9094FA9E6D8A1CD67B1A468C3B18C705818B0C21EA7F44CF3222FDD79327AA678| |98A272E9389CB645E53C5989E25F6FF42DB47FF6F4A9FD22DE82DD9B51DC5B95302| |17ECA3FF34B4F0EDDF2B8F2690F89FC7EC84BD3CB931DC66B53F4ED9FAEBE4D6C7A| |6BA028F183E478EC9BE41869826AFF8960CCDBAE11F819ED7A5| |-------------------------------------------------------------------|
-
Forgive the minor necrothreading.
@crysis did you ever try playing a similar build with Hurricane? My main difficulty is that the PBAoEs like Consumption and Inferno just don't play nice with Hurricane for obvious reasons. Hurricane is too much debuff for me to skip, I'll work it into my build somewhere.
And also, do you get much out of Rain of Fire? It really doesn't seem to do much damage.
-
Theory crafted for my next Brute. More Defense, less Resistance than the other builds in this thread. Proc'd up Devastating Blow and Mud Pots. Could be an okayish Fire Farmer if it wanted to at 44% Fire Def and 82% Fire Res. Clear time would be less than a /Fire, but still good. Also added taunt and would presumably be running Ageless for the Debuff resistance anyway.
I've got a Savage/Stone that is really similar, and it tanks very well. Savage melee I'm hoping gets a tweak or two soon.
SpoilerThis Villain build was built using Mids Reborn 3.1.2.5
https://github.com/LoadedCamel/MidsRebornClick this DataLink to open the build!
Kryptonite Rad/Stone Brute: Level 50 Magic Brute
Primary Power Set: Radiation Melee
Secondary Power Set: Stone Armor
Power Pool: Teleportation
Power Pool: Speed
Power Pool: Leaping
Power Pool: Fighting
Ancillary Pool: Soul MasteryVillain Profile:
Level 1: Radioactive Smash- (A) Hecatomb - Damage/Recharge
- (3) Hecatomb - Chance of Damage(Negative)
- (3) Hecatomb - Damage/Endurance
- (5) Hecatomb - Accuracy/Damage/Recharge
- (5) Hecatomb - Accuracy/Recharge
- (7) Force Feedback - Chance for +Recharge
Level 1: Rock Armor
- (A) Luck of the Gambler - Defense/Increased Global Recharge Speed
- (7) Shield Wall - +Res (Teleportation), +5% Res (All)
Level 2: Stone Skin
- (A) Luck of the Gambler - Defense/Increased Global Recharge Speed
- (13) Luck of the Gambler - Defense
- (13) Luck of the Gambler - Defense/Endurance
- (15) Aegis - Resistance
- (15) Aegis - Resistance/Endurance
- (17) Aegis - Resistance/Recharge
Level 4: Earth's Embrace
- (A) Numina's Convalesence - Heal/Recharge
- (17) Miracle - Heal/Recharge
- (19) Panacea - Heal/Recharge
Level 6: Combat Teleport
- (A) Rectified Reticle - Increased Perception
Level 8: Radiation Siphon
- (A) Superior Blistering Cold - Accuracy/Damage
- (19) Superior Blistering Cold - Damage/Endurance
- (21) Superior Blistering Cold - Accuracy/Damage/Endurance
- (21) Superior Blistering Cold - Accuracy/Damage/Recharge
- (23) Superior Blistering Cold - Damage/Endurance/Accuracy/RechargeTime
- (23) Superior Blistering Cold - Recharge/Chance for Hold
Level 10: Mud Pots
- (A) Superior Brute's Fury - Accuracy/Damage
- (25) Superior Brute's Fury - Accuracy/Damage/Endurance/Recharge
- (25) Superior Brute's Fury - Recharge/Fury Bonus
- (27) Fury of the Gladiator - Chance for Res Debuff
- (27) Ice Mistral's Torment - Chance for Cold Damage
- (29) Obliteration - Chance for Smashing Damage
Level 12: Fusion
- (A) Recharge Reduction IO
- (29) Recharge Reduction IO
Level 14: Hasten
- (A) Recharge Reduction IO
- (31) Recharge Reduction IO
Level 16: Rooted
- (A) Healing IO
- (31) Healing IO
Level 18: Irradiated Ground
- (A) Eradication - Damage
- (31) Eradication - Accuracy/Damage/Endurance/Recharge
- (33) Eradication - Chance for Energy Damage
- (33) Touch of Lady Grey - Chance for Negative Damage
- (33) Armageddon - Chance for Fire Damage
- (34) Obliteration - Chance for Smashing Damage
Level 20: Brimstone Armor
- (A) Aegis - Resistance
- (34) Aegis - Resistance/Endurance
- (34) Aegis - Resistance/Recharge
- (36) Gladiator's Armor - TP Protection +3% Def (All)
- (36) Steadfast Protection - Resistance/+Def 3%
Level 22: Teleport
- (A) Jaunt - Endurance/Range
Level 24: Fold Space
- (A) Accuracy IO
Level 26: Devastating Blow
- (A) Superior Brute's Fury - Damage/Recharge
- (36) Superior Brute's Fury - Accuracy/Damage/Recharge
- (37) Superior Brute's Fury - Damage/Endurance/RechargeTime
- (37) Gladiator's Strike - Chance for Smashing Damage
- (37) Touch of Death - Chance of Damage(Negative)
- (39) Touch of Lady Grey - Chance for Negative Damage
Level 28: Crystal Armor
- (A) Luck of the Gambler - Defense/Increased Global Recharge Speed
- (39) Endurance Modification IO
- (39) Performance Shifter - Chance for +End
- (40) Reactive Defenses - Defense
- (40) Reactive Defenses - Defense/Endurance
- (40) Performance Shifter - EndMod
Level 30: Combat Jumping
- (A) Luck of the Gambler - Defense/Increased Global Recharge Speed
Level 32: Atom Smasher
- (A) Superior Avalanche - Damage/Endurance
- (42) Superior Avalanche - Accuracy/Damage
- (42) Superior Avalanche - Accuracy/Damage/Endurance
- (42) Superior Avalanche - Accuracy/Damage/Recharge
- (43) Superior Avalanche - Accuracy/Damage/Endurance/Recharge
- (43) Superior Avalanche - Recharge/Chance for Knockdown
Level 35: Minerals
- (A) Gift of the Ancients - Run Speed +7.5%
- (43) Luck of the Gambler - Defense/Increased Global Recharge Speed
- (46) Kismet - Accuracy +6%
Level 38: Gloom
- (A) Superior Winter's Bite - Accuracy/Damage
- (45) Superior Winter's Bite - Damage/RechargeTime
- (45) Superior Winter's Bite - Accuracy/Damage/Endurance
- (45) Superior Winter's Bite - Accuracy/Damage/Recharge
- (46) Superior Winter's Bite - Damage/Endurance/Accuracy/RechargeTime
- (46) Superior Winter's Bite - Recharge/Chance for -Speed & -Recharge
Level 41: Taunt
- (A) Perfect Zinger - Chance for Psi Damage
Level 44: Boxing
- (A) Accuracy IO
Level 47: Tough
- (A) Aegis - Resistance
- (48) Aegis - Resistance/Endurance
- (48) Aegis - Resistance/Recharge
- (48) Unbreakable Guard - +Max HP
Level 49: Weave
- (A) Reactive Defenses - Defense
- (50) Reactive Defenses - Scaling Resist Damage
- (50) Reactive Defenses - Defense/Endurance
- (50) Reactive Defenses - Defense/RechargeTime
Level 1: Fury
Level 1: Brawl| Copy & Paste this data into Mids Reborn : Hero Designer to view the build | |-------------------------------------------------------------------| |MxDz;1475;704;1408;HEX;| |78DA6593594F135114C7EF74A6424B590B949D96A52D545A6A7C356E8889D004AD5| |1C34BD3C08093D44ED30E897C00DF8CB268F441145C12D7CFE18ADFC30740E3930F| |663CBDE77FB586269DDF9C7B96FBBFE7CCCDDC9C0A2C2D4D9F125AC3D942BE52C99| |D29AF38A637935FB616742144CF4C79B5E4D845CB31C397F28BA92CBD9B61195447| |EE5EF996CB9805D34C92DFCA3B965D64BB9B7D53E69259AC984999993B5DBE61974| |5DB9C6D17929729AA64971D99E3974BD992692E06E4EBAC992F59C5E546694C5BCB| |D71DB242E74AD642920B67ED95422E93AF386679B58BB48CD2FF76941E42AB3E5CA| |F887984481BC29300C799461C1C631EB9C57CFF3757B89AE8D0D839A34B7EA8FAE0| |F46A7006DAC11666D3717092D992667EA42C1DC91E3D0BE77962CC106D03BC43941| |AEA4590F06E91A6A021EED281EA04B6AD5B336464DB3AB37D03DC6476DE03EF333F| |51964F69F66DF3365DCFC117CC9E93609357B24FB07D87766EC0CE5A438290F6893| |E70883435AA5635627100FC4C6856CEE61121CB0D80EB54B655696AFD46A7EC27E7| |1E33BC0FEEF244C227981168FA425941241B41343B826647D0ECE1631C3C1CD264B| |11869EDC0414447802BEA9D4284D462A887B56D90B66EA5AD7B07659E32479E8171| |3027E4F8A2D0BA5BBD0E2AB9171F4834CC95A30F3828B6CFC9B10370C3235BD6491| |AFBD5ECFB91BC49720655C5C12D9EE9D823F031F88439BE0DEE30BF52D690FAE486| |7CFCA98DA3F2C46F215B53BDE2A36A87D1979C79F415F81A7CC39C780BBE63AE91B| |CB8D21CAFF001353A4842F53581BEEAB49844A49EC4D852185B0A634BFDE2961814| |3CA98227D1AFF44F107D4BFF604E1BF2CACE5783DD3E43A89F5BB55D57CC1E5E9A3| |3D425A7254D2EEDF9FF5D7C44ED1F5E3AA859F288080BA8BFC09DADBFC2A7F8FE5F| |10A6EEC794FDF81A66830448702FFA6B8CABB5C6B55A63BED678585BE00FCD5EE0F| |A| |-------------------------------------------------------------------|
- (A) Empty
Level 1: Sprint- (A) Empty
Level 2: Rest- (A) Empty
Level 1: Swift- (A) Empty
Level 1: Hurdle- (A) Empty
Level 1: Health- (A) Panacea - +Hit Points/Endurance
- (9) Miracle - +Recovery
- (9) Numina's Convalesence - +Regeneration/+Recovery
Level 1: Stamina- (A) Performance Shifter - Chance for +End
- (11) Performance Shifter - EndMod
- (11) Endurance Modification IO
Level 50: Musculature Radial Paragon
Level 50: Born In Battle
Level 50: High Pain Threshold
Level 50: Invader
Level 50: Marshal
Level 50: Ageless Radial Epiphany
------------ -
On 1/9/2022 at 7:05 AM, Sovera said:
The only problem lays in the damage which is just not so good. As someone who really likes old kung fu movies and the staff I really like the set, but then what? Spin spin spin, fragile minions die, then there's just a boss and spin spin spins spin spin spin spin, finally dead.
This. Have a 50 Staff/Electric. It's fun, but it's damage output is as low as any Melee character I've played. Survivable as all heck if you can get Mobs clumped up for the KD though.
Staff is a fun set to play, but don't play it if you're looking for numbers or fast clear times.
-
On 1/10/2022 at 4:48 PM, Ankhammon said:
Actually, that's an interesting answer. Honestly, I would have been looking for heavy proc's for spin but not much else.
On the EA side, I'm wondering if ppl keep the tier 9 or try to work around it? I think it's gonna be useful more as a Dull Pain kind of thing than for the Def bonus. You can get yourself near Max HP with it slotted and that's gotta be worth it.
I couldn't make Overload work so I ditched it, it always de-toggles me. Every time. Not worth it. (There are people who can work around it, those people are better players than me, I'm okay with that)
Presuming you're firing off Energy Drain enough to double stack it, you're at or past the incarnate cap on S/L/F/C/E, Negative Energy is soft capped with room to spare. Psi and Toxic chew you up still. Just eat purples if you want to see 80% Defense numbers. /EA can put up some silly numbers, I actually dialed back on some of the set bonuses to squeeze more procs into the attack chain.
The KD in Spin and Shockwave (and Focus) also help a lot. You're keeping a lot of mobs bouncing. And when fighting multiple bosses Energy Drain will keep Bosses low on Blue so they will sometimes alternate between bouncing and standing around waiting for the Blue bar.
-
Curse you...totally right of course. Scrap it, unplayable.
-
 3
3
-
-
22 hours ago, Bill Z Bubba said:
Yea, me, too. And then argue with it.
Best Broot, fight meh!
SpoilerThis Villain build was built using Mids Reborn 3.1.2.5
https://github.com/LoadedCamel/MidsRebornClick this DataLink to open the build!
Empty Knight: Level 50 Magic Brute
Primary Power Set: Savage Melee
Secondary Power Set: Stone Armor
Power Pool: Fighting
Power Pool: Teleportation
Power Pool: Leaping
Power Pool: Speed
Ancillary Pool: Soul MasteryVillain Profile:
Level 1: Maiming Slash- (A) Hecatomb - Chance of Damage(Negative)
- (3) Hecatomb - Damage/Recharge
- (3) Hecatomb - Accuracy/Damage/Recharge
- (5) Hecatomb - Accuracy/Recharge
- (31) Hecatomb - Damage/Endurance
- (31) Touch of Death - Chance of Damage(Negative)
Level 1: Rock Armor
- (A) Shield Wall - +Res (Teleportation), +5% Res (All)
- (5) Shield Wall - Defense
- (7) Shield Wall - Defense/Endurance
- (13) Shield Wall - Defense/Recharge
Level 2: Shred
- (A) Superior Unrelenting Fury - Damage/Endurance/RechargeTime
- (34) Superior Unrelenting Fury - Accuracy/Damage/RechargeTime
- (34) Superior Unrelenting Fury - Damage/RechargeTime
- (34) Superior Unrelenting Fury - Accuracy/Damage
- (36) Superior Unrelenting Fury - RechargeTime/+Regen/+End
- (36) Superior Unrelenting Fury - Accuracy/Damage/Endurance/RechargeTime
Level 4: Stone Skin
- (A) Aegis - Resistance
- (11) Aegis - Resistance/Endurance
- (13) Steadfast Protection - Resistance/+Def 3%
- (17) Luck of the Gambler - Defense/Increased Global Recharge Speed
- (19) Aegis - Resistance/Recharge
- (19) Luck of the Gambler - Defense
Level 6: Blood Thirst
- (A) Gaussian's Synchronized Fire-Control - Chance for Build Up
- (42) Gaussian's Synchronized Fire-Control - To Hit Buff/Recharge/Endurance
- (43) Gaussian's Synchronized Fire-Control - Recharge/Endurance
- (43) Gaussian's Synchronized Fire-Control - To Hit Buff/Recharge
- (43) Gaussian's Synchronized Fire-Control - To Hit Buff
- (45) Gaussian's Synchronized Fire-Control - To Hit Buff/Endurance
Level 8: Earth's Embrace
- (A) Preventive Medicine - Heal/RechargeTime
- (9) Numina's Convalesence - Heal/Recharge
- (11) Panacea - Heal/Recharge
Level 10: Vicious Slash
- (A) Superior Blistering Cold - Accuracy/Damage
- (37) Superior Blistering Cold - Damage/Endurance
- (37) Superior Blistering Cold - Accuracy/Damage/Endurance
- (37) Superior Blistering Cold - Accuracy/Damage/Recharge
- (39) Superior Blistering Cold - Damage/Endurance/Accuracy/RechargeTime
- (39) Superior Blistering Cold - Recharge/Chance for Hold
Level 12: Mud Pots
- (A) Superior Brute's Fury - Accuracy/Damage
- (15) Superior Brute's Fury - Damage/Recharge
- (15) Superior Brute's Fury - Accuracy/Damage/Recharge
- (17) Superior Brute's Fury - Damage/Endurance/RechargeTime
- (33) Superior Brute's Fury - Recharge/Fury Bonus
- (33) Superior Brute's Fury - Accuracy/Damage/Endurance/Recharge
Level 14: Kick
- (A) Empty
Level 16: Rooted
- (A) Healing IO
- (39) Healing IO
Level 18: Rending Flurry
- (A) Superior Avalanche - Accuracy/Damage
- (40) Superior Avalanche - Damage/Endurance
- (40) Superior Avalanche - Accuracy/Damage/Endurance
- (40) Superior Avalanche - Accuracy/Damage/Recharge
- (42) Superior Avalanche - Accuracy/Damage/Endurance/Recharge
- (42) Superior Avalanche - Recharge/Chance for Knockdown
Level 20: Brimstone Armor
- (A) Aegis - Resistance
- (21) Aegis - Resistance/Endurance
- (21) Aegis - Resistance/Recharge
- (23) Aegis - Resistance/Endurance/Recharge
- (33) Aegis - Psionic/Status Resistance
Level 22: Tough
- (A) Aegis - Resistance
- (23) Aegis - Resistance/Endurance
- (25) Aegis - Resistance/Recharge
- (25) Gladiator's Armor - TP Protection +3% Def (All)
- (27) Unbreakable Guard - +Max HP
Level 24: Weave
- (A) Luck of the Gambler - Defense/Increased Global Recharge Speed
- (27) Luck of the Gambler - Defense
- (29) Luck of the Gambler - Defense/Endurance
Level 26: Combat Teleport
- (A) Range IO
Level 28: Crystal Armor
- (A) Luck of the Gambler - Defense/Increased Global Recharge Speed
- (29) Luck of the Gambler - Defense
- (31) Luck of the Gambler - Defense/Endurance
Level 30: Combat Jumping
- (A) Luck of the Gambler - Defense/Increased Global Recharge Speed
Level 32: Savage Leap
- (A) Cleaving Blow - Accuracy/Damage
- (45) Cleaving Blow - Accuracy/Recharge
- (45) Cleaving Blow - Damage/Recharge
- (46) Fury of the Gladiator - Chance for Res Debuff
- (46) Obliteration - Accuracy/Damage/Endurance/Recharge
- (46) Armageddon - Chance for Fire Damage
Level 35: Minerals
- (A) Luck of the Gambler - Defense/Increased Global Recharge Speed
- (36) Luck of the Gambler - Defense
Level 38: Teleport
- (A) Range IO
Level 41: Fold Space
- (A) Endurance Reduction IO
Level 44: Hasten
- (A) Recharge Reduction IO
- (50) Recharge Reduction IO
Level 47: Gloom
- (A) Superior Winter's Bite - Recharge/Chance for -Speed & -Recharge
- (48) Superior Winter's Bite - Accuracy/Damage/Endurance
- (48) Superior Winter's Bite - Accuracy/Damage/Recharge
- (48) Superior Winter's Bite - Damage/Endurance/Accuracy/RechargeTime
- (50) Superior Winter's Bite - Accuracy/Damage
- (50) Superior Winter's Bite - Damage/RechargeTime
Level 49: Taunt
- (A) Perfect Zinger - Chance for Psi Damage
Level 1: Fury
Level 1: Brawl| Copy & Paste this data into Mids Reborn : Hero Designer to view the build | |-------------------------------------------------------------------| |MxDz;1569;699;1398;HEX;| |78DA6594594F135114C7CFED4C595B28D0959DB27483DA0A3E1A37A809504352E36| |B33C1A136299DA61D8C7C0B458D3EB880825204133F85BB5FC4B8BCFA544FE79C1B| |4A6692F6D7F3BFF77FCEB94B277B6FD1B5B191B90CA2FB5A49ABD5F257AB5BA6EEC| |C6A85E2BA0200AEA5CD8AB93DBE522E16EE98ED2804AD09F9AC5ED2F5644EBBAB15| |3808D1C0A2BEA1976B38641A653D7FA5BA6954C1BD6618A564A699A2582EF45BD14| |DF4548CAAA99945A3ECB2A4555DABE0789715E42ABA7E3BB05429AE272971CED82A| |E5B35ACDD4ABDB416C64163FF5287E09683E0D27241C0069151C116694A8C688A37| |1661EA74754F808A7660556149ABC4C6CCB105DD78947D1E65C419544AF6A89133D| |4C37D3459CEC637A889FD0A5C836950561895D29A22B801C51C1E3A3B83FCDF412D| |F6365A7ACECACD31A626F88F1B7CC03E63E71F690F8195DED5CD9D1FE93D6D291E3| |0E4629BE1103E894ED75DEA79EA71E3077980F89338F988F895FD0D52DCDDDBB94B| |1678FF98AE8794D1C3F60EE131D78A3DCBC367037F081AFF8BB17289FE89D022AC6| |3CC6BDE893C5FA9E510791E7CC17CC97C4D82E738FF80D5D036C5607F814BC7C0A5| |EDE75FF3C71FC0251C10E7DD2E463939F4D413605CFD37206FFF125425340EE7A80| |CF7590CF73D8439CC149215E2884E2B4C0EF8821E91C62E7303B47D9E947E7084F8| |2119EF401B7668CD339C74A946ED66096897397A8C1B9065D8FB98BC41F381CE68C| |22CC1927B96C04CB4DCB46A7B951C50F1095627482C430CE4CC8348904896966F37| |592940D264FE84CCE1D31DF318F89E943669D7882B55272C9A91A759D514FFFC08D| |6115E4D368C6789556EDD29A2A1D28094BFAD585923823FDB64B7F5A24219685F50| |669BB453BF4F7CCE013EAAE6387A8475ABA8CDB5B4AD9A5B45D9AB74B0B76A9D383| |2F1A96E8793A804DC8EA216F4B9009B404C2D712D4C32DC17F025BFA64| |-------------------------------------------------------------------|
- (A) Empty
Level 1: Sprint- (A) Empty
Level 2: Rest- (A) Empty
Level 2: Swift- (A) Empty
Level 2: Hurdle- (A) Empty
Level 2: Health- (A) Miracle - +Recovery
- (7) Numina's Convalesence - +Regeneration/+Recovery
Level 2: Stamina- (A) Performance Shifter - Chance for +End
- (9) Performance Shifter - EndMod
Level 1: Blood Frenzy
Level 1: Prestige Power Dash- (A) Empty
SpoilerLevel 1: Prestige Power Slide
- (A) Empty
SpoilerLevel 1: Prestige Power Quick
- (A) Empty
SpoilerLevel 1: Prestige Power Rush
- (A) Empty
SpoilerLevel 1: Prestige Power Surge
- (A) Empty
SpoilerLevel 4: Ninja Run
Level 50: Ageless Radial Epiphany
Level 50: Ion Core Final Judgement
Level 50: Degenerative Core Flawless Interface
Level 50: Carnival Radial Superior Ally
Level 50: Assault Radial Embodiment
------------ -
For farming? For Teaming? For Soloing? For funsizes?
In my experience Brute primaries are more about the feel for the player. Numbers wise they're actually pretty close (comparted to other ATs) but Spines for AoE, Energy Melee for Single Target, Claws for a solid balance of both. I hear good things about Savage, never run one to 50 though. And Staff is a lot of fun, easily took mine to 50, and it's probably the "worse" Brute primary set.
Secondary sets, Dark Armor for resists, Energy Armor for Defense, Invulnerability for mixed?
And of course Spines/Fire for farming.
It's cliché advise, but play what feels good. They'll all get to 50 just fine, and IO'd and Incarnated will solo most +4/*8 mission content.
If you have a specific "Thing" in mind for your Brute to do, you'll get some real specific feedback I suspect.
-
 1
1
-
-
6 hours ago, Greycat said:
The IO is not a power, and itself also just makes you translucent - costume still visible, unless you're stacking with something else. The tailor has no clue that it's stealthing you, so that one... *shrug*.
Just looking to see what's doing what and if there's an option on a couple:
Steamy mist barely makes you translucent.
Energy cloak, yeah, still does a nice, full invis.
Arctic fog: Translucent.
... didn't go through the others, just took a quick look. While I would probably not use the option (makes sense to be invisible while invisible, and I don't really care how I look when in the middle of a fight,) just normalizing the options (NoFX, Translucent, Invisible for those powers giving more invisibility) makes sense, just to standardize what people expect to have happen.
Totally could be a Null the Gull sort of option for a character instead of a Power by Power sort of change. Just suppress the translucent effect on all abilities if selected. No idea what would be easier to implement.
Either way, should be a player choice. Some players probably like it. They're wrong, but I can't change that : ) Either a power customization option or Null the Gull (or some other third thing I didn't think about).
And, personally, I don't care for even what Steamy mist does. However minor it is. A lot of this games appeal (for me anyway) is the costume generator, don't hide it!
-
Cloak of Darkness from Dark Armor doesn't have the translucency. It has no FX at all that I can see. That would be a nice option for all Stealth powers.
And I mean all the powers that grant Stealth, like the Celerity IO, Energy Cloak from Energy Armor, Steamy Mist, ect, ect. Not just the power pools.
It was an option I appreciated a lot on my Dark Armor character, would be nice for it to make it's way to others.
-
1
-
-
Hi! For PvE it would be nice if we could see our costumes all the time. Cloak of Darkness from Dark Armor already has this option, if it could be added to other Stealth powers that would be nifty.
Thanks!
-
3
-
2
-
-
I meant longer as compared to Scrapper, yes. My Homecoming main is a Claws/Invuln Scrapper, so that's what I was comparing it too. I've taken to grabbing the empowerment station buffs out of the SG base, they help a bit. Also as the build has gotten more durable the recharge buff from Entropic Aura gets stronger from more mobs.
Now that Focus is available I typically save Arcane Bolt for when the bonus damage is up. Or for runners. In general though Arcane Bolt is rarely a bad choice for leveling.
-
Dinged 17, got a couple Kinetic Melee sets slotted, made a noticeable difference. Got Spin 5 Slotted with Avalanche, really feel the longer recharge on Spin. Minions just hang around longer than they should.
Only 17 so the secondary is pretty much /Inspirations, but I've been able to creep up the difficulty. Got some LotGs waiting at 22 though, so EA should start to matter soon. The leveling build is going to look a lot different from the planned build, that's for sure : ) Took Sorcery for Arcane Bolt and Mystic flight and do not not regret.
-
1
-
-
7 hours ago, Without_Pause said:
I would have added /rad but you think /bio has too many clicks. I haven't used /fire for non-farm content, but I love /ea on the Stalker and Scrappers I have used it on. Energize will be the dominate click you use as end usage can be handed rather easily.
Tried /Rad as well and it didn't gel either. Claws/EA it is! Thanks all. Xx Hold my beer xX is now playing on an Indom near you! Have fun out there!
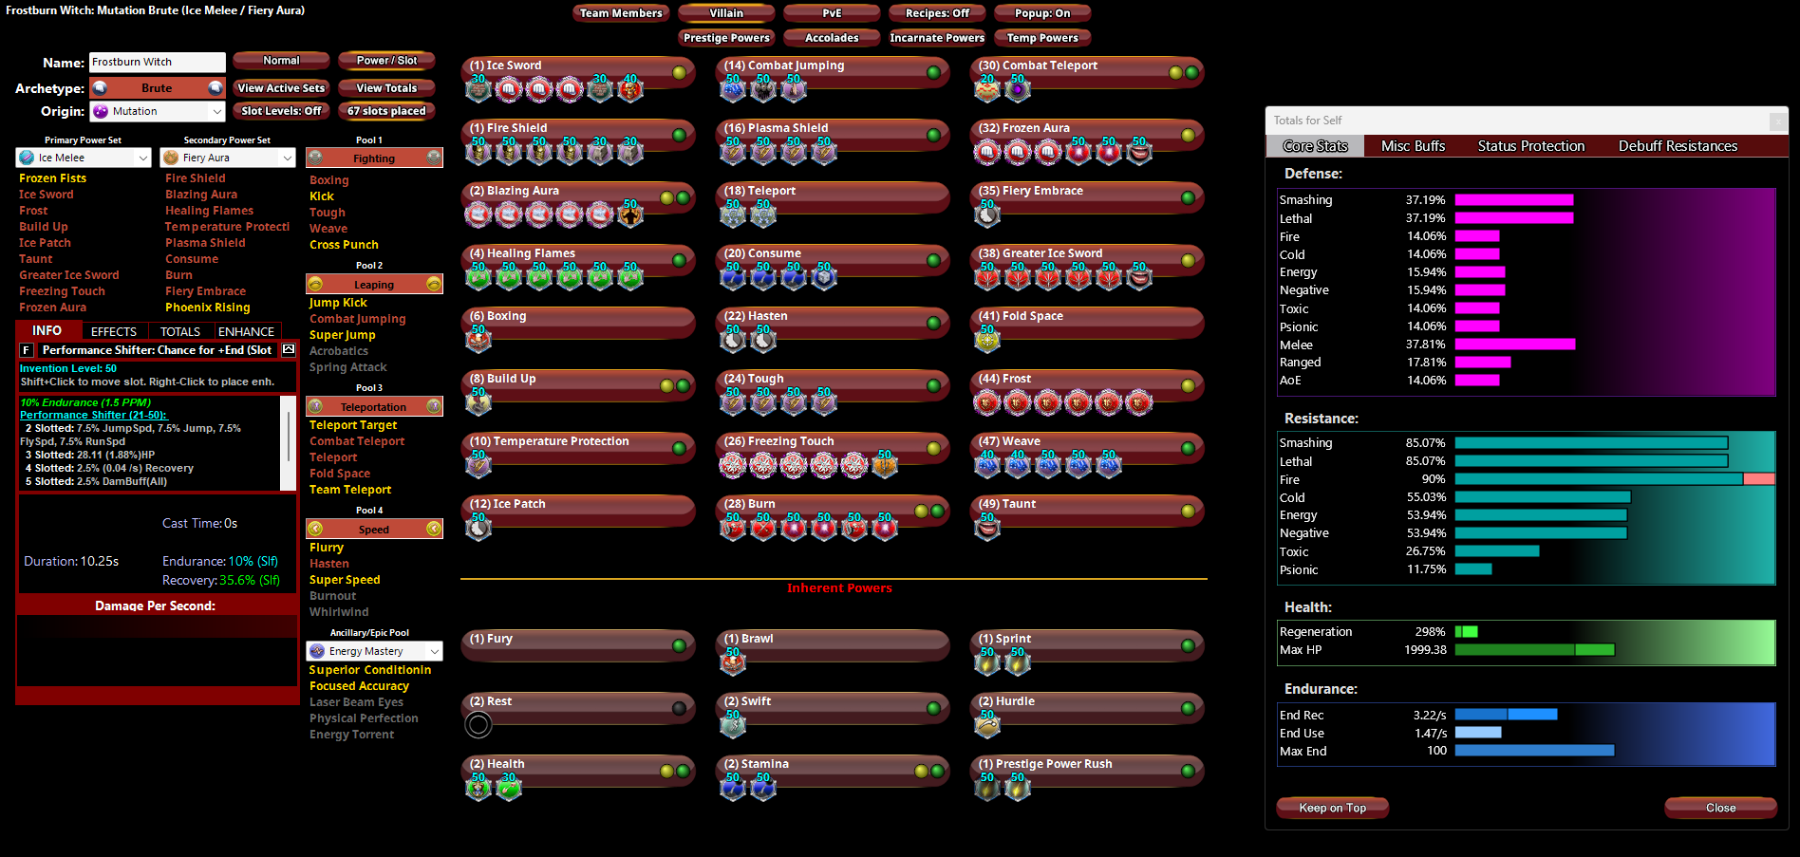

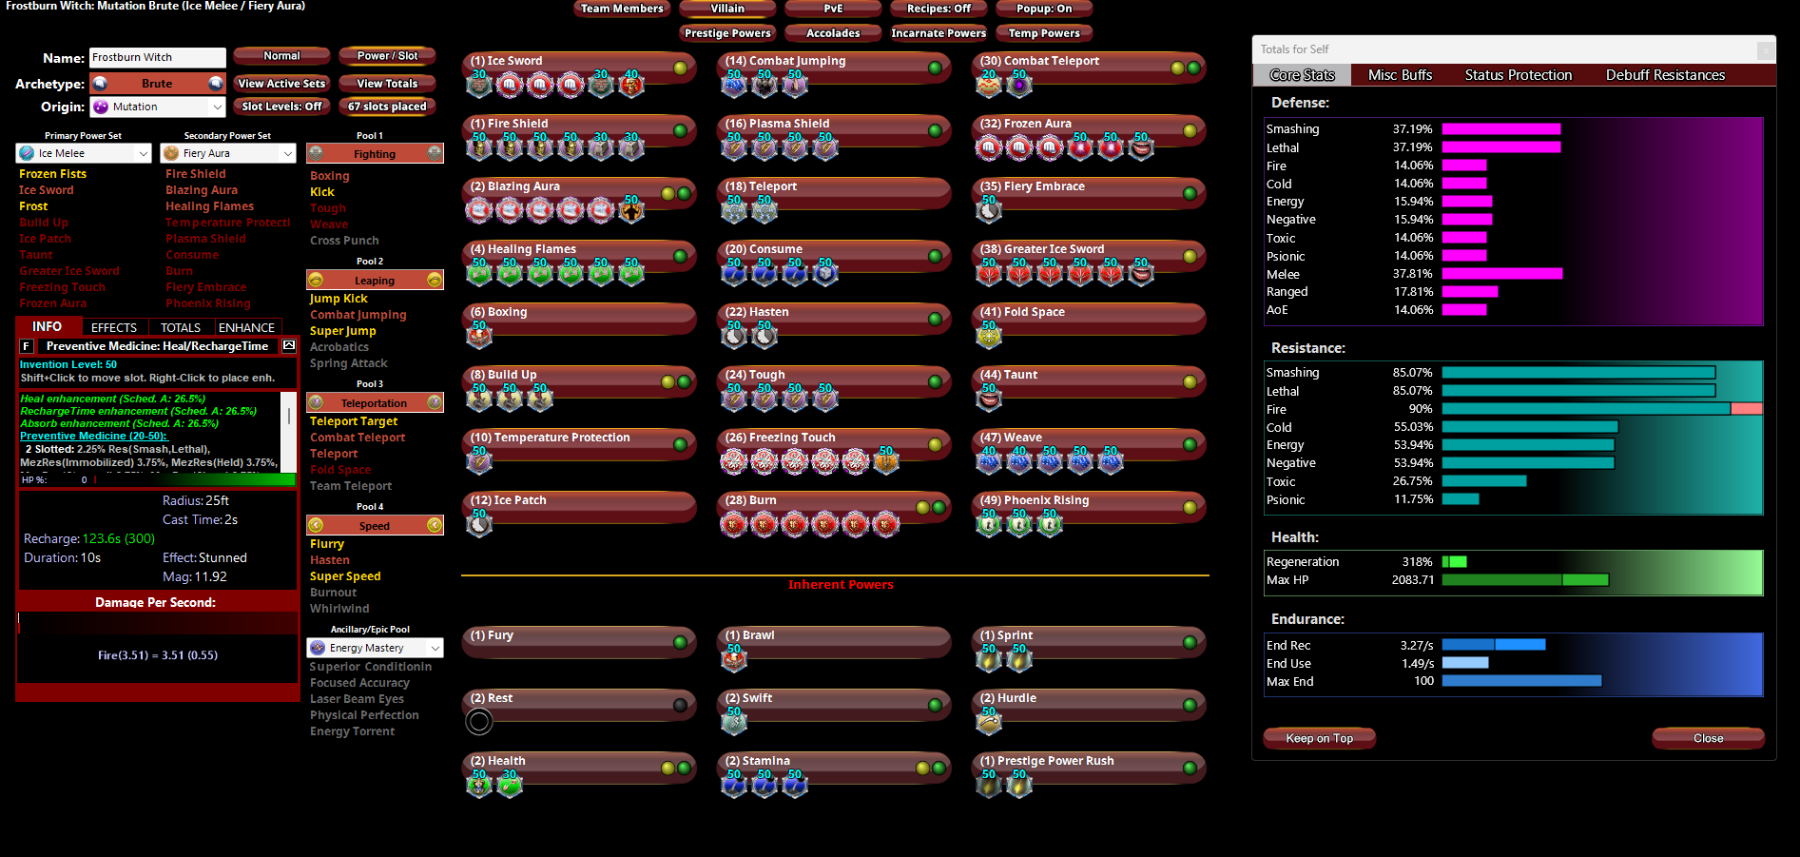


Ice/Fire PVE Build help
in Brute
Posted
...and the Weaveless version with Phoenix Rising, which is what I'll probably play. 88% S/L Resist on a Fire Armor Brute?
View This Build In MRB
Frostburn Witch v 2- Brute (Ice Melee - Fiery Aura).mbd