

lopso
-
Posts
7 -
Joined
-
Last visited
Content Type
Profiles
Forums
Events
Store
Articles
Patch Notes
Posts posted by lopso
-
-
Really want to make a Rad/Rad Sentinel. Doing my research, I have found two builds that are pretty different. One has a capped ranged defense with electron haze and neutron bomb, with lower overall resists, while the other focuses on capped melee defense, with higher resists, but at the cost of neutron bomb and electron haze. Which one should I go with?

-
Looking for a build with this combo. Does anyone have one?
-
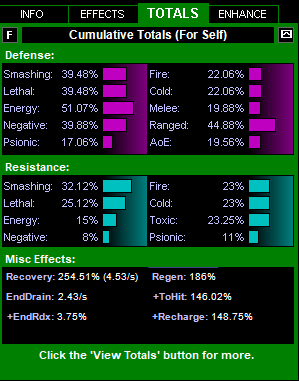
Best I could come up with. Victory Rush can be subbed out for whatever.
This Hero build was built using Mids Reborn 3.2.17
https://github.com/LoadedCamel/MidsRebornClick this DataLink to open the build!
Level 50 Magic Blaster
Primary Power Set: Seismic Blast
Secondary Power Set: Sonic Manipulation
Power Pool: Leaping
Power Pool: Speed
Power Pool: Fighting
Power Pool: Leadership
Ancillary Pool: Mace MasteryHero Profile:
Level 1: Encase- (A) Superior Defiant Barrage - Accuracy/Damage
- (3) Superior Defiant Barrage - Damage/RechargeTime
- (3) Superior Defiant Barrage - Accuracy/Damage/RechargeTime
- (7) Superior Defiant Barrage - Accuracy/Damage/Endurance
- (11) Superior Defiant Barrage - Accuracy/Damage/Endurance/RechargeTime
- (13) Superior Defiant Barrage - RechargeTime/+Status
Level 1: Sonic Thrust
- (A) Explosive Strike - Damage/Knockback
- (43) Explosive Strike - Accuracy/Knockback
- (43) Explosive Strike - Chance for Smashing Damage
Level 2: Rock Shards
- (A) Artillery - Accuracy/Damage
- (19) Artillery - Damage/Endurance
- (19) Artillery - Damage/Recharge
- (31) Artillery - Accuracy/Damage/Recharge
- (31) Artillery - Accuracy/Recharge/Range
- (33) Artillery - Endurance/Recharge/Range
Level 4: Combat Jumping
- (A) Luck of the Gambler - Defense/Increased Global Recharge Speed
- (5) Kismet - Accuracy +6%
- (5) Blessing of the Zephyr - Knockback Reduction (4 points)
- (7) Blessing of the Zephyr - Run Speed, Jump, Flight Speed, Range/Endurance
Level 6: Hasten
- (A) Recharge Reduction IO
- (33) Recharge Reduction IO
Level 8: Seismic Force
- (A) Gaussian's Synchronized Fire-Control - Chance for Build Up
- (9) Rectified Reticle - To Hit Buff
- (9) Rectified Reticle - To Hit Buff/Recharge
Level 10: Sound Booster
- (A) Rectified Reticle - To Hit Buff
- (11) Rectified Reticle - To Hit Buff/Recharge
Level 12: Upthrust
- (A) Ragnarok - Damage
- (13) Ragnarok - Damage/Recharge
- (15) Ragnarok - Accuracy/Damage/Recharge
- (15) Ragnarok - Accuracy/Recharge
- (17) Ragnarok - Damage/Endurance
- (17) Accuracy IO
Level 14: Super Speed
- (A) Blessing of the Zephyr - Run Speed, Jump, Flight Speed, Range
- (46) Blessing of the Zephyr - Run Speed, Jump, Flight Speed, Range/Endurance
Level 16: Kick
- (A) Explosive Strike - Damage/Knockback
- (42) Explosive Strike - Accuracy/Knockback
- (43) Explosive Strike - Chance for Smashing Damage
Level 18: Tombstone
- (A) Sting of the Manticore - Accuracy/Damage
- (33) Sting of the Manticore - Damage/Endurance
- (34) Sting of the Manticore - Accuracy/Interrupt/Range
- (34) Sting of the Manticore - Damage/Interrupt/Recharge
- (34) Sting of the Manticore - Damage/Endurance/Recharge
- (50) Accuracy IO
Level 20: Tough
- (A) Steadfast Protection - Resistance/+Def 3%
- (21) Gladiator's Armor - TP Protection +3% Def (All)
- (21) Unbreakable Guard - +Max HP
Level 22: Sound Barrier
- (A) Preemptive Optimization - EndMod/Endurance/Recharge
- (23) Preemptive Optimization - EndMod/Accuracy/Recharge
- (23) Preemptive Optimization - EndMod/Accuracy/Endurance
- (27) Preemptive Optimization - EndMod/Recharge
- (29) Preemptive Optimization - EndMod/Endurance
- (29) Preemptive Optimization - Accuracy/Recharge
Level 24: Weave
- (A) Luck of the Gambler - Defense/Increased Global Recharge Speed
- (25) Shield Wall - +Res (Teleportation), +5% Res (All)
- (25) Shield Wall - Defense/Endurance
- (27) Shield Wall - Defense
Level 26: Stalagmite
- (A) Superior Winter's Bite - Accuracy/Damage
- (37) Superior Winter's Bite - Damage/RechargeTime
- (37) Superior Winter's Bite - Recharge/Chance for -Speed & -Recharge
- (37) Superior Winter's Bite - Accuracy/Damage/Endurance
- (39) Superior Winter's Bite - Accuracy/Damage/Recharge
- (39) Superior Winter's Bite - Damage/Endurance/Accuracy/RechargeTime
Level 28: Disruption Aura
- (A) Endurance Reduction IO
Level 30: Maneuvers
- (A) Luck of the Gambler - Defense/Increased Global Recharge Speed
- (31) Luck of the Gambler - Defense
- (45) Luck of the Gambler - Defense/Endurance
- (45) Luck of the Gambler - Defense/Endurance/Recharge
- (45) Luck of the Gambler - Defense/Recharge
Level 32: Meteor
- (A) Superior Blaster's Wrath - Accuracy/Damage
- (39) Superior Blaster's Wrath - Damage/Recharge
- (40) Superior Blaster's Wrath - Accuracy/Damage/Recharge
- (40) Superior Blaster's Wrath - Accuracy/Damage/Endurance
- (40) Superior Blaster's Wrath - Accuracy/Damage/Endurance/Recharge
- (42) Superior Blaster's Wrath - Recharge/Chance for Fire Damage
Level 35: Scorpion Shield
- (A) Luck of the Gambler - Defense/Increased Global Recharge Speed
- (36) Reactive Defenses - Scaling Resist Damage
- (36) Reactive Defenses - Defense
- (36) Reactive Defenses - Defense/Endurance
- (46) Reactive Defenses - Defense/Endurance/RechargeTime
- (46) Reactive Defenses - Defense/RechargeTime
Level 38: Assault
- (A) Endurance Reduction IO
Level 41: Tactics
- (A) Rectified Reticle - To Hit Buff/Recharge
- (42) Rectified Reticle - To Hit Buff
Level 44: Vengeance
- (A) Luck of the Gambler - Defense/Increased Global Recharge Speed
Level 47: Super Jump
- (A) Blessing of the Zephyr - Run Speed, Jump, Flight Speed, Range
- (48) Blessing of the Zephyr - Run Speed, Jump, Flight Speed, Range/Endurance
Level 49: Victory Rush
- (A) Performance Shifter - Chance for +End
Level 1: Brawl
- (A) Empty
Level 1: Defiance
Level 1: Sprint -
I haven't rolled with a blaster in years, so I'm afraid I'm out of my league here. I want to go with sonic because seismic becomes more powerful the more attacks you do with it. I have an idea in my head to use only the toggles from the sonic secondary (Sound Barrier and Disruption Aura), along with sound booster, and the mandatory sonic thrust. That'll leave plenty of room to layer on the defenses, and maybe cold mastery for the snow storm toggle and frozen armor?
I have no idea if it'll be good at all, nor do I even know how much defense I should be shooting for on a blaster, because I know it'll be hard to hit cap.
If one of you awesome people could throw a build my way, or just want to tell me how crazy I am, feel free to comment!
-
I'm torn between these two currently. The sexy animations of Katana versus the all out damage of War mace. Help me decide.
-
I can't decide if I should go Brute or Scrapper. Higher resists or Crits. Help me choose!


Rad/Stone build and compilation of Stone Armor builds.
in Brute
Posted
Would you happen to have that war mace build that you could post for me?