

Nezix
-
Posts
26 -
Joined
-
Last visited
Content Type
Profiles
Forums
Events
Store
Articles
Patch Notes
Posts posted by Nezix
-
-
Bump! Still looking for feedback
-
Do you mean you made a lvl 1 character and tested the crit damage in game?
Sounds like that's because Radioactive Smash has the highest Damage Per Activation of any of those powers. It also has a longer animation, so the actual DPS may be the same. You can see this in any of the Build programs (there is pinned in the Discord channel: at-build-general called Mid's Reborn which is up to date with Homecoming.
-
- Hi all, looking for feedback or improvements I could make to this.
1. Is a +Stealth source needed for PvE anywhere?
2. Did I miss any nice 1 offs?
3. I've noticed a lot of people slotting True Grit with a full Heal set but it seems like a good way to get all those other resists up.
Hero Plan by Mids' Hero Designer 1.962
Click this DataLink to open the build!
Disintegrater: Level 50 Natural Stalker
Primary Power Set: Fiery Melee
Secondary Power Set: Shield Defense
Power Pool: Speed
Power Pool: Fighting
Power Pool: Leaping
Power Pool: Leadership
Ancillary Pool: Blaze Mastery
Hero Profile:
Level 1: Fire Sword- (A) Hecatomb - Damage
- (3) Hecatomb - Damage/Recharge
- (3) Hecatomb - Accuracy/Damage/Recharge
- (5) Hecatomb - Accuracy/Recharge
- (5) Hecatomb - Damage/Endurance
- (7) Hecatomb - Chance of Damage(Negative)
Level 1: Hide
- (A) Luck of the Gambler - Defense/Increased Global Recharge Speed
- (21) Shield Wall - +Res (Teleportation), +5% Res (All)
- (25) Kismet - Accuracy +6%
Level 2: Cremate
- (A) Mako's Bite - Accuracy/Damage
- (7) Mako's Bite - Damage/Endurance
- (9) Mako's Bite - Damage/Recharge
- (9) Mako's Bite - Accuracy/Endurance/Recharge
- (11) Mako's Bite - Accuracy/Damage/Endurance/Recharge
Level 4: Deflection
- (A) Luck of the Gambler - Defense/Increased Global Recharge Speed
- (19) Luck of the Gambler - Defense/Endurance
- (50) Luck of the Gambler - Defense
Level 6: Assassin's Blaze
- (A) Superior Stalker's Guile - Accuracy/Damage
- (13) Superior Stalker's Guile - Damage/Recharge
- (13) Superior Stalker's Guile - Accuracy/Damage/Recharge
- (15) Superior Stalker's Guile - Damage/Endurance/Recharge
- (15) Superior Stalker's Guile - Accuracy/Damage/Endurance/Recharge
- (17) Superior Stalker's Guile - Recharge/Chance to Hide
Level 8: Battle Agility
- (A) Luck of the Gambler - Defense/Increased Global Recharge Speed
- (17) Luck of the Gambler - Defense
- (19) Luck of the Gambler - Defense/Endurance
Level 10: True Grit
- (A) Unbreakable Guard - Resistance
- (37) Unbreakable Guard - Resistance/Endurance
- (39) Unbreakable Guard - RechargeTime/Resistance
- (39) Unbreakable Guard - +Max HP
- (39) Numina's Convalesence - +Regeneration/+Recovery
- (40) Miracle - +Recovery
Level 12: Build Up
- (A) Gaussian's Synchronized Fire-Control - Chance for Build Up
- (21) Gaussian's Synchronized Fire-Control - To Hit Buff/Recharge/Endurance
- (23) Gaussian's Synchronized Fire-Control - Recharge/Endurance
- (40) Gaussian's Synchronized Fire-Control - To Hit Buff
- (40) Gaussian's Synchronized Fire-Control - To Hit Buff/Recharge
- (43) Gaussian's Synchronized Fire-Control - To Hit Buff/Endurance
Level 14: Hasten
- (A) Recharge Reduction IO
- (48) Recharge Reduction IO
Level 16: Active Defense
- (A) Endurance Reduction IO
Level 18: Kick
- (A) Empty
Level 20: Against All Odds
- (A) Endurance Reduction IO
Level 22: Tough
- (A) Gladiator's Armor - Resistance
- (34) Gladiator's Armor - Resistance/Rech/End
- (42) Gladiator's Armor - TP Protection +3% Def (All)
- (42) Gladiator's Armor - Recharge/Endurance
- (43) Gladiator's Armor - Recharge/Resist
- (46) Gladiator's Armor - End/Resist
Level 24: Weave
- (A) Red Fortune - Defense/Endurance
- (25) Red Fortune - Defense/Recharge
- (31) Red Fortune - Endurance/Recharge
- (31) Red Fortune - Defense/Endurance/Recharge
- (42) Red Fortune - Endurance
- (43) Red Fortune - Defense
Level 26: Fire Sword Circle
- (A) Armageddon - Damage
- (27) Armageddon - Damage/Recharge
- (27) Armageddon - Accuracy/Damage/Recharge
- (29) Armageddon - Accuracy/Recharge
- (29) Armageddon - Damage/Endurance
- (31) Armageddon - Chance for Fire Damage
Level 28: Grant Cover
- (A) Luck of the Gambler - Defense/Increased Global Recharge Speed
Level 30: Combat Jumping
- (A) Luck of the Gambler - Defense/Increased Global Recharge Speed
Level 32: Greater Fire Sword
- (A) Superior Assassin's Mark - Accuracy/Damage
- (33) Superior Assassin's Mark - Damage/RechargeTime
- (33) Superior Assassin's Mark - Accuracy/Damage/RechargeTime
- (33) Superior Assassin's Mark - Damage/Endurance/RechargeTime
- (34) Superior Assassin's Mark - Accuracy/Damage/Endurance/RechargeTime
- (34) Superior Assassin's Mark - RechargeTime/Rchg Build Up
Level 35: Shield Charge
- (A) Obliteration - Damage
- (36) Obliteration - Accuracy/Recharge
- (36) Obliteration - Damage/Recharge
- (36) Obliteration - Accuracy/Damage/Recharge
- (37) Obliteration - Accuracy/Damage/Endurance/Recharge
- (37) Obliteration - Chance for Smashing Damage
Level 38: Char
- (A) Accuracy IO
Level 41: Melt Armor
- (A) Recharge Reduction IO
Level 44: Fire Ball
- (A) Ragnarok - Damage
- (45) Ragnarok - Damage/Recharge
- (45) Ragnarok - Accuracy/Damage/Recharge
- (45) Ragnarok - Accuracy/Recharge
- (46) Ragnarok - Damage/Endurance
- (46) Annihilation - Chance for Res Debuff
Level 47: Maneuvers
- (A) Reactive Defenses - Defense
- (48) Reactive Defenses - Defense/Endurance
- (48) Reactive Defenses - Endurance/RechargeTime
- (50) Reactive Defenses - Defense/Endurance/RechargeTime
- (50) Reactive Defenses - Scaling Resist Damage
Level 49: One with the Shield
- (A) Steadfast Protection - Resistance/+Def 3%
Level 1: Assassination
Level 1: Brawl
- (A) Empty
Level 1: Prestige Power Dash
- (A) Empty
Level 1: Prestige Power Slide
- (A) Empty
Level 1: Prestige Power Quick
- (A) Empty
Level 1: Prestige Power Rush
- (A) Empty
Level 1: Prestige Power Surge
- (A) Empty
Level 1: Sprint
- (A) Celerity - +Stealth
Level 2: Rest
- (A) Empty
Level 4: Ninja Run
Level 2: Swift
- (A) Run Speed IO
Level 2: Health
- (A) Panacea - +Hit Points/Endurance
Level 2: Hurdle
- (A) Jumping IO
Level 2: Stamina
- (A) Performance Shifter - Chance for +End
- (11) Performance Shifter - EndMod
- (23) Endurance Modification IO
------------

- Hi all, looking for feedback or improvements I could make to this.
-
I would be happy with having the Hidden text under my bars. The opacity is such a disappointment - why not just limit it to PVP
-
I am a programmer. I've worked in game development for almost 9 years. Given the quality the devs here have shown, I'm making what I think is a reasonable assumption that this would not be a difficult task.
I noticed you did not volunteer your services as a programmer... why not?
CoHH is no longer a professional product, but a hobbyist project. Something that needs to be driven home. Hells if I was a CoHH Dev, I would give you the code and say "Here, go for it."
Not saying I think your want would be a good idea, just that it would be entertaining to see you try. From what I've heard of the CoH program, it's spaghetti, with red sauce, and white sauce, and chicken, and hamburger, and mushrooms, and.
Note, a hobbyist project does not mean low quality. Hobbyist projects are often of higher quality in this day and age of wanting it now and cheap.
Oh boy this thread exploded while I was away today, though your question is perfectly fine. I have worked on other freeshard MMOs in the past, and in those instances the developers were incredibly secretive with their code. It was a very different game and situation, and these are not the same people, but I don't want a second job, which is what the last experience was for me. Though to be honest even when I first posted this thread I was genuinely curious how long it would take if I tried to do implement this w/o any context.
One of the early lead developers once described CoX as "spaghetti code", it's that messy and incomprehensibly complex. The program is _badly written_. So one should never, ever, assume something will be easy.And the thing is, he's right. Adding a second autofire power -- or any number of autofire powers -- is a fairly simple thing. IF the code to manage autopowers was implemented rationally, with the intention of having more than one autopower sometime in the future. I can think of easily four different ways that it could be done. And I'm absolutely certain that none of these was used in the CoH server code, and if we were to go digging, we'd find it buried somewhere in the loop that updates countdowns for status effects or something, because that was where the devs could find a code loop that executed with the right frequency to catch the autopowers becoming fireable and set them off. And there's no way to shoehorn a second autopower in, because they used a random integer field they had lying around in the character data structure to record which power was tagged for autofire, and there isn't any space there to put a second field, so you'd have to arbitrarily pick an unused field somewhere else in the data structure, which means you now have two arbitrarily-chosen data fields that have to be maintained whenever something with autofire powers changes, with no explanation why.
(with close to forty years of work experience as a programmer, I have some insight into how spaghetti code gets that way. And we don't want to make it worse just to add a feature that will increase the bottability of the game.)
One of the worse case scenarios that I can think of is if the "feature" is named something stupid that overlaps all over the rest of the code, and thus makes it difficult to search for and find all the side instances of it tucked away in random places.
-
Hehe, really though, should not be challenging assuming they have full client/server code base.
Pray tell, have you heard of the Standard Code Rant...? Because you're tripping over it just about as hard as is conceivably possible.
I understand your point, however.
I am a programmer. I've worked in game development for almost 9 years. Given the quality the devs here have shown, I'm making what I think is a reasonable assumption that this would not be a difficult task.
-
/JRanger
That would violate the concept of actually playing the game. We absolutely do not need more automation.
...
Also, no, not every player takes Hasten. I haven't taken it on a single build yet - even the one that has Superspeed for travel. (I got Combat Jumping instead.)
I didn't say everyone, just most people / characters, which I still think is true.
I can accomplish what I personally have in mind by creating some repeating macro which will be about 80% as effective so why deny it to everyone.
I haven't looked at the CoH code but #2 shouldn't be difficult.Hehe, really though, should not be challenging assuming they have full client/server code base.
-
I don't think this would disturb the balance of the game, but pretty much every player that takes Hasten (almost every player) puts it on auto-cast at least once the cooldown is shortened. Wouldn't it be great if we could use our auto-cast on something else too?
Solutions:
1. Make Hasten have a specific option / it's own version of auto-cast and let us use the regular one for w/e.
2. Simply make a 2nd kind of auto cast (? + Left click)
I haven't looked at the CoH code but #2 shouldn't be difficult. Find code for original, copy/paste, find all references to the first and add checks for the second, change bind, change color ring, write one line that handles if both autos are up, do A before B.
-
OMG yes. Please please give us this option.
-
Came to similar conclusions testing Reactive Radial Interface, which should have a 25% chance to put a DoT on stuff.
1. It does not work on all attack powers (I tested about 4 powers in my main pool as a Water Corruptor) some just never caused the proc after 25+ attempts.
2. Considering #1, it's hard to test whether 25% is working properly. It seems like it happens way less but if you exclude all the powers that don't work then maybe it would be easier to know (shrug).
3. It only does damage once, never in a DoT.
4. The spell effect (on fire) is shared (I think) between the debuff and the DoT, which may be fine but makes testing a little harder.
5. Either "Rain" spells can't proc the damage but do proc the debuff, or the damage instance is just not visible. I can see my rain spells add the fire effect but I don't see any different numbers scrolling by and that stuff isn't reflected in my combat log.
Would really like to see a dev post about this so we know if this is getting fixed any time soon or what.
-
Bump - I've made some very small changes from the above version, but in the interest of space I'm still looking for feedback on the version above and my questions up there. Thanks!
-
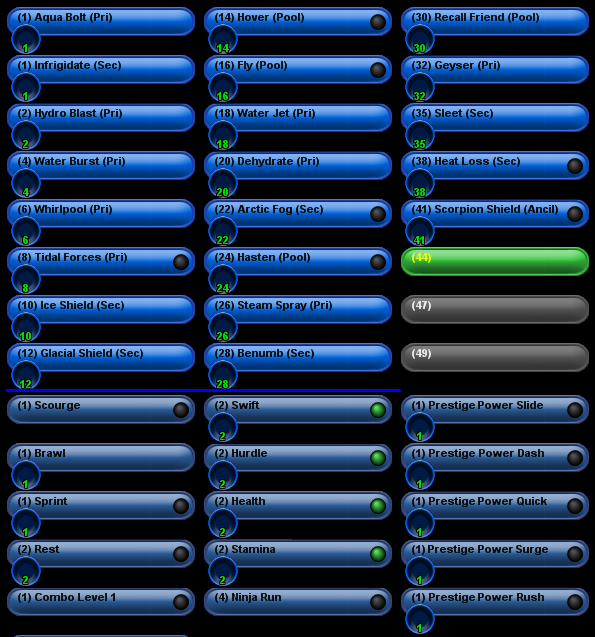
Ok, version 2.0:
- Added aqua bolt and Frostwork, removed Steam Spray and Afterburner
- Went ahead and put in purple sets and superior ATOs for planning
- I would certainly take Aqua Bolt earlier but I didn't want to mess with that for this.
- Changed several normal IOs to 50+3
Hero Plan by Mids' Hero Designer 1.962
Click this DataLink to open the build!
CleansingFlood: Level 50 Magic Corruptor
Primary Power Set: Water Blast
Secondary Power Set: Cold Domination
Power Pool: Flight
Power Pool: Speed
Power Pool: Fighting
Power Pool: Leaping
Ancillary Pool: Mace Mastery
Hero Profile:
Level 1: Hydro Blast
- (A) Superior Scourging Blast - Accuracy/Damage/RechargeTime
- (3) Superior Scourging Blast - RechargeTime/PBAoE +End
- (3) Superior Scourging Blast - Damage/Endurance/RechargeTime
- (5) Thunderstrike - Accuracy/Damage
- (5) Thunderstrike - Accuracy/Damage/Endurance
- (7) Force Feedback - Chance for +Recharge
Level 1: Infrigidate
- (A) Empty
Level 2: Water Burst
- (A) Superior Scourging Blast - Accuracy/Damage
- (7) Superior Scourging Blast - Damage/RechargeTime
- (9) Superior Scourging Blast - Accuracy/Damage/Endurance/RechargeTime
- (9) Javelin Volley - Accuracy/Endurance/Recharge
- (11) Javelin Volley - Accuracy/Damage/End/Rech
- (11) Force Feedback - Chance for +Recharge
Level 4: Ice Shield
- (A) Luck of the Gambler - Defense/Increased Global Recharge Speed
Level 6: Whirlpool
- (A) Superior Malice of the Corruptor - Accuracy/Damage
- (13) Superior Malice of the Corruptor - Damage/Recharge
- (13) Superior Malice of the Corruptor - Accuracy/Damage/Recharge
- (15) Superior Malice of the Corruptor - Damage/Endurance/Recharge
- (15) Superior Malice of the Corruptor - Accuracy/Damage/Endurance/Recharge
- (21) Superior Malice of the Corruptor - Recharge/Chance for Negative Energy Damage
Level 8: Tidal Forces
- (A) Gaussian's Synchronized Fire-Control - To Hit Buff
- (17) Gaussian's Synchronized Fire-Control - To Hit Buff/Recharge
- (17) Gaussian's Synchronized Fire-Control - To Hit Buff/Recharge/Endurance
- (19) Gaussian's Synchronized Fire-Control - Recharge/Endurance
- (19) Gaussian's Synchronized Fire-Control - To Hit Buff/Endurance
- (21) Gaussian's Synchronized Fire-Control - Chance for Build Up
Level 10: Glacial Shield
- (A) Luck of the Gambler - Defense/Increased Global Recharge Speed
Level 12: Dehydrate
- (A) Devastation - Accuracy/Damage
- (23) Devastation - Damage/Recharge
- (25) Devastation - Accuracy/Damage/Recharge
- (25) Devastation - Accuracy/Damage/Endurance/Recharge
- (27) Healing IO
- (27) Healing IO
Level 14: Hover
- (A) Luck of the Gambler - Defense/Increased Global Recharge Speed
- (29) Kismet - Accuracy +6%
Level 16: Fly
- (A) Winter's Gift - Slow Resistance (20%)
Level 18: Water Jet
- (A) Apocalypse - Damage
- (31) Apocalypse - Damage/Recharge
- (31) Apocalypse - Accuracy/Damage/Recharge
- (31) Apocalypse - Accuracy/Recharge
- (33) Apocalypse - Damage/Endurance
- (33) Decimation - Chance of Build Up
Level 20: Arctic Fog
- (A) Red Fortune - Defense/Endurance
- (23) Red Fortune - Defense/Recharge
- (33) Red Fortune - Defense/Endurance/Recharge
- (34) Red Fortune - Endurance/Recharge
- (34) Red Fortune - Defense
- (36) Red Fortune - Endurance
Level 22: Hasten
- (A) Recharge Reduction IO
- (29) Recharge Reduction IO
Level 24: Kick
- (A) Empty
Level 26: Frostwork
- (A) Preventive Medicine - Chance for +Absorb
- (39) Numina's Convalesence - +Regeneration/+Recovery
- (43) Miracle - +Recovery
Level 28: Benumb
- (A) Accuracy IO
- (36) Recharge Reduction IO
- (39) Accuracy IO
- (42) Recharge Reduction IO
Level 30: Tough
- (A) Aegis - Resistance/Endurance
- (34) Aegis - Resistance/Endurance/Recharge
- (36) Aegis - Psionic/Status Resistance
- (37) Aegis - Resistance
- (37) Steadfast Protection - Resistance/+Def 3%
- (37) Gladiator's Armor - TP Protection +3% Def (All)
Level 32: Geyser
- (A) Overwhelming Force - Accuracy/Damage
- (40) Overwhelming Force - Endurance/Recharge
- (40) Overwhelming Force - Accuracy/Damage/Endurance
- (40) Javelin Volley - Accuracy/Damage/End/Rech
- (42) Overwhelming Force - Damage/Endurance/Recharge
- (42) Overwhelming Force - Accuracy/Damage/Endurance/Recharge
Level 35: Sleet
- (A) Slow IO
- (43) Recharge Reduction IO
Level 38: Heat Loss
- (A) Performance Shifter - Accuracy/Recharge
- (39) Recharge Reduction IO
- (45) Performance Shifter - EndMod/Accuracy/Recharge
Level 41: Scorpion Shield
- (A) Reactive Defenses - Defense
- (45) Reactive Defenses - Defense/Endurance
- (45) Reactive Defenses - Endurance/RechargeTime
- (46) Reactive Defenses - Defense/RechargeTime
- (46) Reactive Defenses - Defense/Endurance/RechargeTime
- (43) Reactive Defenses - Scaling Resist Damage
Level 44: Weave
- (A) Luck of the Gambler - Defense/Increased Global Recharge Speed
- (46) Luck of the Gambler - Defense/Endurance
- (48) Shield Wall - +Res (Teleportation), +5% Res (All)
- (50) Luck of the Gambler - Defense/Endurance/Recharge
- (50) Luck of the Gambler - Endurance/Recharge
- (50) Luck of the Gambler - Defense
Level 47: Combat Jumping
- (A) Luck of the Gambler - Defense/Increased Global Recharge Speed
Level 49: Aqua Bolt
- (A) Accuracy IO
Level 1: Brawl
- (A) Empty
Level 1: Prestige Power Dash
- (A) Empty
Level 1: Prestige Power Slide
- (A) Empty
Level 1: Prestige Power Quick
- (A) Empty
Level 1: Prestige Power Rush
- (A) Empty
Level 1: Prestige Power Surge
- (A) Empty
Level 1: Scourge
Level 1: Sprint
- (A) Celerity - +Stealth
Level 2: Rest
- (A) Empty
Level 4: Ninja Run
Level 2: Swift
- (A) Flight Speed IO
Level 2: Health
- (A) Panacea - +Hit Points/Endurance
Level 2: Hurdle
- (A) Jumping IO
Level 2: Stamina
- (A) Endurance Modification IO
- (48) Endurance Modification IO
- (48) Performance Shifter - Chance for +End
Level 1: Combo Level 1
Level 1: Combo Level 2
Level 1: Combo Level 3
------------
------------
Set Bonus Totals:
- 18.5% DamageBuff(Smashing)
- 18.5% DamageBuff(Lethal)
- 18.5% DamageBuff(Fire)
- 18.5% DamageBuff(Cold)
- 18.5% DamageBuff(Energy)
- 18.5% DamageBuff(Negative)
- 18.5% DamageBuff(Toxic)
- 18.5% DamageBuff(Psionic)
- 7.25% Defense(Smashing)
- 7.25% Defense(Lethal)
- 10.38% Defense(Fire)
- 10.38% Defense(Cold)
- 13.5% Defense(Energy)
- 13.5% Defense(Negative)
- 6% Defense(Psionic)
- 8.5% Defense(Melee)
- 17.25% Defense(Ranged)
- 10.06% Defense(AoE)
- 7.2% Max End
- 3.75% Enhancement(Max EnduranceDiscount)
- 91.25% Enhancement(RechargeTime)
- 9% Enhancement(Accuracy)
- 10% Enhancement(Range)
- 22.5% SpeedFlying
- GrantPower Preventive Medicine (10% chance, if Scourge)
- 156.6 HP (14.62%) HitPoints
- 22.5% JumpHeight
- 22.5% SpeedJumping
- MezResist(Confused) 23.75%
- MezResist(Held) 23.75%
- MezResist(Immobilized) 23.75%
- MezResist(Sleep) 23.75%
- MezResist(Stunned) 23.75%
- MezResist(Terrorized) 23.75%
- 6.5% (0.11 End/sec) Recovery
- 50% (2.23 HP/sec) Regeneration
- 20% ResEffect(SpeedFlying)
- 20% ResEffect(RechargeTime)
- 20% ResEffect(SpeedRunning)
- 14.75% Resistance(Smashing)
- 14.75% Resistance(Lethal)
- 9.5% Resistance(Fire)
- 9.5% Resistance(Cold)
- 5% Resistance(Energy)
- 5% Resistance(Negative)
- 5% Resistance(Toxic)
- 0% Resistance(Smashing)
- 0% Resistance(Lethal)
- 0% Resistance(Fire)
- 0% Resistance(Cold)
- 0% Resistance(Energy)
- 0% Resistance(Negative)
- 0% Resistance(Toxic)
- 0% Resistance(Psionic)
- 10% Resistance(Psionic)
- 22.5% SpeedRunning
- (A) Superior Scourging Blast - Accuracy/Damage/RechargeTime
-
Ok, I will try to incorporate this information.
What Alpha slot should I expect to use? I sort of assume damage but (shrug)
Without missing it seems like I wouldn't need Aqua Bolt? Water Jet -> Dehydrate -> Hydro Blast -> Water Jet (pumped) -> Water Jet (fast) -> repeat? If it's just there to use if I miss that's fine, just want to make sure I understand :)
What else could I do with Sleet? It's damage is so low it doesn't make sense to me to slot it for that so I figured I would use it as my debuff tool against clumps of bosses or AVs.
Thanks!
-
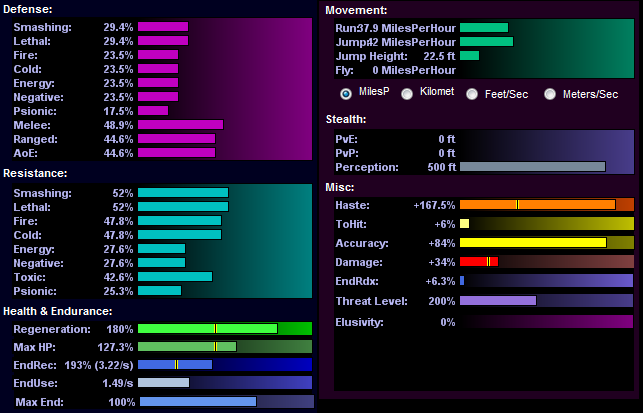
Hi all, I'm looking for feedback and help with my first build (Water/Cold Corr). I barely know what I'm doing so if I didn't include something obvious it's probably b/c I don't know about it. I'm also torn on even getting the Fighting pool but idk what else to get. I also know nothing about Incarnate stuff (gonna try to look that up now) so if that is going to fill in holes somewhere please lmk! I didn't use purples as I figured that would be to expensive for a while but if you think it's better to build with it in mind from the start then tell me :smiley: Finally, I put Decimation on Water Jet for the build up chance, but maybe that should just be another Thunderstrike set? Sorry for the wall, here it is:
EDIT: See version 2.0 a few posts down!
Hero Plan by Mids' Hero Designer 1.962
Click this DataLink to open the build!
CleansingFlood: Level 50 Magic Corruptor
Primary Power Set: Water Blast
Secondary Power Set: Cold Domination
Power Pool: Flight
Power Pool: Speed
Power Pool: Fighting
Power Pool: Leaping
Ancillary Pool: Mace Mastery
Hero Profile:
Level 1: Hydro Blast
- (A) Thunderstrike - Accuracy/Damage
- (3) Thunderstrike - Damage/Endurance
- (3) Thunderstrike - Damage/Recharge
- (5) Thunderstrike - Accuracy/Damage/Recharge
- (5) Thunderstrike - Accuracy/Damage/Endurance
- (7) Thunderstrike - Damage/Endurance/Recharge
Level 1: Infrigidate
- (A) Empty
Level 2: Water Burst
- (A) Scourging Blast - Accuracy/Damage
- (7) Scourging Blast - Accuracy/Damage/RechargeTime
- (9) Scourging Blast - Accuracy/Damage/Endurance/RechargeTime
- (9) Scourging Blast - Damage/RechargeTime
- (11) Scourging Blast - Damage/Endurance/RechargeTime
- (11) Force Feedback - Chance for +Recharge
Level 4: Ice Shield
- (A) Luck of the Gambler - Defense/Increased Global Recharge Speed
- (13) Luck of the Gambler - Defense
- (13) Resist Damage IO
Level 6: Whirlpool
- (A) Malice of the Corruptor - Accuracy/Damage
- (15) Malice of the Corruptor - Damage/Recharge
- (15) Malice of the Corruptor - Accuracy/Damage/Recharge
- (36) Malice of the Corruptor - Damage/Endurance/Recharge
- (46) Malice of the Corruptor - Accuracy/Damage/Endurance/Recharge
- (50) Malice of the Corruptor - Recharge/Chance for Negative Energy Damage
Level 8: Tidal Forces
- (A) Gaussian's Synchronized Fire-Control - To Hit Buff
- (17) Gaussian's Synchronized Fire-Control - To Hit Buff/Recharge
- (17) Gaussian's Synchronized Fire-Control - To Hit Buff/Recharge/Endurance
- (19) Gaussian's Synchronized Fire-Control - Recharge/Endurance
- (19) Gaussian's Synchronized Fire-Control - To Hit Buff/Endurance
- (21) Gaussian's Synchronized Fire-Control - Chance for Build Up
Level 10: Glacial Shield
- (A) Luck of the Gambler - Defense/Increased Global Recharge Speed
- (21) Luck of the Gambler - Defense
- (23) Resist Damage IO
Level 12: Dehydrate
- (A) Devastation - Accuracy/Damage
- (23) Devastation - Damage/Recharge
- (25) Devastation - Accuracy/Damage/Recharge
- (25) Devastation - Accuracy/Damage/Endurance/Recharge
- (27) Healing IO
- (27) Healing IO
Level 14: Hover
- (A) Luck of the Gambler - Defense/Increased Global Recharge Speed
- (29) Kismet - Accuracy +6%
Level 16: Fly
- (A) Winter's Gift - Slow Resistance (20%)
Level 18: Water Jet
- (A) Decimation - Accuracy/Damage
- (31) Decimation - Damage/Endurance
- (31) Decimation - Damage/Recharge
- (31) Decimation - Accuracy/Endurance/Recharge
- (33) Decimation - Accuracy/Damage/Recharge
- (33) Decimation - Chance of Build Up
Level 20: Arctic Fog
- (A) Gladiator's Armor - TP Protection +3% Def (All)
- (33) Steadfast Protection - Resistance/+Def 3%
- (34) Aegis - Resistance
- (34) Aegis - Resistance/Endurance/Recharge
- (34) Aegis - Psionic/Status Resistance
- (36) Aegis - Resistance/Endurance
Level 22: Hasten
- (A) Recharge Reduction IO
- (29) Recharge Reduction IO
- (36) Recharge Reduction IO
Level 24: Kick
- (A) Empty
Level 26: Steam Spray
- (A) Positron's Blast - Accuracy/Damage
- (37) Positron's Blast - Damage/Endurance
- (37) Positron's Blast - Damage/Recharge
- (37) Positron's Blast - Damage/Range
- (39) Positron's Blast - Accuracy/Damage/Endurance
- (39) Positron's Blast - Chance of Damage(Energy)
Level 28: Benumb
- (A) Accuracy IO
- (39) Accuracy IO
- (40) Recharge Reduction IO
Level 30: Tough
- (A) Resist Damage IO
Level 32: Geyser
- (A) Overwhelming Force - Accuracy/Damage
- (40) Overwhelming Force - Endurance/Recharge
- (40) Overwhelming Force - Accuracy/Damage/Endurance
- (42) Overwhelming Force - Damage/Endurance/Recharge
- (42) Overwhelming Force - Accuracy/Damage/Endurance/Recharge
- (42) Javelin Volley - Accuracy/Damage/End/Rech
Level 35: Sleet
- (A) Achilles' Heel - Chance for Res Debuff
- (43) Annihilation - Chance for Res Debuff
- (43) Slow IO
- (43) Recharge Reduction IO
Level 38: Heat Loss
- (A) Performance Shifter - Accuracy/Recharge
- (45) Performance Shifter - EndMod/Accuracy/Recharge
- (48) Recharge Reduction IO
Level 41: Scorpion Shield
- (A) Reactive Defenses - Defense
- (45) Reactive Defenses - Defense/Endurance
- (45) Reactive Defenses - Endurance/RechargeTime
- (46) Reactive Defenses - Defense/RechargeTime
- (46) Reactive Defenses - Defense/Endurance/RechargeTime
- (50) Reactive Defenses - Scaling Resist Damage
Level 44: Weave
- (A) Luck of the Gambler - Defense/Increased Global Recharge Speed
- (50) Defense Buff IO
Level 47: Combat Jumping
- (A) Luck of the Gambler - Defense/Increased Global Recharge Speed
Level 49: Afterburner
- (A) Shield Wall - +Res (Teleportation), +5% Res (All)
Level 1: Sprint- (A) Celerity - +Stealth
Level 2: Rest
- (A) Empty
Level 4: Ninja Run
Level 2: Swift
- (A) Flight Speed IO
Level 2: Health
- (A) Miracle - +Recovery
Level 2: Hurdle
- (A) Jumping IO
Level 2: Stamina
- (A) Endurance Modification IO
- (48) Endurance Modification IO
- (48) Performance Shifter - Chance for +End
Level 1: Combo Level 1
Level 1: Combo Level 2
Level 1: Combo Level 3
------------
------------
Set Bonus Totals:
- 11.5% DamageBuff(Smashing)
- 11.5% DamageBuff(Lethal)
- 11.5% DamageBuff(Fire)
- 11.5% DamageBuff(Cold)
- 11.5% DamageBuff(Energy)
- 11.5% DamageBuff(Negative)
- 11.5% DamageBuff(Toxic)
- 11.5% DamageBuff(Psionic)
- 7.25% Defense(Smashing)
- 7.25% Defense(Lethal)
- 10.38% Defense(Fire)
- 10.38% Defense(Cold)
- 15.38% Defense(Energy)
- 15.38% Defense(Negative)
- 6% Defense(Psionic)
- 8.5% Defense(Melee)
- 17.25% Defense(Ranged)
- 10.06% Defense(AoE)
- 4.05% Max End
- 7.5% Enhancement(Range)
- 73.75% Enhancement(RechargeTime)
- 3.75% Enhancement(Max EnduranceDiscount)
- 27% Enhancement(Accuracy)
- 28.5% SpeedFlying
- 108.4 HP (10.12%) HitPoints
- 28.5% JumpHeight
- 28.5% SpeedJumping
- MezResist(Confused) 33.75%
- MezResist(Held) 33.75%
- MezResist(Immobilized) 33.75%
- MezResist(Sleep) 33.75%
- MezResist(Stunned) 33.75%
- MezResist(Terrorized) 33.75%
- 10% (0.17 End/sec) Recovery
- 44% (1.96 HP/sec) Regeneration
- 20% ResEffect(SpeedFlying)
- 20% ResEffect(RechargeTime)
- 20% ResEffect(SpeedRunning)
- 9.5% Resistance(Smashing)
- 9.5% Resistance(Lethal)
- 10.25% Resistance(Fire)
- 10.25% Resistance(Cold)
- 6.5% Resistance(Energy)
- 6.5% Resistance(Negative)
- 14% Resistance(Toxic)
- 19% Resistance(Psionic)
- 0% Resistance(Smashing)
- 0% Resistance(Lethal)
- 0% Resistance(Fire)
- 0% Resistance(Cold)
- 0% Resistance(Energy)
- 0% Resistance(Negative)
- 0% Resistance(Toxic)
- 0% Resistance(Psionic)
- 28.5% SpeedRunning
- (A) Celerity - +Stealth
- (A) Thunderstrike - Accuracy/Damage
-
In terms of the original questions:
1. Focused Accuracy is an end hog that does little for you.
2. The entire medicine pool is junk. Slot your ATOs, get some healing set procs and eat some inspirations. Most importantly, bulk up your defenses and don't get hit.
3. Afterburner. This is a LotG recharge mule. I suppose it's nice to fly faster than anyone else, but travel at the high end is less about flying from place to place than alternating prestige power teleportation. It could potentially be used as a Personal Force Field-style effect, but you're probably already Ranged Def capped and it doesn't provide resistance.
4. Kick/Tough/Weave. These are normally a bad idea. You have to waste a power - which Water absolutely can't afford - and you get S/L resistance you probably don't need coupled with defenses that could be gotten more cheaply elsewhere.
5. Leadership. Leadership contains two LotG recharge mules and no one is forcing you to run those toggles - just use them when needed.
6. Teleportation. This entire tree is largely replaced by prestige teleports in the endgame, so unless you just want it for solo it's not normally much use.
What would you recommend then?
It doesn't seem like I need LoTG slots, as I already have 5 with Ice Shield, Glacial Shield, Arctic Fog, Hover and Scorpion Shield, unless the idea is to put those on powers that I don't even use to slot other things onto the first ones.
I'm also pretty new to the IO set build game, but I'd like to get my powers in order before I start trying to mess with that.
What do you think of dropping Aqua Bolt and using Dehydrate instead in a ST rotation?
-
My Water/Cold is in his 77's. I do TFs, Examplar lot, and ITrials.
I'd suggest Snow Storm and Frostwork.
Snow Storm is great for AV fights, keeps them slowed, in place, and hitting you less. Plus any foes that join the fight get debuffed as they get close. You can also use it to ground mobs of fliers which can be very handing, since Sleet can't get that far up in the air, nor can whirlpool.
Frostwork is pretty good at giving some Extra HP to a Squishy who you want to help keep alive, or to a Meat Shield who's having issues staying alive.
IF not, Most teams can make use of Manuvers and Tactics, just keep in mind they are as End heavy as a Travel power.
Thanks for the info! BTW do you find yourself using Dehydrate much? If so, how do you slot it?
-
This is slightly different from my Water/Cold build. While you've got Fly/Hover, I'm using CJ/SJ, and I took Fighting Pool instead of TP Friend, and grabbed Snow Storm which is a great debuff IMO. Otherwise we aren't too terribly far off. So Toughness/Weave are great if you're building for def/res, and it's not hard to do with Water/Cold. Leadership is a possibility as well, but I prefer Fighting personally. Aid Self I hear is great, but I prefer stacking def/res to using reactive heals. YMMV.
My vote is toward T/W, but I don't know what your current def/res are to know if it's worth it.
I guess I won't know either until I work out a full build with set bonuses. Thanks for your info :)
-
Thank you for stopping by :) Right now I've got 3 more powers (Maybe more if I dropped Dehydrate) and I'm not sure what I should grab. This is for a group focused PVE character.
1. Focused Accuracy: Is this worth having for some circumstance?
2. Aid Other / Aid Self / Field Medic: How good are the Field Medic bonuses? Aid self seems like a really long cast, but might be nice to have once and a while.
3. Afterburner: Never tried this, thoughts?
4. Kick / Tough / Weave: Worth it on a Corruptor? Already have 5 powers for LotG (but I am still very new to planning a build around set bonuses)
5. Leadership: Not sure I'd have the endurance for 3 of these but I guess it's an option.
6. Teleport Foe / Team Teleport: I picked up Recall friend but at 44 and mostly running TFs I haven't used it much, maybe that would change though.
7. Anything else you can suggest :)
Sorry for two images, upload size was barely to big
-
I found a bug this morning and I was hoping to find out if it's a known issue and if there is a solution to find out what is right.
I was using the Action House and while trying to figure out the history of an item I would get two distinct sets of results. Clicking the item I might see set A, click it again and I'd see set B. The price difference (image will make this more clear) is huge, and I need to know which one is accurate heh. When I switched back and forth I even tried it coming from different sources but that didn't make any difference, those other items all had a consistent price set. This was on Everlasting and the item was Miracle: +Recovery
In the image I have the item selected in my storage and in the find window, showing both of the sets of prices I would see in either place if I switch back and forth to the item. It's not that the price is always different in storage vs finder.
-
I will have to check when I get home, I left mine at 47 when I dreamed up a new alt lol.
But IIRC, Water Burst and Hydro Blast are your mains for FF+Rech, as well as Geyser possibly? I don't think I slotted Geyser with it if I could, because of the longer recharge on it already. You'll have to make a decision on whether it is worth it or not long run in those powers. Personally I think that once you hit 50 or so, if you build for +recharge you won't need it, but YMMV.
Guassian's should go on Tidal, if you run Tactics it might go there too (never tried).
Offhand I know I use Celerity +stealth, and I'm using 5 LotG +Rechg in my defensives, 1 Karma -KB, 1 Reactive Def +scaling dmg res, Performance Shifter +end in Stamina, and a couple more uniques or singles that I can't recall. The sets are mostly focused around extra +def, especially ranged, and +recharge. I think I have a build on Pine's, non-final, and if I can remember I'll post it tonight or this weekend. I probably won't remember, I have some poor soul waiting on my Plant/MA guide that I keep flaking on too lol.
Thanks for the info, if you remember more please add it :) I'm not looking for a full build, but things like the Karma -KB or various synergies with certain powers is good to know!
Does the Stealth from Celerity let you just run around like a Stalker or do you have to avoid running right over mobs?
-
I'm not familiar with Corruptor / Ranged IO sets, so I'm looking for synergies that as an newcomer I wouldn't know about. I discovered the Chance for Hide and Buildup recharge options for Stalker way to late and I want to make sure I don't miss anything like that on my future Water/Cold corruptor.
Edit: My goal is to focus on a fun AoE damage build that is almost entirely pve team play.
Force Feedback: Chance for +Recharge - I think this can only go on Hydro Blast or Water Burst. The first is low recharge so I will use it often, but the latter hits a bunch of targets and the wiki says it's chance to proc is per enemy hit. But if I do that I can't put the full Malice of the Corruptor set on Water Burst (which seems good).
Gaussian's: Chance for Build Up - I think this just goes on Tidal Forces right?
What else is out there and where would you put it?
Edit: Which Corruptor ATO would you get first (would you get both or either) and where would they go? I want to put in things like Force Feedback +Recharge and -Res powers but they mean I can't us a complete set either.
Thanks!
-
Hmm, I'm getting a lot of mixed opinions here. I'm at 48 but I don't know that I've done a lot of 40+ content to know for myself.
-
In the primary you could skip mental thrust. It's ... not great. I'm playing a Psi/WP stalker and I'm seriously thinking of replacing Mental thrust with Air Superiority because I need some -fly action.( I took the martial ancillary pool and web grenade is not to my liking and I may respec into another pool later depending on how the shuriken powers are.) Some people skip Boggle, I personally like confusing mobs. It's great for taking some heat off me while soloing and confusing say a Rikti Guardian so I get bubbles or accelerate metabolism from them.
Yeah I sort of figured I would see where I land with recharge speed and if it's just not necessary then I could drop it.
-
I'm playing a Psi Melee / Super Reflexes Stalker.
Assuming I should take all Primary and Secondary powers (let me know if any of these are not worth it later) it looks like I have about 5 slots open. If I take 3 powers from the Epic/Ancillary Pool then that's 2 remaining. At this point I'm questioning even taking a travel power.
I know very little about IO Sets, so I'm wondering if there is a pool/power that would be worth taking just for that.
I'm also considering friend / Foe Teleport as it might be nice to help a group sneak past a mission.
Thanks for your help!


Can we get a bind for targeting enemies by rank (lieut, boss, AV, etc)?
in Suggestions & Feedback
Posted
+1 - I would really love this on my Stalker!