

StrawberryWitch
-
Posts
61 -
Joined
-
Last visited
Content Type
Profiles
Forums
Events
Store
Articles
Patch Notes
Posts posted by StrawberryWitch
-
-
What's the new power set? Is it Wind? 🥰🥰🌬️ Ty for all your hard work!!
-
 1
1
-
-
Yay!! 🥰🥳🥳
-
On 8/11/2023 at 10:27 AM, SeraphimKensai said:
I have a max level storm/storm defender myself and I'll agree there's a lot of powers that look good, but how did you come to skip Steamy Mist and Tornado? Steamy mist has great utility and increases defense and resistances. Tornado just does a ton of damage.
Do you happen to have your build? I just made a storm/storm def and need an example to look at 😅😅
-
I honestly hate how slow the henchmen are following you. Most of the time in a team, by the time my babies arrive in the fight, the bad guys are already dead. Also hate that I have to take group fly just for my minions to catch up to me or fly with me when I'm flying.
-
1
-
-
4 hours ago, EnjoyTheJourney said:
Attached is a defender version as potential food-for-thought. Wouldn't claim that what's here is necessarily superior to what you've done. But, perhaps there are some ideas you might like. Or not, not sure.
Good luck with your poisoner, however you decide to move forward.Defender (Poison - Electrical Blast - Mu mastery).mbd 44.77 kB · 1 download
Thank you! I'll take a look at it 😄
-
Hi forum peeps! I would like some help on my build. I plan to do team stuff like iTrials, TF/SFs, and random team mishes. Here is what I got so far. Any help will be greatly appreciated. 🙂
(Odd, it won't let me share it on mids 😞 )
-
1 hour ago, Without_Pause said:
At the end of the day Time offers more utility than what FF does. Yes, FF offers more Def, but since players are already building for that, I would rather take something with more options.
Thank you! Ok Time it is.
-
Hello! So I was thinking of making a Dual Pistols hero and not sure if I wanna go Time Manipulation or Force Field as her secondary. Any recommendations? What are the pros and cons for them?
I mostly do iTrials, mishes, radios, or farms. I rarely solo if at all.
-
Broad Sword and Shield Brute. Makes me feel like I'm Wonder Woman and powerful 🙂 Also very survivable and deal a pretty good amount of dmg too. All around just very fun flying at my enemies and just whack 'em with my sword and shield lol.
-
 2
2
-
-
So far I'm having a lot of fun with my Broad Sword/Shield Brute. Very high survivability.
-
18 hours ago, SeraphimKensai said:
How far have you taken it?
All IO'd out, with Destiny and Hybrid T4. No end issues and mobs go down pretty fast at +4/+8. Will do more testing later.
-
8 minutes ago, SeraphimKensai said:
Thoughts between corruptor vs defender? I only spent a minor amount of time checking out storm blast as it went through testing. Now that it's live I figured I'd roll one. Just debating mostly internally about whether to go defender or corruptor with it.
What do you all think?
I went Storm/Storm Mu Mastery Defender. Pretty fun so far. Haven't tested Corruptor yet though.
-
I would like some help with my build. I do alot of teamplay, mostly lots of random team mishes and iTrials. I noticed I've been having end issues. I only got to 30% res to smash and lethal. Inf isn't an issue at all. My hero is a shark merfolk and I would like to keep it on theme with Leviathan Mastery.
This Hero build was built using Mids Reborn 3.4.6
https://github.com/LoadedCamel/MidsRebornClick this DataLink to open the build!
Level 50 Magic Corruptor
Primary Power Set: Water Blast
Secondary Power Set: Cold Domination
Power Pool: Flight
Power Pool: Leadership
Power Pool: Speed
Ancillary Pool: Leviathan MasteryHero Profile:
Level 1: Aqua Bolt- (A) Superior Scourging Blast - Accuracy/Damage
- (3) Superior Scourging Blast - Damage/RechargeTime
- (3) Superior Scourging Blast - Accuracy/Damage/RechargeTime
- (5) Superior Scourging Blast - Damage/Endurance/RechargeTime
- (5) Superior Scourging Blast - Accuracy/Damage/Endurance/RechargeTime
- (7) Superior Scourging Blast - RechargeTime/PBAoE +End
Level 1: Infrigidate
- (A) Ice Mistral's Torment - Chance for Cold Damage
- (7) Impeded Swiftness - Chance of Damage(Smashing)
- (9) Touch of Lady Grey - Chance for Negative Damage
- (9) Shield Breaker - Chance for Lethal Damage
- (11) Achilles' Heel - Chance for Res Debuff
Level 2: Hydro Blast
- (A) Apocalypse - Damage
- (11) Apocalypse - Damage/Recharge
- (13) Apocalypse - Damage/Recharge/Accuracy
- (13) Apocalypse - Recharge/Accuracy
- (15) Apocalypse - Damage/Endurance
- (15) Apocalypse - Chance of Damage(Negative)
Level 4: Fly
- (A) Hypersonic - Flying
Level 6: Water Burst
- (A) Ragnarok - Damage
- (17) Ragnarok - Damage/Recharge
- (17) Ragnarok - Damage/Recharge/Accuracy
- (19) Ragnarok - Recharge/Accuracy
- (19) Ragnarok - Damage/Endurance
- (21) Ice Mistral's Torment - Chance for Cold Damage
Level 8: Whirlpool
- (A) Bombardment - Accuracy/Recharge/Endurance
- (21) Bombardment - Damage/Recharge
- (23) Bombardment - Accuracy/Damage/Recharge
- (23) Bombardment - Accuracy/Damage/Recharge/Endurance
- (25) Bombardment - Chance for Fire Damage
- (25) Shield Breaker - Chance for Lethal Damage
Level 10: Ice Shield
- (A) Luck of the Gambler - Defense/Increased Global Recharge Speed
Level 12: Glacial Shield
- (A) Luck of the Gambler - Defense/Increased Global Recharge Speed
Level 14: Hover
- (A) Luck of the Gambler - Defense/Increased Global Recharge Speed
Level 16: Dehydrate
- (A) Devastation - Accuracy/Damage
- (27) Devastation - Damage/Endurance
- (29) Devastation - Damage/Recharge
- (29) Devastation - Chance of Hold
- (31) Numina's Convalesence - Heal
- (31) Numina's Convalesence - +Regeneration/+Recovery
Level 18: Water Jet
- (A) Superior Malice of the Corruptor - Accuracy/Damage
- (31) Superior Malice of the Corruptor - Damage/Recharge
- (33) Superior Malice of the Corruptor - Accuracy/Damage/Recharge
- (33) Superior Malice of the Corruptor - Damage/Endurance/Recharge
- (33) Superior Malice of the Corruptor - Accuracy/Damage/Endurance/Recharge
- (34) Superior Malice of the Corruptor - Recharge/Chance for Negative Energy Damage
Level 20: Arctic Fog
- (A) Luck of the Gambler - Defense/Increased Global Recharge Speed
Level 22: Maneuvers
- (A) Luck of the Gambler - Defense
- (27) Luck of the Gambler - Defense/Increased Global Recharge Speed
Level 24: Tactics
- (A) To Hit Buff IO
Level 26: Benumb
- (A) Recharge Reduction IO
- (34) Recharge Reduction IO
Level 28: Geyser
- (A) Overwhelming Force - Accuracy/Damage
- (34) Overwhelming Force - Endurance/Recharge
- (36) Overwhelming Force - Accuracy/Damage/Endurance
- (36) Overwhelming Force - Damage/Endurance/Recharge
- (36) Overwhelming Force - Accuracy/Damage/Endurance/Recharge
- (37) Ice Mistral's Torment - Chance for Cold Damage
Level 30: Sleet
- (A) Bombardment - Damage
- (37) Bombardment - Damage/Recharge
- (37) Bombardment - Accuracy/Damage/Recharge
- (46) Bombardment - Chance for Fire Damage
Level 32: Heat Loss
- (A) Power Transfer - EndMod
- (39) Power Transfer - Damage/Recharge
- (39) Power Transfer - Damage/EndMod
- (39) Power Transfer - Damage/Accuracy/Endurance
- (40) Power Transfer - Damage/Accuracy/Recharge/Endurance
- (40) Power Transfer - Chance to Heal Self
Level 35: School of Sharks
- (A) Gravitational Anchor - Immobilize
- (40) Gravitational Anchor - Immobilize/Recharge
- (42) Gravitational Anchor - Immobilize/Recharge/Accuracy
- (42) Gravitational Anchor - Immobilize/Endurance
- (42) Gravitational Anchor - Chance for Hold
- (43) Trap of the Hunter - Chance of Damage(Lethal)
Level 38: Shark Skin
- (A) Steadfast Protection - Resistance/+Def 3%
- (43) Impervium Armor - Psionic Resistance
- (43) Gladiator's Armor - TP Protection +3% Def (All)
Level 41: Spirit Shark Jaws
- (A) Unbreakable Constraint - Hold
- (45) Unbreakable Constraint - Hold/Recharge
- (45) Unbreakable Constraint - Hold/Recharge/Accuracy
- (45) Unbreakable Constraint - Hold/Endurance
- (46) Unbreakable Constraint - Chance for Smashing Damage
- (46) Gladiator's Net - Chance of Damage(Lethal)
Level 44: Summon Coralax
- (A) Soulbound Allegiance - Damage/Recharge
Level 47: Frostwork
- (A) Preventive Medicine - Heal
- (48) Preventive Medicine - Heal/Endurance
- (48) Preventive Medicine - Endurance/RechargeTime
- (48) Preventive Medicine - Heal/RechargeTime
- (50) Preventive Medicine - Heal/RechargeTime/Endurance
- (50) Preventive Medicine - Chance for +Absorb
Level 49: Hasten
- (A) Recharge Reduction IO
- (50) Recharge Reduction IO
Level 1: Scourge
Level 1: Brawl| Copy & Paste this data into Mids Reborn : Hero Designer to view the build | |-------------------------------------------------------------------| |MxDz;1771;747;1494;HEX;| |78DA7594C953135110C6BF49262C09106358650F5B10080497AB169B52862A44D16| |32A6586902224310996FE251E3CBA1407D7AB960B9EE53F70BB092A8AE572D3B133| |3D6D1EA19CAA99F94DF7F7BED73D6FE6CD5D9DAAD97C153909CD3B998AE5F3D1C94| |C2EB7962D6472AEB958227909C5A392CEB67F89E8422C9D30E2A18BB182918B4ED0| |A842472939B1B6B4149ACCA4E2D1A9CC6A321D2B24336978E63399546826954C2C1| |7BC16478C58DCC8E5979359B7F57C2E6B18F15A961555C974A26B3A9BBC142A3947| |8C2BC9586139968ECED19446EE5A339515A473A5872E1AE4305D40AF0E847538D02| |7D0CFA0634020C850814186C7DA5E1B8AD6B96CC91D8AB7EBA8C2A6C38A54A1C269| |45DCD8A0885F478A8AD0D422340CB3D68D11861A84044619EA30261066F0D0BB76A| |264430F5E2E629526702919970BE33CE6008E081C6538886302C719EAA59734D954| |AA7556E28F6E4B4C86466B220B3486663804ECBE9F9045B562836A346896E429DD3| |C6AC623996AEAAD56EDAD5632592ACAAB16E5C54D589943B8C5D086DB02EB0C1D58| |D46CB8C070996C7CAA8D0F779DB6E41E4317EE0B3C1078C8D08D470CCFC9C2AFD6E| |9973A7DD441833281D6807ACDAED396F849D2A4B6DF8471AEF705455BD4C12D1882| |3DB30D796AA0556DA015AFA5B8370C3D782BF04EE03D43AFACF146F16B551A70B6E| |3B76E4B4C017B8D4764695FD2A0CED20F60BA3AB1CBDA7E7C13F82EF08361003F05| |7E31AC502D01B58500E61DB6E42CC3201604CE0B2C321CC60D7E8D29B2E9536C1C7| |DD65B6D2F4A0609068A30CE7DAFD22DA84E19C414DB0D635A6046E0B4C3EE7B5660| |9A6DD2741B52576E082758F28CA221758210B678CC28B6053E0A7C6208E3B3C00E4| |3803E8D316559B43159F7B0C0AC6EED417191986D3AD4C3B482A689C87FE2F3BABA| |87515C432B5BEFB8F76E6F74F670E6CBFE4C90335FF767BAB997DDFD19FB03F8D0B| |8B73273AB3CB05D1E28EE38EAA6679EA1DF2FACB89BBEFAB2C07A8002EA90534D65| |8AEBFE32C55F58C6DD0B| |-------------------------------------------------------------------|
-
Cool! I'd like to see your build too 🙂
-
14 hours ago, BrandX said:
I'd still replace the DMG/RCH IO for the ACC/RCH IO, but I like a bit higher ACC
Ok changed! Thanks! 😄
-
Ok, this is what I'm using now and it's working great! Thank you so much for the inputs, everyone!
This Hero build was built using Mids Reborn 3.4.6
https://github.com/LoadedCamel/MidsRebornClick this DataLink to open the build!
Powered Windrider: Level 50 Mutation Defender
Primary Power Set: Storm Summoning
Secondary Power Set: Electrical Blast
Power Pool: Flight
Power Pool: Fighting
Power Pool: Leadership
Power Pool: Speed
Ancillary Pool: Electricity MasteryHero Profile:
Level 1: O2 Boost- (A) Preventive Medicine - Chance for +Absorb
Level 1: Charged Bolts
- (A) Apocalypse - Damage
- (3) Apocalypse - Damage/Recharge
- (3) Apocalypse - Damage/Recharge/Accuracy
- (5) Apocalypse - Damage/Endurance
- (5) Apocalypse - Chance of Damage(Negative)
Level 2: Lightning Bolt
- (A) Superior Winter's Bite - Accuracy/Damage
- (7) Superior Winter's Bite - Damage/RechargeTime
- (7) Superior Winter's Bite - Accuracy/Damage/Endurance
- (9) Superior Winter's Bite - Accuracy/Damage/Recharge
- (9) Superior Winter's Bite - Damage/Endurance/Accuracy/RechargeTime
- (11) Gladiator's Javelin - Chance of Damage(Toxic)
Level 4: Fly
- (A) Freebird - FlySpeed
Level 6: Hover
- (A) Luck of the Gambler - Defense/Increased Global Recharge Speed
Level 8: Snow Storm
- (A) Endurance Reduction IO
Level 10: Steamy Mist
- (A) Reactive Defenses - Defense
- (11) Reactive Defenses - Defense/Endurance
- (13) Reactive Defenses - Scaling Resist Damage
- (13) Steadfast Protection - Resistance/+Def 3%
- (15) Gladiator's Armor - TP Protection +3% Def (All)
- (15) Luck of the Gambler - Defense/Increased Global Recharge Speed
Level 12: Freezing Rain
- (A) Superior Vigilant Assault - Damage/RechargeTime
- (17) Superior Vigilant Assault - Damage/Endurance/RechargeTime
- (17) Superior Vigilant Assault - Accuracy/Damage/Endurance/RechargeTime
- (19) Achilles' Heel - Chance for Res Debuff
Level 14: Ball Lightning
- (A) Superior Vigilant Assault - Accuracy/Damage
- (19) Superior Vigilant Assault - Accuracy/Damage/Endurance
- (21) Superior Vigilant Assault - RechargeTime/PBAoE +Absorb
- (21) Superior Defender's Bastion - Recharge/Chance for Minor PBAoE Heal
- (23) Positron's Blast - Chance of Damage(Energy)
- (23) Bombardment - Chance for Fire Damage
Level 16: Short Circuit
- (A) Eradication - Accuracy/Damage/Recharge
- (25) Eradication - Accuracy/Damage/Endurance/Recharge
- (25) Eradication - Chance for Energy Damage
- (27) Power Transfer - EndMod
- (27) Power Transfer - Chance to Heal Self
Level 18: Charge Up
- (A) Gaussian's Synchronized Fire-Control - Chance for Build Up
Level 20: Hurricane
- (A) Dark Watcher's Despair - To Hit Debuff
- (29) Dark Watcher's Despair - To Hit Debuff/Recharge
- (29) Dark Watcher's Despair - To Hit Debuff/Recharge/Endurance
- (31) Dark Watcher's Despair - To Hit Debuff/Endurance
- (31) Dark Watcher's Despair - Chance for Recharge Slow
Level 22: Zapp
- (A) Sting of the Manticore - Accuracy/Damage
- (33) Sting of the Manticore - Damage/Endurance
- (33) Sting of the Manticore - Damage/Interrupt/Recharge
- (33) Sting of the Manticore - Damage/Endurance/Recharge
- (34) Sting of the Manticore - Chance of Damage(Toxic)
- (34) Gladiator's Javelin - Chance of Damage(Toxic)
Level 24: Kick
- (A) Empty
Level 26: Maneuvers
- (A) Luck of the Gambler - Defense/Endurance
- (34) Luck of the Gambler - Defense
- (36) Luck of the Gambler - Defense/Increased Global Recharge Speed
Level 28: Tornado
- (A) Overwhelming Force - Endurance/Recharge
- (36) Overwhelming Force - Accuracy/Damage/Endurance
- (36) Overwhelming Force - Damage/Endurance/Recharge
- (37) Overwhelming Force - Accuracy/Damage/Endurance/Recharge
- (37) Overwhelming Force - Damage/Chance for Knockdown/Knockback to Knockdown
- (37) Force Feedback - Chance for +Recharge
Level 30: Tesla Cage
- (A) Superior Defender's Bastion - Accuracy/Damage
- (39) Superior Defender's Bastion - Damage/Recharge
- (39) Superior Defender's Bastion - Damage/Endurance/Recharge
- (39) Superior Defender's Bastion - Accuracy/Damage/Endurance
- (40) Superior Defender's Bastion - Accuracy/Damage/Endurance/Recharge
Level 32: Tough
- (A) Reactive Armor - Resistance/Endurance
Level 35: Lightning Storm
- (A) Force Feedback - Damage/Knockback
- (40) Force Feedback - Recharge/Knockback
- (40) Force Feedback - Recharge/Endurance
- (42) Force Feedback - Damage/Endurance/Knockback
- (42) Force Feedback - Chance for +Recharge
- (42) Sudden Acceleration - Knockback to Knockdown
Level 38: Weave
- (A) Shield Wall - Defense/Endurance
- (43) Shield Wall - Defense
- (43) Shield Wall - +Res (Teleportation), +5% Res (All)
- (43) Luck of the Gambler - Defense/Increased Global Recharge Speed
Level 41: Thunderous Blast
- (A) Bombardment - Accuracy/Recharge/Endurance
- (45) Bombardment - Damage/Recharge
- (45) Bombardment - Accuracy/Damage/Recharge
- (45) Bombardment - Accuracy/Damage/Recharge/Endurance
- (46) Bombardment - Chance for Fire Damage
Level 44: Electric Fence
- (A) Gravitational Anchor - Immobilize
- (46) Gravitational Anchor - Immobilize/Recharge
- (48) Gravitational Anchor - Immobilize/Recharge/Accuracy
- (48) Gravitational Anchor - Immobilize/Endurance
- (48) Gravitational Anchor - Chance for Hold
Level 47: Charged Armor
-
Hamidon Origin:Ribosome Exposure
Level 49: Hasten
- (A) Recharge Reduction IO
- (50) Recharge Reduction IO
Level 1: Vigilance
Level 1: Brawl| Copy & Paste this data into Mids Reborn : Hero Designer to view the build | |-------------------------------------------------------------------| |MxDz;1783;784;1568;HEX;| |78DA7594494C53511486FF375486320A953297A25229D416756B0C020B0653C061D| |934F4012F292D2925CACEA86C9CA26E3431EEC5599021BA3271A9D1A80B374E712B| |4362E2CA584FDF79975C4A7CC97BF77BE73FF7DC73CF1D06CE7415BD79DD7F044AC| |9D178746A2AD2658C1A899891CA1F984E47D36632017ACAC3C9D346CA88794E9989| |58CA24398FACF5C237D2393D3A1A184E27531391E1E9898964C24C8C7936D5A1686| |2CC8805BAE3C6483A658E44E3914E1A2A0D6738998C077AE2E6D878BA98398BD4B7| |D4FAEB37A2D47D6ADC9C2CB4FE87270D23E6EE9E3447366399E999C800C53252336| |ECAC847EF45953E0AC493A1775503423A1EAA909F8C0EB4A996A2A25D4080414750| |4088E111358A14D7A1E0AE6E293B3027E01E433EEE0B78C05088364EC24995D3E4F| |434FC512CA5801487AC38E062E5120D9D272B796882A55C26A5404EAA006B9A3DE0| |3A43117E09A822CF7A1D25E8604B8918E00A85714A613467D69A7DCBD021E020C34| |EBC24EF0A1D8FA92996CAE9284650B81C60A8C42101CB3CE42EACC006D561C1130A| |532AAF4A297EAA569E6EAC0A5863A8C106C7ABC16F86A724944BBDE9678ED7EB6A3| |64B694E7A059658A9C3B2801586063C17F082619E1A975C5817DE72E21EBC13F05E| |C00786267C1460AFB64A6B5A25A757850C3D28277BB5145EAD46996277AD6468168| |B738D52A99553A9C567CD76F922E02BC36E7C13F05DC02CCF68215B42B91EF59867| |97BD5810F04CC022430B9618344AB851DE828D68A0DF161DD729AE574ECF8BB3AAD| |DF99C80F30CFB7041C0AC801FBC903A0DB047DE827BD0C343B7A257409F00BB348B| |14C427CFC987BF1CAECD3ADE16C06183C2D02E76DE6D8AE6977BFB11566D974186F| |D1812705CC009863BD43B20572480C3D4EA1ABC3495A0A42841F8795F84041CD3B7| |5E52993A7DEBDD641969A3F4FFC71ED6E5FE645750CBA1570BB7DD7FCDACAC6D577| |CACACE72834C35E5EDD769C54ECD49BB8F81BDB7D3DB00FCF0DD5F6BDC9E0F65BBE| |B1CD69D2B1A70B4F9A775F2BD54A36E8745C427265AA2B730C9F2A720C83AE1CC3A| |DAC871CF49537C7F00F5868E9C3| |-------------------------------------------------------------------|
- (A) Preventive Medicine - Chance for +Absorb
-
1 hour ago, Meknomancer said:
If your not slotting/planning to use gale dump it for 02 boost and toss a preventetive absorb in. Hurricane with a full dark watchers is a wasted slot, the 6 th piece does nothing for you. Better off with 5 dampened spirits-same recharge and damage bonus but useful res bonus on top. I'd use a FF+rech in lightning storm instead of the rech io. Your a little short of ranged defence and now you have tesla cage but no elec shackles to stack with it, maybe better off with VS. I'd try to find an extra 2.5% ranged def. Theres enough recharge in build you could pull a few slots from powersink.
Thanks! Ok I'll fix it up a bit more 🙂
-
Updated my build 🙂
This Hero build was built using Mids Reborn 3.4.6
https://github.com/LoadedCamel/MidsRebornClick this DataLink to open the build!
Powered Windrider: Level 50 Mutation Defender
Primary Power Set: Storm Summoning
Secondary Power Set: Electrical Blast
Power Pool: Flight
Power Pool: Fighting
Power Pool: Leadership
Power Pool: Speed
Ancillary Pool: Mu MasteryHero Profile:
Level 1: Gale- (A) Empty
Level 1: Charged Bolts
- (A) Apocalypse - Damage
- (3) Apocalypse - Damage/Recharge
- (3) Apocalypse - Damage/Recharge/Accuracy
- (5) Apocalypse - Recharge/Accuracy
- (5) Apocalypse - Damage/Endurance
Level 2: Lightning Bolt
- (A) Superior Winter's Bite - Accuracy/Damage
- (7) Superior Winter's Bite - Damage/RechargeTime
- (7) Superior Winter's Bite - Accuracy/Damage/Endurance
- (9) Superior Winter's Bite - Accuracy/Damage/Recharge
- (9) Superior Winter's Bite - Damage/Endurance/Accuracy/RechargeTime
- (11) Gladiator's Javelin - Chance of Damage(Toxic)
Level 4: Fly
- (A) Freebird - FlySpeed
Level 6: Hover
- (A) Luck of the Gambler - Defense/Increased Global Recharge Speed
Level 8: Snow Storm
- (A) Endurance Reduction IO
Level 10: Steamy Mist
- (A) Reactive Defenses - Defense
- (11) Reactive Defenses - Defense/Endurance
- (13) Reactive Defenses - Scaling Resist Damage
- (13) Steadfast Protection - Resistance/+Def 3%
- (15) Gladiator's Armor - TP Protection +3% Def (All)
- (15) Luck of the Gambler - Defense/Increased Global Recharge Speed
Level 12: Freezing Rain
- (A) Superior Vigilant Assault - Damage/RechargeTime
- (17) Superior Vigilant Assault - Damage/Endurance/RechargeTime
- (17) Superior Vigilant Assault - Accuracy/Damage/Endurance/RechargeTime
- (19) Achilles' Heel - Chance for Res Debuff
Level 14: Ball Lightning
- (A) Superior Vigilant Assault - Accuracy/Damage
- (19) Superior Vigilant Assault - Accuracy/Damage/Endurance
- (21) Superior Vigilant Assault - RechargeTime/PBAoE +Absorb
- (21) Superior Defender's Bastion - Recharge/Chance for Minor PBAoE Heal
- (23) Positron's Blast - Chance of Damage(Energy)
- (23) Bombardment - Chance for Fire Damage
Level 16: Short Circuit
- (A) Eradication - Accuracy/Damage/Recharge
- (25) Eradication - Accuracy/Damage/Endurance/Recharge
- (25) Eradication - Chance for Energy Damage
- (27) Power Transfer - EndMod
- (27) Power Transfer - Damage/Accuracy/Endurance
Level 18: Charge Up
- (A) Gaussian's Synchronized Fire-Control - Chance for Build Up
Level 20: Hurricane
- (A) Dark Watcher's Despair - To Hit Debuff
- (29) Dark Watcher's Despair - To Hit Debuff/Recharge
- (29) Dark Watcher's Despair - To Hit Debuff/Recharge/Endurance
- (31) Dark Watcher's Despair - Recharge/Endurance
- (31) Dark Watcher's Despair - To Hit Debuff/Endurance
- (31) Dark Watcher's Despair - Chance for Recharge Slow
Level 22: Zapp
- (A) Sting of the Manticore - Accuracy/Damage
- (33) Sting of the Manticore - Damage/Endurance
- (33) Sting of the Manticore - Damage/Interrupt/Recharge
- (33) Sting of the Manticore - Damage/Endurance/Recharge
- (34) Sting of the Manticore - Chance of Damage(Toxic)
- (34) Gladiator's Javelin - Chance of Damage(Toxic)
Level 24: Kick
- (A) Empty
Level 26: Maneuvers
- (A) Luck of the Gambler - Defense/Endurance
- (34) Luck of the Gambler - Defense
- (36) Luck of the Gambler - Defense/Increased Global Recharge Speed
Level 28: Tornado
- (A) Overwhelming Force - Endurance/Recharge
- (36) Overwhelming Force - Accuracy/Damage/Endurance
- (36) Overwhelming Force - Damage/Endurance/Recharge
- (37) Overwhelming Force - Accuracy/Damage/Endurance/Recharge
- (37) Overwhelming Force - Damage/Chance for Knockdown/Knockback to Knockdown
- (37) Force Feedback - Chance for +Recharge
Level 30: Tesla Cage
- (A) Superior Defender's Bastion - Accuracy/Damage
- (39) Superior Defender's Bastion - Damage/Recharge
- (39) Superior Defender's Bastion - Damage/Endurance/Recharge
- (39) Superior Defender's Bastion - Accuracy/Damage/Endurance
- (40) Superior Defender's Bastion - Accuracy/Damage/Endurance/Recharge
Level 32: Tough
- (A) Reactive Armor - Resistance/Endurance
Level 35: Lightning Storm
- (A) Devastation - Accuracy/Damage
- (40) Devastation - Damage/Endurance
- (40) Devastation - Damage/Recharge
- (42) Devastation - Accuracy/Damage/Recharge
- (42) Recharge Reduction IO
- (42) Sudden Acceleration - Knockback to Knockdown
Level 38: Weave
- (A) Shield Wall - Defense/Endurance
- (43) Shield Wall - Defense
- (43) Shield Wall - +Res (Teleportation), +5% Res (All)
- (43) Luck of the Gambler - Defense/Increased Global Recharge Speed
Level 41: Thunderous Blast
- (A) Bombardment - Accuracy/Recharge/Endurance
- (45) Bombardment - Damage/Recharge
- (45) Bombardment - Accuracy/Damage/Recharge
- (45) Bombardment - Accuracy/Damage/Recharge/Endurance
- (46) Bombardment - Chance for Fire Damage
Level 44: Power Sink
- (A) Synapse's Shock - Damage/Rechage
- (46) Synapse's Shock - EndMod/Recharge
- (48) Synapse's Shock - Damage/Recharge/Accuracy
- (48) Synapse's Shock - Damage/Accuracy/Endurance
- (48) Synapse's Shock - EndMod/Increased Run Speed
Level 47: Charged Armor
-
Hamidon Origin:Ribosome Exposure
Level 49: Hasten
- (A) Recharge Reduction IO
- (50) Recharge Reduction IO
Level 1: Vigilance
Level 1: Brawl| Copy & Paste this data into Mids Reborn : Hero Designer to view the build | |-------------------------------------------------------------------| |MxDz;1850;799;1598;HEX;| |78DA7594CB4F13511487CFB4B7022DAF0A15CA43A08820855250B7C6F05A0035288| |9AE4C53E9009394B699B651FF0017C647D48DEE7D447C0BF25057262E351A75E1C6| |575C0A854497463C33670E5E469DE4E67EF33BE79E73EEB9772672A2BFF8E58B91F| |DA094F62562994CB45F9D509371552F8CE4B2B1AC964A023EDED1D4715557E38D47| |B4645CD7D05C806A3DFB467B731313A1B16C4A9F8E8EE5A6A753492D39D9B8613D1| |44B4EAAF1D040421DCFEADA782C11EDC55459F08CA65289D060429B9CCA96101B88| |6BCBCCB7113586CB33535ADA6DBE8FA55535EE1F486BE3A1BE94AEE7D298301AC94| |523184CD54F5663491D384E3B407ED68D810FDC3574E58F2ED01DA56E010EE86408| |1108E8620813DCC3499156BB14B8294CCB169861B8455008B719EE10B8A1C369820| |71BE794C280137E2AA6A5082D2ED9E2021F59CE60EA02D952004D605ACEA2A5482E| |AA08F24E2BE12A41317C67A842CF7A01A5D0434A29273887613C5218A7C7508D510| |E3D0C7B08B6C233F4AE10701FA712A9CDAE1208B3CB6E824AD8CBB04829B7C11258| |E07099F000C394496144192C3BCC3AAB6185214F50036B14AF067E103C4483573E6| |B2FCCD0799D37AA945B53010B64A98345862582EDF098E109C35382599C7C72181F| |BCA21D34C26B86370C6F099AE01D8375EC0E3CDC2AB9CE2ABA935ED4FD5278871FC| |A156B692541339FD2052CA5562EA5163E382D978F0C9F0876C067862F0CA7684773| |462FE5CFA01E66C96527CC313C629827688505022716DC20DFC506D88EAFAD022E6| |2DC805C5E00AE82B5F81AC375825D708321C8F0954E54608216F92EB6C020A56E87| |21866106AB35F398BB4DDE531BFCA2701DE6776E02B82C50083AF90A66305A50D9F| |835AC8B207C1396CB324117AC30E4195609B2B83A24772404FB70164E08E056C292| |4509F36EBB190E88CDFFA4F53AF1EF9FD7C87FF45121AF475D815A0ABDE2DE1C1A4| |73359F27F5BDAC8B26AB3605B87E8743BE1B06295DE44CD5FB3F9225E72582E9709| |AA83A64B7C6377F8D9E30F4FDAEE703BB64816047E25DD7243FC9536E17D854D38E| |8B309570C0F39E8F3804D1875DB961CB50B31BB70CC2EFC063AEBFAE1| |-------------------------------------------------------------------|
- (A) Empty
-
30 minutes ago, MistressOhm said:
Whoever told you "Electrical Blast isn't good" was waaay wrong. It might not be the highest damage output, but as a Defender, the immobs, holds, and inherent End Drain complement the Storm Summoning primary - you also get a small End 'refund' on most of your blasts when they hit, which helps keep the End-thirsty nature of Storm Toggles running.
The big weakness I've found is, most of Storm's debuffs take a couple of seconds to kick in, which means you're vulnerable to "alpha strikes" when you piss off an entire spawn. I usually lead with the Immobs/Holds, to keep melee'ers out of melee and forced to rely on whatever ranged attacks they might have. THEN I set them up with the debuffing.
Once you get high enough to take Thunderous Blast, TAKE IT. There's no more end crash from using a T9, so it becomes your "kill the little ones, end drain the bigger ones" opener. Slotted with a Ranged AoE Damage set like Bombardment, it does a stupendous amount of damage, throws in an occasional "set things on fire" proc, and the inherent End Drain of the power itself usually empties the tank on all but EB's in one shot.
I would actually move your Vigilant Assault set above to either your T1 or T2 blast. You'll use it more often, which means that +Absorb will have many MANY more chances to proc. It's... okay? in TB... but I think you'd get more mileage out of Bombardment and set up a small fast-cycling attack to boost you and your teammates's health bars a little.
Not sure why you're putting a Superior Defender's Bastion in Lightning Storm. It's a pseudo-pet summon, so you'll only get the proc benefit when you summon it (the pet itself gets all the boosts, but I don't think it gets the proc chances). You can make it perma with a recharge IO (no need for Hasten with that), maybe some extra damage and possibly throw in a KB/KD conversion IO to keep mobs from being yeeted about.
Hurricane is END HUNGRY. So it's good that you focused on two Endurance IO's. Dampened Spirits is decent, but I ran with the full set of Dark Watcher's Despair. Hurricane is all about debuffing -toHit, but having something that debuffed -recharge was good too.
Entomb in Tesla Cage - I'd actually swap the IO sets with Shocking Bolt, tbh. That +Mag 2 proc will see a lot more use in the lower tier power, and if you don't get the proc on a boss, follow up with Shocking Bolt and stack the hold.
Question: Why no Short Circuit? It's true that with Hurricane running you'll likely not have mobs in range, but you will run into Repel-resistant mobs (Carnie Strongmen, for example) that will get close enough to whomp you before finally being pushed away, and having a way to drain End from melee'ers makes for less pain from the melee'ers. EB's, AV's, and monsters also say "...what? SRSLY?" to Hurricane's Repel effect, and yes you WILL want to be up close and personal with them to debuff their -ToHit so you may as well have SC handy to zap them while you're doing that.
Gale... yeah it's skippable. It's basically a knockdown/knockback cone. Slotted with a KB/KD conversion and an ACC, it makes for a useful and cheap "sit the hell down" power, but if you need the power pick for something else, it's not build critical by any stretch.
Stormfending Team Play - You're not the healer. Don't play as one. You're a herder and a debuffer, it's your job to make sure that whatever you come across, cannot hit your team, either because they can't aim thru a windstorm or they're too busy running away from a dust devil, or they're being knocked on their butts and chilled to the bone. That said, you don't want to blow spawns apart, you'll want to circle the edges, maneuver things up against walls and then back off just enough so they don't slide upward and end up falling back down behind you. In cave maps, be extra careful of overhangs, as you can stuff mobs under them so they stand up outside the map. Then they're untargetable and that's a hassle.
Thank you so much! I'll change it around. Yeah not sure why I have that for Thunderstorm either xD maybe I thought it was something else.
-
I would like some help with my build. I know Electrical Blast isn't good but I like it for thematic reasons. This build is for team play doing mishes, TF, iTF, and stuff.
This Hero build was built using Mids Reborn 3.4.6
https://github.com/LoadedCamel/MidsRebornClick this DataLink to open the build!
Level 50 Mutation Defender
Primary Power Set: Storm Summoning
Secondary Power Set: Electrical Blast
Power Pool: Flight
Power Pool: Fighting
Power Pool: Leadership
Power Pool: Speed
Ancillary Pool: Electricity MasteryHero Profile:
Level 1: Gale- (A) Sudden Acceleration - Knockback to Knockdown
Level 1: Charged Bolts
- (A) Apocalypse - Damage
- (3) Apocalypse - Damage/Recharge
- (3) Apocalypse - Damage/Recharge/Accuracy
- (5) Apocalypse - Recharge/Accuracy
- (5) Apocalypse - Damage/Endurance
- (7) Apocalypse - Chance of Damage(Negative)
Level 2: Lightning Bolt
- (A) Superior Winter's Bite - Accuracy/Damage
- (7) Superior Winter's Bite - Damage/RechargeTime
- (9) Superior Winter's Bite - Accuracy/Damage/Endurance
- (9) Superior Winter's Bite - Accuracy/Damage/Recharge
- (11) Superior Winter's Bite - Damage/Endurance/Accuracy/RechargeTime
- (11) Superior Winter's Bite - Recharge/Chance for -Speed & -Recharge
Level 4: Fly
- (A) Freebird - FlySpeed
Level 6: Hover
- (A) Luck of the Gambler - Defense/Increased Global Recharge Speed
Level 8: Snow Storm
- (A) Pacing of the Turtle - Accuracy/Endurance
- (13) Pacing of the Turtle - Endurance/Recharge/Slow
Level 10: Steamy Mist
- (A) Titanium Coating - Resistance/Endurance
- (13) Titanium Coating - Resistance/Endurance/Recharge
- (15) Reactive Defenses - Scaling Resist Damage
- (15) Shield Wall - +Res (Teleportation), +5% Res (All)
- (17) Luck of the Gambler - Defense/Endurance
- (17) Luck of the Gambler - Defense/Increased Global Recharge Speed
Level 12: Freezing Rain
- (A) Touch of Lady Grey - Defense Debuff/Recharge/Endurance
Level 14: Ball Lightning
- (A) Superior Frozen Blast - Accuracy/Damage
- (19) Superior Frozen Blast - Damage/Endurance
- (19) Superior Frozen Blast - Accuracy/Damage/Endurance
- (21) Superior Frozen Blast - Accuracy/Damage/Recharge
- (21) Superior Frozen Blast - Damage/Endurance/Accuracy/RechargeTime
- (23) Superior Frozen Blast - Recharge/Chance for Immobilize
Level 16: Charge Up
- (A) Gaussian's Synchronized Fire-Control - Chance for Build Up
Level 18: Hurricane
- (A) Dampened Spirits - To Hit Debuff/Recharge/Endurance
- (23) Dampened Spirits - To Hit Debuff/Endurance
Level 20: Zapp
- (A) Sting of the Manticore - Accuracy/Damage
- (25) Sting of the Manticore - Damage/Endurance
- (25) Sting of the Manticore - Accuracy/Interrupt/Range
- (27) Sting of the Manticore - Damage/Interrupt/Recharge
- (27) Sting of the Manticore - Damage/Endurance/Recharge
- (29) Sting of the Manticore - Chance of Damage(Toxic)
Level 22: Kick
- (A) Empty
Level 24: Maneuvers
- (A) Luck of the Gambler - Defense/Endurance
- (29) Luck of the Gambler - Defense/Endurance/Recharge
- (31) Luck of the Gambler - Defense/Increased Global Recharge Speed
Level 26: Tornado
- (A) Overwhelming Force - Accuracy/Damage
- (31) Overwhelming Force - Endurance/Recharge
- (31) Overwhelming Force - Accuracy/Damage/Endurance
- (33) Overwhelming Force - Damage/Endurance/Recharge
- (33) Overwhelming Force - Accuracy/Damage/Endurance/Recharge
- (33) Overwhelming Force - Damage/Chance for Knockdown/Knockback to Knockdown
Level 28: Tesla Cage
- (A) Superior Entomb - Accuracy/Hold
- (34) Superior Entomb - Hold/Recharge
- (34) Superior Entomb - Recharge/Chance for +Absorb
Level 30: Tough
- (A) Reactive Armor - Resistance/Endurance
- (34) Reactive Armor - Resistance/Endurance/Recharge
- (36) Reactive Armor - Resistance
- (36) Gladiator's Armor - TP Protection +3% Def (All)
Level 32: Lightning Storm
- (A) Superior Defender's Bastion - Accuracy/Damage
- (36) Superior Defender's Bastion - Damage/Recharge
- (37) Superior Defender's Bastion - Damage/Endurance/Recharge
- (37) Superior Defender's Bastion - Accuracy/Damage/Endurance
- (37) Superior Defender's Bastion - Accuracy/Damage/Endurance/Recharge
- (39) Superior Defender's Bastion - Recharge/Chance for Minor PBAoE Heal
Level 35: Weave
- (A) Luck of the Gambler - Defense/Endurance
- (39) Luck of the Gambler - Defense/Endurance/Recharge
- (39) Luck of the Gambler - Defense
- (40) Luck of the Gambler - Defense/Increased Global Recharge Speed
Level 38: Thunderous Blast
- (A) Superior Vigilant Assault - Accuracy/Damage
- (40) Superior Vigilant Assault - Damage/RechargeTime
- (40) Superior Vigilant Assault - Damage/Endurance/RechargeTime
- (42) Superior Vigilant Assault - Accuracy/Damage/Endurance
- (42) Superior Vigilant Assault - Accuracy/Damage/Endurance/RechargeTime
- (42) Superior Vigilant Assault - RechargeTime/PBAoE +Absorb
Level 41: Electric Fence
- (A) Gravitational Anchor - Immobilize
- (43) Gravitational Anchor - Immobilize/Recharge
- (43) Gravitational Anchor - Chance for Hold
Level 44: Charged Armor
- (A) Unbreakable Guard - Resistance
- (45) Unbreakable Guard - Resistance/Endurance
- (45) Unbreakable Guard - Resistance/Endurance/RechargeTime
- (45) Steadfast Protection - Resistance/+Def 3%
Level 47: Shocking Bolt
- (A) Basilisk's Gaze - Accuracy/Hold
- (48) Basilisk's Gaze - Accuracy/Recharge
- (48) Basilisk's Gaze - Recharge/Hold
- (48) Basilisk's Gaze - Endurance/Recharge/Hold
- (50) Basilisk's Gaze - Accuracy/Endurance/Recharge/Hold
- (50) Lockdown - Chance for +2 Mag Hold
Level 49: Hasten
- (A) Recharge Reduction IO
- (50) Recharge Reduction IO
Level 1: Brawl
- (A) Empty
Level 1: Sprint
- (A) Empty
Level 1: Vigilance
Level 2: Rest - (A) Sudden Acceleration - Knockback to Knockdown
-
I'm currently playing Dual Pistols/Dark Miasma with Dark Mastery and it's soooooo freakin' fun. I'm playing her with an Occult/Supernatural Hunter background.
-
2
-
1
-
-
4 minutes ago, Neiska said:
@NinjaIceBear - I just realized I made a mistake, I forgot to swap out one of the sets for Superior Command, here is the correct one. Apologies!
This Hero build was built using Mids Reborn 3.1.2.5
https://github.com/LoadedCamel/MidsRebornClick this DataLink to open the build!
NinjaIceBear mk 2: Level 50 Mutation Mastermind
Primary Power Set: Robotics
Secondary Power Set: Electrical Affinity
Power Pool: Flight
Power Pool: Fighting
Power Pool: Leadership
Ancillary Pool: Mu MasteryHero Profile:
Level 1: Battle Drones -- OvrFrc-Dam/KB(A), CaltoArm-+Def(Pets)(3), SprCmmoft-Acc/Dmg(3), SprCmmoft-Dmg/EndRdx(5), SprCmmoft-Acc/Dmg/Rchg(5), SprCmmoft-Rchg/PetAoEDef(7)
Level 1: Shock -- PreOptmz-Acc/Rech(A), PreOptmz-EndMod/End(9), PreOptmz-EndMod/Rech(9), PreOptmz-EndMod/Acc/End(11)
Level 2: Rejuvenating Circuit -- Pnc-Heal/EndRedux(A), Pnc-EndRdx/Rchg(13), Pnc-Heal/Rchg(15), Pnc-Heal(15), Pnc-Heal/EndRedux/Rchg(17)
Level 4: Fly -- Frb-Fly(A)
Level 6: Equip Robot -- EndRdx-I(A)
Level 8: Hover -- LucoftheG-Def/Rchg+(A), BlsoftheZ-ResKB(50)
Level 10: Energizing Circuit -- PreOptmz-Acc/Rech(A), PreOptmz-EndMod/End(19), PreOptmz-EndMod/Rech(19), PreOptmz-EndMod/Acc/End(21), PreOptmz-EndMod/Acc/Rech(21), PreOptmz-EndMod/End/Rech(23)
Level 12: Protector Bots -- SvrRgh-PetResDam(A), EdcoftheM-PetDef(23), ExpRnf-+Res(Pets)(25), Rct-ResDam%(25), LucoftheG-Def/Rchg+(27), ShlWal-ResDam/Re TP(27)
Level 14: Group Fly -- Frb-Fly(A)
Level 16: Faraday Cage -- UnbGrd-ResDam(A), UnbGrd-ResDam/EndRdx(29), UnbGrd-EndRdx/Rchg(29), UnbGrd-Rchg/ResDam(31), UnbGrd-ResDam/EndRdx/Rchg(31), UnbGrd-Max HP%(31)
Level 18: Discharge -- PreOptmz-Acc/Rech(A), PreOptmz-EndMod/End(33), PreOptmz-EndMod/Rech(33), PreOptmz-EndMod/Acc/End(33), PreOptmz-EndMod/Acc/Rech(34), PreOptmz-EndMod/End/Rech(34)
Level 20: Empowering Circuit -- AdjTrg-ToHit(A)
Level 22: Kick -- Empty(A)
Level 24: Tough -- ImpArm-ResPsi(A), UnbGrd-ResDam/EndRdx/Rchg(34), UnbGrd-ResDam(36), UnbGrd-ResDam/EndRdx(36), UnbGrd-EndRdx/Rchg(36), UnbGrd-Rchg/ResDam(37)
Level 26: Assault Bot -- SprMarofS-Dmg(A), SprMarofS-Dmg/EndRdx(37), SprMarofS-Acc/Dmg(37), SprMarofS-EndRdx/+Resist/+Regen(39), SlbAll-Build%(39), SuddAcc--KB/+KD(39)
Level 28: Defibrillate -- FrtHyp-Sleep(A), FrtHyp-Sleep/Rchg(40), FrtHyp-Acc/Rchg(47), FrtHyp-Sleep/EndRdx(48), FrtHyp-Acc/Sleep/Rchg(48), FrtHyp-Plct%(49)
Level 30: Weave -- LucoftheG-Def/Rchg+(A), LucoftheG-Def(40)
Level 32: Upgrade Robot -- EndRdx-I(A)
Level 35: Insulating Circuit -- Prv-Heal(A), Prv-Heal/EndRdx(40), Prv-Heal/Rchg(42), Prv-EndRdx/Rchg(42), Prv-Heal/Rchg/EndRdx(42), Prv-Absorb%(43)
Level 38: Charged Armor -- ImpArm-ResPsi(A), GldArm-3defTpProc(43), StdPrt-ResDam/Def+(43)
Level 41: Electrifying Fences -- GrvAnc-Immob(A), GrvAnc-Immob/Rchg(45), GrvAnc-Acc/Immob/Rchg(45), GrvAnc-Acc/Rchg(46), GrvAnc-Immob/EndRdx(46), GrvAnc-Hold%(46)
Level 44: Amp Up -- RechRdx-I(A), RechRdx-I(45)
Level 47: Maneuvers -- LucoftheG-Def(A), LucoftheG-Def/Rchg+(48)
Level 49: Tactics -- EndRdx-I(A), GssSynFr--ToHit/EndRdx(49)
Level 1: Supremacy
Level 1: Brawl -- Empty(A)
Level 1: Sprint -- Empty(A)
Level 2: Rest -- Empty(A)
Level 1: Swift -- Flight-I(A)
Level 1: Hurdle -- Jump-I(A)
Level 1: Health -- Pnc-Heal/+End(A), NmnCnv-Regen/Rcvry+(7)
Level 1: Stamina -- PrfShf-EndMod(A), PrfShf-End%(13), EndMod-I(50)
Level 1: Prestige Power Slide -- Clr-Stlth(A)
Level 50: Musculature Core Paragon
Level 50: Ion Core Final Judgement
Level 50: Reactive Core Flawless Interface
Level 50: Robotic Drones Core Superior Ally
Level 50: Barrier Core Epiphany
Level 50: Support Core Embodiment
Level 50: Freedom Phalanx Reserve
Level 50: Portal Jockey
Level 50: Task Force Commander
Level 50: The Atlas Medallion
Level 1: Battle Drone
Level 26: Assault Bot
Level 12: Protector Bot
Level 4: Afterburner
------------No worries! Awesome. Looks great! Thank you 👍
-
1 hour ago, Neiska said:
Hello again @NinjaIceBear !
At first pass, this is actually very good! There are a few things I think you missed though! Nothing major, so if you wanted to use this build it should perform well! But here are the things I spotted -
1. You might have forgotten to have Farday's Cage and Hover toggle enabled when looking at values. With them on you are "way" over the S/L resistance cap for MMs, well over the Ranged DEF as well.
2. Your pet slotting is fine, but it could be better. What most MMs do is put 2 parts of Superior Mark of Supremacy into each pet, in order to stack the 10% recharge bonus, then use the 4 piece of Superior Command in another, for a total net of 40% recharge, which is nothing to sniff at! I usually put the 4 Superior Mark into the T3 pet, so along with Soulbound Build up and KB to KD, thats his 6 slots.
3. I moved some of your resist sets and slots around to better optimize. Your build was well over the S/L resistance and had a little wonky Defenses. With a few changes I got you much closer to the caps, but boosted your values in other areas as well.
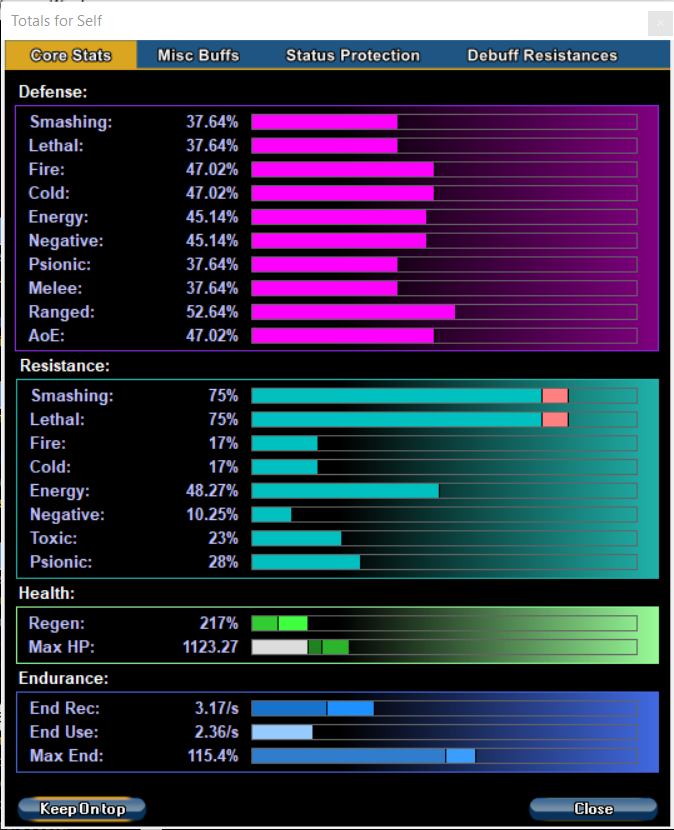
Here is your stats -

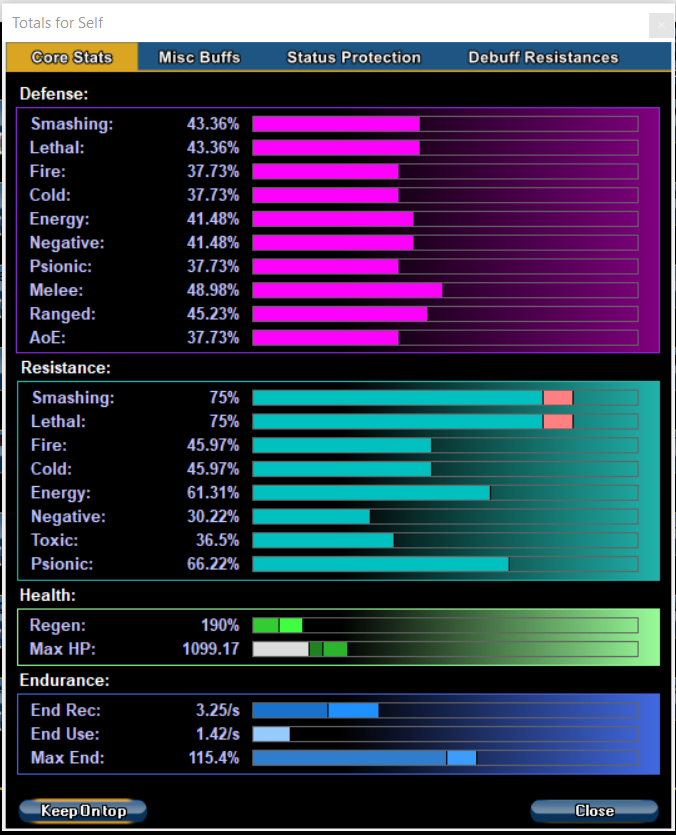
And here is mine -
So You lost a bit of ranged over defense, and I brought your ranged and melee closer to the 45% mark, and boosted your resists across the board, from 20% to 40% or so, I even managed to give your Psionic, Fire, Cold, Negative, and even Toxic Resistance a nice big boost. Personally, I would have made more changes, but you said you mainly play on teams, so I kept Amp Up and Defibrillate. The END use is a bit higher than I would like, but that is also with both Fly and Group Fly on which I doubt you will have enabled all the time. With that toggled off, your END is 1.42/3.25 which is over a 1:2 ratio so that's solid. There are a few other things as well, but I tried to keep within the guidelines that you gave.
Hope you like it and that it helps!
This Hero build was built using Mids Reborn 3.1.2.5
https://github.com/LoadedCamel/MidsRebornClick this DataLink to open the build!
NinjaIceBear mk 2: Level 50 Mutation Mastermind
Primary Power Set: Robotics
Secondary Power Set: Electrical Affinity
Power Pool: Flight
Power Pool: Fighting
Power Pool: Leadership
Ancillary Pool: Mu MasteryHero Profile:
Level 1: Battle Drones -- OvrFrc-Dam/KB(A), SuddAcc--KB/+KD(3), CaltoArm-Acc/Rchg(3), CaltoArm-Acc/Dmg(5), CaltoArm-Dmg/EndRdx(5), CaltoArm-+Def(Pets)(7)
Level 1: Shock -- PreOptmz-Acc/Rech(A), PreOptmz-EndMod/End(9), PreOptmz-EndMod/Rech(9), PreOptmz-EndMod/Acc/End(11)
Level 2: Rejuvenating Circuit -- Pnc-Heal/EndRedux(A), Pnc-EndRdx/Rchg(13), Pnc-Heal/Rchg(15), Pnc-Heal(15), Pnc-Heal/EndRedux/Rchg(17)
Level 4: Fly -- Frb-Fly(A)
Level 6: Equip Robot -- EndRdx-I(A)
Level 8: Hover -- LucoftheG-Def/Rchg+(A), BlsoftheZ-ResKB(50)
Level 10: Energizing Circuit -- PreOptmz-Acc/Rech(A), PreOptmz-EndMod/End(19), PreOptmz-EndMod/Rech(19), PreOptmz-EndMod/Acc/End(21), PreOptmz-EndMod/Acc/Rech(21), PreOptmz-EndMod/End/Rech(23)
Level 12: Protector Bots -- SvrRgh-PetResDam(A), EdcoftheM-PetDef(23), ExpRnf-+Res(Pets)(25), Rct-ResDam%(25), LucoftheG-Def/Rchg+(27), ShlWal-ResDam/Re TP(27)
Level 14: Group Fly -- Frb-Fly(A)
Level 16: Faraday Cage -- UnbGrd-ResDam(A), UnbGrd-ResDam/EndRdx(29), UnbGrd-EndRdx/Rchg(29), UnbGrd-Rchg/ResDam(31), UnbGrd-ResDam/EndRdx/Rchg(31), UnbGrd-Max HP%(31)
Level 18: Discharge -- PreOptmz-Acc/Rech(A), PreOptmz-EndMod/End(33), PreOptmz-EndMod/Rech(33), PreOptmz-EndMod/Acc/End(33), PreOptmz-EndMod/Acc/Rech(34), PreOptmz-EndMod/End/Rech(34)
Level 20: Empowering Circuit -- AdjTrg-ToHit(A)
Level 22: Kick -- Empty(A)
Level 24: Tough -- ImpArm-ResPsi(A), UnbGrd-ResDam/EndRdx/Rchg(34), UnbGrd-ResDam(36), UnbGrd-ResDam/EndRdx(36), UnbGrd-EndRdx/Rchg(36), UnbGrd-Rchg/ResDam(37)
Level 26: Assault Bot -- SprMarofS-Dmg(A), SprMarofS-Dmg/EndRdx(37), SprMarofS-Acc/Dmg(37), SprMarofS-EndRdx/+Resist/+Regen(39), SlbAll-Build%(39), SuddAcc--KB/+KD(39)
Level 28: Defibrillate -- FrtHyp-Sleep(A), FrtHyp-Sleep/Rchg(40), FrtHyp-Acc/Rchg(47), FrtHyp-Sleep/EndRdx(48), FrtHyp-Acc/Sleep/Rchg(48), FrtHyp-Plct%(49)
Level 30: Weave -- LucoftheG-Def/Rchg+(A), LucoftheG-Def(40)
Level 32: Upgrade Robot -- EndRdx-I(A)
Level 35: Insulating Circuit -- Prv-Heal(A), Prv-Heal/EndRdx(40), Prv-Heal/Rchg(42), Prv-EndRdx/Rchg(42), Prv-Heal/Rchg/EndRdx(42), Prv-Absorb%(43)
Level 38: Charged Armor -- ImpArm-ResPsi(A), GldArm-3defTpProc(43), StdPrt-ResDam/Def+(43)
Level 41: Electrifying Fences -- GrvAnc-Immob(A), GrvAnc-Immob/Rchg(45), GrvAnc-Acc/Immob/Rchg(45), GrvAnc-Acc/Rchg(46), GrvAnc-Immob/EndRdx(46), GrvAnc-Hold%(46)
Level 44: Amp Up -- RechRdx-I(A), RechRdx-I(45)
Level 47: Maneuvers -- LucoftheG-Def(A), LucoftheG-Def/Rchg+(48)
Level 49: Tactics -- EndRdx-I(A), GssSynFr--ToHit/EndRdx(49)
Level 1: Supremacy
Level 1: Brawl -- Empty(A)
Level 1: Sprint -- Empty(A)
Level 2: Rest -- Empty(A)
Level 1: Swift -- Flight-I(A)
Level 1: Hurdle -- Jump-I(A)
Level 1: Health -- Pnc-Heal/+End(A), NmnCnv-Regen/Rcvry+(7)
Level 1: Stamina -- PrfShf-EndMod(A), PrfShf-End%(13), EndMod-I(50)
Level 1: Prestige Power Slide -- Clr-Stlth(A)
Level 50: Musculature Core Paragon
Level 50: Ion Core Final Judgement
Level 50: Reactive Core Flawless Interface
Level 50: Robotic Drones Core Superior Ally
Level 50: Barrier Core Epiphany
Level 50: Support Core Embodiment
Level 50: Freedom Phalanx Reserve
Level 50: Portal Jockey
Level 50: Task Force Commander
Level 50: The Atlas Medallion
Level 1: Battle Drone
Level 26: Assault Bot
Level 12: Protector Bot
Level 4: Afterburner
------------Thank you so much! I am currently at work but will take a look at it once I'm home.
-
3 minutes ago, Neiska said:
Hello there @NinjaIceBear
My main is Robot/Electric and I would love to give you some input. However I am at work at this exact moment but I will have a look when I get home. But there are a few important questions that are generally asked for build critiques -
What sort of activities do you intend to do? Normal missions? AE's? ITF's? GM hunting?
Do you intend to play on teams often, or are you more of a lone wolf?
What is your preferred difficulty to play on? Do you like to push a build as hard as you can, or do you like to be more relaxed enjoyment kind of play?
I will take a look at your build and slotting when I get home, but those questions can factor into how to make a build. As an example, "Amp Up" only works on other players, not pets. So if you solo most of the time, that power is likely skippable. The same with Defibrillate.
More to come!
I play alot in team's mostly. I rarely solo if at all. I plan to do alot of TFs, iTFs, and probably a bit of GM hunting. I mostly play on 4x8 with a team. I try to push myself to be stronger but not too crazy on making it the "perfect" build. Thank you so much. Will look forward to your input.
-
1
-
Null the Gull Option: Set Gender for Badge Titles
in Suggestions & Feedback
Posted
Yes please! 💜