JooceBocks
-
Posts
4 -
Joined
-
Last visited
-
EDIT: I slept on it, and figured I should edit into a quicker, more accurate method of DPS calculation. Doing all of the damage together means less calculations, which is more accurate since it reduces the amount of rounding done between equations. Yeah, it seems Sentinels just have low DPS overall, which makes it not surprising that so many people crap on them. But, there's a few extra steps you can take before you bother testing out a character in-game. First is to open a Notepad document with a calculator and note the actual average DPS of your skills by dividing the damage displayed by the cast times. The original rotation of AG -> AB -> LD has 637.7+608.4+439 damage, which equals 1685.1 damage. Divide this by the total cast times of each skill, which are 1.67 + 2.07 + 1.93, which is 5.67s, and you get 1685.1/5.67s, which is 297.2. However, you have to check cast times versus cooldowns. Abyssal Gaze has a 4.13s cooldown, but if you combine the cast times of Life Drain and Antumbral Beam you only get 4s of cast time, which means you have .13s floating. Likewise, Antumbral Beam has a 4.12s cooldown, while Life Drain and Abyssal Gaze have a combined 3.6s cooldown, so you're losing a whole .52s of downtime. .13+52 = .65s lost. This means each rotation could be 5.67s long, but with a .65s loss per rotation it is now 6.32s. So, your total damage versus cast time + recharge time is actually 1685.1/6.32, or 266.6, which accounting for 95% accuracy is only 253.27. Factor in latency, inconsistency of procs, and potential for human error, and 246DPS in-game makes sense. However, if you add Gloom into the mix, you're adding another 1.67s cast time into your rotation. Gloom may have a lower DPS than all other skills individually, but you can remove the DPS loss by plugging any holes in recharge/cast time. So, start with your highest cooldown power, which is Abyssal Gaze at 4.13s, and end with your second highest, which is Antumbral Beam at 4.12s, and put everything else in between. This way you start with AG at 4.13s CD, and in between you have 1.67+1.93+2.07s, for a total of 5.67s total cast time, meaning it will be off cooldown when you get back to it. Likewise, you end your rotation with AB at 4.12s, and in between you have 1.67+1.67+1.93s, for a total of 5.27s of cast time, meaning it too will be off cooldown when you cycle back to it. A rotation of AG -> G -> LD -> AB has 2029 damage, while the original 5.67 +1.67 Gloom CD = 7.34s. So, the damage of this rotation is 2029/7.34=276.4, which with 95% accuracy = 262.6DPS. So, AG -> AB -> LD has 253.7DPS versus AG -> G -> LD -> AB having 262.6DPS, which means the latter is a 3.5% DPS increase without changing the build and just by optimizing the rotation of skills that you have. Of course 3.5% isn't a massive increase to the point I say it saves the build if you find the initial DPS unacceptable, but it is an indicator to keep an eye out on your cooldowns when theorycrafting other builds in the future, and to not underestimate the value of your weaker attacks in rotations. Plus you can immediately know that if the baseline DPS of your rotation is only hitting around 300DPS before factoring in any cooldowns or accuracy, there's no way you're actually hitting 300DPS in-game, so if you must reach that point then you already know the build's a flop.
-
While I agree with most of what you said, including the 50+5 ToHit being in Terra Firma since the other stats of the D-Sync Elusivity are doing nothing in a passive skill, I would say that Crystal Armor should not get a 50+5 END Mod IO over Stamina. Stamina has a base 25% recovery, while Crystal Armor only has 20%, so he'd get more gains with END Modification in Stamina first. The only time Crystal Armor should be picked over Stamina is to finish a set bonus or because Stamina is already hitting the ED cap. Regardless of that, Performance Shifter: Chance for +END is also not unique, so another one of those should be able to go into Crystal Armor instead, which I believe is more gains overall than any single END Mod enhancement. Lastly, while he himself doesn't need Tactics, it could still be more useful than another attack if he parties a lot, so it's circumstantial as to how good a pick that is. However, if he's just focusing on his own stats, I'd say to get rid of it for Assault, and if he wants to keep the full Adjusted Targeting set bonuses, as well as a little extra +ToHit, he could just put an END Reduction into Assault and move the slots over to Terra Firma.
-
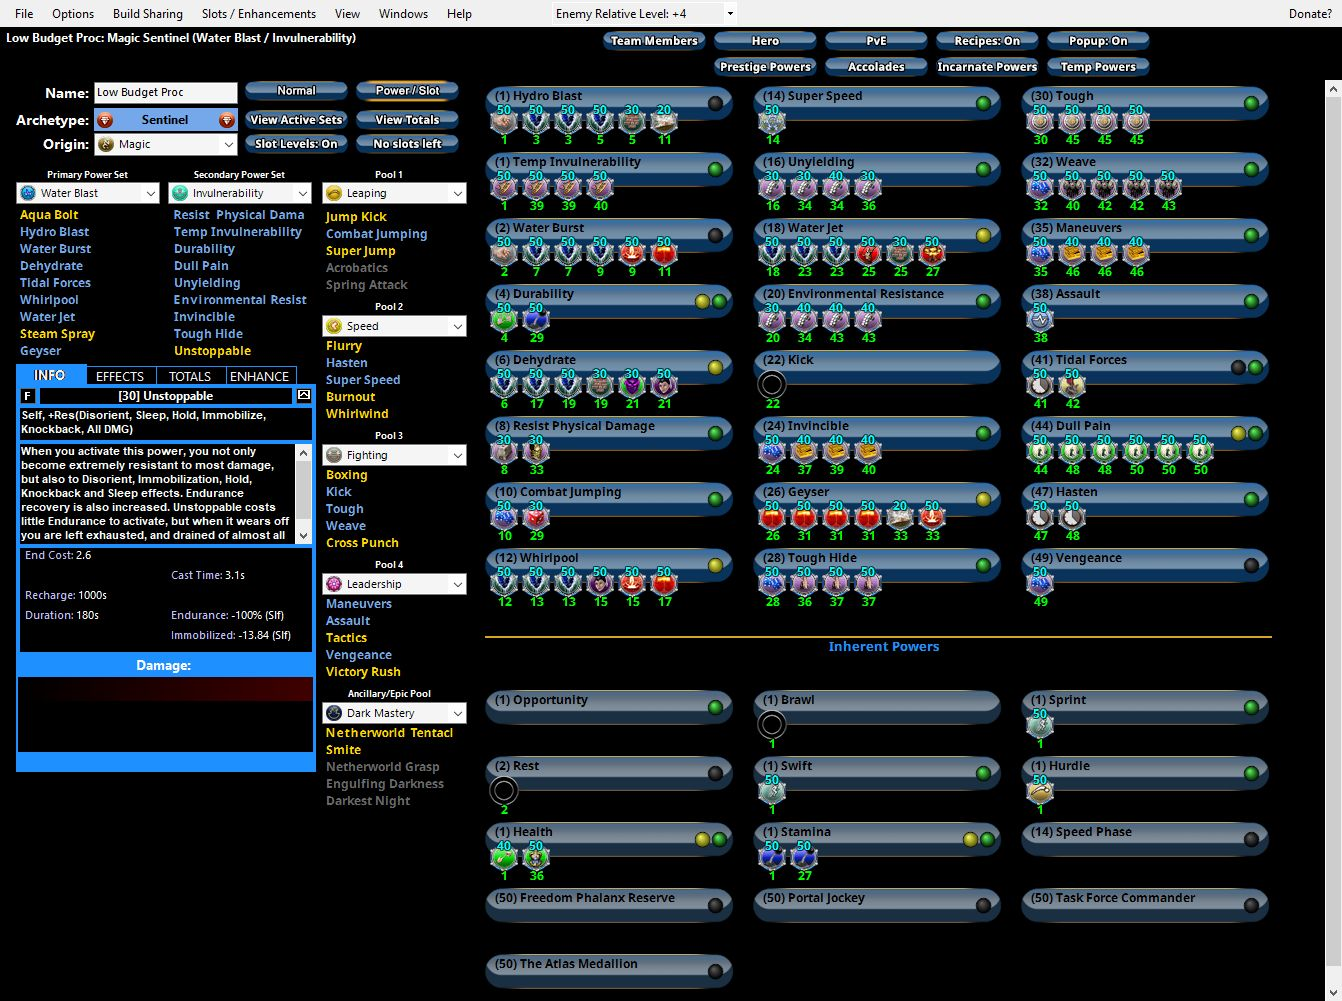
I've been researching builds and am finally delving into making my own in Mids after getting a fire farmer rolling and am now looking for any criticism or advice. I can maths, but I'm only working based off general information without experience. My goal here is to build this character with the goal of hitting moderate defenses with HP cap, over 95% accuracy on +4 enemies, hitting 75% cap on smashing/lethal resistance, and staying over +1 end/s gain, all as a fresh 50 without any accolades or incarnate powers with as cheap of a budget as possible. This means no purples, and no higher end $10M+ influence enhancements, although I sort of broke that rule in Water Jet due to not having any more procs available outside of Gladiator's Javelin and Apocalypse, but I could certainly temporarily substitute that with the Damage/Recharge and Damage/Slow of Ice Mistral's Torment to get another 6.25% recharge rate along the way. Mids only shows about a 9 damage difference if doing so, but I hear Water Jet is great for procs due to its ability to double cast every 8 seconds, so I'm unsure if the actual damage output would be more substantial in practice with the procs than what is displayed. I have no personal experience with proccing skills, so any advice in that regard would certainly be appreciated. And yes, I intentionally grabbed no epic pools because none of them really fit thematically, and with Invulnerability seeming to want a lot of slotting I decided it better to not add another pool at this budget level. The slots are also in no specific leveling order because I didn't feel like cleaning things up only to be told the build is stupid and dumb and that I should change it to prioritize other things. Low Budget Proc - Hero Sentinel Build plan made with Mids' Reborn v3.6.6 rev. 3 ────────────────────────────── Primary powerset: Water BlastSecondary powerset: InvulnerabilityPool powerset (#1): LeapingPool powerset (#2): SpeedPool powerset (#3): FightingPool powerset (#4): LeadershipEpic powerset: Dark Mastery ────────────────────────────── Powers taken: Level 1: Hydro Blast A: Force Feedback: Chance for +Recharge3: Ice Mistral's Torment: Accuracy/Damage/Endurance3: Ice Mistral's Torment: Accuracy/Damage/Endurance/Recharge5: Ice Mistral's Torment: Chance for Cold Damage5: Impeded Swiftness: Chance of Damage(Smashing)11: Explosive Strike: Chance for Smashing Damage Level 1: Temp Invulnerability A: Unbreakable Guard: Resistance39: Unbreakable Guard: Resistance/Endurance39: Unbreakable Guard: Resistance/Endurance/RechargeTime40: Unbreakable Guard: RechargeTime/Resistance Level 2: Water Burst A: Force Feedback: Chance for +Recharge7: Ice Mistral's Torment: Accuracy/Damage/Endurance7: Ice Mistral's Torment: Accuracy/Damage/Endurance/Recharge9: Ice Mistral's Torment: Chance for Cold Damage9: Bombardment: Chance for Fire Damage11: Positron's Blast: Chance of Damage(Energy) Level 4: Durability A: Numina's Convalesence: +Regeneration/+Recovery29: Performance Shifter: Chance for +End Level 6: Dehydrate A: Ice Mistral's Torment: Accuracy/Damage/Endurance17: Ice Mistral's Torment: Accuracy/Damage/Endurance/Recharge19: Ice Mistral's Torment: Chance for Cold Damage19: Impeded Swiftness: Chance of Damage(Smashing)21: Touch of the Nictus: Chance for Negative Energy Damage21: Touch of Lady Grey: Chance for Negative Damage Level 8: Resist Physical Damage A: Steadfast Protection: Resistance/+Def 3%33: Gladiator's Armor: TP Protection +3% Def (All) Level 10: Combat Jumping A: Luck of the Gambler: Defense/Increased Global Recharge Speed29: Kismet: Accuracy +6% Level 12: Whirlpool A: Ice Mistral's Torment: Accuracy/Damage/Endurance13: Ice Mistral's Torment: Accuracy/Damage/Endurance/Recharge13: Ice Mistral's Torment: Chance for Cold Damage15: Touch of Lady Grey: Chance for Negative Damage15: Bombardment: Chance for Fire Damage17: Positron's Blast: Chance of Damage(Energy) Level 14: Super Speed A: Winter's Gift: Slow Resistance (20%) Level 16: Unyielding A: Impervium Armor: Psionic Resistance34: Impervium Armor: Resistance34: Impervium Armor: Resistance/Endurance/Recharge36: Impervium Armor: Resistance/Endurance Level 18: Water Jet A: Ice Mistral's Torment: Accuracy/Damage/Endurance/Recharge23: Ice Mistral's Torment: Accuracy/Damage/Endurance23: Ice Mistral's Torment: Chance for Cold Damage25: Gladiator's Javelin: Chance of Damage(Toxic)25: Impeded Swiftness: Chance of Damage(Smashing)27: Apocalypse: Chance of Damage(Negative) Level 20: Environmental Resistance A: Impervium Armor: Psionic Resistance34: Impervium Armor: Resistance/Endurance43: Impervium Armor: Resistance43: Impervium Armor: Resistance/Recharge Level 22: Kick (Empty) Level 24: Invincible A: Luck of the Gambler: Defense/Increased Global Recharge Speed37: Gift of the Ancients: Defense39: Gift of the Ancients: Defense/Endurance40: Gift of the Ancients: Defense/Endurance/Recharge Level 26: Geyser A: Positron's Blast: Accuracy/Damage31: Positron's Blast: Accuracy/Damage/Endurance31: Positron's Blast: Damage/Recharge31: Positron's Blast: Chance of Damage(Energy)33: Explosive Strike: Chance for Smashing Damage33: Bombardment: Chance for Fire Damage Level 28: Tough Hide A: Luck of the Gambler: Defense/Increased Global Recharge Speed36: Reactive Defenses: Scaling Resist Damage37: Reactive Defenses: Defense37: Reactive Defenses: Defense/Endurance Level 30: Tough A: Aegis: Resistance45: Aegis: Resistance/Endurance45: Aegis: Resistance/Endurance/Recharge45: Aegis: Psionic/Status Resistance Level 32: Weave A: Luck of the Gambler: Defense/Increased Global Recharge Speed40: Shield Wall: +Res (Teleportation), +5% Res (All)42: Shield Wall: Defense42: Shield Wall: Defense/Endurance43: Shield Wall: Defense/Endurance/Recharge Level 35: Maneuvers A: Luck of the Gambler: Defense/Increased Global Recharge Speed46: Gift of the Ancients: Defense46: Gift of the Ancients: Defense/Endurance46: Gift of the Ancients: Defense/Endurance/Recharge Level 38: Assault A: Invention: Endurance Reduction Level 41: Tidal Forces A: Invention: Recharge Reduction42: Gaussian's Synchronized Fire-Control: Chance for Build Up Level 44: Dull Pain A: Preventive Medicine: Heal48: Preventive Medicine: Heal/Endurance48: Preventive Medicine: Endurance/RechargeTime50: Preventive Medicine: Heal/RechargeTime50: Preventive Medicine: Heal/RechargeTime/Endurance50: Preventive Medicine: Chance for +Absorb Level 47: Hasten A: Invention: Recharge Reduction48: Invention: Recharge Reduction Level 49: Vengeance A: Luck of the Gambler: Defense/Increased Global Recharge Speed ────────────────────────────── Inherents: Level 1: Opportunity Level 1: Brawl (Empty) Level 1: Sprint A: Invention: Run Speed Level 2: Rest (Empty) Level 1: Swift A: Invention: Run Speed Level 1: Hurdle A: Invention: Jumping Level 1: Health A: Miracle: +Recovery36: Panacea: +Hit Points/Endurance Level 1: Stamina A: Performance Shifter: Chance for +End27: Performance Shifter: EndMod Level 14: Speed Phase Mids Data Chunk

-
I've never made a Sentinel myself, but I see a few glaring issues to be addressed in the early levels of slot placement. The 4-piece Aegis in High Pain Tolerance uses an Endurance/Recharge, without the Resistance, even though it's an auto-skill, meaning both recharge and endurance reduction are useless modifiers. Then, considering that Combat Jumping already has practically no endurance cost, and gives a lower base defense value than Maneuvers, it seems like an odd decision to put a full 4-slot set into Combat Jumping while Maneuvers remains only two-slotted. You also used Endurance/Recharge again for the Shield Wall set in Combat Jumping, which is effectively doing nothing, while later putting the +TP Res/+Res into Weave. You could keep Combat Jumping at 1 slot, put in the +7.5% Recharge from Luck of the Gambler, move that slot to Maneuvers so that it has 5 slots, keep the other+7.5% Recharge in it, and put the 4-slot Shield Wall into Maneuvers, while also removing the Endurance/Recharge and instead replacing it with the +TP Res/+Res from Weave. This would free the later slot from Weave, which you could then put back into Combat Jumping if you want to get back the two-piece Luck of the Gambler set bonus that is lost from Maneuvers. I would also personally say it's simply not worth a whole slot to put the Gift of the Ancients: Defense/Run Speed into Weave. Also, Weave has an even higher defense bonus than either Combat Jumping or Maneuvers, although Maneuvers does apply to teammates, but if you're more worried about personal survivability then Weave should definitely get more priority. No matter which way you want to go, Combat Jumping is absolutely where you want to go for dumping stat enhancements, while Weave and Maneuvers should be a higher priority for full defense sets. This means I'd pull the Gift of the Ancients from Weave, move the Kismet: Accuracy into Combat Jumping, and use the two freed slots in Weave for an actual set bonus with a Defense and Defense/Endurance enhancement. Lastly, the Regenerative Tissue: +Regeneration that you put into Fast Healing is only worth a flat +25% regeneration, which is less than the amount you would get from just putting any standard level 50 heal IO into that power. The power gives a base 75% regeneration, and a 50 IO is a 42.4% enhancement, which takes the regeneration up to 106.8%, which means it's worth +31.8% regeneration. Since you already have a Numina's: +Regen/+Recovery in the power, you could put a Numina's: Heal into it to get that +31.8% regeneration, on top of the +12% 2-piece set bonus, for a total of +43.8%, rather than the current flat +25% that you get from the single Regenerative Tissue. So, I would say you're getting more bang for your buck to change: Level 1: High Pain Tolerance A: Numina's Convalesence: Heal 21: Aegis: Resistance/Endurance 21: Aegis: Resistance/Recharge 23: Aegis: Resistance/Endurance/Recharge 23: Aegis: Endurance/Recharge Level 6: Combat Jumping A: Shield Wall: Defense/Endurance 15: Shield Wall: Defense/Recharge 17: Shield Wall: Defense/Endurance/Recharge 9: Shield Wall: Endurance/Recharge Level 8: Fast Healing A: Regenerative Tissue: +Regeneration 9: Numina's Convalesence: +Regeneration/+Recovery 48: Miracle: +Recovery Level 12: Maneuvers A: Luck of the Gambler: Defense 17: Luck of the Gambler: Defense/Increased Global Recharge Speed Level 28: Weave A: Shield Wall: +Res (Teleportation), +5% Res (All) 36: Reactive Defenses: Scaling Resist Damage 36: Gift of the Ancients: Defense/Increased Run Speed 37: Kismet: Accuracy +6% Into: Level 1: High Pain Tolerance A: Numina's Convalesence: Heal 21: Aegis: Resistance/Endurance 21: Aegis: Resistance/Recharge 23: Aegis: Resistance/Endurance/Recharge 23: Aegis: Resistance Level 6: Combat Jumping A: Luck of the Gambler: Defense/Increased Global Recharge Speed 9: Kismet: Accuracy +6% 36: Reactive Defenses: Scaling Resist Damage Level 8: Fast Healing A: Numina's Convalesence: Heal 9: Numina's Convalesence: +Regeneration/+Recovery 48: Miracle: +Recovery Level 12: Maneuvers A: Shield Wall: Defense 15: Shield Wall: Defense/Endurance 17: Shield Wall: Defense/Endurance/Recharge 17: Shield Wall: +Res (Teleportation), +5% Res (All) Level 28: Weave A: Luck of the Gambler: Defense/Increased Global Recharge Speed 36: Luck of the Gambler: Defense 37: Luck of the Gambler: Defense/Endurance This way you are effectively using the same slots and sets for the same types of bonuses while getting higher values in all regards, while not really spending much more influence. The only thing you're losing entirely is the +7.5% run speed, but in exchange you're getting another +7.5% recharge speed, which I would say the +recharge is far superior to +run speed. There are perhaps other changes I would do personally, but I'm not looking to decide how you play, so I'm just trying to offer how to get mathematical gains in what you seem to be going for without actually changing the build itself.