

cbr7598
-
Posts
6 -
Joined
-
Last visited
Content Type
Profiles
Forums
Events
Store
Articles
Patch Notes
Posts posted by cbr7598
-
-
Thanks for the information!
I have a hard time understanding MIDs so maybe I just need to spend a bit more time there.
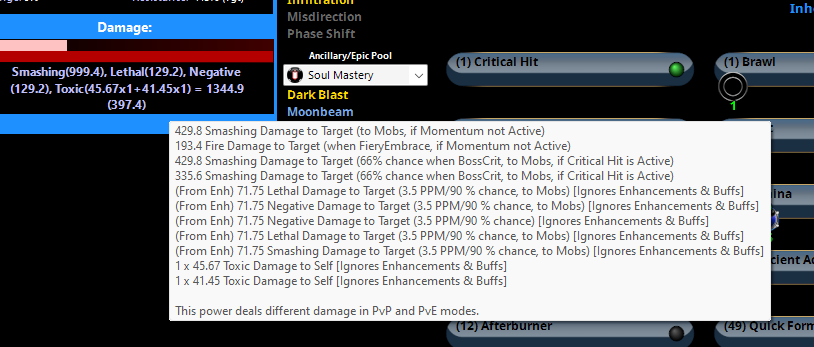
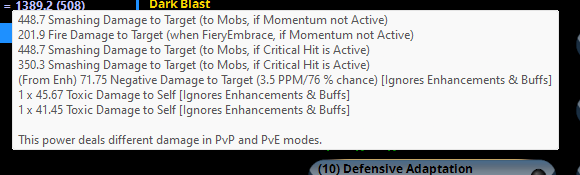
How are folks calculating procs? I see quite a few builds out there where some DPS abilities are slotted purely for "Chance for [X] damage" instead of using a set.
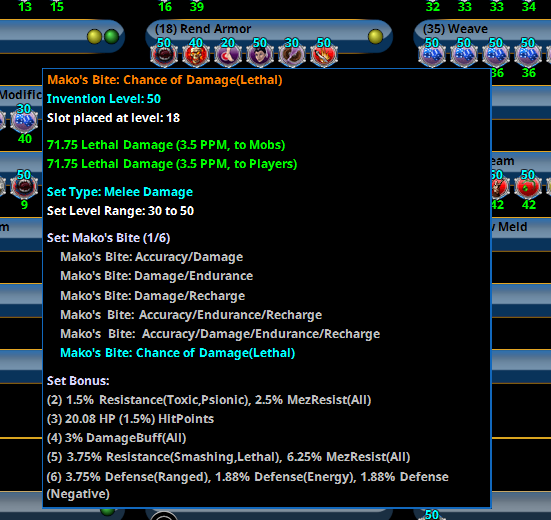
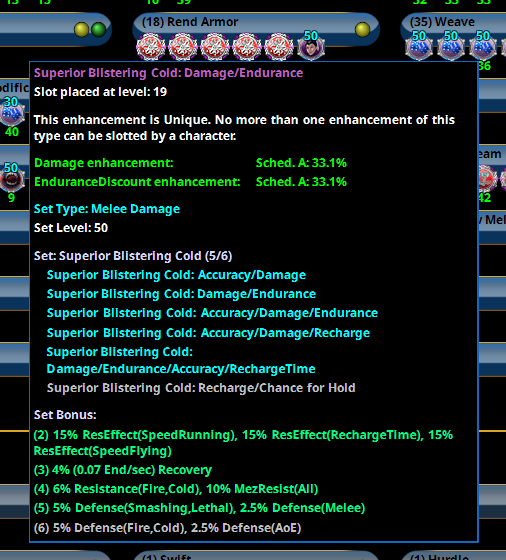
I slotted Rend with two different options and I think MIDs is telling me that the Superior Blistering Cold slotting will yield a higher DPS, but am I reading this correctly?
Also, @Ratch_, do you mind sharing build(s) you have that fit certain use cases? I'd love to understand more about your line of thinking

-
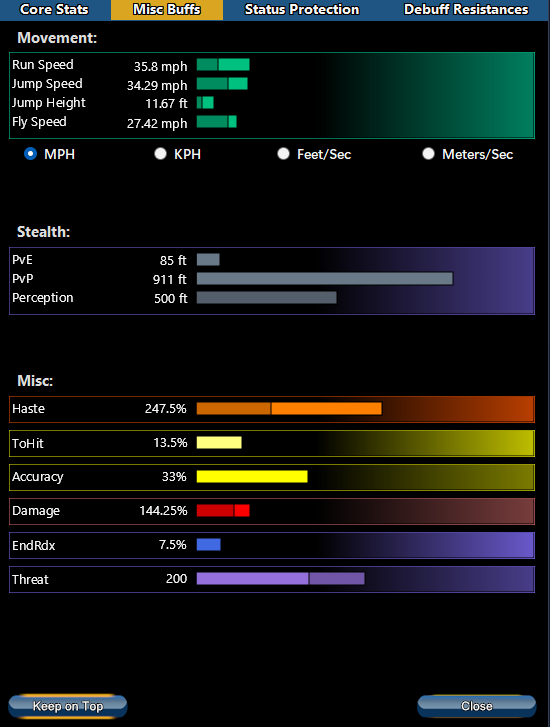
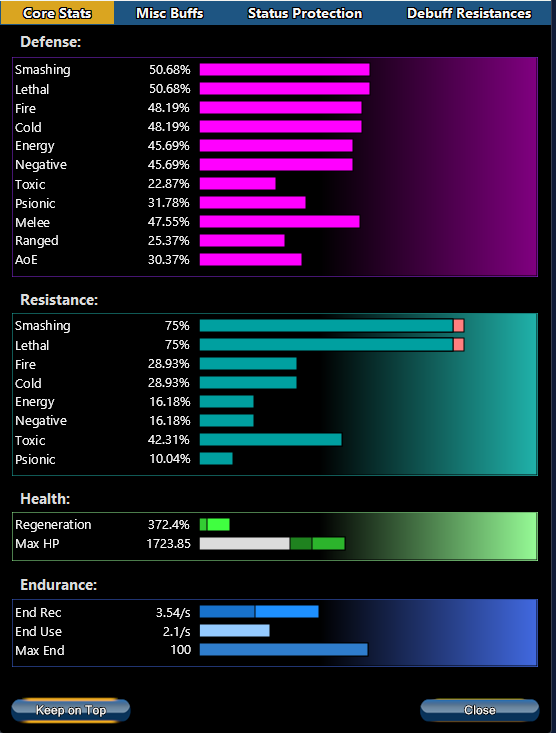
Is there a way in Mids to understand the damage output trade-off? Like, if I build for capped S/L def and res, how much potential damage am I losing?
In `View Totals`, I see `Damage` but unsure if that's what I want. I understand that builds can benefit from multiple procs in various offensive abilities but I don't really know if there is a straight-forward way to model that and compare to a more defensive-oriented build
-
30 minutes ago, SomeGuy said:
Trying to get S/L Def softcap passively with TW/BIO seems against what the combo is really about, but what do I know? I've only been playing the combo since 2011 (yes, I'm aware of what that means)/
What do you mean? I'm new to the build so I don't quite understand. I assumed most/all melee builds would want soft capped S/L def
-
I'm interested in getting S/L Def and Res capped and wanted feedback on this build. I'm new to self builds and curious what I'm sacrificing to hit the 45 and 75% caps
Build plan made with Mids' Reborn v3.6.6 rev. 3
──────────────────────────────- Primary powerset: Titan Weapons
- Secondary powerset: Bio Armor
- Pool powerset (#1): Flight
- Pool powerset (#2): Fighting
- Pool powerset (#3): Speed
- Pool powerset (#4): Concealment
- Epic powerset: Soul Mastery
──────────────────────────────
Powers taken:
Level 1: Crushing Blow
- A: Kinetic Combat: Accuracy/Damage
- 3: Kinetic Combat: Damage/Endurance
- 3: Kinetic Combat: Damage/Recharge
- 5: Kinetic Combat: Damage/Endurance/Recharge
- 15: Achilles' Heel: Chance for Res Debuff
Level 1: Hardened Carapace
- A: Steadfast Protection: Resistance/+Def 3%
- 11: Gladiator's Armor: TP Protection +3% Def (All)
- 11: Unbreakable Guard: Resistance
- 13: Unbreakable Guard: Resistance/Endurance
- 13: Unbreakable Guard: RechargeTime/Resistance
- 15: Unbreakable Guard: Resistance/Endurance/RechargeTime
Level 2: Inexhaustible
- A: Performance Shifter: Chance for +End
- 5: Performance Shifter: EndMod
Level 4: Environmental Modification
- A: Luck of the Gambler: Defense/Increased Global Recharge Speed
- 39: Luck of the Gambler: Defense/Endurance
- 40: Luck of the Gambler: Defense/Recharge
- 40: Luck of the Gambler: Defense/Endurance/Recharge
- 40: Luck of the Gambler: Defense
Level 6: Follow Through
- A: Mako's Bite: Accuracy/Damage
- 7: Mako's Bite: Damage/Endurance
- 7: Mako's Bite: Damage/Recharge
- 9: Mako's Bite: Accuracy/Endurance/Recharge
- 9: Mako's Bite: Chance of Damage(Lethal)
Level 8: Build Momentum
- A: Gaussian's Synchronized Fire-Control: Chance for Build Up
- 46: Rectified Reticle: To Hit Buff
- 46: Rectified Reticle: To Hit Buff/Recharge
Level 10: Adaptation
Level 12: Fly- A: Blessing of the Zephyr: Run Speed, Jump, Flight Speed, Range
Level 14: Boxing
- A: Kinetic Combat: Accuracy/Damage
Level 16: Ablative Carapace
- A: Preventive Medicine: Heal
- 39: Preventive Medicine: Chance for +Absorb
Level 18: Rend Armor
- A: Superior Blistering Cold: Accuracy/Damage
- 19: Superior Blistering Cold: Damage/Endurance
- 19: Superior Blistering Cold: Accuracy/Damage/Endurance
- 21: Superior Blistering Cold: Accuracy/Damage/Recharge
- 21: Superior Blistering Cold: Damage/Endurance/Accuracy/RechargeTime
- 25: Gladiator's Strike: Chance for Smashing Damage
Level 20: Evolving Armor
- A: Unbreakable Guard: Resistance
- 29: Unbreakable Guard: Resistance/Endurance
- 34: Unbreakable Guard: RechargeTime/Resistance
- 37: Unbreakable Guard: Resistance/Endurance/RechargeTime
Level 22: Whirling Smash
- A: Superior Avalanche: Accuracy/Damage
- 23: Superior Avalanche: Damage/Endurance
- 23: Superior Avalanche: Accuracy/Damage/Endurance
- 25: Superior Avalanche: Accuracy/Damage/Recharge
- 27: Superior Avalanche: Accuracy/Damage/Endurance/Recharge
- 27: Force Feedback: Chance for +Recharge
Level 24: DNA Siphon
- A: Superior Scrapper's Strike: Accuracy/Damage/Recharge
- 34: Superior Scrapper's Strike: Recharge/Critical Hit Bonus
- 37: Superior Scrapper's Strike: Accuracy/Damage/Endurance/Recharge
- 48: Obliteration: Chance for Smashing Damage
- 48: Obliteration: Accuracy/Recharge
- 49: Obliteration: Accuracy/Damage/Recharge
Level 26: Arc of Destruction
- A: Superior Critical Strikes: Accuracy/Damage
- 29: Superior Critical Strikes: Damage/RechargeTime
- 31: Superior Critical Strikes: Accuracy/Damage/RechargeTime
- 31: Superior Critical Strikes: Damage/Endurance/RechargeTime
- 31: Superior Critical Strikes: Accuracy/Damage/Endurance/RechargeTime
- 33: Superior Critical Strikes: RechargeTime/+50% Crit Proc
Level 28: Genetic Contamination
- A: Superior Scrapper's Strike: Accuracy/Damage
- 37: Superior Scrapper's Strike: Damage/Recharge
- 39: Superior Scrapper's Strike: Damage/Endurance/Recharge
- 45: Obliteration: Chance for Smashing Damage
- 45: Obliteration: Damage
- 45: Obliteration: Accuracy/Damage/Recharge
Level 30: Parasitic Aura
- A: Preventive Medicine: Heal/RechargeTime/Endurance
- 43: Preventive Medicine: Heal/RechargeTime
Level 32: Tough
- A: Unbreakable Guard: Resistance
- 33: Unbreakable Guard: +Max HP
- 33: Unbreakable Guard: Resistance/Endurance
- 34: Unbreakable Guard: RechargeTime/Resistance
Level 35: Weave
- A: Luck of the Gambler: Defense/Endurance
- 36: Luck of the Gambler: Defense/Recharge
- 36: Luck of the Gambler: Defense/Endurance/Recharge
- 36: Luck of the Gambler: Defense
- 47: Luck of the Gambler: Defense/Increased Global Recharge Speed
- 48: Kismet: Accuracy +6%
Level 38: Hasten
- A: Invention: Recharge Reduction
Level 41: Moonbeam
- A: Superior Winter's Bite: Accuracy/Damage
- 42: Superior Winter's Bite: Damage/RechargeTime
- 42: Superior Winter's Bite: Accuracy/Damage/Endurance
- 42: Superior Winter's Bite: Accuracy/Damage/Recharge
- 43: Superior Winter's Bite: Damage/Endurance/Accuracy/RechargeTime
- 43: Superior Winter's Bite: Recharge/Chance for -Speed & -Recharge
Level 44: Shadow Meld
- A: Luck of the Gambler: Defense/Increased Global Recharge Speed
Level 47: Stealth
- A: Luck of the Gambler: Defense/Increased Global Recharge Speed
- A: Shield Wall: +Res (Teleportation), +5% Res (All)
Level 49: Hover
- A: Luck of the Gambler: Defense/Increased Global Recharge Speed
──────────────────────────────Inherents:
Level 1: Critical Hit
Level 1: Brawl- (Empty)
Level 1: Sprint
- A: Celerity: +Stealth
Level 2: Rest
- (Empty)
Level 1: Swift
- (Empty)
Level 1: Hurdle
- (Empty)
Level 1: Health
- A: Numina's Convalesence: +Regeneration/+Recovery
- 17: Panacea: +Hit Points/Endurance
- 17: Miracle: +Recovery
Level 1: Stamina
- A: Performance Shifter: Chance for +End
- 46: Performance Shifter: EndMod
Level 1: Momentum
Level 10: Defensive Adaptation
Level 10: Efficient Adaptation
Level 10: Offensive Adaptation
Level 12: Afterburner
Level 49: Quick Form
-
I'm on the fence too.
I do agree that account-wide badges might potentially de-value certain activities and that's a definite concern. At the same time, I sometimes feel restricted (perhaps just me though) to playing my main for badges instead of playing any character for badges.
I wonder if the right move here is to sort of borrow a page from how WoW does this - the majority of achievements in that game are account-wide, but some are not. I think the balance might be different for CoH, but the same idea might work. I'm honestly not sure which badges should be considered account-wide, but I know that if there were steps taken in this direction, I'd feel more free to play whatever characters I want (again, I'm not going to pretend that this is a feeling affecting the majority of the player base, but it definitely affects me).
-
 1
1
-
City of Heros TW/BIO Titan Weapon / Bio Armor Build List
in Scrapper
Posted
@Ratch_
Amazing! Thank you so much for the explanation! I'll dig a bit into this but this gives me a great start!