

Seroster01
-
Posts
166 -
Joined
-
Last visited
Content Type
Profiles
Forums
Events
Store
Articles
Patch Notes
Posts posted by Seroster01
-
-
I'd like to chime in that I was personally very confused when I went to convert Insp on HC & saw that there wasn't an option to combine 3 insp to do a tier-up. I stared at the combine UI for a good bit trying to see what I was missing.
So, FWIW, I also have a memory of this feature. But I have no idea when in this was in terms of the game's lifecycle, and/or when it would've been changed. Very early? Very late? I have no idea, I just remember that I did it quite a bit at some point.
-
 1
1
-
 1
1
-
-
6 hours ago, Sovera said:
According to the link you posted AS can go up to 81% recharge to keep a 90% chance to proc Superior Stalker's Guile. Not sure if I'm doing it right.
This is good because I have a tight rotation and I prefer losing out on PPM chance than having gaps where I wait for things to recharge.
2 things:
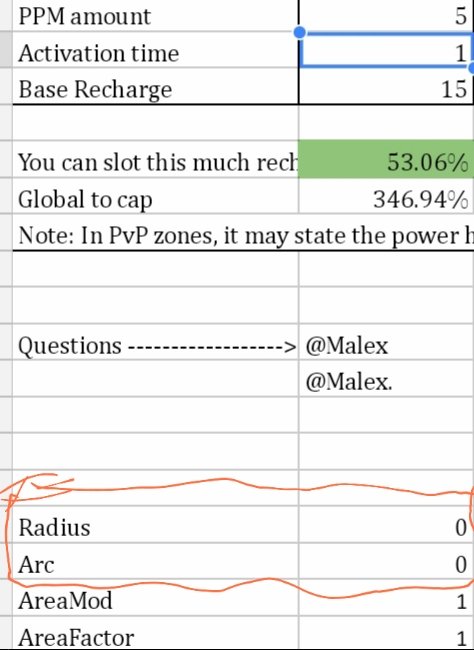
1.) If that # comes out negative, that means that it's impossible for the given PPM to have a 90% proc chance with the power info that's been entered. You can see the text that explains this over to the right of the output cell.
2.) Since you got a negative output # it seems like something went wrong. Most likely there's some non-zero values in the cells used to calculate the proc chance for AoEs, and you probably didn't notice them because they're wll below the rest of the stuff & I think it had some values there when I downloaded it myself, so they're probably still there.
Here's a very poorly edited screenshot to show what I'm talking about & the results I got:

I think that for the most part those fields speak for themselves, but the important part is that you want those bottom 2 cells to be 1 if you're calculating ST attacks, which means you want the top 2 cells to be blank or zero. Technically you can put something in the Arc cell & it won't affect the calculations unless there's also something in the Radius cell, but they might as well just be left blank if they aren't being utilized for the power in question.
Oddly, I think in my posts on this yesterday I said it could handle up to 58% & be capped, but when I went to make an "example" screenshot my results came back as 53. My assumption is that I just misread the 3 as an 8, cause when I try to think back I'm pretty sure it was 53% the other times I'd done it (but I've got a very hazy memory these days).
In kinda-related news, the fact that AS has potentially very different activation times between the Hidden & un-Hidden versions can & will influence the results, because the PPM system will apparently calculate the proc chance based on the animation used to trigger the roll. Because of this & the fact that I can't find good documentation on AS's activation time, I'm not terribly sure what the proper activation time is for AS, or if that activation time is the same across all primaries (I believe I got the 1s from my in-game UI for Savage's AS, & I just assumed the fast activation times for AS were all 1s for balance reasons) but if the activation time is greater than the 1s I put in to calculate my result then the power will end up with more "space" to its cap than what I gave (& of course if it's less than 1s it'll have less). It certainly doesn't feel like my Stalker's AS has a 1.67s animation time like you used, but I certainly don't know what the exact value is...
Edit: if you want to see the actual proc chance you have with what you have (or plan to have) slotted you can obviously use the top portion of that document. The Arc & Radius fields still need to be set properly, but if your slotting comes out close enough to the 90% cap that you think it's worth the rotational improvements that the bonus recharge gives that's totally a personal call. I'll also point out that different primaries would find the Hide proc more or less useful. It's a huge deal for SM at least, because Hemorrhage from hide apparently does more damage than an AS from hide would. But if it were KM or some other set without a big hitter to make good use of the auto-crit then it probably won't matter a whole lot.
-
1 minute ago, Sovera said:
Could you link where you found this information about recharge times? HD doesn't show it for damage procs. I know I have my AS at 76% recharge and the Hide proc only happens... I can't really say... but one in three ou four AS'?
The guide on how this all works is here:
But if you don't really care about the whys & hows, you can just put the applicable numbers in the sheet linked in the bottom of this post & it'll spit out the chance to proc with your current slotting and/or the maximum amount of +rech that can be slotted & keep tma 90% chance, depending on what you're after:
I'd still suggest having a look at the guide itself, as I'm always of the opinion that understanding any game's systems will help you make better decisions for many more aspects of that game than just the system(s) themselves. Perhaps more pertinently, it also has a link to a list of all the PPM and % chance values (there's only a few of the latter left at this point), along with full details of what the procs actually do.
If that stuff isn't what you're asking for you'll have to forgive me, I need to get some sleep. I'll check back in tomorrow.
-
5 hours ago, Bob the Painter said:
So I've been playing a bit recently. Have my SM/Shield in the late 30s now. Thanks for the discussion above, it's helped me form my opinion of the build and given some direction.
Taking the discussion into consideration, I've made the build below for when I hit 50. I welcome any positive criticism. I did not take slot levels into consideration. I also feel like damage powers are a little thin in the early levels so it may not play as well when examplared way down. Thanks in advance, everyone.
Villain Plan by Mids' Reborn : Hero Designer 2.6.0.7
https://github.com/ImaginaryDevelopment/imaginary-hero-designerClick this DataLink to open the build!
Rex Sr.: Level 50 Science Stalker
Primary Power Set: Savage Melee
Secondary Power Set: Shield Defense
Power Pool: Speed
Power Pool: Fighting
Power Pool: Leaping
Power Pool: Leadership
Ancillary Pool: Blaze MasteryVillain Profile:
Level 1: Maiming Slash -- SprAssMar-Rchg/Rchg Build Up:50(A), SprAssMar-Acc/Dmg:50(3), SprAssMar-Dmg/Rchg:50(3), SprAssMar-Acc/Dmg/Rchg:50(5), SprAssMar-Dmg/EndRdx/Rchg:50(5), SprAssMar-Acc/Dmg/EndRdx/Rchg:50(7)
Level 1: Hide -- LucoftheG-Def/Rchg+:50(A)
Level 2: Deflection -- LucoftheG-Def/Rchg+:50(A), RedFrt-Def/EndRdx:50(7), RedFrt-Def:50(9), RedFrt-Def/EndRdx/Rchg:50(9)
Level 4: Battle Agility -- Rct-ResDam%:50(A), Rct-Def:50(11), Rct-Def/EndRdx:50(11), Rct-EndRdx/Rchg:50(13), Rct-Def/Rchg:50(13), Rct-Def/EndRdx/Rchg:50(15)
Level 6: Assassin's Frenzy -- SprStlGl-Rchg/Hide%:50(A), SprStlGl-Acc/Dmg:50(15), SprStlGl-Dmg/Rchg:50(17), SprStlGl-Acc/Dmg/Rchg:50(17), SprStlGl-Dmg/EndRdx/Rchg:50(19), SprStlGl-Acc/Dmg/EndRdx/Rchg:50(19)
Level 8: Build Up -- GssSynFr--Build%:50(A)
Level 10: Super Speed -- WntGif-ResSlow:50(A)
Level 12: Kick -- FrcFdb-Rechg%:50(A)
Level 14: Tough -- GldArm-3defTpProc:50(A), StdPrt-ResDam/Def+:30(21), UnbGrd-Max HP%:50(21)
Level 16: Active Defense -- RechRdx-I:50(A)
Level 18: Rending Flurry -- ScrDrv-Acc/Dmg:50(A), ScrDrv-Dmg/EndRdx:50(23), ScrDrv-Acc/Dmg/EndRdx:50(23), Obl-%Dam:50(25), Erd-%Dam:30(25), ScrDrv-Dam%:50(27)
Level 20: Against All Odds -- EndRdx-I:50(A)
Level 22: Weave -- LucoftheG-Def/Rchg+:50(A), LucoftheG-Def/EndRdx:50(27), LucoftheG-Def/EndRdx/Rchg:50(29), LucoftheG-Def:50(29), LucoftheG-EndRdx/Rchg:50(50)
Level 24: Hasten -- RechRdx-I:50(A), RechRdx-I:50(31)
Level 26: Hemorrhage -- Mk'Bit-Acc/Dmg:50(A), Mk'Bit-Dmg/EndRdx:50(31), Mk'Bit-Acc/Dmg/EndRdx/Rchg:50(31), Mk'Bit-Acc/EndRdx/Rchg:50(33), Mk'Bit-Dmg/Rchg:50(33), Mk'Bit-Dam%:50(33)
Level 28: Combat Jumping -- ShlWal-ResDam/Re TP:50(A), RedFrt-Def:50(34), RedFrt-Def/EndRdx:50(34), RedFrt-Def/EndRdx/Rchg:50(46)
Level 30: Maneuvers -- LucoftheG-Def/Rchg+:50(A), RedFrt-Def:50(34), RedFrt-Def/EndRdx:50(36), RedFrt-Def/EndRdx/Rchg:50(36)
Level 32: Savage Leap -- Obl-Dmg:50(A), Obl-%Dam:50(36), FuroftheG-ResDeb%:50(37), Erd-%Dam:30(37), ScrDrv-Dam%:50(37), Arm-Dam%:50(39)
Level 35: Shield Charge -- Obl-Dmg:50(A), Obl-Acc/Rchg:50(39), Obl-Dmg/Rchg:50(39), Obl-Acc/Dmg/Rchg:50(40), Obl-Acc/Dmg/EndRdx/Rchg:50(40), Obl-%Dam:50(40)
Level 38: True Grit -- Prv-Absorb%:50(A), TtnCtn-ResDam:50(50)
Level 41: Ring of Fire -- Thn-Acc/Dmg:50(A), Thn-Acc/Dmg/EndRdx:50(42), Thn-Dmg/EndRdx:50(42), TraoftheH-Dam%:50(42), Apc-Dam%:50(46)
Level 44: Melt Armor -- AchHee-ResDeb%:20(A), TchofLadG-%Dam:50(45), ShlBrk-%Dam:30(45), ShlBrk-DefDeb:30(45), ShlBrk-Acc/DefDeb:30(46)
Level 47: Fire Ball -- Dtn-Acc/Dmg:50(A), Dtn-Dmg/EndRdx:50(48), Dtn-Acc/Dmg/EndRdx:50(48), PstBls-Dam%:50(48)
Level 49: Grant Cover -- LucoftheG-Def/Rchg+:50(A)
Level 1: Assassination
Level 1: Brawl -- Empty(A)
Level 1: Prestige Power Dash -- Empty(A)
Level 1: Prestige Power Slide -- Empty(A)
Level 1: Prestige Power Quick -- Empty(A)
Level 1: Prestige Power Rush -- Empty(A)
Level 1: Prestige Power Surge -- Empty(A)
Level 1: Sprint -- Clr-Stlth:50(A), Clr-EndRdx:50(50)
Level 2: Rest -- Empty(A)
Level 4: Ninja Run
Level 2: Swift -- Empty(A)
Level 2: Health -- Pnc-Heal/+End:50(A), Mrc-Rcvry+:40(43), NmnCnv-Regen/Rcvry+:50(43)
Level 2: Hurdle -- Empty(A)
Level 2: Stamina -- PrfShf-End%:50(A), PrfShf-EndMod:50(43)
Level 1: Blood Frenzy
Level 50: Musculature Core Paragon
Level 50: Preemptive Total Radial Conversion
Level 50: Carnival Core Superior Ally
Level 50: Barrier Core Epiphany
Level 50: Assault Core Embodiment
Level 50: Ion Core Final Judgement
------------
------------
Set Bonus Totals:- 14% DamageBuff(Smashing)
- 14% DamageBuff(Lethal)
- 14% DamageBuff(Fire)
- 14% DamageBuff(Cold)
- 14% DamageBuff(Energy)
- 14% DamageBuff(Negative)
- 14% DamageBuff(Toxic)
- 14% DamageBuff(Psionic)
- 12.88% Defense(Smashing)
- 12.88% Defense(Lethal)
- 8.5% Defense(Fire)
- 8.5% Defense(Cold)
- 10.38% Defense(Energy)
- 10.38% Defense(Negative)
- 6% Defense(Psionic)
- 12.25% Defense(Melee)
- 11% Defense(Ranged)
- 11% Defense(AoE)
- 3.75% Enhancement(Max EnduranceDiscount)
- 71.25% Enhancement(RechargeTime)
- 57% Enhancement(Accuracy)
- 7.5% SpeedFlying
- GrantPower Preventive Medicine (10 % chance, if Scourge)
- 144.6 HP (12.01%) HitPoints
- 7.5% JumpHeight
- 7.5% SpeedJumping
- MezResist(Confused) 71.25%
- MezResist(Held) 71.25%
- MezResist(Immobilized) 71.25%
- MezResist(Sleep) 71.25%
- MezResist(Stunned) 71.25%
- MezResist(Terrorized) 71.25%
- MezResist(Teleport) 100% (20 % chance)
- 8.5% (0.14 End/sec) Recovery
- 20% (1 HP/sec) Regeneration
- 20% ResEffect(SpeedFlying)
- 20% ResEffect(RechargeTime)
- 20% ResEffect(SpeedRunning)
- 38% Resistance(Smashing)
- 38% Resistance(Lethal)
- 15.5% Resistance(Fire)
- 15.5% Resistance(Cold)
- 11.75% Resistance(Energy)
- 11.75% Resistance(Negative)
- 9.5% Resistance(Toxic)
- 9.5% Resistance(Psionic)
- 7.5% SpeedRunning
I'll kinda-sorta repost some of the stuff I put in another thread that seems applicable to the build you linked:
I would strongly suggest keeping AS under 58% +recharge slotted, as anything below that will give the Hide proc a 90% chance to trigger on every use. This is a big deal for Savage because Hemorrhage from stealth is probably your most damaging single target ability, and with decent slotting & end-game levels of recharge reduction you can basically cycle AS>Hemo every 3-5 seconds. The slotting I chose was 3 Stalker's Guile (Acc/Dmg, Acc/Dam/End/Rech, and the proc), a Mako's Dam/End at 50+5, the ToD NE proc, and the Hecatomb NE proc. With that slotting you'll end up with 56% Acc, 87% Dam, 56% EndRdx, and 46% recharge time. If you throw in any damage boosting alpha you'll hit the applicable ED cap, and as the Hecatomb will have ~84% chance to proc & the ToD ~65%, the 2 procs will typically be more impactful than getting to the ED cap even if you exemp out of Incarnate range. Those 2 procs seem to have quite a bit of impact on how killy he is, partially because they proc a lot but also because it's a significant source of damage that isn't lethal (At 50 it's around 180 NE damage when they both proc). Considering that Shield is positional defense rather than typed defense I'm not sure that 3 Guiles in 2 powers is an ideal expenditure of resources, so you might want to put 5 slots elsewhere & just the proc in Frenzy. Still, that would end up as 5% Melee defense & a 30% accuracy boost instead of 2.5% & 15%, and the extra Acc is very helpful for Leap since it probably won't have any Acc enhancement.
The other bit that I'll point out, which is pretty minor all things considered, is that I don't think the stealth IO you put in Sprint will have any actual impact, at least in PVE. With just Stalker Hide in effect my guy, who's in the 20-ish range of Vet levels, has never been seen by mobs that don't outright ignore stealth (most commonly encountered of those types are Rikti drones, but I think there's a few others). Given that they're pretty cheap & you seem to be going for a set bonus, it's pretty much whatever... but you'd probably be better served putting the other IO from that set in there since that would actually have a mathematical impact, however minor. That said, I hear things function differently in PVP (but I've never really engaged in it myself) so if that's what that is there for then feel free to ignore this part.
I'll throw in my build if you want to have a look at how things are slotted, but some of my build goals were probably pretty different for a /Bio character than what you'd want out of a /Shield build.
SpoilerVillain Plan by Mids' Reborn : Hero Designer 2.6.0.7
https://github.com/ImaginaryDevelopment/imaginary-hero-designerClick this DataLink to open the build!
Level 50 Magic Stalker
Primary Power Set: Savage Melee
Secondary Power Set: Bio Armor
Power Pool: Fighting
Power Pool: Flight
Power Pool: Speed
Power Pool: Leadership
Ancillary Pool: Soul MasteryVillain Profile:
Level 1: Maiming Slash -- Hct-Dmg(A), Hct-Dmg/Rchg(3), Hct-Acc/Dmg/Rchg(3), Hct-Acc/Rchg(5), Hct-Dmg/EndRdx(5), TchofDth-Dam%(7)
Level 1: Hide -- ShlWal-ResDam/Re TP(A)
Level 2: Hardened Carapace -- UnbGrd-ResDam(A), UnbGrd-ResDam/EndRdx(7), UnbGrd-Rchg/ResDam(9), UnbGrd-ResDam/EndRdx/Rchg(9), GldArm-3defTpProc(11)
Level 4: Shred -- Arm-Dmg/EndRdx(A), Arm-Dmg/Rchg(11), Arm-Acc/Dmg/Rchg(13), Arm-Acc/Rchg(13), Erd-%Dam(15), AchHee-ResDeb%(15)
Level 6: Assassin's Frenzy -- SprStlGl-Acc/Dmg(A), SprStlGl-Acc/Dmg/EndRdx/Rchg(17), SprStlGl-Rchg/Hide%(17), Mk'Bit-Dmg/EndRdx(19), TchofDth-Dam%(19), Hct-Dam%(21)
Level 8: Boundless Energy -- PrfShf-EndMod(A), PrfShf-End%(21), Pnc-Heal(48), Pnc-Heal/+End(50)
Level 10: Environmental Modification -- LucoftheG-Def/EndRdx(A), LucoftheG-Def/EndRdx/Rchg(23), LucoftheG-Def/Rchg+(23), Ksm-ToHit+(25)
Level 12: Build Up -- RctRtc-ToHit/Rchg(A), RctRtc-Pcptn(25), GssSynFr--Build%(27)
Level 14: Hover -- WntGif-RunSpd/Jump/Fly/Rng(A), WntGif-RunSpd/Jump/Fly/Rng/EndRdx(34), WntGif-ResSlow(34), LucoftheG-Def/Rchg+(34)
Level 16: Adaptation
Level 18: Rending Flurry -- SprAvl-Acc/Dmg(A), SprAvl-Dmg/EndRdx(27), SprAvl-Acc/Dmg/EndRdx(29), SprAvl-Acc/Dmg/Rchg(29), SprAvl-Acc/Dmg/EndRdx/Rchg(31), SprAvl-Rchg/KDProc(31)
Level 20: Ablative Carapace -- Pnc-Heal/EndRedux(A), Pnc-EndRdx/Rchg(31), Pnc-Heal/Rchg(33), Pnc-Heal/EndRedux/Rchg(33), Pnc-Heal(33)
Level 22: Kick -- Empty(A)
Level 24: Placate -- RechRdx-I(A)
Level 26: Hemorrhage -- SprAssMar-Acc/Dmg(A), SprAssMar-Dmg/Rchg(36), SprAssMar-Acc/Dmg/Rchg(36), SprAssMar-Dmg/EndRdx/Rchg(36), SprAssMar-Acc/Dmg/EndRdx/Rchg(37), SprAssMar-Rchg/Rchg Build Up(37)
Level 28: DNA Siphon -- SprStlGl-Dmg/Rchg(A), SprStlGl-Acc/Dmg/Rchg(37), SprStlGl-Dmg/EndRdx/Rchg(39)
Level 30: Tough -- UnbGrd-ResDam/EndRdx/Rchg(A), UnbGrd-ResDam/EndRdx(39), UnbGrd-EndRdx/Rchg(39), UnbGrd-Max HP%(40), StdPrt-ResDam/Def+(40)
Level 32: Savage Leap -- Arm-Dmg(A), Arm-Dam%(40), FuroftheG-ResDeb%(42), Erd-%Dam(42), ScrDrv-Dam%(42), Obl-%Dam(43)
Level 35: Hasten -- RechRdx-I(A), RechRdx-I(43)
Level 38: Moonbeam -- Apc-Dmg(A), Apc-Acc/Dmg/Rchg(43), Apc-Dam%(45), Apc-Acc/Rchg(45), Apc-Dmg/EndRdx(45), CldSns-%Dam(46)
Level 41: Maneuvers -- LucoftheG-Def/EndRdx(A), LucoftheG-Def(46), LucoftheG-Def/Rchg+(46)
Level 44: Tactics -- RctRtc-ToHit(A), RctRtc-ToHit/Rchg(48)
Level 47: Weave -- LucoftheG-Def/EndRdx(A), LucoftheG-Def(48), LucoftheG-Def/Rchg+(50)
Level 49: Shadow Meld -- LucoftheG-Def/Rchg+(A), LucoftheG-Def/Rchg(50)
Level 1: Assassination
Level 1: Brawl -- Empty(A)
Level 1: Prestige Power Dash -- Empty(A)
Level 1: Prestige Power Slide -- Empty(A)
Level 1: Prestige Power Quick -- Empty(A)
Level 1: Prestige Power Rush -- Empty(A)
Level 1: Prestige Power Surge -- Empty(A)
Level 1: Sprint -- Run-I(A)
Level 2: Rest -- Empty(A)
Level 4: Ninja Run
Level 2: Swift -- Flight-I(A)
Level 2: Health -- Mrc-Rcvry+(A)
Level 2: Hurdle -- Jump-I(A)
Level 2: Stamina -- PrfShf-End%(A)
Level 1: Blood Frenzy
Level 16: Defensive Adaptation
Level 16: Efficient Adaptation
Level 16: Offensive Adaptation
Level 38: Quick Form
Level 0: Born In Battle
Level 0: High Pain Threshold
Level 0: Invader
Level 0: Marshal
Level 50: Musculature Radial Paragon
------------ -
Here's my Build:
SpoilerVillain Plan by Mids' Reborn : Hero Designer 2.6.0.7
https://github.com/ImaginaryDevelopment/imaginary-hero-designerClick this DataLink to open the build!
Level 50 Magic Stalker
Primary Power Set: Savage Melee
Secondary Power Set: Bio Armor
Power Pool: Fighting
Power Pool: Flight
Power Pool: Speed
Power Pool: Leadership
Ancillary Pool: Soul MasteryVillain Profile:
Level 1: Maiming Slash -- Hct-Dmg(A), Hct-Dmg/Rchg(3), Hct-Acc/Dmg/Rchg(3), Hct-Acc/Rchg(5), Hct-Dmg/EndRdx(5), TchofDth-Dam%(7)
Level 1: Hide -- ShlWal-ResDam/Re TP(A)
Level 2: Hardened Carapace -- UnbGrd-ResDam(A), UnbGrd-ResDam/EndRdx(7), UnbGrd-Rchg/ResDam(9), UnbGrd-ResDam/EndRdx/Rchg(9), GldArm-3defTpProc(11)
Level 4: Shred -- Arm-Dmg/EndRdx(A), Arm-Dmg/Rchg(11), Arm-Acc/Dmg/Rchg(13), Arm-Acc/Rchg(13), Erd-%Dam(15), AchHee-ResDeb%(15)
Level 6: Assassin's Frenzy -- SprStlGl-Acc/Dmg(A), SprStlGl-Acc/Dmg/EndRdx/Rchg(17), SprStlGl-Rchg/Hide%(17), Mk'Bit-Dmg/EndRdx(19), TchofDth-Dam%(19), Hct-Dam%(21)
Level 8: Boundless Energy -- PrfShf-EndMod(A), PrfShf-End%(21), Pnc-Heal(48), Pnc-Heal/+End(50)
Level 10: Environmental Modification -- LucoftheG-Def/EndRdx(A), LucoftheG-Def/EndRdx/Rchg(23), LucoftheG-Def/Rchg+(23), Ksm-ToHit+(25)
Level 12: Build Up -- RctRtc-ToHit/Rchg(A), RctRtc-Pcptn(25), GssSynFr--Build%(27)
Level 14: Boxing -- Empty(A)
Level 16: Adaptation
Level 18: Rending Flurry -- SprAvl-Acc/Dmg(A), SprAvl-Dmg/EndRdx(27), SprAvl-Acc/Dmg/EndRdx(29), SprAvl-Acc/Dmg/Rchg(29), SprAvl-Acc/Dmg/EndRdx/Rchg(31), SprAvl-Rchg/KDProc(31)
Level 20: Ablative Carapace -- Pnc-Heal/EndRedux(A), Pnc-EndRdx/Rchg(31), Pnc-Heal/Rchg(33), Pnc-Heal/EndRedux/Rchg(33), Pnc-Heal(33)
Level 22: Hover -- WntGif-RunSpd/Jump/Fly/Rng(A), WntGif-RunSpd/Jump/Fly/Rng/EndRdx(34), WntGif-ResSlow(34), LucoftheG-Def/Rchg+(34)
Level 24: Placate -- RechRdx-I(A)
Level 26: Hemorrhage -- SprAssMar-Acc/Dmg(A), SprAssMar-Dmg/Rchg(36), SprAssMar-Acc/Dmg/Rchg(36), SprAssMar-Dmg/EndRdx/Rchg(36), SprAssMar-Acc/Dmg/EndRdx/Rchg(37), SprAssMar-Rchg/Rchg Build Up(37)
Level 28: DNA Siphon -- SprStlGl-Dmg/Rchg(A), SprStlGl-Acc/Dmg/Rchg(37), SprStlGl-Dmg/EndRdx/Rchg(39)
Level 30: Tough -- UnbGrd-ResDam/EndRdx/Rchg(A), UnbGrd-ResDam/EndRdx(39), UnbGrd-EndRdx/Rchg(39), UnbGrd-Max HP%(40), StdPrt-ResDam/Def+(40)
Level 32: Savage Leap -- Arm-Dmg(A), Arm-Dam%(40), FuroftheG-ResDeb%(42), Erd-%Dam(42), ScrDrv-Dam%(42), Obl-%Dam(43)
Level 35: Hasten -- RechRdx-I(A), RechRdx-I(43)
Level 38: Moonbeam -- Apc-Dmg(A), Apc-Acc/Dmg/Rchg(43), Apc-Dam%(45), Apc-Acc/Rchg(45), Apc-Dmg/EndRdx(45), CldSns-%Dam(46)
Level 41: Maneuvers -- LucoftheG-Def/EndRdx(A), LucoftheG-Def(46), LucoftheG-Def/Rchg+(46)
Level 44: Tactics -- RctRtc-ToHit(A), RctRtc-ToHit/Rchg(48)
Level 47: Weave -- LucoftheG-Def/EndRdx(A), LucoftheG-Def(48), LucoftheG-Def/Rchg+(50)
Level 49: Shadow Meld -- LucoftheG-Def/Rchg+(A), LucoftheG-Def/Rchg(50)
Level 1: Assassination
Level 1: Brawl -- Empty(A)
Level 1: Prestige Power Dash -- Empty(A)
Level 1: Prestige Power Slide -- Empty(A)
Level 1: Prestige Power Quick -- Empty(A)
Level 1: Prestige Power Rush -- Empty(A)
Level 1: Prestige Power Surge -- Empty(A)
Level 1: Sprint -- Run-I(A)
Level 2: Rest -- Empty(A)
Level 4: Ninja Run
Level 2: Swift -- Flight-I(A)
Level 2: Health -- NmnCnv-Regen/Rcvry+(A)
Level 2: Hurdle -- Jump-I(A)
Level 2: Stamina -- PrfShf-End%(A)
Level 1: Blood Frenzy
Level 16: Defensive Adaptation
Level 16: Efficient Adaptation
Level 16: Offensive Adaptation
Level 38: Quick Form
Level 0: Born In Battle
Level 0: High Pain Threshold
Level 0: Invader
Level 0: Marshal
Level 50: Musculature Radial Paragon
------------Things to point out: keeping AS under 58% will give the Hide proc a 90% chance to trigger on every use, and with the slotting I put in it the Hecatomb will have ~84% chance & ToD ~65%. The 2 procs seem to have quite a bit of impact on how killy he is, partially because they proc a lot but also because it's a source of damage that isn't lethal. For an Elec Melee character this probably isn't as big of a deal, but it's still a pretty high chance to do an additional 180-ish damage of a rarely resisted type.
Similarly, keeping Build Up under 68% slotted recharge will give Gaussian's a 90% chance to trigger & given the reset mechanics from the 2nd ATO you don't really need much (any?) recharge in it anyway. I have the 2 slots there for the bonus to S/L defense, as this is a pretty low amount of slots invested for the amount of S/L defense it gives.
I think it's worth noting that I end up fairly short of the S/L soft cap, but this apparently doesn't matter much in-game cause I didn't realize how short I was till I just exported it. 😂
As for the stuff relating to /Bio itself, I slotted the 3 recharge-heavy pieces of Stalker's Guile there for the 5% S/L, but having 84% recharge reduction & near-SO accuracy in 3 slots seemed a decent use of the slots. Obviously the damage boost doesn't do a lot of good, and if you've got some other place you'd like to put those then I'd imagine there's more defense-oriented ways to slot it.
After fiddling around with some of the spare slots I had I eventually decided to put 4 slots in Boundless Energy, because it has a higher base recovery bonus than Stamina, and after playing around with various slotting options putting a 50+5 healing IO in it seemed to give me the largest defensive bonus for a single slot. After considering my options for that I chose to put a Panacea Heal there and move the Panacea proc from Health to BE in order to get the 2.5% Recovery bonus, since that slot was going to be used in either power for a recovery bonus anyway. Panacea's also a PVP enhancement, which has the bonus of the set bonuses behaving like a purple set (will exemp to any level regardless of the level of the enhancements). In a bit of a related topic, I put a Numina's in Health rather than a Miracle because the character doesn't struggle much with Endurance until Leap is available, and even after that I felt like the 20% regen was a bit more useful than the 5% difference in Recovery. It does have the downside that it's far easier to exemp out of the range that it will work, but if my character was exemp'd that low he didn't really need it it. In the end I don't think the choice between the two will mater very much (1 HP/sec vs .08 End/Sec), but if your primary is more end intensive than SM is it might be a big deal.
Another thing that's probably more unique to SM than others is that I find Hover very useful for getting range on targets mid combat (which boosts leap damage), which requires a certain amount of build investment to make it not be agonizingly slow (also relatively end intensive). CJ would work just as well, and would allow for those some or all of those slots to be put elsewhere if you wanted to do so.
It's not a part of the export, but I picked Ageless Radial Epiphany for the Destiny; primarily for the debuff resistance, but also because the recharge boost helps me get perma-hasten & about the time I start running low on Endurance from my regular rotation it will come back up & refill my bar. This is only really an issue in long AV fights, and the only time I've had to make use of it to this point is when I was soloing the Avatar of Mot or whatever it's name is at the end of the DA story arc. Picked Assault Interface (chance for double hit of energy damage) because it seemed the most impactful for my character, and the Void Judgement because a.) the -damage seemed more useful to my character than moar damage, b.) Negative Energy is a rarely resisted damage type, and c.) I think it looks pretty freaking awesome (at least the higher levels, I don't remember the T1 version looking as cool as the T3 version he has now).
Anyway, that's all the stuff I can see that I think is worth pointing out. If you have some questions on any of it feel free to ask.
-
1 hour ago, Neiska said:
Hehe, sorry, still learning acyronyms, meant Luck of the Gambler - global recharge. I was asking you need haste, with a reduction IO, plus 5 Gamblers to max your cooldown.
I havent really done many Task Forces. Most of playtime has been playing normal missions on +3 or 4/8 difficulty. And as far as my goals? Not looking to solo AVs and whatnot (though that would be pretty neat). Mostly just hoping to be able to play on max difficulty, at least radio/normal missions, finish ouros, badge hunting, max my incarnates. Anything after that is a bonus. And I havent gotten to really join up with the big missions like ITFs or Mothership (whatever that is. keep hearing it mentioned.)
You should try the ITF some time. It's popular because it's a trifecta of fun, interesting, & unlike a lotbof late-game content additions it isn't overly challenging. Not to say that it's easy per se (the defense Debuffs that keep being brought up will certainly keep people on their toes), but a lot of the content added later in the game's life has mob groups that are far more annoying than the Cimerorans, Council, and Nictus from the ITF.
Anyway, I'll try to remember to post my SM/Bio when I get home & flash out some of the reasons I did certain things, might give you some ideas.
-
6 hours ago, Neiska said:
Thank you for the feedback Sovera, i definately missed some things. Your loadout does look better than mine for sure. My single complaint is its missing parasite aura, isnt that a big one to have from Bio armor? I mean thats the other absorb/super recovery tool there, and ive always had it. Unless it sucks on stalkers?
IDK if it's any better or worse on Stalkers than it is on any other AT, but my Savage/Bio Stalker hasn't really felt the need for it, at least in comparison to the powers he took instead. I hit Ablative Carapace>Shadow Meld before my opening volley, and typically I'll kill enough of the spawn that I can Siphon the dead ones for a good regen bonus. Between the 3 of those powers he almost never dies.
When he DOES eat dirt, it's typically a borderline Insta-gib due to some combination of ye olde Cascading Defense Failure and/or enemy To-Hit buffs (which seem annoyingly common on newer mob types...). Given that I don't usually have enough time to react when this goes wrong, I'm not sure that the T9 would help a whole lot unless it was cast before it was needed, and then you'd run into uptime issues & such. It's good for a T9 from an Armor set, but like most of those it seems like it's too situational to use a power pick on when you can pick something that's more frequently available and/or broadly useful.
-
14 hours ago, Neiska said:
Hello everyone,
Thank you all for the imput! I decided to go electric melee/bio. Staff looked interesting but it wouldn't have really suited the character. Strangely there doesnt seem to be as many referance builds for stalkers, or at least as many as other AT's. I assume this is because during live the AT was percived as being "weak"? (just guessing on my part).
Anyway, thanks bunches for the replies. It is appreciated! And I am still learning stuff about the game. Powers I understand, its power slotting that gets confusing. Game seems a bit complicated to min/max. But its something to shoot for!
Yeah I think Stalkers were considered underperforming for much of the game's history. Stalker's big calling card was AS from hidden, but this was slow, interruptible, and after combat started it only came up when Placate was up & then could still get interrupted pretty easily. But for Homecoming I think they're in the running for one of the strongest ATs due to sheer damage output. I quit playing CoH a fair amount of time before the shutdown, so I'm not sure what exactly changed when, but there's 3 Stalker specific changes/additions that seem to have come between what I remember & now, and they get another bonus from the change to a PPM system instead of a flat %.
The first change is the overhaul on AS mechanics, which made it a normal part of the ST attack chain (now animates very quickly & can't be interrupted if it's used while the character isn't Hidden). The other 2 are the Stalker ATO unique effects, which I'd say are both among the most powerful ATO effects I've seen. the chance to recharge BU is strong, but for several primaries the the Chance for Hidden proc is a huge game changer. Sticking the Hide proc in AS & trying to maximize its proc chance by limiting the recharge slotted in it will result in AS having a 90% chance to put you in Hide any time it hits a mob, which can then be followed up with whatever your next strongest single target attack is for the auto-crit (or to give one of the AOEs that can crit their Hidden chance, if you're more concerned about AOE). When you combine all of these factors & add it to the existing Stalker chassis, the result is a class with basically unparalleled ST DPS, solid survivability, and with some of the newer primaries a Stalker can also have strong-to-extreme AoE damage.
I'm sure there's some weaknesses in the class that I've papered over with the inf I've spent on the build, but I seriously don't think I've ever had a character as strong as my Sav/Bio Stalker is at 50. I hear good things about ElM as well, so hopefully you'll like your character too.
-
1
-
-
1 hour ago, Lazarillo said:
It's not simply that it breaks Hide, it's that it breaks Hide while not giving the benefit normally associated with breaking Hide (that is, a Critical hit), and it's not like Stalkers need the gap-closer since they can just jump in normally while Hidden.
The larger benefit of a properly slotted proc-Leap is that it has an 89% chance for the 4 damage procs to go off, which by themselves add up to around 200-300 total damage of diverse types. It has the same chance to proc the PVP -res IO, & of course -res is very powerful in the modern game. A secondary benefit that isn't specifically a benefit of Leap is that the BU refresh IO is a flat 4/5% chance on hit from any power, so hitting a lot if mobs with Leap has a decently high chance to reset it. So with my end-game build I can cast it apprx. every 15 seconds for 200-300 proc damage, a -20% resistance buff for 10s, and whatever damage you get out of the normal Leap (seems about 100-200 + a dot?).
As far as the "scales with distance" shenanigans, I use Hover for combat movement & find that most of the time if I start flying up & back I can get enough distance to charge in for least 2 fury stacks, if not 3. Generally I try to do this when I'm casting an ability that has an animation that allows the character to move while casting. Most of the time this is BU, so that I can BU>AS & spend the resulting stack on Rending Flurry or Hemorrhage depending on what's needed. Shadow Meld & Ablative Carapace are the other 2 that get used most often. I'll give a disclaimer that I've devoted a moderate amount of build resources to movement boosts so that Hover isn't insufferably slow, so YMMV on whether this will work for you or not.
At some point I'll have to link my build in one of these SM threads & see what other folks think of my slotting...
-
One of the other nifty things with putting an Performance Shifter proc in there is that it isn't affected by -recovery Debuffs (at least as far as I know). That isn't a huge deal, but combined with the fact that it's also a bit better numerically & it seems like a clearly better option.
If I've got a character who's very end hungry even after that, I'll stick a 3rd slot in & put a 50+5 generic IO in there, and with a Musculature radial I think those will put you at the ED cap. So yeah, I think the proc is the best option for that slot overall.
-
6 hours ago, Microcosm said:
This is usually what I do as well. I put the Acc/dam, quad and proc from the set to get the hide chance in there but modify the recharge as little as possible. The other slots are 2 procs and a straight damage io.
I ended up putting a 50+5 Mako's Dam/End in the spare slot, after I realized 2-slotting ToD wouldn't get me to the ED cap with a Musculature Radial. I think even with that I'm a bit under without an Alpha slot, but my character has end problems when he doesn't have a bunch of dead mobs to siphon for +recovery. SO, I figured that getting about an SO's worth of extra End Redux might be a better use of the slot than 5% extra damage.
Anyway, I finally got him to 50 today, and my initial impression of his current performance is best summed up by a quote from The Good Place, but after I thought about it I feel like that might break rules about partial avoidance of inappropriate language or something... So instead, I will follow the traditions of the internet & express myself via an animal gif:
I've never leveled a Stalker to 50, so I don't know what I'm comparing things against, but the sheer damage output of this character is insane when compared to my other characters. BU w/ Gaissian's proc + Proc'd out Savage Leap will kill almost any minions it hits before they can respond. Most fights I end up with a few bodies standing upright, because they died so fast that they didn't ragdoll properly. Following Leap with AS>Rending Flurry will kill most LTs that get hit by both Leap & Flurry, and I'm fairly certain I killed at least 1 boss that got hit with all 3. If I have a normal amount of luck w/ the ATO resetting BU, I can do this every 15s or so.
But AFTER that is what really amazes me. As I've mentioned, the charact is set up such that AS has a 90% proc chance on the hide IO, & given that AS & Hemorrhage cool down fast enough to be up almost directly after each other, it seems like I can largely chain AS>Hemo a majority of the time vs beefy targets, with occasional pauses for Placate, BU, and/or Moonbeam, as needed. After filling out his build, I solod an AV for the first time in a very long time (I'm generally of the opinion that it isn't worth the time & hassle to do so). I've got 2 procs in Moonbeam & it typically fulfills a "filler" roll in the attack chain, but I do have a question there. I could've sworn that before getting my build into its level 50 form Moonbeam's crit damage was basically double whatever the normal damage portion was, but now it seems to be doing a little more than half the damage of the main hit. Any ideas there?
May write some more about this tomorrow, but I need to sleep.
-
1 hour ago, Coyote said:
Agree completely:
1: always put the chance to Hide ATO in Assassin's Strike for the reasons stated above.
2: the set has good bonuses, and I always 6-slot it in AS.
I'm going to 3 slot it in 2 different powers, so that I get 10% S/L defense out of the set rather than 5%. Only way I can find to get anywhere close to the soft cap.
Edit: The other 3 slots have 2 Touch of Death (including the proc) & the Hecatomb proc. I'll have to check my math in a second, but with the slotting I had for it I think Hecatomb & the ATO had a 90% proc chance. Those 2 barely reached 90% so the ToD is probably under the cap, but should still be pretty good.
-
I've got my SM/Bio Stalker up into the high 30s at this point, and overall I'm very impressed with his capabilities. I do wish he had like, ANY amount of DDR, but such is the lot of /Bio characters (except for Sentinels, oddly enough, who end up with a solid 40%+ DDR, IIRC... they definitely got the best version of Bio IMO). I think it'd be really nice to have a unique IO that gave resistance to Defense Debuffs similar to the Winter's Gift unique, but it seems like such a thing would end up either too strong & unbalance a lot of the game, or too weak & be a waste of a slot.
In an attempt to get back on topic after having derailed my own thread, I'm frequently amazed at how strong Stalker ST damage is. Opening with BU(+Gaussian's)>Hemorrhage>Assassin's will kill a lot of bosses before the Hemo dot runs out. Only thing I'd consider an "issue" in the ST department is that I have a hard time keeping track of when the Hide proc triggers. Rending Flurry is also much better than I was expecting, both with 5 stacks and without. The range certainly feels tiny when it isn't empowered, though that may be some amount of cognitive bias. Leap is amazing, and I can't wait to reach 50 so that I can slot the 2 pieces of Armageddon that you suggested & then giggle maniacally when I've got a 600 damage 15' AOE with a 10-15s cooldown.
Questions I do have, if anyone cares to answer them:
What's considered good among the Stalker EPP/PPPs? Saw it mentioned somewhere that Moonbeam was a good pickup, especially if you stick some procs in it. This leads me to question a few things: is Moonbeam affected by Hidebin any way, and/or can it crit through normal means? Do any of you folks use it in their regular rotation & can tell how it performs? Shadow Meld or whatever its called also looks very attractive to me, both as a significant mitigation buffer & as a place to put a LOTG. Any other suggestions?
There was far more that i wanted to ask, but I'm suddenly extremely sleepy, so that'll have to wait for another time & assume I can remember to check in on this thread...
-
21 hours ago, Bopper said:
Sometimes I update the front page, so it's possible it wasn't there before. But it has been awhile since I last updated it.
Nah I'm sure it was there & I just didn't look for it, since I assumed the sheet linked from the PPM list was all I'd ever need. My brain's been pretty useless lately, but that's neither here nor there...
-
15 minutes ago, oedipus_tex said:
I just want to marvel that that was the response to a build showing how, with 2 IOs and 7 powers (could have done it in 6 honestly but I wanted to explore the S/L Resistance portion) you can come within 6 points of incarnate cap to all positions. Is there a Sentinel armor set that is also doing this? This is not a sarcastic question. I'm just wondering if "soft capped to everything before we even get to the other 8 powers in the set" is a standard for an Armor set I've not explored yet.
I've had bad luck with these forums today, just lost most of a post on this subject & it's time for dinner... maybe later. 😑
-
2 hours ago, oedipus_tex said:
I hope I don't sound like I'm talking down to you. Tone is hard to read on the forums. I assume all of us on this forum are posting in good faith because we love this game and want to see the best for it, even if our philosophies of what is "best" differ. So whatever differences in opinion we may have I hope the conversation remains friendly.
This is a serious question. Do you not agree that a power set where you can start your build with just 4 powers in Mids and be soft capped to all positions and elements trivializes other sets? If we were talking about just Ranged defense or something I could see maybe not flagging it as an outlier. But ALL positions and elements?
My mention above of a being able to cap to Ranged defense with 4 powers was rhetorical. There is no such set. The closest any set can come to Time + Power Boost is Traps. Traps can get very good defense. With work, it can even soft cap to most positions. But it requires at least some investment in the build, because after Force Field Generator the next highest Defense power I can access is going to be Weave, with just +5%. If Power Boosted Farsight is ok they should just let me summon 2 Force Field Generators because other than the 2% difference in Defense its the same thing.
I'll break this into 2 parts that I felt like I'd already covered:
1.) No, I don't think TM having extraneous defense trivializes other sets, because defense was trivialized long before it existed. The only set that could even make the claim is FF, and it's the whole reason FF needs some affection. Even then, the defense bonus to the caster is the thing that people are up in arms about, which only directly compares to Dispersion Bubble, & it isn't even the most useful part of Dispersion! If the argument right now is that FS+PB is so much more powerful than DB (which I don't really agree with anyway) that it somehow trivializes the whole FF set, that really seems to me like were really focusing on the wrong part of this equation. With 2 power picks that are available by level 10 (double Maneuvers), my SoA gives out a 21.4% bonus to all defenses, both to himself & anyone within 60 yds. This value is identical to the value of a FF defender with DB & Maneuvers, but DP only has a 25 ft radius, so it's actually worse. And all he has to do for that is remain conscious! He also brings a lot of other buffs & Debuffs to the party, along with significantly higher damage than is possible for an FF defender. Does that trivialize FF as a set? Or perhaps the value of FF has been severely harmed by the changes in game systems over time, & there's more to the value of FF than the numerical value of defense that DP gives to the caster?
2.) I think I brought something about this up earlier, but to have the effect you're describing you would specifically have to be a Defender, a class that can already reach the soft cap with relative ease because it gets the best buff #s in the game from the pool sets that every defense-focused build takes anyway. Yet this change would affect every AT that has this combo as an option. If I fully fill out my MM's build at level 50, PB+FS will give ~20.5% defense instead of the ~14.4% it gives when enhanced. That's nice, but I don't think I'd call it exceptional, and even without PB affecting FS she ends up at 48-ish% total S/L defense instead of 54%. Meanwhile, a MM trying to do a mission set to +4 needs basically every scrap of to-hit it can acquire.
It just feels to me like the boost in defense that everyone'a so focused on is largely inconsequential, can't be acquired until the character that can do it it could usually accomplish something that is very close to the same effect, & have that same effect be be less likely to be lost while exemplared.
P.S.: Dispersion bubble also isn't available till lvl 18.
-
1
-
 1
1
-
-
28 minutes ago, Redlynne said:
Was true when I wrote it then for that other thread ... and it's just as true now.
DON'T FEED THE CONCERN TROLL(S).
I'm not real sure who this is in response to. I would assume this is talking about me, based on my earlier post about concerns over a lot of nerfs getting rolled out... but the definition of concern troll you link doesn't really sound like what I'm saying. I'm not attempting to show false support for the topic while "raising concerns". I legitimately disagree with the changes. I don't think this change would cause any substantial changes to the survivability of TM characters, which is what everyone is up in arms about. Meanwhile, the To-hit portion that I actually care about retaining isn't getting any real discussion despite being much harder to come by overall.
I suppose I've gotten into the weeds again, since none of this is terribly important to the actual topic of discussion, and at this point I think I've explained my stance on that as well as I can...
-
5 minutes ago, sacredlunatic said:
It seems pretty clear to me that there are a lot of people who either do not understand the ways in which powers are balanced against each other, or don’t care. In many cases they have explicitly stated that they don’t care, with comments such as if the person is solo then it doesn’t make any difference.
Well, fortunately it seems thus far that the homecoming devs do actually care about game balance and understand it fairly well. Therefore I predict that eventually both Fade and Farsight Will be marked to ignore power boost.
It's obvious you're talking about me, and you're right I don't care very much about balancing the sets against each other, unless one set is such an outlier that it trivializes every other set of the same type.
As such, if the HC devs cared that much about game balance then I'd like to think that TW wouldn't be left as it is; insurmountably better than any other melee set in the game. It has a parry-style power for some free defense, copious CC via multiple Knockdowns, it's own -res power in addition to multiple -def powers allowing it to slot the Achilles Heel -res. All of this, while doing so much DPS that, despite it being a smashing damage set, its performance is still several standard deviations better than any other melee set.
Yet people are in this thread freaking out about 5-12% extra defense from a combination of powers that won't be available until 41+...
-
1
-
1
-
-
14 minutes ago, Infinitum said:
On live double stack eliminated the crash - it was a bug.
Homecoming fixed it to where it crashed for every instance.
There was a proposed change to where it would only crash if you double stacked it but that was pulled.
As of now it crashes after every expiration.
I thought this change was already done by the time I quit playing. I certainly remember having a discussion with a SG member that there was some change that made double stacking it unpopular, but I thought it was still considered good at 1 stack. I thought the change on SCORE was something different, though perhaps I'll just have to go read the threads on it.
-
15 minutes ago, Leogunner said:
I just remembered a nerf. Rage having consequences for double stacking it? I think you don't get a crash if you don't stack it. You can still stack it but you get a crash...I dunno, I don't play Super Strength
As I understand it the issue is that they increased the crash even with a single stack. I'm relatively hazy on it myself, but from what I understood of the topic, Rage has always had some component of the crash that was in the original code but didn't trigger because it was "bugged", and that said bug remained in this state for the whole game. Said "bug" was "fixed" at some time during the SCORE years & the end result was that it made Rage an unpopular power pick in a lot of builds.
-
9 minutes ago, Leogunner said:
If +def was the least useful support effect, why does everyone want it in their build?
I think you mean the most abundant. Which actually goes handily with the OP's argument, don't you think?
It is the least useful support effect for a support SET to provide, because of a combination of factors: it is one of the most generally abundant, one of the most efficient effects to boost within a character's own build, on top of all of that it has a significantly lower functional cap than most other support effects. I said it earlier & I'll say it again, I care comparatively little about the defense portion of this discussion. Which leads to this next bit:
19 minutes ago, Leogunner said:If that buff is so abundant for such a statement, what are you arguing against me about?
I believe that I've stated several times that what I'm ambivalent to the defensive portion of this discussion. Honestly I don't even care overmuch if this change did happen, and the tiny bit of care I do have for it is about the To-hit being boosted. It's right there in the section you quoted!
Ive probably gone way out in the weeds, but what I'm ultimately trying to get across is that I don't want to start a trend of nerfing things considered overpowered. My protests in this thread are much more about the fact that this just doesn't seem like something that really deserves a nerf when there's sets like TW that are 30-50% more effective than any similar set, or buffs like Fulcrum Shift that will be more impactful for less build investment. It's small potatoes in the grand scheme of things, and as a general principle I'd 100% rather boost underperforming sets than start swinging a nerf bat at anything currently in the game... except for TW, that one is such a huge outlier that SOMETHING needs to happen to it.
-
1
-
-
9 minutes ago, Leogunner said:
And try not to assume someone expresses things poorly without actually discussing it. You obviously misconstrued or escalated a statement. Maybe you just poorly read the post?
I mean, I obviously wasn't the only one who thought the tone of your post was dismissive and/or confrontational. So, maybe not? If your intent with these statements was something other than that what's been discussed in the responses, then you seem to have caused at least 2 people to make repeated posts disagreeing with a point that you apparently weren't trying to make. Sounds "Poorly Phrased" to me.
8 minutes ago, Leogunner said:When I play the game, I just play. What the numbers are or the effectiveness of the team isn't as important as what is actually in front of you. It's a computer screen. A game
Great! This is exactly how everyone should act. That's the whole point of my half of the argument. Well, that & "+defense is the least useful support effect in the modern game". The +To-hit is a much bigger deal for me.
19 minutes ago, Leogunner said:Especially considering how often people will throw around the statement that "things are balanced around SOs, not IOs" which is why I said you can't go north and south at the same time. If people aren't min/maxing all the time, then how are we using the argument that everyone runs around with capped defense to argue against the OP?
I don't know who "Everyone" is in this statement, because I certainly never say that or have any opinions to this effect, and nobody in this thread brought up anything similar before this post. Quite the opposite, everyone that has posted in this thread on the side you're arguing against has said the reason it doesn't deserve a nerf is because people ARE min/maxing all the time. Labeling the other side of the argument as "Everyone" & bringing in talking points that haven't actually been brought up in the current discussion sounds dismissive to the other side of the argument. Much like following "you people" with an accusatory statement...
To the actual point, none of the content from before IOs existed is balanced around IOs. The community seems to approve of this, because that's the content that most gets done most frequently. I don't care very much what it's balanced around; as long as I can join any given group of randos & clear content, I find this game enjoyable. I'd rather not have to screen applicants & construct the perfect group to do content. Having individual characters that are significantly more powerful than is needed is the whole reason that this is possible, and it doesn't seem to have much of a detrimental effect on players seeking groups. If folks still like to group & having individual characters being OP increases the ease of finding enjoyable groups, I don't see any reason to complain about OP characters. In fact, I'd rather like to keep them that way.
-
2
-
-
49 minutes ago, Leogunner said:
Then read the sentence after the part you quoted. It goes together to make that point.
Do you mean "And if we don't do it every time, do we just point to those exploiting the system and say "everybody's doing it!"?" Cause I don't see how that changes the intent in any way.
My parsing of that statement takes it as saying "We can't have min-maxers because then EVERYONE has to min-max!" This isn't true, as this game got along just fine before IOs, and I'd imagine that the average player could join most Homecoming groups with a pure SO build without anyone else noticing and/or caring. Now, I can understand that people can dislike the current systems because in the end almost no one wants to do this. Having crazy OP characters is a lot of fun for most of the player base & the ones who aren't looking for that feel obligated to do it so that they don't drag down the team. I can empathize with this causing a bit of frustration for those who don't want it, though obviously I don't agree with it. My actual issue with that line & the post in general is that calling this type of play style "exploiting the system" sounds dismissive or demeaning towards those who enjoy said system (which seems to be a majority of the playerbase). IOs were created by the developers, seem to have been implemented for this exact purpose, and the resulting min-max shenanigans are one of the biggest selling points in the game to a lot of players.
To me, behaving as if this has "ruined the game", when it's one of the foundational pieces of CoH at this point & has been for years, reeks of old-school MMO Elitism; "If it isn't hard it isn't fun!" & "If you don't enjoy the game the same way I do you're doing it wrong!" are staples of that mindset, and I can't parse anything from that paragraph that seems to be expressing anything other than those ideas.
Perhaps thay wasn't the intent, but if so it was expressed poorly IMO.
-
2
-
2
-
-
51 minutes ago, Leogunner said:
As for ruining the fun, you people have already done that. I mean, okay, we have the capacity to softcap practically every character and give them ridiculous recharge and good to broken damage but should we do it?
Um, yes? This whole paradigm is the exact reason that CoH is my favorite MMO of all time. I liked it well enough before IOs, but it turned into my gaming equivalent of Cocaine after the system's introduction. I get that different folks enjoy different parts of any given game, but this statement seems kinda snooty in a "Stop having fun guys!" manner...
-
3
-
1
-

Water/Bio Questions
in Sentinel
Posted
I just happened to check the forums today, got the ping so we lucked into a relatively quick response. I'll preface this post with the following: This post will probably be even more rambling than normal, cause I just got back from a long trip that involved me wrangling babies for the entire duration & had physical therapy earlier in the day. So I'm pretty tired, & then realized half way through typing this up that Oldskool was responding to Papa's post. Hopefully it remains coherent enough to be good advice... 😂
Part 1) I'll disagree with Oldskool with my stance that I'd never skip Steam Spray. Steam spray is pretty powerful for an AOE ability with the usability stats it has, by which I mean it has pretty high Damage per Activation relative to it's cone size, target cap, & recharge time. As such it becomes a core part of my opening strike, but folks are playing from melee or such I guess I could see skipping it maybe? With a bit of planning you can get some +range bonuses from a few places, which always pairs well with cones (Slotting Posi's, using both ATO sets, & Intuition radial will get it ~68 ft range). IMO it's one of WBs best overall powers, if not outright THE best power when compared as a complete package.
Part 2) This is probably irrelevant since Oldskool just mentioned it in passing, but AFAIK, Mids is calculating Hover speed very wrong (well, flight speed in general, but 99% of the time Hover's the only power that this would matter for). I had a talk with Pine (the person who'd updated the build planner some in the SCORE era) & he said that at some point in the last 6-8 months he'd partnered up with a couple of people to work on the builder. To try & keep this concise, they did some updates that helped with some things but resulted in some new errors. Unfortunately, after a bit of time the other people he was working with basically just disappeared & dropped contact & Pine couldn't resume development because he didn't know how to use GITHub (I don't either, so I couldn't help him.😑) I don't THINK it's been updated since then, & if it has it's not being picked up with the auto-update feature. I haven't been playing much lately & thus haven't really looked into any of this in the last month or so, but given that the flight speed cap is ~58 MPH & character's in-game flight speed is listed as ~53 MPH, I'd imagine that's still an issue.
Part 3) I'm not sure where I'd put that extra slot to be honest. As I mentioned, I made this character relatively early in my HC time & I feel like I've if I were going to play this character heavily again I'd probably start over on slotting & try to fine-tune it more. I don't know that it would be super different than what it is now, but I can't say for sure. The first suggestion I'd have is a pretty generic one; pull that slot out of CJ/Hover & put it in Hurdle w/ a high-end Jump IO. Slotting Hurdle is surprisingly good return on investment for jump speed, to an abnormal level IMO. I'm not sure I'd put there personally, simply because I have a distaste for using jumping as primary movement in a lot of the more common mission maps (I seem to easily get stuck in small corners or on weird objects) & it'd probably be even worse at higher jumping speeds. A more complicated suggestion that I'd still say is relatively simple is to take that slot & put it in Inexhaustible, then take the 1 spare slot out of health & put it on Inexhaustible as well. What you'd then do w/ those slots is to figure out what 2-p heal set has a unique you'd like to put there & stick that in 1 slot & the set's Heal-only IO in the other. This would boost both your max HP & your regen rate a relatively minor amount because the enhanceable part of Inexhaustible is pretty small, but because those 2 things are basically in a feedback loop with each other you'd end up with a bit more HP/s than the actual #s would appear to give on paper. Panacea would be the "best" fit from a pure mechanical standpoint, since PVP IO set bonuses work at any level, so you could get a 50+5 for the heal IO & the set bonus work all the way down to 10... but the bonus for +5ing that IO isn't very big, & when i was playing this character endurance was pretty much a complete non-factor, so IDK if the +recovery is really worth caring about. Preventive Medicine has a pretty nice 2p bonus & the unique is solid for most characters, but you'll have a lot of absorb already from Bio's other stuff. From my own brief fiddling, what I think I'd suggest for this route is using a Catalyzed Numi Heal along with the Regen/Recovery unique for that 2p Regen bonus. With the rest of the build & full accolades, you'll end up with 1840 HP & 38.09 HP/s instead of 1814 & 33.54 HP/s. 4.5 HP/s doesn't sound that extreme, it's actually about a 13% increase in HP/s (Note that this isn't the same as the "Regeneration bonus", which actually gets a 57% bonus from this slotting) for 2 slots worth of investment, & as always layered mitigation is great in COH however you can get it. Ultimately this isn't likely to make or break a character, but in long fights it can have a significant impact. As a final comment here, there's a lot of uniques and/or procs that could be fit into many of these powers if they strike your fancy, & as I'll discuss later you could potentially use that slot + a few re-assign a few others to put in Whirlpool. I probably wasted more time on this idea than my ideas on the subject were worth..
Part 4.) I don't really think it's worth sticking the stealth IO in a different power, at least at this point in the game. As the character is constructed right now (in a moderately stripped down state because I looted a lot of his IOs for other alts) he hits the run speed cap with just Ninja Run turned on while running Offensive Adaptation+Athletic Regulation. IDK how it all works on the back end, and this may be a bug, but somehow Athletic Regulation + Offensive Adaptation gives a disproportionately large increase in the base magnitude of movement powers. For a numerical breakdown, Ninja Run w/o Offensive Adaptation says it gives a 20.05 MPH boost to run speed. When I toggle Offensive Adaptation on it spikes up to 65.65 MPH. I don't THINK it's supposed to work that way, but I'd never thought to ask if it was a bug until I saw the magnitude of that difference just now. Aaaanyway, since Ninja Run will set him to the maximum run speed & also has far better vertical mobility than SS, I use it as my "travel power". The only reason I took/use SS at all is that for the cost of a single power pick & a cheap IO I have almost perfect stealth in PVE (No normal mob will be able to see you, but there's still Snipers & multiple enemies that just ignore stealth).
Part 5.) Overwhelming Force slotted in Steam Spray wasn't terribly well thought out in retrospect, & I can't remember exactly why I have it there. Steam Spray has no innate KB, so I didn't put it there for anything relating to that part of the IO. I THINK I slotted it there because I was trying to figure out how to get the damage to the ED cap & had one lying around from a point in time where I thought I'd slot it in Water Burst to keep it from scattering Clocks all over if I ran Synapse with him. Ultimately it didn't work particularly well for that, so I redid my slotting for WB & ended up w/ the OF proc as a spare IO, which I then decided to put it into Steam Spray for the aforementioned reasons. I will say that I ended up liking it quite a bit, as it does seem to proc a pretty significant amount (I read either in-game or on the forums from someone that it's close to a 100% proc chance if it's put in a non-KB power, & it procs frequently enough that feels like it might well be, but that doesn't match up w/ any other proc in the modern game & I haven't empirically tested it.) Even with that in mind, there's probably better procs you could put there from a damaging perspective.
Part 6.) Whirlpool ultimately just fell out of my build due to what would best be described as slot squeeze. WP might have been OK w/ no extra slots, but when I made this build I didn't think WP with only 1-2 slots would be a better option than any of the powers i took after 32. It looks like a good power on paper, & it probably is, but I didn't feel like it worked very well in my build at the time. After launching my Alpha (Tidal>Geyser>Steam Spray) just about any minions were dead & LTs were either dead as well or close to it. WP is a 2s cast w/ for a long-term DoT & ultimately seems more useful for the CC than the damage in a normal mob fight, especially if everything was dead after my opener. Had plenty of attack powers at that point & WP seemed out of place, so I dropped it. If I made the guy over again I might try to fit it in somewhere, IDK. If you wanted to work it into the current build IDK what level I'd actually take it, BUT if you swipe a few of the less important slots I've discussed (the CJ, the OF out of Spray, and or the 2nd slot in Health spring to mind) you could use them for WP at whatever level you want & just replace one of the powers I took at 35+ since they're all 1-slot wonders to round out the build at the end.
Anyway, hope this helps. Gonna get ready for bed, if I remember I'll check back in tomorrow to see if you've digested this wall of text. 😉