

Owenknowone
-
Posts
72 -
Joined
-
Last visited
Content Type
Profiles
Forums
Events
Store
Articles
Patch Notes
Posts posted by Owenknowone
-
-
Question then. Would Martial Arts with storm kick be the best min/max secondary or would Staff fighting be the better option?
-
I understand the need or in this case with rad to step away from def. It is my understanding a little defense never hurts.
Also, can anyone expand on the other pools idea? Are we talking hasten or fighting?
-
Thoughts? I have two tankers going and trying to sort things out which direction I want to move forward with. Anyone have experience with these combos? Pro/Cons?
-
Reading the forums, sets like kinetic melee have the ability to slot interesting sets. What primary and secondary sets allow for some interesting combos?
-
Same here?!?
-
4 hours ago, MoonSheep said:
the data is really hard to align with perception - i want to make an ice/ice *something* soon and my brain won’t accept that the tank would also be a suitable option for good damage
tanks are such a good AT thesedays, i agree with you that people are unaware however. i see a lot of outdated trends promoted
I concur with this thinking. Having played CoH at its inception, coming back it takes a bit to get out of the mindset the days of being a meat shield, running around Perez Park and taunting half the map are gone. We get to bring the pain with the brawn!
-
 1
1
-
-
Sooooo... In reading these comments It feels as if one doesn't play a tanker as the agro magnet it's class was originally conceived but more as another damage dealer who has better survivability???
If that is the thinking does a highly tuned scrapper out perform a tank with a brute something in the middle?
-
Please feel free to review my build and any feedback is appreciated. Thank you.
This Hero build was built using Mids Reborn 3.4.6
https://github.com/LoadedCamel/MidsRebornClick this DataLink to open the build!
Level 50 Science Tanker
Primary Power Set: Ice Armor
Secondary Power Set: Radiation Melee
Power Pool: Leaping
Power Pool: Leadership
Power Pool: Fighting
Power Pool: Speed
Ancillary Pool: Energy MasteryHero Profile:
Level 1: Frozen Armor- (A) Reactive Defenses - Scaling Resist Damage
- (3) Reactive Defenses - Defense
- (3) Reactive Defenses - Defense/Endurance
- (48) Reactive Defenses - Defense/RechargeTime
Level 1: Contaminated Strike
- (A) Hecatomb - Damage
- (17) Hecatomb - Damage/Recharge
- (45) Hecatomb - Damage/Recharge/Accuracy
- (45) Hecatomb - Recharge/Accuracy
- (45) Hecatomb - Damage/Endurance
- (46) Hecatomb - Chance of Damage(Negative)
Level 2: Hoarfrost
- (A) Panacea - +Hit Points/Endurance
- (5) Panacea - Heal
- (5) Panacea - Heal/Endurance/Recharge
- (7) Panacea - Heal/Recharge
- (7) Panacea - Endurance/Recharge
- (9) Panacea - Heal/Endurance
Level 4: Chilling Embrace
- (A) Pacing of the Turtle - Accuracy/Slow
- (9) Pacing of the Turtle - Damage/Slow
- (11) Pacing of the Turtle - Chance of -Recharge
Level 6: Wet Ice
- (A) Recharge Reduction IO
Level 8: Super Jump
- (A) Unbounded Leap - +Stealth
- (13) Unbounded Leap - Jumping
- (15) Unbounded Leap - Endurance
Level 10: Permafrost
- (A) Unbreakable Guard - +Max HP
- (15) Gladiator's Armor - TP Protection +3% Def (All)
- (17) Impervium Armor - Psionic Resistance
- (19) Impervious Skin - Status Resistance/Regeneration
Level 12: Icicles
- (A) Superior Might of the Tanker - Accuracy/Damage
- (19) Superior Might of the Tanker - Damage/Recharge
- (21) Superior Might of the Tanker - Accuracy/Damage/Recharge
- (21) Superior Might of the Tanker - Damage/Endurance/Recharge
- (23) Superior Might of the Tanker - Accuracy/Damage/Endurance/Recharge
- (23) Superior Might of the Tanker - Recharge/Chance for +Res(All)
Level 14: Taunt
- (A) Mocking Beratement - Threat/Placate
Level 16: Radiation Siphon
- (A) Superior Gauntleted Fist - RechargeTime/+Absorb
- (25) Superior Gauntleted Fist - Accuracy/Damage/Endurance/RechargeTime
- (25) Superior Gauntleted Fist - Damage/Endurance/RechargeTime
- (27) Superior Gauntleted Fist - Accuracy/Damage/RechargeTime
- (27) Superior Gauntleted Fist - Damage/RechargeTime
- (34) Superior Gauntleted Fist - Accuracy/Damage
Level 18: Glacial Armor
- (A) Shield Wall - Defense
- (36) Shield Wall - Defense/Endurance
- (36) Shield Wall - Defense/Endurance/Recharge
- (37) Shield Wall - +Res (Teleportation), +5% Res (All)
Level 20: Maneuvers
- (A) Luck of the Gambler - Defense
- (31) Luck of the Gambler - Defense/Endurance/Recharge
- (36) Luck of the Gambler - Defense/Increased Global Recharge Speed
Level 22: Boxing
- (A) Empty
Level 24: Tough
- (A) Aegis - Resistance/Endurance
- (39) Aegis - Resistance/Recharge
- (39) Aegis - Endurance/Recharge
- (40) Aegis - Resistance/Endurance/Recharge
- (48) Aegis - Resistance
- (49) Aegis - Psionic/Status Resistance
Level 26: Energy Absorption
- (A) Power Transfer - EndMod
- (29) Luck of the Gambler - Defense/Recharge
- (29) Luck of the Gambler - Defense
- (31) Luck of the Gambler - Defense/Increased Global Recharge Speed
- (31) Power Transfer - Chance to Heal Self
Level 28: Irradiated Ground
- (A) Superior Avalanche - Accuracy/Damage
- (33) Superior Avalanche - Damage/Endurance
- (33) Superior Avalanche - Accuracy/Damage/Endurance
- (33) Superior Avalanche - Accuracy/Damage/Recharge
- (34) Superior Avalanche - Accuracy/Damage/Endurance/Recharge
- (34) Superior Avalanche - Recharge/Chance for Knockdown
Level 30: Weave
- (A) Luck of the Gambler - Defense/Increased Global Recharge Speed
- (40) Luck of the Gambler - Defense/Endurance
- (40) Luck of the Gambler - Defense
Level 32: Hibernate
- (A) Recharge Reduction IO
Level 35: Devastating Blow
- (A) Superior Blistering Cold - Accuracy/Damage
- (37) Superior Blistering Cold - Damage/Endurance
- (37) Superior Blistering Cold - Accuracy/Damage/Endurance
- (39) Superior Blistering Cold - Accuracy/Damage/Recharge
- (42) Superior Blistering Cold - Damage/Endurance/Accuracy/RechargeTime
- (43) Superior Blistering Cold - Recharge/Chance for Hold
Level 38: Atom Smasher
- (A) Armageddon - Chance for Fire Damage
- (42) Armageddon - Damage/Endurance
- (42) Armageddon - Recharge/Accuracy
- (43) Armageddon - Damage/Recharge/Accuracy
- (43) Armageddon - Damage/Recharge
- (47) Armageddon - Damage
Level 41: Hasten
- (A) Recharge Reduction IO
- (47) Recharge Reduction IO
Level 44: Focused Accuracy
- (A) Endurance Reduction IO
Level 47: Physical Perfection
- (A) Power Transfer - Chance to Heal Self
- (48) Power Transfer - EndMod
Level 49: Combat Jumping
- (A) Luck of the Gambler - Defense
- (49) Luck of the Gambler - Defense/Endurance
- (50) Luck of the Gambler - Defense/Endurance/Recharge
Level 1: Gauntlet
Level 1: Brawl
-
Always enjoy the great discussions.
-
I agree anything is viable and I don't have to go crazy min/max but I do want to make fun and awesome characters.
Thank you for the information! Now to decide before I go too deep down the rabbit hole.
-
Again more information is great but that does leave me with a few more questions.
Is a SS/Rad Brute a better option (I do understand the difference of the archetypes) base off of the powersets?
Does Energy Melee work just as well as SS on a tank?
Would a INV/Dark tanker be more durable?
-
Awesome stuff. My thought process was to ignore damage and focus on all primaries and resists. I felt def was a bit of waste or not achievable to the exten it was worth it. Perhaps reevaluate this? Super team guy.
It seems going for a more balanced approach. I do agree mitigate the damage with knock downs. Perhaps I'm old school (ok I am) but other then a solo build, I don't mind not being a big damge dealer, yet I do see the benefit at times.
I will head back to the drawing board and see what I come up with.
Again thanks for all the help!
-
A little backstory on this build. My main goal was to go all in on resists. But maybe that's overkill. I understand what your saying with def. Rad does not excel at def and focusing on one over the other was my goal. This build was more my "tanky" build. So some of the decisions were based on survivability and not damage. Again perhaps having three build slots is more of a distraction then potentials?
Very much appreciated with your input. As long as Ive been playing CoH, I truly do enjoy the community. Switching gears, would dark melee be good fit as well or does SS supersede it?
-
Ok Im picking up what your laying down. What type of synergies would you suggest or should I be looking for?
-
Looking for feedback on my build. Thank you.
This Hero build was built using Mids Reborn 3.4.6
https://github.com/LoadedCamel/MidsRebornClick this DataLink to open the build!
Level 50 Magic Tanker
Primary Power Set: Radiation Armor
Secondary Power Set: Super Strength
Power Pool: Flight
Power Pool: Fighting
Ancillary Pool: Energy MasteryHero Profile:
Level 1: Alpha Barrier- (A) Titanium Coating - Resistance
- (3) Titanium Coating - Resistance/Endurance
- (5) Titanium Coating - Resistance/Endurance/Recharge
- (7) Impervium Armor - Psionic Resistance
Level 1: Jab
- (A) Perfect Zinger - Chance for Psi Damage
- (5) Perfect Zinger - Threat/Placate
- (7) Perfect Zinger - Threat/Placate/Recharge
Level 2: Gamma Boost
- (A) Numina's Convalesence - +Regeneration/+Recovery
- (11) Numina's Convalesence - Heal
- (11) Numina's Convalesence - Heal/Endurance
- (13) Numina's Convalesence - Heal/Recharge
- (13) Power Transfer - Chance to Heal Self
- (15) Power Transfer - Damage/Accuracy/Recharge/Endurance
Level 4: Fly
- (A) Freebird - Endurance
- (15) Freebird - FlySpeed
- (17) Freebird - +Stealth
Level 6: Proton Armor
- (A) Impervium Armor - Psionic Resistance
- (9) Titanium Coating - Resistance
- (19) Titanium Coating - Resistance/Endurance
- (19) Titanium Coating - Resistance/Endurance/Recharge
Level 8: Punch
- (A) Hecatomb - Damage/Recharge/Accuracy
- (21) Hecatomb - Recharge/Accuracy
- (21) Hecatomb - Damage/Endurance
Level 10: Fallout Shelter
- (A) Titanium Coating - Resistance
- (23) Titanium Coating - Resistance/Endurance
- (25) Titanium Coating - Resistance/Endurance/Recharge
- (25) Impervium Armor - Psionic Resistance
Level 12: Radiation Therapy
- (A) Touch of the Nictus - Healing/Absorb
- (27) Touch of the Nictus - Healing/Absorb/Recharge
- (27) Touch of the Nictus - Accuracy/Healing/Absorb
- (29) Touch of the Nictus - Accuracy/Endurance/Healing/Absorb
- (29) Touch of the Nictus - Accuracy/Endurance/Recharge
- (31) Touch of the Nictus - Chance for Negative Energy Damage
Level 14: Beta Decay
- (A) Perfect Zinger - Chance for Psi Damage
- (31) Perfect Zinger - Threat/Placate
- (31) Perfect Zinger - Threat/Placate/Recharge
Level 16: Hover
- (A) Luck of the Gambler - Defense/Increased Global Recharge Speed
Level 18: Particle Shielding
- (A) Preventive Medicine - Heal
- (33) Preventive Medicine - Heal/Endurance
- (33) Preventive Medicine - Endurance/RechargeTime
- (34) Preventive Medicine - Heal/RechargeTime
- (34) Preventive Medicine - Heal/RechargeTime/Endurance
- (34) Preventive Medicine - Chance for +Absorb
Level 20: Hand Clap
- (A) Absolute Amazement - Stun
- (36) Absolute Amazement - Stun/Recharge
- (36) Absolute Amazement - Stun/Recharge/Accuracy
- (36) Absolute Amazement - Recharge/Accuracy
- (37) Absolute Amazement - Stun/Endurance
- (37) Absolute Amazement - Chance for ToHit Debuff
Level 22: Boxing
- (A) Recharge Reduction IO
Level 24: Tough
- (A) Impervium Armor - Psionic Resistance
- (37) Titanium Coating - Resistance
- (39) Titanium Coating - Resistance/Endurance
- (39) Titanium Coating - Resistance/Endurance/Recharge
Level 26: Ground Zero
- (A) Superior Might of the Tanker - Accuracy/Damage
- (39) Superior Might of the Tanker - Damage/Recharge
- (40) Superior Might of the Tanker - Accuracy/Damage/Recharge
- (40) Superior Might of the Tanker - Damage/Endurance/Recharge
- (40) Superior Might of the Tanker - Accuracy/Damage/Endurance/Recharge
- (42) Superior Might of the Tanker - Recharge/Chance for +Res(All)
Level 28: Weave
- (A) Shield Wall - +Res (Teleportation), +5% Res (All)
- (42) Shield Wall - Defense/Endurance
- (42) Shield Wall - Defense
- (43) Shield Wall - Endurance/Recharge
Level 30: Taunt
- (A) Perfect Zinger - Threat/Placate
- (45) Perfect Zinger - Threat/Placate/Recharge/Range
- (45) Perfect Zinger - Accuracy/Recharge
Level 32: Meltdown
- (A) Impervium Armor - Psionic Resistance
- (48) Aegis - Psionic/Status Resistance
- (48) Titanium Coating - Resistance/Endurance
- (49) Titanium Coating - Resistance
Level 35: Evasive Maneuvers
- (A) Reactive Defenses - Defense
- (46) Reactive Defenses - Defense/Endurance
- (47) Reactive Defenses - Defense/Endurance/RechargeTime
- (50) Reactive Defenses - Scaling Resist Damage
Level 38: Foot Stomp
- (A) Superior Gauntleted Fist - Accuracy/Damage
- (43) Superior Gauntleted Fist - Damage/RechargeTime
- (43) Superior Gauntleted Fist - Accuracy/Damage/RechargeTime
- (45) Superior Gauntleted Fist - Damage/Endurance/RechargeTime
- (46) Superior Gauntleted Fist - Accuracy/Damage/Endurance/RechargeTime
- (46) Superior Gauntleted Fist - RechargeTime/+Absorb
Level 41: Focused Accuracy
- (A) Endurance Reduction IO
Level 44: Physical Perfection
- (A) Miracle - Heal/Endurance
- (47) Miracle - Heal
- (48) Miracle - +Recovery
Level 47: Laser Beam Eyes
- (A) Superior Winter's Bite - Damage/Endurance/Accuracy/RechargeTime
- (49) Superior Winter's Bite - Accuracy/Damage/Endurance
Level 49: Group Fly
- (A) Winter's Gift - Run Speed, Jump, Flight Speed, Range
- (50) Winter's Gift - Run Speed, Jump, Flight Speed, Range/Endurance
Level 1: Gauntlet
Level 1: Brawl -
Guess I should ask, what time?.....nvm got it!
-
I thank you very much!
-
Been a coh'er since issue 1 and honestly only did one tanker tuseday.. Did the recent one and was awesome. Where or what is the rotation for these?
-
52 minutes ago, TheZag said:
Its that first time you hear the character select screen music and atlas park music after so many years. Keep coming back for more after that.
Definitely! Everytime I think i love just making new toons just to run around at low levels to feel fresh! Miss Galaxy City.
-
2 hours ago, PLVRIZR said:
Honored!
You're going to have to change the name, in-game, though 😆
LoL yes, his name is Shrug. I failed to change it in mods.
-
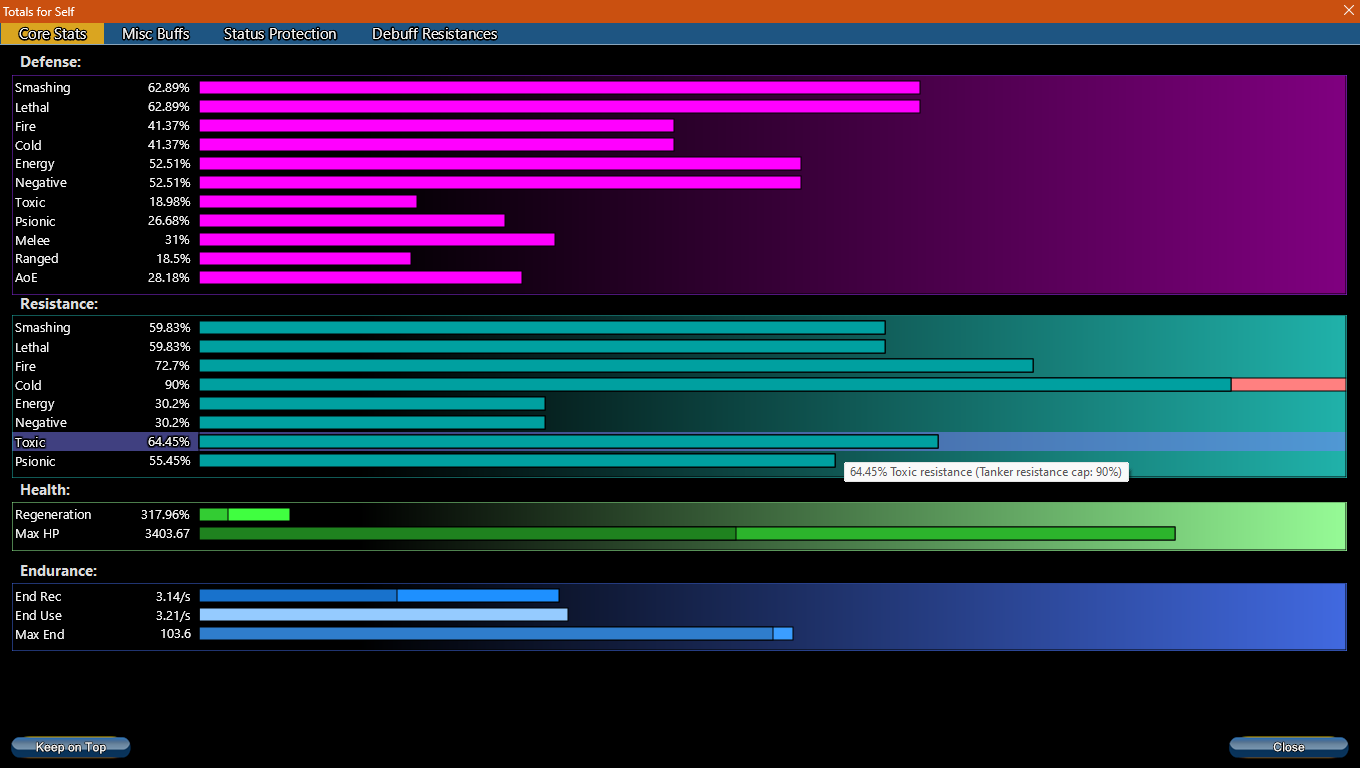
Ok, here is my build. I have played around with many options. It seems grabbing def is the most difficult. I believe everything is turned off that would skew the numbers.
This Hero build was built using Mids Reborn 3.4.6
https://github.com/LoadedCamel/MidsRebornClick this DataLink to open the build!
AVALNCH_4.0: Level 50 Magic Tanker
Primary Power Set: Ice Armor
Secondary Power Set: Titan Weapons
Power Pool: Sorcery
Power Pool: Fighting
Power Pool: Concealment
Ancillary Pool: Energy MasteryHero Profile:
Level 1: Frozen Armor- (A) Shield Wall - +Res (Teleportation), +5% Res (All)
- (3) Shield Wall - Defense
- (3) Shield Wall - Defense/Endurance
Level 1: Defensive Sweep
- (A) Superior Might of the Tanker - Accuracy/Damage
- (5) Superior Might of the Tanker - Damage/Recharge
- (5) Superior Might of the Tanker - Accuracy/Damage/Recharge
- (7) Superior Might of the Tanker - Damage/Endurance/Recharge
- (7) Superior Might of the Tanker - Accuracy/Damage/Endurance/Recharge
- (9) Superior Might of the Tanker - Recharge/Chance for +Res(All)
Level 2: Chilling Embrace
- (A) Pacing of the Turtle - Accuracy/Slow
- (9) Pacing of the Turtle - Damage/Slow
- (11) Pacing of the Turtle - Accuracy/Endurance
- (11) Pacing of the Turtle - Range/Slow
- (13) Pacing of the Turtle - Endurance/Recharge/Slow
- (13) Pacing of the Turtle - Chance of -Recharge
Level 4: Titan Sweep
- (A) Superior Gauntleted Fist - Accuracy/Damage
- (15) Superior Gauntleted Fist - Damage/RechargeTime
- (15) Superior Gauntleted Fist - Accuracy/Damage/RechargeTime
- (17) Superior Gauntleted Fist - Damage/Endurance/RechargeTime
- (17) Superior Gauntleted Fist - Accuracy/Damage/Endurance/RechargeTime
- (19) Superior Gauntleted Fist - RechargeTime/+Absorb
Level 6: Hoarfrost
- (A) Preventive Medicine - Heal
- (19) Preventive Medicine - Heal/Endurance
- (21) Preventive Medicine - Endurance/RechargeTime
- (21) Preventive Medicine - Heal/RechargeTime
- (23) Impervium Armor - Psionic Resistance
- (46) Preventive Medicine - Heal/RechargeTime/Endurance
Level 8: Mystic Flight
- (A) Winter's Gift - Run Speed, Jump, Flight Speed, Range
- (23) Winter's Gift - Run Speed, Jump, Flight Speed, Range/Endurance
- (25) Winter's Gift - Slow Resistance (20%)
Level 10: Wet Ice
- (A) Endurance Reduction IO
Level 12: Permafrost
- (A) Impervium Armor - Psionic Resistance
Level 14: Icicles
- (A) Superior Avalanche - Accuracy/Damage
- (25) Superior Avalanche - Damage/Endurance
- (27) Superior Avalanche - Accuracy/Damage/Endurance
- (27) Superior Avalanche - Accuracy/Damage/Recharge
- (29) Superior Avalanche - Accuracy/Damage/Endurance/Recharge
- (29) Superior Avalanche - Recharge/Chance for Knockdown
Level 16: Taunt
- (A) Perfect Zinger - Threat/Placate
Level 18: Glacial Armor
- (A) Red Fortune - Defense/Endurance
- (31) Red Fortune - Defense
- (31) Red Fortune - Defense/Endurance/Recharge
Level 20: Kick
- (A) Force Feedback - Chance for +Recharge
Level 22: Tough
- (A) Gladiator's Armor - TP Protection +3% Def (All)
- (31) Gladiator's Armor - End/Resist
- (33) Gladiator's Armor - Resistance/Rech/End
- (48) Gladiator's Armor - Resistance
Level 24: Weave
- (A) Red Fortune - Defense/Endurance
- (33) Red Fortune - Defense/Recharge
- (33) Red Fortune - Defense/Endurance/Recharge
Level 26: Energy Absorption
- (A) Red Fortune - Defense/Recharge
- (34) Red Fortune - Endurance/Recharge
- (34) Red Fortune - Defense
- (34) Power Transfer - Damage/Accuracy/Recharge/Endurance
- (36) Power Transfer - Damage/Recharge
- (36) Power Transfer - Chance to Heal Self
Level 28: Spirit Ward
- (A) Panacea - +Hit Points/Endurance
Level 30: Rend Armor
- (A) Superior Blistering Cold - Accuracy/Damage
- (36) Superior Blistering Cold - Damage/Endurance
- (37) Superior Blistering Cold - Accuracy/Damage/Endurance
- (37) Superior Blistering Cold - Accuracy/Damage/Recharge
- (37) Superior Blistering Cold - Damage/Endurance/Accuracy/RechargeTime
- (39) Superior Blistering Cold - Recharge/Chance for Hold
Level 32: Hibernate
- (A) Preventive Medicine - Endurance/RechargeTime
- (39) Performance Shifter - EndMod/Recharge
Level 35: Rune of Protection
- (A) Aegis - Psionic/Status Resistance
- (39) Aegis - Resistance/Endurance
- (40) Aegis - Resistance/Endurance/Recharge
- (40) Aegis - Resistance
Level 38: Whirling Smash
- (A) Force Feedback - Chance for +Recharge
- (40) Perfect Zinger - Threat/Placate
- (42) Multi-Strike - Damage/Recharge
- (42) Multi-Strike - Accuracy/Endurance
- (42) Multi-Strike - Accuracy/Damage/Endurance
- (43) Multi-Strike - Damage/Endurance/Recharge
Level 41: Arc of Destruction
- (A) Force Feedback - Chance for +Recharge
- (43) Sudden Acceleration - Knockback to Knockdown
- (43) Perfect Zinger - Chance for Psi Damage
- (45) Perfect Zinger - Threat/Placate/Range
- (45) Perfect Zinger - Threat/Placate/Recharge
- (45) Perfect Zinger - Threat/Placate/Recharge/Range
Level 44: Focused Accuracy
- (A) Gaussian's Synchronized Fire-Control - Chance for Build Up
Level 47: Physical Perfection
- (A) Power Transfer - Chance to Heal Self
- (47) Power Transfer - EndMod
- (47) Power Transfer - Damage/EndMod
- (47) Numina's Convalesence - +Regeneration/+Recovery
- (48) Numina's Convalesence - Heal
- (48) Numina's Convalesence - Heal/Endurance
Level 49: Infiltration
- (A) Reactive Defenses - Scaling Resist Damage
Level 1: Gauntlet
Level 1: Brawl -
I totally understand where your coming from. And I will double check. When I use mids I am constantly going back and forth messing around to see what kind of numbers I get for kicks and giggles. I team mostly and usually I am not too concerned about min/max. No ill will or shade thrown. Im sure there was something on or in effect that I didn't account for.
That being said, I guess my question was do I go for regen and neglect def/res?
-
Ok what I focused on what sets that offer regen/end/+hp. To be clear I never claimed I had maxed out def/res. To the contrary they are most likely suffering. Once I get home I will post the build with the regen.
-
Im pulling plus 600% regen. Not sure if thats a good number versus reversing course and re-focusing on def/resists.
Martial Arts Tanker! Show me the way!
in Tanker
Posted
What pairings would you recoomend?