

Zalari
-
Posts
11 -
Joined
-
Last visited
Content Type
Profiles
Forums
Events
Store
Articles
Patch Notes
Posts posted by Zalari
-
-
Here's my Claw/Stone Scrapper. He is very tanky, and deals respectable damage. New Stone is rough on End, so I ended up needing to go with Ageless for sustain, as Geode isn't reliable enough. In fact, Geode itself feels almost entirely skippable, easily the weakest link in the set. It either needs a major buff or rework, as the state it's in now is poor at best.
This Hero build was built using Mids Reborn 3.1.2.5
https://github.com/LoadedCamel/MidsRebornClick this DataLink to open the build!
Level 50 Magic Scrapper
Primary Power Set: Claws
Secondary Power Set: Stone Armor
Power Pool: Speed
Power Pool: Fighting
Power Pool: Leaping
Ancillary Pool: Soul MasteryHero Profile:
Level 1: Strike- (A) Superior Critical Strikes - Accuracy/Damage: Level 50
- (5) Superior Critical Strikes - Damage/RechargeTime: Level 50
- (5) Superior Critical Strikes - Accuracy/Damage/RechargeTime: Level 50
- (7) Superior Critical Strikes - Damage/Endurance/RechargeTime: Level 50
- (7) Superior Critical Strikes - Accuracy/Damage/Endurance/RechargeTime: Level 50
- (9) Superior Critical Strikes - RechargeTime/+50% Crit Proc: Level 50
Level 1: Rock Armor
- (A) Luck of the Gambler - Defense/Increased Global Recharge Speed: Level 50
- (9) Luck of the Gambler - Defense: Level 50
- (11) Luck of the Gambler - Defense/Endurance: Level 50
- (11) Shield Wall - +Res (Teleportation), +5% Res (All): Level 50
Level 2: Stone Skin
- (A) Luck of the Gambler - Defense/Increased Global Recharge Speed: Level 50
- (13) Luck of the Gambler - Defense: Level 50
- (13) Luck of the Gambler - Defense/Endurance: Level 50
- (15) Gladiator's Armor - Resistance: Level 50
- (15) Gladiator's Armor - TP Protection +3% Def (All): Level 50
- (17) Steadfast Protection - Resistance/+Def 3%: Level 30
Level 4: Earth's Embrace
- (A) Preventive Medicine - Heal: Level 50
- (17) Preventive Medicine - Heal/Endurance: Level 50
- (19) Preventive Medicine - Endurance/RechargeTime: Level 50
- (19) Preventive Medicine - Heal/RechargeTime: Level 50
- (21) Preventive Medicine - Heal/RechargeTime/Endurance: Level 50
- (21) Preventive Medicine - Chance for +Absorb: Level 50
Level 6: Spin
- (A) Obliteration - Damage: Level 50
- (23) Obliteration - Accuracy/Recharge: Level 50
- (23) Obliteration - Damage/Recharge: Level 50
- (25) Obliteration - Accuracy/Damage/Recharge: Level 50
- (25) Obliteration - Accuracy/Damage/Endurance/Recharge: Level 50
- (27) Obliteration - Chance for Smashing Damage: Level 50
Level 8: Follow Up
- (A) Hecatomb - Damage: Level 50
- (27) Hecatomb - Accuracy/Damage/Recharge: Level 50
- (29) Hecatomb - Accuracy/Recharge: Level 50
- (29) Hecatomb - Damage/Endurance: Level 50
- (31) Hecatomb - Chance of Damage(Negative): Level 50
- (31) Gaussian's Synchronized Fire-Control - Chance for Build Up: Level 50
Level 10: Hasten
- (A) Recharge Reduction IO: Level 50
- (31) Recharge Reduction IO: Level 50
Level 12: Super Speed
- (A) HamiO:Microfilament Exposure
Level 14: Mud Pots
- (A) Obliteration - Damage: Level 50
- (33) Obliteration - Accuracy/Recharge: Level 50
- (33) Obliteration - Damage/Recharge: Level 50
- (33) Obliteration - Accuracy/Damage/Recharge: Level 50
- (34) Obliteration - Accuracy/Damage/Endurance/Recharge: Level 50
- (34) Obliteration - Chance for Smashing Damage: Level 50
Level 16: Rooted
- (A) Panacea - Heal/Endurance: Level 50
- (34) Panacea - Endurance/Recharge: Level 50
- (36) Panacea - Heal/Recharge: Level 50
- (36) Panacea - Heal/Endurance/Recharge: Level 50
- (36) Panacea - Heal: Level 50
- (37) Panacea - +Hit Points/Endurance: Level 50
Level 18: Focus
- (A) Superior Scrapper's Strike - Accuracy/Damage: Level 50
- (37) Superior Scrapper's Strike - Damage/Recharge: Level 50
- (37) Superior Scrapper's Strike - Accuracy/Damage/Recharge: Level 50
- (39) Superior Scrapper's Strike - Damage/Endurance/Recharge: Level 50
- (39) Superior Scrapper's Strike - Accuracy/Damage/Endurance/Recharge: Level 50
- (39) Superior Scrapper's Strike - Recharge/Critical Hit Bonus: Level 50
Level 20: Crystal Armor
- (A) Luck of the Gambler - Defense/Increased Global Recharge Speed: Level 50
- (40) Luck of the Gambler - Defense: Level 50
- (40) Luck of the Gambler - Defense/Endurance: Level 50
- (40) Power Transfer - EndMod: Level 50
- (42) Power Transfer - Chance to Heal Self: Level 50
Level 22: Boxing
- (A) Empty
Level 24: Tough
- (A) Unbreakable Guard - Resistance: Level 50
- (42) Unbreakable Guard - Resistance/Endurance: Level 50
- (42) Unbreakable Guard - Resistance/Endurance/RechargeTime: Level 50
- (43) Unbreakable Guard - +Max HP: Level 50
Level 26: Weave
- (A) Luck of the Gambler - Defense/Increased Global Recharge Speed: Level 50
- (43) Luck of the Gambler - Defense: Level 50
- (43) Luck of the Gambler - Defense/Endurance: Level 50
- (45) Reactive Defenses - Scaling Resist Damage: Level 50
Level 28: Minerals
- (A) Luck of the Gambler - Defense/Increased Global Recharge Speed: Level 50
- (45) Endurance Reduction IO: Level 50
Level 30: Combat Jumping
- (A) Kismet - Accuracy +6%: Level 30
Level 32: Shockwave
- (A) Bombardment - Damage: Level 50
- (45) Bombardment - Accuracy/Recharge/Endurance: Level 50
- (46) Bombardment - Accuracy/Damage/Recharge: Level 50
- (46) Bombardment - Accuracy/Damage/Recharge/Endurance: Level 50
- (46) Bombardment - Chance for Fire Damage: Level 50
- (48) Overwhelming Force - Damage/Chance for Knockdown/Knockback to Knockdown: Level 50
Level 35: Brimstone Armor
- (A) Endurance Reduction IO: Level 50
Level 38: Moonbeam
- (A) Sting of the Manticore - Accuracy/Damage: Level 50
- (48) Sting of the Manticore - Damage/Endurance: Level 50
- (48) Sting of the Manticore - Accuracy/Interrupt/Range: Level 50
- (50) Sting of the Manticore - Damage/Endurance/Recharge: Level 50
- (50) Sting of the Manticore - Chance of Damage(Toxic): Level 50
- (50) Apocalypse - Chance of Damage(Negative): Level 50
Level 41: Geode
- (A) Recharge Reduction IO: Level 50
Level 44: Shadow Meld
- (A) HamiO:Membrane Exposure
Level 47: Super Jump
- (A) HamiO:Microfilament Exposure
Level 49: Soul Storm
- (A) HamiO:Endoplasm Exposure
Level 1: Critical Hit
Level 1: Brawl -
I recently built a Claw/Stone Scrap, and Geode wasn't enough to self-sustain End without Recovery Serum, so I went with Ageless. I don't worry much about survivability, but having Geode in the build feels like a mistake. It's like Hibernate with a gimmick, and the gimmick doesn't feel worth it, i.e a short-lived minor buff to Brimstone's damage. The power needs a buff or a change, but as it stands it feels like a perpetual waste of a power slot that could help you in more situations.
-
Neat change, but isn't terribly useful for the actual Stalker AT, as their ATO set that adds a Hide proc is much more useful than wasting a power slot on Placate itself.
-
Previous builds were not true perma-Dom, please consider
There is a bit of flexibility with this build in terms of slotting, but you need around this much recharge pre-Hasten if you wish to be perma-Dom
-
 1
1
-
-
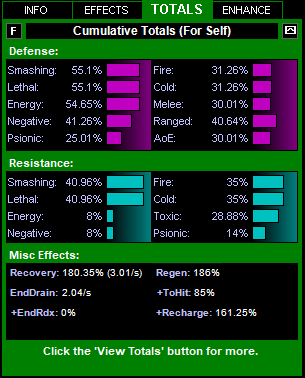
On 8/11/2021 at 5:43 PM, Muppy said:
Alrighty. Took a look and messed around with the build a bit more. Let me know if there's anything wrong with it! I'm pretty sure something is wrong. 😛
EDIT: Totals didn't paste in... Here are the totals if you need to look at them. This is with every defense/resist power enabled, etc:

This Villain build was built using Mids Reborn 3.0.5.9
https://github.com/Reborn-Team/MidsRebornClick this DataLink to open the build!
Chaos Creep Jones: Level 50 Technology Dominator
Primary Power Set: Gravity Control
Secondary Power Set: Radioactive Assault
Power Pool: Flight
Power Pool: Speed
Power Pool: Concealment
Power Pool: Fighting
Ancillary Pool: Mace MasteryVillain Profile:
Level 1: Lift- (A) Thunderstrike - Accuracy/Damage
- (31) Thunderstrike - Damage/Endurance
- (40) Thunderstrike - Damage/Recharge
- (43) Thunderstrike - Accuracy/Damage/Recharge
- (43) Thunderstrike - Accuracy/Damage/Endurance
- (43) Thunderstrike - Damage/Endurance/Recharge
Level 1: Neutrino Bolt
- (A) Decimation - Chance of Build Up
Level 2: Gravity Distortion
- (A) Superior Ascendency of the Dominator - Accuracy/Control Duration
- (3) Superior Ascendency of the Dominator - Control Duration/Recharge
- (3) Superior Ascendency of the Dominator - Endurance/Recharge
- (5) Superior Ascendency of the Dominator - Accuracy/Control Duration/Endurance
- (5) Superior Ascendency of the Dominator - Accuracy/Control Duration/Endurance/Recharge
- (7) Superior Ascendency of the Dominator - Recharge/Chance for +Damage
Level 4: X-Ray Beam
- (A) Thunderstrike - Accuracy/Damage
- (19) Thunderstrike - Damage/Endurance
- (23) Thunderstrike - Damage/Recharge
- (25) Thunderstrike - Accuracy/Damage/Recharge
- (25) Thunderstrike - Accuracy/Damage/Endurance
- (50) Thunderstrike - Damage/Endurance/Recharge
Level 6: Propel
- (A) Apocalypse - Damage
- (7) Apocalypse - Damage/Recharge
- (9) Apocalypse - Accuracy/Damage/Recharge
- (9) Apocalypse - Accuracy/Recharge
- (11) Apocalypse - Damage/Endurance
Level 8: Crushing Field
- (A) Superior Dominating Grasp - Accuracy/Control Duration
- (11) Superior Dominating Grasp - Control Duration/RechargeTime
- (13) Superior Dominating Grasp - Endurance/RechargeTime
- (13) Superior Dominating Grasp - Accuracy/Control Duration/Endurance
- (15) Superior Dominating Grasp - Accuracy/Control Duration/Endurance/RechargeTime
- (15) Superior Dominating Grasp - RechargeTime/Fiery Orb
Level 10: Hover
- (A) Luck of the Gambler - Defense/Increased Global Recharge Speed
- (17) Shield Wall - +Res (Teleportation), +5% Res (All)
- (17) Reactive Defenses - Scaling Resist Damage
Level 12: Dimension Shift
- (A) Debilitative Action - Disorient Bonus
Level 14: Fly
- (A) Freebird - +Stealth
Level 16: Fusion
- (A) Gaussian's Synchronized Fire-Control - Chance for Build Up
Level 18: Hasten
- (A) Recharge Reduction IO
- (19) Recharge Reduction IO
Level 20: Radiation Siphon
- (A) Superior Blistering Cold - Accuracy/Damage
- (21) Superior Blistering Cold - Damage/Endurance
- (21) Superior Blistering Cold - Accuracy/Damage/Endurance
- (23) Superior Blistering Cold - Accuracy/Damage/Recharge
- (48) Superior Blistering Cold - Damage/Endurance/Accuracy/RechargeTime
- (50) Superior Blistering Cold - Recharge/Chance for Hold
Level 22: Stealth
- (A) Luck of the Gambler - Defense/Increased Global Recharge Speed
Level 24: Grant Invisibility
- (A) Luck of the Gambler - Defense/Increased Global Recharge Speed
Level 26: Wormhole
- (A) Absolute Amazement - Stun
- (27) Absolute Amazement - Stun/Recharge
- (27) Absolute Amazement - Accuracy/Stun/Recharge
- (29) Absolute Amazement - Accuracy/Recharge
- (29) Absolute Amazement - Endurance/Stun
Level 28: Atom Smasher
- (A) Armageddon - Damage
- (31) Armageddon - Damage/Recharge
- (31) Armageddon - Accuracy/Damage/Recharge
- (34) Armageddon - Accuracy/Recharge
- (37) Armageddon - Damage/Endurance
Level 30: Boxing
- (A) Kinetic Combat - Accuracy/Damage
- (46) Kinetic Combat - Damage/Endurance
- (48) Kinetic Combat - Damage/Recharge
- (48) Kinetic Combat - Damage/Endurance/Recharge
Level 32: Singularity
- (A) Call to Arms - Accuracy/Recharge
- (33) Call to Arms - Accuracy/Damage
- (33) Call to Arms - Damage/Endurance
- (33) Call to Arms - Accuracy/Damage/Recharge
- (34) Call to Arms - Endurance/Damage/Recharge
- (34) Call to Arms - Defense Bonus Aura for Pets
Level 35: Tough
- (A) Gladiator's Armor - TP Protection +3% Def (All)
- (36) Steadfast Protection - Resistance/+Def 3%
- (36) Reactive Armor - Resistance
- (36) Reactive Armor - Resistance/Endurance
- (37) Reactive Armor - Resistance/Endurance/Recharge
- (37) Reactive Armor - Resistance/Recharge
Level 38: Devastating Blow
- (A) Hecatomb - Damage
- (39) Hecatomb - Damage/Recharge
- (39) Hecatomb - Accuracy/Damage/Recharge
- (39) Hecatomb - Accuracy/Recharge
- (40) Hecatomb - Damage/Endurance
- (40) Hecatomb - Chance of Damage(Negative)
Level 41: Weave
- (A) Luck of the Gambler - Defense/Increased Global Recharge Speed
- (42) Luck of the Gambler - Defense
- (42) Luck of the Gambler - Defense/Endurance
- (42) Luck of the Gambler - Defense/Endurance/Recharge
Level 44: Scorpion Shield
- (A) Red Fortune - Defense
- (45) Red Fortune - Defense/Endurance
- (45) Red Fortune - Defense/Recharge
- (45) Red Fortune - Defense/Endurance/Recharge
- (46) Red Fortune - Endurance
Level 47: Poisonous Ray
- (A) Achilles' Heel - Chance for Res Debuff
Level 49: Disruptor Blast
- (A) Sudden Acceleration - Knockback to Knockdown
Level 1: Brawl
- (A) Empty
Level 1: Domination
Level 1: Sprint- (A) Empty
Level 2: Rest
- (A) Empty
Level 1: Swift
- (A) Empty
Level 1: Health
- (A) Panacea - +Hit Points/Endurance
- (50) Numina's Convalesence - +Regeneration/+Recovery
Level 1: Hurdle
- (A) Empty
Level 1: Stamina
- (A) Performance Shifter - Chance for +End
- (46) Performance Shifter - EndMod
Level 14: Afterburner
Level 50: Musculature Radial Paragon
Level 50: Ion Radial Final Judgement
Level 50: Assault Core Embodiment
Level 50: Warworks Core Superior Ally
------------
------------
Set Bonus Totals:| Copy & Paste this data into Mids Reborn : Hero Designer to view the build | |-------------------------------------------------------------------| |MxDz;1465;696;1392;HEX;| |78DA6D93CB6F125114C6EF3083B5504A91BEDFD052682903D48D8F6A6DA836F6A1D| |81AB7CD4827ED24C834CCD8C8D295BA52ABC68DEF956E5CFB5CF887F8A88D8F8D8F| |C4B5C1C37C87D2A44E80DFE59BF3DDFBCDB977E62F4D353C9FBE3C21247F26AF59D| |6D29479C12868B659F49CD573AB05336FAE9464214420B3AA99567FA6A8EB6BFD33| |6641B7EA480D6D972F65CC825D34F3EA74515B37EC52F57FA456316959DAC5BCAD2| |E68CB86A9E56C635DAF6AC29B35C97B226FACACDA1E67BCB8A6EBCB016778B2B06E| |58C679234FF3FA5058A9330A2B5DC7D78C9C5A5B625ECBE9F463D97AB1D44EF962F| |41DADC477AEB25BDC27A415D1FB008C3E04471E311F339F809B950924C72BC43D42| |5411099A4F82E6965EC84E9DEB25F315A8BC66BE01F7BC05B7683E99B3C89C651F6| |769E52CED9CA59DB3A4398B4A4637BC8A7BD4857913E05E9599043D2930499E3ACE| |5A37AEE0DE11B0E12873026C3CC69C04EB6983EBE175D5B7488ED6348BE768FA03A| |6085EEE8FF73A0D7A14E1259F8F35DF5FF8BED073FB59F33F43B630D505A0498138| |F782F995EA839C3B7803799A6F3237C0D65B60F23698BE03FA68DE16F449B470EE4| |6D2DA586B636D8CB277703F3B6690A97396390776CF334F81DF2857177BBA0E40EB| |3DC83C04860E8383E3A0446BF7C023F76409613A4367C0E4027311DC4F99FAF87CF| |4BD7739FDECFFC0FCC8FC048636999F4199D60973CFC263D89F8136ECC940E5069D| |DD815E7030C4EC03BFD37345D81B1942EEA12833C61C06A323CC38A8D0BA3178E51| |8F776B899D9C40C825729561CB54ABC11DAA887E965FAC0841FBC421E95CF8EFA8E| |D60C2AE21A6929DECFD416F6BD5BD97ECFE94357A5A155A53CB7EB6E56E1579B14C| |9517E7876BCED8EF2ABA64822849EA6CF21D7CF5DD5BF7756DF4577121B60F93F97| |68A537A59A2F4865F0963B9B6BE3A7E1DAF8F40EFD1F86B7F5B4| |-------------------------------------------------------------------|
Lemme see if I can figure something out for ya
-
On 5/8/2021 at 7:10 PM, underfyre said:
Well some good has come of this. While I was searching for a secondary that could possibly add to Fire's primary damage output, I found out that Shinobi applies a "crit" chance that is just a damage proc. So now I need to code that in to the sheet.
I have a Fire/Nin Blaster and he is an absolute monster! Have all Fire attacks besides Flares and Fire Breath, and the only attack from Nin is Golden Dragonfly. Very lenient set and supports Fire incredibly well. The Crits aren't anywhere near as glamorous as a Scrapper or Stalker's, but the added damage is definitely noticeable. -
On 5/31/2021 at 6:30 PM, Sancerre said:
aside from mobs that speficially end drain you, i never had problems with end *after* being mostly kitted out. getting there can be a little more painful. not sure where your toon is at IO wise, but i could recommend using Victory Rush (from leadership) for a while inplace of combat jumping to help with that and/or *not* using assault/maneuvers until you can actually support them.
I am using the same exact build this thread suggested, and continuously fighting while buffing/debuffing is definitely not sustainable with just Dark Consumption and the tiny amount of end/recovery Chrono Shift offers without outside influence.
-
I know you said you didn't want to replay a set you've already used, but I recently finished my Claws/Rad Scrapper and he is an absolute monster both solo and on teams.
Has a bit of def from sets, good all-around res from Rad, great regeneration/end recovery, and the extra AoEs from Rad help support Claw's already strong Spin attack. Slapped on Soul Mastery for Moonbeam and Shadow Meld (for that emergency def and another lotg slot) and he is an efficient killing (arresting?) machine!
Definitely give Claws a try if you haven't played it before. It's not very flashy, but it's very efficient.
-
I see you're running Cardiac AND Ageless. If you're struggling for End don't forget about slotting uniques in Health. You're already using Numina's in Ablative and Panacea in Inexhaustible, but you can also try putting Miracle +Recovery in Health. Also if you can spare a slot I would recommend putting a second one in Stamina and throwing in Performance Shifter Endmod. The proc is nice on its own, but boosting how much End Stamina gives at base is also quite helpful.
-
Heya! So I made a Fire/Time Corr before viewing this thread. Was previously using Soul Mastery for Power Boost with Musculature Alpha, Ageless Destiny for end sustain, and Assault Hybrid. Felt okay solo or on a team, but saw this thread and decided to try the build out. It seems nice having Clarion/Rune for CC protection but without Ageless the build seems to burn through end quite fast, even with Support Hybrid and Dark Consumption. I've been using the Recovery Serum temporary power to supplement it, but that's obviously not always going to be available depending on what content you're playing. How do you manage your end on this build? Also any ideas for improvements/changes to the build following the RoP nerf?
Staff Melee
in Suggestions & Feedback
Posted
A somewhat underrated (maybe underpowered?) set, a weapon set at that. It's flashy and fun, has a couple niches that makes it unique. One thing it doesn't share among all other weapon sets, is the ability to set no redraw. What that means is; without the drawing animation, the set can perform its attacks more smoothly after using a non-set attack, and with the first attack used in combat. Example being Scrappers and their access to snipe attacks from epic pools. If you're using Staff and perform an epic snipe, you have to go through the entire re-drawing animation before another attack activates, and it both hampers the flow of combat and the overall performance of the set. As far as I am aware, Staff is the only weapon set without access to the "no redraw" customization that skips the drawing animation and allows attacks to flow freely. Many updates have come and gone, and it's somewhat appalling that Staff hasn't been given this touch of love yet, and it's much needed. Also scythe skin when?