The Beta Account Center is temporarily unavailable
×


Story Archer
-
Posts
523 -
Joined
-
Last visited
Content Type
Profiles
Forums
Events
Store
Articles
Patch Notes
Everything posted by Story Archer
-
I'll never understand why most auras - if not all - don't have a minimal effect option. Seems like it'd be one of the easiest features to implement and I'm sure I'm not alone in saying that I avoid entire power sets solely because of what it does to the costume I spent over an hour fine-tuning...
-
...PLUS unbreakable stealth and one of the best self-heals in the game up every 20 seconds or so.
-
I run hot and cold on MA because Storm Kick is so good but Eagle's Claw really gets on my nerves for some reason, but MA/Dark has got to be the toughest tanker there is. Check out the build below just as an example, and keep in mind that this is with NO purple enhancements or Incarnates of any kind. Tanker (Dark Armor - Martial Arts).mbd You're basically soft-capped on defense, and your resistances to everything are high as a kite and that's not even counting the crazy self-heal that's up every 15-20 seconds or the fact that you've got one of the strongest Stealth options in the game. Martial Arts lacking in AoE? Guess what, you've got Cross Punch and not one but two tricked out damage auras running simultaneously to compliment it. Just imagine what you could do if you actually put some influence into it... my 50+ version is over the soft-cap defensively on everything, maxes all resists except Energy and Toxic (70% each), has better recharge and deals even more damage. Now, in the interest of full disclosure, while this was the toughest tanker I've ever played, the most fun I've had as a Tanker was probably my Rad/SS... going proc-heavy in all the wonderful ways that set opens up almost completely mitigates Rage Crash and you're melting baddies faster than you can track.

-
I'd appreciate some thoughts/critiques on this Rad/SS Tanker...
Story Archer replied to Story Archer's topic in Tanker
Again, thank-you so much for the response - this is very helpful. I agree that Cross Punch is better, but I HAVE to take Punch, and I have to slot it/use it because Cross-Punch won't take Tanker IO's. I'd rather not have to kick anything out for Haymaker and I don't think I have the slots for it anyway. 😞 I currently have Gloom in the actual character, and looking at it, Soul Tentacles is certainly overkill on the AoE, I just figured averaging 315 dmg per attack was fine even if you're only attacking one target. Having said that, I can reasonably get Gloom up to 377 dmg, it casts faster and recharges faster, so I'll definitely swap that back in. Gloom has nice set bonuses as well. 🙂 She's getting a little expensive 😜 but I'm liking the attack chain - it's super smooth, it just repeats itself, alternating between KO blow and Foot Stomp, and seems pretty seamless, even without the FF proc going off (remember, Punch is where I've got both the MotT and the FF proc, I want that attack going off as often as possible). KO Blow -> Punch -> Gloom -> Punch Foot Stomp -> Punch -> Gloom -> Punch EDIT: Here's where I'm at right now. Tanker (Rad-SS) 50-2.mbd -
I'd appreciate some thoughts/critiques on this Rad/SS Tanker...
Story Archer replied to Story Archer's topic in Tanker
Thank you very much for the response - I wish I was that proficient with my phone! Cross Punch and Kick was originally part of the build (technically still is, in the actual character I'm playing with) in part to give me another solid, fast-recharging attack that I could also drop a FF proc in. I've dropped those two for the higher-damaging-but-slower-recharging AoE Soul Tentacles and Dark Obliteration because I figured, between the those attacks and everything else I'd have a smooth attack chain - that, and because it's more exotic damage it'd be a little less resisted than the Smashing from Cross Punch. Right now the idea is to basically auto-fire Punch and intersperse all of my other attacks in between each time it goes off, something like: Dark Obliteration -> Punch -> KO Blow -> Punch -> Foot Stomp -> Punch -> Soul Tentacles -> Punch -> ...and, of course, Ground Zero and Radiation Therapy when they come up. That's about a 12-second attack chain, which should be plenty of time for everything to come back up, especially if even one of the FF procs fire. Every one of those attacks deals more than Cross Punch, or so it seems - is that a bad plan? Right now, my L50 build (which has been tweaked a tiny bit vs. what I originally posted - see below) has 80% Slow resistance and 85% Endurance Drain resistance - do you think the need for more than that is great enough to start unravelling other things? Tanker (Rad-SS) 50-2.mbd -
My mindset when building Tankers has always been to approach it as 'how can I build THE most survivable character possible', working from the old-school concept of what a Tanker should be. With this build I'm breaking away from that and figuring that in large groups I'm always getting ancillary buffs from my allies that tend to mitigate a lot of my min./maxing minutia meaningless anyway. So I decided to see how deadly a Tanker I could make, and to see if it could give Scrappers and Brutes a run for their money while still being as durable, if not moreso. Playing to the Tanker's strengths, I wanted to make AoE damage the top priority, with single-target damage and survivability 2a & 2b. I thought the potential for mini-nukes in Rad/ was very strong and realized that leaning heavily into procs would be a great way to mitigate the only downside of /SS, mainly Rage crash. I took Soul Mastery because I felt that Darkest Night could help out with survivability when needed, and because it gave me two more AoE's to play around with. Obviously I want to get my recharge up for pretty much everything (AoE attacks, Rage, Hasten, Meltdown, etc.), and the only way I could think of doing that without unravelling the entire concept were the FF procs. These builds are intended for all aspects of play, solo and group, but hasn't factored in Incarnates yet. Thus far it seems to be working out really well (low 40's atm) - I play her like an AoE Scrapper and she's going through mobs like a hot knife through butter - but I can't help but wonder if there are as yet unforeseen issues for builds like this in post-50 play? I just want to make sure I'm getting the most out of my concept and that I'm not missing anything that should be glaringly obvious (or maybe not so glaringly). I know that I'm heavily exploiting procs with this one, but it's my first time, so I'm kind of like a kid in a candy store. Let me know if its too much for my purposes. Tanker (Rad-SS) pre-50.mbd Tanker (Rad-SS) 50.mbd Thanks in advance 🙂 P.S. If anybody has Incarnate suggestions, I'm all ears. I think I'm finally ready to dip my toe into that aspect of the game.
-
If I drop a Celerity +Stealth IO into the Infiltration slot and turn it on, do stealth benefits of both stack or is there some sort of funky interaction I need to be aware of? If they do, is that adequate to effectively stealth missions I don't want to fight my way through? TIA.
-
This is confusing to me - tonight I opened 200 capsules and the only thing I got was 200 Tokens. No badges, just a few costumes and a toy bat. How did you get 19 years worth of celebration badges from opening the capsules? EDIT: Okay, I figured out that you can't buy the Celebration badges with Anniversary Tokens, you need to burn Reward Merits for that - which doesn't make any sense to me... you can;t use Anniversary tokens to buy anniversary badges?? All you can buy is vanity pets and costumes?
-
Is there any way to earn Tokens apart from opening time capsules?
-
I appreciate the time taken to respond - very much - and I'm sure we're fine agreeing to disagree on a few things. I like Gloom for a lot of reasons, including pulling, attacking flyers and having a non Smashing damage type, as well as serving to mule for IO enhancements that I wouldn't be able to use otherwise. Darkest Night helps to protect the group from things that I otherwise could not, like AoE effects being less accurate and less damaging. I don't use it all the time but when I do I'm always glad its there. I was very clear that I don't like Eagle Claw at all, for the reasons you just stated. Again, it proves useful to mule certain IO sets but rarely plays a roll in my attack chain. Purples very much contribute to defense, largely by granting Resistance bonuses in areas of need and often by boosting your HP, which matters a good deal. I have two damage auras, not one - procced out as it is, Cloak of Fear deals just as much damage on average as the Death Shroud, on top of its other benefits. Since I often prefer to play a lot of different builds rather than engage in a great deal of post-50 content, I almost never plan builds to be dependent on Incarnates and try to make them as strong as I can without having to invest in too many purple sets either. It's made for a fun challenge. All of this, of course, ignores the fact that 90% of the time you're going to be so loaded down with buffs from your fellow players that squeezing every ounce of water from a stone is really just an intellectual exercise. If I can get a build close to but not quite at as many caps as I can, I consider that a win. Thanks again for the response, especially in such detail. The board is a huge help for players, especially newer players, with people like you making the time to lend some advice.
-
I'm tweaking a Rad Armor/SS build, not that it matters. This is really the final decision, what to do with a couple of enhancement slots. Also, you think I'm getting more +Global Recharge out of two LotG or two FF procs in relatively fast-recharging AoE attacks (Foot Stomp & Cross Punch)? Tanker (Radiation Armor - Super Strength) - L50-2.mbd
-
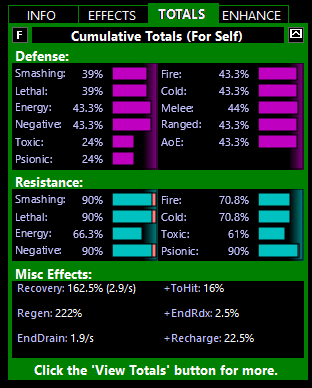
Keep in mind that the build on the right is with no purple sets whatsoever. You're not going to find anything tougher than that with no purps, I don't think. The finished maxed out build has actually been updated with stronger numbers overall (I'll link it below), but again, with that uber powerful heal up so often, it's really just theory-crafting at this point, the toon is pretty much unkillable. The heal is the perfect compliment because, once you jump into a new mob, it buys you the time (if you need it) for Cloak of Fear/Oppressive Gloom to set in, and to land that first Storm Kick and that ATO that'll get you to all the maxes. After that, just cook them down with the double damage auras and Dragon's Tail, really. Again, this is my 'most survivable build' (no Incarnates - is that what 'Barrier' is referencing?), not necessarily my 'most fun' or 'most effective overall' build. I'd go to a different power set for that. Probably Rad Armor/SS, mainly due to the opportunities for FF and because proc'ing out the two mini-nukes and Foot Stomp means that you can pretty much ignore the negative side effects of RageQuit while still reaping all the benefits. Still, let me know what you think. Tanker (Dark Armor - Martial Arts) L50.mbd
-
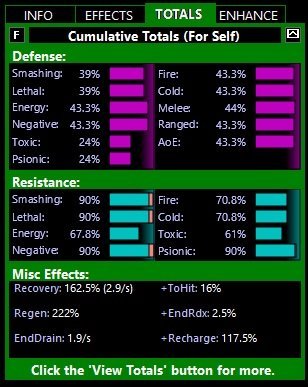
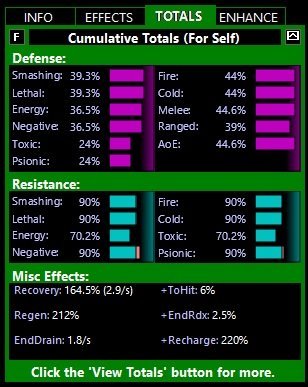
My favorite defensive sets for Tankers have always been Electric Armor and Radiation Armor. Those two proc'ed out mini nukes on Rad Armor just nudges it over the top for me. Maxed out, I remain convinced that nothing beats a Dark/MA Tanker for survivability - see the image below for numbers with purple sets (1st) and numbers without ANY purple sets, and that's not accounting for its massive Heal up every 10-12 seconds, or the DM attacks/Cloak of Fear debuffing everyone's ToHit - but I really don't like Eagle's Claw and I find having a Recovery power is just too important. There is such a thing as being TOO survivable, especially if it gimps you in damage output.
-
Looking for help getting started with controllers.
Story Archer replied to duckman's topic in Controller
I play two controllers. The first is a Plant/Kin named Speed Orchid who is always welcomed on teams because everybody loves a Kin and who's very easy to play from the Controller side of things. Seeds of Confusion is arguably the strongest Mez in the game, it works great right out of the box and you get it by 8th level. That, your single-target hold and a fire-and-forget Carrion Creepers is really all you need out of the Plant set to shine. Controller (Plant - Kinetics) - L50.mbd The second is a whole other ball of wax and servers as my solo or small-team controller. She's a Dark/Dark named Mistress of Chains. This is one of my most powerful and most fun characters to play regardless of AT or power set. She can literally do it all: basically at soft-cap for all her defenses soft-capped for S/L/E resists high regeneration with an AoE heal high stealth multiple pets that are very survivable and layer on damage, healing AND control deals significantly more damage than you would expect from most controllers AoE fear, AoE stun, single-target hold, single-target confuse for a wide variety of mezzing options Strong buffs for pets and teammates alike Equally strong de-buffs that allow you to make a difference against even the toughest of foes. One of the best thing about her is that she doesn't even need purple IO's, so she's easy on the pocketbook. Completely maxed out, I have her at 1-1/2 purple IO sets just to up the damage a bit. Controller (Darkness Control - Darkness Affinity) L50.mbd Hope this is of help 🙂 -
DB means Dual Blades - is that what you're asking?
-
Well, I've played one now til 45 and I've found the attack chain(s) that work for Me. I take 5 attack powers: NS, AS, TE, BF & SS. The first three give me the Weaken combo which never loses its usefulness, especially against large groups. BF does what it does and SS gives me a second, quick-animating AoE attack. I'm able to chain those five attacks very smoothly without near the +Recharge a shorter chain might need and get great efficiency and value out of it. When my foes get whittled down to one or two, I just change over to the Empower combo and continue on without TE. Works superbly well for me. So... vs. large groups: BF -> NS -> AS -> TE -> SS vs. single targets: BF -> SS -> NS -> AE I'm pairing it with Willpower for anyone who might want to know.
-
Ok.
-
And... that matters to some people.
-
But it looks flat-out Fugly in a lot of cases...
-
I feel like it really all depends on what you consider a 'super-hero's super-hero'... something that's unkillable, something that annihilates anything it comes across or trying to find a happy medium between both? At the moment my two favorite Tankers are both in the middle, one leaning much closer to one end and one, of course, leaning to the other. Candidate #1: Dark Armor / Martial Arts This guy can survive anything. There are a few different ways you can build it, depending on what attacks you want to focus on. The numbers posted below are first from a build with NO purple/L50 enhancements or Incarnates at all... and second from the L50 build with purples but no Incarnates. Some of my favorite features of these builds are TWO stacking damage auras that put out about as much damage together as a T2 attack with every pulse, unbreakable Stealth that pretty much renders Ranged defense pointless and, on top of all the layers of defense you see listed there and the -ToHit from the Dark abilities (like Cloak of Fear and Darkest Night) you get arguably the best self-heal in the game available every 12-15 seconds. Ain't nothing killing this guy. Candidate #2: Radiation / Stone Hammer or Super Strength This build is kind of at the other end of the spectrum. It evaporates bad guys like snow in a desert sandstorm. There are actually two different versions of this (Stone or SS) depending on how you feel about Rage crash, but what they have in common are two potent mini-nukes (one which heals you and one which heals your allies)... each deal about half as much damage as a well-slotted Blaster's T9 with one up every 20 seconds or so and one up every 30 seconds or so - that's in addition to a potent PBAoE attack that goes off 5-8 seconds. The mini-nukes are even unaffected by rage-crash since the majority of their damage come from procs. In both cases the Damage Resistances are comparable to what you see above, but the character is only soft-capped to Melee attacks with more middling defenses against ranged and AoE attacks. To help that out, I make liberal use of Fold Space which pairs beautifully with Beta Decay. I bounce back and forth between which version I like more, but generally lean towards the 'super-hero' feeling that comes with dropping a maxed out Foot Stomp. If you're interested in any of these builds, just let me know.
-
I have a question that I haven't seen addressed (sorry if I missed it) - for some reason in Mids, Fold Space has a 15 second Duration. What is that in regards to? The power doesn't continuously go off for 15 seconds (pulling in people who might enter the AoE), does it? Or does the duration reference some sort of anti-TP effect it has?
-
Need a reality check (Unslotters just sitting)
Story Archer replied to Story Archer's topic in The Market
That's the thing - what you describe has always been my experience. I'd understand it if I had only sold half of them and it was all mixed up as to how many from which stack, and I understand that the market fluctuates and some items listed at a higher price may have to wait for the market to 'come around again' before they are sold... but I literally haven't sold ONE. Not one, in a month of them all sitting there, with literally every purchase I ever see higher than what I'm listing them for. I understand that there are a sort of priorities that determine the order in which similarly priced items that are available get sold... but none? In a month? I'm willing to accept that they might have been a glitch or something, I'm just loathe to eat the listing fee (and pay another one) to find out and, more importantly, if there are some forces at work here that I don't understand, I want to learn what they are. I get that this is relative chump change for most people, but I'm trying to understand why the functionality that I have grown used to seems to have suddenly stopped working in this case. -
I read someone say in a recent post that 750 million 'is just chump change for most of us'... I don't know who 'us' is, but that sure ain't me. I've never seen that kind of money. About a month ago I cashed in some reward merits hoping to make some influence so I could start outfitting my new Tanker, and I put 100 Unslotters into the market place, listed for 90K a piece. At the time they seemed to be going fro about 100K, so I figured they'd sell pretty quick. Since then - again, a month - I haven't sold any of them. Not one. I've never had anything reasonably-priced sit for this long on the market and the funny thing is that every time I look in (almost daily) the bidding history is still all 100K. I just wanted a reality check, to make sure that my posted stuff isn't sitting in some kind of glitch-limbo. I don't want to eat the money I spent on the listing fee, but I just can't figure out what's going on.
-
I'd be interested in a follow-up to this as well...
-
Best similar builds for trio play
Story Archer replied to Story Archer's topic in General Discussion
I'm a big fan of Ice and Dark. Where Dark falls short in this particular venture is the lack of +Recharge and +Endurance. I suppose an argument can be made for a slower, more measured approach for newer players, but removing triple stacked AM's creates a gap that Dark just can't fill. As for Ice, I'm not opposed to it at all, I think both are very strong. At the moment, since we're planning on stacking Choking Clouds, there should be little fear of wading into melee, especially once RI has been placed. To be honest, as nice as that early Hold is, by the mid levels things should be dying so quickly there really won't be any point to holding individual targets most of the time. The build I've put together has been set up to give a broad range of experience for lots of different types of abilities - toggle buffs and debuffs, click buffs and debuffs, single target ranged and melee damage, AoE and PBAoE damage, holds, heals - pretty much everything but pets. I'm sure they'll be making plenty of their own builds based on what they liked most from our play.

.png.3a820d5452cf81e7a0fc2dc6cb0d9c75.png)


.png.fc8d4fb4fd94fa322bab9f60dc1a7773.png)