

Two Dollar Bill
-
Posts
114 -
Joined
-
Last visited
Content Type
Profiles
Forums
Events
Store
Articles
Patch Notes
Posts posted by Two Dollar Bill
-
-
"Crabberminds" generally slot for +Recharge to keep their pets in play as much as possible. If that's what you're doing, I don't think you will need (or want) to use freebie powers in your attack chain.
I would drop Longfang in favor of Frag Grenade in a heartbeat. Even if it caused a momentary pause in your attack chain once in a while, it's just a far more powerful attack and should not be skipped.
Take Omega Bomb and give it a spin. My own feeling is that it's fun for solo play and basically worthless on a typical team. It takes some time to lure in its targets and explode, and many teams will steamroll through a spawn before the Omega Bomb even goes off, leaving it to explode in an empty room.
I think Wolf Spider Armor and Combat Training: Offensive are fairly skippable if you need more power slots, but they're okay if you just want powers that require no enhancement slots.
My Crab has 8 points of Knockback reduction from IOs, and he still gets tossed around sometimes. Carnie Phantasms, for example. Still, I feel 8 points is "good enough". You can slot the Blessing of the Zephyr KB reduction IO into both Super Jump and Teleport Target if you don't actually want Acrobatics.
-
 1
1
-
-
I admit I do not have a Fortunata, but there has been are fair amount of discussion here in the forum of ranged- or psi-Forts. I know @Tidge plays one and has posted a build which doesn't require a mountain of Shield Wall PvP IOs.
-
This build seems to be derived from @Bopper's Arachnos Sentinel build in this thread. I recognize the gratuitous use of Shield Wall.
https://forums.homecomingservers.com/topic/26059-pure-ranged-fortunata-soul-mastery-build/
There are quite a lot of Fortunata builds on the forum and I'm curious why you went with this one. What do you want your character do do exactly? Team or solo? End-game content versus exemplaring? -
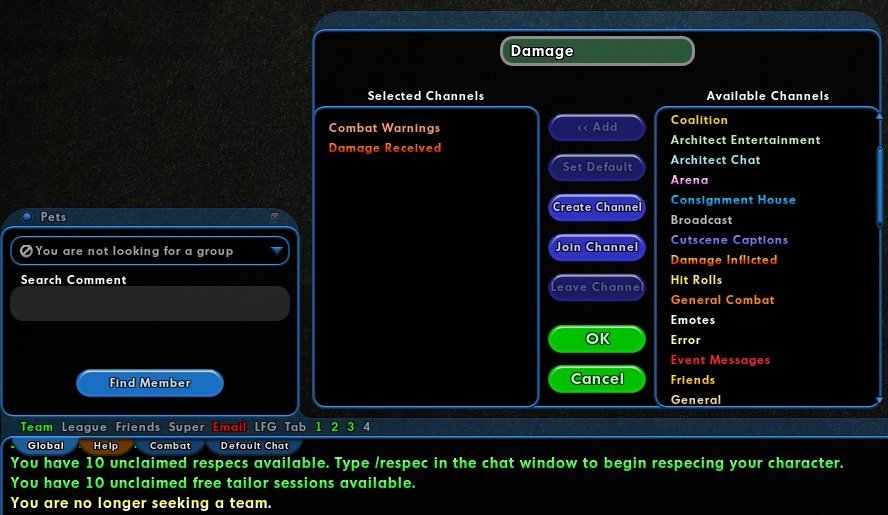
At the top of your chat bar hit the "1" to create a new tab.
Move it somewhere you can see it.
Hit the Add Tab button and you'll get an interface like this and you can put "Damage Received" and whatever else you want in there.
I recommend including something like Rewards that isn't red and will scroll by frequently in combat. If the only thing you include in there is Damage Received it will just stay red all the time and you won't notice if you start taking new hits.

-
Some other random Crab Spider thoughts.
Since the leading cause of death for Crab Spiders is Defense Debuffs, I have tried to make sure that I know immediately if my defenses have failed. I have a chat window that displays damage taken, and if that suddenly starts scrolling red messages, I can check my defenses, which are also displayed on the screen. I also tend to keep my inspirations configured oddly so that if I make a wild stab at the F1-F4 keys I will get a defense buff first, then healing if needed, then resistance, depending on how many times I hit it. Things like damage or accuracy buffs I can just hit with the mouse. I also hate missing with my attacks so I always want to know what my last to-hit chance was....-
1
-
-
My own experience with Crabberminds is that they're fun solo but the pets just can't handle the punishment of really challenging (fun) team battles. Spiderlings, in particular, just seem to evaporate and accomplish nothing, despite stacked leadership bonuses and unique pet-buff IOs. My own Crab has no pets and no Hasten.
I would also classify Frenzy as a "solo power" because a Crab on a team will struggle to gather up the crowd needed to pull off an effective Frenzy. I think Arm Lash is a more practical melee attack that can take the same IOs. If you've practiced hitting multiple targets with your Sands of Mu as a lowbie, you'll be able to use the small AoE of Arm Lash.
I have a lot fewer attacks and fewer procs than you do so I can't really say how your attack chain will work, though I suspect you don't really need both Channelgun and Longfang to go along with five ranged AoEs. I'd probably lose one filler attack and put a couple more slots in Stamina, and get some set bonuses that you have stopped short of, or slot Super Jump like a real movement power.
In general though, I would say you are hitting all the important benchmarks for playing the tanky crab.
-
1
-
-
Controllers can solo just fine, though slowly, since most of them have mediocre damage output.
Dark/Dark has some features which imply a close-range "standing just behind the Tanker" play style.
- You need to be standing right next to someone to heal them with Twilight Grasp.
- Soul Absorption is a team buff which requires nearby foes to power it, so it won't work if you're hiding in the back.
- Fade is your big defense and resistance buff, and it's centered on you. Unless you find a team that likes to gather for buffs before a fight, you will have to chase them down and trigger it during the fight.
- Heart of Darkness is a PBAoE disorient which can stack with Howling Twilight if you really need it.
- Many people take Ghost Widow's Soul Mastery pool for Dark Consumption and Soul Drain to have even more PBAoE powers.A few other odds and ends....
- Haunt is cast like a ranged attack, but it creates two pets that hang around and fight things until they expire. If your target dies before the animation for Haunt completes, the power is wasted and you get no pets, so don't use it on the first minion in the front of a group.
- Shadow Field is your AoE hold but it's a ground target which creates a short-lived area hold. It's a hassle to cast but you can do some curious things with it, like using Fold Space to drag foes inside. I tend to use Heart of Darkness / Howling Twilight instead since they both recharge faster and don't need to be ground-targeted.
- If you have money to burn on purple sets, or you don't mind slotting everything for maximum +recharge, you can get "perma" Fade and be unnaturally durable for a Controller. I've never had quite that much recharge on mine, but it's something to consider.-
 1
1
-
-
2 hours ago, desarix said:
Well in your opinion do you think taking first aid will bring up this secondary in any way for a beast build. The problem would be fitting it in.
For a Mastermind with ranged pets (Robots, Mercenaries) and high defense numbers (Force Field, Traps, Time) Medicine Pool powers can be great. With melee pets and a secondary which doesn't give you any defense buffs, I think you'll get interrupted a lot. I'd concentrate on supporting your pets with buffs and debuffs, maybe a bit of crowd control, and re-summon the casualties.
-
I'm afraid neither of those of builds are current, I just haven't posted anything new since nobody was reading the thread anyway.
Although Robot/Sonic is fun to solo with, and I could do newspaper and mayhem missions all day, I think Sonic Resonance in general works better with melee pets. You need to stay close to your melee characters anyway to avoid breaking Disruption Field all the time, and to insure anyone who might need the damage resistance of Sonic Dispersion (the big bubble) is covered.
-
Sonic Resonance doesn't get any respect no matter what archetype it's on. I did post a couple builds for my Robot/Sonic Mastermind here back in 2020 and that thread was enthusiastically ignored by the community, so I'm jealous you got some conversation going here!
I think Sonic is a perfectly good secondary, but it is pretty passive and you spend a lot of your time spamming the same three attacks and Sonic Siphon. I have largely switched to Demon/Thermal when I'm in the mood to Mastermind.
-
Lots of people like Dark Armor, but why War Mace? Well, I used to have a War Mace character long ago and the subject came up in another thread about using Stuns for crowd control and War Mace does have four stun attacks. Nostalgia is a dangerous thing, and so here we are.
Anyway, I created this character last night. Some nice farmers let me mooch some XP, and now he's 36th level and running around Brickstown beating up Crey employees who don't actually seem to be doing anything illegal. At the moment I am using just SOs and endurance is a problem, but I hope that will be mitigated when I get some IO sets going.
- Am I correct about the endurance? Will these IOs handle it or will I be a cripple until I get incarnate powers?
- Does Dark Armor have no knockback resistance? And how much should I add?
- Should a Dark Armor character care about defense? Are these Kinetic Combats a waste of time?
- Or, is it more advantageous to use set bonuses to get even damage resistance?- I'm not doing anything to counteract the knockback of Shatter or Crowd Control. Will I regret it?
- I did have Whirling Mace slotted with a real AoE damage set but I actually like the bonuses from Stupefy better.
- Moonbeam is just in there for fun though it doesn't strictly need to be 6-slotted.This Hero build was built using Mids Reborn 3.2.17
https://github.com/LoadedCamel/MidsRebornClick this DataLink to open the build!
Stun Scrapper 220322: Level 50 Science Scrapper
Primary Power Set: War Mace
Secondary Power Set: Dark Armor
Power Pool: Leaping
Power Pool: Teleportation
Power Pool: Fighting
Ancillary Pool: Soul MasteryHero Profile:
Level 1: Pulverize -- KntCmb-Acc/Dmg(A), KntCmb-Dmg/EndRdx(23), KntCmb-Dmg/Rchg(25), KntCmb-Dmg/EndRdx/Rchg(25)
Level 1: Dark Embrace -- ImpArm-ResDam/EndRdx(A), ImpArm-ResDam/EndRdx/Rchg(3), ImpArm-ResDam(3), ImpArm-ResPsi(5)
Level 2: Bash -- KntCmb-Acc/Dmg(A), KntCmb-Dmg/EndRdx(27), KntCmb-Dmg/Rchg(27), KntCmb-Dmg/EndRdx/Rchg(29)
Level 4: Murky Cloud -- ImpArm-ResDam/EndRdx(A), ImpArm-ResDam/EndRdx/Rchg(5), ImpArm-ResDam(7), ImpArm-ResPsi(7)
Level 6: Death Shroud -- SprAvl-Dmg/EndRdx(A), SprAvl-Acc/Dmg/EndRdx(9), SprAvl-Acc/Dmg/Rchg(9), SprAvl-Acc/Dmg/EndRdx/Rchg(34), SprAvl-Rchg/KDProc(40), FuroftheG-ResDeb%(45)
Level 8: Clobber -- KntCmb-Acc/Dmg(A), KntCmb-Dmg/EndRdx(29), KntCmb-Dmg/Rchg(31), KntCmb-Dmg/EndRdx/Rchg(31)
Level 10: Obsidian Shield -- UnbGrd-ResDam/EndRdx(A), UnbGrd-Max HP%(11)
Level 12: Super Jump -- Lnch-Jump(A), Lnch-End/Jump(13), Lnch-End(13), Lnch-+Special(15)
Level 14: Confront -- MckBrt-Taunt/Rchg(A), MckBrt-Taunt/Rchg/Rng(33), MckBrt-Acc/Rchg(34), MckBrt-Taunt/Rng(42)
Level 16: Dark Regeneration -- ThfofEss-Acc/Heal(A), ThfofEss-Acc/EndRdx/Heal(17), ThfofEss-Acc/EndRdx/Rchg(17), ThfofEss-+End%(19)
Level 18: Whirling Mace -- Stp-Acc/Rchg(A), Stp-EndRdx/Stun(31), Stp-Acc/EndRdx(33), Stp-Stun/Rng(33), Stp-Acc/Stun/Rchg(34), Dmg-I(37)
Level 20: Cloak of Darkness -- LucoftheG-Def/EndRdx(A), LucoftheG-Def/EndRdx/Rchg(21), LucoftheG-Def/Rchg+(21), Ksm-ToHit+(37), ShlWal-ResDam/Re TP(48)
Level 22: Build Up -- RctRtc-Pcptn(A)
Level 24: Teleport Target -- BlsoftheZ-ResKB(A)
Level 26: Shatter -- SprCrtStr-Acc/Dmg(A), SprCrtStr-Dmg/Rchg(42), SprCrtStr-Acc/Dmg/Rchg(43), SprCrtStr-Dmg/EndRdx/Rchg(43), SprCrtStr-Acc/Dmg/EndRdx/Rchg(43), SprCrtStr-Rchg/+50% Crit(45)
Level 28: Kick -- Empty(A)
Level 30: Tough -- ImpArm-ResDam/EndRdx(A), ImpArm-ResDam/EndRdx/Rchg(46), ImpArm-ResDam(46), ImpArm-ResPsi(46)
Level 32: Crowd Control -- SprScrStr-Acc/Dmg(A), SprScrStr-Dmg/Rchg(42), SprScrStr-Acc/Dmg/Rchg(45), SprScrStr-Dmg/EndRdx/Rchg(48), SprScrStr-Acc/Dmg/EndRdx/Rchg(48), SprScrStr-Rchg/+Crit(50)
Level 35: Oppressive Gloom -- Stp-Acc/Rchg(A), Stp-EndRdx/Stun(36), Stp-Acc/EndRdx(36), Stp-Stun/Rng(36), Stp-Acc/Stun/Rchg(37)
Level 38: Moonbeam -- ExtMsr-Acc/Dmg(A), ExtMsr-Dmg/EndRdx(39), ExtMsr-Acc/ActRdx/Rng(39), ExtMsr-Dmg/ActRdx/Rchg(39), ExtMsr-Dmg/EndRdx/Rchg(40), ExtMsr-Acc/Rng/Rchg(40)
Level 41: Shadow Meld -- LucoftheG-Def/Rchg+(A)
Level 44: Combat Jumping -- LucoftheG-Def/Rchg+(A)
Level 47: Weave -- LucoftheG-Def/EndRdx(A), LucoftheG-Def/EndRdx/Rchg(50), LucoftheG-Def/Rchg+(50)
Level 49: Soul Transfer -- RechRdx-I(A)
Level 1: Brawl -- Empty(A)
Level 1: Critical Hit
Level 1: Sprint -- Empty(A)
Level 2: Rest -- Empty(A)
Level 1: Swift -- Empty(A)
Level 1: Health -- Mrc-Rcvry+(A), NmnCnv-Regen/Rcvry+(11), Pnc-Heal/+End(15)
Level 1: Hurdle -- Empty(A)
Level 1: Stamina -- PrfShf-EndMod(A), PrfShf-End%(19), EndMod-I(23)
Level 12: Double Jump
Level 49: Quick Form
-------------
1
-
-
What factors made you design this character as a Corruptor as opposed to a Blaster?
You have a lot of powers that are way over-enhanced for diminishing returns... that's how you can have 6-slotted Hover, 6-slotted Arctic Fog, 6-slotted Weave and still not have soft-capped defenses. You could juggle those slots a bit to gain another copy of Artillery and soft-cap without P2W.
Also, your Stamina is not going to be sufficient to have all this stuff running, even with Heat Loss. All those attacks that are nothing but piles of procs are going to cost a lot of endurance.
This slightly revised version of your build goes some way towards combating these issues, though if it were me I would have a lot fewer procs and more set bonuses.This Villain build was built using Mids Reborn 3.2.17
https://github.com/LoadedCamel/MidsRebornClick this DataLink to open the build!
Level 50 Magic Corruptor
Primary Power Set: Ice Blast
Secondary Power Set: Cold Domination
Power Pool: Flight
Power Pool: Speed
Power Pool: Fighting
Power Pool: Leadership
Ancillary Pool: Soul MasteryVillain Profile:
Level 1: Ice Bolt -- SprScrBls-Dmg/Rchg(A), SprScrBls-Acc/Dmg/Rchg(3), SprScrBls-Acc/Dmg(3)
Level 1: Infrigidate -- IceMisTrmt-+ColdDmg(A), ImpSwf-Dam%(5), AchHee-ResDeb%(5), TchofLadG-%Dam(7), ShlBrk-%Dam(7), Acc-I(9)
Level 2: Frost Breath -- Artl-Acc/Dam(A), Artl-Dam/End(11), Artl-Dam/Rech(11), Artl-Acc/Dam/Rech(23), Artl-End/Rech/Rng(25), Artl-Acc/Rech/Rng(37)
Level 4: Ice Shield -- LucoftheG-Def/Rchg+(A)
Level 6: Aim -- GssSynFr--Build%(A)
Level 8: Freeze Ray -- HO:Nucle(A), GldJvl-Dam%(13), GhsWdwEmb-Dam%(13), NrnSht-Dam%(15), GldNet-Dam%(15), UnbCns-Dam%(17)
Level 10: Glacial Shield -- LucoftheG-Def/Rchg+(A)
Level 12: Ice Storm -- Artl-Dam/End(A), Artl-Acc/Dam(17), Artl-End/Rech/Rng(19), Artl-Dam/Rech(19), Artl-Acc/Dam/Rech(21), Artl-Acc/Rech/Rng(21)
Level 14: Hover -- LucoftheG-Def/Rchg+(A), LucoftheG-Def(23), LucoftheG-Def/EndRdx/Rchg(27)
Level 16: Super Speed -- EndRdx-I(A)
Level 18: Bitter Ice Blast -- HO:Nucle(A), GldJvl-Dam%(29), Apc-Dam%(29), IceMisTrmt-+ColdDmg(31), CldSns-%Dam(31), ImpSwf-Dam%(31)
Level 20: Arctic Fog -- Ags-ResDam/EndRdx(A), Ags-ResDam/EndRdx/Rchg(33), Ags-Psi/Status(33), LucoftheG-Def/EndRdx(33), LucoftheG-Def/EndRdx/Rchg(34), LucoftheG-Def/Rchg+(34)
Level 22: Hasten -- RechRdx-I(A), RechRdx-I(34)
Level 24: Boxing -- Empty(A)
Level 26: Tough -- StdPrt-ResDam/Def+(A), GldArm-3defTpProc(36)
Level 28: Benumb -- Acc-I(A)
Level 30: Weave -- LucoftheG-Def/Rchg+(A), Ksm-ToHit+(36), LucoftheG-Def/EndRdx(36), LucoftheG-Def/EndRdx/Rchg(37), ShlWal-ResDam/Re TP(37)
Level 32: Blizzard -- SprMlcoft-Rchg/Dmg%(A), SprMlcoft-Acc/Dmg(39), SprMlcoft-Dmg/Rchg(39), SprMlcoft-Acc/Dmg/Rchg(39), SprMlcoft-Dmg/EndRdx/Rchg(40), SprMlcoft-Acc/Dmg/EndRdx/Rchg(40)
Level 35: Sleet -- Artl-End/Rech/Rng(A), Artl-Acc/Dam(40), Artl-Dam/End(42), Artl-Dam/Rech(42), Artl-Acc/Dam/Rech(42), Artl-Acc/Rech/Rng(43)
Level 38: Heat Loss -- PreOptmz-Acc/Rech(A), PreOptmz-EndMod/End(43), PreOptmz-EndMod/Rech(43), PreOptmz-EndMod/Acc/End(45), PreOptmz-EndMod/Acc/Rech(45), PreOptmz-EndMod/End/Rech(45)
Level 41: Dark Embrace -- HO:Ribo(A), ResDam-I(46)
Level 44: Soul Drain -- Arm-Dam%(A), Arm-Dmg(46), Arm-Dmg/Rchg(46), Arm-Acc/Dmg/Rchg(48), Arm-Acc/Rchg(48), FuroftheG-ResDeb%(50)
Level 47: Burnout -- RechRdx-I(A), RechRdx-I(48)
Level 49: Maneuvers -- LucoftheG-Def/Rchg+(A), LucoftheG-Def/EndRdx(50), LucoftheG-Def(50)
Level 1: Scourge
Level 1: Brawl -- Empty(A)
Level 1: Sprint -- Empty(A)
Level 2: Rest -- Empty(A)
Level 1: Swift -- Empty(A)
Level 1: Hurdle -- Empty(A)
Level 1: Health -- Pnc-Heal/+End(A), Prv-Absorb%(9)
Level 1: Stamina -- PrfShf-EndMod(A), PrfShf-End%(25), EndMod-I(27)
Level 16: Speed Phase
-------------
 1
1
-
-
I rarely see anyone using Energy Melee, but I used to have a Fire/Energy tank that used disorient to make up for his somewhat lacking defenses, so I have a general feel for how it plays.
The Triumphant Insult disorient procs are interesting. Do they really contribute noticeably, given how much stun you already have? I wonder if they would work well in PBAoE toggles like Death Shroud and Oppressive Gloom.
I would be tempted to scrounge up some less-critical enhancements to capture the 6.25% +Recharge from 5-slotted Stupefy.
I'm inspired to try my own similar build, as soon as I have time....That other thread about the stunning Corruptor.
-
6 minutes ago, Riverdusk said:
I'm with you there on tankers. Idea does sound fun though. Another way to go would be a EM/DA/Leviathan scrapper. Leviathan for water spout for stun, and the fun of tossing them in the air too. Leviathan is always one of my favorite scrapper epics to take anyway, water spout a strong easy one pick wonder, leaving you with more room for other powers.
It does seem like there are some good melee stunner options. Looking at Intermipants' Tanker build, I see there are stun procs I never considered. You could potentially go with a set like War Mace, Kinetic Melee or Super Strength that has fewer/weaker stun attacks if you were generous with the Pounding Slugfest and Triumphant Insult procs. Of course the melee stunners might still need some healing, so the stun-oriented Corruptor wouldn't be redundant!
-
5 hours ago, Intermipants said:
I was also looking for a build that was focused purely around control through stuns and I eventually settled on a dark armor / energy melee tank and just treated it like a melee controller. You get the stun effect from oppresssive gloom and then more or less every attack power, including an aoe, has a stun component. I also took the earth ancillary pool for stalagmites to get another aoe stun. It’s really fun to be in a massive group where everyone is wobbling about - it’s like being the designated driver in the pub at midnight.
I know you’re looking for a defender AT and so apologies if this is an uncalled for tangent, just thought I’d throw it out there. Happy to post the build too if you’re interested.
Well, I did call the thread Stun Control, and I suppose Whirling Hands, Oppressive Gloom and Stalagmites does qualify as three AoE stuns. I do think that Stuns are more amusing than Holds, but while just about everyone has Holds they can stack on things, it's easy to be the only person on a team with meaningful disorient powers. Just ask any Human-form Warshade. Maybe we need a special theme team to make every mob stagger drunkenly around.
Although a disorient-spamming Tanker does sound fun, a strange thing happens when you join a team as a Tanker... people start following you around as-if you know where you're going. Since I often have no idea, I prefer to avoid that responsibility and only have one Tanker on Homecoming. Still, I would be happy to see that build if you post it in the Tanker forum.
-
More than anything else, I think the one ability that makes a "healing set" like Pain Domination awesome is keeping a teammate from face-planting. Even if you see your character as a (de)buffing blaster-type, I would always take Soothe and slot it like you mean it. There is just no substitute.
For this particular build I went with soft-capped ranged defense because I think that's the easiest way to avoid getting mezzed by random enemies. Still, Scorpion Shield for smashing/lethal defense, like Wimbochismo's build, would be good if you like close range combat.This Hero build was built using Mids Reborn 3.2.17
https://github.com/LoadedCamel/MidsRebornClick this DataLink to open the build!
Level 50 Technology Defender
Primary Power Set: Pain Domination
Secondary Power Set: Sonic Attack
Power Pool: Leaping
Power Pool: Speed
Power Pool: Leadership
Ancillary Pool: Mu MasteryHero Profile:
Level 1: Nullify Pain -- NmnCnv-Heal/EndRdx(A), NmnCnv-EndRdx/Rchg(3), NmnCnv-Heal/Rchg(3), NmnCnv-Heal/EndRdx/Rchg(5), NmnCnv-Heal(5), NmnCnv-Regen/Rcvry+(7)
Level 1: Shriek -- Thn-Acc/Dmg(A), Thn-Dmg/EndRdx(7), Thn-Dmg/Rchg(9), Thn-Acc/Dmg/Rchg(9), Thn-Acc/Dmg/EndRdx(11), Thn-Dmg/EndRdx/Rchg(11)
Level 2: Soothe -- Prv-Heal(A), Prv-Heal/EndRdx(15), Prv-EndRdx/Rchg(17), Prv-Heal/Rchg(17), Prv-Heal/Rchg/EndRdx(19), Prv-Absorb%(19)
Level 4: Scream -- Thn-Acc/Dmg(A), Thn-Dmg/EndRdx(21), Thn-Dmg/Rchg(21), Thn-Acc/Dmg/Rchg(23), Thn-Acc/Dmg/EndRdx(23), Thn-Dmg/EndRdx/Rchg(25)
Level 6: Howl -- Artl-Acc/Dam(A), Artl-Dam/End(25), Artl-Dam/Rech(27), Artl-Acc/Dam/Rech(27), Artl-Acc/Rech/Rng(29), Artl-End/Rech/Rng(29)
Level 8: Super Jump -- BlsoftheZ-Travel(A), BlsoftheZ-Travel/EndRdx(31), BlsoftheZ-ResKB(31)
Level 10: Combat Jumping -- LucoftheG-Def/Rchg+(A), LucoftheG-Def(31)
Level 12: Enforced Morale -- RechRdx-I(A)
Level 14: Acrobatics -- EndRdx-I(A)
Level 16: Shout -- SprDfnBst-Acc/Dmg(A), SprDfnBst-Dmg/Rchg(33), SprDfnBst-Dmg/EndRdx/Rchg(33), SprDfnBst-Acc/Dmg/EndRdx(33), SprDfnBst-Acc/Dmg/EndRdx/Rchg(34), SprDfnBst-Rchg/Heal%(34)
Level 18: World of Pain -- UnbGrd-EndRdx/Rchg(A), UnbGrd-Rchg/ResDam(34), UnbGrd-ResDam/EndRdx/Rchg(36), UnbGrd-Max HP%(36)
Level 20: Amplify -- RechRdx-I(A)
Level 22: Hasten -- RechRdx-I(A), RechRdx-I(36)
Level 24: Maneuvers -- RedFrt-Def/EndRdx(A), RedFrt-Def/Rchg(37), RedFrt-EndRdx/Rchg(37), RedFrt-Def/EndRdx/Rchg(37), RedFrt-Def(39), RedFrt-EndRdx(39)
Level 26: Anguishing Cry -- AnlWkn-Acc/DefDeb(A), AnlWkn-Acc/Rchg(39), AnlWkn-Acc/Rchg/EndRdx(40)
Level 28: Conduit of Pain -- RechRdx-I(A)
Level 30: Tactics -- EndRdx-I(A)
Level 32: Painbringer -- PreOptmz-EndMod/Rech(A), PreOptmz-EndMod/End/Rech(40)
Level 35: Charged Armor -- Ags-ResDam/EndRdx(A), Ags-ResDam/EndRdx/Rchg(40), Ags-Psi/Status(42), StdPrt-ResDam/Def+(42), GldArm-3defTpProc(42)
Level 38: Dreadful Wail -- SprVglAss-Acc/Dmg(A), SprVglAss-Dmg/Rchg(43), SprVglAss-Dmg/EndRdx/Rchg(43), SprVglAss-Rchg/+Absorb(43), SprVglAss-Acc/Dmg/EndRdx(45), SprVglAss-Acc/Dmg/EndRdx/Rchg(45)
Level 41: Conserve Power -- RechRdx-I(A)
Level 44: Screech -- Stp-Acc/Rchg(A), Stp-KB%(45), Stp-EndRdx/Stun(46), Stp-Acc/EndRdx(46), Stp-Stun/Rng(46), Stp-Acc/Stun/Rchg(48)
Level 47: Summon Adept -- ExpRnf-Acc/Rchg(A), ExpRnf-Acc/Dmg(48), ExpRnf-Dmg/EndRdx(48), ExpRnf-Acc/Dmg/Rchg(50), ExpRnf-EndRdx/Dmg/Rchg(50), ExpRnf-+Res(Pets)(50)
Level 49: Vengeance -- LucoftheG-Def/Rchg+(A)
Level 1: Brawl -- Empty(A)
Level 1: Sprint -- Empty(A)
Level 1: Vigilance
Level 2: Rest -- Empty(A)
Level 1: Swift -- Empty(A)
Level 1: Health -- Mrc-Rcvry+(A), Pnc-Heal/+End(13)
Level 1: Hurdle -- Empty(A)
Level 1: Stamina -- PrfShf-EndMod(A), PrfShf-End%(13), EndMod-I(15)
Level 8: Double Jump
-------------
1
-
-
I am actually partial to Sonic Resonance and I did try that combination first, but I had some issues with it. So, at the risk of going off-topic in my own thread, let's discuss...
1) Sonic Siphon (Single-target -resist debuff)
This is generally assumed to be your opener on any sort of big bad guy, which means you won't be opening with Disintegration. If you switch targets with Beam Rifle you can often just pick a nearby target and it will already have the Disintegrating effect on it, but Sonic Siphon has to be cast again, and... redraw. And if you miss with that first Sonic Siphon and have to use Disintegrate and then try Sonic Siphon again, more redraw. If the fight lasts more than 30 seconds and Sonic Siphon wears off, you get the idea.
Sonic Siphon is a great power and not skippable, but it does take you out of the zen of Beam Rifle shooting.2) Disruption Field (AoE -resist toggle, makes your Tanker look like Saturn)
One of the great features of Beam Rifle is that all its powers can be used from long range, even the nuke. You can hide in the back with the squishy characters... or can you? Disruption Field is a toggle and it breaks if you're too far from the Tank, which is basically any time you're safely in the rear and the Tank rushes forward to engage a new spawn. It's also any time the Tank takes an elevator on a mission map. It's a hassle to maintain and it really requires that you stay glued to the Tank and not do your own blaster thing.
Again, a great power and not skippable, but also not ideal if you really just want to concentrate on Beam Rifle.I feel like Sonic Resonance makes you a better teammate, but Force Field is more fun.
-
Well, if it were optimal, everyone would be doing it! What's the fun in that? The concept for this build came from my Dark/Dark Controller. I'm not a big fan of ground target powers like Shadow Field and so I was using Howling Twilight offensively and then stacking Heart of Darkness (PBAoE disorient) on it.
As far as I can tell, Dark/Dark/Dark Defenders and Corruptors are the only characters that can get three different AoE stuns for maximum stacking. I'm not sure what the magnitude of the stun proc in Moonbeam is, but I plan to test that out. Even if his crowd control is somewhat inconsistent he's still buffing, debuffing and healing... usual Defender/Corruptor stuff.
It would be great to have Blackstar/Soul Drain but I think the real signature powers of any Dark/Dark build are the cone attacks which, as you say, don't synergize well with PBAoE. The general plan is to fight at long range with cones, Howling Twilight and Dark Pit, and use my ranged defense to stay alive. I'm hoping Oppressive Gloom will only be used as a backup, and I have it slotted with the knockback proc so it will bounce melee attackers.
You're right that one of Howling Twilight's big weaknesses is it long recharge time. Unfortunately the old standby of stun IO sets, Stupefy, has a rather lackluster bonus to recharge time. That's why I went with the more expensive purple set, to get the best recharge for the fewest slots.
Tar patch could definitely show up sooner in the build.
I'm sure there are things I could shuffle around to get an extra slot in Hasten or maybe to slot Howling Twilight with five slots of Stupefy plus a recharge IO. Dark Embrace is over-slotted for Resistance but I wanted that endurance discount. I suspect I'll just have to build the character and see what works.
-
Dark/Dark Defenders and Corruptors have always been very Controllery and I wanted to give this character an emphasis on crowd control in the form of stun, while still inflicting reasonable damage and not being too squishy.
- Howling Twilight, Dark Pit and Oppressive Gloom can stack a lot of stun. There's even a stun proc in Moonbeam.
- Soft-capped Ranged Defense and 52% Smashing/Lethal resist should hopefully make him less-squishy.
I found it surprisingly difficult to squeeze everything I wanted in here. Every power slot was precious which is how he ended up being a Corruptor and not a Defender... I didn't want Dark Blast, the tier 1 filler attack which Defenders are required to take. I also ran out of enhancements slots, leaving some things under-slotted. But maybe you guys can do it better!This Villain build was built using Mids Reborn 3.2.17
https://github.com/LoadedCamel/MidsRebornClick this DataLink to open the build!
DDC 220313: Level 50 Magic Corruptor
Primary Power Set: Dark Blast
Secondary Power Set: Dark Miasma
Power Pool: Teleportation
Power Pool: Speed
Power Pool: Fighting
Power Pool: Leaping
Ancillary Pool: Dark MasteryVillain Profile:
Level 1: Gloom -- SprScrBls-Acc/Dmg/Rchg(A), SprScrBls-Dmg/EndRdx/Rchg(3), SprScrBls-Rchg/+End(3)
Level 1: Twilight Grasp -- Prv-Heal/EndRdx(A), Prv-EndRdx/Rchg(5), Prv-Heal/Rchg(5), Prv-Heal/Rchg/EndRdx(21), Prv-Absorb%(31), Acc-I(34)
Level 2: Moonbeam -- ExcCnt-Acc/Dmg(A), ExcCnt-Dmg/EndRdx(7), ExcCnt-Dmg/ActRdx(7), ExcCnt-Dmg/Rng(34), ExcCnt-Stun%(40), ExcCnt-Dmg/Rchg(50)
Level 4: Teleport -- Wrp-Range(A), Wrp-End/Range(9), Wrp-End(9), Wrp-+Special(11)
Level 6: Darkest Night -- EndRdx-I(A)
Level 8: Tenebrous Tentacles -- Artl-Acc/Dam(A), Artl-Dam/End(11), Artl-Dam/Rech(13), Artl-Acc/Dam/Rech(34), Artl-Acc/Rech/Rng(36), Artl-End/Rech/Rng(46)
Level 10: Howling Twilight -- AbsAmz-Stun/Rchg(A), AbsAmz-Acc/Stun/Rchg(13), AbsAmz-Acc/Rchg(15), AbsAmz-EndRdx/Stun(37), AbsAmz-ToHitDeb%(50)
Level 12: Night Fall -- Artl-Acc/Dam(A), Artl-Dam/End(15), Artl-Dam/Rech(17), Artl-Acc/Dam/Rech(33), Artl-Acc/Rech/Rng(37), Artl-End/Rech/Rng(48)
Level 14: Dark Pit -- Stp-Acc/Rchg(A), Stp-Stun/Rng(17), Stp-Acc/EndRdx(19), Stp-EndRdx/Stun(19), Stp-Acc/Stun/Rchg(37)
Level 16: Shadow Fall -- LucoftheG-Def/EndRdx(A), LucoftheG-Def/Rchg+(21), UnbGrd-ResDam/EndRdx(31), UnbGrd-Max HP%(39)
Level 18: Hasten -- RechRdx-I(A)
Level 20: Fearsome Stare -- CldSns-ToHitDeb(A), CldSns-Acc/ToHitDeb(23), CldSns-Acc/Rchg(23), CldSns-ToHitDeb/EndRdx/Rchg(39), CldSns-Acc/EndRdx/Rchg(43), CldSns-%Dam(48)
Level 22: Teleport Target -- BlsoftheZ-ResKB(A)
Level 24: Boxing -- Acc-I(A)
Level 26: Life Drain -- SprMlcoft-Acc/Dmg(A), SprMlcoft-Dmg/Rchg(27), SprMlcoft-Acc/Dmg/Rchg(27), SprMlcoft-Dmg/EndRdx/Rchg(33), SprMlcoft-Acc/Dmg/EndRdx/Rchg(33), SprMlcoft-Rchg/Dmg%(40)
Level 28: Petrifying Gaze -- BslGaz-Acc/Hold(A), BslGaz-Acc/Rchg(29), BslGaz-Acc/EndRdx/Rchg/Hold(29), BslGaz-Slow%(40)
Level 30: Combat Jumping -- LucoftheG-Def(A), LucoftheG-Def/Rchg+(31)
Level 32: Tar Patch -- Slow-I(A)
Level 35: Oppressive Gloom -- Stp-Acc/Rchg(A), Stp-EndRdx/Stun(36), Stp-Acc/EndRdx(36), Stp-Stun/Rng(42), Stp-Acc/Stun/Rchg(43), Stp-KB%(43)
Level 38: Dark Servant -- CldSns-Acc/ToHitDeb(A), CldSns-Acc/Rchg(39)
Level 41: Dark Embrace -- ImpArm-ResDam/EndRdx(A), ImpArm-EndRdx/Rchg(42), ImpArm-ResDam/EndRdx/Rchg(42), ImpArm-ResDam(45), StdPrt-ResDam/Def+(46), GldArm-3defTpProc(46)
Level 44: Tough -- Ags-ResDam/EndRdx(A), Ags-ResDam/EndRdx/Rchg(45), Ags-Psi/Status(45)
Level 47: Weave -- LucoftheG-Def/EndRdx(A), LucoftheG-Def/Rchg+(48), LucoftheG-Def/EndRdx/Rchg(50)
Level 49: Soul Transfer -- RechRdx-I(A)
Level 1: Scourge
Level 1: Brawl -- Empty(A)
Level 1: Sprint -- Empty(A)
Level 2: Rest -- Empty(A)
Level 1: Swift -- Empty(A)
Level 1: Hurdle -- Empty(A)
Level 1: Health -- Mrc-Rcvry+(A), NmnCnv-Regen/Rcvry+(25)
Level 1: Stamina -- PrfShf-EndMod(A), PrfShf-End%(25)
Level 49: Quick Form
-------------
1
-
-
Why did you decide on this specific combination of power sets for your first Defender?
I like Pain Domination but it can a bit hit-or-miss... it can be essential to a low-level team where nobody has good IOs or soft-capped defenses, but a team of 50s with set IOs and incarnate powers may not need any healing at all. In cases like this, the Pain Domination Defender is basically a Blaster who can buff the team with World of Pain and Painbringer, so it's good to have a secondary that you enjoy.
Do you like Sonic Attack or do you just like resistance debuffs?-
1
-
-
I have a few different Beam Rifle characters and I find that I enjoy the powerset most when I am able to concentrate on just shooting things and working out the best attack chain to deal optimum damage. It's just a busy powerset that doesn't like to be interrupted. My current Beam Rifle character is a Force Field / Beam Rifle Defender.
-
1
-
-
Beam Rifle is a "busy" power set... you want to scan each group for a boss and hit it with Disintegrate, then hit it with a chain of single-target attacks to spread the disintegrating effect, and switch to your AoEs while there's still a group to AoE. You don't want to have to watch the team's health, or change targets to deliver heals or (de)buffs in the middle of your attack chain, which is why I think Beam Rifle pairs well with Force Field. This character does exist and he's 50 but I am switching from using Fly to Teleport and reorganizing his powers a bit. Cutting Beam and Piercing Beam just work a lot better when you're standing on the ground.
This Hero build was built using Mids Reborn 3.2.17
https://github.com/LoadedCamel/MidsRebornClick this DataLink to open the build!
Jackson Hazard 220220: Level 50 Technology Defender
Primary Power Set: Force Field
Secondary Power Set: Beam Rifle
Power Pool: Teleportation
Power Pool: Leaping
Power Pool: Speed
Power Pool: Leadership
Ancillary Pool: Electricity MasteryHero Profile:
Level 1: Personal Force Field -- ShlWal-ResDam/Re TP(A)
Level 1: Single Shot -- Dcm-Acc/Dmg(A), Dcm-Dmg/EndRdx(3), Dcm-Dmg/Rchg(3), Dcm-Acc/EndRdx/Rchg(23), Dcm-Acc/Dmg/Rchg(25), Dcm-Build%(31)
Level 2: Charged Shot -- SprWntBit-Dmg/Rchg(A), SprWntBit-Acc/Dmg/EndRdx(5), SprWntBit-Acc/Dmg/Rchg(5), SprWntBit-Dmg/EndRdx/Acc/Rchg(25), SprWntBit-Rchg/SlowProc(31)
Level 4: Cutting Beam -- Artl-Acc/Dam(A), Artl-Dam/End(7), Artl-Dam/Rech(7), Artl-Acc/Dam/Rech(33), Artl-Acc/Rech/Rng(33), Artl-End/Rech/Rng(33)
Level 6: Teleport -- Wrp-Range(A), Wrp-End/Range(9), Wrp-End(9), Wrp-+Special(34), Tim&SpcMn-Stlth(34)
Level 8: Combat Jumping -- LucoftheG-Def/Rchg+(A)
Level 10: Disintegrate -- SprVglAss-Acc/Dmg(A), SprVglAss-Dmg/Rchg(11), SprVglAss-Dmg/EndRdx/Rchg(11), SprVglAss-Acc/Dmg/EndRdx(34), SprVglAss-Acc/Dmg/EndRdx/Rchg(36), SprVglAss-Rchg/+Absorb(37)
Level 12: Dispersion Bubble -- Rct-Def(A), Rct-Def/EndRdx(13), Rct-EndRdx/Rchg(13), Rct-Def/Rchg(37), Rct-Def/EndRdx/Rchg(37), Rct-ResDam%(39)
Level 14: Deflection Shield -- LucoftheG-Def(A), LucoftheG-Def/Rchg+(15)
Level 16: Insulation Shield -- LucoftheG-Def(A), LucoftheG-Def/Rchg+(17)
Level 18: Repulsion Field -- EndRdx-I(A)
Level 20: Lancer Shot -- SprDfnBst-Acc/Dmg(A), SprDfnBst-Dmg/Rchg(21), SprDfnBst-Dmg/EndRdx/Rchg(21), SprDfnBst-Acc/Dmg/EndRdx(40), SprDfnBst-Acc/Dmg/EndRdx/Rchg(40), SprDfnBst-Rchg/Heal%(40)
Level 22: Hasten -- RechRdx-I(A), RechRdx-I(23)
Level 24: Teleport Target -- BlsoftheZ-ResKB(A)
Level 26: Maneuvers -- LucoftheG-Def/EndRdx(A), LucoftheG-Def(27), LucoftheG-Def/Rchg+(27)
Level 28: Tactics -- GssSynFr--ToHit(A), GssSynFr--ToHit/Rchg(29), GssSynFr--ToHit/Rchg/EndRdx(29), GssSynFr--Rchg/EndRdx(42), GssSynFr--ToHit/EndRdx(43), GssSynFr--Build%(43)
Level 30: Aim -- RctRtc-Pcptn(A)
Level 32: Force Bubble -- EndRdx-I(A)
Level 35: Piercing Beam -- SprFrzBls-Acc/Dmg(A), SprFrzBls-Dmg/EndRdx(36), SprFrzBls-Acc/Dmg/EndRdx(36), SprFrzBls-Acc/Dmg/Rchg(43), SprFrzBls-Dmg/EndRdx/Acc/Rchg(45), SprFrzBls-Rchg/ImmobProc(46)
Level 38: Overcharge -- Artl-Acc/Dam(A), Artl-Dam/End(39), Artl-Dam/Rech(39), Artl-Acc/Dam/Rech(46), Artl-Acc/Rech/Rng(46), Artl-End/Rech/Rng(48)
Level 41: Thunder Strike -- ScrDrv-Acc/Dmg(A), ScrDrv-Dmg/EndRdx(42), ScrDrv-Acc/Rchg(42), ScrDrv-Acc/Dmg/EndRdx(48), ScrDrv-Dam%(50)
Level 44: Charged Armor -- UnbGrd-ResDam/EndRdx(A), UnbGrd-ResDam/EndRdx/Rchg(45), UnbGrd-Max HP%(45), StdPrt-ResDam/Def+(50), GldArm-3defTpProc(50)
Level 47: Assault -- EndRdx-I(A), EndRdx-I(48)
Level 49: Vengeance -- LucoftheG-Def/Rchg+(A)
Level 1: Brawl -- Empty(A)
Level 1: Sprint -- Qck-EndRdx/RunSpd(A)
Level 1: Vigilance
Level 2: Rest -- Empty(A)
Level 1: Swift -- Run-I(A)
Level 1: Health -- Mrc-Rcvry+(A), NmnCnv-Regen/Rcvry+(15), Pnc-Heal/+End(19), Prv-Absorb%(31)
Level 1: Hurdle -- Jump-I(A)
Level 1: Stamina -- PrfShf-EndMod(A), PrfShf-End%(17), EndMod-I(19)
Level 1: Disintegrating
-------------
1
-
-
The most valuable thing about Forge is actually the damage buff. If you enhance its recharge you can buff more teammates.
Maybe I exemplar a lot more than you do. My Pain Domination characters, including Controllers, take Share Pain because six-slotted Nullify Pain isn't always enough healing.
On the subject of Thermal Radiation, I have a Thermal/Energy Defender and a Demon/Thermal Mastermind that I play pretty regularly. I think it has a good balance of offensive and defensive powers. You can keep your teammates alive by making them resist damage and healing them. You can increase your team's damage output substantially with Forge and of course Melt Armor. I generally only break out Heat Exhaustion when dealing with big boss-types, but it does work great.
I still have a character somewhere with Enflame. Maybe I will give it another chance!
-
1
-
-
Defense isn't the only thing this build forsakes. How about support? You seem to have boiled down Thermal Radiation to Warmth and the two debuffs. Important support powers like Cauterize, both Shields and Forge are either missing completely or just slotted as mules. Is this character just intended to solo?
Strangler - I think five procs with some Accuracy will ultimately do more damage than six procs that miss a lot.
Seeds of Confusion - It's great, though I think you would get more bang for your buck if you gave it a Range IO instead of a damage proc. Big cone attacks really get a lot of mileage out of range increases.
Enflame - I've tried to use Enflame and I'm not really sold on it. In an environment where you're spamming Seeds of Confusion and most mobs are fighting each other, is it going to be worth all the enhancement slots you have invested?
-
1
-

Crab Spider Build: Sentinel with Pets
in Arachnos Soldier & Widow
Posted
There shouldn't be any problem trading in Longfang for Frag Grenade since you do already have Channelgun on your list of powers to get.
There was a time when teams would stop fighting long enough to gather for the Empath's Recovery Aura, wait patiently for the Controller to confuse a Malta Sapper, and hold their fire for the Tanker to group up the mobs into a nice bunch... and Omega Maneuver would have been a perfectly good power in that game. In modern City of Heroes it's just too slow to be effective for its intended purpose as an opener / AoE control power.
If you want to have your pets in play as much as possible, I would get Hasten.
Feel free to post a build if you want to discuss fine details.