

Hjarki
-
Posts
1051 -
Joined
-
Last visited
Content Type
Profiles
Forums
Events
Store
Articles
Patch Notes
Posts posted by Hjarki
-
-
One way to examine this question is to consider 'effective health'. For example, if you're at 70% health and have 25% resists, it would take a hit equal to .7 / (1 - .25) = 93% of maximum health to kill you.
Super Reflexes and Reactive Armor add the wrinkle of scaling resists. Presuming you have both, some breakpoints (based on your resists without any of the scaling resists):
- 30% Resists. This is the steady state point where your effective health stops moving below 60%. A single hit is no more likely to kill you at 10% health than it is at 60% health.
- 40% Resists. This is the point at which it becomes advantageous to fight at low health. A 40% resist SR Tanker has the same effective health at 20% as they do at 100%. As you move above 40%, you actually have more effective health at low health totals (while also taking far less total damage that needs to be offset with healing/regen).
- 80% Resists. The "fight better at low health" category ends around here and you're better off just staying at maximum health.
However, it should be noted that no SR Tanker has a particularly high effective health. A 90% Resist Tanker with 100% health can take 10 times their total health bar in a single hit. For realistic levels of resist on an SR Tanker (such as recommended elsewhere in this thread), 2.5 times is about the max.
Super Reflexes also doesn't grant any bonuses to maximum health. An Invulnerability or Stone Tanker probably has 25% more total health than an SR Tanker. So our Invulnerability Tanker is probably going to have an effective health (vs. S/L) at 100% health five times higher than our Super Reflexes Tanker.
With that in mind, effective health is primarily meaningful against AV. Against minions/lt/boss, no individual hit is hard enough to kill you outright so all you're really worried about is total mitigation. So if we focus strictly on AV fights, we can count the 8% from uniques (Shield Wall, non-scaling portion of Reactive) and 13% from ATO proc (presuming we place it in the right power). That 21% and our goal should probably be another 9% from set bonuses at minimum. With both ATO, we get another 12% S/L.
As a result, I view Toughness on a SR Tanker to be a poor choice. Unlike the overwhelming majority of builds, you have no particular need for Weave - you've got more than enough Defense mules for every unique and it's nearly impossible to build a sub-soft-cap SR Tanker if you're not actively trying to screw up. With uniques and ATOs, you're already in the 30% - 40% range where your scaling resists cause your health decline to stall at low health. While obviously more resist is always better, all it's really doing is shifting the point you hit maximum resists to a slightly health total.
Not taking Toughness means you save:
- A power pool. You've only got 4, so might as well not waste one.
- A power pick. Kick/Boxing are wastes of a power pick that you can't do anything with.
- Endurance. Not having to keeping those two toggles running is a significant endurance savings for a primary that has no endurance management.
With that in mind, not taking Toughness also means you no longer have the ability to slot Unbreakable Guard, Gladiator's Armor, Steadfast Protection and Impervious Skin. Luckily, there's an alternative: Rune of Protection.
To get to Rune of Protection, you can easily take Mystic Flight - it's a perfectly serviceable travel power that can be used to slot Winter's Chill (amongst other things). Spirit Ward is essentially a dead power - none of the healing uniques function in powers you don't use and you're not going to be using Spirit Ward.
Arcane Bolt can potentially be effective. Eyeballing the math, Arcane Power probably only procs once every 25 sec or so. Once it has proc'd, Arcane Bolt is 66 dpa (higher tahn all but the hardest-hitting Tanker attacks) so it can be used to (slightly) increase your single target dps. It's also a good place to dump sets like Apocalypse if needed.
You also gain access to Enflame. This allows slotting Ragnarok. Unless I'm misreading City of Data, this deals 26.415 (5.283*5) damage to 5 targets every 3 sec for 60 sec. The frequent patch dropping also means procs activate quite a bit more often than would otherwise occur.
In terms of Rune of Protection itself, it provides about +30% to all resists while active (60 sec every 180 sec, no recharge reduction). This isn't useful for churning through endless waves of ITF trash, but it's quite handy when you first engage an AV and having yet gotten a chance to stack your ATO procs. And, of course, it costs zero endurance when you're not using it.
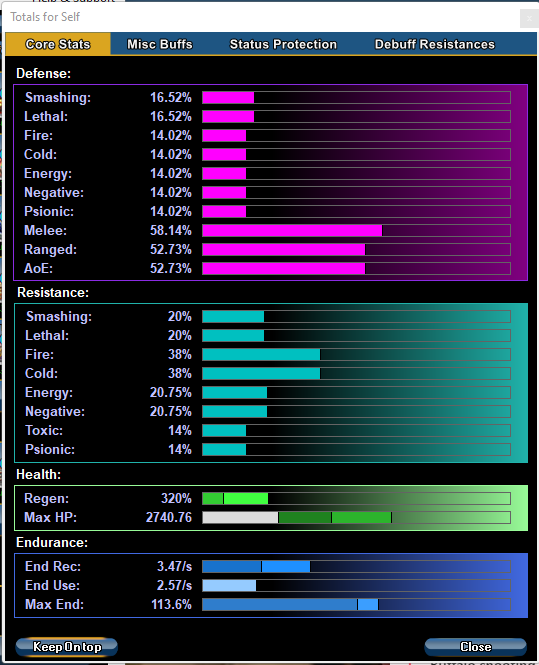
Below are the stats for my current SR/Staff Tanker @100% health without ATO proc, Staff resist proc, or Rune of Protection. With all three of those active, I'd have about +56% to all resists.
-
 1
1
-
 1
1
-
1 hour ago, arcane said:
The most important contributions from support classes tend to be +damage, -res, -regen, CC, and shoring up your non-melee teammates’ mitigation.
-Regen isn't very useful. -100% Regen on an endgame AV/GM is roughly equivalent to 15 (non-scaling) dps. Certainly, it's great if you're trying to solo even-level AV/GM for kicks, but for teams it's mostly superfluous.
+damage/-res are definitely useful, but it becomes a calculation of how much dps you lose vs. how much dps you gain. More importantly, the melee AT brings these abilities as well - they're just lower numbers. So while you can theorize about some perfectly structured group full of defenders, it's a lot easier to just grab 8 melee AT who can all operate effectively independently of one another and who synergize in any combination when you stack them.
-
On 4/22/2022 at 11:57 AM, Solvernia said:
Super Reflexes is easy to build, light on slotting, and will make you immortal without purple sets provided you take all the powers except Elude.
To amplify this comment a bit, Super Reflexes is... different. A lot of the approaches that players are used to from other sets don't really work all that well with Super Reflexes because they just end up with ridiculously over-capped resists without ever bothering to take advantage of those resists. While I agree on the "build for health" approach, there's only so far you can go with this. Exploiting these virtues to amplify offense is a lot easier and you can still make a very tanky build.
One of my more elegant builds is below. It's the sort of build you can only do with a Tanker and while it can't tank everything that could ever be thrown at it, it can do pretty well against most content while still having fairly decent offense.
SpoilerThis Hero build was built using Mids Reborn 3.2.17
https://github.com/LoadedCamel/MidsReborn
Click this DataLink to open the build!
Level 50 Magic Tanker
Primary Power Set: Super Reflexes
Secondary Power Set: Staff Fighting
Power Pool: Leaping
Power Pool: Sorcery
Power Pool: Leadership
Hero Profile:
Level 1: Focused Fighting
- (A) Shield Wall - +Res (Teleportation), +5% Res (All)
- (3) Shield Wall - Defense/Endurance
- (3) Shield Wall - Defense
- (5) Shield Wall - Defense/Recharge
Level 1: Mercurial Blow
- (A) Superior Might of the Tanker - Accuracy/Damage/Recharge
- (5) Superior Might of the Tanker - Accuracy/Damage/Endurance/Recharge
- (7) Mako's Bite - Chance of Damage(Lethal)
- (7) Mako's Bite - Accuracy/Damage
- (9) Mako's Bite - Damage/Endurance
- (9) Mako's Bite - Accuracy/Damage/Endurance/Recharge
Level 2: Focused Senses
- (A) Shield Wall - Defense
- (17) Shield Wall - Defense/Endurance
- (17) Shield Wall - Defense/Recharge
Level 4: Agile
- (A) Luck of the Gambler - Defense/Increased Global Recharge Speed
- (19) Luck of the Gambler - Defense
Level 6: Practiced Brawler
- (A) Endurance Reduction IO
Level 8: Dodge
- (A) Luck of the Gambler - Defense/Increased Global Recharge Speed
- (19) Luck of the Gambler - Defense
Level 10: Precise Strike
- (A) Superior Might of the Tanker - Damage/Recharge
- (21) Superior Might of the Tanker - Accuracy/Damage
- (21) Touch of Death - Chance of Damage(Negative)
- (23) Superior Might of the Tanker - Recharge/Chance for +Res(All)
- (23) Perfect Zinger - Chance for Psi Damage
- (25) Superior Might of the Tanker - Damage/Endurance/Recharge
Level 12: Evasion
- (A) Luck of the Gambler - Defense/Increased Global Recharge Speed
- (25) Luck of the Gambler - Defense
- (27) Perfect Zinger - Chance for Psi Damage
- (27) Perfect Zinger - Threat/Placate
- (29) Perfect Zinger - Threat/Placate/Recharge
- (29) Perfect Zinger - Threat/Placate/Range
Level 14: Guarded Spin
- (A) Armageddon - Chance for Fire Damage
- (31) Armageddon - Damage/Endurance
- (31) Armageddon - Damage/Recharge
- (31) Armageddon - Accuracy/Damage/Recharge
- (33) Armageddon - Accuracy/Recharge
- (33) Luck of the Gambler - Defense/Increased Global Recharge Speed
Level 16: Combat Jumping
- (A) Kismet - Accuracy +6%
Level 18: Lucky
- (A) Luck of the Gambler - Defense/Increased Global Recharge Speed
- (34) Luck of the Gambler - Defense
Level 20: Mystic Flight
- (A) Hypersonic - Flying / Increased Fly Protection
Level 22: Staff Mastery
Level 24: Spirit Ward
- (A) Panacea - Heal
- (48) Panacea - Endurance/Recharge
- (48) Panacea - Heal/Recharge
- (50) Panacea - Heal/Endurance/Recharge
- (50) Panacea - Heal/Endurance
Level 26: Quickness
- (A) Run Speed IO
Level 28: Serpent's Reach
- (A) Apocalypse - Damage
- (36) Apocalypse - Damage/Endurance
- (36) Apocalypse - Chance of Damage(Negative)
- (36) Gladiator's Javelin - Chance of Damage(Toxic)
- (37) Explosive Strike - Chance for Smashing Damage
- (37) Perfect Zinger - Chance for Psi Damage
Level 30: Taunt
- (A) Perfect Zinger - Threat/Placate
- (33) Perfect Zinger - Threat/Placate/Recharge/Range
- (34) Perfect Zinger - Threat/Placate/Range
- (34) Perfect Zinger - Chance for Psi Damage
Level 32: Enflame
- (A) Ragnarok - Accuracy/Recharge
- (37) Ragnarok - Accuracy/Damage/Recharge
- (39) Ragnarok - Damage/Recharge
- (39) Bombardment - Chance for Fire Damage
- (39) Ragnarok - Damage/Endurance
- (40) Ragnarok - Chance for Knockdown
Level 35: Innocuous Strikes
- (A) Ice Mistral's Torment - Accuracy/Damage/Endurance/Recharge
- (40) Ice Mistral's Torment - Endurance/Slow
- (40) Ice Mistral's Torment - Chance for Cold Damage
- (42) Ice Mistral's Torment - Damage/Recharge
- (42) Ice Mistral's Torment - Damage/Slow
- (42) Ice Mistral's Torment - Accuracy/Damage/Endurance
Level 38: Sky Splitter
- (A) Hecatomb - Chance of Damage(Negative)
- (43) Hecatomb - Accuracy/Damage/Recharge
- (43) Hecatomb - Accuracy/Recharge
- (43) Hecatomb - Damage/Recharge
- (45) Superior Gauntleted Fist - RechargeTime/+Absorb
- (45) Hecatomb - Damage/Endurance
Level 41: Rune of Protection
- (A) Unbreakable Guard - +Max HP
- (46) Gladiator's Armor - TP Protection +3% Def (All)
- (46) Steadfast Protection - Resistance/+Def 3%
- (46) Impervious Skin - Status Resistance/Regeneration
- (45) Unbreakable Guard - Resistance
- (48) Gladiator's Armor - Resistance
Level 44: Assault
- (A) Endurance Reduction IO
Level 47: Maneuvers
- (A) Reactive Defenses - Scaling Resist Damage
Level 49: Tactics
- (A) Gaussian's Synchronized Fire-Control - Chance for Build Up
Level 1: Sprint
- (A) Celerity - +Stealth
Level 1: Swift
- (A) Flight Speed IO
Level 1: Hurdle
- (A) Jumping IO
Level 1: Health
- (A) Regenerative Tissue - +Regeneration
- (11) Panacea - +Hit Points/Endurance
- (11) Numina's Convalesence - +Regeneration/+Recovery
- (13) Miracle - +Recovery
- (50) Preventive Medicine - Chance for +Absorb
Level 1: Stamina
- (A) Power Transfer - Chance to Heal Self
- (13) Power Transfer - EndMod
- (15) Performance Shifter - Chance for +End
- (15) Performance Shifter - EndMod
Level 22: Form of the Body
Level 22: Form of the Mind
Level 22: Form of the Soul
Level 1: Combo Level 1
Level 1: Combo Level 2
Level 1: Combo Level 3
Level 50: Freedom Phalanx Reserve
Level 50: Portal Jockey
Level 50: Task Force Commander
Level 50: The Atlas Medallion
------------
In terms of the rest of the primaries, I tend to view them as:
- Super Reflexes/Shield. These tend to share the same strength/weaknesses and both can be justified for certain builds.
- Bio/Stone > Invulnerability/Willpower/Ice. These hybrid sets tend to have similar build structures, but Bio/Stone just do it better with fewer holes and more supplemental benefits.
- Radiation/Fire/Electric/Dark. Classically, the rule was "Resist for Tankers, Defense for Scrappers". However, the way IO sets are structured makes it very hard to build from a base of a pure resist set (at least on a Tanker). Defense toggles let you equip 5xLotG, the other uniques and only take a minimal number of slots to deliver their benefits. Resist sets tend not to be particularly good at buffing anything you're likely to need - Melee and F/C Def are perhaps the least useful forms of defense and the only stackable Resist special is the not-terribly-useful Psi Resist. I actually think these are more useful for Stalkers since they get Hide and Shadow Meld on even zero-defense sets.
However, it's really more about the combination of primary/secondary working synergistically and it's tough to say "X is good" without referencing what it's paired with.
- (A) Shield Wall - +Res (Teleportation), +5% Res (All)
-
14 hours ago, Voltak said:
THis is all assuming you are playing the easiest of content in the game.
No, it's assuming you're playing the actual content in the game.
The fact that you can set up an AE mission using parameters found nowhere in the game to create a challenge doesn't alter the underlying reality that support archetypes just aren't very useful in the game because they're buffing allies beyond what is needed. Even running with no temporary powers/inspirations/etc., there really isn't a need for more than what well-designed melee AT can do defensively.
-
Staff is weak single target, but an AE powerhouse.
There are three forms: Body, Soul and Mind. You can get up to three stacks. Body provides +15% damage, Mind provides +15% recharge and Soul provides +33% endurance discount. You can also spend these stacks for slightly elevated damage with two 'finisher' moves which give different benefits:
- Eye of the Storm grants -resist, -defense or -recharge/slow. -Resist is far and away the best of these, but Eye of the Storm itself is the weakest of the AE attacks in the set.
- Skysplitter grants +resist, +hit or +recovery/regen. Of this, either +resist or +recovery/regen are strong choices.
You also get a bit extra smashing, psionic or energy damage (depending on stance) but this is trivial.
Personally, I view Staff as a set you take for the purposes of tanking - and it works better on Tankers due to the Cone-centric emphasis. While it's not great at single target damage, it solves so many potential problems with a build that it just makes almost any build easier.
-
 1
1
-
On 5/3/2022 at 12:24 PM, Apparition said:
Eight Tankers could do LRSF at +4, but you'll need temporary powers.
Bio Armor, Radiation Armor and Energy Melee can all debuff regen. However, it's probably not worthwhile to use Energy Melee for this purpose.
-
1
-
-
As I see it, the problem with support AT is that the game simply runs off the rails at the high end. When almost anyone with a defense set can hard-cap resists and soft-cap defenses, there isn't much need for these sorts of buffs. Moreover, the stacking nature of these sorts of buffs means that even if you shift the goal posts a bit, you merely end up in a situation where you only need one.
Buff/debuffs also aren't created equal. Even significant amounts of -damage barely make a dent in the damage output of serious enemies because of the way the scaling works and their resistances. But even minor amounts of +resist can slice damage taken into a fraction of its value (presuming they're not already hard-capped).
Ultimately, I think the only solution is to scale almost everything logarithmically and remove most of the inherent resists to debuffs. On such a scaling, you'd never be able to 'cap' anything - each subsequent buff/debuff would provide less and less benefit - and increasing/decreasing a stat would have the same overall effect with the same numbers.
However, this would be a radical departure from the fundamental game mechanics, require everyone to re-build their characters and dramatically change a huge array of playstyles. You'd probably no longer have those +4 Fire Farms and you'd find much of the content far harder than it is now.
-
 2
2
-
-
On 1/9/2022 at 1:25 PM, Sovera said:
On a suppert/Tanker it says it's 15% but actual testing shows to be 4-5%. This is the not really part.
On most of your attacks, you'll be running +150% or so damage. Adding another 15% would take it from a 2.5x attack to a 2.65x, or a 6% boost. Are you sure this isn't what you're seeing?
In any case, if you've got the endurance and the power slot to spare, there's little reason not to take it. Unlike Maneuvers/Tactics which mostly serve as self-buffs (since your group mates will have already capped their hit/defense without your help), Assault is almost always a benefit for the entire group.
-
4 hours ago, Lazarillo said:
In fairness, /Shield gets Terrorize protection, too, but has other more cosmetic problems for me (which is neither here nor there in a power comparison, granted, but is why I tend to semi-forget it), plus click mez protection. I think Bill mentioned it either here or in the other power comparisons thread? Time clickin' mez protection is time not smitin'. As for other Def sets, depends. Defense still isn't a guarantee, after all. Plus AFAIK, Longbow Terrorizes are all unvectored "psi defense only"-type hits, so most defense sets won't offer notable protection there: IIRC, /Stone is the only set that actually offers Psi Defense, no?
Willpower and Bio both offer Psi Defense.
-
 1
1
-
-
3 hours ago, Bill Z Bubba said:
Rune of Protection is available at level 20 and works as a break free and there's always the P2W cheatcode Defense Amplifier for 4 mez protect. Hell, just gettin 8 hours of it at lvl 1 for 8000 inf and you can solo mez-free to 20 and still have hours left before it runs out.
P2W, inspirations and other temporary powers fall into the same "renders the question moot" category as Incarnates.
Rune of Protection is more situational. Ultimately, the reason you need status protection is that the 5% - 10% of the time when Defense fails against status effects, it's utterly crippling. Rune of Protection transforms those odds to more like 2.5% - 5% due to its uptime.
-
If you're talking about with Incarnate powers, it's mostly all the same. If you're talking without them, then status protection tends to be the most important aspect of 'tankiness' since that's the one thing you can't get from IO sets or pools.
-
The concept of 'endgame' doesn't really exist in CoH.
In most MMORPG, 'endgame' is the most challenging content that delivers the greatest rewards. But if you want the greatest rewards CoH has to offer, all you need to do is go sit in a Fire Farm - it's a lot more efficient than actually playing the game.
Likewise, the traditional candidates for most challenging content - such as Incarnate Trials - are actually quite trivial to beat.
So you end up with a variety of make-your-own-fun arbitrary challenges that differ from player to player. As a result, when you're asking about optimal builds, you're going to get different answers based on that particular player's (often unspoken) criteria for what content is worth doing.
My personal criteria:
- Must be able to exemplar smoothly across a wide range of levels
- Must be functional in a variety of group sizes from solo to full raid
- Shouldn't require Incarnate abilities to function effectively in non-Incarnate content
- Shouldn't require the use of temporary powers or outside buffs to function effectively
- Should be the best implementation of that particular power set combination
Given the above, some general observations on Stalkers:
- Stalkers will almost always have worse AE damage than other melee AT.
- Stalkers are competitive in single target damage over the span of all melee sets with Scrappers but this competitiveness largely takes the form of a higher floor and lower ceiling. That is, Stalkers transform many 'bad' sets into 'good' ones, but rarely elevate 'good' sets into 'excellent' ones.
- Stalkers lack the ability to tank hard targets such as AV/GM. While they're normally just as good as Scrappers (and, often, Brutes) at mitigating damage, they lack the taunt necessary to control such targets in a group setting.
-
2
-
Illu/?
in Controller
Phantom Army is unaffected by buffs. Phantasm can be buffed/healed, but it's a relatively unimportant part of the kit.
As a result, most Illusion builds are debuff based.
-
Neither is particularly useful.
Most of my farming is done semi-afk - I'm just letting autofire powers and auras do all the damage. Actively playing the character would speed up the process in real time at the expense of massively increasing the time commitment I'm personally making.
However, when I do actively farm, I have macros to endlessly convert/chew reds. This means I'm running at/near the +damage cap anyway. Moreover, it means that every character who isn't actively contributing is cutting into my Inspiration drops.
-
1
-
-
2 hours ago, Neiska said:
One thing I don't see mentioned, is how you can slot DNA siphon for END instead of Healing or Damage. I usually 4 slot mine with Preemptive, so once every 30 seconds I can completely refill my END bar, even a single enemy will return 22%, 2 enemies will return 44%.
I suspect the reason you don't see much endurance slotting is that builds only spend so much endurance - and this amount is predictable. So once you hit the point where your build sustains itself, there's no point in more endurance regeneration. I do - from time to time - slot powers for endurance I don't need, but that's mainly an issue of set bonuses. However, the set bonuses for endurance sets aren't particularly good for typed defense armor sets.
-
While we're on the subject of Bio, I've linked my Bio/Staff below.
One of the key advantages of Bio is that you don't need quite as much single target damage due to DNA Siphon (and it's -regen) against most foes. So you can go for a more purely 'tank' build to leverage the multiple taunt auras. The build below is S/L hard-capped, F/C/N/E/P soft-capped (or nearly so) while having exceptional AE damage with Staff's enormous radius/arc on a Tanker. DDR is largely unnecessary since stacking Guarded Spin pushes Lethal Defense well above the point where enemies can reasonably debuff you. As you shift into Incarnate content, Barrier lets you stay relevant and your defense + regen can hopefully deal with the relative weakness of non-S/L resists
SpoilerThis Hero build was built using Mids Reborn 3.1.2.5
https://github.com/LoadedCamel/MidsRebornClick this DataLink to open the build!
Level 50 Magic Tanker
Primary Power Set: Bio Armor
Secondary Power Set: Staff Fighting
Power Pool: Flight
Power Pool: Fighting
Power Pool: Leaping
Power Pool: LeadershipHero Profile:
Level 1: Hardened Carapace -- StdPrt-ResDam/Def+(A), GldArm-3defTpProc(3), UnbGrd-Max HP%(3), UnbGrd-ResDam(5), UnbGrd-ResDam/EndRdx(5)
Level 1: Mercurial Blow -- SprBlsCol-Dmg/EndRdx/Acc/Rchg(A), SprBlsCol-Acc/Dmg(7), SprBlsCol-Dmg/EndRdx(7), SprBlsCol-Acc/Dmg/EndRdx(9), SprBlsCol-Acc/Dmg/Rchg(9)
Level 2: Inexhaustible -- NmnCnv-Regen/Rcvry+(A)
Level 4: Environmental Modification -- LucoftheG-Def/Rchg+(A), LucoftheG-Def(13), ShlWal-Def(13), ShlWal-ResDam/Re TP(15), Ksm-ToHit+(15)
Level 6: Adaptation
Level 8: Hover -- LucoftheG-Def/Rchg+(A)
Level 10: Precise Strike -- Hct-Dam%(A), Hct-Dmg/EndRdx(17), Hct-Dmg/Rchg(17), Hct-Acc/Dmg/Rchg(19), Hct-Acc/Rchg(19)
Level 12: Evolving Armor -- PrfZng-Acc/Rchg(A), PrfZng-Taunt/Rchg/Rng(21), PrfZng-Dam%(23), PrfZng-Taunt/Rng(23), PrfZng-Taunt/Rchg(25), PrfZng-Taunt(25)
Level 14: Guarded Spin -- SprAvl-Acc/Dmg(A), SprAvl-Dmg/EndRdx(27), SprAvl-Rchg/KDProc(27), Obl-Dmg(29), Obl-%Dam(29)
Level 16: Fly -- WntGif-ResSlow(A)
Level 18: DNA Siphon -- SprGntFis-Dmg/EndRdx/Rchg(A), SprGntFis-Acc/Dmg/Rchg(31), SprGntFis-Dmg/Rchg(31), SprGntFis-Acc/Dmg(31), SprGntFis-Acc/Dmg/EndRdx/Rchg(33), SprGntFis-Rchg/+Absorb(33)
Level 20: Eye of the Storm -- Arm-Dam%(A), Arm-Dmg/EndRdx(33), Arm-Dmg/Rchg(34), Arm-Acc/Dmg/Rchg(34), Arm-Acc/Rchg(34), FrcFdb-Rechg%(36)
Level 22: Staff Mastery
Level 24: Ablative Carapace -- Prv-Absorb%(A), Prv-Heal/Rchg/EndRdx(36), Prv-Heal(36), Prv-Heal/EndRdx(37), Prv-EndRdx/Rchg(37), Prv-Heal/Rchg(37)
Level 26: Genetic Contamination -- SprMghoft-Dmg/Rchg(A), SprMghoft-Acc/Dmg(39), SprMghoft-Acc/Dmg/EndRdx/Rchg(39), SprMghoft-Acc/Dmg/Rchg(39), SprMghoft-Dmg/EndRdx/Rchg(40), SprMghoft-Rchg/Res%(40)
Level 28: Serpent's Reach -- Apc-Dam%(A), Apc-Acc/Dmg/Rchg(40), Apc-Dmg/Rchg(42), Apc-Dmg(42), Apc-Dmg/EndRdx(42), Apc-Acc/Rchg(43)
Level 30: Kick -- Empty(A)
Level 32: Tough -- ImpArm-ResPsi(A), ImpArm-ResDam(43), ImpArm-ResDam/EndRdx(43)
Level 35: Innocuous Strikes -- ScrDrv-Acc/Rchg(A), ScrDrv-Dmg/Rchg(45), ScrDrv-Dmg/EndRdx(45), ScrDrv-Acc/Dmg(45), ScrDrv-Acc/Dmg/EndRdx(46), ScrDrv-Dam%(46)
Level 38: Weave -- LucoftheG-Def/Rchg+(A), LucoftheG-Def(46)
Level 41: Combat Jumping -- Rct-ResDam%(A), Rct-Def(49)
Level 44: Maneuvers -- LucoftheG-Def/Rchg+(A), LucoftheG-Def(47)
Level 47: Taunt -- PrfZng-Acc/Rchg(A), PrfZng-Taunt/Rchg/Rng(47), PrfZng-Taunt/Rchg(47), PrfZng-Taunt(48), PrfZng-Taunt/Rng(48), PrfZng-Dam%(48)
Level 49: Evasive Maneuvers -- LucoftheG-Def/Rchg+(A)
Level 1: Gauntlet
Level 1: Brawl -- Empty(A)
Level 1: Sprint -- Empty(A)
Level 2: Rest -- Empty(A)
Level 1: Swift -- Empty(A)
Level 1: Hurdle -- Empty(A)
Level 1: Health -- Mrc-Rcvry+(A), Pnc-Heal/+End(11)
Level 1: Stamina -- PrfShf-End%(A), PrfShf-EndMod(11)
Level 1: Combo Level 1
Level 1: Combo Level 2
Level 1: Combo Level 3
Level 6: Defensive Adaptation
Level 6: Efficient Adaptation
Level 6: Offensive Adaptation
Level 22: Form of the Body
Level 22: Form of the Mind
Level 22: Form of the Soul
Level 16: Afterburner
Level 50: Musculature Core Paragon
Level 50: Ion Core Final Judgement
Level 50: Reactive Radial Flawless Interface
Level 50: Barrier Core Epiphany
Level 50: Assault Core Embodiment
-------------
1
-
-
1 hour ago, Sovera said:
Pretty much. While what Hjarki said is correct CoH is a much simpler game. Don't tell me we run ten times the Trapdoor mission and don't get an average time for a certain set's performance.
You get an average time for your particular interpretation of a set and how it synergizes with another particular set. It doesn't necessarily tell you anything about the set itself in isolation. You also bring a degree of subjectivity with the player and the choices/abilities they bring to the table.
You can eliminate these factors - if you have a large enough data set. Unfortunately, we don't.
-
1
-
-
4 hours ago, Bill Z Bubba said:
A good way to find out if a set sucks is to compare it to all the other sets in a controlled environment using the same armor set for all your tests. No procmonster builds needed. Pylons are an excellent test of a set's single target DPS, regardless of how the character is built. Same goes for the Trapdoor missions. If max diff is too hard for the builds you run, drop it to +0/x8. Or +0/x4. As long as it remains the same throughout your testing, it'll be fair.
Unfortunately, the design space is simply too complex and the data points too sparse. For this sort of statistical method to have much value, you need an enormous body of data - far more than is contained in a few popular threads on this board.
Even then, you're falling squarely into the McNamara Fallacy by focusing on metrics which aren't particularly reflective of actual game play.
To put this in perspective, even with the vast amounts of data provided by warcraftlogs, a much simpler design space and far more limited target content, projecting that design space onto a single dimension is still nearly impossible. To do so in CoH with a few data points? You're unlikely to get answers you didn't already know.
-
I have something similar with Stone/Energy, although it's more of an 'additional feature' to a build that's structure around damage.
-
On 1/13/2022 at 2:35 PM, PLVRIZR said:
I got *really* lucky and was invited to one of @Linea's 801 AE runs last night, this one an 801.7. Linea was running one of their usual indestructible scrappers (EM/EA, as I recall), but I was the only tank.
What I'm getting from this line is that 801.7 has no psi damage. 🙂
-
I don't like 'tier lists' for melee because they tend to overlook the synergy between primary and secondary.
For example, my current (non-farming) Brute is Staff/Stone. I would consider it one of the best combination possible on a Brute for general purpose play. But I'm not sure I'd consider either Staff or Stone 'top tier' in isolation. Staff has relatively weak single target damage while Stone has serious endurance problems. However, the combination of two sets that can each fix the problem in the other makes it a top tier combination - I can tank pretty much anything with confidence while also dishing out more damage than other comparably tank-y builds can generate and I can do it without Incarnate powers.
-
I've linked one of my builds below to amplify my thoughts on what Ill/TA 'should' be.
- Holds (Blind, Ice Arrow, EMP Arrow). I don't actually use these all that much. While I could theoretically lock down a single target pretty well, it's normally superfluous. These mainly exist as mules for Basilisk's Gaze. EMP Arrow I primarily use defensively - for the 'bubble' effect - and then generally only on major fights (even in a build like this, it doesn't recharge fast enough for every spawn).
- Additional Controls (Deceive, Spectral Terror). These are also mules for excellent sets. I don't use them all that much because they're unnecessary in most cases. However, they're nice to have as an option.
- Single Target Debuffing (Entangling Arrow, Poisonous Ray). These generally only come out against an AV/GM encounter. Entangling Arrow can theoretically set Containment, but I do so little personal damage that it's not all that meaningful. Since all of my knockback is suppressed, I don't need to lock enemies in place either.
- Multi-target Debuffing (Flash Arrow, Disruption Arrow). These are really my bread-and-butter debuffs. Flash Arrow shuts down most everything and makes Ill/TA the ultimate Stealther - you can even manipulate clickies right next to a spawn. Disruption Arrow is an every-spawn damage increase. Note that, as with virtually everything else in the build, these are slotted primarily for recharge.
- AE Damage (Oil Slick Arrow, Disruptor Blast). Oil Slick does massive damage, but needs something to set it off. Disruptor Blast not only sets it off, but lets me slot Force Feedback to reduce its recharge even more. AE damage is normally a big hole with Illusion and being able to patch that hole is a major reason why Trick Arrow pairs so well.
- Pets (Phantom Army, Phantasm, Tarantula). All of these are perma-pets at the levels of recharge I run. I have all four pet uniques slotted, but the Phantasm/Tarantula are primarily relying on the PA taunt and Flash Arrow to stay alive. I've suppressed the knockback on Phantasm to avoid scattering spawns. The Tarantula is particularly nice due to the -fly on attacks bringing enemies into my ground AE and removing them from my sky.
- Defenses/Utility (Fighting pool, Flight pool, Leaping pool, Speed pool). There shouldn't be many surprises here. I don't aim for pre-Incarnate soft-cap because my primary defense is Invisibility + Flash Arrow. In those rare circumstances where I can be spotted, Evasive Maneuvers will normally give me enough defense to lay in a Flash Arrow. I'm mostly unconcerned with resists because I can't get them high enough to make much difference and I'm expecting my PA to tank most anything I can't dodge.
This approach is not for 'farming' (although I suppose it's possible). The goal is to avoid as much fighting as possible and focus on hard targets for mission completion while bringing significant support to a team (if one is present). My main method of managing endurance is the simple expedient of not doing stuff. Mostly I support the pets as they do their job. I open with Flash Arrow followed by Disruption Arrow. If I want to AE, I lay in an Oil Slick and ignite it with Disruptor Blast. Against AV/GM, I'll use Entangling Arrow and Poisonous Ray to further reduce their resistance. EMP Arrow is an option for tough fights to provide safety from status effects.
SpoilerThis Hero build was built using Mids Reborn 3.1.2.5
https://github.com/LoadedCamel/MidsRebornClick this DataLink to open the build!
Level 50 Magic Controller
Primary Power Set: Illusion Control
Secondary Power Set: Trick Arrow
Power Pool: Flight
Power Pool: Fighting
Power Pool: Speed
Power Pool: Leaping
Ancillary Pool: Mace MasteryHero Profile:
Level 1: Blind- (A) Basilisk's Gaze - Accuracy/Hold
- (3) Basilisk's Gaze - Accuracy/Recharge
- (3) Basilisk's Gaze - Endurance/Recharge/Hold
- (5) Basilisk's Gaze - Accuracy/Endurance/Recharge/Hold
Level 1: Entangling Arrow
- (A) Gravitational Anchor - Chance for Hold
- (5) Gravitational Anchor - Immobilize/Endurance
- (7) Gravitational Anchor - Immobilize/Recharge
- (7) Gravitational Anchor - Accuracy/Immobilize/Recharge
- (9) Gravitational Anchor - Accuracy/Recharge
Level 2: Flash Arrow
- (A) Cloud Senses - ToHit Debuff
- (13) Cloud Senses - ToHit Debuff/Endurance/Recharge
- (15) Cloud Senses - Accuracy/ToHitDebuff
- (15) Cloud Senses - Accuracy/Endurance/Recharge
Level 4: Deceive
- (A) Coercive Persuasion - Confused/Endurance
- (17) Coercive Persuasion - Confused
- (17) Coercive Persuasion - Confused/Recharge
- (19) Coercive Persuasion - Accuracy/Confused/Recharge
- (19) Coercive Persuasion - Accuracy/Recharge
- (21) Coercive Persuasion - Contagious Confusion
Level 6: Hover
- (A) Luck of the Gambler - Defense/Increased Global Recharge Speed
Level 8: Superior Invisibility
- (A) Kismet - Accuracy +6%
Level 10: Ice Arrow
- (A) Basilisk's Gaze - Accuracy/Hold
- (21) Basilisk's Gaze - Endurance/Recharge/Hold
- (23) Basilisk's Gaze - Accuracy/Endurance/Recharge/Hold
- (23) Basilisk's Gaze - Accuracy/Recharge
Level 12: Kick
- (A) Empty
Level 14: Fly
- (A) Blessing of the Zephyr - Knockback Reduction (4 points)
Level 16: Hasten
- (A) Recharge Reduction IO
- (25) Recharge Reduction IO
Level 18: Phantom Army
- (A) Expedient Reinforcement - Resist Bonus Aura for Pets
- (25) Expedient Reinforcement - Accuracy/Recharge
- (27) Expedient Reinforcement - Endurance/Damage/Recharge
- (27) Expedient Reinforcement - Accuracy/Damage/Recharge
- (29) Soulbound Allegiance - Damage/Recharge
- (29) Soulbound Allegiance - Accuracy/Damage/Recharge
Level 20: Tough
- (A) Gladiator's Armor - TP Protection +3% Def (All)
- (31) Steadfast Protection - Resistance/+Def 3%
Level 22: Weave
- (A) Luck of the Gambler - Defense/Increased Global Recharge Speed
- (31) Luck of the Gambler - Defense
Level 24: Evasive Maneuvers
- (A) Luck of the Gambler - Defense/Increased Global Recharge Speed
Level 26: Spectral Terror
- (A) Superior Will of the Controller - Control Duration/Recharge
- (31) Superior Will of the Controller - Accuracy/Control Duration
- (33) Superior Will of the Controller - Accuracy/Control Duration/Endurance/Recharge
- (33) Superior Will of the Controller - Endurance/Recharge
- (33) Superior Will of the Controller - Accuracy/Control Duration/Endurance
- (34) Superior Will of the Controller - Recharge/Chance for Psionic Damage
Level 28: Disruption Arrow
- (A) Synapse's Shock - Damage/Accuracy/Endurance
- (34) Synapse's Shock - EndMod
- (34) Synapse's Shock - Damage/Rechage
- (36) Synapse's Shock - EndMod/Recharge
- (36) Synapse's Shock - Damage/Recharge/Accuracy
Level 30: Combat Jumping
- (A) Luck of the Gambler - Defense/Increased Global Recharge Speed
Level 32: Phantasm
- (A) Call to Arms - Accuracy/Damage
- (36) Call to Arms - Damage/Endurance
- (37) Call to Arms - Accuracy/Damage/Recharge
- (37) Call to Arms - Defense Bonus Aura for Pets
- (37) HamiO:Nucleolus Exposure
- (39) Sudden Acceleration - Knockback to Knockdown
Level 35: Oil Slick Arrow
- (A) Ragnarok - Chance for Knockdown
- (39) Ragnarok - Damage/Endurance
- (39) Ragnarok - Accuracy/Recharge
- (40) Ragnarok - Accuracy/Damage/Recharge
- (40) Ragnarok - Damage/Recharge
Level 38: EMP Arrow
- (A) Basilisk's Gaze - Accuracy/Recharge
- (40) Basilisk's Gaze - Recharge/Hold
- (42) Basilisk's Gaze - Endurance/Recharge/Hold
- (42) Basilisk's Gaze - Accuracy/Endurance/Recharge/Hold
Level 41: Poisonous Ray
- (A) Apocalypse - Chance of Damage(Negative)
- (42) Apocalypse - Damage/Recharge
- (43) Apocalypse - Damage/Endurance
- (43) Apocalypse - Accuracy/Damage/Recharge
- (43) Apocalypse - Accuracy/Recharge
- (46) Achilles' Heel - Chance for Res Debuff
Level 44: Disruptor Blast
- (A) Bombardment - Damage
- (45) Bombardment - Chance for Fire Damage
- (45) Annihilation - Accuracy/Damage
- (45) Annihilation - Chance for Res Debuff
- (46) Overwhelming Force - Damage/Chance for Knockdown/Knockback to Knockdown
- (46) Force Feedback - Chance for +Recharge
Level 47: Summon Tarantula
- (A) Expedient Reinforcement - Accuracy/Recharge
- (47) Expedient Reinforcement - Accuracy/Damage
- (47) Expedient Reinforcement - Accuracy/Damage/Recharge
- (47) Expedient Reinforcement - Endurance/Damage/Recharge
- (48) Edict of the Master - Defense Bonus
- (48) Sovereign Right - Resistance Bonus
Level 49: Scorpion Shield
- (A) Luck of the Gambler - Defense/Increased Global Recharge Speed
- (49) Luck of the Gambler - Defense
Level 1: Containment
Level 1: Brawl- (A) Empty
Level 1: Sprint- (A) Celerity - +Stealth
Level 2: Rest- (A) Empty
Level 1: Swift- (A) Flight Speed IO
Level 1: Hurdle- (A) Empty
Level 1: Health- (A) Miracle - +Recovery
- (9) Panacea - +Hit Points/Endurance
- (11) Numina's Convalesence - +Regeneration/+Recovery
Level 1: Stamina- (A) Performance Shifter - Chance for +End
- (11) Performance Shifter - EndMod
- (13) Power Transfer - Chance to Heal Self
Level 50: Intuition Radial Paragon
Level 14: Afterburner
-------------
1
-
1 minute ago, arcane said:
Ice Arrow does -special and has a 90% proc rate. Probably the best single target attack you have access to besides Blind and potentially Seismic Smash. Guess you don’t have to, but I like all my characters to have at least a couple single target attacks because I feel like you can wind up taking forever to clean up bosses / EB’s no matter how good your AoE damage is.
With my Ill/TA, I don't really spend much effort - if any - on single target attacks because none of them are really worth the endurance compared to just letting the Phantom Army rip up my enemies.
With Ice Arrow in particular, having an attack that I'll rarely ever use at the expense of +2.5% E/N defense and +7.5% recharge from Basilisk? Not remotely worth it.
-
On 1/4/2022 at 8:54 AM, Sovera said:
That said both Elec Melee and Savage Melee are outliers due to their endurance helping inherent.
Staff Mastery is another option for endurance mitigation, although normally it's used for damage amplification/mitigation instead.
Good Resistance Values For SR Tankers?
in Tanker
Posted · Edited by Hjarki