ThePhlebotomist
-
Posts
26 -
Joined
-
Last visited
-

Invulnerability/Stone Melee build feedback
ThePhlebotomist replied to ThePhlebotomist's topic in Tanker
Ah, cool! I was afraid of always throwing foes out of melee! I completely overlooked the tohit aspect of Invincibility! Thank you for the feedback! -
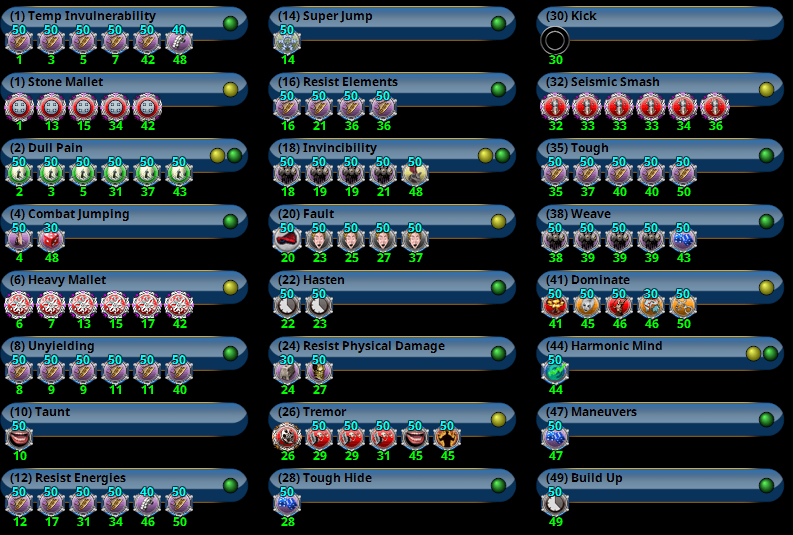
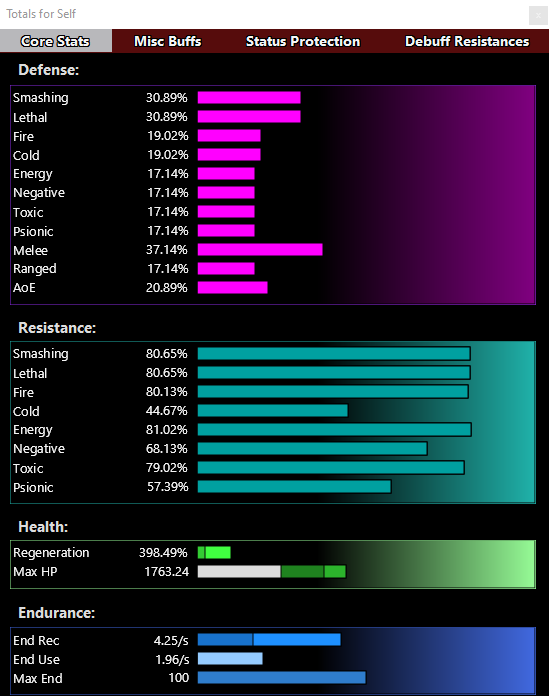
Hi! I like the sound effects and animations of Stone Melee and recently made this Invulnerability/Stone Melee build based on Infinitum's Build Collection. For the character concept, I was looking at either Invulnerability or Willpower and it sounded like Invulnerability is a bit stronger in the later game. She seems like she'll be pretty sturdy with a lot of mitigation knockdown but would do little damage. Is that just the way of Stone Melee? Or am I over-emphasizing resistance and defense in slotting here? Thanks! BeatrixBastion3 - Tanker (Invulnerability - Stone Melee).mbd

-
Awesome thank you! I agree Spine Burst feels super long.
-
Hi! I have a Spines/Rad Brute that I like a lot but that somehow feels a bit weak unless I use Barrier or Meltdown. This is my first Brute, though, so maybe my expectations are a bit high as I have a solid Dark/Dark Tank whose resists and defenses are higher (but of course without the regen/absorb!). Do you generally rely on Meltdown/Barrier with Radiation Armor? This is the build I was going towards. So far, I don't have the purple Armageddon set, any of the Superior Avalanches, and have been using the full Cupid's Crush set in Spine Burst since I got it from doing wedding missions. What do you think? Without Meltdown or Barrier: HC SpinesRad 4 - Brute (Spines - Radiation Armor).mbd
-
Thank you both for the tips!! Doh! I'd been hoping Frostbite some of those would really help out on the damage side. Ah well, they're still great. Yeah I was using Victory Rush to try to overcome some of that -- I noticed the end drain was significant! Can you tell me a bit more about Arctic Air? Back on live, my recollection of the conventional wisdom was that Arctic Air wasn't worth it -- its end drain was massive, you needed to be in the fight, and it caused foes to scatter which most teams didn't want Snow Storm was better than Arctic Air or Cold Snap (though I think it was called something else maybe?) since it had similar slow effects at range with no accuracy check or foe scatter I briefly tried Cold Snap but its accuracy looks so low in Mids I went back to Snow Storm. I haven't actually tried Arctic Air on Homecoming, though! Thanks for the build! Very cool. Yeah the cost was indeed quite oppressive but I figured I'd slowly get there as I do like playing the character a lot!
-
Hi! I have an Ice/Storm controller that I like quite a lot but I'm a bit confused about a few things and could use some help! I have the non-purple sets in the attached build so far and she generally seems to do great in terms of keeping groups occupied and debuffed -- Freezing Rain is up most of the time and I have many control options. What do you think of the build? Some specific questions: Mids Reborn makes it look like Ice Slick and Freezing Rain should do a lot of damage, but posts on the forums and the in-game Detailed information seem to suggest not. Should I avoid slotting them as damaging powers entirely? Wouldn't Containment still make them pretty good for contributing damage in a large area? I've seeing conflicting advice about whether to use damage procs (like Bombardment: Chance for Fire Damage) in powers like Ice Slick, Freezing Rain, and Ice Storm. Something about pseudo-pet powers and procs I think. Do they not work well? Thanks! 2025 HC Ruby Rime 3 - Controller (Ice Control - Storm Summoning).mbd
-
Awesome, thank you~! I hadn't even thought about WotC in Flashfire but makes a lot of sense.
-
Aaa thanks for posting your build! Very cool -- seems like more damage, perma-hasten, not dramatically less defense, and less expensive too!
-
Hi! I have a fire/kin that I really like that I've built based on @Caldazar4's build over here. I'm working towards the attached build (which is absurdly expensive) which will have capped S/L resists, 69.5% fire resist, 38/31/32% melee/ranged/AoE defenses. It seems like it'll have good recharge and damage over time too. Usually I play Defenders (including kin defs) and am more support focused, but want this character to also be able to contribute a lot of AoE damage in addition to buffs and be able to do a little soloing. Some questions (you can assume I'll always have some damage buffs from Fulcrum Shift): Should I be slotting Fire Cages for damage instead of Superior Will of the Controller (which has a damage proc but is otherwise good for the accuracy, recharge, and defense bonuses)? The base damage seems so low maybe it's not worth it but with Containment maybe anything helps? Is putting damage procs in Char useful? Or better to just fill it out with Lockdown or something for more set bonuses? Is it useful to slot Bonfire for damage (after the knockback to knockdown IO) like this or better to use those slots for other things? Generally it feels weird coming from Kin Defs to have no slots in Transference or Fulcrum Shift! But it does seem like with the global buffs they'd be okay. What do you think? Thanks! *edit* I should mention that in the build I took Inertial Reduction and then Superspeed (with +Stealth IO). I just like having my pets be able to follow me all over quickly. But Siphon Power would probably be more useful. 20240819 FireKin Exp 4 - Controller (Fire Control - Kinetics).mbd
-
NCSOFT & Homecoming License Announcement
ThePhlebotomist replied to Homecoming's topic in Announcements
This announcement is such a huge step! Thank you for all your efforts through this! The staying closed-source seems to continue to drive division between the City of Heroes community, though, and between it and the other terms of the license, it does still make me worry it could all be taken away again. Please consider open sourcing. -
Earth/Rad controller build critique
ThePhlebotomist replied to ThePhlebotomist's topic in Controller
Indeed. Maybe I should've replied there! I'd read it, but It looked like goals were a bit different (they looked to be going for more melee tank-y whereas I tend to go for team support at range when possible). I'm pretty sure I must've originally used the Earth/Rad guide @Area Man had posted way back when I first created this character on live as I adopted similar sensibilities. -
Hi, I love my Earth/Rad controller but haven't really looked at IO sets much for her. I'm also super ignorant of the frankenslot options! Here's what I was thinking but curious about your thoughts. Some notes: * I like always having AoE control options (hard or soft) in every fight so have focused on controls over taking Fighting or Leadership * I love stalagmites * I like having big debuffs * I find quickstand pretty useful at lower levels so was hoping to keep it for TFs but could be persuaded otherwise * I was aiming for high recharge so accelerate metabolism is up almost always but may have overdone it on both the +recharge and +accuracy here while really neglecting resistance and defense (and am worried I'm going to get held all the time) 202307 HC Tina Tremors - Controller (Earth Control).mbd
-
Thanks for breaking this down! I can see how some of those things would fall out from the equations. I didn't even think about the recharge reduction Alpha Incarnates affecting this! I agree it's complicated but I suppose that's part of the min/max'ing fun. 🙂 Thanks for this reference!!
-
Oh, also -- somehow I got the impression that focusing on defense (especially positional defense) these days was the way to go. Yet comments here suggest focusing on capping Dark's strong resists is best for it as long as melee defense is decent. Is that right?
-
Thanks for the great tips! Some things I hadn't been thinking about for sure include splitting unique sets (since I was almost always fixated on some 5 or 6 slot bonus) and optimizing sets that have recharge enhancements to be in powers that can use them. Generally I'm hearing it's also usually a mistake to put procs in toggles. This is a bit surprising -- I thought procs had a procs-per-minute max and if in a click power you'd only even trigger the potential if you clicked it whereas a toggle would be on all the time so get that max. Looking at this post about the Issue 24 change, definitely seems more complicated.