

Linea
-
Posts
619 -
Joined
-
Last visited
Content Type
Profiles
Forums
Events
Store
Articles
Patch Notes
Posts posted by Linea
-
-
Zip Format - Part 2
-
 2
2
-
-
Zip format - Part 1
-
 1
1
-
2
-
-
Clarion*PBU*Farsight is the order I use due to duration 12 on Clarion and Duration 10 on PBU, I should have been more clear, it didn't occur to me.
Clarion Radial should not be modifying PBU, this is probably a bug.
-
1
-
-
In general you'd want a /Kin to take advantage of the higher damage cap. However, depending on build, I can see exceptions to that rule.
-
You can take one of the PBU builds and work that with Clarion Radial for more support. PBU*Clarion Radial T4*farsight is plain silly. 4b is a beam translation and pretty close to what I ran on live (live wasn't beam). (Note: if you use PBU or Clarion Radial you can NOT recast farsight when they are down, or you will overwrite a 35-45 defense bubble with a 20 defense bubble.)
As for procs, that wasn't a thing at that time, and I've not looked at those builds since.
The offensive build would be my choice ...
-
1
-
-
Standard Linea Rune/Hybrid/Rune/Kitchen Sink builds.
Kate Wolf Kat/Bio Scrapper (also Amhra)
SpoilerHero Plan by Mids' Hero Designer 1.962
http://www.cohplanner.com/Kinetic Amp - Musc, Spirit, Agility - Ageless Radial, Rebirth Radial - Reactive Degen: Level 50 Magic Scrapper
Primary Power Set: Katana
Secondary Power Set: Bio Armor
Power Pool: Speed
Power Pool: Fighting
Power Pool: Sorcery
Power Pool: Leadership
Ancillary Pool: Blaze MasteryHero Profile:
------------
Level 1: Gambler's Cut SprCrtStr-Acc/Dmg(A), SprCrtStr-Dmg/Rchg(3), SprCrtStr-Acc/Dmg/Rchg(3), SprCrtStr-Dmg/EndRdx/Rchg(5), SprCrtStr-Acc/Dmg/EndRdx/Rchg(5), SprCrtStr-Rchg/+50% Crit(7)
Level 1: Hardened Carapace UnbGrd-ResDam(A), UnbGrd-ResDam/EndRdx(7), UnbGrd-ResDam/EndRdx/Rchg(9), UnbGrd-Max HP%(9), GldArm-3defTpProc(11), StdPrt-ResDam/Def+(11)
Level 2: Inexhaustible PrfShf-End%(A)
Level 4: Environmental Modification LucoftheG-Def/EndRdx(A), LucoftheG-Def(15), LucoftheG-Rchg+(17), ShlWal-ResDam/Re TP(17), Rct-ResDam%(19)
Level 6: Build Up RechRdx-I(A), RechRdx-I(19)
Level 8: Divine Avalanche Hct-Dmg/Rchg(A), Hct-Acc/Dmg/Rchg(21), Hct-Acc/Rchg(21), Hct-Dmg/EndRdx(23), Hct-Dam%(23), LucoftheG-Rchg+(25)
Level 10: Adaptation
Level 12: Hasten RechRdx-I(A), RechRdx-I(25)
Level 14: Boxing KntCmb-Acc/Dmg(A)
Level 16: Ablative Carapace Prv-Heal/EndRdx(A), Prv-Heal/Rchg(27), Prv-Heal/Rchg/EndRdx(27), Prv-EndRdx/Rchg(29)
Level 18: The Lotus Drops SprAvl-Rchg/KDProc(A), SprAvl-Dmg/EndRdx(29), SprAvl-Acc/Dmg/EndRdx(31), SprAvl-Acc/Dmg/Rchg(31), SprAvl-Acc/Dmg/EndRdx/Rchg(31), SprAvl-Acc/Dmg(50)
Level 20: Evolving Armor Ags-ResDam/EndRdx(A), Ags-ResDam/EndRdx/Rchg(33), Ags-ResDam(33)
Level 22: Tough Ags-ResDam/EndRdx(A), Ags-ResDam/EndRdx/Rchg(33), Ags-ResDam(34)
Level 24: Weave LucoftheG-Def/EndRdx(A), LucoftheG-Def(34), LucoftheG-Rchg+(34)
Level 26: Soaring Dragon SprBlsCol-Rchg/HoldProc(A), SprBlsCol-Dmg/EndRdx(36), SprBlsCol-Acc/Dmg/EndRdx(36), SprBlsCol-Acc/Dmg/Rchg(36), SprBlsCol-Dmg/EndRdx/Acc/Rchg(37), AchHee-ResDeb%(42)
Level 28: DNA Siphon Erd-Acc/Dmg/EndRdx/Rchg(A), Erd-Acc/Dmg/Rchg(37), Erd-Acc/Rchg(37), Prv-Heal/EndRdx(39), Prv-Heal/Rchg(39)
Level 30: Arcane Bolt SprWntBit-Dmg/Rchg(A), SprWntBit-Acc/Dmg/EndRdx(39), SprWntBit-Acc/Dmg/Rchg(40), SprWntBit-Dmg/EndRdx/Acc/Rchg(40), SprWntBit-Rchg/SlowProc(40)
Level 32: Golden Dragonfly SprScrStr-Acc/Dmg(A), SprScrStr-Acc/Dmg/Rchg(42), SprScrStr-Dmg/EndRdx/Rchg(42), SprScrStr-Acc/Dmg/EndRdx/Rchg(43), SprScrStr-Rchg/+Crit(43)
Level 35: Genetic Contamination Erd-Acc/Dmg/EndRdx/Rchg(A), Erd-Acc/Dmg/Rchg(43), Erd-Acc/Rchg(45), ScrDrv-Acc/Dmg/EndRdx(45)
Level 38: Parasitic Aura TchoftheN-Acc/EndRdx/Heal/HP/Regen(A), Prv-Heal/Rchg(45), DctWnd-Heal/Rchg(46), Prv-Heal/Rchg/EndRdx(46)
Level 41: Maneuvers LucoftheG-Def/EndRdx(A), LucoftheG-Def(46), LucoftheG-Rchg+(48)
Level 44: Spirit Ward Prv-Absorb%(A)
Level 47: Rune of Protection UnbGrd-ResDam(A), UnbGrd-EndRdx/Rchg(48), UnbGrd-Rchg/ResDam(48), UnbGrd-ResDam/EndRdx/Rchg(50)
Level 49: Char BslGaz-Acc/Hold(A), BslGaz-Acc/Rchg(50)
Level 1: Brawl KntCmb-Dmg/EndRdx(A)
Level 1: Critical Hit
Level 1: Prestige Power Dash Empty(A)
Level 1: Prestige Power Slide Empty(A)
Level 1: Prestige Power Quick Empty(A)
Level 1: Prestige Power Rush Empty(A)
Level 1: Prestige Power Surge Empty(A)
Level 1: Sprint Clr-Stlth(A)
Level 2: Rest RechRdx-I(A)
Level 4: Ninja Run
Level 2: Swift Run-I(A)
Level 2: Health Pnc-Heal/+End(A), Mrc-Rcvry+(13), NmnCnv-Regen/Rcvry+(13)
Level 2: Hurdle Jump-I(A)
Level 2: Stamina PrfShf-End%(A), PrfShf-EndMod(15)
Level 10: Defensive Adaptation
Level 10: Efficient Adaptation
Level 10: Offensive Adaptation
Level 50: Agility Core Paragon
Level 50: Ageless Radial Epiphany
Level 50: Void Radial Final Judgement
Level 50: Melee Core Embodiment
Level 50: Reactive Radial Flawless Interface
Level 50: Talons of Vengeance Radial Superior Ally
Level 0: Kinetic Shield
------------| Copy & Paste this data into Mids' Hero Designer to view the build |
|-------------------------------------------------------------------|
|MxDz;1663;829;1658;HEX;|
|78DA6594C96F127114C77F038315BA524AF7DA816E94AD607B37D4AAD19658DBE81|
|5A7C34F9884021946637BF30F305A5A9783FBCD35D1A337AFC6E5A28907F7E56017|
|35713731F898F75A884C423E6FDEEFBDDFFBFEDEFC1ED1A36335B7761DDBC684BAE|
|D2939978B4D2B9A9CCD72CD129513AAC2E0D93FAEA6B9AE2A5264362B05A4E8E19C|
|E297A6B3AAA6EA7E29925053AA3E07FE4882A7782E274DC971554EF9A5293EA36A7|
|A92DE21608ACB8AAE1EE1D2184FF07415ECEC5C2F168B422E0F8ECBBA9C96DD1BDE|
|317E88A7733C38AA66627BB5849C569558449BCD68F6DDE924D7785A0FAE1BB6C94|
|C26159CCE721EAF35CC9D6A22A9ABE9440D2E6434856B73F5C6CB0497E35CCB25D5|
|6CE38EACAA044753F23C8F45E59C0E21ADA06B087EC78B028DA760610745C6C2223|
|3C9C419A4A810E3C84D1CF9BC07D204CAFD66C6B5EFC8CDBF88BF91B6ADC41648E8|
|12D90BC815309709674CC6DA4BF099D1279A1B04C357D7846C7012C7719FC6AFC81|
|3A0DF82FA058B0F10B6B24683167612D6AA8C22054BD500D668F2100791CD5EA20F|
|D94A755E81162B6A29B8619F6AB4856AAAD14A1460AD16EBB3DA49805B646F20B71|
|E7DE6FA8FA8B37D85B88AEC5C46E621DF4EFDB75FC6BE769E476EB940BC48BC840C|
|9F43BE853A0ED465728450B7344C1C419A617F27C538FF8B71518C08312D14D3427|
|D77197DB73217F5631162DA4867DB29ACDFB340CC131791BD4BC8C17BD05387C8DE|
|81CE0E6633BE6BC79AC9F8FEBDABC46564BFD1272BEB5F41E6FBC08DF5C4AEABB85|
|FFF35E4C075E20DE24DE41268ECA69CEEFBD8DFC107C48748EF23E263E47BD0E6C6|
|B39BDDA4CD4BDAFCA4CD3F8FDFFA03C4F6E139CC7DCDA8D34F7A0351EC576015DFE|
|DA0C5433DF5504F03D4D321EAE9029CD14777C7B7867A4E832F487A823453433F88|
|3F91619AAD2B70F14274F7434F506BF829B253DC986BC6F6E1BDEC1637E6B5E02D5|
|F2FC0C342159E708567B8C23352E19928F75871AA26452A5C9C76637244666D8069|
|475F61CD56F66F10C0F5CF259F4970E1896BF680630078003BF8A93CCF83795F4A3|
|E61FD9FA52E6F323A7FBB38D554F375997DA7CCFED30CA1649F75946C7F13D8D4BD|
|BBEEA2DFB809856765317F7B4B31EDD546070CFB1F66912075|
|-------------------------------------------------------------------|Allmhara DB/BioScrapper
SpoilerHero Plan by Mids' Hero Designer 1.962
http://www.cohplanner.com/BF, AS, VS, SS or BF, AS, SS, AS - Kinetic Amp - Musc, Spirit, Agility - Ageless Radial, Rebirth Radial - Reactive Degen: Level 50 Magic Scrapper
Primary Power Set: Dual Blades
Secondary Power Set: Bio Armor
Power Pool: Speed
Power Pool: Fighting
Power Pool: Sorcery
Power Pool: LeadershipHero Profile:
------------
Level 1: Nimble Slash KntCmb-Acc/Dmg(A), KntCmb-Dmg/EndRdx(3), KntCmb-Dmg/Rchg(3), KntCmb-Dmg/EndRdx/Rchg(5), Hct-Acc/Dmg/Rchg(5)
Level 1: Hardened Carapace UnbGrd-ResDam(A), UnbGrd-ResDam/EndRdx(7), UnbGrd-ResDam/EndRdx/Rchg(7), UnbGrd-Max HP%(9), GldArm-3defTpProc(9), StdPrt-ResDam/Def+(11)
Level 2: Ablating Strike SprScrStr-Acc/Dmg(A), AchHee-ResDeb%(11), SprScrStr-Acc/Dmg/Rchg(13), SprScrStr-Dmg/EndRdx/Rchg(13), SprScrStr-Acc/Dmg/EndRdx/Rchg(15), SprScrStr-Rchg/+Crit(15)
Level 4: Inexhaustible PrfShf-End%(A)
Level 6: Typhoon's Edge SprAvl-Rchg/KDProc(A), SprAvl-Dmg/EndRdx(19), SprAvl-Acc/Dmg/EndRdx(21), SprAvl-Acc/Dmg/Rchg(21), SprAvl-Acc/Dmg/EndRdx/Rchg(23)
Level 8: Environmental Modification LucoftheG-Def/EndRdx(A), LucoftheG-Def(23), LucoftheG-Rchg+(25), ShlWal-ResDam/Re TP(25), Rct-ResDam%(27)
Level 10: Blinding Feint SprCrtStr-Acc/Dmg(A), SprCrtStr-Dmg/Rchg(27), SprCrtStr-Acc/Dmg/Rchg(29), SprCrtStr-Dmg/EndRdx/Rchg(29), SprCrtStr-Acc/Dmg/EndRdx/Rchg(31), SprCrtStr-Rchg/+50% Crit(31)
Level 12: Adaptation
Level 14: Hasten RechRdx-I(A), RechRdx-I(43)
Level 16: Ablative Carapace Prv-Heal/EndRdx(A), Prv-Heal/Rchg(31), Prv-Heal/Rchg/EndRdx(33), Prv-EndRdx/Rchg(33)
Level 18: Vengeful Slice SprBlsCol-Rchg/HoldProc(A), SprBlsCol-Dmg/EndRdx(33), SprBlsCol-Acc/Dmg/EndRdx(34), SprBlsCol-Acc/Dmg/Rchg(34), SprBlsCol-Dmg/EndRdx/Acc/Rchg(34)
Level 20: Evolving Armor Ags-ResDam/EndRdx(A), Ags-ResDam/EndRdx/Rchg(36), Ags-ResDam(36)
Level 22: Boxing KntCmb-Acc/Dmg(A)
Level 24: Tough Ags-ResDam/EndRdx(A), Ags-ResDam/EndRdx/Rchg(36), Ags-ResDam(37)
Level 26: Sweeping Strike Arm-Dmg/Rchg(A), Arm-Acc/Dmg/Rchg(39), Arm-Acc/Rchg(39), Arm-Dmg/EndRdx(39), Arm-Dam%(40), FuroftheG-ResDeb%(40)
Level 28: DNA Siphon Erd-Acc/Dmg/EndRdx/Rchg(A), Erd-Acc/Dmg/Rchg(40), Erd-Acc/Rchg(42), Prv-Heal/EndRdx(42), Prv-Heal/Rchg(42)
Level 30: Weave LucoftheG-Def/EndRdx(A), LucoftheG-Def(37), LucoftheG-Rchg+(37)
Level 32: Arcane Bolt SprWntBit-Dmg/Rchg(A), SprWntBit-Acc/Dmg/EndRdx(43), SprWntBit-Acc/Dmg/Rchg(43), SprWntBit-Dmg/EndRdx/Acc/Rchg(45), SprWntBit-Rchg/SlowProc(45)
Level 35: Genetic Contamination Erd-Acc/Dmg/EndRdx/Rchg(A), Erd-Acc/Dmg/Rchg(45), Erd-Acc/Rchg(46)
Level 38: Parasitic Aura TchoftheN-Acc/EndRdx/Heal/HP/Regen(A), Prv-Heal/Rchg(46), DctWnd-Heal/Rchg(46), Prv-Heal/Rchg/EndRdx(48)
Level 41: Maneuvers LucoftheG-Def/EndRdx(A), LucoftheG-Def(48), LucoftheG-Rchg+(48)
Level 44: Spirit Ward Prv-Absorb%(A)
Level 47: Rune of Protection Ags-ResDam/Rchg(A), Ags-EndRdx/Rchg(50), Ags-ResDam/EndRdx/Rchg(50), Ags-ResDam(50)
Level 49: Mystic Flight BlsoftheZ-Travel(A)
Level 1: Brawl KntCmb-Dmg/EndRdx(A)
Level 1: Critical Hit
Level 1: Prestige Power Dash Empty(A)
Level 1: Prestige Power Slide Empty(A)
Level 1: Prestige Power Quick Empty(A)
Level 1: Prestige Power Rush Empty(A)
Level 1: Prestige Power Surge Empty(A)
Level 1: Sprint Clr-Stlth(A)
Level 2: Rest RechRdx-I(A)
Level 4: Ninja Run
Level 2: Swift Run-I(A)
Level 2: Health Pnc-Heal/+End(A), Mrc-Rcvry+(17), NmnCnv-Regen/Rcvry+(17)
Level 2: Hurdle Jump-I(A)
Level 2: Stamina PrfShf-End%(A), PrfShf-EndMod(19)
Level 10: Defensive Adaptation
Level 10: Efficient Adaptation
Level 10: Offensive Adaptation
Level 50: Agility Core Paragon
Level 50: Ageless Radial Epiphany
Level 50: Void Radial Final Judgement
Level 50: Melee Core Embodiment
Level 50: Reactive Radial Flawless Interface
Level 50: Talons of Vengeance Radial Superior Ally
------------| Copy & Paste this data into Mids' Hero Designer to view the build |
|-------------------------------------------------------------------|
|MxDz;1693;852;1704;HEX;|
|78DA6594D96F12511487EFC054A476A3745FA7B415DA0285B62F6E69C05AA32DB19|
|6A4AF381DAE30090532438D758BFD13DABABDB83DBA26FAE89BAFC6E5D518F7E5C1|
|2E6AA2266A62F030E714884C42BE7BCF3DCBEF9E7B2FA1E3631577F72F8E32A16A6|
|F42D6F54858D1E4749A6B652139A62A0CBE93C171B71408BBA519F885C39294D224|
|69D3160EE728491E69424DF28CAA4881B934CC42F3BA02AB69555333E01153136A6|
|601EC81184F705D97A6E5A82A27DCD2349F55B54C9CE6E030CD6525A31EE3D2188F|
|F1A405EAB76C4A8A8420967BC7E6E544249890A35C77E497C6F8519ED4B937A8A62|
|287B4989C549548409B4B69B603C938D77832E3DD1C944FA552096F38CD79B4D218|
|8EABB178464DC62A7021A5295C5BA83626931CCA687A5C4DDBF6A555C51B4C45172|
|22159CF80471368F3C2EF444EA4F1654536057088CC7498388D14C344978931BF95|
|BDEC86B960C494B11F66B0896CCB4FE22FE4D6DFC42164792304B48BEC948542215|
|678446B0F21AF5D64158F715EF10459F594F80CF90AEA9AB12E335F3419B6D390AF|
|8CF4975D170D5BED6564DD15E25564C335E46BC863C13CA2A546C0B53A64533D710|
|26BB67C479E813A566632745B8F609E1619D9364B54901D512247BE817ADBB05ED6|
|01792A712C540E30A39FFDC477E0578D7B31577FC6BA1D6B48699DB88A3C0B796CB|
|46FDB79AC232D21BB96892BC473C8F790DF8EB54D761FEEB37B98388214206F3DE6|
|65F5741FCC606BA4B8C6FFE27A286E117C9AE95C9B77E03DD9BE93B88BB81BE9DC8|
|367E71CC5BD7C005DADACDCD84BEB86C9B827CE7564DF2AD1E88795F5AD2145A8D7|
|4E9ADAE90C7B8C33B4B21E3AC3E55EC63AA9479D37B007FD3789B790EEDBC43BC88|
|FA0C541791DA4C54D5A3CA4E513F8F4A25E736F03EAF1902E4F08350CAEE3DC063A|
|5D94CF453A0749E720E95C029D03D4F3810DECC905B07931CEECF5A39F7F8848BDF|
|753EF57C0D747F1BE17D8DB3631FFAE19A3F7DC29E6DF6DB6BF783D0B1FF39558FC|
|2596E112CB488965B2D86245355362FED533C1B8ED22B3D6C06B465B76039A29D0C|
|B163CB8FEB56033095DD8959A836070026770E75F8AE35C18F7AD601304FA97A85D|
|C69B77AF3BF78AB1E6DBA2F1FDA2F19F0670A52E5DB2C398ECEEBA82FD812367376|
|E40F67991CFDF9E82CF3F1D5423A0|
|-------------------------------------------------------------------|Kat Bio Scrapper - Alpha 3 ITF - [i25].mxd DB Bio Scrapper - Alpha 2 ITF - [i25].mxd
-
Standard Linea Rune/Hybrid/Rune/Kitchen Sink build.
Lucy Medrano - Shield Defense/Rad Melee
SpoilerHero Plan by Mids' Hero Designer 1.962
http://www.cohplanner.com/Level 50 Natural Tanker
Primary Power Set: Shield Defense
Secondary Power Set: Radiation Melee
Power Pool: Fighting
Power Pool: Sorcery
Power Pool: Speed
Ancillary Pool: Energy MasteryHero Profile:
------------
Level 1: Deflection ShlWal-Def/EndRdx(A), ShlWal-Def/EndRdx/Rchg(3), ShlWal-Def(3), LucoftheG-Rchg+(5), ImpArm-ResPsi(5)
Level 1: Contaminated Strike SprMghoft-Acc/Dmg(A), SprMghoft-Dmg/Rchg(7), SprMghoft-Acc/Dmg/Rchg(7), SprMghoft-Dmg/EndRdx/Rchg(9), SprMghoft-Acc/Dmg/EndRdx/Rchg(9), SprMghoft-Rchg/Res%(11)
Level 2: Battle Agility ShlWal-Def/EndRdx(A), ShlWal-Def(11), ShlWal-ResDam/Re TP(13), Rct-ResDam%(13), LucoftheG-Rchg+(15), ShlWal-Def/EndRdx/Rchg(50)
Level 4: Radioactive Smash SprGntFis-Acc/Dmg(A), SprGntFis-Dmg/Rchg(19), SprGntFis-Acc/Dmg/Rchg(21), SprGntFis-Dmg/EndRdx/Rchg(21), SprGntFis-Acc/Dmg/EndRdx/Rchg(23), SprGntFis-Rchg/+Absorb(23)
Level 6: Active Defense RechRdx-I(A)
Level 8: True Grit GldArm-ResDam(A), GldArm-End/Res(25), GldArm-3defTpProc(25), StdPrt-ResDam/Def+(27), ImpArm-ResPsi(27)
Level 10: Against All Odds EndRdx-I(A)
Level 12: Phalanx Fighting ShlWal-Def(A), ShlWal-Def/EndRdx(29), ShlWal-Def/EndRdx/Rchg(29), LucoftheG-Rchg+(31), Ksm-ToHit+(31)
Level 14: Boxing Empty(A)
Level 16: Radiation Siphon Mk'Bit-Acc/Dmg(A), Mk'Bit-Dmg/EndRdx(31), Mk'Bit-Dmg/Rchg(33), Mk'Bit-Acc/EndRdx/Rchg(33), Mk'Bit-Acc/Dmg/EndRdx/Rchg(33), Mk'Bit-Dam%(34)
Level 18: Grant Cover Rct-Def(A), Rct-Def/EndRdx(34), LucoftheG-Rchg+(34)
Level 20: Fusion RechRdx-I(A), RechRdx-I(36)
Level 22: Tough Ags-ResDam/EndRdx(A), Ags-ResDam(36), Ags-Psi/Status(36)
Level 24: Weave ShlWal-Def(A), ShlWal-Def/EndRdx(37), ShlWal-EndRdx/Rchg(37), ShlWal-Def/EndRdx/Rchg(37), LucoftheG-Rchg+(39)
Level 26: Shield Charge Arm-Dam%(A), Arm-Dmg/Rchg(39), Arm-Acc/Dmg/Rchg(39), Arm-Acc/Rchg(40), Arm-Dmg/EndRdx(40), Arm-Dmg(40)
Level 28: Irradiated Ground ScrDrv-Acc/Dmg/EndRdx(A), Mlt-Acc/Dmg/EndRdx(42), Obl-Acc/Dmg/EndRdx/Rchg(42), Mlt-Dmg/EndRdx(42)
Level 30: Mystic Flight WntGif-ResSlow(A)
Level 32: One with the Shield ResDam-I(A), ResDam-I(43)
Level 35: Devastating Blow Mk'Bit-Acc/Dmg(A), Mk'Bit-Dmg/EndRdx(43), Mk'Bit-Dmg/Rchg(43), Mk'Bit-Acc/EndRdx/Rchg(45), Mk'Bit-Acc/Dmg/EndRdx/Rchg(45), Mk'Bit-Dam%(45)
Level 38: Atom Smasher SprAvl-Acc/Dmg(A), SprAvl-Dmg/EndRdx(46), SprAvl-Acc/Dmg/EndRdx(46), SprAvl-Acc/Dmg/Rchg(46), SprAvl-Acc/Dmg/EndRdx/Rchg(48), SprAvl-Rchg/KDProc(48)
Level 41: Spirit Ward Prv-Absorb%(A)
Level 44: Rune of Protection TtnCtn-ResDam/Rchg(A), UnbGrd-Rchg/ResDam(48), Ags-ResDam/Rchg(50)
Level 47: Hasten RechRdx-I(A), RechRdx-I(50)
Level 49: Conserve Power RechRdx-I(A)
Level 1: Brawl Empty(A)
Level 1: Gauntlet
Level 1: Prestige Power Dash Empty(A)
Level 1: Prestige Power Slide Empty(A)
Level 1: Prestige Power Quick Empty(A)
Level 1: Prestige Power Rush Empty(A)
Level 1: Prestige Power Surge Empty(A)
Level 1: Sprint Empty(A)
Level 2: Rest Empty(A)
Level 4: Ninja Run
Level 2: Swift Run-I(A)
Level 2: Health Pnc-Heal/+End(A), Mrc-Rcvry+(15), NmnCnv-Regen/Rcvry+(17)
Level 2: Hurdle Jump-I(A)
Level 2: Stamina PrfShf-End%(A), PrfShf-EndMod(17), EndMod-I(19)
Level 50: Agility Core Paragon
Level 50: Melee Core Embodiment
------------| Copy & Paste this data into Mids' Hero Designer to view the build |
|-------------------------------------------------------------------|
|MxDz;1466;692;1384;HEX;|
|78DA65945B6F1261108667612B42C19EEC991EA0AD1C4A29AB35F1182F6CE911D35|
|8E36DB3295FE95A021530B1DE9978BC5413BD51AB7FA046BD33F16F68D5DFD0D6E8|
|85898959879D576CC20678F69B9DF966DE970F323727FDDBD3B72F90E6BF9837CBE|
|5E52B66615D953C97CCCA8D9299A7EAE5E1779FC49727D5AA2A94557269CD52F9EC|
|BF65104F332AAF54F2B299B5CC8A552CC89A028BC5623E99B6726B15AB90F33BABA|
|562694595367DB2D8502A2B591995B556AC826A9BDAB05692530555CA6D2E67CC72|
|8593BB788E08BF2703FCA15527B3754ABB890C9D5CB3E09C506FD78431669F4EDB9|
|15A4D037D929C439FC11DE1E12FE057A1EF9B708AFB69A8D5D0CF873EFE79F0A7F0|
|08FA1A98E70DF77593D4BAEFE84EACF5AEF0E83DF0BEB0E301F85038CD7D1BA42F3|
|58C320C2FA539E68176CFB8F4E832C0E3C29E4ED1DC53D51ED169866BBC8E009BBC|
|21D96796638DD8A7115A82D016C4ECFDD0D2FF879CFD343E0801D142019B2F7ACBE|
|A9AA0AE6995243B271C5C032DF09A30B42E9CE3AD5A640257CB9E740CED83E8FC31|
|46D426FB6B6D8E031E1A02DD3C4D3BEADB53923F34019E14E53AE774426527540E4|
|3E5F00C08B5C7D0739EE7EA86A6EEF32E79761A3C238C9C05CF81A7843FA244BD52|
|EBEEBD254EC72AA23766BB647D5DD64F46D854B8D9D72B332C70EF01E81D48487D1|
|C7CC75E873157185EC7E1751C5E27E075025E27E0F57BAE1D41EDC873395D632FC0|
|97E09670FC15F85AF8880BA39833BA2B733EE5D828BC1FADDEF07CE3BFDC0E0D43D|
|661F63E29395A12DF99016E716A0A7BA670B2833AE1B2F9553D5D31BDF69BB5E375|
|4F537511A32E72A22E32511759A88B2CEA68CB11CD89789B6BBF627BD757FB37206|
|D4CFCDDFF1F736921FC13CCC9196CBE2AE76AEF605D54EABE1FAC7B2667A8F9B1CB|
|F1A87550BCFADDC140EF0FE1EABDCFB9FF0B44AFE375|
|-------------------------------------------------------------------| -
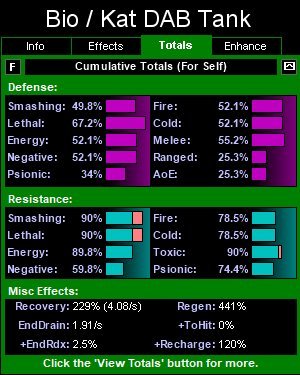
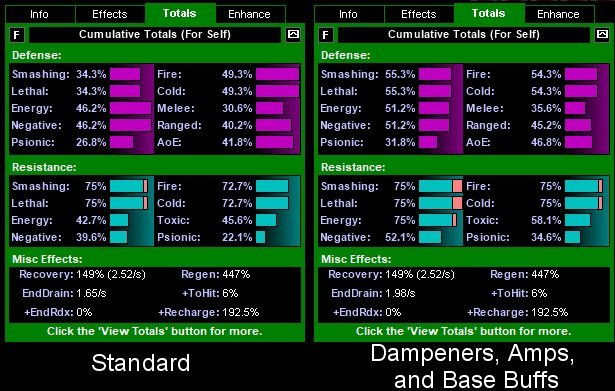
Bio/Anything is good.
For stupid silly There's BioCat, Bio/Katana with Dampeners, Amps, Base Buffs, More or less Caps everything and massive regen healing too. Absolutely no reason to ever build this build, it's just something I've threatened to do repeatedly. ... and yes, I know your defense can be stripped, but considering what I do with a Kat/Bio Scrapper, I really wouldn't be that worried here. Of course considering what I do with a Kat/Bio Scrapper, I'll almost certainly never build this either.

Note: This is WITH Amplifiers, Dampeners, and Base Buffs turned on.
Bio/Katana Silliness
SpoilerHero Plan by Mids' Hero Designer 1.962
http://www.cohplanner.com/Level 50 Mutation Tanker
Primary Power Set: Bio Armor
Secondary Power Set: Katana
Power Pool: Speed
Power Pool: Fighting
Power Pool: Leadership
Power Pool: SorceryHero Profile:
------------
Level 1: Hardened Carapace UnbGrd-ResDam(A), UnbGrd-ResDam/EndRdx(3), UnbGrd-ResDam/EndRdx/Rchg(3), UnbGrd-Max HP%(5), StdPrt-ResDam/Def+(5), ImpArm-ResPsi(7)
Level 1: Sting of the Wasp SprMghoft-Acc/Dmg(A), SprMghoft-Rchg/Res%(7), SprMghoft-Acc/Dmg/Rchg(9), SprMghoft-Dmg/EndRdx/Rchg(9), SprMghoft-Acc/Dmg/EndRdx/Rchg(11), AchHee-ResDeb%(11)
Level 2: Inexhaustible PrfShf-End%(A), PrfShf-EndMod(13)
Level 4: Environmental Modification Rct-Def(A), Rct-Def/EndRdx(17), LucoftheG-Rchg+(19), ShlWal-ResDam/Re TP(19), Rct-ResDam%(21), Rct-Def/EndRdx/Rchg(21)
Level 6: Adaptation
Level 8: Ablative Carapace DctWnd-Heal/EndRdx/Rchg(A), Pnc-Heal/EndRedux/Rchg(23), Pnc-Heal/Rchg(23)
Level 10: Hasten RechRdx-I(A), RechRdx-I(50)
Level 12: Evolving Armor Ags-ResDam/EndRdx(A), Ags-ResDam/EndRdx/Rchg(25), Ags-ResDam(25), GldArm-3defTpProc(27), ImpArm-ResPsi(27)
Level 14: Boxing KntCmb-Acc/Dmg(A)
Level 16: Divine Avalanche SprBlsCol-Dmg/EndRdx(A), SprBlsCol-Acc/Dmg/EndRdx(31), SprBlsCol-Acc/Dmg/Rchg(31), SprBlsCol-Dmg/EndRdx/Acc/Rchg(33), SprBlsCol-Rchg/HoldProc(33), LucoftheG-Rchg+(33)
Level 18: DNA Siphon Erd-Acc/Dmg/Rchg(A), Erd-Acc/Rchg(34), Erd-Acc/Dmg/EndRdx/Rchg(34), TchoftheN-Acc/EndRdx/Heal/HP/Regen(34), TchoftheN-Heal(36)
Level 20: Build Up RechRdx-I(A), RechRdx-I(36)
Level 22: Tough Ags-ResDam/EndRdx(A), Ags-ResDam/EndRdx/Rchg(29), Ags-ResDam(29), ImpArm-ResPsi(31)
Level 24: Weave LucoftheG-Def/EndRdx(A), LucoftheG-Def(36), LucoftheG-Rchg+(37)
Level 26: Genetic Contamination Erd-Dmg(A), Erd-Acc/Dmg/EndRdx/Rchg(39), Erd-Acc/Rchg(39), ScrDrv-Acc/Dmg/EndRdx(39), Mlt-Acc/Dmg/EndRdx(40)
Level 28: The Lotus Drops SprAvl-Rchg/KDProc(A), SprAvl-Dmg/EndRdx(40), SprAvl-Acc/Dmg/EndRdx(40), SprAvl-Acc/Dmg/Rchg(42), SprAvl-Acc/Dmg/EndRdx/Rchg(42)
Level 30: Maneuvers LucoftheG-Def/EndRdx(A), LucoftheG-Def(37), LucoftheG-Rchg+(37)
Level 32: Parasitic Aura TchoftheN-Acc/EndRdx/Heal/HP/Regen(A), Pnc-EndRdx/Rchg(42), Pnc-Heal/Rchg(43), Pnc-Heal/EndRedux/Rchg(43)
Level 35: Soaring Dragon Hct-Dmg/Rchg(A), Hct-Acc/Dmg/Rchg(43), Hct-Acc/Rchg(45), Hct-Dmg/EndRdx(45), Hct-Dam%(45), AchHee-ResDeb%(50)
Level 38: Golden Dragonfly SprGntFis-Acc/Dmg(A), SprGntFis-Dmg/Rchg(46), SprGntFis-Acc/Dmg/Rchg(46), SprGntFis-Dmg/EndRdx/Rchg(46), SprGntFis-Acc/Dmg/EndRdx/Rchg(48), SprGntFis-Rchg/+Absorb(48)
Level 41: Mystic Flight EndRdx-I(A)
Level 44: Spirit Ward Prv-Absorb%(A)
Level 47: Rune of Protection Ags-ResDam/Rchg(A), TtnCtn-ResDam/Rchg(48), UnbGrd-Rchg/ResDam(50)
Level 49: Dragon's Roar PrfZng-Taunt/Rchg(A)
Level 1: Brawl KntCmb-Acc/Dmg(A)
Level 1: Gauntlet
Level 1: Prestige Power Dash Empty(A)
Level 1: Prestige Power Slide Empty(A)
Level 1: Prestige Power Quick Empty(A)
Level 1: Prestige Power Rush Empty(A)
Level 1: Prestige Power Surge Empty(A)
Level 1: Sprint Clr-Stlth(A)
Level 2: Rest RechRdx-I(A)
Level 4: Ninja Run
Level 2: Swift Run-I(A)
Level 2: Health Mrc-Rcvry+(A), NmnCnv-Regen/Rcvry+(13), Pnc-Heal/+End(15)
Level 2: Hurdle Jump-I(A)
Level 2: Stamina PrfShf-End%(A), PrfShf-EndMod(15), EffAdp-EndMod(17)
Level 8: Defensive Adaptation
Level 8: Efficient Adaptation
Level 8: Offensive Adaptation
Level 0: Biological Mutagens
Level 0: Kinetic Shield
------------| Copy & Paste this data into Mids' Hero Designer to view the build |
|-------------------------------------------------------------------|
|MxDz;1499;729;1458;HEX;|
|78DA6594594F135114C7EF746E819602C5B243595AB09B94567837286A22544934B|
|E369332C244EC90E998A86F26AE892F80CB132E0F26EEDFC12F615C3E81C4826111|
|70493D9DFF09367692E9EFF69C7BE6FECFB9E7DECC9509DFBB93D78F08C5776C5E2|
|B14B2E7B4FC45DDAACB5CB635DB30F3A2FCD4D2DB0F477642BFA0E70B7AF2A86166|
|CF58B35ADEC865C7AD4BA615E009197D5ED793939AADE535E19D36CDF9E4D9055D9|
|F697086278CD939DBC8CF3639FFA6746D46B70A73C6820F134D2BA75B5703C7178C|
|5C72DCCAD9F4F18C56B0C9D6411AE2F46E84E94729AB2AB9C5962A445A0AD736731|
|7947BCC769A1894A226468C48F13C22F8A1D80F9853F305ACFBC8FC047A3F33DFBB|
|840848B149EB2A5857511EB91C9F6FA94C8FD8229FCA9AD435C4F9D7C103AD0A388|
|9FF2D9BCC0D709B62DD882DEDD1B8166357ED69C5F9765B9F0AF68221DA0C0FEBF0|
|2484634B3B748B9F145F0F9FAC4F61DD8E51E618D87518EB76714D14FA5E036A221|
|AA6092129DE529D9A389FA645E9CCEF5D622E83FDF7990F989CE72FD2D02CBC8E86|
|E66F549FA0470CAC328BCC36E4120E802F69BD00342801CE29CC54495F2BB4A8AD9|
|C530FE7D4C339F5722E92E6B673FDDAFDF0855BC041D6F79BF475728D3ABFBA9CFE|
|385864AE32AF61ED880DBE227DDDD027BB9F21DFC80AF331187BC27C0A369396206|
|B09B296C1FFB4FC212D7DA895DAC7358905C138EF779CF7FF35690871EF8622E8BF|
|7814FD7728C68C3313F0A7B977DF50EC10C70EDD80BEE19BCC5BCCDBE0C81DE65D7|
|09902A3DC1FD101D463916C09B6258AE8A787644B72BEC9347A772401A67790C30B|
|D291E2B89409AD3D72FF4C0AC1FD1793FB67BC14AFF497E811A92A4BBACA325A651|
|9ABB24C555A3CA8D8B4E485C9A6381D2885C74FA71BB652D1BB7F0B086518FEF57F|
|3697720A9DE83B8F1D6E1C4075D62AE3A288FB5E19C7374AA373A3B885FF1EAAB31|
|3C6ED5B5EFB47C578B762BC525F3E371877558CFF02ADA9E8F0|
|-------------------------------------------------------------------|-
 1
1
-
-
I've not done any regular arcs here.
Cathan
- Is probably the best bet for a regular team. 801.1 - Is designed for a team of four to six Level 50+3 Tier 4 Incarnates. It Is my Standard Incarnate Test. This is where I take an armor (solo) to break it, learn it's limits, and make it better. About a third of my builds can solo it +4x8, Most of the rest +1x8. I've been taking various size teams through it as a challenge and change of pace. I'd be happy to duo it with you if our schedules allow. And you're welcome to run it with any teams you want, just be clear about what to expect.
STANDARD WARNING: If someone doesn't die every 30 seconds we're doing it wrong. You can expect multiple simultaneous EB Ambushes, Pulling 12+ spawns into a pile while already fighting 6 others, …
INCARNATE WARNING: This is Incarnate Content, intended for a team of 4 to 5 level 50+3 Tier 4 Incarnates with Defense Buffs, Resist Buffs, Debuffs, Controls, and Armor.
801.4 and 801.5 - This is where I go to break the best of the best. Both are designed similar to my Cimmie Test. Aggro an intersection and survive 10 minutes without using any offensive powers. It's a bit luck of the draw on damage types, so you might have to run more than once. Cimmie Test - My Basic Melee Durability Test. Survive 10 minutes with 6 Bosses and all the rest of 3 spawns of +4x8 Cimmies aggroed while using no offensive powers. You have to make sure to keep the bosses aggroed, the riff raff just fill in the rest of the gaps. This shows you can survive -defense debuffs (the 6 bosses), and that you can handle any crash or transition in clicky armors. -
1
-
-
It's archived. I'll look into pulling it out. The AE 3 arcs limit is a PITA. If you're feeling sadistic and masochistic try 801.1, but do NOT take a team of lowbies into any 801 arcs.
-
1
-
-
Do you really need to be this tough: No, not at all. It really depends on the team.
I'll second what Hyperstrike said about how to build. I'll add that for heal-tank armors a defensive weapon like Katana can really help.
For a Tank I recommend:
Other armors as well, but these are my top picks in each armor type.
- Defense Armor: */EnA (brute only armor), Inv/Rad, SD/Rad; ( for a cheap SO only build, I'd probably recommend the Inv/Rad or Kat/Ena )
- Resist Armor: Rad/Kat;
- Heal-Tank Armor: Bio/Kat; ( My "Main Incarnate Tank" is a Kat/Bio Scrapper 😜 )
My standards are as follows:
Note the following are SLE heavy tests, you also need to evaluate your other types of defenses and resists. SL > EN > FC > TP, where TP can be half that of SL.
- Base Level: Solo +4x8 Council. If as a tank you can't do this, I would say you need to work on your build or the Incarnate content will shred you like tissue paper.
- Squishies: Survive a Fire Farm or SL Farm Patrol Cave Intersection on +4x8 for 10+ minutes ... at a very minimum set for no-bosses, but preferably set with-bosses.
- Melees: Survive 10 minutes with 6 Bosses and all the rest of 3 spawns of +4x8 Cimmies aggroed while using no offensive powers. You have to make sure to keep the bosses aggroed, the riff raff just fill in the rest of the gaps. This shows you can survive -defense debuffs (the 6 bosses), and that you can handle any crash or transition in clicky armors.
- Tanks: Solo +4x8 AE Arc "801.1"
-
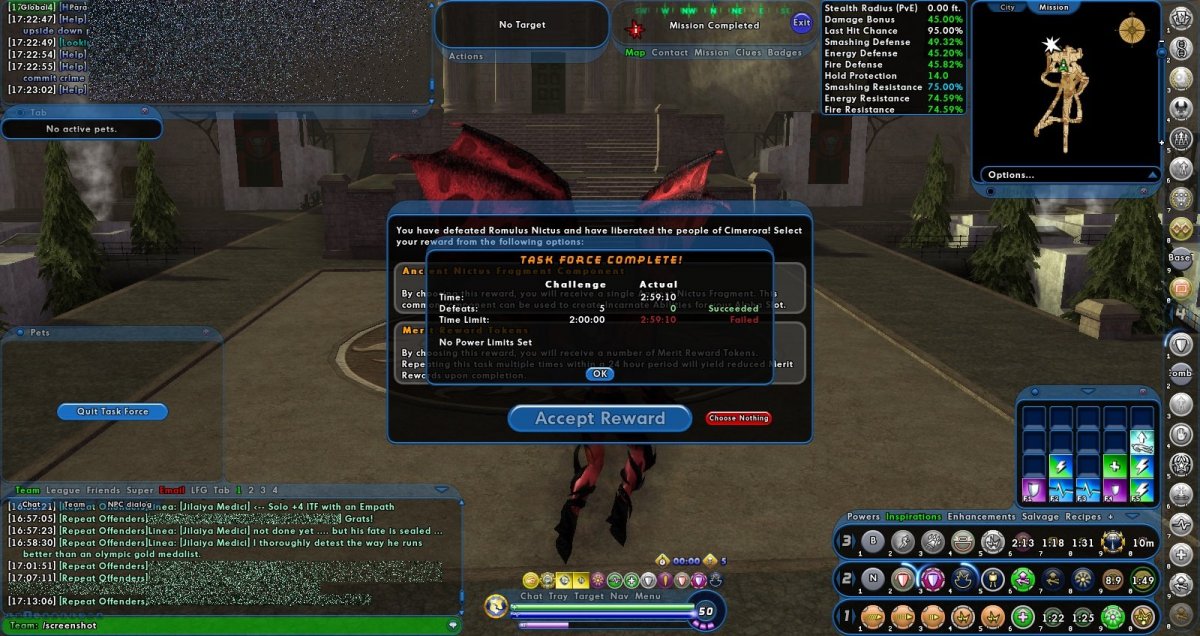
As to the ITF. It's entirely more likely that the issue was the healing nictus, and not lack of -regen. If it /was/ lack of -regen, then just carry Envenomed Daggers, you can typically double stack them and get way more debuff from that source. If you really are paranoid about -regen, then just get at least one other person to carry daggers, then you can have 4 stacks, that should be enough for all but the worst of teams. /IF/ you do hit a wall, you can buy from p2w in Pocket D even during a TF, and just load up on daggers, or have the whole team load up on daggers. Note: ONLY the Pocket D vendor will sell to you during TFs.
The healing nictus cheats and heals from /all/ entities nearby, including it's allies. Kill all adds, and defense buff all pets. Also, Do NOT use Carrior Creepers in range of the nictus if the nictus in in range of Rommy. (unless you can defense buff them, and I'm not sure you /can/ defense buff them. Or if you optionally just have massive overkill dps, it is possible to power through, but I advise that you ditch the creepers).
Rommy Running can cut your effective applied dps in half. Immobilize him, or taunt him. The taunt can be as little as a scrapper taunt aura, it doesn't have to be an actual taunt. This means think ahead and try to have control or taunt on the team. If you don't, then it's often easier to kill the nictus instead of Rommy due to his running, but this will be more difficult than killing an immobilized/taunted Rommy. Immobilized/Taunted Rommy > Kill the Nictus > Kill Trackstar that runs everywhere like a maniac.
The Autohit is the other major issue. Stay outside it's circle. It's power has a very obvious graphic circle, Stay outside that circle. Alternately -damage debuff it, and/or +resist buff the team.
-
I disagree. There are times (build and team configurations) where no -regen is better than some small about of -regen. If the -regen is 'free' with absolutely no cost, that might be different, but there is always at least a minimal cost. A 5 dps equivalent -regen that only applies to AVs, should cost less than 5 dps of general offense/recharge. In cases where the cost is elsewhere than dps, the question is more subjective, but should not be ignored entirely.
-
1 hour ago, Captain Powerhouse said:
On the Phantom Army zoning issue:
Tested all three.
Old FX: All three zone.
Mirror and Phantom Mirror: only 1 zones.
-
1
-
-
Edge(PC) doesn't seem to like the link. Firefox(linux) worked.
Here's an alternate copy Downloaded from above via firefox, then re-attached via the forum.
Mids Builds Archives 1905 FX.7z
Scroll Down for a .Zip format version
-
1
-
1
-
-
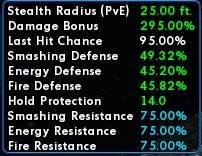
The following worked well for me, and is capable of soloing a +4x8 ITF.
Armored D.A.B. Build. (Optionally uses Dampeners, Amps, and Base Buffs for extremely high performance . This is not required for more normal performance levels.)
Offensive Rating 80: 347 (107%) ST DPS vs Pylons, 15 (67%) AoE MPL in a Fire Farm, (as compared to my Fire/Atomic Blaster)
Standard Rune/Hybrid Core T4/Rune/Demonic Kitchen Sink for resists and status protection. (500s up, 30s gap. The gap is of minimal impact once you factor in moving between mobs and using the clicks more efficiently. In practice I pause for recharge reasons less than once per week.)
P2W:Kinetic Dampener to seal up SL defenses for tanking or soloing. Add optional Base Buffs and/or Amps ...
P2W:Stun Grenades stack with Thunderclap, Tornado, and OG to stun most of a spawn PBAoE, Stun bosses, for both defense and to slow things from running away. (The stuns are very useful, particularly early on.)
You can also stack holds.
Trica Arashi - Storm/Elec/Souldrain Defender
SpoilerHero Plan by Mids' Hero Designer 1.962
http://www.cohplanner.com/Trica Arashi - Control Concept - : Level 50 Magic Defender
Primary Power Set: Storm Summoning
Secondary Power Set: Electrical Blast
Power Pool: Fighting
Power Pool: Leadership
Power Pool: Speed
Power Pool: Sorcery
Ancillary Pool: Dark MasteryHero Profile:
------------
Level 1: O2 Boost DctWnd-Heal/EndRdx(A)
Level 1: Charged Bolts SprWntBit-Acc/Dmg(A), SprWntBit-Dmg/Rchg(3), SprWntBit-Acc/Dmg/EndRdx(3), SprWntBit-Acc/Dmg/Rchg(5), SprWntBit-Dmg/EndRdx/Acc/Rchg(5), SprWntBit-Rchg/SlowProc(7)
Level 2: Snow Storm EndRdx-I(A)
Level 4: Ball Lightning SprFrzBls-Acc/Dmg(A), SprFrzBls-Dmg/EndRdx(11), SprFrzBls-Acc/Dmg/EndRdx(11), SprFrzBls-Acc/Dmg/Rchg(13), SprFrzBls-Dmg/EndRdx/Acc/Rchg(13), SprFrzBls-Rchg/ImmobProc(15)
Level 6: Steamy Mist Rct-Def(A), Rct-Def/EndRdx(15), LucoftheG-Rchg+(17), GldArm-3defTpProc(17), StdPrt-ResDam/Def+(19), GldArm-End/Res(19)
Level 8: Freezing Rain SprDfnBst-Acc/Dmg(A), SprDfnBst-Dmg/Rchg(21), SprDfnBst-Dmg/EndRdx/Rchg(21), SprDfnBst-Acc/Dmg/EndRdx(23), SprDfnBst-Acc/Dmg/EndRdx/Rchg(23), SprDfnBst-Rchg/Heal%(25)
Level 10: Short Circuit Erd-Acc/Dmg/EndRdx/Rchg(A), Erd-Acc/Dmg/Rchg(25), Erd-Dmg/Rchg(27), ClvBlo-Dmg/EndRdx(27), ClvBlo-Dmg/Rchg(29), ClvBlo-Acc/Rchg(29)
Level 12: Hurricane DarWtcDsp-ToHitDeb/EndRdx(A)
Level 14: Boxing SprBlsCol-Rchg/HoldProc(A), SprBlsCol-Dmg/EndRdx(31), SprBlsCol-Acc/Dmg/EndRdx(31), SprBlsCol-Acc/Dmg/Rchg(31), SprBlsCol-Dmg/EndRdx/Acc/Rchg(33), SprBlsCol-Acc/Dmg(33)
Level 16: Aim RechRdx-I(A), RechRdx-I(33), GssSynFr--Build%(34)
Level 18: Thunder Clap AbsAmz-Stun/Rchg(A), AbsAmz-Acc/Stun/Rchg(34), AbsAmz-Acc/Rchg(34), AbsAmz-EndRdx/Stun(36), AbsAmz-ToHitDeb%(36), Stp-Acc/EndRdx(36)
Level 20: Tough TtnCtn-ResDam/EndRdx(A)
Level 22: Weave Rct-Def(A), Rct-Def/EndRdx(37), LucoftheG-Rchg+(37), Ksm-ToHit+(37)
Level 24: Maneuvers Rct-Def(A), Rct-Def/EndRdx(39), LucoftheG-Rchg+(39)
Level 26: Tornado SlbAll-Dmg/Rchg(A), SlbAll-Acc/Dmg/Rchg(39), SlbAll-Acc/Rchg(40), SlbAll-Dmg/EndRdx(40), SlbAll-Build%(40), OvrFrc-Dam/KB(42)
Level 28: Tesla Cage SprEnt-Acc/Hold(A), SprEnt-End/Rchg(42), SprEnt-Acc/Hold/End(42), SprEnt-Acc/Hold/End/Rchg(43), SprEnt-Rchg/AbsorbProc(43), SprEnt-Hold/Rchg(43)
Level 30: Hasten RechRdx-I(A), RechRdx-I(45)
Level 32: Mystic Flight BlsoftheZ-ResKB(A)
Level 35: Oppressive Gloom Acc-I(A)
Level 38: Spirit Ward Prv-Absorb%(A)
Level 41: Dark Embrace RctArm-ResDam/EndRdx(A), RctArm-ResDam/EndRdx/Rchg(45), RctArm-ResDam(46), RctArm-ResDam/Rchg(50)
Level 44: Soul Drain Arm-Dmg/Rchg(A), Arm-Acc/Dmg/Rchg(46), Arm-Acc/Rchg(46), Arm-Dmg/EndRdx(48), Arm-Dam%(48)
Level 47: Rune of Protection RctArm-ResDam/Rchg(A), RctArm-EndRdx/Rchg(48), RctArm-ResDam/EndRdx/Rchg(50), RctArm-ResDam(50)
Level 49: Assault EndRdx-I(A)
Level 1: Brawl KntCmb-Dmg/EndRdx(A)
Level 1: Prestige Power Dash Empty(A)
Level 1: Prestige Power Slide Empty(A)
Level 1: Prestige Power Quick Empty(A)
Level 1: Prestige Power Rush Empty(A)
Level 1: Prestige Power Surge Empty(A)
Level 1: Sprint Clr-Stlth(A)
Level 1: Vigilance
Level 2: Rest RechRdx-I(A)
Level 4: Ninja Run
Level 2: Swift Run-I(A)
Level 2: Health Pnc-Heal/+End(A), Mrc-Rcvry+(7), NmnCnv-Regen/Rcvry+(9)
Level 2: Hurdle Jump-I(A)
Level 2: Stamina PrfShf-End%(A), PrfShf-EndMod(9), EffAdp-EndMod(45)
Level 50: Spiritual Core Paragon
Level 50: Ageless Radial Epiphany
Level 50: Ion Radial Final Judgement
Level 50: Melee Core Embodiment
Level 50: Reactive Radial Flawless Interface
Level 50: Storm Elemental Radial Superior Ally
Level 0: Biological Mutagens
Level 0: Kinetic Shield
------------| Copy & Paste this data into Mids' Hero Designer to view the build |
|-------------------------------------------------------------------|
|MxDz;1600;763;1526;HEX;|
|78DA6594494F535114C7EF7B7D055AC6029519DA32535AA8BA710A3269148A0CC66|
|DD39447696C5F9B4749746570A9A80C4E1BF7A2E2C4A4AC1CBF830B37AE15F00B98|
|7AFAFE07DAA42F697EE7FEEF99EEE97DCF7F63A8E8F5C5853E21950C46837373812|
|17546D5A655DDEC0F862321418FF3AA1E09051DFD7A706E36E2F03806E35A528F47|
|D30CA9892429F9E4D570181818989F99F14E25E37A2C30351F8BC5B58816761CED4|
|E06B5B03AED1D8EAAA1643A6F3430407593B64BDAACAAAB5AD27B68148FC7E351EF|
|8548783649094A8DD5A81AA41CD446C26AACA712AA3A5D0433AE8754FDA66D38110|
|9798782FAF5809FD292524DCD79E8774716FCA484189184F059C47A46338BE70A69|
|8A90D7982F40E525F31598B70EDEA55889F3494E61E47B439A89F39936E167DD626|
|E83453BCC0F60C947709162CD1262CDFB26EC1D806576093C8E757915AD1B883E93|
|51F71EC5E673DDFCF7F0A9DC606E82C7B698DB60F50EF896622D1C6BD9938DBCD57|
|FC0DADFCC98307CEB35661CBC4FDB853C83C25DD9E845A2468A395FF1239CAD7199|
|B9C25C051D0F994BE03B4A518A58B9D48D993A98CE35D9F07940B0717EDB086A3A4|
|7997EB0798C790531CD0BF8BF4DD45B05662C2ABAA029A4D9A199EC3CF7169E7B0B|
|CFBDE59F30E66023DF2AF8CA55ECDBC6BE6DECBB44256BB8BF9A3EF4D1761E6CEF6|
|70E3007D15FE72FE4D8A0651DDF81BA4F9849E717E657B0EB1BF33BF333E8A2DE1A|
|102B35F0CCBA99ABAD4234F1FFD4F413356F5149176BAE5AF82D935F2B6BAD7BE86|
|981D0C1F3E96824A35D11DD4ED0E3027D4DE06DF2751B6F454A719FC2193DA79967|
|C09EB3CC73E8E33115F4A2A6C9CB797A1C9C97EBF8B84E399DB197FBEBE577AE5EC|
|97AAF27082E9A49B696A247F4E628BE1CE5448E723247194D2B7C8384052718CB68|
|A97125EBABE0C65B62293BFA2AA4F6ACB4CFF19207FB07194D969C987ADE659CB8E|
|01A6ED57E765C07E2FE5A8F6AC9D213F452B082E9762F82131504AEFD346D739FB5|
|95197BD795B17F64F94CDA33F6B3C2F4BDE2D82CFB3F877B01E0|
|-------------------------------------------------------------------|
-
1
-
-
Time/* ... Tank, Scrapper, Blaster, Support, ... so many different ways you can build them.
-
The primary builds are resist based damage builds, the secondary build is a more traditional defense armored build with less damage.
Any blast set is acceptable, I'm just most fond of Fire (Damage), Ice (Damage/Utility, Holds), Water (Utility, Self-Heal).
Same way I rate Armors, EnA (Defense), RadA (Resist), Bio (Heal-Tank) ...
I'm picking one of each type to recommend, not shuffling all types together and picking the top 3 ... that could lead to either very bias results, or the need for just listing every set possible. For instance, I tend to never recommend resist based armor on 75% resist cap ATs because you are always going to be stuck with taking 2.5x incoming damage even with the best build. The only exceptions to that would be Dark, Bio, Nature, or any other set that can provide 2.5x or more Healing and/or Regen. But then that in turn probably means it's a Heal-Tank instead of primarily defense or resist set, or it's a hybrid. Messy and complicated, So I give one for each type so at least one will most likely fit the play-style desired.
I built Offenders, from a support perspective it's a bit more ambivalent, although the defender does get better support numbers.
The primary builds push near-perma Overgrowth and near-perma soul-drain for blaster level damage plus support. A blaster that's buffing damage (half a kin's worth), resistance, regen, recovery, absorb, that massive AoE heal/absorb, and some minor healing (although the directional 'heal' is a total PITA without binds.)
Directional Heal - Bind numpad to "team_select 1$$face$$follow" .. then heal. I'll attach my binds if you can decipher them. (good luck. I have hundreds of bind files, so binds are second nature to me, and as a result my binds may appear a bit complicated at first.)
On 1/2/2020 at 2:14 AM, purplereign said:though a bit too OFFender for my taste
You should see my Empath. Totally Blasphemous Sacriledge, It's primary build isn't even Green Machine compliant. *face palm* ... of course it's also an unholy terror. 😜
-
If I had to pick one defender for you to bring to all my teams, I'd pick Nature. Chances are really good someone else will bring a kin, and/or most of the other buffable things, but nature is pretty unique and buffs those things I can make use of most and tends to be the hardest to find.
If you want to specialize in killing AV/GMs, then I'd pick Cold (assuming I didn't pick Illusion/Rad). But really, any reasonable team these days should be able to kill all the AVs or GMs it wants. Cold even on pure SO builds guts hard targets.
No one defender does everything. But some really nice pairs are Kin/Cold, Time/Nature, Emp/Emp, ... any of these would be great picks ... but honestly just about any defender would be a great pick.
Also, you do not HAVE to box yourself into /Sonic Blast. Yes, it's a nice additional multiplier, but at least half of the other blast sets would be just as good a choice. I personally recommend Fire, Ice, and Water as the top three overall choices and much less frustrating to play if you ever do wind up on a small team or solo.
- Kin/Cold pair translates to max +dam * max -resist = 9x damage.
- Time/Nature buffs defense, damage, resist, absorb, recharge, and healing.
- Emp/Emp is just silly fun when run Green Machine style, perma buffs for all.
... etc. ...
Nature Fire - Fourcade 2 - [i25].mxd Nature Fire - Fourcade 2td - [i25].mxd Nature Fire - Laoraine 2c - [i25].mxd
-
Just be warned, if you use the PBU and/or Clarion Radial +Special, if you recast Farsight without those buffs, you'll overwrite the +50defense bubble with a +20defense one, losing that nice boost. With PBU that's less of an issue as it can recharge must faster, but with Clarion it means both you and your team need to have (nearly) PERFECT buffing discipline. aka: It's not easy, but the rewards are well worth it.
-
1
-
-
Jilaiya (Empathy/Fire/Souldrain) soloed a +4x8 ITF
Emp Fire - Combat Medic Concept 4 - [i25].mxd Emp Fire - Harlequin Device 2 - [i26].mxd
Jil's in-combat numbers when she's all dolled up with Amps, Dampener's, and Base Buffs ... Rune/Hybrid/Rune/Demonic/Kitchen Sink
-
3
-
-
I built this as a brute, these files are from the archives when I was planning and testing builds, probably don't include the most recent changes, and I'm not sure what kind of shape they are in.
Kat / EnA Build (scrapper)
SpoilerHero Plan by Mids' Hero Designer 1.962
http://www.cohplanner.com/Blaze(3!), Darkness (Cone/Hold), Leviathon (Spout, Hold), Mace (3!), Mu (3!), Soul (!Shadowmeld), : Level 50 Magic Scrapper
Primary Power Set: Katana
Secondary Power Set: Energy Aura
Power Pool: Speed
Power Pool: Fighting
Power Pool: Leadership
Power Pool: Sorcery
Ancillary Pool: Soul MasteryHero Profile:
------------
Level 1: Gambler's Cut KntCmb-Acc/Dmg(A), KntCmb-Dmg/EndRdx(3), KntCmb-Dmg/Rchg(3), KntCmb-Dmg/EndRdx/Rchg(5), Acc-I(5), SprCrtStr-Rchg/+50% Crit(7)
Level 1: Kinetic Shield Rct-Def(A), Rct-Def/EndRdx(7), LucoftheG-Rchg+(9), Ksm-ToHit+(9), ShlWal-ResDam/Re TP(11), Rct-ResDam%(11)
Level 2: Dampening Field Ags-ResDam/EndRdx(A), Ags-ResDam/EndRdx/Rchg(13), Ags-ResDam(13), GldArm-3defTpProc(15), StdPrt-ResDam/Def+(15)
Level 4: Power Shield Rct-Def(A), Rct-Def/EndRdx(19), LucoftheG-Rchg+(21)
Level 6: Build Up RechRdx-I(A), RechRdx-I(21)
Level 8: Divine Avalanche SprScrStr-Acc/Dmg/Rchg(A), SprScrStr-Acc/Dmg/EndRdx/Rchg(23), SprScrStr-Rchg/+Crit(23), Hct-Acc/Dmg/Rchg(25), Hct-Dmg/EndRdx(25), DefBuff-I(27)
Level 10: Entropic Aura EndRdx-I(A)
Level 12: Hasten RechRdx-I(A), RechRdx-I(39)
Level 14: Boxing Acc-I(A)
Level 16: Energy Protection Ags-ResDam/EndRdx(A), Ags-ResDam/EndRdx/Rchg(29), Ags-ResDam(31)
Level 18: The Lotus Drops SprAvl-Dmg/EndRdx(A), SprAvl-Acc/Dmg/EndRdx(31), SprAvl-Acc/Dmg/Rchg(31), SprAvl-Acc/Dmg/EndRdx/Rchg(33), SprAvl-Rchg/KDProc(33)
Level 20: Energy Cloak Rct-Def(A), Rct-Def/EndRdx(33), LucoftheG-Rchg+(34)
Level 22: Tough Ags-ResDam/EndRdx(A), Ags-ResDam/EndRdx/Rchg(27), Ags-ResDam(29)
Level 24: Weave Rct-Def(A), Rct-Def/EndRdx(34), LucoftheG-Rchg+(34)
Level 26: Soaring Dragon SprBlsCol-Dmg/EndRdx(A), SprBlsCol-Acc/Dmg/EndRdx(36), SprBlsCol-Acc/Dmg/Rchg(37), SprBlsCol-Dmg/EndRdx/Acc/Rchg(37), SprBlsCol-Rchg/HoldProc(37)
Level 28: Energize Prv-EndRdx/Rchg(A), Prv-Heal/Rchg/EndRdx(39), DctWnd-Heal/Rchg(39)
Level 30: Maneuvers Rct-Def(A), Rct-Def/EndRdx(36), LucoftheG-Rchg+(36)
Level 32: Golden Dragonfly SprScrStr-Acc/Dmg(A), SprScrStr-Dmg/Rchg(40), SprScrStr-Dmg/EndRdx/Rchg(40), Erd-Acc/Dmg/EndRdx/Rchg(40), Erd-Acc/Dmg/Rchg(42), Erd-Acc/Rchg(42)
Level 35: Energy Drain RedFrt-Def/Rchg(A), Rct-Def/Rchg(42), LucoftheG-Def/Rchg(43)
Level 38: Dark Blast Thn-Acc/Dmg(A), Thn-Dmg/EndRdx(45), Thn-Dmg/Rchg(45), Thn-Acc/Dmg/Rchg(46), Thn-Acc/Dmg/EndRdx(46), Thn-Dmg/EndRdx/Rchg(46)
Level 41: Shadow Meld LucoftheG-Def/Rchg(A), LucoftheG-Def/EndRdx/Rchg(43), ShlWal-Def/Rchg(43), ShlWal-Def/EndRdx/Rchg(45)
Level 44: Arcane Bolt SprWntBit-Dmg/Rchg(A), SprWntBit-Acc/Dmg/EndRdx(48), SprWntBit-Acc/Dmg/Rchg(48), SprWntBit-Dmg/EndRdx/Acc/Rchg(48), SprWntBit-Rchg/SlowProc(50)
Level 47: Mystic Flight BlsoftheZ-ResKB(A)
Level 49: Rune of Protection Ags-ResDam/Rchg(A), Ags-EndRdx/Rchg(50), Ags-ResDam/EndRdx/Rchg(50)
Level 1: Brawl Acc-I(A)
Level 1: Critical Hit
Level 1: Prestige Power Dash Empty(A)
Level 1: Prestige Power Slide Empty(A)
Level 1: Prestige Power Quick Empty(A)
Level 1: Prestige Power Rush Empty(A)
Level 1: Prestige Power Surge Empty(A)
Level 1: Sprint Clr-Stlth(A)
Level 2: Rest RechRdx-I(A)
Level 4: Ninja Run
Level 2: Swift Run-I(A)
Level 2: Health Pnc-Heal/+End(A), Mrc-Rcvry+(17), NmnCnv-Regen/Rcvry+(17)
Level 2: Hurdle Jump-I(A)
Level 2: Stamina PrfShf-End%(A), PrfShf-EndMod(19)
------------| Copy & Paste this data into Mids' Hero Designer to view the build |
|-------------------------------------------------------------------|
|MxDz;1567;774;1548;HEX;|
|78DA6594596F125114C7EF85A194A50BAD74A1DB40AD9D02A5D0F6DD685B6B6D49A|
|A24BE921BB80229CE9001D4FAE607302AADFAD4CD37D70FE2FA057C3769BA687CF1|
|C5E0E99C53DAC824E437F33FCBFFDC3B73493E98F77E587C7499F1F6B9A22897D3A|
|98C294A25693A922257C830B8B2578BE2A1D466821351755E986BBA2C97556DCED0|
|E5D475A398057545DE2B884ADED0552D5532AA95A84A81A4C848152BD56495EE524|
|6B5A86AC1545E648DFB77A595A83AC1C87FEA9D4ECAA294B1655111BA186CA8F3F2|
|8ED4CB32B6A04B33B79EBE5235856F49CF4B53EA95D8E98D7BD5308AB15449CA6C9|
|B757BAD90CB570A7AAEC37A5A91222BCD72BE50F262A26166A4B9DEBF502A6462A9|
|8A28AE81D1C984E9A4285720D207838DC1EFF1C984D65577B055404861B69BC45B4|
|825450C00132ED62215203CF7C033A7DA23BBA5B51C235BFD1CF917C2430A732FA3|
|EEFE8D74402DC75A85C731D73B439C45B64F636E7B2FB77AB4408D1D6B6C76F2EB2|
|2BF0BE4F704D6E3C0F5704784618CF814624E6BE0BAC3F919EB7ABE12BF21FB349B|
|B5C6BE3032308C6B7682B7CB1AB8CE5C41D442D0CF83F3704F04B54B161D8C43AC0|
|DE7606D01F46F851E1D347F07AD7990D63C4C6BAE419D0FEB14DF16EEF3F0367107|
|A9EE12F7902EE8DB4D7DBB695F54DA9720ED8B1DFAFA29C74FDE01F21E246F05727|
|A29A797FA04FFEBB30139FD345FFF33F41FAD212F6E103789CF916E986F006B6C03|
|FB76DCA70362925BF441DF21F21E22EF51F21E25EF4DC819A16F75E423C6C63F11B|
|F100F6DD6B7327140DC477A608610775BFD431EF49CF88533847DF8FCC38E67E2A4|
|FFD816BEB3E836710739B94BDC23BE42FEF132A661AD5DF3E1BCE16EE222FA44979|
|0353089D01E465EE31E4DBD21BE25BE4326DE2337A02646DF53ECBBCDD25E8016A7|
|3D8B27D02B314D3C7DB74AE37C3346DFE188D238B7F5F0F9781D2E166F52124DCA4|
|C9332DBA4AC9CB9C0D1C18957159240E374625C9D70AA51AB1FBA1BFF0A8C4F62FC|
|F84CB3F120BEE5CE1B208C036FE32A8FCED76958F7F34CE3FC25FA77D5F054FF03D|
|F40F879|
|-------------------------------------------------------------------|Kat ENA MeltArmor Scrapper - Alpha 2 - [i25].mxd Kat ENA Shadowmeld Scrapper - Alpha 2 - [i25].mxd Kat ENA Spout Scrapper - Alpha 2 - [i25].mxd
-
This works (almost) just as well as a Scrapper. Scrapper versions are probably in the archives.
Kat / Ena Build:SpoilerVillain Plan by Mids' Villain Designer 1.962
http://www.cohplanner.com/Level 50 Magic Brute
Primary Power Set: Katana
Secondary Power Set: Energy Aura
Power Pool: Fighting
Power Pool: Leadership
Power Pool: Sorcery
Power Pool: Speed
Ancillary Pool: Mu MasteryVillain Profile:
------------
Level 1: Gambler's Cut SprBrtFur-Acc/Dmg/Rchg(A), SprBrtFur-Acc/Dmg/EndRdx/Rchg(3), SprBrtFur-Rech/Fury(3), PndSlg-Acc/Dmg(5), PndSlg-Dmg/EndRdx(5), PndSlg-Dmg/Rchg(7)
Level 1: Kinetic Shield LucoftheG-Rchg+(A), Rct-Def/EndRdx(7), Rct-Def(9), Ksm-ToHit+(9), ShlWal-ResDam/Re TP(11), Rct-ResDam%(11)
Level 2: Dampening Field Ags-ResDam/EndRdx(A), Ags-ResDam/Rchg(13), Ags-ResDam(13), GldArm-3defTpProc(15), StdPrt-ResDam/Def+(15)
Level 4: Power Shield LucoftheG-Rchg+(A), Rct-Def(19), Rct-Def/EndRdx(21)
Level 6: Build Up RechRdx-I(A), RechRdx-I(21)
Level 8: Divine Avalanche SprUnrFur-Acc/Dmg(A), SprUnrFur-Dmg/Rchg(23), SprUnrFur-Acc/Dmg/Rchg(23), SprUnrFur-Dmg/EndRdx/Rchg(25), SprUnrFur-Acc/Dmg/EndRdx/Rchg(25), SprUnrFur-Rchg/+Regen/+End(27)
Level 10: Entropic Aura EndRdx-I(A)
Level 12: Kick FrcFdb-Rechg%(A)
Level 14: Tough Ags-ResDam/EndRdx(A), Ags-ResDam/EndRdx/Rchg(27), Ags-ResDam(29)
Level 16: Energy Protection Ags-ResDam/EndRdx(A), Ags-ResDam/EndRdx/Rchg(29), Ags-ResDam(31)
Level 18: The Lotus Drops SprAvl-Rchg/KDProc(A), SprAvl-Dmg/EndRdx(31), SprAvl-Acc/Dmg/EndRdx(31), SprAvl-Acc/Dmg/Rchg(33), SprAvl-Acc/Dmg/EndRdx/Rchg(33)
Level 20: Energy Cloak LucoftheG-Rchg+(A), Rct-Def(33), Rct-Def/EndRdx(34)
Level 22: Weave LucoftheG-Rchg+(A), Rct-Def(34), Rct-Def/EndRdx(34)
Level 24: Maneuvers LucoftheG-Rchg+(A), Rct-Def(36), Rct-Def/EndRdx(36)
Level 26: Soaring Dragon SprBlsCol-Dmg/EndRdx(A), SprBlsCol-Acc/Dmg/EndRdx(36), SprBlsCol-Acc/Dmg/Rchg(37), SprBlsCol-Dmg/EndRdx/Acc/Rchg(37), SprBlsCol-Rchg/HoldProc(37)
Level 28: Energy Drain RedFrt-Def/Rchg(A), Rct-Def/Rchg(39), LucoftheG-Def/Rchg(39)
Level 30: Arcane Bolt SprWntBit-Dmg/Rchg(A), SprWntBit-Acc/Dmg/EndRdx(39), SprWntBit-Acc/Dmg/Rchg(40), SprWntBit-Dmg/EndRdx/Acc/Rchg(40), SprWntBit-Rchg/SlowProc(40)
Level 32: Golden Dragonfly Erd-Acc/Rchg(A), Erd-Acc/Dmg/Rchg(42), Erd-Acc/Dmg/EndRdx/Rchg(42), SprBrtFur-Acc/Dmg(42), SprBrtFur-Dmg/Rchg(43), SprBrtFur-Dmg/EndRdx/Rchg(43)
Level 35: Energize Prv-EndRdx/Rchg(A), Prv-Heal/Rchg/EndRdx(43), DctWnd-Heal/Rchg(45)
Level 38: Electrifying Fences OvrFrc-Acc/Dmg(A), OvrFrc-End/Rech(45), OvrFrc-Acc/Dmg/End(45), OvrFrc-Dmg/End/Rech(46), OvrFrc-Acc/Dmg/End/Rech(46)
Level 41: Ball Lightning Rgn-Dmg/Rchg(A), Rgn-Acc/Dmg/Rchg(46), Rgn-Acc/Rchg(48), Rgn-Dmg/EndRdx(48), Rgn-Dmg(48)
Level 44: Hasten RechRdx-I(A), RechRdx-I(50)
Level 47: Mystic Flight BlsoftheZ-ResKB(A)
Level 49: Rune of Protection Ags-ResDam/Rchg(A), Ags-EndRdx/Rchg(50), Ags-ResDam/EndRdx/Rchg(50)
Level 1: Brawl KntCmb-Acc/Dmg(A)
Level 1: Prestige Power Dash Empty(A)
Level 1: Prestige Power Slide Empty(A)
Level 1: Prestige Power Quick Empty(A)
Level 1: Prestige Power Rush Empty(A)
Level 1: Prestige Power Surge Empty(A)
Level 1: Fury
Level 1: Sprint Clr-Stlth(A)
Level 2: Rest RechRdx-I(A)
Level 4: Ninja Run
Level 2: Swift Run-I(A)
Level 2: Health Mrc-Rcvry+(A), NmnCnv-Regen/Rcvry+(17), Pnc-Heal/+End(17)
Level 2: Hurdle Jump-I(A)
Level 2: Stamina PrfShf-EndMod(A), PrfShf-End%(19)
Level 50: Agility Core Paragon
------------| Copy & Paste this data into Mids' Hero Designer to view the build |
|-------------------------------------------------------------------|
|MxDz;1466;698;1396;HEX;|
|78DA6594CB4F534114C667DA5BB02FDA42CBFB552A0FAD5C5B40B74605944713121|
|3B7F5A68CA50929E4B624B274E1D2A80575A5828F850AF8FA77F0B1263C34EE4C4C|
|3D9DF3018DDCE4F677E7CC7766BE3933D3D49D51DFD6B5BB9784F45E9DB70A85F41|
|57BA9A85C292B9BCB38053DB5F4D6EB603AA5E69532A7ACA295B75A3834AA6EAB7C|
|41996379656797D397976C2B34919F53B6CA17CDC30FFFCCC2C2BC399ECBCE1573F|
|96C40B7A69535ABECC25C6ED1A7DB3716EC8CB2973DDC58546A3632B698CB989879|
|299DB20A451234939D3E7AEF87E947560C965DE225394D1AC2F11A7CC334AE53770|
|771825933C9DC1055B911A9B535079C736A1FFCCB5ACF14B73DBF999B9554CE3564|
|82737D4970845937C4DABA26A9C7D822B593731C4ECC578F79C298F701ADC725B44|
|6BAE284A45B84355DE261B8B20D52FBADF5195ADFE807EB98CD0130C86C0D197A8C|
|0F94E5D686CBC21D155C1FDA532FCF25BCF71C3AE6A4981F1EFD5857EB30B31DEBF|
|A48BD016802D0B443D3094D89BC86786C23B4CE5E3A9F81CF99DD2FC035E6275237|
|60DC06D4A71BF589A23E06F98B40138126FA9F26449A26689AA0894113836685FCB|
|5C05FCB239E3F56629E5E0157C1C7CCCFA46E931E3D6E9B57EABAF6FD723243DC2E|
|F5D25663DC8EB79CD7F78ED9FF1EDC003799ABE4A58B735C5D3B0E7D56CEEC827BE|
|01AFB3EBB0EBE627EA1AC1EACB567077DBBCC7329F6748B9ABDF0D4BB8DBEAFE037|
|E6E077F007D3220C20676098CFC6E008F3FC05F02238C4ECA1BAC7D98B8CE3EC267|
|17657C88089B3666EB3FE09C512F09EC0DD490E818767CE1078CA42CC54164BEBAB|
|8E95E91109E3E82623923CA1193E11193911193F1EA73C5DDDEB66C73306BA2926E|
|37C8BDC41BAD51C2BEF798EFE15841CE4FE83E398434ED247BF2182377975C12857|
|7BBF3A6F80F37E1EC7A42C397435EB9FB28F3F8D04F8FC0735DDDBA0|
|-------------------------------------------------------------------|-
1
-
-
10 hours ago, Captain Powerhouse said:
OR making those minions (and everything else) sturdier and deadlier on incarnate difficultly.
Run 801.1 solo +4x8 ... I used several ideas from Capt and others for changing the composition of spawns to try to create an incarnate class combat experience.
... the minions are still too squishy for heavy offense, but you are likely to find you have difficulty deciding who to kill first.
... "You are likely to have difficulty deciding who to kill first": This was the basic plan, nothing should be ignore-able, and there should be something to annoy almost any build.
... I really need to rollback some of the more recent changes and go back to more Beam Rifle to better balance for defense vs resist armors
... I can solo this +1x8 on a Tier 4 incarnate empath, but less than a handful of my builds can solo it +4x8 both offensively and defensively. (Lower Offense is more often the issue with my build style)
... A team of 4 or more Tier 4 Incarnates should still stomp this into oblivion, but it should at least be a little bit more difficult than normal.
Darkir's Shivering Bite: Water/Cold/Dark Corruptor 45% M/R def, 50% s/l res, perma hasten, perma heat loss, 2 sleet stacking, up to 115% -res
in Corruptor
Posted
Re Procs: I build builds as a whole, and that proc in that power costs the build as a whole something, does what it gain offset what it costs? Sometimes yes, sometimes no. Just brainstorming, off the top of my head, I think I'd love to see a fully procced DP/Storm, but that still retained armor. That should be a tricky and interesting build, with nice ST damage and I'd be curious to see where the AOE damage clocked in.
Re Benumb: I mourn the loss of Benumb. Benumb does more than just that -regen, the -damage -special can completely gut an AV. But Vengeance can indeed turn the tide of a battle. I'm very torn on which I'd pick, but I think I'd lean just the slighted bit toward Benumb. But my Cold/ spedialized in killing AVs, so the emphasis is a bit different, and that perspective and purpose influences everything.