jprewitt73
-
Posts
259 -
Joined
-
Last visited
Content Type
Profiles
Forums
Events
Store
Articles
Patch Notes
Everything posted by jprewitt73
-
This is a great resource! I completely and totally missed this when I was searching.
-
That makes sense! I've noticed that with permadom I don't have as many end issues as earlier levels with the auto refill, so this may be worth messing with. Being slot starved just seems to be the default for Dominators unfortunately.
-
And I completely forgot to say, but I rarely take travel powers before level 49. The temp travels from the P2W vendor does more than enough for me usually. Just my own personal preference.
-
Thank you so much for the feedback. I will definitely be adjusting some of my choices. I've definitely noticed that my lack of any ranged attacks doesn't always make it easy to be in place to do what I need to do on a team. Quick question for you though: How do you survive with your end use? It looks like you're barely above the break-even point. How are you able to play fast-paced with that sort of recovery?
-
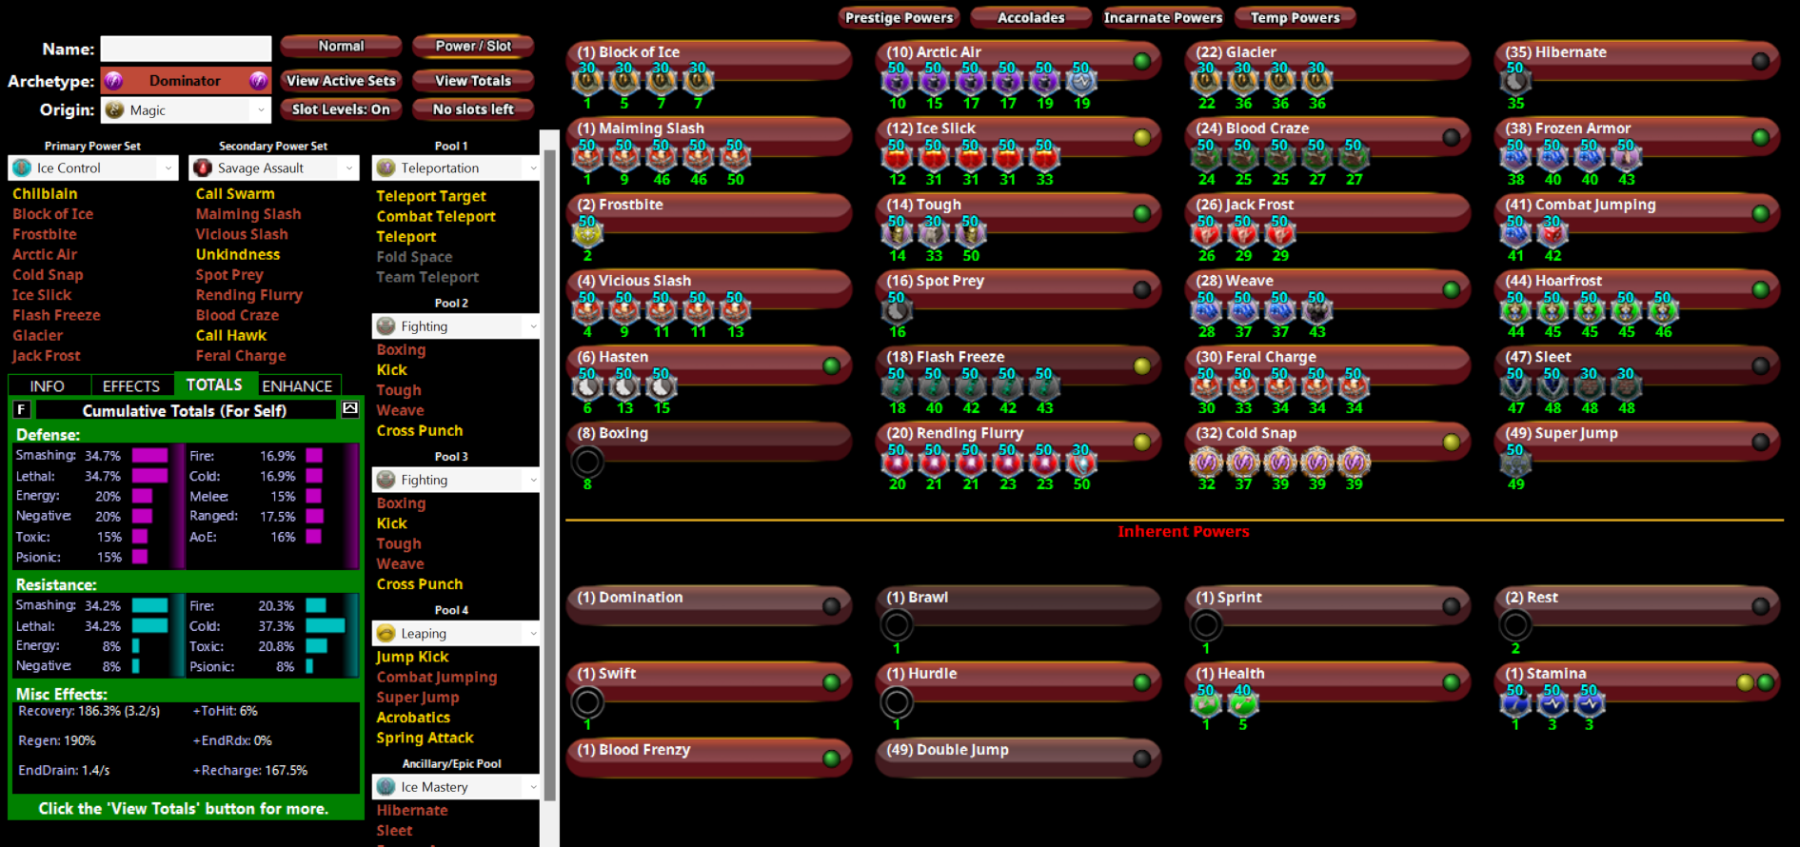
I recently finished my Ice/Savage Dom and I'm wondering if anyone has any advice moving forward to help increase survivability. This is what I'm currently running: Dominator (Ice Control - Savage Assault).mbd I can pop a small purple and be close to the soft cap, but I'm wondering if there are some things I may have missed or some additional slotting that will make this really go crazy. I would like to be able to solo and team about 50/50. Any thoughts?

-
Is there anything in particular about Earth Control that helps with the AV killing aspect, or are you relying more on the -Regen from Drain Psyche and other debuffs from Incarnates?
-
A Savage Melee Brute seems like it would best fit your needs. As for secondary, honestly it's up to you. If you plan on soloing most content then I would go with something that increases recharge and end management. The best way to solo with a Brute (in my opinion) is putting down your opponents quickly. Energy Aura is great at both and with very solid defenses as well. Radiation Armor fits the bell too with great resists. Fire Armor for additional damage and end (no +recharge) would a great solo friendly build. Willpower is the set and forget type of secondary, which I have found it great for soloing sometimes if I get into the "keep Fury at the highest level at all times" mindset. And on second thought, I would seriously consider Energy Aura. You get a +Stealth power in your secondary that will help with getting through missions with ease if you aren't feeling up to wading through mobs the whole time. /EA is a seriously underrated set on Brutes.
-
Energy Aura doesn't have a click mezz protection. It has a toggle mezz. Are you thinking of Super Reflexes maybe?
-
[/img] View This Build In MRB This is what I currently decided on with input from everyone above. I have a completely separate build for low levels and Oro flashbacks, but this works very well for me in 50+ content.
-
So you're saying we should ask for some stimulus money from the Devs to increase prices? Yes, I agree. 😜
-
Well yeah, you could build something useful. Or, and I'm just spitballing here, you could building something as a giant middle finger to everyone else. I don't see a problem here. 😜
-
Thank you so much! I like the idea of Burnout, but not sure how I could fit it in with my overall theme. Definitely something to think about though.
-
That worked! Thank you! This is a great starting point for me!
-
Thank you!
-
Hmm...When I try to open your build it just opens Mids without importing it.
-
That definitely helps! Is there a particular attack that you think I should be skipping? Right now I have every attack available except Taunt and it feels way overkill. I just didn't see anything I should remove honestly.
-
I am currently running up a Elec/BA tank and I am absolutely in love with this character. A lot of fun to solo, and even better in team environments. This is a magic character, so I will be using Ghost Widow's patron power as it fits in with my backstory. However, I am trying to figure out a good attack chain that isn't so clunky. Anyone with experience with BA have some advice? Maybe some build ideas I can look at to come to some solid consensus? Any help would be greatly appreciated. Thanks!
-
Yeah, I tried that with no luck. Still the same message even with a fresh install from the website.
-
Keep getting this error message and I am at a loss as to how to fix it. Anyone know what I need to be doing differently?
-

Storm Chasing: how are you building so far?
jprewitt73 replied to ThaOGDreamWeaver's topic in Corruptor
I'm anxiously following this thread as well. I played around with the set on Beta a bit, but never had a good idea on how to properly utilize Storm Cell and how to slot it properly. -
I will definitely have to rethink not adding Hasten. I was hoping I wouldn't need it since I have a pretty good chain going now using just plain IOs with no +Recharge bonuses. Would dropping one of either Neutrino or XRay Beam be worth it then? Honestly, I am very underwhelmed by WoC so far. I pretty much live in Melee and I have seen very little to make me want to keep it. I was hopeful, but it just doesn't seem worth it. The scare is nice if you want to take a particularly annoying mob out of the equation (Sapper/Sorcerer/Etc.) but I can see it being dropped potentially as well.
-
This is the first Blaster I've had past level 20 since around Issue 7. I've just never been a huge fan of Blasters. However, the changes have clearly made me enjoy them much more. This character pretty much lives in melee with two PBAoE attacks and Drain Psyche. This is what I am currently working towards as I am planning on making the final 10 levels here in the next couple days. What do you all think? Anyone that has played this combo before found something that works better? Any help would be appreciated. I definitely felt very starved for slots on this character... This Hero build was built using Mids Reborn 3.4.6 https://github.com/LoadedCamel/MidsReborn Click this DataLink to open the build! Professor Pyromaniac: Level 50 Technology Blaster Primary Power Set: Radiation Blast Secondary Power Set: Mental Manipulation Power Pool: Leaping Power Pool: Concealment Power Pool: Fighting Power Pool: Leadership Ancillary Pool: Mace Mastery Hero Profile: Level 1: X-Ray Beam (A) Decimation - Accuracy/Damage (11) Decimation - Accuracy/Damage/Recharge (13) Decimation - Damage/Recharge (13) Decimation - Accuracy/Endurance/Recharge (15) Decimation - Chance of Build Up Level 1: Subdual (A) Trap of the Hunter - Accuracy/Recharge (15) Trap of the Hunter - Chance of Damage(Lethal) (17) Trap of the Hunter - Accuracy/Endurance (46) Trap of the Hunter - Immobilize/Accuracy (46) Trap of the Hunter - Accuracy/Immobilize/Recharge Level 2: Irradiate (A) Obliteration - Accuracy/Recharge (5) Obliteration - Damage/Recharge (7) Obliteration - Accuracy/Damage/Recharge (7) Obliteration - Chance for Smashing Damage (9) Obliteration - Accuracy/Damage/Endurance/Recharge Level 4: Combat Jumping (A) Luck of the Gambler - Defense/Increased Global Recharge Speed (5) Kismet - Accuracy +6% Level 6: Super Jump (A) Jumping IO Level 8: Aim (A) Recharge Reduction IO (9) Recharge Reduction IO Level 10: Stealth (A) Luck of the Gambler - Defense/Increased Global Recharge Speed (46) Endurance Reduction IO Level 12: Proton Volley (A) Sting of the Manticore - Accuracy/Damage (36) Sting of the Manticore - Chance of Damage(Toxic) (37) Sting of the Manticore - Accuracy/Interrupt/Range (40) Sting of the Manticore - Damage/Interrupt/Recharge (48) Sting of the Manticore - Damage/Endurance/Recharge Level 14: Acrobatics (A) Endurance Reduction IO Level 16: Concentration (A) Recharge Reduction IO (17) Recharge Reduction IO Level 18: Cosmic Burst (A) Decimation - Accuracy/Damage (19) Decimation - Damage/Endurance (19) Decimation - Damage/Recharge (37) Decimation - Accuracy/Endurance/Recharge (37) Decimation - Accuracy/Damage/Recharge Level 20: Drain Psyche (A) Power Transfer - EndMod (21) Power Transfer - Damage/Recharge (21) Power Transfer - Damage/EndMod (23) Power Transfer - Damage/Accuracy/Endurance (23) Power Transfer - Damage/Accuracy/Recharge/Endurance (25) Power Transfer - Chance to Heal Self Level 22: Kick (A) Empty Level 24: Tough (A) Gladiator's Armor - TP Protection +3% Def (All) (25) Steadfast Protection - Resistance/+Def 3% Level 26: Neutron Bomb (A) Positron's Blast - Accuracy/Damage (27) Positron's Blast - Damage/Recharge (27) Positron's Blast - Damage/Range (36) Positron's Blast - Accuracy/Damage/Endurance (36) Positron's Blast - Chance of Damage(Energy) Level 28: Weave (A) Luck of the Gambler - Defense/Increased Global Recharge Speed (29) Luck of the Gambler - Defense/Endurance (29) Luck of the Gambler - Defense (31) Luck of the Gambler - Defense/Endurance/Recharge Level 30: Scare (A) Glimpse of the Abyss - Accuracy/Recharge (31) Glimpse of the Abyss - Accuracy/Endurance (31) Glimpse of the Abyss - Accuracy/Fear/Recharge (33) Glimpse of the Abyss - Fear/Range (33) Glimpse of the Abyss - Endurance/Fear Level 32: Atomic Blast (A) Obliteration - Accuracy/Recharge (33) Obliteration - Damage/Recharge (34) Obliteration - Accuracy/Damage/Recharge (34) Obliteration - Accuracy/Damage/Endurance/Recharge (34) Obliteration - Chance for Smashing Damage Level 35: Psychic Shockwave (A) Obliteration - Accuracy/Recharge (39) Obliteration - Damage/Recharge (39) Obliteration - Accuracy/Damage/Recharge (39) Obliteration - Accuracy/Damage/Endurance/Recharge (40) Obliteration - Chance for Smashing Damage (48) Eradication - Chance for Energy Damage Level 38: World of Confusion (A) Malaise's Illusions - Accuracy/Recharge (40) Malaise's Illusions - Endurance/Confused (43) Malaise's Illusions - Accuracy/Endurance (43) Malaise's Illusions - Accuracy/Confused/Recharge (43) Malaise's Illusions - Chance of Damage(Psionic) (45) Cacophany - Chance of Damage(Energy) Level 41: Scorpion Shield (A) Luck of the Gambler - Defense/Increased Global Recharge Speed (42) Luck of the Gambler - Defense/Endurance (42) Luck of the Gambler - Defense (42) Luck of the Gambler - Defense/Endurance/Recharge Level 44: Maneuvers (A) Luck of the Gambler - Defense/Increased Global Recharge Speed (45) Luck of the Gambler - Defense/Endurance (45) Endurance Reduction IO Level 47: Tactics (A) Rectified Reticle - To Hit Buff (47) Rectified Reticle - Increased Perception (47) Endurance Reduction IO Level 49: Telekinetic Thrust (A) Kinetic Combat - Accuracy/Damage (49) Kinetic Combat - Damage/Endurance (49) Kinetic Combat - Damage/Recharge (50) Kinetic Combat - Damage/Endurance/Recharge Level 1: Brawl (A) Empty Level 1: Defiance Level 1: Sprint | Copy & Paste this data into Mids Reborn : Hero Designer to view the build | |-------------------------------------------------------------------| |MxDz;1675;732;1464;HEX;| |78DA7594D96ED35010867F272EA54B6842BAD29626DDD2D54D7902C426018D145AC| |4050882494D6A29C4519222F2180851BAC053209607E0128458EED81E00510A2DE5| |82258C3D1938A1AA25DB9FE7CC3F73CECCC8891BC79A9F3D9D390C2D70346B168BA| |923F42C5985C6B3567A21E7649D4C1974B5260BCE55AB58740A9164B9E05C3373B6| |99AEA7858355FFD4AC99CB58F3C6AC396F9B25DBC971A001599E5BCCE79D42C9485| |8B992994D2528407E31EB79A239E9385963C632F3762E13F23E4EE6AEDB45FB8A9D| |B54BE58067396167164AB4DE22CEF356A1B860E7BB8EE7EDB421691266DAA287CBE| |54EDA5E94EEF301A8574507EED03BA6A3116B0CCD58115865D887BB0C37B143BDA4| |01D3AECB1A4310CB0C9358115865B840B93555ADE1A7CF5BD1F18B610F7E0BC0EFC| |15E54D8D24E15F6FF9357343FDA345193A1574707B9D42909E863049ECB454A5DAF| |8AEB318E6AFC2A0448DCA0BA3448FC49AF720497284A937A80263CE79501BC6618C| |40B86185E324CE1154327250828091090B8B7E9D5A2A66E914D050552943AA4B8E8| |21E9DB7E2C0B54FB36287D1B94962ED12BACFD2D7EA52E8C0DDD8BDB8A2F029B0CE| |DD812F8C6D0896D061F9DA04DAD6F1B2A74C14FF60E75FF1D38E4AF4A5D3BB5E632| |EDBF4BDD7F17EEF3C90EE081C04329E62381C70C3A25E856D4FE6EE94D0F8202AD0| |C07DD93BAE096A5574DD98B37E2F24EE0034304EF05DE3298B4E13E55DD27C31A91| |618DCAB0466546A332B56E27FA15755DBFA887453D2CEA6151C7443D85759F5735B| |7C5436A98217CD5AABE9B0C63D812D816F8CE30818F5CFC1F4160442DDF88946F54| |CA372AE51B95F285A8E6E38AC8372EA2094F147321CAF315265F43F535B0462708E| |B30704FA03AECB7E81557371347D2AD968E38CE08CC324C638EA147AFFDF1B8B73B| |7951D7AE04ABCCECE298D46BFF3DF4E1D93F35D60610FFCFFFD9094FF1A17D38C76| |558DF45BAB1531AE1A3FB049E8CD5FEA82AA7C910570D7F00D7F1ECE1| |-------------------------------------------------------------------|
-
I can definitely see it being overkill. I'll see what I can with the build. Overall there just weren't any epic pools that stood out to me on this character at all. Maybe Mu Patron for the two potential ranged AoE attacks. I'll see what I can come up with.
-
Finally figured it out. This seems to be the easiest way for me to show the build. This is what I am looking at running. This Villain build was built using Mids Reborn 3.4.6 https://github.com/LoadedCamel/MidsReborn Too Cool For School: Level 49 Magic Brute Primary Power Set: Ice Melee Secondary Power Set: Bio Armor Power Pool: Fighting Power Pool: Leaping Power Pool: Speed Power Pool: Leadership Ancillary Pool: Energy Mastery Villain Profile: ------------ Level 1: Ice Sword (A) Crushing Impact - Accuracy/Damage (42) Crushing Impact - Damage/Recharge (43) Crushing Impact - Accuracy/Damage/Recharge (43) Crushing Impact - Accuracy/Damage/Endurance (43) Crushing Impact - Damage/Endurance/Recharge Level 1: Hardened Carapace (A) Gladiator's Armor - TP Protection +3% Def (All) (15) Unbreakable Guard - Resistance (15) Unbreakable Guard - Resistance/Endurance (17) Unbreakable Guard - RechargeTime/Resistance (19) Unbreakable Guard - Resistance/Endurance/RechargeTime Level 2: Inexhaustible (A) Power Transfer - EndMod (5) Power Transfer - Damage/Recharge (5) Power Transfer - Damage/EndMod (7) Power Transfer - Damage/Accuracy/Endurance (9) Power Transfer - Damage/Accuracy/Recharge/Endurance (9) Power Transfer - Chance to Heal Self Level 4: Boxing (A) Absolute Amazement - Stun (19) Absolute Amazement - Stun/Recharge (40) Absolute Amazement - Stun/Recharge/Accuracy (40) Absolute Amazement - Recharge/Accuracy (42) Absolute Amazement - Chance for ToHit Debuff Level 6: Build Up (A) Recharge Reduction IO (7) Recharge Reduction IO Level 8: Environmental Modification (A) Luck of the Gambler - Defense/Increased Global Recharge Speed (11) Gift of the Ancients - Defense/Endurance (11) Gift of the Ancients - Defense/Endurance/Recharge (13) Gift of the Ancients - Defense (13) Gift of the Ancients - Defense/Recharge Level 10: Super Jump (A) Jumping IO Level 12: Adaptation Level 14: Ice Patch (A) Recharge Reduction IO Level 16: Combat Jumping (A) Luck of the Gambler - Defense/Increased Global Recharge Speed (17) Kismet - Accuracy +6% Level 18: Ablative Carapace (A) Doctored Wounds - Endurance/Recharge (46) Doctored Wounds - Heal/Recharge (46) Doctored Wounds - Heal/Endurance/Recharge (46) Doctored Wounds - Recharge (48) Doctored Wounds - Heal/Endurance Level 20: Greater Ice Sword (A) Crushing Impact - Accuracy/Damage (21) Crushing Impact - Damage/Recharge (21) Crushing Impact - Accuracy/Damage/Recharge (39) Crushing Impact - Accuracy/Damage/Endurance (40) Crushing Impact - Damage/Endurance/Recharge Level 22: Evolving Armor (A) Unbreakable Guard - +Max HP (23) Unbreakable Guard - Resistance (23) Unbreakable Guard - Resistance/Endurance (39) Unbreakable Guard - RechargeTime/Resistance Level 24: Tough (A) Steadfast Protection - Resistance/+Def 3% (25) Unbreakable Guard - Resistance (25) Unbreakable Guard - Resistance/Endurance (39) Unbreakable Guard - Endurance/RechargeTime (45) Unbreakable Guard - Resistance/Endurance/RechargeTime Level 26: Freezing Touch (A) Unbreakable Constraint - Hold/Recharge (27) Unbreakable Constraint - Hold/Recharge/Accuracy (27) Unbreakable Constraint - Recharge/Accuracy (34) Unbreakable Constraint - Hold/Endurance (37) Unbreakable Constraint - Chance for Smashing Damage Level 28: DNA Siphon (A) Touch of the Nictus - Healing/Absorb/Recharge (29) Touch of the Nictus - Accuracy/Healing/Absorb (29) Touch of the Nictus - Accuracy/Endurance/Healing/Absorb (31) Touch of the Nictus - Accuracy/Endurance/Recharge (31) Touch of the Nictus - Chance for Negative Energy Damage Level 30: Weave (A) Luck of the Gambler - Defense/Increased Global Recharge Speed (31) Shield Wall - +Res (Teleportation), +5% Res (All) (45) Shield Wall - Defense/Endurance (48) Shield Wall - Defense Level 32: Frozen Aura (A) Obliteration - Accuracy/Recharge (33) Obliteration - Damage/Recharge (33) Obliteration - Accuracy/Damage/Recharge (33) Obliteration - Accuracy/Damage/Endurance/Recharge (34) Obliteration - Chance for Smashing Damage (34) Perfect Zinger - Chance for Psi Damage Level 35: Genetic Contamination (A) Obliteration - Damage (36) Obliteration - Damage/Recharge (36) Obliteration - Accuracy/Damage/Recharge (36) Obliteration - Accuracy/Damage/Endurance/Recharge (37) Obliteration - Chance for Smashing Damage (37) Perfect Zinger - Chance for Psi Damage Level 38: Parasitic Aura (A) Recharge Reduction IO (45) Recharge Reduction IO Level 41: Hasten (A) Recharge Reduction IO (42) Recharge Reduction IO Level 44: Superior Conditioning (A) Endurance Modification IO Level 47: Physical Perfection (A) Performance Shifter - EndMod (47) Performance Shifter - Chance for +End (47) Performance Shifter - EndMod/Recharge Level 49: Maneuvers (A) Luck of the Gambler - Defense/Increased Global Recharge Speed (49) Luck of the Gambler - Defense/Endurance Level 1: Fury Level 1: Brawl (A) Empty Level 1: Sprint (A) Empty Level 2: Rest (A) Empty Level 1: Swift (A) Empty Level 1: Hurdle (A) Empty Level 1: Health (A) Numina's Convalesence - +Regeneration/+Recovery (3) Miracle - +Recovery Level 1: Stamina (A) Performance Shifter - EndMod (3) Performance Shifter - EndMod/Accuracy (48) Performance Shifter - EndMod/Recharge Level 10: Double Jump Level 12: Defensive Adaptation Level 12: Efficient Adaptation Level 12: Offensive Adaptation ------------ | Copy & Paste this data into Mids Reborn : Hero Designer to view the build | |-------------------------------------------------------------------| |MxDz;1674;716;1432;HEX;| |78DA7594EB4E135110C7FFDBDD5A2E4540E80501A92D7770459F40B954815648307| |EADB5AC6513EC365B4CE43534D107F18220F0C98FFA282A46408DE23AECECC8A186| |266D7F67E6CCCC7FCE99DDFC93E9E8C70FB91BD09AA7568BB55A61D27DBC6685F3C| |5B25DD20174DC759CD494E3ACA6B28E9B5A2AAD1046C81EF3F715F2D6AA6599B3A5| |80FAD83A6D3DB42A35CB9CB49DC2825B2E56EC52E1A6FBC871D1B248F166D62EAFA| |CD99572D45FE5AC6295164DFE62A96A59CBAD625FB6DCDA8A5DED9AA9DA2573A662| |B9E5F542BE585BB3DC75169A242919FA6E0CD28F06F97806709FFEAF1918C10382B| |4815194D8328A65018BE165E6BFE8EBBAEF398F7D810386367C67B8801F0CAF285A| |D3FE857B610D7B86EF31F055E01BC339EC3334E040E09041A363D59534868EB9505| |0699E610839817C28E86E8161930E20ACB4A0853186A06400AF496744ED328298E6| |7B9A60100C1D4384218A0681304382E435E2249A16C39CF70DE56D56F27A5BA4A54| |531A04524C42949ABAAB25524B4E1880CBD06B6285BBB52C768478EB75C415EE08E| |C022C355CC336C53E90EB5C70E99834E7F0E7C08E66050E66048E6E01DD5263D12E| |FE931FCE43B8ECB1CC4650E06650E74EA29A1964CF84B6A252941C993A043867119| |9E1D12DCA5DE7A1766F8462F222B708BE1326E33F46396619B0477ABB5BBD1C9797| |B101388335C424220C94003805E255AEF95DBB88479D199D583139E63D825C17D4A| |50B80FBF594C0A47027F043C510E3D801A5B7648795A7D68D2F8C59E8CA4C9489A8| |CA4E99734FD926697D20CA8033520A3362E90A62E87D52DC3E2191168A4811B5307| |768CA4FB9E28794CC51332F1942B9B7821F08CA19D0A4DA88526E43827D0C690354| |EBF68BC1E03EAC7F38D9E87DC19F645438D27BBC6F64F4DA713CBFECF67D8BFD4D9| |09EFB1C410E6F881DFABDB424D06AD87F03C140C45D0FAFBD1D32F07EFEDF13B413| |56CD41B36EB0D7F01C9FEDFB0| |-------------------------------------------------------------------|
-
Seem to be having issues with exporting the actual build, so not sure what I'm doing wrong on that end...