

Gammos
-
Posts
86 -
Joined
-
Last visited
Content Type
Profiles
Forums
Events
Store
Articles
Patch Notes
Posts posted by Gammos
-
-
1 hour ago, SomeGuy said:
Something to keep in mind is that Beta Decay adds a defense debuff. This DIRECTLY increases your chance to hit a target. 1:1 ratio.
Yes I noticed. I slotted the Lady Grey IOs to help increase the debuff potential. It sits at -17.42% (In Mids) and when I tried to increase it further, I only saw it go up to -17.97% which wasn't worth any extra slots. At one point I had -to-hit slotting in there also, but I took those out to add to Radiation Therapy
SpoilerAlso, Meltdown may be the best T9 ability in the game. It gives a good damage buff and greatly increases your resistances while it is active. And it doesn't have a nasty crash. It has a low(ish) recharge and decent duration. The "crash" for Meltdown is it just stops your End/S recovery. You can still eat blues or pop Ageless if need be.
It's definitely up there with Icy Bastion (Stalker Ice Armor) IMO. The only reason I have SJ there is for the slow resistance IO. I don't really use travel powers anymore, mostly rely on NJ+Sprint+Swift. Maybe I can swap out SJ and switch Maneuvers to lvl 30 so I can pick up Meltdown at 38. If I use Ageless Radial, it will help my debuff resistance across the board, including slows right?
-
36 minutes ago, thunder_crane said:
Adding your 4 accolades should immensely help with hp and end. At your base of 1600 or so health grabbing your +hp accolades will get you something like 300 extra hp. It's very worth it.
Other than that it looks good. My only recommendation would be to reconsider swapping something out (maybe Tactics) in favor of meltdown. Meltdown is a massive boon to resists and damage and once you have an ageless (radial for the +debuff resist for example) it's basically up half the time all the time. Really helps with harder content and absorbing alpha strikes.Definitely going to go after the Accolades, thanks for the reminder!
So, I wrestled between Keeping Meltdown vs going for Tactics. The main reason I went for Tactics is because I didn't have enhanced perception built in the build. Therefore, things like Arachnos were blinding me and I would have to pop a yellow (if I had one) to see them. Meltdown is a great power though...Especially for harder content. I have to factor in Incarnates also because there might be some benefits I haven't considered also
-
23 hours ago, SomeGuy said:
Just remember this:
Total HP > HP/s
Most heals are % based of your HP, and if you increase your HP you also increase your HP/s.
And, if you have 200 HP and get hit for 150 you are still alive and can do something. If you have 140 HP and get hit for 150 you're dead. Can't regen 0. That % is still zero. 😄
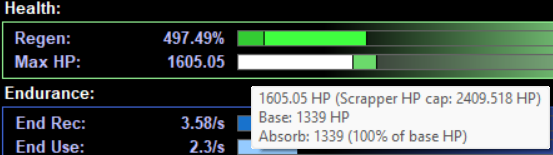
Lol very true! I mistook my HP being blue for being at the regen cap instead of just being at full health haha. Here's where I stand on that:

Is there anything you would change in the build to add more HP? In a way that doesn't sacrifice anything too much I suppose
-
Update:
So,
After taking all that everyone said into consideration, I altered my build on the test server and I must say, i'm so much happier with this new build! I realized I was really giving wayyyy too many slots towards endurance recovery when it wasn't necessary for Rad with the all the baked in endurance recovery tools. Instead,
I diverted those slots so I was able to add more regen into the mix without sacrificing too much damage. EM is a beast and the toon feels very life and death sometimes, which keeps things exciting. I'm playing +3/8 and I was able to handle Carnies and Arachnos with this build. That being said, anything that attacks my regen is a serious threat, so I have to be careful. However, I haven't even started testing Incarnates yet so i'd say I'm in pretty good shape!
Here's the updated build. Let me know if you see any further little tweaks I can make:
Data Chunk:
Full Build:
SpoilerThis Hero build was built using Mids Reborn 3.2.17
https://github.com/LoadedCamel/MidsRebornClick this DataLink to open the build!
Fullmetal Fallout: Level 50 Mutation Scrapper
Primary Power Set: Energy Melee
Secondary Power Set: Radiation Armor
Power Pool: Speed
Power Pool: Fighting
Power Pool: Leaping
Power Pool: Leadership
Ancillary Pool: Soul MasteryHero Profile:
Level 1: Energy Punch -- Empty(A)
Level 1: Alpha Barrier -- UnbGrd-Max HP%(A), UnbGrd-ResDam(3), UnbGrd-ResDam/EndRdx(3), UnbGrd-Rchg/ResDam(5), UnbGrd-ResDam/EndRdx/Rchg(5)
Level 2: Bone Smasher -- SprScrStr-Rchg/+Crit(A), SprScrStr-Acc/Dmg(7), SprScrStr-Dmg/Rchg(9), SprScrStr-Acc/Dmg/Rchg(9), SprScrStr-Dmg/EndRdx/Rchg(11), SprScrStr-Acc/Dmg/EndRdx/Rchg(11)
Level 4: Gamma Boost -- PwrTrns-+Heal(A)
Level 6: Proton Armor -- GldArm-3defTpProc(A), ImpArm-ResPsi(13), UnbGrd-ResDam(13), UnbGrd-ResDam/EndRdx(15), UnbGrd-Rchg/ResDam(15), UnbGrd-ResDam/EndRdx/Rchg(17)
Level 8: Hasten -- RechRdx-I(A), RechRdx-I(17)
Level 10: Fallout Shelter -- Ags-Psi/Status(A), UnbGrd-ResDam(19), UnbGrd-ResDam/EndRdx(19), UnbGrd-Rchg/ResDam(21), UnbGrd-ResDam/EndRdx/Rchg(21), StdPrt-ResDam/Def+(23)
Level 12: Build Up -- GssSynFr--Build%(A), GssSynFr--ToHit(23), GssSynFr--ToHit/Rchg(25), GssSynFr--ToHit/Rchg/EndRdx(25), GssSynFr--Rchg/EndRdx(27), GssSynFr--ToHit/EndRdx(27)
Level 14: Boxing -- Empty(A)
Level 16: Radiation Therapy -- ThfofEss-Heal(A), ThfofEss-Acc/Heal(29), Obl-%Dam(29), Heal-I(31), Obl-Dmg(31), ScrDrv-Dam%(31)
Level 18: Whirling Hands -- FuroftheG-ResDeb%(A), SprAvl-Rchg/KDProc(33), SprAvl-Acc/Dmg(33), SprAvl-Acc/Dmg/EndRdx(33), SprAvl-Acc/Dmg/Rchg(34), SprAvl-Dmg/EndRdx(34)
Level 20: Beta Decay -- TchofLadG-DefDeb/EndRdx(A), TchofLadG-DefDeb(34)
Level 22: Combat Jumping -- LucoftheG-Def/Rchg+(A), ShlWal-ResDam/Re TP(36), Rct-ResDam%(36), Ksm-ToHit+(50)
Level 24: Tough -- UnbGrd-ResDam(A), UnbGrd-ResDam/EndRdx(36), UnbGrd-Rchg/ResDam(37), UnbGrd-ResDam/EndRdx/Rchg(37)
Level 26: Total Focus -- TchofDth-Dam%(A), Hct-Dam%(37), Hct-Dmg/Rchg(39), Hct-Acc/Dmg/Rchg(39), Hct-Dmg(39), Hct-Dmg/EndRdx(40)
Level 28: Particle Shielding -- Prv-Absorb%(A), Prv-Heal(40), Prv-Heal/EndRdx(40), Prv-EndRdx/Rchg(42), Prv-Heal/Rchg(42), Prv-Heal/Rchg/EndRdx(42)
Level 30: Super Jump -- WntGif-ResSlow(A)
Level 32: Energy Transfer -- SprCrtStr-Rchg/+50% Crit(A), SprCrtStr-Acc/Dmg(43), SprCrtStr-Dmg/Rchg(43), SprCrtStr-Acc/Dmg/Rchg(43), SprCrtStr-Dmg/EndRdx/Rchg(45), SprCrtStr-Acc/Dmg/EndRdx/Rchg(45)
Level 35: Ground Zero -- Arm-Dam%(A), AchHee-ResDeb%(45)
Level 38: Maneuvers -- LucoftheG-Def/Rchg+(A)
Level 41: Weave -- LucoftheG-Def/Rchg+(A), LucoftheG-Def/EndRdx(46), LucoftheG-Def(46), LucoftheG-Def/EndRdx/Rchg(46), LucoftheG-EndRdx/Rchg(48)
Level 44: Moonbeam -- Apc-Dam%(A), Apc-Acc/Dmg/Rchg(48), Apc-Dmg/Rchg(48), Apc-Acc/Rchg(50), Apc-Dmg/EndRdx(50)
Level 47: Shadow Meld -- LucoftheG-Def/Rchg+(A)
Level 49: Tactics -- DS:DSyncEndToHitDef(A)
Level 1: Critical Hit
Level 1: Brawl -- Empty(A)
Level 1: Sprint -- Run-I(A)
Level 2: Rest -- Empty(A)
Level 1: Swift -- Run-I(A)
Level 1: Hurdle -- Empty(A)
Level 1: Health -- NmnCnv-Regen/Rcvry+(A), Mrc-Rcvry+(7)
Level 1: Stamina -- PwrTrns-+Heal(A)
Level 1: Energy Focus
Level 49: Quick Form
Level 30: Double Jump
Level 4: Ninja Run
-------------
 1
1
-
-
43 minutes ago, SomeGuy said:
Oh, Bio Armor isn't complicated at all. It doesn't have a combo system like primaries do. It does have three different stances/modes and their titles are pretty self explanatory. That's really the only thing that is complicated about it. It becomes just as "complicated" as Rad Armor outside of those three toggles.
Good to know! Might make one soon 🙂
-
1
-
 1
1
-
-
I'm not sure if you've already made your preliminary decisions yet or not. I'd like to throw Claws/Nin into the ring. An amazing blend of ST and AoE plus (full chain potential for both). Nin provides a great balance of steady protection with utility clicks and enough speed potential to make standard travel powers irrelevant. It's enough clicks to keep me engaged without feeling like a chore. Plus he's super zippy and I can play bounce in and out of mobs, destroying them from multiple angles...I can't say enough good things about the paring. My Claws/Nin is a Tiger turned ninja assassin named Klawe 🙂
Cheers!
@Gammos
-
Just now, Troo said:
I believe so.
Thanks! I'm glad I know that for future planning 😄
-
1
-
-
4 minutes ago, Troo said:
LotGs are an exception to that rule. You get the five LotGs +rech and five 7.5% +rech from other sources if you want.
That said, correct, the 6th 10% recharge would not count.
Is it because it's an IO bonus versus a set bonus so they count as two separate lanes?
-
On 4/30/2022 at 2:02 PM, Bopper said:
But if true optimal slotting is desired, folks should be looking at @SomeGuy slotting (but don't slot up Boxing like that, there's no need for a 6th 10% recharge bonus).
By this, am I to assume that the rule of 5 applies to bonuses that offer the same percentages as well? In other words, if I have 5 LotG 7.5% recharge increases, and I have some random other set that provides 7.5% recharge, that extra set would not be counted?
Or were you just saying 6 10% recharge bonuses were overkill at that point?
-
2 hours ago, SomeGuy said:
I personally haven't found a set as risk/reward as Bio Armor. That armor set is absolutely a glass cannon. For a resist set, Rad Armor is somewhere in between Energy Aura and Bio to me.
Honestly, I've so far avoided Bio because it seems a little too complicated for me at first glance haha. Combo systems have always been a little challenging for...part of why DB and I never really got along when it was first introduced haha. I know it's not the same and I do want to try it sometime soon though!
-
Update:
By just tweaking my playstyle a bit and keeping Particle Shielding up at all times, I was able to clear an Arachnos mission without dying (+2/8). I enjoy near death playstyles (My main on live was a F/F Blaster), so I look forward to tweaking this build and getting better at Rad Armor. I play so many Def based powersets so it's nice to switch it up now and then..
-
1
-
-
15 hours ago, thunder_crane said:
Here's what I'm running. Generally happy with it:
This Hero build was built using Mids Reborn 3.2.17
https://github.com/LoadedCamel/MidsRebornClick this DataLink to open the build!
Mr Scary: Level 50 Magic Scrapper
Primary Power Set: Energy Melee
Secondary Power Set: Radiation Armor
Power Pool: Speed
Power Pool: Fighting
Power Pool: Leaping
Power Pool: Concealment
Ancillary Pool: Soul MasteryHero Profile:
Level 1: Energy Punch- (A) Superior Scrapper's Strike - Accuracy/Damage
- (3) Superior Scrapper's Strike - Damage/Recharge
- (3) Superior Scrapper's Strike - Accuracy/Damage/Recharge
- (5) Superior Scrapper's Strike - Damage/Endurance/Recharge
- (5) Superior Scrapper's Strike - Accuracy/Damage/Endurance/Recharge
- (48) Superior Scrapper's Strike - Recharge/Critical Hit Bonus
Level 1: Alpha Barrier
- (A) Gladiator's Armor - End/Resist
- (7) Gladiator's Armor - Recharge/Resist
- (7) Gladiator's Armor - Resistance/Rech/End
- (9) Gladiator's Armor - Resistance
- (9) Gladiator's Armor - TP Protection +3% Def (All)
Level 2: Bone Smasher
- (A) Superior Critical Strikes - Accuracy/Damage
- (11) Superior Critical Strikes - Accuracy/Damage/Endurance/RechargeTime
- (11) Superior Critical Strikes - RechargeTime/+50% Crit Proc
- (13) Touch of Death - Chance of Damage(Negative)
- (13) Gladiator's Strike - Chance for Smashing Damage
- (15) Mako's Bite - Chance of Damage(Lethal)
Level 4: Gamma Boost
- (A) Power Transfer - Chance to Heal Self
Level 6: Proton Armor
- (A) Titanium Coating - Resistance/Endurance
- (15) Titanium Coating - Resistance/Recharge
- (17) Titanium Coating - Resistance/Endurance/Recharge
- (17) Titanium Coating - Resistance
Level 8: Hasten
- (A) Recharge Reduction IO
- (19) Recharge Reduction IO
Level 10: Fallout Shelter
- (A) HamiO:Ribosome Exposure
Level 12: Build Up
- (A) Gaussian's Synchronized Fire-Control - Chance for Build Up
Level 14: Super Speed
- (A) Winter's Gift - Slow Resistance (20%)
Level 16: Radiation Therapy
- (A) Fury of the Gladiator - Chance for Res Debuff
- (19) Obliteration - Chance for Smashing Damage
- (21) Scirocco's Dervish - Chance of Damage(Lethal)
- (21) Eradication - Chance for Energy Damage
- (23) Touch of the Nictus - Chance for Negative Energy Damage
- (23) Touch of the Nictus - Healing/Absorb
Level 18: Whirling Hands
- (A) Armageddon - Damage
- (25) Armageddon - Accuracy/Recharge
- (25) Armageddon - Chance for Fire Damage
- (27) Armageddon - Damage/Endurance
- (27) Armageddon - Accuracy/Damage/Recharge
Level 20: Beta Decay
- (A) Achilles' Heel - Chance for Res Debuff
Level 22: Kick
- (A) Empty
Level 24: Tough
- (A) Unbreakable Guard - Resistance
- (43) Unbreakable Guard - Resistance/Endurance
- (47) Unbreakable Guard - +Max HP
- (49) Steadfast Protection - Resistance/+Def 3%
Level 26: Total Focus
- (A) Hecatomb - Damage
- (29) Hecatomb - Damage/Recharge
- (29) Hecatomb - Accuracy/Damage/Recharge
- (31) Hecatomb - Accuracy/Recharge
- (31) Hecatomb - Damage/Endurance
- (31) Touch of Death - Chance of Damage(Negative)
Level 28: Particle Shielding
- (A) Preventive Medicine - Heal
- (33) Preventive Medicine - Heal/Endurance
- (33) Preventive Medicine - Endurance/RechargeTime
- (33) Preventive Medicine - Heal/RechargeTime
- (34) Preventive Medicine - Heal/RechargeTime/Endurance
- (34) Preventive Medicine - Chance for +Absorb
Level 30: Weave
- (A) Shield Wall - Defense/Endurance
- (34) Shield Wall - Defense/Endurance/Recharge
- (36) Shield Wall - Defense
- (36) Shield Wall - +Res (Teleportation), +5% Res (All)
- (36) Luck of the Gambler - Defense/Increased Global Recharge Speed
Level 32: Energy Transfer
- (A) Superior Blistering Cold - Accuracy/Damage/Endurance
- (37) Superior Blistering Cold - Accuracy/Damage
- (37) Hecatomb - Chance of Damage(Negative)
- (37) Mako's Bite - Chance of Damage(Lethal)
- (39) Touch of Death - Chance of Damage(Negative)
- (39) Gladiator's Strike - Chance for Smashing Damage
Level 35: Ground Zero
- (A) Achilles' Heel - Chance for Res Debuff
- (39) Touch of Lady Grey - Chance for Negative Damage
- (40) Shield Breaker - Chance for Lethal Damage
- (40) Obliteration - Chance for Smashing Damage
- (40) Eradication - Chance for Energy Damage
- (42) HamiO:Nucleolus Exposure
Level 38: Meltdown
- (A) Unbreakable Guard - Endurance/RechargeTime
- (42) Unbreakable Guard - RechargeTime/Resistance
- (42) Unbreakable Guard - Resistance/Endurance/RechargeTime
Level 41: Combat Jumping
- (A) Luck of the Gambler - Defense/Increased Global Recharge Speed
- (43) Kismet - Accuracy +6%
- (43) Reactive Defenses - Scaling Resist Damage
Level 44: Moonbeam
- (A) Apocalypse - Damage/Recharge
- (45) Apocalypse - Accuracy/Damage/Recharge
- (45) Apocalypse - Accuracy/Recharge
- (45) Apocalypse - Damage/Endurance
- (46) Apocalypse - Chance of Damage(Negative)
Level 47: Shadow Meld
- (A) Luck of the Gambler - Defense/Increased Global Recharge Speed
Level 49: Stealth
- (A) Luck of the Gambler - Defense/Increased Global Recharge Speed
Level 1: Critical Hit
Level 1: Brawl- (A) Accuracy IO
Level 1: Sprint- (A) Run Speed IO
Level 2: Rest- (A) Interrupt Reduction IO
Level 1: Swift- (A) Run Speed IO
Level 1: Hurdle- (A) Jumping IO
Level 1: Health- (A) Numina's Convalesence - +Regeneration/+Recovery
- (46) Miracle - +Recovery
- (47) Panacea - +Hit Points/Endurance
Level 1: Stamina- (A) Performance Shifter - Chance for +End
- (46) Performance Shifter - EndMod
- (48) Performance Shifter - EndMod/Accuracy
- (48) Power Transfer - Chance to Heal Self
Level 1: Energy Focus
Level 12: Speed Phase
Level 49: Quick Form
Level 50: Freedom Phalanx Reserve
Level 50: Portal Jockey
Level 50: Task Force Commander
Level 50: The Atlas Medallion
------------
------------
Set Bonus Totals:-
- 8% DamageBuff(Smashing)
- 8% DamageBuff(Lethal)
- 8% DamageBuff(Fire)
- 8% DamageBuff(Cold)
- 8% DamageBuff(Energy)
- 8% DamageBuff(Negative)
- 8% DamageBuff(Toxic)
- 8% DamageBuff(Psionic)
- 11% Defense(Smashing)
- 11% Defense(Lethal)
- 6% Defense(Fire)
- 6% Defense(Cold)
- 6% Defense(Energy)
- 6% Defense(Negative)
- 6% Defense(Psionic)
- 8.5% Defense(Melee)
- 6% Defense(Ranged)
- 6% Defense(AoE)
- +78.75% Enhancement(RechargeTime)
- 8.75% Enhancement(Max EnduranceDiscount)
- +45% Enhancement(Accuracy)
- 7.5% SpeedFlying
- GrantPower Preventive Medicine (when PreventiveMedicine, if Scourge)
- 336.3 HP (25.12%) HitPoints
- 7.5% JumpHeight
- 7.5% SpeedJumping
- Knockback (Mag -3)
- Knockup (Mag -3)
- 67.5% MezResist(Confused)
- 67.5% MezResist(Held)
- 67.5% MezResist(Immobilized)
- 67.5% MezResist(Sleep)
- 67.5% MezResist(Stunned)
- 67.5% MezResist(Terrorized)
- 200% MezResist(Teleport) (20% chance)
- 14.5% (0.24 End/sec) Recovery
- 26% (1.45 HP/sec) Regeneration
- 35% ResEffect(SpeedFlying)
- 35% ResEffect(RechargeTime)
- 35% ResEffect(SpeedRunning)
- 19.25% Resistance(Smashing)
- 19.25% Resistance(Lethal)
- 23% Resistance(Fire)
- 23% Resistance(Cold)
- 18.5% Resistance(Energy)
- 18.5% Resistance(Negative)
- 11.75% Resistance(Toxic)
- 11.75% Resistance(Psionic)
- 7.5% SpeedRunning
- 36% GlobalChanceMod PlayerCrit
Also a summary of chains and proc slotting from another thread:
I will check it out, thank you!
-
18 hours ago, Sovera said:
Try and keep Particle shielding up 24/7, don't wait until you need it and just use it on CD.
Definitely using this strategy. By the time you realize you need it, the long animations of the powers leave you dead in the water
-
1
-
-
1 hour ago, Uun said:
People think of Rad Armor as a resist set, but it's really a hybrid resist/regen set. Use Particle Shielding proactively and keep it up all the time. In addition to the +absorb, it provides 100% +regen (unenhanced) for 30 seconds. In addition to the heal, Radiation Therapy provides an additional 100% +regen (unenhanced) for 60 seconds as well as resistance to -regen. Between the two you're approaching Willpower and Regen (w/o Instant Healing) levels. I use Melee Core Hybrid as my panic button, as it adds both resistance and +regen.
I think that's really the issue for me. Even though i'm leveling up this toon through missions and the like, i'm still not getting a grasp of how to best approach survivability. You saying it's a hybrid set is super helpful bc I hadn't really considered that! I'm going to rebuild with that frame of mind
-
1
-
-
21 hours ago, Parabola said:
It was probably debuffs that were the problem. Resistance sets will get hit far more often and therefore eat more debuffs. I play a lot of rad on tanks and brutes and I wouldn't build one without focused accuracy and enough winter 2 pieces to cap recharge/slow resist. Also consider taking ageless radial even if the endurance and recharge are superfluous. You could also try slotting some heal in radiation therapy, scrappers only have 4 damage procs to put in it so if you can find the slots you can slot it for its actual purpose too!
Thank you!
-
Good morning!
I am leveling an EM/Rad scrapper who is currently at lvl 47. I actually really enjoy playing with him but I feel as though I cannot seem to grasp the strength's of Rad. I don't have as much issue with EM because it's pretty straightforward. I took the below build to test server last night and got steamrolled multiple times (I auto-completed). Granted it was Arachnos so that might be why. Another mish I tried was Council and I got through it, but not as smoothly as I wanted. Both of these missions were set to +3/8 so I could really test out this build I made. I'm not an expert with Mids so if anyone could please take a look and offer advice, I would appreciate it! Also, can anyone offer insight as to Rad's strengths and challenges? When it comes to large mobs, I must be doing something wrong. Thank you!
Export Link:
Full Build:
SpoilerThis Hero build was built using Mids Reborn 3.2.17
https://github.com/LoadedCamel/MidsRebornClick this DataLink to open the build!
Fullmetal Fallout: Level 50 Mutation Scrapper
Primary Power Set: Energy Melee
Secondary Power Set: Radiation Armor
Power Pool: Speed
Power Pool: Fighting
Power Pool: Leaping
Power Pool: Teleportation
Ancillary Pool: Soul MasteryHero Profile:
Level 1: Energy Punch -- Empty(A)
Level 1: Alpha Barrier -- UnbGrd-Max HP%(A), UnbGrd-ResDam(3), UnbGrd-ResDam/EndRdx(3), UnbGrd-EndRdx/Rchg(5), UnbGrd-Rchg/ResDam(5), UnbGrd-ResDam/EndRdx/Rchg(7)
Level 2: Bone Smasher -- SprScrStr-Rchg/+Crit(A), SprScrStr-Acc/Dmg(9), SprScrStr-Dmg/Rchg(9), SprScrStr-Acc/Dmg/Rchg(11), SprScrStr-Dmg/EndRdx/Rchg(11), SprScrStr-Acc/Dmg/EndRdx/Rchg(13)
Level 4: Gamma Boost -- PrfShf-End%(A)
Level 6: Proton Armor -- GldArm-3defTpProc(A), ImpArm-ResPsi(13), UnbGrd-ResDam(15), UnbGrd-ResDam/EndRdx(15), UnbGrd-Rchg/ResDam(17), UnbGrd-ResDam/EndRdx/Rchg(17)
Level 8: Hasten -- RechRdx-I(A), RechRdx-I(19)
Level 10: Fallout Shelter -- Ags-Psi/Status(A), UnbGrd-ResDam(19), UnbGrd-ResDam/EndRdx(21), UnbGrd-Rchg/ResDam(21), UnbGrd-ResDam/EndRdx/Rchg(23), StdPrt-ResDam/Def+(23)
Level 12: Build Up -- GssSynFr--Build%(A), GssSynFr--ToHit(25), GssSynFr--ToHit/Rchg(25), GssSynFr--ToHit/Rchg/EndRdx(27), GssSynFr--Rchg/EndRdx(27), GssSynFr--ToHit/EndRdx(50)
Level 14: Boxing -- Empty(A)
Level 16: Radiation Therapy -- TchoftheN-%Dam(A), ScrDrv-Dam%(29), Obl-%Dam(29)
Level 18: Whirling Hands -- Obl-%Dam(A), Obl-Dmg(31), Obl-Acc/Rchg(31), Obl-Dmg/Rchg(31), Obl-Acc/Dmg/Rchg(33), Obl-Acc/Dmg/EndRdx/Rchg(33)
Level 20: Beta Decay -- TchofLadG-DefDeb/EndRdx(A), TchofLadG-DefDeb(33), DarWtcDsp-ToHitDeb(34), DarWtcDsp-ToHitDeb/EndRdx(34)
Level 22: Super Jump -- WntGif-ResSlow(A)
Level 24: Tough -- UnbGrd-ResDam(A), UnbGrd-ResDam/EndRdx(34), UnbGrd-Rchg/ResDam(36), UnbGrd-ResDam/EndRdx/Rchg(36)
Level 26: Total Focus -- TchofDth-Dam%(A), Hct-Dam%(36), Hct-Dmg/Rchg(37), Hct-Acc/Dmg/Rchg(37), Hct-Dmg(37), Hct-Dmg/EndRdx(39)
Level 28: Particle Shielding -- Prv-Absorb%(A), Prv-Heal(39), Prv-Heal/EndRdx(39), Prv-EndRdx/Rchg(40), Prv-Heal/Rchg(40), Prv-Heal/Rchg/EndRdx(40)
Level 30: Combat Jumping -- ShlWal-ResDam/Re TP(A), LucoftheG-Def/Rchg+(42), Rct-ResDam%(42)
Level 32: Energy Transfer -- SprCrtStr-Rchg/+50% Crit(A), SprCrtStr-Acc/Dmg(42), SprCrtStr-Dmg/Rchg(43), SprCrtStr-Acc/Dmg/Rchg(43), SprCrtStr-Dmg/EndRdx/Rchg(43), SprCrtStr-Acc/Dmg/EndRdx/Rchg(45)
Level 35: Ground Zero -- Arm-Dam%(A), TchofLadG-%Dam(45), Obl-%Dam(45)
Level 38: Meltdown -- ImpArm-ResPsi(A)
Level 41: Weave -- LucoftheG-Def/Rchg+(A), LucoftheG-Def/EndRdx(46), LucoftheG-Def(46), LucoftheG-Def/EndRdx/Rchg(46), LucoftheG-EndRdx/Rchg(48)
Level 44: Moonbeam -- Apc-Dam%(A), Apc-Acc/Dmg/Rchg(48), Apc-Dmg/Rchg(48), Apc-Acc/Rchg(50), Apc-Dmg/EndRdx(50)
Level 47: Shadow Meld -- LucoftheG-Def/Rchg+(A)
Level 49: Combat Teleport -- Range-I(A)
Level 1: Brawl -- Empty(A)
Level 1: Critical Hit
Level 1: Sprint -- Empty(A)
Level 2: Rest -- Empty(A)
Level 1: Swift -- Empty(A)
Level 1: Health -- NmnCnv-Regen/Rcvry+(A), Mrc-Rcvry+(7)
Level 1: Hurdle -- Empty(A)
Level 1: Stamina -- PrfShf-End%(A)
Level 1: Energy Focus
Level 49: Quick Form
Level 4: Ninja Run
Level 22: Double Jump
------------ -
Quote
The starter attacks have low cool down so you are going to get very low proc chances off those. Those are better left for set bonuses and you can fit at least 1 if not two of the ATOs in those early picks that have low cooldowns.
Thats a point I forgot to really take into consideration. I was basing it off of the numbers I was seeing from Mids.
QuoteThere is that conventional wisdom that long cast time = bad. That's only half the story. Look at Psi scream vs Psi Nado. What's the cone size on scream and damage on it? What's the radius on Psi Nado? What's the radius on Spin? The fact that Psi Nado can also slot a force feedback proc makes it an absolute no brainer for me if I had to choose between scream and nado.
That's true, i'll be keeping it!
QuoteWhile we are talking about force feedback procs and the recharge it gives you, your build needs mind link to achieve softcap defense vs all positions. The force feedback proc in Telek Blast gives you a false impression that mind link has an 89 second cool down. Turn the green dot off on Telek blast and you will see that mind link actually recharges in 127 seconds. You need a lot more recharge to get to perma mind link, if that's what you are going for.
But all that recharge is completely neutered the moment something applies -recharge debuff on you. Don't skimp on slow resist especially if you are not taking hasten to act as a -rech buffer. You may not encounter slows all the time but when you do you'll have a real bad day without any buffers/slow resist.
I'll look into it and adjust!
Finally you need to understand the fundamentals of proc builds. Those builds need a few things to function:
Quote1 - Enough global Recharge to make up for the lack of recharge slotting in powers that you plan to proc
2 - Enough ACC or to hit bonuses to make up for the lack of ACC slotting in powers that you plan to proc
3 - Good enough endurance management to make up for the lack of endurance reduction in powers you plan to proc
You NEED set bonuses to hit some of those goals. To slot every power with procs without a way to compensate for the above 3 factors is a bad idea. There's a lot of synergy with a fortunata build that makes fitting in all those easier:
More global recharge means Mind link recharges faster. If made perma it gives you both survival and to hit. When you add the to hit bonuses from leadership and followup, and various +acc bonuses that you can pick up through slotting sets (most notably purple sets that offer 15% global acc), you can take care of both items 1 and 2.
I'll need some real world experience with the build to be able to observe and fine tune things to fix holes. This is great thinking.
QuoteEnd management is much tougher, especially if you choose to take the fighting pool and all the toggles and/or the actual leadership pool to double stack maneuvers/assault/tactics. Easy way out is to drop those toggles/power picks. Second tip is to be selective about what you proc and how many procs you fit in those powers.
I picked up Ageless as a way to help deal with Endurance and recharge speed. Which is where my thinking was for getting ML to perma status. I could be off however!
QuoteYou can also pick up medicine pool for the self heal and field medic. With the latter the self heal will also give you endurance back. This is not a pool that's used by a lot of people but for forts it hits a sweet spot.
Honestly I never even looked into Field Medic! I'm in shock because that's such an amazing power and I could definitely fit it into my build somehow.
QuoteHere's my build, take a look at my slotting decisions/methods. I know you might not have the budget to get there now but it's for your reference. P.S. field medic is a dead last pick because this is a level 50 build and aid self doesn't care what level you got field medic, only that you have it. So the last time I checked, it will still give you endurance even if you are exemped.
Thank you for your feedback! I appreciate you taking the time to lay all those points out. I will look into your build and gain some playtime with my Fort so I can see where the room for improvement is, and what powers I've chosen that are kind of unecessary. Thanks again!
-
On 7/31/2022 at 3:46 PM, Harakh said:
Between the two, AoC. Its an offensive and defensive skill. It has longer duration than TD as well. Use AoC before engaging to avoid alpha strike, or during a rough spot to help survive.
Rularuu and longbow are tough. Arachnos, and any -Def mobs can be tough but very doable.
I love CT: Offensive but all my Fort builds well off without it.
For -Def mobs, having Touch/Weave is great, in my experience.
I just came back to my Fort after some time away and changed his build back to a Max Defense - incarnate content, and -acc debuff build. And its got to be one of the safest builds I've played. It doesn't have to lean into confuse powers.
If you want to feel strong against -def debuffs build as much defense as possible. I'm not on my main comp at the moment, but my build is running around (I think...) 63% ranged/AoE, and ~66% melee defenses. Couples with dark epic pool for -acc in dark obliteration, and just for the hell of stacking -acc from darkest night + running the degen(?) interface applying further -acc.
I'm loving the above set-up vs the little fluffier versions that laid more into controls.
Solid points! Thanks for the feedback! Arachnos are definitely a pain!
-
Thanks for your feedback!
Quote- I'd skip Psychic Scream altogether. It's not a bad power but I found the damage to be underwhelming, especially for its animation time. Same thing with Psionic Tornado.
- Spin is a great PBAoE and it comes up super early in a Widow's set. You might want to consider moving it to an earlier level so you'll have it when exemp'd further down.
So I kept those within the build for the soft control aspects (- recharge etc.). I may end up switching out one day however. Spin is awesome indeed. I can probably switch the places of Psychic Scream (16) and Spin (38). Good idea!
QuoteWith some power shuffling, you can pick up Aid Self. If you're good just using insps that's cool but I prefer having an actual self-heal on Defense based characters.
I thought about getting Aid Self at some point. If I find myself on the ground too often, then i'll respec it in. Much appreciated!
-
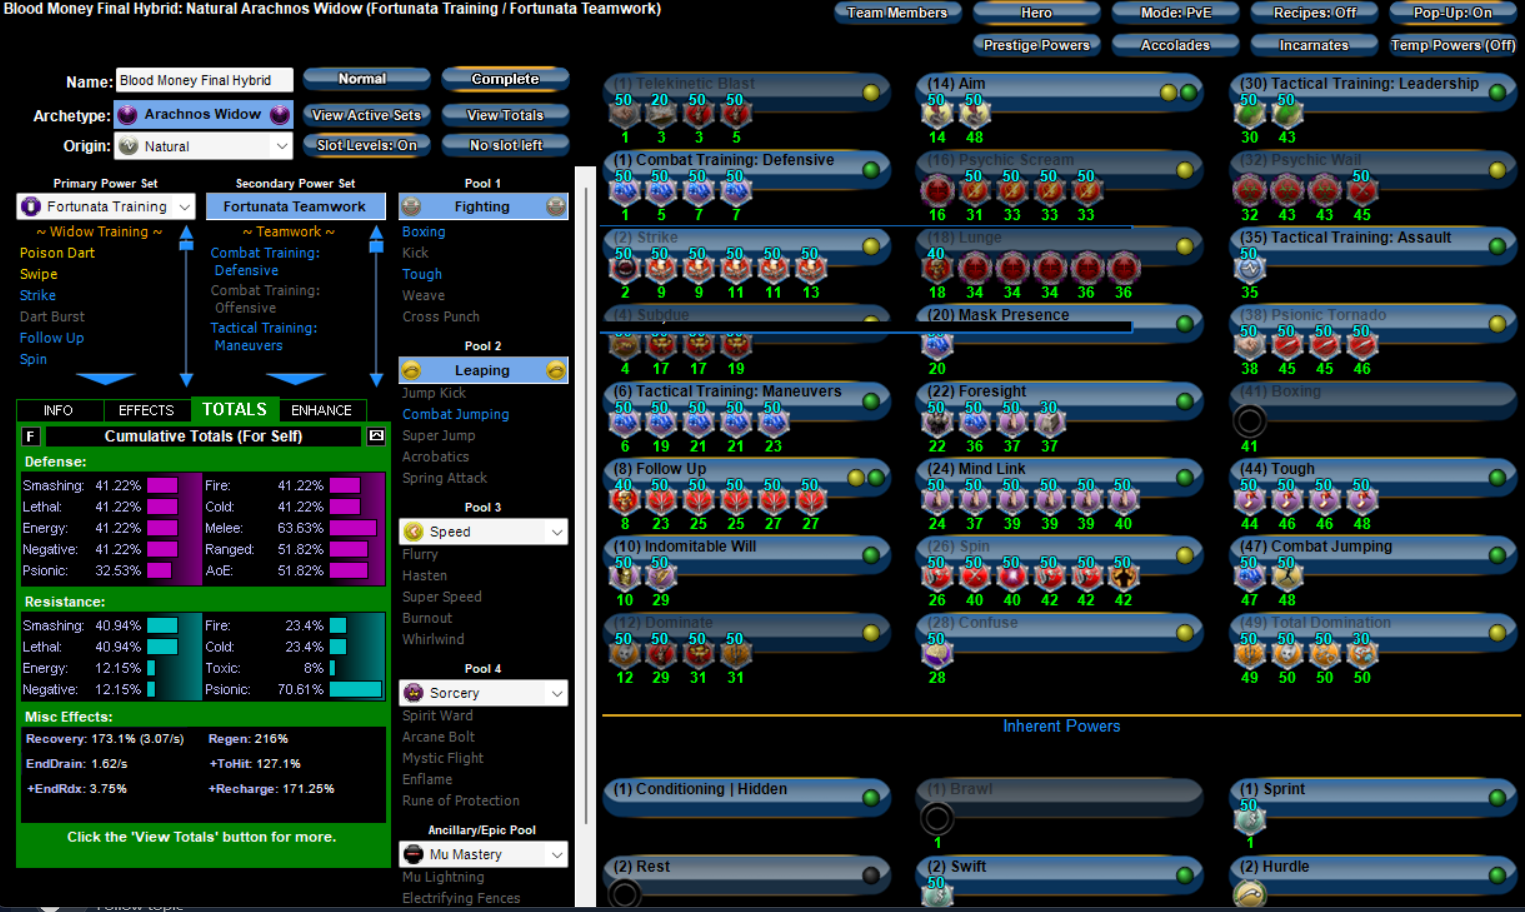
Alright, so I tweaked the build a bit and settled on this build I'm bringing to live. I ended up taking both Total Dom and Aura of Confusion because they ended up being amazing panic buttons lol. My last two powers were kind of placed there since I didn't have anything else I really wanted. Mystic Flight because I needed some vertical movement and Vengeance to help the team in case of opportunity. I'm looking forward to bringing this to live!
SpoilerThis Hero build was built using Mids Reborn 3.2.17
https://github.com/LoadedCamel/MidsRebornClick this DataLink to open the build!
Blood Money Final Hybrid: Level 50 Natural Arachnos Widow
Primary Power Set: Fortunata Training
Secondary Power Set: Fortunata Teamwork
Power Pool: Leaping
Power Pool: SorceryHero Profile:
Level 1: Telekinetic Blast- (A) Force Feedback - Chance for +Recharge
- (3) Explosive Strike - Chance for Smashing Damage
- (3) Gladiator's Javelin - Chance of Damage(Toxic)
- (5) Gladiator's Javelin - Accuracy/Damage
Level 1: Combat Training: Defensive
- (A) Luck of the Gambler - Defense/Increased Global Recharge Speed
- (5) Luck of the Gambler - Defense
- (7) Luck of the Gambler - Defense/Endurance
- (7) Luck of the Gambler - Defense/Endurance/Recharge
Level 2: Strike
- (A) Crushing Impact - Accuracy/Damage/Endurance
- (9) Crushing Impact - Damage/Endurance/Recharge
- (9) Crushing Impact - Accuracy/Damage
- (11) Crushing Impact - Damage/Endurance
- (11) Crushing Impact - Damage/Recharge
- (13) Mako's Bite - Chance of Damage(Lethal)
Level 4: Subdue
- (A) Trap of the Hunter - Chance of Damage(Lethal)
- (17) Apocalypse - Chance of Damage(Negative)
- (17) Apocalypse - Damage/Endurance
- (19) Apocalypse - Accuracy/Damage/Recharge
Level 6: Tactical Training: Maneuvers
- (A) Luck of the Gambler - Defense/Increased Global Recharge Speed
- (19) Luck of the Gambler - Defense
- (21) Luck of the Gambler - Defense/Endurance
- (21) Luck of the Gambler - Defense/Endurance/Recharge
- (23) Luck of the Gambler - Endurance/Recharge
Level 8: Follow Up
- (A) Touch of Death - Chance of Damage(Negative)
- (23) Hecatomb - Chance of Damage(Negative)
- (25) Hecatomb - Damage/Recharge
- (25) Hecatomb - Accuracy/Damage/Recharge
- (27) Hecatomb - Damage/Endurance
Level 10: Indomitable Will
- (A) Gladiator's Armor - TP Protection +3% Def (All)
- (27) Unbreakable Guard - +Max HP
Level 12: Dominate
- (A) Ghost Widow's Embrace - Chance of Damage(Psionic)
- (29) Gladiator's Javelin - Chance of Damage(Toxic)
- (29) Apocalypse - Damage
- (31) Gladiator's Net - Chance of Damage(Lethal)
Level 14: Combat Jumping
- (A) Luck of the Gambler - Defense/Increased Global Recharge Speed
- (31) Unbounded Leap - +Stealth
Level 16: Psychic Scream
- (A) Superior Dominion of Arachnos - Recharge/Chance for -Dmg and Terrorize
- (31) Annihilation - Chance for Res Debuff
- (33) Annihilation - Accuracy/Damage
- (33) Annihilation - Damage/RechargeTime
- (33) Annihilation - Accuracy/Damage/RechargeTime
Level 18: Lunge
- (A) Touch of Death - Chance of Damage(Negative)
- (34) Superior Dominion of Arachnos - Damage/Recharge
- (34) Superior Dominion of Arachnos - Accuracy/Damage
- (34) Superior Dominion of Arachnos - Accuracy/Damage/Endurance/Recharge
- (36) Superior Dominion of Arachnos - Accuracy/Damage/Recharge
- (36) Superior Dominion of Arachnos - Damage/Endurance/Recharge
Level 20: Mask Presence
- (A) Luck of the Gambler - Defense/Increased Global Recharge Speed
Level 22: Foresight
- (A) Shield Wall - +Res (Teleportation), +5% Res (All)
- (36) Luck of the Gambler - Defense/Increased Global Recharge Speed
- (37) Reactive Defenses - Defense
- (37) Steadfast Protection - Resistance/+Def 3%
Level 24: Mind Link
- (A) Reactive Defenses - Scaling Resist Damage
- (37) Reactive Defenses - Defense/RechargeTime
- (39) Reactive Defenses - Endurance/RechargeTime
- (39) Reactive Defenses - Defense/Endurance
- (39) Reactive Defenses - Defense
- (40) Reactive Defenses - Defense/Endurance/RechargeTime
Level 26: Total Domination
- (A) Gladiator's Net - Chance of Damage(Lethal)
- (40) Ghost Widow's Embrace - Chance of Damage(Psionic)
- (40) Unbreakable Constraint - Chance for Smashing Damage
- (42) Neuronic Shutdown - Chance of Damage(Psionic)
- (42) Unbreakable Constraint - Accuracy/Recharge
Level 28: Confuse
- (A) Coercive Persuasion - Contagious Confusion
Level 30: Tactical Training: Leadership
- (A) Gaussian's Synchronized Fire-Control - Chance for Build Up
- (42) Gaussian's Synchronized Fire-Control - To Hit Buff
- (43) Gaussian's Synchronized Fire-Control - To Hit Buff/Recharge
- (43) Gaussian's Synchronized Fire-Control - To Hit Buff/Recharge/Endurance
- (43) Gaussian's Synchronized Fire-Control - Recharge/Endurance
- (45) Gaussian's Synchronized Fire-Control - To Hit Buff/Endurance
Level 32: Psychic Wail
- (A) Superior Spider's Bite - RechargeTime/Global Toxic
- (45) Superior Spider's Bite - Accuracy/Damage/RechargeTime
- (45) Superior Spider's Bite - Accuracy/Damage
- (46) Scirocco's Dervish - Chance of Damage(Lethal)
Level 35: Tactical Training: Assault
- (A) Endurance Reduction IO
Level 38: Spin
- (A) Armageddon - Chance for Fire Damage
- (46) Fury of the Gladiator - Chance for Res Debuff
- (46) Scirocco's Dervish - Chance of Damage(Lethal)
- (48) Obliteration - Chance for Smashing Damage
- (48) Armageddon - Accuracy/Recharge
- (50) Armageddon - Damage/Endurance
Level 41: Psionic Tornado
- (A) Force Feedback - Chance for +Recharge
- (48) Annihilation - Chance for Res Debuff
- (50) Annihilation - Accuracy/Damage
- (50) Annihilation - Damage/RechargeTime
Level 44: Aura of Confusion
- (A) Malaise's Illusions - Chance of Damage(Psionic)
Level 47: Mystic Flight
- (A) Flight Speed IO
Level 49: Tactical Training: Vengeance
- (A) Kismet - Accuracy +6%
Level 1: Conditioning | Hidden
Level 1: Brawl- (A) Empty
Level 1: Sprint- (A) Run Speed IO
Level 2: Rest- (A) Empty
Level 2: Swift- (A) Run Speed IO
Level 2: Hurdle- (A) Jumping
Level 2: Health- (A) Panacea - +Hit Points/Endurance
- (13) Numina's Convalesence - +Regeneration/+Recovery
- (15) Miracle - +Recovery
Level 2: Stamina- (A) Performance Shifter - Chance for +End
- (15) Performance Shifter - EndMod
Level 1: Prestige Power Dash- (A) Empty
Level 1: Prestige Power Slide- (A) Empty
Level 1: Prestige Power Quick- (A) Empty
Level 1: Prestige Power Rush- (A) Empty
Level 1: Prestige Power Surge- (A) Empty
Level 4: Ninja Run
Level 50: Ageless Core Epiphany
Level 50: Musculature Core Paragon
Level 50: Ion Core Final Judgement
Level 50: Reactive Radial Flawless Interface
Level 50: Assault Core Embodiment
------------
------------ -
5 hours ago, Gulbasaur said:
I think my build has higher base resists but slightly lower overall defence.
I think it slightly depends on your playstyle - personally, I don't think it's a problem that needs solving. I can solo AVs on my fortunado, so they do survive quite well enough on just high defence. You'll be relying on inspirations for heals, but that's what they're for so that doesn't bother me overly.
I'd be a bit concerned about the constant endurance drain of Tough; fortunatas haemorrhage endurance, even on a well made build.
Ok perfect that makes sense! Yes they use endurance like a bottomless pit. I did some testing last night and I realized I don't need tough to survive. I'm going to swap out that power pool and test some other options out. First i'll see how AoC and aid self work in this build. Maybe try an APP next...or even Teleport pool... *starts tinkering*
QuoteI've just noticed you don't have a travel power - the P2W vendors have a couple of flight powers, if you need one, although they do cause power lockout.
Yes that was intentional. I use Ninja run, sprint and movement bonuses to get places in a zippy manner. I also get jetpacks for vertical movement. I may not have added them to the build. I tested with SS at one point and I didn't feel it was necessary with all the new travel options available. These days almost everyone has a team TP option haha.
Thanks again for your expertise!
-
Quote
If it's a one-off bonus (like the 3% defence enhancements), it'll work as long as you have access to that power.
The set bonus level is also relevant. It's lowest level minus three, so if it's a level 20-50 enhancement, the set bonus kicks in from level 17. The power also has to be useable.
Purple IOs break the rules and the bonuses scale all the way down to level 1.
Ok thank you for the clarification. It's been a long long time lol
QuotePersonally, I like the confuse effect in general. Total Domination is good if you like holds. The CC proc in Confuse is pretty nice, though. Totally up to you. However not picking one of them earlier will severely impact your survivability if you do exemp; they're both panic-button powers that basically turn off all incoming damage from anything below a boss for your whole team.
Noted, I'll see if I can pick one of them up earlier for when I ex down!
QuoteConfuse the sappers!
Mannn those guys...Yes that's what I gotta do be one drained me in like 2 hits haha
QuotePersonally, I don't take it. It's a one-slot wonder, so if you want to shove it in as a late power choice, I don't think you could go wrong with it.
Yes I'm on the same page, I think I should be ok without it on a premium build.
QuoteHonestly, it looks solid. Your low level attack chain will be a bit chaotic if you do things like low level task forces, but that's not unusual. I wouldn't bother with the fighting pool - you're using up two power picks for S&L resistance.
I like having a fully intact separate melee and ranged attack chain - redraw is something that you'll either hate or barely notice, but it's worth mentioning.
You don't think it's worth it for the extra ~20%? I'll do some test without it toggled on in Beta and see if I can do without it. Maybe I'll be able to dip into other power or ancillary pools then haha. Thanks again for your feedback!
-
Hey everyone!
I've been doing some extensive research and testing (some of my fav aspects of the CoX universe actually), as well as using @Gulbasaur's excellent thread for a basis. Seriously, thanks for your dedication! Check that out here!
I've been trying to get the best Fort for my playstyle. My main was a Fire/Fire blapper on live. I enjoy being in the middle of things as well as having a healthy amount of AoE. I do not, however, enjoy long cast times (I'm looking at you Psinado). Basically, This is an end game build geared towards handling super tough content. I'm not as concerned with ex'ing down as of now and one day soon i'll create a 2nd build for the NW aspect of this toon (I simply LOVE VEATs).
Questions:
-When you EX down, assuming your IOs are attuned, but the power isn't available at that level, do you still receive the IO benefit/set bonus?
-What about if it's not attuned, does that matter?
- I'm deciding between Aura of Confusion or Total Domination. Shouldn't Confuse with the contagious confusion proc be enough for a pseudo sub for AoC?
-Are there any mobs you pro Forts avoid? Anything end-draining can potentially have me by the throat.
-Is 55% Accuracy and 127.1% +To-Hit to not need CT: Offensive?
Overall Build critique:
I'm by no means loaded with inf. However, I won't mind working towards this build over time for these expensive IOs. This is the build I put together and tested (with the exception of switching swipe for subdue). I feel like I have too many attack powers and I'm trying to lock down 2 attack chains (one ST and one AoE). I switched out swipe for Subdue since it's ranged and more powerful. I put TK blast in its place but honestly, I'm not sold on either one. If someone has a better suggestion for this build, I'm all ears!
TL;DR: AoE/ glass cannon junkie trying to get the most he can out of this amazing AT. I welcome all feedback. Thanks everyone!
Screenshot of build
Spoiler
Data Link
-
On 7/27/2020 at 7:49 AM, oldskool said:
You're welcome!
Gloom's 20% res debuff is Defensive Opportunity. It will be available on a single target for 15 seconds and have a downtime related to how long it takes to rebuild to 90% in the meter. So its not nearly as reliable as something like Achilles' Heel would be, but it is still a good effect on tough targets. I don't want to get into a drawn out discussion on the failures and merits of the inherent though. Gloom's base damage is actually higher than Life Drain (90 vs 86). The higher base damage and faster cast time makes it have better DPA. However, Life Drain has more proc potential and that slightly favors Life Drain. So if you went with a proc LD it becomes a viable replacement to Gloom.
Why chase FF procs when you can just build for perma-Hasten? I'd think that's the entire point behind picking Super Reflexes, Energy Aura, Electric Armor, or Radiation. Take a gander at the build in the block below. It has 185% global recharge which is more than enough to perma your Hastens. I didn't change any powers to do it. I just changed the slotting. BTW, KO Blow has a base 40 second recharge which really puts a hurt on that plan. Thunderstrike isn't much better at 36 seconds. The Epic pools with some Goldilocks zone potential would be Psychic Mastery, Dark Mastery, and Fire Mastery. Those sets have a melee power which animates and recharges within reasonable ranges while also doing respectable damage. The holds in those sets can be made to work but Dominate is the best for the whole Goldilocks zone set of attributes. What I mean by this is the animation and recharge impacts to proc chance are juuuuuuust right. Not too long and not too short.
Opportunity Strikes is hot crap for the proc. The entire set bonus is pretty good though. The Sentinel Ward set is the same way. The bonuses are pretty good and the proc itself is absolute garbage. That said, the build below includes both because the set benefits can be worth it. Its also how the build goes slightly above 45% defense while also attaining 185% global recharge. Anyway, I don't think you'd gain much for using Ragnarok since the point of that set is 10% recharge which is already included.I don't want to tell you how you should build or play. So everything below is 100% up for revision by you or anyone else. Its not intended to be considered "perfect". However, the slotting strategies should serve as an illustration of what I am talking about.
Couple other points...
In the originally posted build a conceptual attack routine of Antumbral Beam, Abyssal Gaze, Gloom, Dark Blast sounds fantastic on paper. However, there is a pretty significant gap there before Antumbral Beam becomes available again. So if you went into the Window options and clicked "DPS" Mids will tell you that attack chain does 191 DPS. Its also bull$h!t. Abyssal Gaze to DB is 4.884 seconds of animation and that gap (0.39 seconds) before the next AB will lower the DPS which isn't accounted for. Still, this is actually a good chain to shoot for because Gloom is a really good T2 and Dark Blast, despite is low per target damage, is a good T1.
However, if you up the recharge you can dump Gloom for Life Drain. You can run Antumbral Beam, Abyssal Gaze, Life Drain, Dark Blast (Mid's won't count DB in the routine which is silly). There is still a gap, but it is significantly smaller (0.12 seconds). More damage is loaded into Abyssal Gaze and damage from Antumbral Beam is spread into Life Drain. You could still use Gloom if you like, but it will likely lower some damage over time. That just hypothetical napkin mathing and in real play you probably won't notice. The only time really nitpicking this kind of rotation counts is if you're gunning for AVs where piling on that much damage can matter. You could tinker with the slotting in DB and Gloom. Sometimes I mule Apocalypse 5pc for the recharge and put the proc into a power that has no recharge modification (i.e., Antumbral Beam in this example). You could change that up and go a different direction. The difference is likely going to be small.| Copy & Paste this data into Mids' Reborn : Hero Designer to view the build | |-------------------------------------------------------------------| |MxDz;1505;712;1424;HEX;| |78DA6594CB4F135114C6EF6DA740CB1B4A296F4A81BE6068D5851A0D89020604432| |071A358877229C55A9A16135CFA2FB861A551776EFC4B7C61D400E21E511EEADAD4| |33733E4A934E687E33DF9DEF9CEFDE3B97998DB19A37379E8C0A59773D6DE4F3F17| |995594F6554DA3163245309615E95F46B3FD5E3734626A996F43123F7207E8D2CEB| |3DC5A131B5AC3279A5CF3FCAAA5C7C4E2DA7D586CA0BF7ECDA5A5A9F56C692CAE55| |752D9F8A25A376A2D7122955C216FD2653DCD67955AAA397D3B4B7AC7783695D08B| |0D6EA532AB467C869AAADC632FC50AD16F2B2070151CE2BB26444C13757BE036D3B| |3C3F4EE327DDF98778264939657130DD2D26C6EB09959D502FEA3D7BA34F129000B| |79E490CD1AAB88325DC34C9F0E8E30EF521F3BF7B1DB515F433F0D7D2AD0E733D57| |7603E8E49F6F73FE4B141435A1906C7EDFC3CC40C84985F02BC5DE495951142AC4A| |045E738D7B94C189BACE43F87E3143FBE00FF08019FEC9FC4A75ABE1ADDEE2B50B7| |F04DF3287DE81EFC10F4C232C442DE65E3BC5F5FA6F326313E024D3A08CF5FCAEAD| |FE80FD0DC7E0A6398F4AB14D591A91A531C6736BDAB759EBD284F5703F33E7EE14E| |EE74CCF4B6682B234737DD9FC8AEBC55E306DB4702D5C57B414E81276525A91A6D5| |C32BEF6D65F69FE34E3B94A60D69DA90A2DDCB63ED48D389349D48D38B348B34DB0| |EAE2F3A86859542A39E5DAC39BAFEB0BFFB083C064F98BDBFC1BFCC5DCAD2832C3D| |57796586AF8017C14BCC91CBE0287B1394A50FBBD4872FD48F2FD48F2FD48F2FB48| |F320E601507229C7B04BC4F7582985310EF2F9016811681E6A11A3A34BD9BBD7ED2| |A2D0A24EDE954EAD78BAE9CFDC9555F3D04BF384140AE1B2D16899122B53CE97291| |7CA94E93265562B9E7B212DC5D940A79A95C2A18B46915D622F8FCF349BBC2D2DAD| |668A1820FAECD6F351A92FC8BE93334DCAA7F8CFB2C99C75992AF75C28B9374AEE1| |74BEEFF031BE7F865| |-------------------------------------------------------------------|
So, I took the basis of your suggestions (because numbers make my head hurt haha) and tweaked it a little more to my interests, which might provide an alternate perspective for the OP. I've been looking for a good Dark/SR build since I got mine to 50 ages ago but he's been shelved until recently. I was tempted to get rid of SS since I usually ninja run everywhere and there's a lot of movement bonuses built in. I also decided not to take any APP attacks since I believe my attack chain is full enough as is. Plus, while Dominate was tempting, it wasn't strictly necessary to complete an attack chain (I don't think). My calculations may be off, but here's my attempt. On paper it looks good but feel free to pick it apart hehe 🙂
SpoilerThis Hero build was built using Mids Reborn 3.2.17
https://github.com/LoadedCamel/MidsRebornClick this DataLink to open the build!
Normos: Level 50 Mutation Sentinel
Primary Power Set: Dark Blast
Secondary Power Set: Super Reflexes
Power Pool: Speed
Power Pool: Leaping
Power Pool: Fighting
Power Pool: Leadership
Ancillary Pool: Ninja Tool MasteryHero Profile:
Level 1: Dark Blast- (A) Superior Opportunity Strikes - RechargeTime/Chance for Opportunity
- (3) Superior Opportunity Strikes - Accuracy/Damage
- (3) Superior Opportunity Strikes - Damage/RechargeTime
- (5) Superior Opportunity Strikes - Accuracy/Damage/RechargeTime
- (5) Superior Opportunity Strikes - Accuracy/Damage/Endurance
- (7) Superior Opportunity Strikes - Accuracy/Damage/Endurance/RechargeTime
Level 1: Focused Fighting
- (A) Luck of the Gambler - Defense/Increased Global Recharge Speed
- (7) Luck of the Gambler - Defense/Endurance
- (9) Luck of the Gambler - Defense/Endurance/Recharge
- (9) Luck of the Gambler - Defense
- (11) Kismet - Accuracy +6%
Level 2: Gloom
- (A) Apocalypse - Damage
- (13) Apocalypse - Damage/Recharge
- (15) Apocalypse - Accuracy/Damage/Recharge
- (15) Apocalypse - Accuracy/Recharge
- (17) Apocalypse - Damage/Endurance
Level 4: Focused Senses
- (A) Luck of the Gambler - Defense/Increased Global Recharge Speed
- (17) Luck of the Gambler - Defense/Endurance
- (19) Luck of the Gambler - Defense/Endurance/Recharge
- (19) Luck of the Gambler - Defense
Level 6: Agile
- (A) Luck of the Gambler - Defense/Increased Global Recharge Speed
Level 8: Abyssal Gaze
- (A) Unbreakable Constraint - Chance for Smashing Damage
- (21) Ghost Widow's Embrace - Chance of Damage(Psionic)
- (21) Gladiator's Net - Chance of Damage(Lethal)
- (23) Thunderstrike - Accuracy/Damage
- (23) Thunderstrike - Accuracy/Damage/Recharge
- (25) Thunderstrike - Accuracy/Damage/Endurance
Level 10: Master Brawler
- (A) Preventive Medicine - Chance for +Absorb
- (25) Preventive Medicine - Heal
- (27) Preventive Medicine - Heal/Endurance
- (27) Preventive Medicine - Endurance/RechargeTime
- (29) Preventive Medicine - Heal/RechargeTime
- (29) Preventive Medicine - Heal/RechargeTime/Endurance
Level 12: Hasten
- (A) Recharge Reduction IO
- (31) Recharge Reduction IO
Level 14: Aim
- (A) Gaussian's Synchronized Fire-Control - Chance for Build Up
- (31) Gaussian's Synchronized Fire-Control - To Hit Buff
- (48) Gaussian's Synchronized Fire-Control - To Hit Buff/Recharge
- (48) Gaussian's Synchronized Fire-Control - To Hit Buff/Recharge/Endurance
- (48) Gaussian's Synchronized Fire-Control - Recharge/Endurance
- (50) Gaussian's Synchronized Fire-Control - To Hit Buff/Endurance
Level 16: Dark Obliteration
- (A) Superior Sentinel's Ward - RechargeTime/Chance for +Absorb
- (31) Superior Sentinel's Ward - Accuracy/Damage
- (33) Superior Sentinel's Ward - Damage/RechargeTime
- (33) Superior Sentinel's Ward - Accuracy/Damage/RechargeTime
- (33) Superior Sentinel's Ward - Accuracy/Damage/Endurance
- (34) Superior Sentinel's Ward - Accuracy/Damage/Endurance/RechargeTime
Level 18: Antumbral Beam
- (A) Apocalypse - Chance of Damage(Negative)
- (34) Cloud Senses - Chance for Negative Energy Damage
- (34) Gladiator's Javelin - Chance of Damage(Toxic)
- (36) Thunderstrike - Accuracy/Damage
- (36) Thunderstrike - Accuracy/Damage/Recharge
- (36) Thunderstrike - Accuracy/Damage/Endurance
Level 20: Enduring
- (A) Performance Shifter - Chance for +End
- (37) Synapse's Shock - EndMod/Increased Run Speed
- (37) Synapse's Shock - EndMod
Level 22: Dodge
- (A) Luck of the Gambler - Defense/Increased Global Recharge Speed
Level 24: Combat Jumping
- (A) Shield Wall - +Res (Teleportation), +5% Res (All)
Level 26: Life Drain
- (A) Touch of the Nictus - Chance for Negative Energy Damage
- (37) Cloud Senses - Chance for Negative Energy Damage
- (39) Gladiator's Javelin - Chance of Damage(Toxic)
- (39) Thunderstrike - Accuracy/Damage
- (39) Thunderstrike - Damage/Recharge
- (40) Thunderstrike - Accuracy/Damage/Recharge
Level 28: Quickness
- (A) Run Speed IO
Level 30: Boxing
- (A) Empty
Level 32: Blackstar
- (A) Fury of the Gladiator - Chance for Res Debuff
- (40) Armageddon - Chance for Fire Damage
- (40) Armageddon - Damage
- (42) Armageddon - Damage/Recharge
- (42) Armageddon - Accuracy/Damage/Recharge
- (42) Armageddon - Accuracy/Recharge
Level 35: Evasion
- (A) Luck of the Gambler - Defense/Increased Global Recharge Speed
- (43) Luck of the Gambler - Defense/Endurance
- (43) Luck of the Gambler - Defense/Endurance/Recharge
- (43) Luck of the Gambler - Defense
Level 38: Tough
- (A) Steadfast Protection - Resistance/+Def 3%
- (45) Gladiator's Armor - TP Protection +3% Def (All)
- (50) Unbreakable Guard - +Max HP
Level 41: Weave
- (A) Reactive Defenses - Scaling Resist Damage
- (45) Reactive Defenses - Defense
- (45) Reactive Defenses - Defense/Endurance
- (46) Reactive Defenses - Endurance/RechargeTime
- (46) Reactive Defenses - Defense/RechargeTime
- (46) Reactive Defenses - Defense/Endurance/RechargeTime
Level 44: Super Speed
- (A) Run Speed IO
Level 47: Maneuvers
- (A) Gift of the Ancients - Defense/Increased Run Speed
Level 49: Tashibishi
- (A) Ice Mistral's Torment - Chance for Cold Damage
Level 1: Brawl
- (A) Empty
Level 1: Opportunity
Level 1: Sprint| Copy & Paste this data into Mids Reborn : Hero Designer to view the build | |-------------------------------------------------------------------| |MxDz;1409;692;1384;HEX;| |78DA6593D94F135114C6EFB453D642D92960C1B2B59432509F5C62345A485420041| |25F5CEA08B765B04C9BB624F86FF8E29351E3FE77F8EA8651C3A2EF88B2A84F3E98| |7A3ADFB9807142F9B5E7DE73BEEF9C7B676239EE4D26C7CE0AADF67CDACCE71333D| |22E58B64C574C2C15CC8295B1053D659399DC62265F4E5FDBD586C4B469A7E49C11| |3773B712E728B7D0B5BF14974969E7A531B39495B9C4B44CA6E5B2CC8BAAA94C266| |DCC64A59CF33A5FC7A599B5EC548DF363CC4ACD537ACAA796E6642E3F6F653B46B3| |D6ACB15F7BD2B217CCC404E9C9DC6D3F390AD2672544FFB4925551F4882FBA10315| |DB856996BA0BECEDC00CB3E8357C207C9BA68D6B058075634329BC0AA3FB42DA08B| |F7A4A8A9242DEA7216BD4360ADC11C06EB46C0ABA4E4E624B79B95EA58A981951A5| |8E91A6DF6F066E1E1CD1F48B65C70A3E51750B669118B4DA36E872DF704F800F43F| |04AF53C54A35A5CA6D6CF66F82ED5F995BE0916FCCEF6037C95673B2563D888A9DC| |C8F64AB4655AE79015B9D8FC1E127CCA7CC6760EC39F889927DAA27DF0A0EA5F315| |78F435F30DF32D187C07AE5272BD4AAE8FA16270D3E51C52300AEF3D3C901E1E480| |F0FC4A48134B26D57E35D24F7EEA272EF1678833635AB7368E67368A169B4AA60EB| |25C8AC9197363585363F82BDECA59FBDF4B397FEFB60883DDD24990E55B16308418| |D6402DC9D0814E911EB24D2A51AEE3A83A2A1D3F01E3A0E0E9C609E649E026749A4| |5B5DC06EEE25C21730C21730C217D04DE27D6A3A7DA56EA98DE83128C67E833A6D0| |AAB9EC3BF108CEE3077C1A13DE60FE64F3E174A1E543D0F72CFF5143454D028DDD7| |902E1E91F111151CA9F5E06AEA423D45FA2B4D6761C079973DA55071FCFFF5295DB| |DEA14D29CD076D5C1EB2F049BD83D147489CBFCEE5F84995810F677FEC90C2373EF| |5050137CA7BC77C09260F16584BA660FC5BFD088DB24| |-------------------------------------------------------------------|
- (A) Empty
Level 2: Rest- (A) Empty
Level 1: Swift- (A) Run Speed IO
Level 1: Health- (A) Numina's Convalesence - +Regeneration/+Recovery
- (11) Miracle - +Recovery
- (50) Panacea - +Hit Points/Endurance
Level 1: Hurdle- (A) Jumping IO
Level 1: Stamina- (A) Performance Shifter - Chance for +End
- (13) Performance Shifter - EndMod
Level 44: Speed Phase
-------------
 1
1
SD/DM Build Critique (2023 Update)
in Tanker
Posted · Edited by Gammos
Hello everyone! I figured it would be easier to revive this old thread instead of creating a new one. with all the changes that have happened to Tanks in the last 3 years, I wanted to refresh and update my SD/DM Tank. Right now, he's super sturdy but I'm sure he's not optimized. I'm looking for great defense, good AoE and overall survivability. On this current build, I'm checking all three boxes. If you wise experts would take a look at this and see where I could improve, especially with all the new changes in the last few issues (such as being able to skip Shadow Punch altogether), I would be eternally grateful!
Here's the current build I have:
This Hero build was built using Mids Reborn 3.4.7
https://github.com/LoadedCamel/MidsReborn
Click this DataLink to open the build!
Death Knocker: Level 50 Mutation Tanker
Primary Power Set: Shield Defense
Secondary Power Set: Dark Melee
Power Pool: Speed
Power Pool: Fighting
Power Pool: Leaping
Ancillary Pool: Soul Mastery
Hero Profile:
Level 1: Deflection
Level 1: Shadow Punch
Level 2: Battle Agility
Level 4: Smite
Level 6: Active Defense
Level 8: Shadow Maul
Level 10: True Grit
Level 12: Against All Odds
Level 14: Hasten
Level 16: Phalanx Fighting
Level 18: Siphon Life
Level 20: Grant Cover
Level 22: Super Speed
Level 24: Boxing
Level 26: Shield Charge
Level 28: Soul Drain
Level 30: Tough
Level 32: Kick
Level 35: Dark Consumption
Level 38: Midnight Grasp
Level 41: Cross Punch
Level 44: Combat Jumping
Level 47: Taunt
Level 49: Gloom
Level 1: Gauntlet
Level 1: Brawl
Level 1: Prestige Power Dash
Data Link
https://www.midsreborn.com/builds/download.php?uc=1827&c=776&a=1552&f=HEX&dc=78DA7594CB4F534114C6BFDB7B2BB4B4BCDA52102AEF470B7D01266E8C460B3E4A13128CDBA6810BAD342D698B01DDAAD1C49D0B37C6C7DFE256376EFD0F8CA8898AA0403DBD6746A6606FD2E637E7CCFDE67C67666E6A2BE17AFF6EE13234D7D57CA65C4EDFCA14D6CD52736AB392A9E48A05D0E34E98994A762059282E53AA8922019E954E98AB66A16C4696B23933BF22877E914D9979D38C2432A5754638178BC57C6469C33457DC16CEE7D6B2955C61CD658D16CCCC060D5A3895AFE5FC731BB9E5C895D266C54C2F1537F3E954A65C314BDBDD5444887E0937FD69904FD50EF8681837602048306EA019FBBA1569C50F8601FC6418C61EC3AE03EA53ADFDE8C11CC96BAABC06A7946F6168864B13F26E4DC8B76A42BE8DE117C9EB8ABC5DC73AACCC19AC4A5863E8429661103908993B0CD7A81AFBB1DD2A0D266B1907F66881267581265C62674EBC312C70E1852116786988055E318CE035C33C2DE050ECEA0EF86918A8C94CEB4246B4D58B1D8E5CA797A817C755B590B255D51095E456E434B7AC372AE106BDDCA636B84DEE5F3BDA25743074A35313857B18C6E165F84DFE3B54FF1D64CA5AA0134FD85B271E1842E621C3393C92FE1F33DCA46A3CAA7F0F926CD28BEF0C211CC2EA4858163A4C2E7DEAD9F1E1A3CDCA6894F1AB193F9FAA242DD3A356DB631D0F7AE32CEE43C05D8822B720BC6E4BB8C77040A67B95E360EF95327DF8631370601332870C411CD984912A834E5506D42D08E0BC3CC8318629C4254C338431C310C52C838D64FA55B3FD6CF690AA1C528E873684CF86B53523F8C470445346D57E8CCAEB3126AFC798BC1E63F27A04E5F508CAEBF19434261419630217A557D19829D9DFB0EC6F14176C56115D54FFA4D2063AA16283F7A9BC88EA2C8232EB2E936A4CC9E831C43913C714CBC6119191A8D801A3FE9355ED33FEFFF15968105F34D4F729AE717CC759FFB1A278982FC197D39909CE7C3D9121BE2DF61383DCB36FA7A73CB78929BB7C6FDE86EAAF4035D4A0F4588378BC417CA6417CB641DCD15EFFA1AD263D54A01AF079611DE67F816727677C3819F80B3257F6BD