

noogens2
-
Posts
27 -
Joined
-
Last visited
Content Type
Profiles
Forums
Events
Store
Articles
Patch Notes
Posts posted by noogens2
-
-
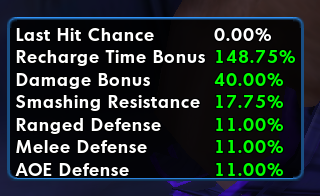
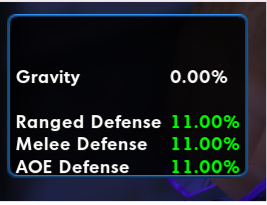
I haven't seen this mentioned anywhere yet but the customized attribute monitor window is showing different things between live and beta. I've verified this with newly transferred characters and ones that already existed on beta. I'm not sure what Gravity is supposed to be but luckily I've been able to go in and recustomize the window to what I had before. This has been happening since the first public beta build.
LIVE

BETA
-
For a suggestion, what about another default chat tab that only has the "Looking for Group" filter enabled? This actually helps anyone who likes to PUG a lot and lets players easily see all the teaming requests without all the extra stuff shown in the global channel. I actually do this for every character I create.
-
 1
1
-
-
I'll agree with the others saying that some of the changes are "balancing" the fun out of powers, especially regarding the long recharge times of many powers. Can I suggest that instead of just altering values at 2 to 3 times base values that we instead allow more incremental steps like 1.25, 1.5 and 2.5. For instance, epic holds could be set to 20 seconds which is 2.5 times the 8 second controller/dominator hold recharge and in my opinion a better balancing point than 24 seconds. The new dominator tar patch recharge could be set to 120 or 135 seconds which would be 1.33 or 1.5 times the base 90 second recharge.
From what I remember from live, the original intent of the epic pools were to round out the ATs weaknesses and allow for some cross-AT functionality. For instance, all the squishy ATs got defense toggles, blasters got CC powers, and controllers got real attacks. I think that epic powers should still stay strong allowing for more flavor and more variety of builds. The overperorming powers should be "slighly" adjusted and the other powers should be buffed to compete.
-
3
-
 8
8
-
-
1 hour ago, LastHumanSoldier said:
Epic > Fire Mastery > Bonfire (Blaster/Mastermind) - Knockdown rate has been reduced while using KB2KD enhancements
Just tested this on my Fire/Earth Dominator.
I feel its been pretty much completely gutted out.On average i see about 2 enemies knocked down, and very inconsistent.
I just tested this on a fire controller and it's much weaker there as well. It looks like a global nerf contrary to the release notes.
-
 1
1
-
-
I played an end game arsenal/aresenal dom for about 3-4 hours and have these thoughts.
- The set is fun but the damage feels like on the lowerish side as it took me longer to clear mishes than my other doms. It may be due to the amount of heavy lethal resistance. Maybe allow more variety of proc slotting like Savage. Also single targe damage "feels" slower due to the slower DOT on the T9 power.
- Since this set is unique to the AT, would it be possible to have the knockback turned to knockdown for most or all of the powers? It would be nice to have the "knockback slot tax" be shifted to the fewer players who want do KB and make them slot KB enhancements versus most other players having to slot KB2KD enhancements. Making this change would free up slots on already tight dom builds. At the minimum it would be nice for trip mine to have that change since the power is meant to be the quasi-pbaoe power in the set. None of the other dominator pbaoes do KB.
- I wish there was slightly more flavor such as a pbaoe like dragon's tail but with a 360 gun fluorish..
- Overall it feels a bit middling performance-wise but fun enough to roll on live. I already had a ghetto gun-troller AR/TA blaster so this will be up my alley.
-
1
-
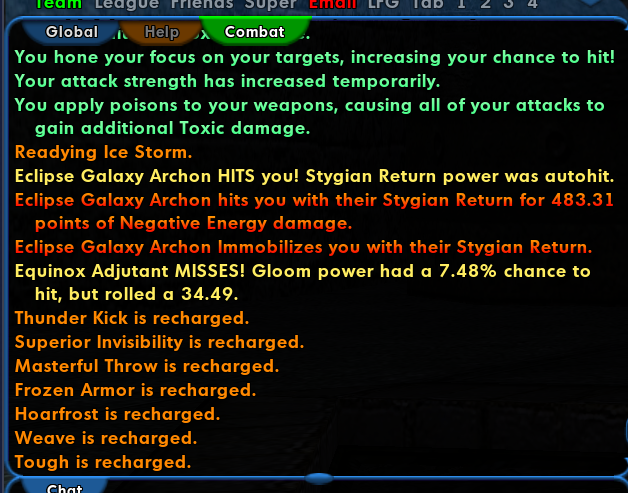
I noticed that I've been missing a lot more as the mobs are running maneuvers. I also didn't know why I was faceplanting so fast until I looked at the combat logs. What is this Stygian Return power and why is it so strong for being autohit. Is this intended? It's extremely lame if it is.
-
2
-
-
I tried 3 general content end game builds on the test server. All the builds had fold space (my fave power) and skipped both flash and phantasm due to a tight build. I fought 4/8 difficulty missions with and without bosses depending on the faction but mostly tested on CoT and Council maps.
- ill/energy/ice - I wasn't fan. Energy's AOE is pretty lackluster and mobs tended to scatter because they didn't die quick enough. Adding Flash back probably would've helped the scatter but I probably still wouldn't have liked the combo. This build would probably be better for content that prioritizes taking down single hard targets.
- ill/sonic/ice - This combo is pretty nice and had decent clear times due all the -res being thrown around allowing PA to hit harder. Sonic is a also very solid all around assault set.
- ill/martial/ice - My fave combo. People poo poo on martial but it has good synergies with the right primaries and a decent build. Mob scatter was greatly mitigated by the knockdown of dragon's tail with the slow of caltrops and sleet. Dragon's tail's knockdown also helps with damage mitigation and frequently procs force feedback to help PA recharge faster. Out of the three builds, this one was the quickest on average clearing missions. If all you want to do is AV hunt then this would be the weakest of the three builds.
-
2
-
30 minutes ago, JayboH said:
Defender?
The base flash arrow debuff for every AT shows to be lower than intended.
Defender patch notes - 15%
Actual in game
Defender 9.38%Corrupter 7.5%
Controller 7.5%
Mastermind 5.63 %-
1
-
-
Are the numbers wrong for flash arrow? The base debuff numbers in game are much lower than in the patch notes.
-
I'm still on the side of being able to light Oil slick arrow within the powerset. I just don't see the balance issue where some characters can easily light it with their other powerset while others have to use origin powers. This may be an unpopular opinion but I propose that glue arrow be made more similar to the blaster version where it has a minor DOT which can then be used to light OSA.
I do like all the other changes so far though. I do wish that EMP affected self as well as teammates though.
-
When I pulled up the patch notes today, I was excited to see all the changes until I got to travel changes. The ease and speed of zone travel on Homecoming is one of the highlights of this server over other servers. All those legacy TFs with the multitude of timesink zone changes were made much more tolerable and less grindy with the slash command. Having to rely on a plethora of teleport powers to roughly approximate the current ease of travel makes the game both more complicated and less fun in my opinion.
I would be more ok with losing the slash command if the P2W option had a much lower cooldown like 30s.
-
6
-
-
Ok I'll eat a little crow and say that @kiramon was totally correct on the proc chances of FF in Feral Charge. I'm not sure why my initial observations didn't match the reality of how often it fired in the power. I don't know the exact radius of the AOE portion of the power, but if it's 10 ft, it would mathematically have a greater chance to fire than unkindness at 2 enemies or above (like @kiramon said). So I readded FF back to that power in last iteration of the build.
So I put up what will probably be the "final" version of the build. I did manage to six slot creepers, keep Ice storm, keep unkindness procced out (with less procs), but had to drop the first melee power (RIP low level attack chain). I was also able to fit in Gaussian in Spot Prey. The recharge is much better now with FF in both call hawk and feral charge. The build lacks some of the great unique IOs like preventative medicine or shield wall but those can be added if you drop procs from attacks or chase less bonuses for defense
Thanks to the community for the feedback.
-
 1
1
-
-
EnjoytheJourney took almost all the Dark powers which makes the build very tight but here is my take with those same Dark power selections in mind. This build is permadom and soft caps to S/L/R if you're willing to boost the defensive toggles to about +3. The set bonuses in the defense toggles powers aren't game changing when exemping and LOTG recharges don't have to be attuned to work at lower levels. I removed Hoarfrost and Consume in favor of super speed and manuevers. You shouldn't need a great amount of healing when you're soft capped and have lots of -ToHit in your powers. I also like to take Ageless Core at end game for endurance management and extra recharge. For end management while leveling up, I like to buy cheap Serums from the P2W vendor (I know it's lame) but this allows more flexibility in builds. If you don't mind underslotting a pet, you can move those slots to proc attacks or add more defensive uniques. I personally like to slot flares with at least 2 slots for lower level play but I didn't slot it here.
SpoilerVillain Plan by Mids' Reborn : Hero Designer 2.6.0.7
https://github.com/ImaginaryDevelopment/imaginary-hero-designerClick this DataLink to open the build!
Level 50 Mutation Dominator
Primary Power Set: Darkness Control
Secondary Power Set: Fiery Assault
Power Pool: Speed
Power Pool: Leaping
Power Pool: Fighting
Power Pool: Leadership
Ancillary Pool: Ice MasteryVillain Profile:
Level 1: Dark Grasp -- BslGaz-Acc/Hold(A), BslGaz-Acc/EndRdx/Rchg/Hold(3), BslGaz-Rchg/Hold(3), BslGaz-Acc/Rchg(5)
Level 1: Flares -- Thn-Acc/Dmg(A)
Level 2: Living Shadows -- EnfOpr-Acc/Immob(A), EnfOpr-Acc/Rchg(5), EnfOpr-EndRdx/Immob(34), EnfOpr-Acc/EndRdx(37)
Level 4: Fire Breath -- Artl-Acc/Dam(A), Artl-Dam/End(9), Artl-Dam/Rech(9), Artl-Acc/Dam/Rech(11), Artl-Acc/Rech/Rng(11), Artl-End/Rech/Rng(13)
Level 6: Possess -- CrcPrs-Conf(A), CrcPrs-Conf/Rchg(13), CrcPrs-Acc/Conf/Rchg(15), CrcPrs-Conf/EndRdx(15), CrcPrs-Acc/Rchg(17), CrcPrs-Conf%(17)
Level 8: Fearsome Stare -- CldSns-ToHitDeb(A), CldSns-Acc/ToHitDeb(19), CldSns-Acc/Rchg(19), CldSns-ToHitDeb/EndRdx/Rchg(21), CldSns-Acc/EndRdx/Rchg(21), CldSns-%Dam(23)
Level 10: Fire Blast -- Dcm-Acc/Dmg(A), Dcm-Dmg/EndRdx(23), Dcm-Dmg/Rchg(25), Dcm-Acc/EndRdx/Rchg(25), Dcm-Acc/Dmg/Rchg(27)
Level 12: Hasten -- RechRdx-I(A), RechRdx-I(27)
Level 14: Combat Jumping -- LucoftheG-Def/Rchg+(A)
Level 16: Boxing -- KntCmb-Acc/Dmg(A), KntCmb-Dmg/EndRdx(29), KntCmb-Dmg/Rchg(29), KntCmb-Dmg/EndRdx/Rchg(31)
Level 18: Embrace of Fire -- RechRdx-I(A), RechRdx-I(31)
Level 20: Heart of Darkness -- SprAscoft-Acc/Conf/Hold/Immob/Sleep/Stun/Fear(A), SprAscoft-Conf/Hold/Immob/Sleep/Stun/Fear/Rchg(31), SprAscoft-EndRdx/Rchg(33), SprAscoft-Acc/Conf/Hold/Immob/Sleep/Stun/Fear/EndRdx(33), SprAscoft-Rchg/+Dmg%(33), SprAscoft-Acc/Conf/Hold/Immob/Sleep/Stun/Fear/EndRdx/Rchg(34)
Level 22: Tough -- StdPrt-ResDam/Def+(A), GldArm-3defTpProc(34)
Level 24: Weave -- LucoftheG-Def/Rchg+(A), LucoftheG-Def/EndRdx(36), LucoftheG-Def(36)
Level 26: Shadow Field -- BslGaz-Acc/Hold(A), BslGaz-Acc/Rchg(36), BslGaz-Rchg/Hold(37), BslGaz-EndRdx/Rchg/Hold(37)
Level 28: Super Speed -- BlsoftheZ-ResKB(A)
Level 30: Haunt -- ExpRnf-Acc/Rchg(A), ExpRnf-Acc/Dmg(39), ExpRnf-+Res(Pets)(39), ExpRnf-Dmg/EndRdx(39), ExpRnf-Acc/Dmg/Rchg(40), ExpRnf-EndRdx/Dmg/Rchg(40)
Level 32: Umbra Beast -- ExpRnf-Acc/Dmg(A), ExpRnf-EndRdx/Dmg/Rchg(43), ExpRnf-Dmg/EndRdx(45), ExpRnf-Acc/Dmg/Rchg(50)
Level 35: Blazing Bolt -- StnoftheM-Dmg/ActRdx/Rchg(A), StnoftheM-Acc/Dmg(40), StnoftheM-Dmg/EndRdx(42), StnoftheM-Dam%(42), StnoftheM-Dmg/EndRdx/Rchg(42)
Level 38: Blaze -- Apc-Dam%(A), Apc-Dmg/Rchg(43), Apc-Acc/Dmg/Rchg(43), Apc-Dmg/EndRdx(45), Apc-Acc/Rchg(45)
Level 41: Sleet -- RechRdx-I(A), RechRdx-I(46)
Level 44: Frozen Armor -- LucoftheG-Def/Rchg+(A), LucoftheG-Def/EndRdx(46), LucoftheG-Def(46)
Level 47: Ice Storm -- Rgn-Dmg(A), Rgn-Dmg/Rchg(48), Rgn-Acc/Dmg/Rchg(48), Rgn-Acc/Rchg(48), Rgn-Dmg/EndRdx(50)
Level 49: Maneuvers -- LucoftheG-Def/Rchg+(A), LucoftheG-Def(50)
Level 1: Brawl -- Empty(A)
Level 1: Domination
Level 1: Prestige Power Dash -- Empty(A)
Level 1: Prestige Power Slide -- Empty(A)
Level 1: Prestige Power Quick -- Empty(A)
Level 1: Prestige Power Rush -- Empty(A)
Level 1: Prestige Power Surge -- Empty(A)
Level 1: Sprint -- Clr-Stlth(A)
Level 2: Rest -- Empty(A)
Level 4: Ninja Run
Level 2: Swift -- Empty(A)
Level 2: Health -- Mrc-Rcvry+(A), Pnc-Heal/+End(7)
Level 2: Hurdle -- Empty(A)
Level 2: Stamina -- EndMod-I(A), PrfShf-End%(7)
Level 1: Quick Form
Level 50: Intuition Radial Paragon
------------
------------
Set Bonus Totals:- 23% DamageBuff(Smashing)
- 23% DamageBuff(Lethal)
- 23% DamageBuff(Fire)
- 23% DamageBuff(Cold)
- 23% DamageBuff(Energy)
- 23% DamageBuff(Negative)
- 23% DamageBuff(Toxic)
- 23% DamageBuff(Psionic)
- 12.25% Defense(Smashing)
- 12.25% Defense(Lethal)
- 6% Defense(Fire)
- 6% Defense(Cold)
- 24.13% Defense(Energy)
- 24.13% Defense(Negative)
- 6% Defense(Psionic)
- 9.13% Defense(Melee)
- 31.94% Defense(Ranged)
- 6% Defense(AoE)
- 4.5% Max End
- 4% Enhancement(Stunned)
- 8% Enhancement(Confused)
- 8% Enhancement(Sleep)
- 11% Enhancement(Immobilized)
- 117.5% Enhancement(RechargeTime)
- 4% Enhancement(Held)
- 4.4% Enhancement(Terrorized)
- 39% Enhancement(Accuracy)
- 7.5% SpeedFlying
- 80.12 HP (7.88%) HitPoints
- 7.5% JumpHeight
- 7.5% SpeedJumping
- Knockback (Mag -4)
- Knockup (Mag -4)
- MezResist(Confused) 27.5%
- MezResist(Held) 27.5%
- MezResist(Immobilized) 27.5%
- MezResist(Sleep) 27.5%
- MezResist(Stunned) 27.5%
- MezResist(Terrorized) 27.5%
- MezResist(Teleport) 100% (20% chance)
- 12% (0.2 End/sec) Recovery
- 78% (3.31 HP/sec) Regeneration
- 10% Resistance(Smashing)
- 10% Resistance(Lethal)
- 17.5% Resistance(Fire)
- 17.5% Resistance(Cold)
- 19% Resistance(Energy)
- 19% Resistance(Negative)
- 10% Resistance(Toxic)
- 10% Resistance(Psionic)
- 7.5% SpeedRunning
| Copy & Paste this data into Mids' Reborn : Hero Designer to view the build |
		|-------------------------------------------------------------------|
		|MxDz;1487;671;1342;HEX;|
		|78DA65945B4F13511485CF74A69472B1209772871610045B5A405F8D0131222428A|
		|F6A9DC0042662DBB443A28FFE03353178897FC167AFBF41A37879F0CDEB8B82B7A8|
		|093AEECE5AB44D3A49F375F6DA6B9F337B9F99F98BD375778F5D3EACB4D0D49A99C|
		|FA7A63317ECB4E96472D5F3EB8EE9D899B4AEE40AC82F5AD4525399B493CBACC5A7|
		|CDDCF9B42536067A4B2947F279737DCD89CFD856EED2EE9DAA59C8886D316B59CB7|
		|5DEDF39CBCCDAE9957AEF66C65E5975E42EB42B2D5BB9FCAA9DED389AB597E2C797|
		|ACD4BC99770AF58AEBB4C9C686E4B71356BC5C5D6DFA94EA0E28DF6BF22568BC007|
		|FFA8AB94ADD112403EAAFF835FAB5EB1AF2AF689E16B90A0E5C037F895F47AE5FD7|
		|FD5EACDA20FD604D151900EBAAC17FB28E9F5EFF691FB433E09EB3E439B021459AA|
		|01BC6200ADEC05B3CCBDE77E47BB0F903F9116CFD04FE1604E135821B85A6897603|
		|6CBB49DE023B6E835159ACD66B8AABD58EA24F1D64AB68F5D0547D0BFAA2492CC41|
		|E86160A2726A0BA4E92A7C09E45F08FECA711B95A236BF6904A86DA84DAFEA67B3A|
		|B4FB60DF03F221F9188C3C0275B1B770CF2D61CC31320ECD102D0CCD17E69EFB1BC|
		|866D0276BB7F319DA798EFA796E06788E065E312EF53A798E3ADF60469AF8BB39A3|
		|EE2DC4F66D933FC8AFE0D037F23BA88BB7976BF7D23342ED003D497A760451CE33F|
		|A0C7D1B7A02EE7F4A6E92CF79C6C53348CF6092F563649CEB24C831B04D8634CC39|
		|0D733E31B253B451F67394FD8CB19F31F6B34B72E25C333E8E9A6313E4247990CF7|
		|6086C94BE2638C304EB2677EB1965EFAE2B978A9622EE48859AA888242B22131591|
		|C98AC85C7924887D2E18C56F86D2BCAC6043F1CBE07EAE11552B57B74A114D9BD5B|
		|C77AC2A82B3F9A5227BBB3CBB0F1DAFDAC0CA27464ACF6CC85721893CF73FD1B8F2|
		|E8|
		|-------------------------------------------------------------------|
-
It's all tradeoffs.
Originally I had FF slotted in both Call Hawk and Feral Charge. From my playing time, I noticed that Call hawk was procing FF much more reliably for me so I switched to another damage proc in Feral Charge. Feral Charge only has a 5 target limit and a smallish AOE so you're not going to trigger a low PPM proc that well. From personal experimentation, it appears that the the initial target of feral charge doesn't take account the area factor but the AOE portion does take it into account hence why less procs occur on the AOE portion. I didn't say that FF doesn't proc in that power. It just doesn't proc enough for me to give up a slot to something more reliable and slots are very tight in the build.
As far as not slotting Creepers, again it's tradeoffs. For my playstyle, I would rather focus procs on powers I use all the time rather than on something I pop out occasionally. I have creepers six slotted on my Plant/Fire but on this build I preferred to focus on the Savage powers. When you have a whole secondary dedicated to damage, I don't see it as a major loss. Everyone's build should be tailored to his or her playstyle so you do you.
-
1 hour ago, oedipus_tex said:
This is an excellent build and advice. Thanks for sharing.
One question/note. Do you feel like you're missing out on damage by not taking Gaussian's Chance for Build Up in Spot Prey? Savage Assault is one of the few Assault sets that can slot it.
I think the build up buff is a "nice to have" type of thing rather than essential since the buff only last 5 seconds and savage powers cast a bit on slowish side. With that said, I may rearrange some slots to fit it a future build. It's all tradeoffs.
-
Overview
This guide is not meant to be and end-all-be-all guide to plant/savage builds but it should give you an idea of what's possible. I whole-heartedly believe that people should try out every power in the primary and secondary to see what powers you like and don't like and work your build around that. With this build, the goals were to 1) softcap smash/lethal/range defense, 2) perma-dom, 3) squeeze as much damage and recharge after the first two goals were met. At the end is a mini-guide for Savage Assault.
End Game Build
- Smash/lethal defense at 44.96 (close enough), ranged defense capped
- Boosted +5 IOs in the following powers: Call Swarm, Unkindness, Hasten, Combat Jumping, Weave, Frozen Armor, Maneuvers, Sleet, Spot Prey. You're not giving up any game-changing set bonuses by not attuning the IOs in these powers. All the IO's are set to +5 in Mids for simplicity.
- Comfortable perma-dom doesn't occur until 40's but the build exemps fairly well since you have all your attacks. Call Hawk slotted with force-feedback can help get perma-dom earlier if engaged in combat.
- Several powers may have been sub-optimally slotted to chase certain set bonuses or because of a lack of slots
- I took most of the attacks to maximize the blood frenzy system and to make the low level exemplar attack chain tolerable.
- Ice APP for Sleet which is one of the best debuffs in the game. It gives the build versatility since you can CC, DPS and debuff.
-
Incarnates (What I like):
- Alpha: Intuition Radial - Improves damage, range, defense debuffs, slows, and hold duration
- Destiny: Ageless - recharge buff and end refill/discount which can help supercharge random PUGS with lots of lowbies. Rebirth, Barrier, and Incandescent are situationally good as well.
- Interface: Degenerative, Reactive
- Hybrid: Melee Core for Status protection before you get domination going. Assault Radial for moar damage.
SpoilerVillain Plan by Mids' Reborn : Hero Designer 2.6.0.7
https://github.com/ImaginaryDevelopment/imaginary-hero-designerClick this DataLink to open the build!
Level 50 Mutation Dominator
Primary Power Set: Plant Control
Secondary Power Set: Savage Assault
Power Pool: Leaping
Power Pool: Leadership
Power Pool: Speed
Power Pool: Fighting
Ancillary Pool: Ice MasteryVillain Profile:
Level 1: Strangler -- BslGaz-Acc/Hold(A), BslGaz-Acc/Rchg(3), BslGaz-Rchg/Hold(3), BslGaz-EndRdx/Rchg/Hold(5)
Level 1: Call Swarm -- Thn-Acc/Dmg(A), Thn-Acc/Dmg/Rchg(5), Thn-Acc/Dmg/EndRdx(7), Thn-Dmg/EndRdx/Rchg(7), Thn-Dmg/EndRdx(9), Thn-Dmg/Rchg(9)
Level 2: Roots -- SprAscoft-Acc/Conf/Hold/Immob/Sleep/Stun/Fear(A), SprAscoft-Conf/Hold/Immob/Sleep/Stun/Fear/Rchg(11), SprAscoft-Rchg/+Dmg%(11), SprAscoft-EndRdx/Rchg(13), SprAscoft-Acc/Conf/Hold/Immob/Sleep/Stun/Fear/EndRdx(13), SprAscoft-Acc/Conf/Hold/Immob/Sleep/Stun/Fear/EndRdx/Rchg(15)
Level 4: Vicious Slash -- KntCmb-Acc/Dmg(A), KntCmb-Dmg/EndRdx(17), KntCmb-Dmg/Rchg(19), KntCmb-Dmg/EndRdx/Rchg(19)
Level 6: Combat Jumping -- LucoftheG-Def/Rchg+(A)
Level 8: Seeds of Confusion -- CrcPrs-Conf(A), CrcPrs-Conf/Rchg(21), CrcPrs-Acc/Conf/Rchg(21), CrcPrs-Conf%(23), CrcPrs-Acc/Rchg(23), CrcPrs-Conf/EndRdx(25)
Level 10: Unkindness -- Rgn-Dmg(A), AchHee-ResDeb%(25), PstBls-Acc/Dmg/EndRdx(27), Ann-ResDeb%(27)
Level 12: Maneuvers -- LucoftheG-Def/Rchg+(A), LucoftheG-Def(29)
Level 14: Super Speed -- BlsoftheZ-ResKB(A), BlsoftheZ-Travel/EndRdx(29)
Level 16: Hasten -- RechRdx-I(A), RechRdx-I(31)
Level 18: Boxing -- Empty(A)
Level 20: Rending Flurry -- Arm-Dmg(A), Arm-Dmg/Rchg(31), Arm-Acc/Dmg/Rchg(31), Arm-Acc/Rchg(33), Arm-Dmg/EndRdx(33)
Level 22: Vines -- BslGaz-Acc/Hold(A), BslGaz-Acc/Rchg(33), BslGaz-Rchg/Hold(34), BslGaz-EndRdx/Rchg/Hold(34)
Level 24: Tough -- GldArm-3defTpProc(A), StdPrt-ResDam/Def+(34)
Level 26: Carrion Creepers -- ExpStr-Dam%(A), ExpStr-Dmg/KB(36), ExpStr-Acc/KB(36), Bmbdmt-+FireDmg(36), JvlVll-Dam%(37), PstBls-Dam%(46)
Level 28: Weave -- LucoftheG-Def/Rchg+(A), LucoftheG-Def(37), LucoftheG-Def/EndRdx(37)
Level 30: Spot Prey -- GssSynFr--Build%(A)
Level 32: Fly Trap -- ExpRnf-Acc/Rchg(A), ExpRnf-Acc/Dmg(39), ExpRnf-Dmg/EndRdx(39), ExpRnf-Acc/Dmg/Rchg(39), ExpRnf-EndRdx/Dmg/Rchg(40), ExpRnf-+Res(Pets)(40)
Level 35: Call Hawk -- Apc-Dmg(A), Apc-Dam%(40), Thn-Acc/Dmg/EndRdx(42), CldSns-%Dam(42), FrcFdb-Rechg%(42)
Level 38: Feral Charge -- Hct-Dmg(A), Hct-Dam%(43), TchofDth-Dam%(43), ExpStr-Dam%(43), GldStr-%Dam(45), CrsImp-Acc/Dmg/EndRdx(45)
Level 41: Sleet -- RechRdx-I(A), RechRdx-I(45)
Level 44: Frozen Armor -- LucoftheG-Def/Rchg+(A), LucoftheG-Def(46), LucoftheG-Def/EndRdx(46)
Level 47: Ice Storm -- Artl-Acc/Dam(A), Artl-Dam/End(48), Artl-Dam/Rech(48), Artl-Acc/Dam/Rech(48), Artl-Acc/Rech/Rng(50), Artl-End/Rech/Rng(50)
Level 49: Tactics -- RctRtc-Pcptn(A), RctRtc-ToHit(50)
Level 1: Brawl -- Empty(A)
Level 1: Domination
Level 1: Quick Form
Level 1: Prestige Power Dash -- Empty(A)
Level 1: Prestige Power Slide -- Empty(A)
Level 1: Prestige Power Quick -- Empty(A)
Level 1: Prestige Power Rush -- Empty(A)
Level 1: Prestige Power Surge -- Empty(A)
Level 1: Sprint -- Clr-Stlth(A)
Level 2: Rest -- Empty(A)
Level 4: Ninja Run
Level 2: Swift -- Run-I(A)
Level 2: Health -- Pnc-Heal/+End(A), Mrc-Rcvry+(15)
Level 2: Hurdle -- Jump-I(A)
Level 2: Stamina -- PrfShf-End%(A), PrfShf-EndMod(17)
Level 1: Blood Frenzy
Level 50: Intuition Radial Paragon
------------
------------
Set Bonus Totals:- 14.5% DamageBuff(Smashing)
- 14.5% DamageBuff(Lethal)
- 14.5% DamageBuff(Fire)
- 14.5% DamageBuff(Cold)
- 14.5% DamageBuff(Energy)
- 14.5% DamageBuff(Negative)
- 14.5% DamageBuff(Toxic)
- 14.5% DamageBuff(Psionic)
- 11.63% Defense(Smashing)
- 11.63% Defense(Lethal)
- 6% Defense(Fire)
- 6% Defense(Cold)
- 26.31% Defense(Energy)
- 26.31% Defense(Negative)
- 6% Defense(Psionic)
- 8.81% Defense(Melee)
- 32.56% Defense(Ranged)
- 6% Defense(AoE)
- 4% Enhancement(Stunned)
- 4% Enhancement(Held)
- 4.4% Enhancement(Terrorized)
- 8% Enhancement(Sleep)
- 8% Enhancement(Immobilized)
- 81.25% Enhancement(RechargeTime)
- 46% Enhancement(Accuracy)
- 8% Enhancement(Confused)
- 13.5% SpeedFlying
- 38.15 HP (3.75%) HitPoints
- 13.5% JumpHeight
- 13.5% SpeedJumping
- Knockback (Mag -4)
- Knockup (Mag -4)
- MezResist(Confused) 15%
- MezResist(Held) 15%
- MezResist(Immobilized) 15%
- MezResist(Sleep) 15%
- MezResist(Stunned) 15%
- MezResist(Terrorized) 15%
- MezResist(Teleport) 100% (20% chance)
- 20% PerceptionRadius
- 18% (0.3 End/sec) Recovery
- 66% (2.8 HP/sec) Regeneration
- 10% Resistance(Smashing)
- 10% Resistance(Lethal)
- 17.5% Resistance(Fire)
- 17.5% Resistance(Cold)
- 11.5% Resistance(Energy)
- 11.5% Resistance(Negative)
- 10% Resistance(Toxic)
- 10% Resistance(Psionic)
- 13.5% SpeedRunning
| Copy & Paste this data into Mids' Reborn : Hero Designer to view the build |
		|-------------------------------------------------------------------|
		|MxDz;1499;709;1418;HEX;|
		|78DA6594396F134114C767BCEB249B03DB38779CC3CEE1DBC481824B42282181102|
		|3435AC0AC925562C9D896BD81A4A4E00BD050A0707534B484ABE03B7014D0430309|
		|47095A9EE7FD6347F2CAD66FE7DDEFCDCC6636E73A9F2FDC3923A467B66056ABB9B|
		|9D2CD7CD1B44B95B6CC866DDAF9525113F4B4D27FB4AECBCD968A76A55448650B66|
		|D1DE5F8D35F467AB5573A360A796CD5BE69AB5BF149DD912392D5966395F5CF3EC2|
		|F56AD4A753D5F6E57EBE5B265AD76A9D7F9FCDABA4D8683E7CAF995D485152B9731|
		|ABB655D96A14D94F6545E8BFA08AAC3D8E26DEBB84183684EB03F891A97F62FE8DD|
		|66DDD629B9026DD6366CB13F029B3ED21F888799EF248F8CA1D4DC9DA5F826F999D|
		|AFC0D7CC436F98222684861AB52C216408EF65E6E12BE032B397E6ED56891CE1EE9|
		|1CA7F51E36DA8E56EBDEA52B2EE6BE07566AF09E698FD379892721BC86DCC40F78E|
		|E837C4E00BEE6DF02BD7E9A3241D9C5B762077A09B394EBA2E8E23BBBE709CC0676|
		|688741EF879E21C730494A4F3B19FF039F4081755E46789EE3FCE11464E80279963|
		|A7C0D3CC252AB0075DF46097C7B0CB41EC7210BBAC51C63E54DA37C39D05FBA4D26|
		|5683980490E6CF114C66F839BA0CB4D3EBA9808698AC91DA1A853DC21EED23584E9|
		|4C603A135EA646BD0DA3DBE16714AFDB109728CC28728EEEBA54ACA93DF027F88B1|
		|9FE0DFE61FEA3131B52E7CED143099E4538CD8CE2C446BF71DFD1BB2C77C86712F9|
		|26A758168B8339128789E83D11E1F924563956BF8F6F556D7611EC60021C225D1CF|
		|DC7D17F12FD27D17F806C52C89DD2DC4A764407DD600B33DD0AB631FD34DF69E49E|
		|DEAED5A78BF4036640AFDF5CFAD54E51A821712EC61AEFB126CBE92649BA4972B44|
		|972AC49B25493E0660A83E799D5EB5F05219595E1ADDF75E77B3B69E121933CC5DD|
		|864CCA20BE138B52EDCA8F83F611B6DF3B687F9FB37AEF31AD70BD2247A7239FC6F|
		|B7F7034E873|
		|-------------------------------------------------------------------|
Cheapish Level-up Build Example
Focus on recharge to get perma-dom. Then figure out what you like and don't like for the final build.
SpoilerVillain Plan by Mids' Reborn : Hero Designer 2.6.0.7
https://github.com/ImaginaryDevelopment/imaginary-hero-designerClick this DataLink to open the build!
Level 50 Mutation Dominator
Primary Power Set: Plant Control
Secondary Power Set: Savage Assault
Power Pool: Leaping
Power Pool: Speed
Power Pool: Leadership
Ancillary Pool: Ice MasteryVillain Profile:
Level 1: Strangler -- BslGaz-Acc/Hold(A), BslGaz-Acc/Rchg(3), BslGaz-Rchg/Hold(3), BslGaz-EndRdx/Rchg/Hold(5)
Level 1: Call Swarm -- Dcm-Acc/Dmg(A), Dcm-Dmg/EndRdx(29), Dcm-Dmg/Rchg(31), Dcm-Acc/EndRdx/Rchg(31), Dcm-Acc/Dmg/Rchg(45)
Level 2: Maiming Slash -- CrsImp-Acc/Dmg(A), CrsImp-Dmg/EndRdx(5), CrsImp-Dmg/Rchg(7), CrsImp-Acc/Dmg/Rchg(7), CrsImp-Acc/Dmg/EndRdx(15)
Level 4: Vicious Slash -- CrsImp-Acc/Dmg(A), CrsImp-Dmg/EndRdx(11), CrsImp-Dmg/Rchg(11), CrsImp-Acc/Dmg/Rchg(13), CrsImp-Acc/Dmg/EndRdx(13)
Level 6: Roots -- AscoftheD-Acc/Conf/Hold/Immob/Sleep/Stun/Fear(A), AscoftheD-Conf/Hold/Immob/Sleep/Stun/Fear/Rchg(15), AscoftheD-Rchg/+Dmg%(17), AscoftheD-EndRdx/Rchg(17), AscoftheD-Acc/Conf/Hold/Immob/Sleep/Stun/Fear/EndRdx(19), AscoftheD-Acc/Conf/Hold/Immob/Sleep/Stun/Fear/EndRdx/Rchg(19)
Level 8: Seeds of Confusion -- MlsIll-Acc/Rchg(A), MlsIll-Dam%(21), MlsIll-EndRdx/Conf(21), MlsIll-Acc/Conf/Rchg(23), MlsIll-Acc/EndRdx(23), MlsIll-Conf/Rng(25)
Level 10: Unkindness -- PstBls-Acc/Dmg(A), PstBls-Dam%(25), PstBls-Acc/Dmg/EndRdx(27), PstBls-Dmg/EndRdx(27), PstBls-Dmg/Rng(29)
Level 12: Combat Jumping -- LucoftheG-Def/Rchg+(A)
Level 14: Super Speed -- BlsoftheZ-ResKB(A)
Level 16: Hasten -- RechRdx-I(A), RechRdx-I(33), RechRdx-I(40)
Level 18: Maneuvers -- LucoftheG-Def/Rchg+(A)
Level 20: Rending Flurry -- Obl-Dmg(A), Obl-Acc/Rchg(33), Obl-Dmg/Rchg(33), Obl-Acc/Dmg/Rchg(34), Obl-Acc/Dmg/EndRdx/Rchg(34), Obl-%Dam(50)
Level 22: Vines -- BslGaz-Acc/Hold(A), BslGaz-Acc/Rchg(34), BslGaz-Rchg/Hold(36), BslGaz-EndRdx/Rchg/Hold(36)
Level 24: Assault -- EndRdx-I(A)
Level 26: Carrion Creepers -- PstBls-Acc/Dmg(A), PstBls-Dam%(36), Bmbdmt-+FireDmg(37), Ann-ResDeb%(37), RechRdx-I(37)
Level 28: Blood Craze -- Heal-I(A), Heal-I(31), RechRdx-I(40), RechRdx-I(50)
Level 30: Spot Prey -- RechRdx-I(A), RechRdx-I(39)
Level 32: Fly Trap -- ExpRnf-Acc/Rchg(A), ExpRnf-Acc/Dmg(39), ExpRnf-Dmg/EndRdx(39), ExpRnf-Acc/Dmg/Rchg(40)
Level 35: Call Hawk -- Dcm-Acc/Dmg(A), Dcm-Dmg/EndRdx(42), Dcm-Dmg/Rchg(42), Dcm-Acc/Dmg/Rchg(42), Dcm-Acc/EndRdx/Rchg(43)
Level 38: Feral Charge -- CrsImp-Acc/Dmg(A), CrsImp-Dmg/EndRdx(43), CrsImp-Dmg/Rchg(43), CrsImp-Acc/Dmg/Rchg(45), CrsImp-Dmg/EndRdx/Rchg(45)
Level 41: Sleet -- RechRdx-I(A), RechRdx-I(46)
Level 44: Frozen Armor -- LucoftheG-Def/Rchg+(A), LucoftheG-Def(46), LucoftheG-Def/EndRdx(46)
Level 47: Ice Storm -- Bmbdmt-Dam(A), Bmbdmt-Acc/Rech/End(48), Bmbdmt-Dam/Rech(48), Bmbdmt-Acc/Dam/Rech(48), Bmbdmt-Acc/Dam/Rech/End(50)
Level 49: Vengeance -- LucoftheG-Def/Rchg+(A)
Level 1: Brawl -- Empty(A)
Level 1: Domination
Level 1: Quick Form
Level 1: Prestige Power Dash -- Empty(A)
Level 1: Prestige Power Slide -- Empty(A)
Level 1: Prestige Power Quick -- Empty(A)
Level 1: Prestige Power Rush -- Empty(A)
Level 1: Prestige Power Surge -- Empty(A)
Level 1: Sprint -- Clr-Stlth(A)
Level 2: Rest -- Empty(A)
Level 4: Ninja Run
Level 2: Swift -- Run-I(A)
Level 2: Health -- Pnc-Heal/+End(A), Mrc-Rcvry+(9)
Level 2: Hurdle -- Jump-I(A)
Level 2: Stamina -- PrfShf-End%(A), PrfShf-EndMod(9)
Level 1: Blood Frenzy
Level 50: Intuition Radial Paragon
------------
------------
Set Bonus Totals:- 11% DamageBuff(Smashing)
- 11% DamageBuff(Lethal)
- 11% DamageBuff(Fire)
- 11% DamageBuff(Cold)
- 11% DamageBuff(Energy)
- 11% DamageBuff(Negative)
- 11% DamageBuff(Toxic)
- 11% DamageBuff(Psionic)
- 1.88% Defense(Smashing)
- 1.88% Defense(Lethal)
- 8.13% Defense(Energy)
- 8.13% Defense(Negative)
- 3.75% Defense(Melee)
- 8.75% Defense(Ranged)
- 4.5% Max End
- 3% Enhancement(Stunned)
- 3% Enhancement(Held)
- 5.5% Enhancement(Confused)
- 6% Enhancement(Sleep)
- 55% Enhancement(Accuracy)
- 3.3% Enhancement(Terrorized)
- 6% Enhancement(Immobilized)
- 5% Enhancement(Range)
- 110% Enhancement(RechargeTime)
- 7.5% SpeedFlying
- 57.23 HP (5.63%) HitPoints
- 7.5% JumpHeight
- 7.5% SpeedJumping
- Knockback (Mag -4)
- Knockup (Mag -4)
- MezResist(Confused) 26.25%
- MezResist(Held) 26.25%
- MezResist(Immobilized) 26.25%
- MezResist(Sleep) 26.25%
- MezResist(Stunned) 26.25%
- MezResist(Terrorized) 26.25%
- 11.5% (0.19 End/sec) Recovery
- 10% (0.42 HP/sec) Regeneration
- 9% Resistance(Smashing)
- 9% Resistance(Lethal)
- 2.25% Resistance(Fire)
- 2.25% Resistance(Cold)
- 4.5% Resistance(Energy)
- 4.5% Resistance(Negative)
- 7.5% SpeedRunning
| Copy & Paste this data into Mids' Reborn : Hero Designer to view the build |
		|-------------------------------------------------------------------|
		|MxDz;1501;680;1360;HEX;|
		|78DA6594C952135114866F0F11121243083361C80019804897EE2D0B14C584A28A0|
		|7084DD2055D15D331DD58BAF415DCE0F00E6EB4D40771D8B877A5204E0B21ED499F|
		|9F0E56BA92FA72CF3DFFB9E7DEFB77CA0FD7C22FD71F5F175274B5AEDB7665CDBA6|
		|73674C76AF5970F1CDD31AD8622E8E9A3EFAC3F5759B51A4ECBAA17B7EA7AC3391F|
		|CD75E76FD8B67E50778ADBFA037DCF381F8AF09645A292A137CDC65EC81B6C370DA|
		|3163D8FD78C96BD6F3623DEF896B9B7EF50E2E4CDA6592DDEA91A95B26E3B46EB51|
		|B7C9716A2B47DF75AFC9CEE32AE2BD2CC4B42AE40FE047A6FA89799AF773557148C|
		|8AA22F19439F30C7CCE5C7AC16C93468246DA21A4A89ECEBCB40B5699976B4C5110|
		|4281468126044D089A303461686E9320C09A40A049038DEADD670E1E802DE6900D3|
		|ACC0D85AFA9A3ED3B91BCD8F01FF00773F437F89339FE8B2951AF41F41A7C2578EE|
		|1D73F22DF89A9978C31CA5C506BC4371C5C008D749532CC27544E4B3ECC552148B7|
		|29E1C5D64ED1C980563941343AD186AC9D4531CFB89FFE55A73A7E01933D9065DA6|
		|26F82C4A8411F861047E48C20F69F8210D3F0CD1DA63E8792CC9FD94493F81F398C|
		|079A4711E1939C0FCC26B65B00795FA9DC29A53198ECD64FEDFA7062A943BCDB9D2|
		|74271657C502B84965675167F688F7B5700C7E67664F9867E4CB94E74C574DC1CB7|
		|978390F2FE7E1E1023CED92661E7B9BDFE17E0A3AB8CB5CAA8206BC10E3F7ACD36F|
		|0E7B5806A7686E11F7BB88BB5B1E06079909CA2962CDE299EAC5AEB44117147CAE9|
		|AC41CA67B59C1BDACA06E42F5DF5DFAD0E3BD6888B8770BDDDF859ECC959E88D613|
		|B9DA13B9D613297522F0AA08F23D6CA9FEFF8390BCACE0A0FFF6BB5F43340B85B4C|
		|CA776D48D4952929DD4BF217937F4ED627E8EF38F2FE61FF2AAFD4F9846D6EFC855|
		|C9CA1A7EFF036141ECA9|
		|-------------------------------------------------------------------|
Slotting Rationale
This build sacrifices a bit of recharge and some sub-optimal slotting for procs and defense bonuses but it is worth the tradeoff for me. For your playstyle, you may opt to slot more sets with recharge bonuses instead or use some of the slots to fit in any of the other powerful unique IOs.
- Strangler: 1.25% ranged defense , 7.5% recharge
- Call Swarm: 3.75% ranged defense
-
Maiming slash: 3.75% smash/lethal defense , you may opt to boost rather than attune this set for optimal accuracy/damage - Vicious Slash: 3.75 Ranged defense
- Roots: 10% recharge, 5% ranged defense. This would optimally be slotted for damage but the +Damage IO fires often to even out the loss.
- Seeds of Confusion: 10% recharge , 5% ranged defense
- Unkindness: 2 IOs boosted to +5 to get accuracy and damage to decent level and 2 -res procs. Alt Slotting: 5 Positron's blast with another proc or Bombardment
- Super speed: 1.25 Ranged defense , knockback protection
- Rending Flurry: 10% Recharge
- Vines: 1.25% ranged defense, 7.5% recharge
- Carrion Creepers: 1.88% s/l defense, optimally this would be 6 slotted with all procs, or acc/dam/recharge IO and 5 procs
- Spot Prey: Gaussian chance for build up
- Fly Trap: 6.25% Recharge, 3.13% ranged defense
- Call Hawk: 2 IOs boosted to +5 to get accurage and damage to decent level, the rest procs to maximize burst damage. Force feedback proc can be slotted here. Alt Slotting: 5 Apocalypse with proc and another proc.
- Feral Charge: 2 IOs boosted to +5 to get accurage and damage to decent level, the rest procs to maximize burst damage. Force Feedback proc can be slotted here as well. The splash damage from this power also procs but at a lower rate than the main target. Alt Slotting: 5 Hecatomb with proc.
- Sleet: +5 boosted level 50 recharge to get power to recharge as quickly as possible
- Ice Storm: 4% ranged defense
- Tactics: 1.88% S/L defense
Savage Assault mini guide
-
Blood Frenzy System
- Each attack either builds or consumes blood frenzy stacks
- 5 stacks maximum
- Each stack provides 4% recharge bonus discount and 5.65% endurance discount
- Rending Flurry (PBAOE) and Call Hawk (Ranged) consume all blood frenzy stacks
- Rending Flurry AOE improves from 8ft to around 15ft range at max stacks and has damage boost. Call Hawk has very modest damage boost
- If you consume 5 stacks all at once, you become "Exhausted" where you can't gain more stacks for 10 seconds.
-
Feral Charge
- Slotted as single target melee even though it does PBAOE damage with a 5 target limit.
- Teleports to target
- Builds 1 blood stack and increases damage for every 20 ft away from the enemy. Max 3 blood stacks and 3x damage bonus. It's best to initially use this power at max range
- The initial target procs at a rate for a single target attack whereas the aoe damage portion procs at the rate for AOE damage.
-
Attack Chains
- Ranged single target: Call Hawk, Unkindness, Call Swarm
-
Melee single targe: Call Hawk, Feral Charge (Ideally from max range), Vicious Slash,
Maiming Slash (if chain has gaps) -
Single target non stack consuming: Feral Charge, Vicious Slash,
Maiming Slash, Call Swarm -
1,2,3 AOE chain:
- Unkindness (then walk/jump/fly backwards during animation since you are not rooted) for +2 blood stacks
- Feral Charge at max range for +3 blood stacks. If you don't have 5 stacks yet, use some other attacks until you get 5
- Rending Flurry to consume stacks which gives you a larger AOE with more damage.
-
3
-
The last major patch on March 31 nerfed fade so you can’t powerboost it anymore. The patch also slightly nerfed twilight grasp and tar patch. The power set is still good nonetheless.
-
This suggestion may be off the wall but what about TK being a toggle anchor that pulls mobs to that location within a certain radius and holds them. That would give the a power different flavor from anything else in the game. The radius can be medium to smallish side for balance purposes. It would be sort of a reverse repel.
-
2
-
-
I just added a couple of vids to the Fire/Earth thread if you want to see how that plays. I can see Dark/ being safer to pair with Earth. I haven't tried Energy Assault after the changes so it might be my next project.
-
So I added a couple of videos in the OP showing a bit how this plays. Many times I don't use immobilize in order to let anything missed with flashfire to run into the bonfire at my feet.
I was monitoring my work chat at the same time so I had a few misclicks but you'll get the idea.
-
I'm still not convinced that spirit tree is worth taking but to each his own. I didn't really think about proccing out seeds because the purple confuse set has great set bonuses but I guess it all depends on the overall build to see if it's worth the tradeoff.
Anyways, I reconfigured the build slightly with changing the slotting in Weave, sleet, and combat jumping. I reslotted Weave with 3 Lotg and six slotted Sleet with Artillery IOs since they give a higher ranged defense bonus. This allowed me to save slot which I used to change the defense IO in Combat Jumping to the Scaling Resist IO.
-
1
-
-
15 hours ago, Dr Causality said:
I have a sense that Plant/Earth will have roughly similar damage from a proc-ed out Carrion Creepers, but more control from Seeds, with 'Tree of Life' being enough Regen to be a near heal. So overall would be safer, with similar damage and maybe faster clear times from the Confuse. But this is just theory from time played on both Plant and Fire Control, a lot which was back on live. But I've never tried Earth Assault...
Has anyone played both Fire/Earth and Plant/Earth kitted out at 50 to compare?
I’ve played a lot of Plant and a lot of Earth but never Plant/Earth together. I think it would be strong combo but won’t be as damaging as fire/earth. Here are my thoughts.
Minuses
- You lose the damage aura in hotfeet
- Imps do more damage then Fly Trap
- Using seeds as pseudo damage is less effective. Earth does a lot of knockdown. The ice powers do slows and knockdowns. The enemies are attacking each other significantly less than optimal.
Pluses- The build would be safer. Seeds is stupidly OP with a short recharge and long duration. Creepers are actually good soft control.
- You can slot the confuse Purple set in seeds which gives you 5% defense and 10% recharge. This gives more flexibility on slotting for defense bonuses.Hit or miss
- Procced out creepers are pretty decent but the creepers don’t move very quickly. They are good if you are soloing at a slower pace but they don’t keep up on any medium paced team.
- The regen is “ok” at best for spirit tree and it’s stationary so I don’t see that as a game changer. -
Like Cazden21 said, one of the main reasons to roll fire/earth is for the double damage auras as they greatly contribute to your damage and damage is the main reason for the build. You also don’t need to spam cages as they have a long duration and you only need to apply it once before you’ve killed everything. You can literally jump in to the middle of a level 50 group of minions on Peregine island, do fire cages and tremor, and everything is dead in less than 5 seconds.
I’ve also extensively played Fire/Ice which also has double damage auras but the procability of earth made it a little stronger in my opinion.
In response to MBRE2006, the build was min/maxed with incarnates in mind. Yes the end usage is horrible but you have endless endurance via Ageless and perms-Domination. Without incarnates, the build would be made differently focusing on end reduction/recovery . You can always do a second build if you want to min/max pre level 50. I loved playing this character so I wanted to take it the furthest I could. Also the build was made through countless hours of playing and tweaking and not just on a spreadsheet. Min/maxing is meaningless if it doesn’t work well in practice.
As far as playing lower level content it’s not as horrible as you think. You just selectively turn off various toggles and be mindful of your blue bar. You can always use Recovery Serums from P2W, base buffs, blue insps, etc. I played the Posi 1 TF (level 15) last night and I thought the build did pretty well. The only expensive toggle was hot feet and I was not constantly gasping for end. I was actually able to have permadom at level 15 thanks to the force feedback proc-ing frequently.
-
Since I love this game, I want to contribute back to the community. I've only seen 1 maybe 2 other Fire/Earth builds the whole time playing on Everlasting so I thought I would share my build with everyone as I believe this combo is vastly underrated. I've gotten compliments about my build being a "beast" and "tanktroller" so I hope others can get the same enjoyment as I have and inspire others to take their toons to the next level. Fire/Earth/Ice is easily the most damaging dominator I've played. The build also has good survivability and underrated crowd control. From the 150+ hours playing Fire/Earth, lots of respecs, and experimenting with beta test server builds, I've finally settled on a min/max build I'm happy with.
Build Philosphy
- I try to address 3 main weaknesses of dominators with this build : squishiness (no inherit defense with low HP), endurance issues, and middling AOE damage.
- Living in melee range means softcapping defense is vital. You can't control everything and damage will coming from all directions especially in late game content. Using a defense base shield is superior to a resistance based one. Since you can't heal and have low HP, not getting hit is better than receiving numerous lower damage hits you can't heal automatically. Softcapping means you can often jump into the middle spawns with minimal crowd control and start to do damage immediately. Softcapping allows you to do things like to brush off the onslaught of swords during the last mission of Tinmage while other squishies are running for their lives.
- In my opinion, the Ice Mastery pool is a tier above all other epic pools for dominators. Sleet alone makes it the overall best. Add in a defense shield, AOE damage, and +HP power gives you an excellent pool.
- Shooting for recharge bonuses is no longer the ultimate goal like it was on Live. With Homecoming, the new IO sets, proc changes, and IO availabilty (remember 2 billion inf glad armor IOs on Live) allow us a lot more flexibility on min/maxing. The release of new IO sets in the latest patch greatly opened up the options to soft cap ranged defense which in turn allowed me to squeeze in more damage.
- Procs greatly enhance your damage over what was previously possible - Your 2 MVP attacks are Seismic Smash and Tremor so use those as often as possible.
Build Pros
- High AOE damage with 2 damage auras, 2 AOE, and 1 PBAOE
- High single target damage: Sleet + PowerBuildup + Seismic Smash + two Purple procs = 1100+ damage on level 50 targets. Add in Interface incarnate procs and Hybrid alpha and damage goes higher. I've experimented with more procs in Seismic Smash but I like this slotting the best.
- Softcap Smash/Lethal/Ranged Defense - This is effectively softcapping against melee and ranged attacks
- Leverages lots of procs to take your damage higher and enhance recharge
- It can farm old school maps such as Council and Battle Maiden maps at +4/8 with bosses where you can control the spawns. However, it's not good on maps like AE ComicCon because of low damage resistance and lack of regen/healing. Roll a brute if you really want to farm.
Build Cons
- This is extremely late blooming but I think you will be rewarded for the dedication.
- Endurance issues aren't totally rectified until you get T4 Ageless Core Destiny power. You can get by using blues inspirations, turning off toggles, and buying Serums from the p2w vendor.
- Only has one ranged power (I consider Fissure melee-ish). I had Hurl Boulder for awhile but respecced out it once I found that you had to be on the ground to use it and I couldn't use it while flying around the Hamidon portion of the Lady Grey TF. I just use Nemesis Staff, Stone Spears, and char for ranged damage for the limited cases where I need it.
- This is a level 50 focused build. It's not the best at being exemplared but can still hold it's own with proper insp usage and selective toggle usage. But I think most doms are mediocre at best at lower levels
Notes
- The new Targeted AOE IO set "Artillery" grants 4 ranged defense when 6 slotted (1pt with 3 slots, 3 additional pts with 6 slots)
- About 10 seconds short of perma-hasten but force feedback procs and Ageless more than fill that void.
- No pets but you can swap out an AOE power for Fire Imps and slot it with Blood Mandate
Incarnates I used
- Alpha - T4 Intuition Radial (right side). Musculature is a good alternative
- Interface - T3 Reacitve Radial (right side) or T4 Degenerative Core (Left Side)
- Destiny - T4 Ageless Core (left side)
- Hybrid - T4 Assault Radial (Both sides are good though)
Build for Mids 2.6.0.7 - The missing slots are for the new Artillery IO's which provide a little over 12% of ranged defense total. Anything that is frankenslotted or seems to be underslotted has been boosted to +5.
SpoilerVillain Plan by Mids' Reborn : Hero Designer 2.6.0.7
https://github.com/ImaginaryDevelopment/imaginary-hero-designerClick this DataLink to open the build!
Level 50 Mutation Dominator
Primary Power Set: Fire Control
Secondary Power Set: Earth Assault
Power Pool: Speed
Power Pool: Leaping
Power Pool: Fighting
Power Pool: Leadership
Ancillary Pool: Ice MasteryVillain Profile:
Level 1: Char -- BslGaz-Acc/Hold(A), BslGaz-Acc/Rchg(3), BslGaz-Rchg/Hold(3), BslGaz-EndRdx/Rchg/Hold(5)
Level 1: Stone Spears -- Thn-Acc/Dmg(A), Thn-Dmg/EndRdx(5), Thn-Dmg/Rchg(7), Thn-Acc/Dmg/Rchg(7), Thn-Acc/Dmg/EndRdx(9), Thn-Dmg/EndRdx/Rchg(9)
Level 2: Stone Mallet -- KntCmb-Acc/Dmg(A), KntCmb-Dmg/EndRdx(11), KntCmb-Dmg/Rchg(11), KntCmb-Dmg/EndRdx/Rchg(13)
Level 4: Tremor -- Obl-Dmg(A), Obl-%Dam(15), Arm-Dam%(17), FrcFdb-Rechg%(17), FuroftheG-ResDeb%(19), ExpStr-Dam%(19)
Level 6: Fire Cages -- EnfOpr-Acc/EndRdx(A)
Level 8: Hot Feet -- Arm-Dmg/Rchg(A), Arm-Acc/Dmg/Rchg(21), Arm-Dmg/EndRdx(21), Arm-Dmg(23), Arm-Acc/Rchg(23)
Level 10: Super Speed -- BlsoftheZ-ResKB(A), BlsoftheZ-Travel/EndRdx(25)
Level 12: Flashfire -- SprAscoft-Acc/Conf/Hold/Immob/Sleep/Stun/Fear(A), SprAscoft-Conf/Hold/Immob/Sleep/Stun/Fear/Rchg(25), SprAscoft-EndRdx/Rchg(27), SprAscoft-Acc/Conf/Hold/Immob/Sleep/Stun/Fear/EndRdx(27), SprAscoft-Acc/Conf/Hold/Immob/Sleep/Stun/Fear/EndRdx/Rchg(29), SprAscoft-Rchg/+Dmg%(29)
Level 14: Hasten -- RechRdx-I(A), RechRdx-I(31)
Level 16: Power Up -- RechRdx-I(A)
Level 18: Cinders -- BslGaz-Acc/Hold(A), BslGaz-Acc/Rchg(31), BslGaz-Rchg/Hold(31), BslGaz-EndRdx/Rchg/Hold(33)
Level 20: Heavy Mallet -- KntCmb-Acc/Dmg(A), KntCmb-Dmg/EndRdx(33), KntCmb-Dmg/Rchg(33), KntCmb-Dmg/EndRdx/Rchg(34), TchofDth-Dam%(34), ExpStr-Dam%(34)
Level 22: Combat Jumping -- LucoftheG-Def/Rchg+(A), Rct-ResDam%(36)
Level 24: Boxing -- Empty(A)
Level 26: Bonfire -- OvrFrc-Dam/KB(A)
Level 28: Seismic Smash -- Hct-Dmg/EndRdx(A), Hct-Dmg(36), Hct-Dam%(36), Hct-Dmg/Rchg(37), Hct-Acc/Dmg/Rchg(37), UnbCns-Dam%(37)
Level 30: Tough -- StdPrt-ResDam/Def+(A), GldArm-3defTpProc(39), UnbGrd-Max HP%(39)
Level 32: Weave -- LucoftheG-Def/Rchg+(A), LucoftheG-Def/EndRdx(39), LucoftheG-Def(40)
Level 35: Sleet -- Empty(A), Empty(40), Empty(40), Empty(42), Empty(42), Empty(42)
Level 38: Fissure -- Empty(A), Empty(43), Empty(43), Empty(43), Empty(45), Empty(45)
Level 41: Mud Pots -- Erd-Dmg(A), Erd-Acc/Dmg/EndRdx/Rchg(45), Erd-Dmg/Rchg(46)
Level 44: Frozen Armor -- LucoftheG-Def/Rchg+(A), LucoftheG-Def/EndRdx(46), LucoftheG-Def(46)
Level 47: Ice Storm -- Empty(A), Empty(48), Empty(48), Empty(48), Empty(50), Empty(50)
Level 49: Maneuvers -- LucoftheG-Def/Rchg+(A), LucoftheG-Def(50)
Level 1: Brawl -- Empty(A)
Level 1: Domination
Level 1: Prestige Power Dash -- Empty(A)
Level 1: Prestige Power Slide -- Empty(A)
Level 1: Prestige Power Quick -- Empty(A)
Level 1: Prestige Power Rush -- Empty(A)
Level 1: Prestige Power Surge -- Empty(A)
Level 1: Sprint -- Empty(A)
Level 2: Rest -- Empty(A)
Level 4: Ninja Run
Level 2: Swift -- Empty(A)
Level 2: Health -- Pnc-Heal/+End(A), Mrc-Rcvry+(13)
Level 2: Hurdle -- Empty(A)
Level 2: Stamina -- PrfShf-End%(A), PrfShf-EndMod(15)
Level 1: Quick Form
------------
------------
Set Bonus Totals:- 4% DamageBuff(Smashing)
- 4% DamageBuff(Lethal)
- 4% DamageBuff(Fire)
- 4% DamageBuff(Cold)
- 4% DamageBuff(Energy)
- 4% DamageBuff(Negative)
- 4% DamageBuff(Toxic)
- 4% DamageBuff(Psionic)
- 13.5% Defense(Smashing)
- 13.5% Defense(Lethal)
- 6% Defense(Fire)
- 6% Defense(Cold)
- 21% Defense(Energy)
- 21% Defense(Negative)
- 6% Defense(Psionic)
- 9.75% Defense(Melee)
- 20.06% Defense(Ranged)
- 6% Defense(AoE)
- 1.8% Max End
- 8% Enhancement(Immobilized)
- 75% Enhancement(RechargeTime)
- 52% Enhancement(Accuracy)
- 4% Enhancement(Stunned)
- 4% Enhancement(Held)
- 4% Enhancement(Confused)
- 4.4% Enhancement(Terrorized)
- 8% Enhancement(Sleep)
- 13.5% SpeedFlying
- 129.7 HP (12.75%) HitPoints
- 13.5% JumpHeight
- 13.5% SpeedJumping
- Knockback (Mag -4)
- Knockup (Mag -4)
- MezResist(Confused) 28.75%
- MezResist(Held) 28.75%
- MezResist(Immobilized) 28.75%
- MezResist(Sleep) 28.75%
- MezResist(Stunned) 28.75%
- MezResist(Terrorized) 28.75%
- MezResist(Teleport) 100% (20% chance)
- 14% (0.23 End/sec) Recovery
- 30% (1.27 HP/sec) Regeneration
- 5.25% Resistance(Smashing)
- 5.25% Resistance(Lethal)
- 18% Resistance(Fire)
- 18% Resistance(Cold)
- 3% Resistance(Energy)
- 3% Resistance(Negative)
- 3% Resistance(Toxic)
- 3% Resistance(Psionic)
- 13.5% SpeedRunning
| Copy & Paste this data into Mids' Reborn : Hero Designer to view the build |
		|-------------------------------------------------------------------|
		|MxDz;1431;649;1298;HEX;|
		|78DA65945B6F125110C7CF61172914044A29B4947BBB502808EA83D734A617532D0|
		|9DA0F4036EDA66C822C59B6897DF4C12FD0172FB117FD003E7BFD165E1EF4C54763|
		|AA263E191F707A66B824BB61CF8F333367E6BF332CB5FB2BDE97371F2C31EE5F6EA|
		|9DD6E63C5B8A7B755CB30C76ABB966AE9465B6270B9E04E0C7C8D65A36D9946ABBC|
		|A69B5A7F931CBA6F74BBEA6ECB2AAFAAA6D5ECEF98A76EC091CD8EA66D7BC5D70D4|
		|DEDE8ED1D9FD8ACE93B4D0B76FEBE6B5B33BB4DBD33B3DAD1B7CAEB5B5AA3A6762D|
		|CDDC1B4A8C822805EEAC90787AF524F6C1C1585C668E8FC44F48F933F2B16F10EB6|
		|407802AF80E91678E88C7C8B1E7C417C8277096531D5E076464E6B943BC8BF46E22|
		|9F42ACC4B18EF4CF21CE9F659260E03AEE030F91134B689FD8837D486673B075621|
		|DE6DCE7C2A780CD85F964D7653C377985780D39758978159985A9B9F10C777F455B|
		|F40B3207F9C649DFF82BAC1F7D8D9C79437C8B9C7D477C8FCC405E1FE5F515B1370|
		|9E233786E3F69F7932D0FC782D4B720CD2741F349D07C52349F03381FA2F984A8C7|
		|29EA718A7A9CA61EA71BC01C90FA3605BAC2A42B1CC6BE65FFA0660EBE08E98AF4E|
		|0620BE098C66836FD0DA30EA17A8CAAC70AD445855844CEE58879E23A52820A71CC|
		|E78847B8781AE53CE655FE22658849524C92142A01646E121985566548434628CD8|
		|DAC0BB6F51834CF53FCBCB0146CEBE2C87A04F179D290FF8E5D5F3C41967E2063A0|
		|A1483145D259229D25D2390B3165AA5B1699CFD9D6EAC81A8467AFD0742A94B3DAC|
		|F250FDE4AF89C466786965EC1E6ADD82C559BE582CD72D166D9B059EAF2E01D675C|
		|58DC01C6245272E2012F1FF5FE1A5A384FE394BDB7B8F85DFEB445FF1E8D7E44FF0|
		|AFBC8DB85E113FF07808E2930|
		|-------------------------------------------------------------------|
The same build using the unofficial mids found here https://forums.homecomingservers.com/topic/16930-mids-reborn-unofficial-mrbu/
SpoilerVillain Plan by Mids' Reborn : Hero Designer 2.6.0.7
https://github.com/ImaginaryDevelopment/imaginary-hero-designerClick this DataLink to open the build!
Level 50 Mutation Dominator
Primary Power Set: Fire Control
Secondary Power Set: Earth Assault
Power Pool: Speed
Power Pool: Fighting
Power Pool: Leaping
Power Pool: Leadership
Ancillary Pool: Ice MasteryVillain Profile:
Level 1: Char -- BslGaz-Acc/Hold(A), BslGaz-Acc/EndRdx/Rchg/Hold(3), BslGaz-Rchg/Hold(3), BslGaz-EndRdx/Rchg/Hold(5)
Level 1: Stone Spears -- Thn-Acc/Dmg(A), Thn-Dmg/EndRdx(5), Thn-Dmg/Rchg(7), Thn-Acc/Dmg/Rchg(7), Thn-Acc/Dmg/EndRdx(9), Thn-Dmg/EndRdx/Rchg(9)
Level 2: Stone Mallet -- KntCmb-Acc/Dmg(A), KntCmb-Dmg/EndRdx(11), KntCmb-Dmg/Rchg(11), KntCmb-Dmg/EndRdx/Rchg(13)
Level 4: Tremor -- Obl-Dmg(A), Obl-%Dam(15), Arm-Dam%(17), FrcFdb-Rechg%(17), FuroftheG-ResDeb%(19), ClvBlo-Acc/Dmg(19)
Level 6: Fire Cages -- EnfOpr-Acc/EndRdx(A)
Level 8: Hot Feet -- Arm-Dmg/Rchg(A), Arm-Acc/Dmg/Rchg(21), Arm-Dmg/EndRdx(21), Arm-Dmg(23), Arm-Acc/Rchg(23)
Level 10: Super Speed -- BlsoftheZ-ResKB(A), BlsoftheZ-Travel/EndRdx(25)
Level 12: Flashfire -- SprAscoft-Acc/Conf/Hold/Immob/Sleep/Stun/Fear(A), SprAscoft-Conf/Hold/Immob/Sleep/Stun/Fear/Rchg(25), SprAscoft-EndRdx/Rchg(27), SprAscoft-Acc/Conf/Hold/Immob/Sleep/Stun/Fear/EndRdx(27), SprAscoft-Acc/Conf/Hold/Immob/Sleep/Stun/Fear/EndRdx/Rchg(29), SprAscoft-Rchg/+Dmg%(29)
Level 14: Hasten -- RechRdx-I(A), RechRdx-I(34)
Level 16: Power Up -- RechRdx-I(A)
Level 18: Cinders -- BslGaz-Acc/Hold(A), BslGaz-Acc/Rchg(31), BslGaz-Rchg/Hold(31), BslGaz-EndRdx/Rchg/Hold(31)
Level 20: Heavy Mallet -- KntCmb-Acc/Dmg(A), KntCmb-Dmg/EndRdx(33), KntCmb-Dmg/Rchg(33), KntCmb-Dmg/EndRdx/Rchg(33), TchofDth-Dam%(34), FrcFdb-Rechg%(34)
Level 22: Combat Jumping -- LucoftheG-Def/Rchg+(A), Rct-ResDam%(36)
Level 24: Boxing -- Empty(A)
Level 26: Bonfire -- OvrFrc-Dam/KB(A)
Level 28: Seismic Smash -- Hct-Dmg/EndRdx(A), Hct-Dmg(36), Hct-Dam%(36), Hct-Dmg/Rchg(37), Hct-Acc/Dmg/Rchg(37), UnbCns-Dam%(37)
Level 30: Tough -- StdPrt-ResDam/Def+(A), GldArm-3defTpProc(39), UnbGrd-Max HP%(39)
Level 32: Weave -- LucoftheG-Def/Rchg+(A), LucoftheG-Def(39), LucoftheG-Def/EndRdx(40)
Level 35: Sleet -- Artl-Acc/Rech/Rng(A), Artl-Dam/End(40), Artl-End/Rech/Rng(40), Artl-Dam/Rech(45), Artl-Acc/Dam(46), Artl-Acc/Dam/Rech(46)
Level 38: Fissure -- Artl-Acc/Dam(A), Artl-Dam/End(42), Artl-Dam/Rech(42), Artl-Acc/Dam/Rech(42), Artl-Acc/Rech/Rng(43), Artl-End/Rech/Rng(43)
Level 41: Mud Pots -- Erd-Dmg(A), Erd-Acc/Dmg/EndRdx/Rchg(43), Erd-Dmg/Rchg(45)
Level 44: Frozen Armor -- LucoftheG-Def/Rchg+(A), LucoftheG-Def/EndRdx(45), LucoftheG-Def(46)
Level 47: Ice Storm -- Artl-End/Rech/Rng(A), Artl-Acc/Dam(48), Artl-Dam/End(48), Artl-Dam/Rech(48), Artl-Acc/Rech/Rng(50), Artl-Acc/Dam/Rech(50)
Level 49: Maneuvers -- LucoftheG-Def/Rchg+(A), LucoftheG-Def(50)
Level 1: Brawl -- Empty(A)
Level 1: Domination
Level 1: Prestige Power Dash -- Empty(A)
Level 1: Prestige Power Slide -- Empty(A)
Level 1: Prestige Power Quick -- Empty(A)
Level 1: Prestige Power Rush -- Empty(A)
Level 1: Prestige Power Surge -- Empty(A)
Level 1: Sprint -- Clr-Stlth(A)
Level 2: Rest -- Empty(A)
Level 4: Ninja Run
Level 2: Swift -- Empty(A)
Level 2: Health -- Pnc-Heal/+End(A), Mrc-Rcvry+(13)
Level 2: Hurdle -- Empty(A)
Level 2: Stamina -- PrfShf-End%(A), PrfShf-EndMod(15)
Level 1: Quick Form
Level 0: Born In Battle
Level 0: High Pain Threshold
Level 0: Invader
Level 0: Marshal
------------
------------
Set Bonus Totals:- 10% DamageBuff(Smashing)
- 10% DamageBuff(Lethal)
- 10% DamageBuff(Fire)
- 10% DamageBuff(Cold)
- 10% DamageBuff(Energy)
- 10% DamageBuff(Negative)
- 10% DamageBuff(Toxic)
- 10% DamageBuff(Psionic)
- 13.5% Defense(Smashing)
- 13.5% Defense(Lethal)
- 6% Defense(Fire)
- 6% Defense(Cold)
- 31.31% Defense(Energy)
- 31.31% Defense(Negative)
- 6% Defense(Psionic)
- 9.75% Defense(Melee)
- 32.25% Defense(Ranged)
- 6% Defense(AoE)
- 1.8% Max End
- 8% Enhancement(Immobilized)
- 75% Enhancement(RechargeTime)
- 79% Enhancement(Accuracy)
- 4% Enhancement(Stunned)
- 4% Enhancement(Held)
- 4% Enhancement(Confused)
- 4.4% Enhancement(Terrorized)
- 8% Enhancement(Sleep)
- 13.5% SpeedFlying
- 129.7 HP (12.75%) HitPoints
- 13.5% JumpHeight
- 13.5% SpeedJumping
- Knockback (Mag -4)
- Knockup (Mag -4)
- MezResist(Confused) 28.75%
- MezResist(Held) 28.75%
- MezResist(Immobilized) 28.75%
- MezResist(Sleep) 28.75%
- MezResist(Stunned) 28.75%
- MezResist(Terrorized) 28.75%
- MezResist(Teleport) 100% (20% chance)
- 14% (0.23 End/sec) Recovery
- 60% (2.54 HP/sec) Regeneration
- 5.25% Resistance(Smashing)
- 5.25% Resistance(Lethal)
- 18% Resistance(Fire)
- 18% Resistance(Cold)
- 3% Resistance(Energy)
- 3% Resistance(Negative)
- 3% Resistance(Toxic)
- 3% Resistance(Psionic)
- 13.5% SpeedRunning
| Copy & Paste this data into Mids' Reborn : Hero Designer to view the build |
		|-------------------------------------------------------------------|
		|MxDz;1517;687;1374;HEX;|
		|78DA6594496F126118C7DF81A12C0581B614BAB0B665195A5AD4836B1AD3C5544BD|
		|2DA83C60B99B4933209028169A2470F7E815E5C6217FD009E5DBF855BA2178FC654|
		|4D3C190FF830CF9F256102F9BDEFB3BDFF799E9929DC5D76BFB87A7F5148DEA5B2D|
		|A681497AB77F48A6A54EB8EC29EA11A7AB5621574D9E91FE9F88A4BD58A51AF9673|
		|AB7A5D6B6FA25DF7954643DD2B1BB915B56E94DA3BE1DAA852CA564DD3763CE6725|
		|5DF2D197A65D76DEED635B5461B6F7BB3A3D51B25BD36BE52D3B7736BDB5AB1A036|
		|0CAD7EAF2B3144A214FA4F99125B57D32ADE5B8408CBC2F219FCC8943F311F793AB|
		|1367140C893EF903970041E331DCFC0E7CCC7942BE11C69839090856B13BCC1746F|
		|319F50AC15E758FF59CCFC532D0BD17799F7BE07CCA145B60F95F99C69DADA3857D|
		|8F625D396249BDD3CBC29DBCF73DEC805F01273F41C789139455373728EE4FCCAB6|
		|D017668AEA0D42DFE04B3E3FF48A39FE1A7CC39C7C0BBE6326A8AE07753D59D61C0|
		|79FD27D7BA1DD0B5B9AD2FCE89B1FF3897C00319F08E67340F9C3D0358C1EC7D0E3|
		|187A1C438FE345628A883E8E92AE00740502DCB7A93FAC59225F10BA824DBA44861|
		|C631C2DC6BE71D4219D3E81D327147431096699D329300DAE31AD744298EB59C241|
		|C9BC9BE469AE9BFCCB9429268A982814264798291F3344AD4A4043C26E639F0C3A9|
		|8B336E69C151C601E93FE19E4CEC097416E063919C42AA8ADA0E611E5A639D792FE|
		|CED3504E98B33F9813A42D0BFD59E89F85EE39DCC724C5E4A02187DAF3D0320F2DF|
		|3D09287863C34F9A93F0B98E002EAE7DB75E5CE9B4BBFD604135D4B53E9F32EF459|
		|F27D96337D96B37D96F59605CF8970F2AC37E4CE9740486694D3D779DF9B272EF24|
		|ABDDE5F5D8B24C5F959705F93CCA7F7675FF4EFDEE887F876EC33AF2BDD7BDE74B5|
		|22787DB3677DAB677DBB67FD1FB772EFDC|
		|-------------------------------------------------------------------|
-
3
-
1
Water spout shows description that it does PBAOE damage and causes wet. Release Candidate 2
in [Open Beta] Bug Reports
Posted
This was the dominator version of the power.