Projector
-
Posts
79 -
Joined
-
Last visited
Content Type
Profiles
Forums
Events
Store
Articles
Patch Notes
Everything posted by Projector
-
Clarity Suggestion for Labyrinth of Fog
Projector replied to Projector's topic in Suggestions & Feedback
Even so, I think there's value beyond the instructional aspect for leaders for the idea for two reasons: 1. If there's not an active league in the zone while the Mino is on cooldown, people entering the zone would get a popup giving them a hint as to what they can be doing in the meantime. So, in the absence of said leaders, players can still get instructions. That alone is reason enough for me, tbh. 2. A progress bar on the motes would also tell you how many you have left to find, or if it simply said "Find all 7 motes" so that you can tell how many you still need to look for without just straight telling you which ones you need to find. -
With talk around the difficult of leading Labyrinths, clarity and confusion around what to do and when, and the confusion around people trying to find the motes while also running the labyrinth, etc. I wanted to propose two, hopefully straightforward changes that would give league leaders something UI-based to lean on when giving instructions and instructing players on the ideal times to look for motes/badges. I propose three potential options. These could both be implemented or it could be an either/or thing: 1. When the Minotaur is defeated and the hour countdown starts for respawn, could the nav bar also read, "Find 7 Hidden Motes of Power while the Minotaur is down! Then visit the Gate of Darkness" wherever you are in the zone? The level shifts are basically meaningless during that time anyway. Having this show up as subtext in the navbar could be something concrete leaders can point to as another "phase." 2. A itrial-style (fun words to say out loud back to back) pop-up window that opens once you access the core that has a progress bar for the seven motes. So, now once players enter the Core, there is a clear signal to everyone that there's something specific to do as well as a progress bar that tells you how close you are. That pop-up would then stay with you no matter where you go in the zone until you leave or log-out. Alternatively, its appearance doesn't have to be tied to the Core, but instead could be just be tied to the Mino defeat, so no matter where you are in the zone, if the Minotaur has been defeated, the pop-up will be active until he respawns! 3. Make a league pop-up window the entire time you're in the zone that contains all the info currently in the nav bar, but also shows how many Malfos are spawned in zone at any given time, and then, once you access the core or the Minotaur is defeated, the progress bar for the motes shows up until you leave the zone, log out, or the Minotaur respawns. Having the pop-up window trigger once the Mino is defeated would also discourage new players from leaving the zone immediately like I did the first couple of times I fought the Minotaur, thinking that was all there was. Bonus points if the pop-up also shows which weapon the Minotaur is carrying, though this feels like a double-edged sword of people coming, seeing it's not the one they need, and leaving immediately before helping lol. If the game detects you have all seven motes, the nav bar or popup windows could still say to hunt for them, but it could also just not show that part of the instruction anymore. I don't know what's possible or not possible. I could easily picture introductory macros being written around the expectation of the UI prompting players these directions: "Welcome to the Labyrinth of Fog! Our aim is to gain access to the Core of the Labyrinth by defeating the Minotaur that's hunting us down! To We will need to acquire 10 level shifts before challenging the Minotaur, here's how we will do it" *insert normal instruction macros here* "Once the Minotaur is defeated, we will enter the core and begin hunting for the Motes of Power! If you happen to find one sooner, make sure not to leave the zone until we find them all!" I should also point out that these macros can exist on their own, and probably do, without any of my proposed changes. What my proposed changes aim to do is give those leaders more credibility in their instructions by giving an in-game prompt that encourages players to begin seeking out the motes intentionally at that point. It also gives a distinct purpose of what to do when the respawn timer is counting down, rather than showing up to zone, seeing the Mino is down, and thinking there's nothing to do until it's back. I know other raid zones don't give these kinds of hints regarding what to do and when, but this zone is entirely different in its mechanics, expectations, depth, and the way it's led. So, I feel that giving players some sense of direction at these key junctures could be helpful. Potential downsides: 1. May not be room on the nav bar. 2.Players may not like having pop-up windows and may hate having them take up screen real estate during iTrials and zone events like the Prison Break in Bricks. 3. Favors one specific approach to the labyrinth, which is Level Shifts>Mino>Core>Motes. I would argue that the zone design actually favors this approach anyway because the orange area isn't even accessible until you can get to the core (or if you happen to have the Mino aether costume). I decided to make this a new thread since it's a very specific suggestion, but I'm happy to delete this and make it a reply in another, if needed.
-
Changes to the game/IOs SOs
Projector replied to Living Brain 3000's topic in Suggestions & Feedback
I don't think this suggested change makes the base game harder overall, it would just adjust combat scaling to be around IOs past level 35. That's all. So, the only point at which the game gets harder when you hit level 35 and haven't upgraded to IOs yet. Which, could be problematic the same way that the old leveling walls around DOs and SOs were back in live. My bigger concern is moreso around drops, but I think there could be in-game lore reasons that could turn basic training IOs into drops as well as buyable enhancements from the stores once you hit level 35 and that wouldn't be problematic necessarily. There would probably need to be something additional added in the form of a popup box or something that explains that SOs are no longer effective for post 35 content and encouraging players to start getting training IOs. Now that I think about it though, the drops and store changes would have to happen once you hit level 32, not level 35, as it would need to be at the minimum level that you can start slotting said enhancements. Though, I supposed normal training IOs could just start dropping as soon as you hit their earliest available level, and then they just upgrade in drop rate once you're 32. I honestly wonder if just adding the training IOs to the drop pool would be enough, rather than outright removing SOs. I don't think this is a bad idea, I just don't know what fundamental problem it solves for the game. I know not everything should be seen that way, sometimes a QoL change is a QoL change and that's fine. I just wonder, of all the complaints of issues I typically see, such as MM pets not being even level at 50, or Controller/Dom usability in harder content, etc., where this really sits and if it's important enough to be worth that much developer investment. The main hurdles I have in my mind to this are mostly market-based-- Selling SOs is a decent way to keep a basic income when leveling, especially if leveling with XP doubled. The training IO recipes sell for a LOT more than regular enhancements, so, if the enhancements themselves turn into sellable drops, how will that impact selling price. Would the actual IOs be sellable at the market and buyable at the market? And if so, what price point would make sense if a level 50 damage IO recipe sells for 110k. Does that mean the enhancement should be purchasable for that amount? Or more? Or would the price of recipes need to come down, thus nerfing a source of income for many players. I haven't mentioned farming in this mainly because while the financial side is relevant to how farming impacts the game, I know balancing decisions aren't made around farming and shouldn't necessarily be. So, the solutions to any market-based problem should start from a place that looks at the game as if farming doesn't exist, and then tweaked in anticipation of how farming could impact/abuse said changes. At least, that's how I've understood farming to be treated for game balancing issues. Personally, if the market questions could be reasonable addressed, I think a great compromise would actually be to leave SOs in the game as they are and just introduce IOs into the drop pool, similar to how SOs were changed to drop at much earlier levels. Just make the IO drop rate rarer than SOs, so people are still encouraged to go build the recipes as they start adding them into their builds. Basically, IOs wouldn't drop enough to slot out a build as fast as SOs do, so SOs would still make up the bulk of a mid-game build, with Training IOs acting more like a special treat that makes seeking them out via auction house and crafting more enticing as players see the stat differences. As it stands now, when they lowered level access to SOs, the change didn't require the removal of DOs or basic TO enhancements, so I don't necessarily think making training IOs available via drops would be particularly harmful, and if anything, would make the game even easier from level 35-50 if you don't adjust combat balance at those levels. Then I would keep set IOs still gated behind recipe drops and auction house. Those should be worth the extra effort required to receive the benefits they offer. -
I think this is a MAJOR strength of the Labyrinth that doesn't get appreciated enough--how easily you can just go do one with a pre-made group! It's really cool that there is now a zone raid event that a supergroup can just get together some people for and go do. When Sovereign does Hami Raids and MSRs, there's often still 20-30 minutes of recruiting. It's awesome that if you can get enough people for an iTrial, you have enough people to do a Lab run, and that you can recruit while you're getting started with the run (provided that the Mino hasn't been defeated in the last hour, of course). It won't surprise me to eventually see an player-developed approach to Labyrinth that is somewhat like Hami Raids in that Team 1 usually has a specific setup and is closer to a "premade" team while the rest of the league fills with the general player base.
-
Updated in the my reply! Thank you!!
-
I just want to start by saying that @Mezmerais wrong. Not because anything he said is factually wrong. It's just because it's Mez. 😄 Second, I want to highlight something that I think is leading to the chaos: It lacks a clear, consistent, and satisfying sense of progression. The Labyrinth doesn't end when the Mino dies, but there is nothing that really tells you that there's more. If anything, the only thing you see immediately is a reward table, and reward tables in this game almost universally signal the "end" of content, with this being the only exception I can think of. I still have never seen the portal that opens up where Mino is defeated because it's covered by the whole league/lores, even with /noparticles 1 set. I only ever found out it was there because someone told me, and I've gone through it only by guessing lol. Even MSR has a sense of progression. Pylons>Bombs>GM>Kill until shield resets. There is clearly more to the MSR after beating up the aliens on the ship after Ukon dies because 1. There is no reward table. 2. there is a timer that actually increases once you take him down. 3. Mobs continually spawn and respawn and this is visible and immediately actionable. And if someone doesn't know this, the confusion is simple to remedy: stay put and fight enemies in the bowl. It's quick to remedy and easy to understand. Hami raids also have progression. Kill Monsters for EoE and to spawn hami>Kill Hami>Reward Table>Repeat. Abyss/Eden have the element of random incans, but you still are grounded by map position, so the whiplash isn't as harsh. Plus, if someone forgets to incan, the league can easily see Monsters near by and continue killing and it's easy to help those not on the league find where the league is so they can participate. It happens all the time if an incanner doesn't see chat at the right time. I also recognize there's a bias toward the idea of progression for the other zone events have player instructions/tactical contributions have contributed to that sense of progression being made clear to players, but I submit also that the "next steps" are far less burdensome to explain and navigate people through, and if someone misses something, like an EoE, it's not like we have to send someone back up somewhere to help them get it. We can solve that immediately. But in the Labyrinth, it is a repeated case of "Okay, now what?" with no indicator of what to do next. "We killed the mobs here, now what?" We wait until an incanner finds a random spot elsewhere that 2-3 mobs have spawned in. But also, those mobs get deleted once our level shifts are above 5, reducing the challenge and the rewards. Admittedly, this one is an assumption. I haven't actually looked at the exp rewards when mobs turn grey because I'm usually hunting Malfos. (EDIT 2: Thanks @lemming for confirming level shifts do not affect rewards! Leaving the statement for intellectual honesty, but rewards do not actually reduce at all) "We killed Mino, now what?" You don't even know you can't get all seven motes until you kill Mino (or someone tells you) because the orange area is hidden until then. And the timer is a countdown UNTIL something happens, rather than being a indicator of how long you have to continue an action, like it works in an MSR. There's no sense of map- or movement-based progression because you can't see yourself progressing through a map. If I'm lost anywhere else in the game, there are hints that tell me where to go, such as Fog of War still hiding unexplored areas (unless I was stupid and hit reveal on those crey lab maps that have the three elevators on the same floor. IYKYK). The mote progression also isn't linear, which is convenient, but also makes it a constant game of "wait, which one don't I have yet?" and then when you do have them, there's no message or anything that gives a hint or clue of where you are supposed to go. Even a riddle or poem about the black/white portal could thematically work here, idk. That ongoing feedback of progress that reinforces player behavior and rewards them for actions they take, even if it's just a dopamine hit, just isn't there. If I'm killing mobs with the league, once a mob dies, everyone just...stands there, at least until an incanner finds a new mob. The only progression-based feedback I see is if you are off hunting Malfos, but the very heavy trade-off is it gives players a very disconnected feel from a zone-wide league event. I can't see my league get stronger, I can't see them empowered to do anything, and I just keep hunting until 10. It's solo play while being listed in a league, but ignoring everything the league is doing. So, the limited sense of progression isn't unifying. I also don't know what to do with feeling that way. I don't know what the solution is, but I at least think that the topic of progression feel should be included in the conversation. While I'm here I'll share that when I first heard about the Labyrinth, I had presumed it would be more like a roguelite, where the progression through the labyrinth was linear, but also repetitive. The idea of the Mino chasing us had me picturing those sidescrolling/platform games where you have to outrun a flood or some other thing that is chasing you down and if you get stuck on an enemy or can't get to the next platform fast enough, you die. If the league wipes, you start again at the beginning or go to Zone 2, just like when you fail a Hami raid lol. It would be cool if this were the case, and then fogs could spawn along that linear path as you are killing enemies. If you miss a fog, there's no backtracking since the minotaur is chasing, and there would be this constant sense of impending doom, kind of like what you get when Hami is taking just a little too long to kill and the triple and quad blooms are hitting. I also wish it was easier to stay in a specific color. Like, I wish that when I go to green, any doors I click would also be green, and if I click blue, I stay in blue. And maybe there could be predetermined portal locations in each color's maps that take you to the "next" color or the color of your choice (just depending). Maybe the portals would be linearly connected (blue only goes to green, green only goes to red or back to blue, red only goes to yellow or back to green, etc.). Each color's maps would have multiple portals to the next color, so you could still jump at any time, and you have an "oh shit" button if the minotaur is about to catch your league, with the trade-off being that you forfeit any Malfos that you would have missed in the prior color since you leave it early, (while FtF allows players who mistakenly take a portal to rejoin their team.) Idk, this all would require a fundamental rework of the content though, but since I'm spitballing already.... You would still have to kill enemies along the way, and do so fast before the minotaur catches the league, and the enemies you kill could spawn Malfos up ahead at a TBD spawn chance/rate. Or maybe when you defeat the Mino and he is on cooldown, the portals work like the train does and gives the player a list of all of the color zones plus adds Orange, the Colonnade, and the Core until the timer resets and the mino respawns. Though, Orange doesn't seem to hold much purpose aside from containing a mote and being a secret area. If you do nothing but kill enemies and ignore Malfos all the way to the end, you could still predetermine the rewards for the spawns so that you always have enough level shifts to fight the minotaur if you've killed along the way, rather than making it to the end and just being killed because you didn't get enough Malfos. If you leave a color "early," that would raise the importance of killing Malfos, since you now won't have encountered enough mobs to get your level shifts. Right now, it feels more like a random and aimless assortment of mission maps (which, I know a randomizer was used to determine map order, so this is partially intended). This could also make it so the endless colonnade could be located at the "end" of some of the colored maps, being a "reward" for making it to the end. So maybe there's one access point at the halfway color and one access point at the end. If you get the level shifts needed for Mino, you can defeat him and continue progressing the labyrinth to the end. At the moment, there is no sense of "I conquered this area or piece, and now onto the next." A real labyrinth has a linear path that takes you from start to end, obviously with dead ends being the consequence of a wrong turn. Since wrong turns aren't as easily implemented here, the consequence for alternate pathing could be skipping colors all together. But navigating the zone currently feels like I'm just walking around in circles. There's no sense of direction unless you start memorizing door orders. That would also feel more linear and would give a sense of progression to conquering the Labyrinth (even though I understand the real "labyrinth" is the Collonnade.) Lastly, none of this is to take away from the immense amount of work Cobalt and others have put into this. I love that new content is being added, invested in, and is trying to be inclusive of the wider player-base. I can't be thankful enough for more content to explore with people and more things being added to this wonderful relic of a game. I'm forever grateful for everything we have here 🙂 Thanks for coming to my TED Talk! EDIT: Grammar/spelling
-
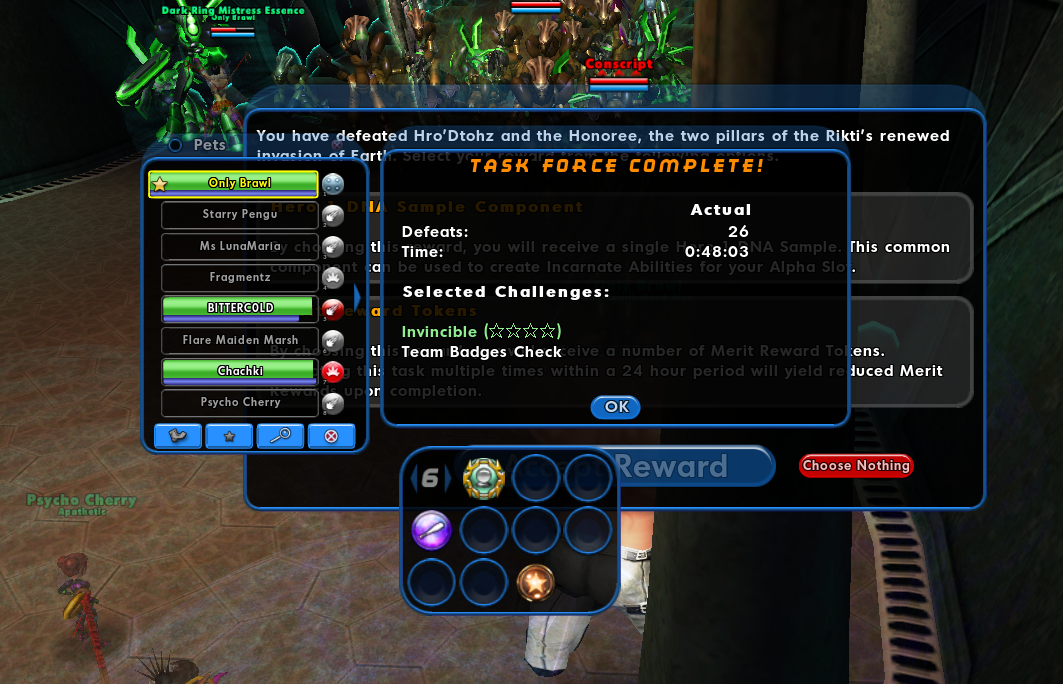
What started as a joke turned into an absolute icon in the form of Only Brawl, my new Stone Armor/Energy Melee Tanker that only uses Brawl for combat--no autopowers, no toggles, no actives. (I do use Travel Powers...I'm not a monster.) This means that every single power and slot is a set mule to empower my endless usage of Brawl, which is 6-slotted with 2 Acc/Dams and 4 procs. My first accomplishment with him was taking him on a Really Hard Way Magisterium before he had any incarnate powers. I dualboxed, played my ice/cold corruptor, gave Only Brawl a jetpack and put myself on follow with Brawl on auto. Somehow, despite no level shifts and autofire brawl, Only Brawl managed to get the killing blow on Chimera. If only you could have heard our voice chat in that moment... Since that day, I decided to step it up, finish up a few passive accolades for some bonus health, and then lead a 4-Star Lady Grey where I tanked with him. No following or dualboxing this time. I would either get this the legit way, or I wouldn't get it at all. As I thought through the TF mechanics, I realized it would be impossible to tank well without the use of Taunt, as brawl alone is not enough to control and maintain aggro on multiple high-priority threats. I also realized I would need to use Fold Space and Combat TP for effective movement. If I'm asking my team to carry me with everything else, I needed to make sure I carried out my end of the deal to tank it effectively. So, with those necessary concessions made, I gathered some friends and we set off to conquer Omega K'ong and his merry band of Rikti fodder. Not only did we pull it off, we did it in under 50 minutes with only 26 deaths, no teamwipes, and Only Brawl did not die a single time (screenshot in spoiler tag) As additional proof, I did record the run, but I accidentally screwed up my OBS settings and it did not capture the in-game audio, however I did clean up the Discord audio and kept it so all of you could experience the marvel that was the Only Brawl run, all the shot calls, and most of the jokes. Later that evening, I also tanked a 4Star Aeon, however I failed to record that one (recorded the wrong game window 😭). So now Only Brawl has legitimately earned Excalibonk and the Rikti Mobile Combat Dummy. Special thank you to StarWhispers, Chachki, Cherry, SapphireRachel, Gregg (Celestia), Cowbell, and Marsh for actually agreeing to go through with this run! But this achievement does not actually support the argument that you can bring what you want just because I showed it can be beat just using Brawl. It actually proves the opposite, as without everyone else on the team bringing mostly "meta" builds/powerset combos, this wouldn't have been possible. I don't know that this would be possible with any less meta of a setup. It's moreso proof that all of the work the dedicated hardmode community has invested in this content has been really successful. For anyone who would like to see it, I have attached the Mids build in this post. The V1 of this build that I use for normal content is less than 1% off of softcap for S/L and Melee Defense through set bonuses alone. Happy to provide that upon request if anyone would like to see it. PVE - ONLY BRAWL V2.mbd With that, enjoy the run!

- 7 replies
-
- 14
-

-

-

-

-

-
Hey there! My name is Projector (go by Project0r in-game) and I've been making a lot of content around Hardmode TFs lately. I have a few guides posted in the Forth Trident section, including an Omega K'ong fight walkthrough and a non-meta run of 4* Aeon! My YT also has an Incan guide for LGTF, and a bunch of different recorded runs with and without discord audio. Wanted to share this here for visibility, but I wrote out a step by step 4-star ASF guide for anyone who wants to learn or lead a 4Star Aeon. I am assuming that those interested in this have some level of familiarity with Aeon and the different missions. I want to clarify that this is stuff I have learned, but I am eternally grateful to people like Apollo, Maya, Eos, Loc, Bloodom, and many others who have spent countless hours testing builds and strategies to figure out the best ways to accomplish a lot of this content. This is not the ONLY way to do this (you can do a kill-most if you want, it will just take a LOT longer). I know a lot about 4-starr content now, but it's thanks to people like them. I do not take credit for "figuring out" anything I am sharing below. Pre-Requisites and Setup Team Lead should have Master of Aeon badge. It is REQUIRED to do the full Vanguard fight in the 5th mission. If Team Lead does not have it, then before the fifth mission, you will need people to relog until the star passes to a team member that does have it. There is no way around this, so never assume you have the badge--always double-check before starting. How to Handle Deaths Get a full tray of Immortal Recovery inspirations and feel free to email some to yourself. I keep one email in my inbox titled "immortal recovery" and just Reply to it whenever I need to send more to myself. That way you can access additional ones inside missions if you need. If you die, you should use Immortal Recoveries immediately and get back into the fight. Don't wait for it to be "safe," just stand back up and start fighting IMMEDIATELY. Team Lead should call for rebuffing whenever people rez, but do NOT throw off a barrier timing, or else you're just ensuring that your whole team will die a little bit later when the early barrier wears off. AVOID using powers like Rise of the Phoenix or the START Vendor Rezzes. Anything that makes you untouchable will also make you unbuffable. Always fun to use a self-rez, become untouchable, miss Barrier because you were untouchable, and then die again immediately because you didn't get Barrier. These self-rez powers, when used incorrectly, can actually mean you are out of the fight for an entire minute if you happen to miss a Barrier. The ONLY time I use these self-rez powers is when our team has wiped and I want to rez and stay alive long enough to reposition myself somewhere safe, die again to break any aggro, and then use an IR and TP my team members to me. Team lead should be mindful of when the next barrier will be so you can give advance warning on when to use Immortal Recoveries. (e.g. "Next Barrier in 5 seconds--REZ NOW" Team Comp: 1 DPS 2-3 debuff/def buff (Cold is great since it offers both debuff and defense buffs). Force Field is another amazing option. 1 Kin 1 second healer (Nature or EA are optimal) 1 tank 1 flex role (bring whatever) Ideally, some players should have Fold Space, as Fold Space is what allows your team to stay together for barrier calls while still clearing rooms. You shouldn't have to go chasing enemies. Fold Space them to your team instead. If going into this brand new, it can be safe to have that last flex role being an extra Defense Buffs. An optimal Speed Comp usually looks like this: 2 Fire/Fire Blasters 3 Ice/Cold Corruptors 1 Tanker or Scrapper with Confront (usually Bio/BA or BA/Bio) 1 Ice/Kin Corruptor 1 Ice/Nature or Ice/Elec Affinity Corruptor Targeting Macros I use: /macro SMEL targetcustomnext enemy alive Smelter /macro BRIC targetcustomnext enemy alive Brickernaut /macro RS targetcustomnext enemy alive Ripplesurge /macro ZOE targetcustomnext enemy alive Princess /macro SHIM targetcustomnext enemy alive Shimmering Incarnate Setups Option #1 (If you need additional Def): 6 Barrier Core, 1 Clarion Core, 1 Incan Core (obviously need some form of stealth. Celerity+SS is fine for this TF) Incarnate setup option #2 (If you need additional End Recovery): 5 Barrier Core, 1 Incan Core, 1 Ageless Core Incarnate setup option #3 (Speediest option if you have an experienced team): 5 Barrier Core, 2 Incan Core, 1 Clarion Anyone running Incan needs to have some form of invis. Super Speed+Celerity Proc in Stealth is enough. Barrier Teams: Team 1: Team lead (or whoever is calling barriers) + 1 player Flex 1: 1 player (If you go with a 5 barrier setup, just refer to "Flex 1" as "Flex," instead, since there won't be a flex 2) Team 2: 2 players Flex 2: 1 player Barrier timers are tracked by the cooldown of Team 1's barrier. Give about 5-7 seconds of lead time when calling the next barrier in case someone is held, doesn't hear you, is mid-attack animation, or lags. So, Flex 1 barrier should be called at 1:35 CD for Team 1 Barrier (ideally goes off at 1:30), Team 2 called at 1:05 CD, Flex 2 called at 0:35 CD, and then that cycle repeats when Team 1's barrier recharges. If running with 5 barriers, call Team 1, then Team 2 at 1:15, then Flex at 0:30, then repeat with Team 1 as soon as it recharges. How to Incan Cancel An Incan Cancel is when you incan your team but cancel the knockback effects before they knock anything back. This will NOT cancel the Teleport function of Incandescence When you aim your incan, immediately move your mouse to your buff bar, right click the Incan icon, and hit 'C.' If you do this fast enough, you can actually do it before the incan is even finished with the animation, meaning it can be cancelled before you even land. You have about 1 second to cancel it after you land before it starts knocking everything back. You need to be quick in order to find the Incan icon before it gets pushed to the side as your team's buffs start filling up your buff bar. Occasionally, you won't be able to cancel your incan at all because your buff bar is full, so the icon doesn't show up. Oh well. Pre-Mission 1: If anyone on your team has RIkti Dummies from prior 4star aeon experience, spawn these outside of the mission door and have you kin spawm Fulcrum Shift/Siphon Power until you start the SF. Feel free to also pop an Ultimate inspiration just before your team lead starts the SF, so you can do the first mission with your incarnate level at 50+2. Mission 1 (Run this exactly like a speed Aeon): Enter mission This mission is the exact same map as the "Capture Dr. Aeon" mission from the Ms Liberty TF. The only difference is the Aeon version does not have the last Elevator you would take to actually fight Aeon. Instead, it stops where you fight the last AV in MLTF. Aggro security bot and Team 1 Barrier on the Security bot (unless someone is afk/not paying attention, then do it before aggroing the bot) Kill Security Bot Incan runs to end of mission while the rest of team clears the 4 scientists on the first floor in that first big room. Will probably need a Flex 1 barrier during this time. When the Nav bar says 6 scientists left, Incan to the final room. Incanner needs to cancel incan knockback by right clicking the power in their buff bar and hitting cancel. Continue calling barriers on the right timer. If this portion is taking a long time, you may need to give a specific location for the next barrier call (e.g. "Team 2 Barrier on Project0r!" or "Flex 2 barrier on the glowie!") Take out the Head of R&D and make sure someone talks to him and speeds through the dialogue to activate the glowie Finish mission like a normal Speed Aeon. If you did this method properly, the last scientist will be the one by the glowie. If there is still one left after this, it means one of the ones in the last room probably ran off and hid. Exit Mission 2: This is run exactly like a speed run, except make sure to incan team to the cauldron. You don't want to drag any Boomers or Smelters to the cauldron, or else you'll have to deal with Taunts and heals. There are also two smelters standing on the entrance-side of the cauldron that will "activate" when the AV hits 50% HP. See steps below: Team Lead must talk to the Tournament organizer. If anyone is Fire primary or secondary, they can talk to him instead. If team lead: Lie, C, Cinderburn will get you in without fighting. Incan into the lava cauldron in the backroom (and cancel the incan) and immediately fire a Team barrier. This is just like a normal Aeon run up until the AV. Keep barrier calls going as needed. If any Smelters aggro, take them out before continuing. They are always your number one priority target and you should be looking out for them in every fight from here on out. Once the AV gets to half health, the NPCs around the cauldron will attack (which includes two Smelters). If you have any Ice Blast on the team, dropping blizzards just outside the entrance-side of the cauldron (where the Smelters are standing) will keep them aggroed so they don't heal the AV. If you do not have this option, you will need to taunt/take out the Smelters before continuing to defeating the Cauldron Champion. Radial Lores ONLY can be used for the AV. They will be recharged by the time you are ready for Vanguard. Exit Mission 3 (Again, run like a speed): Incanner should run to the end of mission and Incan in the far back corner of the room. Try to avoid tripping the ambushes on the first floor as they will run straight for your team waiting at the door. You can self TP past the floor lasers or fly/jump over them. Priority targets: Glowie, Brokernaut Flashbang, 11th Gen Paragon Protector, Dr. Bushnell (Just a normal named NPC) This is the first mission with an exploding Brickernaut in the form of Brokernaut Flashbang. This means your targeting macro for Brickernauts won't work here specifically. If you have Psi procs in your holds, always save these CDs for when the explosion countdown starts. With my Ice Blast Corruptors/Defenders, I am able to use Freeze Ray and Dominate twice during a coundtown if I save the cooldowns properly beforehand. Mission 4: WARNING: Do NOT use Barrier before starting the Shivan fight on the ship! If you are close enough, you will give the Shivans/Echo Barrier as well. Beat up Echo and the Shivans (shouldn't need barrier for this, but if you feel so inclined, read the above warning) Have one Incan or someone with stealth+TP target run to the tube behind the Security Chief. Hug the back wall inside of the tube and TP the team to you. Single Target pull the Security Chief to the back of the tube to kill him. If you cannot kill the Chief before 4-econds left on the countdown prepare to either die to the explosion or start running. The incanner should leave early from this fight no matter what. Incan everyone to the hallway just before the last room (if everyone is alive and buffed, after the cutscene you can incan directly onto the grate in the front center of the room. Pull enemies around the grate to the grate and clear the front of the room. Always pull more enemies to the team. There's no need to leave the group other than to pull specific mobs back to the group. Priority targets are Smelters then Golden Brickernauts. Scan constantly for these. Once there are only 2-3 mobs left and any remaining Smelters have been dealt with, have a Ranged DPS Single Target Pull Mr. Rivers (He is a Brickernaut). He will TP to you, so as soon as you hit him, rejoin the group on the grate. Defeat Mr. Rivers (remember, he is a Brickernaut). Starting here, if a barrier timer lines up with the moment in a fight where the team will need to move, you should plan to call barriers AFTER moving to the next objective/location, not before. People often move pretty fast to get to the next location, so calling Barriers before, even calling to "Group up before we move" often fails. Unfortunately, I've experienced MANY teamwipe's on all 4star TFs because the leader tried to call it BEFORE the team needs to move instead of AFTER. Either Incan to Zoe or jump on the platform to start the fight. If it's time for the next barrier, call it out like this: "Team # Barrier on Zoe" if jumping to her or "Team # Barrier after Incan" if Incanning to her. Every 25%, Zoe will move to a different part of the room and summon reinforcements from the overhead portal, your job is to follow her, but check the first two ambushes for Smelters. Sometimes two will spawn, sometimes none will spawn. The tank should taunt these on their way to wherever Zoe lands, or else have fun dealing with a full health Zoe again and again if the Smelters aren't dealt with. Team lead calls Smelters out and asks any ranged DPS to spike the Smelters before continuing on Zoe. If Zoe goes to the far side of the room, you can likely ignore any Brickernauts on the far side of the room (even if they aggro) and you can ignore the last ambush since it is only Luddites. Just focus ST DPS on Zoe and you should kill her before the Brickernauts become a problem. But team lead should still keep an eye on them just in case. Exit Mission Mission 5 (Through Vanguard Fight): Run this exactly like a Speed Aeon until the third Dimensional Pull Stealth/TP to Golden Roller (or individual TP if you only have one Incanner). If you single target TP to GR, TP far enough away so you don't give Golden Roller a Barrier. If you incan to Golden Roller, Talk to him and start the fight before Incanning so you don't buff the Car when everyone lands. Team Barrier should be called as soon as you land from incan. First Dimenson Pull -- ST Pull the EB at to the fence. Stacking holds on the EB before he transforms will prevent the Dwarf transformation. If you have any Elec Affinity on the team, note their "static" effect will likely result in aggroing the whole mob. Cutscene skip: If you have Teleport, you will need to go to the street corner (where the train track turns left) and TP straight from there to skip. If you have Mystic Flight, your Translocation will actually work directly from where the Shift spawns you in the map without triggering the cutscene. Incan/TP team to the fence in front of the EB. You can actually incan to the EB's side of the fence without being seen, just be sure to hug the fence. If successful, call barrier as soon as you are back at GR. Second Dimension Pull -- Team Lead should call out which Bioelectric Pustule they will be at. Protip: The team lead can spam click the pustule itself without choosing a dialogue option until the dialogue option says "...and return to Langston Corp." That's how you know the other 3 Pustules have been clicked. Remember to call a barrier as soon as you land back at GR. Third Dimension Pull (VANGUARD FIGHT) -- Team Lead talks to Psi-Curse. You need to select the Top dialogue for EACH response until you can click "Agree to the deal" While the team lead talks to Psi-Curse, the rest of the team pulls Apex to the back right part of the courtyard. I like to use either of the little ditches between Apex and the Alcove, but you can use the alcove, too. You can use TP target to get a pretty safe pull of Apex. Note: If you kill Apex before talking to Psi-Curse, it's fine. You can still make the deal with Psi-Curse as long as you don't activate the computer. Once you activate the portal to go inside Portal Corps. (do NOT click "Return to Langston Corp"), everyone needs to run to the portal and go through it. Once through, Everyone runs to the right and follows the path to fight Glacia and Infernia. Don't use Barriers for this. Go through the portal, but instruct your team to stay put until you talk to Lady Grey. Talk to Lady Grey and choose the "Master" option. You did it right when Unai turns into an enemy and tries to run away. Team can come through the portal and through the next doorway. If they go through the doorway BEFORE you talk to Lady Grey, it can prevent the full Vanguard fight from spawning. It's not a guaranteed screw up, so if someone doesn't listen to you and goes ahead, it's fine. It's moreso that there is a slight chance it can happen, so it's better to be safe than sorry. If you want, feel free to clear the Med-bay area to activate the hospital. Otherwise if you teamwipe in the fight and can't get out of the room, you'll have to run/tp all the way back from the parking lot. Stealth/TP to the small room just before the Weapons Depot area (there will be a circular hole with a rainbow ring around it--Do not enter this until you are ready). Kill the Vanguard mob behind you if they aggro. Before doing anything else, go into Options>Graphics & Audio> and turn down Particle Count low, or use /noparticles 1 (trust me on this). VANGUARD FIGHT INSTRUCTIONS TL;DR: One person runs in and aggros Incandescence so she uses her nuke (do not barrier yet) Person rejoins group, summon lores (except tank), buff, barriers, clarion Incan into fight, Tank grabs Hero 1's attention and pulls him slightly away so he can't taunt team members Defeat Order: Incandescent, Lady Grey, Levantera, Borea, Gaussian, Dark Watcher, Serpent Drummer, then Hero 1. Change up order as needed, but Incandescent is always first and Hero 1 is always last. Refocus Lores between each hero Cry in pain realizing you still have ~2.5 missions left. Getting Hero 1 to half health while still defeating the others will make him waste his T9, allowing you to kill him faster If Hero 1 dies early, the fight automatically ends and you don't get the rewards. VANGUARD FIGHT INSTRUCTIONS DETAILED: Incandescent's Nuke: Incandescent has a nuke that operates similar to the Brickernaut explosions without a countdown. This will wipe your team. One person, usually the tank, or someone with Phase Shift, runs through the barrier, aggroes Incandescent and stays long enough to trigger Incandescent's nuke animation. Please don't waste a barrier on this part. Just wait until after she is triggered. Once she begins the animation, she has been triggered successfully. She will not activate this until she is near her target, so you just need to live long enough for the "Incandescent has begun storing power" message to flash on screen. If you die, hosp and get a TP back to team. You cannot individually TP people in and out of the fight. You will have 30 minutes to do this fight once you aggro any of the Vanguard. One person will trigger Incandescent's nuke, then rejoin the team to buff. Once Incandescent is triggered and the team is regathered, summon lores and buff, fire Team Barrier and Clarion, then Incan into the fight. Incan in the only way to TP in and out of the room, as it technically is in another dimension. Tank needs to hold Hero 1 and keep him facing away from the team. Ideally, he's kept close enough to still get AoE damage, but not close enough to taunt the team/lores. The Tank should stay close enough to still get Barriers. HERO 1 MUST DIE LAST or else the fight will end immediately and you will not get the Mobile Combat Dummy or other rewards. The rest of the team focuses enemies in the following order: Incandescent is ALWAYS first, then the typical order is ladies first, then the men, with Serpent Drummer being last before fighting Hero 1. My usual order is Incandescent, Lady Grey, Levantera, Borea, Gaussian, Dark Watcher, Serpent Drummer, then Hero 1. You can switch these up based on who is easiest to target, just keeping Incandescent and Hero 1 first and last, respectively. CALL OUT TO REFOCUS YOUR LORES AFTER EVERY HERO IS DEFEATED. (Every team member must individually target Heroes to focus Lores. You cannot focus Lores by targeting through a teammate.) Vanguard fight tips: Keep your team's Ranged Defense above 125% no matter what until most of the heroes have been taken out, so be prepared to call barriers a little earlier than normal if you need. Controlling Lores correctly while they are still active is vital, otherwise they can kill Hero 1 on their own. Dark Watcher can kill Illusion Decoys and damage through Phase Shift. If AoEs have brought any Vanguard members to low health, let AoEs continue to finish them off and focus your single target DPS on full-health targets. If your team wipes with Incandescent still alive, and you have to restart the fight, you will likely need to re-trigger her nuke before going in again, otherwise prepare to run away if you need to. Hero 1 can still hit the tank 2,300+ damage THROUGH capped Resistances and Defenses. So, the tank needs to have a lot of HP 🙂 Use an additional Incan mid fight to boost your team's heals if needed. For efficiency, getting Hero 1 to just below half HP with AoEs while you take out the rest of the Vanguard is fastest, as he will use his T9 and burn through it while you are fighting the others. If not, it'll just take a little longer to kill him at the end. Mission 5 Cont. (After Vanguard): Call for Barrier again after the cutscene and finish destroying GR. Incanner should stealth to Mr. Rodney and the Brickernauts--Run past them to the far corner of the room, incan the team, buff up, and then a Ranged DPS should pull Rodney and the 3 Brickernauts. Plan to have to hide behind the containers if you can't kill the Brickernauts in time. My rule of thumb is, "There is always one more Brickernaut explosion." So, wait a little longer than you need to before coming back out. If you aim right, tou can TP through the window into the room with the glowie Exit mission. Reset Particle Count Graphic setting if you want! Mission 6: Talk to Echo to spawn the glowies. Tank and one person should go to the north glowie. The tank should fold space or taunt the enemies to the left and away from the glowie . Do NOT just jump into the mob and then pull them off, as they will drop a location debuff that will continuously interrupt the glowie. For the Tower glowie, you can stealth this one by hiding behind the structure that the glowie is up against. The positioning has to be spot on though or they will see you. For the Southeast glowie, you can stealth this by hiding behind one of the tall bushes behind the glowie. If a Luddite turns around however, you will be spotted. So, cross your fingers and pucker up, or be ready to fight if they aggro. Gold Bricker ambushes will begin appearing as you clear glowies, so be quick! Once all glowies have been acquired, incan under the bridge and barrier/Clarion immediately, then jump on Ripplesurge /macro SHIM targetcustomnext enemy alive Shimmering (Use this to target and destroy the Shimmering Effusions when they spawn). Shimmerings must be destroyed with Single Target damage before they heal Ripplesurge and spawn instant death damage patches on the ground. If this happens, just avoid stepping on the damage patches. This isn't like Battle Maiden in Tinpex--these patches will instakill ANYONE that steps on them. Kill Ripplesurge Exit Mission Mission 7: If you have it, Clarion Radial's +range can be helpful for this specific mission, but you don't need to go out of your way for it. Assign two people to be Beam Runners that draw the Blue Beam away from the team during the Midas fight. My recommendation is Ice/Colds are great for this. I wouldn't recommend the tank, kin, or 2nd healer to do this role, as they will be far from the fight. Also, make sure these players turn their particle effects back up at least partially, or they won't properly see the blue beam in time. Take out the 3 blockade lines like a normal Aeon while being careful not to aggro the mobs inbetween. Optimal Method: Call team barrier at entrance. While the team is aggroing the first blockade line, 1 player flies/TPs to the second blockade line, hits Pyronic Judgement on them, and then TPs/flies back to the team at the first blockade line and they will follow. This will allow you to fight both of the first blockades while minimizing the risk of extra aggro. Ionic judgement could hit extra mobs, so I don't recommend it for this. Incanner stealths behind the final blockade line a little early and waits for the first two to be taken out. Incan to the last blockade line (preferably incan to the little walled pocket that's in between the blockade line and the where the portal will spawn. Jump and Fold Space or just AoE the mob to pull them to you. Go through the portal Ranged should snipe the 3 Wavelength Disruptors (Clarion Radial will allow Ice Blast users to do this too) If anything is aggroed, do not bring that aggro to the glowie. Activate glowie and proceed through the portal. Incan everyone to a corner of the next room and buff up. Target Priority: Smelter, Brickernauts, Rodney, Zoe. Note: If you cannot kill the Brickernauts, you just need to back up far from them. No need to break line of sight, the space is open enough that you can get a safe distance away. Once fight is over the team stays put and summons Lores. The tank should not use their lores here so that they don't steal the tank's aggro and prevent Midas from entering a lava pit. The Incanner should not use their Lores because they need to still stealth to the end. Incanner runs to the end and incans everyone to either the doorway or the first lava pit. Incanner can summon lores now. The correct lava pit order is clockwise starting at the front left and ending at the front right. Any other order is a bannable offense, imo. 😉 Or it should be, at least. Barriers can be used however people want at this point. You don't NEED to keep calling barrier teams anymore. NO ONE FLIES FOR THIS FIGHT EXCEPT THE BEAM RUNNERS. Two beam runners IMMEDIATELY move to the catwalks on the side of the room. The beam will alternatively target the furthest players from the group. You will see a blue beam appear first and just move out of it before the beam actually fires (the damage patch looks like the ones from fighting Battle Maiden in the Apex TF, but without the falling sword animation and it will be a darker blue). The person the beam targets can actually run back in and fight until the beam targets the OTHER beam runner, then they swap out. But it's important that both players run away from the team until the beam actually targets one of them. If only one person separates from the team at the start of each phase of the fight, it can still target the other players. For each Room warp, the beam runners still need to separate from the team and move to the sides of the room. Midas is actually "underneath" the map for each of the room warps (if you look down right when you warp, you will actually see your target reticle still on him underneath the map). This is why flight is a problem. If someone is flying, it counts as being far from Midas and they can draw the beam aggro away from the runners. First Room Warp at 75%: Defeat the Ripple Duplicates. If I am on a fire/fire blaster, I love dropping Targeting Midas in the middle, firing Pyronic Core Judgement (it will hit all of them if Midas is targeted), Inferno, Burnout, Inferno. If not save, burnout for the AV in the third room warp. Second Room Warp at 50%: Defeat the Midas Clone. It will either be the front center (6 o'clock) or the back right (1 o'clock). It's the only one that takes damage. Third Room Warp at 75%: Defeat Dr. Zeon. This is the time for burnouts for debuffers for powers like Heat Loss. It's not particularly hard here, it's just a long fight. Finish the Midas fight Follow the waypoint to the last room, pose for the camera before someone clicks the console glowie. Talk to the Arbiter to end the SF Make sure to choose D-Sync Enhancement in the reward tables. Congrats on your new Acc/Mez D-Sync you got for all that hard work. Definitely worth all that effort and stress. Let me know if you have any questions! Good luck and happy hunting!
-
@Cobalt Arachne Since you stopped by, I just wanted to say thank you for the hardmode content. For real. I have an entire new group of friends because of doing this content together with them, and it's given me a space I can also meaningfully contribute to in the game. Aside from the cool, unique, and more challenging gameplay, the kind of camaraderie it's provided has been wonderful during a really rough period in my life. Also, and this is my favorite thing about 4* content: It brought Role-based teamplay back to City of Heroes. Playing through 4star content feels like the old days where I'd be on lowbie teams struggling through low level CoT Ruin Mages or original posi 1 and crying out that we desperately need a tank or a healer. With things like Barrier providing so much survivability across the board, everyone is left to focus on what their role actually does best. It's less about steamrolling and more about using your role's strengths to eliminate/neutralize key targets quickly. Aggro control is meaningful for tanks again, blasters get to really blast and enjoy all the orange numbers on their screen again. I think it's the most under-appreciated/under-recognized contribution that hardmode content has brought to the game.
-
Thanks for the advice. I've feel bad because I don't want to spam multiple forums just for visibility, and I figure if I start posting here, more people will start to use these sections as they fill with more content. But I really like the idea of just linking here in another section just to help with the visibility. That's not the same thing as just copy/pasting a post, so I definitely feel better about that method!
-
YOU SCALLYWAG!
-
Let me clarify a couple of things: 1. "Anyone who isn't using a meta build is a carry." I mean that, specifically, one player is getting carried.If all 7 other people are using meta builds, the 8th person will likely get carried through and not contribute much. So, I've taken an 8th man who doesn't have a proper build or not really done 4star content at all through Omega Kong 2-3 times now, and other times we've completed the Omega Kong fight even after someone DCd. That's how strong the 7 meta builds are. The 8th man really matters more for helping with barrier rotations or using Clarion or Ageless in that situation. This is also how you can easily carry Masterminds and Sentinels through 4star content. Because things like Ice/Cold corruptors fill multiple roles, the 8th man can be whatever and it doesn't matter. As I said in a prior post, it's like being a lowbie on a +4x8 KM ITF, You'll be there, but you'll be doing far less than the 50s on your team, and you won't be able to finish without them doing most of the work. The other example in this context would be a total new player doing a speed ITF. Even if they have a proper build but have never done a speed ITF, they'll be lost, and they won't contribute much, relying on their team to do most of the work and TP them around. 2. "The roles matter more than the builds." They do. As long as you have the proper roles filled and people are using their powers correctly, you should be able to complete the task forces. It will be slower, but you can do it. If you're the person bringing a weaker build, you'll be contributing less to each fight. That's literally just how the math works out in terms of damage and tohit calculations, etc. And if everyone is bringing non-4star builds, then you cannot afford to have someone not filling a role, period. If your whole team is using regular pve builds, then the importance of EVERY player filling a proper role skyrockets. So, everything I've said in prior posts is still true, but which is more relevant will largely depend on what team you are playing alongside, and what you specifically are bringing.
-
Check most of my Lady Grey videos. Basically, go next to a mission door, click to summon your pet, and then immediately click the door so you enter while the animation is happening. The dummies will follow you inside, and so will the MDC 😉
-
TLDR; You can do any 4star with the right roles. Roles will always matter more than builds. IMO, it just makes it take longer, but doesn't really make it more interesting. Hey everyone, With the growing talk around procs, 4star builds, and what is and isn't possible, I decided to record a run of Aeon that would specifically avoid all of the meta sets and would only utilize general PVE builds. Here was the specific ruleset: No Kinetics, Nature, or Cold Domination No Ice Blast, Fire Blast, Fire Melee, or Battle Axe No Bio Armor or Rad Armor No 4star optimized builds, only general PVE builds (my Rad/Rad Corrupter had only 2-3 additional procs that weren't already included in an IO set (like a Glad Javelin Toxic Damage+5 Apocalypses in Proton Volley). No prep like respecs or acquiring additional accolades beyond what a toon already has T4 incarnates were obviously allowed because Hardmode was designed specifically with them in mind I also did not seek any specific powerset combinations other than that I did want an Electric Affinity. Otherwise, I just said I needed roles filled (like debuff, buffs, taunt, etc.) and this is what people had. Here's the video of the run with gameplay audio only: Rad/Rad Corruptor (Barrier) ME! AR/FF Corruptor (Barrier) FF/AR Defender (Incan) Psi/Time Corruptor (Barrier) Grav/Elec Affinity Controller (Clarion) Stone/Stone Tanker (Barrier for missions 1-2, Ageless for the rest of the TF) Energy/Elec Blaster (Barrier) Trick Arrow/Electric Defender (Barrier) Here is the biggest takeaway that I hope people get from this: Those who advocate for 4star builds aren't being elitist, nor are they saying it's impossible without said builds. In fact, I've never heard anyone seriously claim that. The closest I hear is that it's just not worth the time it takes to do it with regular builds (I'm inclined to agree). The 4* builds are not about being the only way to succeed, but they ARE about EFFICIENCY and SPEED, and honestly they do make things easier. There's a reason people don't do Shadow Shard TFs a lot. Not everyone has 2 hours to spend on one type of content. It's also horribly inefficient if you're trying to get as many DSyncs and HOs as possible to fund your altitis. This was not a hard run at all. None of us were even worried about difficulty at all. We were chillin and having casual conversation throughout most of this and joking about things like putting detention field on the Brickernauts (particularly hilarious moment of this at 55:00 when we can't kill literally the last Boomer we need to move to the next area). In reality, 4star builds mainly make these easier and more casual. 4star builds also enable specific strategies that would actually be impossible without the time saved by killing things faster. In Mission 3 of the ITF, the time saved by the increased DPS means that if everyone survives, you can actually have your Lores out for Romulus, Requiem, the Phalanx Computer, the giant robots, Vandal, and all of the Generals. It makes all of those fights much easier. I've completed the Vanguard fight in less than 2 minutes flat with an optimized team. I know of other teams that have taken down Dra'Gon/K'ong in less than 3 minutes. But this run took us more than that to kill only Hero 1. In my opinion, sitting there for 5 minutes chipping away at Hero 1 isn't interesting gameplay and there is no challenge. Once you are standing in the right spot, you just keep cycling your attacks until he dies. In that same vein, I hate how long it takes to defeat U'Kon Grai in a standard MSR now after the Page 7 GM changes. Not only is this not interesting to me, but I've also been experiencing several nerve/muscle issues in my arms (so I prob shouldn't make these long posts), limiting my play time and making me miss out on things I would like to do. With that limited play time, I want to experience as much as possible, so doing things efficiently is really valuable to me to minimize the physical impact to my body. Here are a few other takeaways I hope people get from this: 1. There is one specific build requirement that you need to keep in mind for all 4-star content--whoever is tanking needs to have a minimum of 2,400 HP. I thought this was just a best practice, but as our tank discovered and was shocked by, Hero 1 and Mr. Rodney were both hitting him casually for ~2,300 damage through full defense and resist cap from Barriers. So, if you want to tank 4star content seriously, get yourself more HP. 2. Your roles matter more than your powersets. While the roles can overlap, here is what you need: 2 Defense buffs 2 AoE healers (kin and nature/elec affin are the best options), 1 Taunt, 2 debuffers (prioritize -regen, and -res, with -heal being equal priority for Romulus in ITF and Dra'Gon/K'ong in LGTF.) 2 DPS You can immediately see in that role list why Cold Domination is so good--you get AoE key stat debuffs, You get def buffs for your team, you get an additional source of end recovery, and you get high DPS with ice blast. One Ice/Cold fills 3 different roles simultaneously, making it much more valuable than just a single toon. This is also why Thermal just isn't as good--Resistance buffs are not as helpful, because, obviously, attacks that don't hit you will always do less damage than the ones that do. A typical, meta 4star run with powersets is: Bio/BA Tank or Bio/BA Scrapper (though, admittedly, anything with high regen and an absorb is good here. I've even tanked all the 4* TFs on my shield/BA Tank) 3 Ice/Cold Corrs 2 Ice/Fire or Fire/Fire Blasters 1 Ice/Kin 1 Ice/Nature The reason Ice is so good, beyond just what procs it can take and the versatility of the various powers, is that it also gives you another beautiful advantage: You can control when enemies die. Instead of relying on sudden bursts of damage from Inferno, stacking Blizzards allows things to die at a slow enough rate that you can track them and adjust your positioning accordingly to avoid things like Nullification fields. For my next demonstration, I suspect that regular builds could actually beat the Omega K'ong fight, given you have 25 minutes to do it. I did a run a few weeks ago where we had all the meta power sets, but only myself on a Kin and our Nature were 4-star optimized builds. We completed the TF, but failed the K'ong fight, but our strategy did not include stacking Dra'Gon and K'ong whenever the gas was down to double up the DPS+debuffs, so we could not overcome Dra'Gon's second heal. We were basically stuck with Dra'Gon at a little under half-HP until the time ran out. Again, I think we will be successful, but I don't think the fight will be any harder, I just think it will take longer. The only risk there is that there are more chances to mess up a barrier call, get your positioning wrong, get caught by a stray shot, etc. That's really it though. The fight isn't any harder or more complex, it's just...slower. Hope you enjoyed this and thanks for coming to my TED Talk. What are your thoughts?
-
First, thank you so much for the kind words. I've been working on hard on making Hard Mode more accessible from the resources I have available. It really means a lot to me that the post was so helpful for you and made such a big impact! I was honestly a little surprised the guide got such little active response, whether positive or negative. But, I do have more coming regardless! That being said, I do want to make one thing really clear that I don't think I've done enough: You absolutely can do all of the hardmode TFs without proc builds and with normal PVE builds. It's moreso that you're wasting build space that could be used to put toward damage via procs, regen, and HP, since barriers will cap your def/res. 4*-optimized builds are for efficiency and speed, but they are not required to beat the TFs. I'm actually running a 4* Aeon tomorrow night that will be normal PVE builds, and have no Kinetics, Nature, Cold Dom, Ice Blast, Fire Blast, Battle Axe, or Bio/Rad Armor. All of these are the top meta powersets for 4* content. It's definitely possible, and it will likely be easier to survive! The real problem is how much LONGER it will take to complete. You really just need the following roles: 1 Taunt for aggro control, 2 DPS, 2 Debuff, 2 Def Buff, 2 healers (Kin & Nature or EA are the best combo for healers). I know that totals 9, that's why Cold Domination is so good--Defense buffs AND huge debuffs in one set 🙂 The difference between proc builds and general content builds in 4* content is being done with the 4* in 30-45 minutes versus being done in 2-3 hours. That's why they matter. There's a reason it's so hard to Shadow Shard TFs, and it's not their difficulty. It's their length. Procs are great, but they require too many conditions to be met to be used for generalized content. They're really only effective in situations where you can rely on your team/league to assist with buffs--iTrials, MSRs, Hami raids, and Hardmode content
-
Gotta throw my enemies off my trail.
-
I'm just tryna be more OP. This game is too hard 😞
-
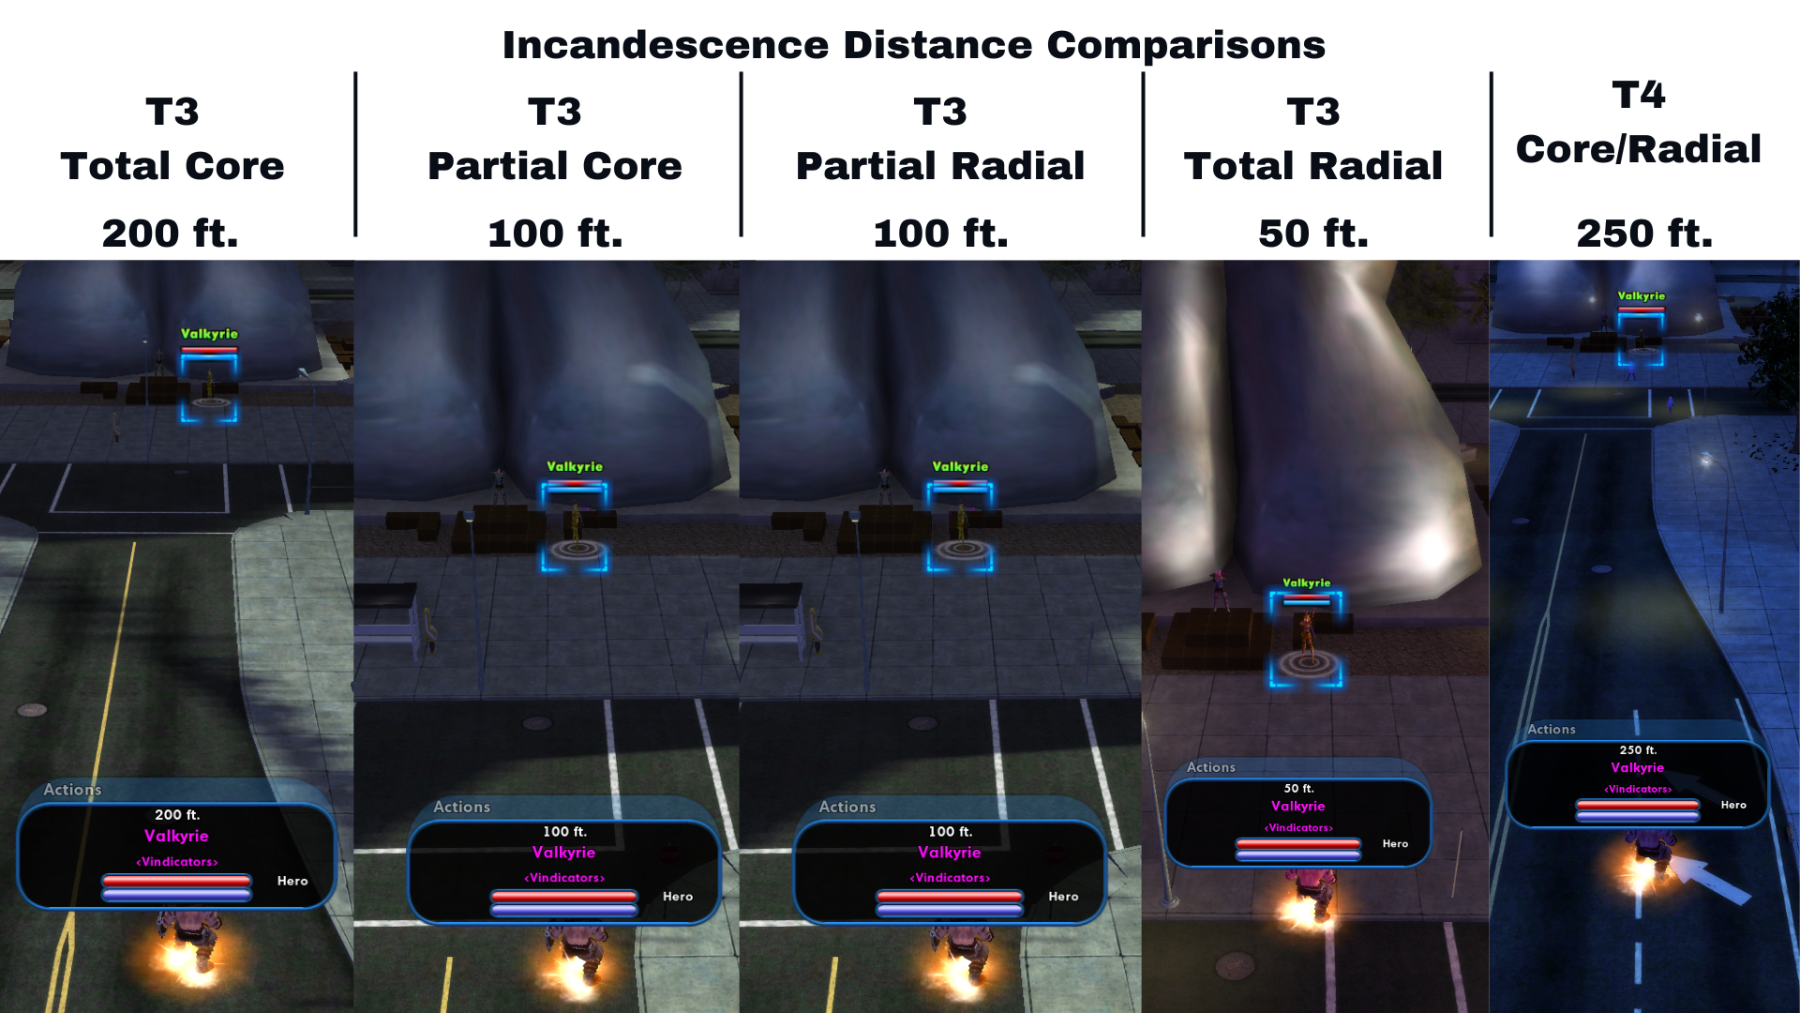
TL;DR Would it be unreasonable or difficult to simply add a Max Teleport Distance: ## feet to each of the power descriptions for Incan? It's a key feature of the power, and my hope is that it's as simple as adding some text, but this would be really helpful. It would be a simple indicator of a tier difference without rewriting the entire description. I discovered a couple of months ago that the Incandescence powers all have different max TP ranges, but that is not noted anywhere in the power description nor the power details, that I could see. And there are scenarios in which that incan TP range is surprisingly consequential in some endgame content. I've been working on a single-run MoKeyes strategy that utilizes a tight grouping of the league and using 6-8 Incans to move the league between two pre-determined waypoints. There is only a 4-second window of time in which you can move out of the Obliteration beam target (from 0:29-0:25 on the Obliteration Beam timer). The idea was that without having to leave the group, my incanners can literally just aim at the next waypoint and fire at 0:29 on the timer. But the green circle is big, so the waypoints are pretty far apart. So, I would recruit some people to use incan specifically, and then I would be confused as to why I would see someone run out from the group to fire theirs off, and many times this would mean they have to leave early, or if they are the one Disintegrating, they are now missing heals at what could be a critical moment. I couldn't figure it out until I happened to play on a toon that had T3 Radial and discovered the range was virtually nothing compared to Core. I hopped on the test server to make all of the T3/T4 incans and tested each to compare, and I believe T1 and T2 Incans are all the same 50 ft. radius, but the differences between T3s and upgrading to T4, as well, are pretty massive, but are not communicated to the player in any way. Prior to this, I could not figure out why it would even be worth upgrading to T4 incan because the power descriptions don't actually indicate any difference from T3 to T4, unlike with the other Destiny Incarnate powers which indicate both a longer effect duration and a wider radius. I would love for the Max TP Distance to be added to the power descriptions for each tier of Incandescence. It would highlight a key difference between tiers and powers without needing any nerfs, description rewrites or anything. I guess the one problem would be players misunderstanding that to mean they can only incan their team that far (like team teleport, for example), not realizing that it actually means that's how far the teleport reticle can be aimed, but even with that misunderstanding, people would still end up choosing the highest range they can, even if they think the power itself is worse than it is lol. Honestly, my fear in suggesting this is all the ranges get somehow nerfed instead, so I'm I'm being selfish in begging for that not to be the outcome of this suggestion. The Incan tactic I described for Keyes is how I help my league win in a situation where literally any one person on a full league just rubberbanding a little can cost the whole league 1-2 badges, whereas the incan approach for MoKeyes lowers that risk substantially since now only one player has to do anything to keep everyone safe. Lowering the effective range of the higher distance incans would also hurt some hardmode tactics too, so I would hate to see the ranged decreased if any changes would be made.
-
If I am there, there is an additional role on Team 1: AFK. I'm an expert at it, tbh. AMA
-
End game 1-4 star content AT/Powerset optimization
Projector replied to Snarky's topic in General Discussion
Sounds like you hard-carried your team, not the other way around. haha. That Recovery pun call out is beautiful and I respect you forever for it. Even 1*s get hectic, especially a 1* ITF where there are just constant streams of enemies and chaos happening. Aeon and LGTF feel fast-paced in movement, but ITF can be wild. The Shadow Crystal mission is make or break for many teams. lol. So don't feel bad for feeling lost or feeling like you were carried. Regardless of whether you were carried through or not, a player with your mindset, who is seriously trying and wanting to learn and understand it is exactly the kind of player I would want to bring along. I would just make sure you aren't on a pivotal role on the team until you feel more comfortable. It's really hard to play a kin in a situation where you have no idea what's going on, for example. Honestly, my method for LGTF doesn't really involve a whole lot of jousting, or even needing faster reflexes. You can navigate most of these fights with anticipation. If I know an Assault Suit is getting low, for example, I will make it a point to not use any long animation powers. As much as it's within my power, I'm not going to hit "Inferno" right next to a low assault suit. I will reposition first, then use it. You also get clear visual indicators before Kong is going to jump corners in a 4*--the gas stops. Now, he probably won't jump for another 5-10 seconds after that, but you know that it's coming, and you can plan play with that in mind. Not saying that any of these situations happened to you, or that you would do these things, I just mean they are examples of things that people commonly think of "reactive" situations that can actually be approached proactively. Usually the unexpected things that require an instant reaction are things that will kill more experienced/knowledgeable players, too, so don't knock yourself there, either. -
Wanted to make a quick correction on this, which I will also add as an edit to the OP. Someone more knowledgeable than me gave me some helpful feedback and pointed out something I wasn't aware of: When K'ong and Dra'Gon are Psi-Protected, their health regen is frozen. That happens each time they get reinforcements, so the Magus, the Suit, and the Scientist spawns all also spawn with a psi-protect field. This actually gives you three really solid checkpoints if you need them. For example, if you can hold out until a reinforcement point, and then a teamwipe happens, they won't regen at all! Whereas, if you wipe and reset inbetween these "checkpoints," it's likely they will have regened either most or all of the damage that's been done to them. Luckily, you won't have to repeat each checkpoint, so if Dra'Gon heals above 75% after you dealt with the Maguses, you won't have to deal with them again. So, don't kill a Psi-Protector Primate until you are confident your team will survive and everyone is in a good rhythm. It's totally safe to pause and focus all your attention on the reinforcements, then take out a Psi-Protector Primate and continue damaging Dra'Gon and K'ong!
-
Zerg them and intentionally do NOT use holds so that you can still kill it has been the approach of every 4* ITF I've done.
-
End game 1-4 star content AT/Powerset optimization
Projector replied to Snarky's topic in General Discussion
@Maelwys Covered this just fine, but to put it in even simpler terms: I aim for at least 50% Accuracy total in Mids when building for 4-star content specifically. To see this specific stat, click the View Totals button near the top, then go to the second tab, and you will see Accuracy at the bottom under To-hit. This is usually accomplished with 3-4 purple sets that have the 10% Accuracy set bonus dropped into a few slot mules and one ATO set. Two of these mules are usually your T1 blast (like ice or fire blast) and Brawl. On one of my tanks, I actually took Ring of Fire and threw 5 Gravitational Anchors into it as a mule, too. Though, that occasionally does get used when fighting Zoe for the first time in the Aeon SF. Comparing to the Kin I referenced in my first comment, I looked at that Kin's build from yesterday and his accuracy was at 15% and he was also not running Vigor. For a Kin, especially if you're a corruptor, my current understanding is that it's optimal to go Vigor Core, not Radial or Intuition. The healing and accuracy boost is pretty massive, especially considering that out of the box, Corruptors don't heal/buff as much as Defenders do. I am also not trying to be an expert here. This is advice I have been taught, have found clear success with, and have adopted into my own approach to building. I'm sure your build is great for regular content though, so I hope you're finding a lot of success. Hope this helps! -
End game 1-4 star content AT/Powerset optimization
Projector replied to Snarky's topic in General Discussion
Quick disclaimer: My entire reply is specifically about 4* content, not 1*-3*. I tend to agree on the "just a carry" portion, for sure. The problem with this comes in the fact that many people have been the carry in a 4* team, but did not think they were being carried, so you hear things like, "Yeah, I did a 4* on my regular slotted blaster with no problem! You don't need 4* builds or anything" They fail to realize they missed the majority of their attacks, and the attacks that did hit basically tickled enemies. My rad/fire melee tank that has a 4* optimized build for max dps still once only hit Dra'Gon for like 5 damage with Greater Fire Sword the other day. The resists are just that high. I did my role as a tank, no problem, but I won't pretend like I actually contributed to the dps output for the Omega K'ong fight. So yes, you can play anything on a 4* run, provided you have 6-7 other people that are all optimized and willing to carry you through it. Though, at that point you're basically just a walking Barrier user and that's about it. The exception here being a Tank/Brute with taunt (or scrapper with their ST taunt in ITF/Aeon since it's mostly solo target kills in those). These are the most likely to be able to waltz into 4* content with a non-optimized build and meaningfully contribute through actual tanking skills, such as keeping enemies facing away from the team, or thoughtfully dragging the Assault Suits to where their null fields won't threaten your team at all when they explode. I brought a Kin on a 4* run yesterday who had a regular PvE build that did not have high accuracy, and he was missing critical buffs the majority of the time. We succeeded, but it was way more stressful for the team and it was way less fun for him to see "deflected" the majority of the time. And I think that fun factor is a huge contributing factor. Being a carry in a 4* TF is like being a lowbie on a +4 ITF or a fire farm. Sure, slogging through a +4 KM ITF with your incarnated, fully built 50 toon is fun, but being even level 49 without proper enhancements in that same situation SUCKS. Every time I have brought a lowbie to a KM, even if it had training IOs in it, was just an absolute miserable time. Pretty sure your damage is so low you are actively healing EBs when they use Unstoppable 😂 It doesn't feel good to see such low damage numbers, miss most of the time, and die in 2-3 hits because everything is +5 to you. Some times I have even felt quite a bit of guilt for bringing a lowbie in those situations, thinking I may as well be sitting AFK in a farm for all the nothing I'm contributing to the team. Aside from that, I genuinely don't think the Omega K'ong fight is actually possible without dps-optimized builds and proper debuffing (that needs to actually hit its target, such as Benumb, Heat Loss, Acid Arrow, Lingering Rad, etc.). Even then, if you miss a single heal or are slightly out of position, then someone is going to die, throwing off a lot of rhythm and complicating the fight significantly. The Excalibonk, in my mind, is the single hardest thing to acquire because of the sheer amount of prep work, understanding of movement/timing, and dps/debuffing needed to succeed in that fight. The last thing I will add on this point is that there is one more thing optimized builds do: They show that someone actually cares enough to take the content seriously. It's called hard mode for a reason, and someone waltzing in thinking that it's going to be just another TF is in for a rude awakening. I have encountered some massive toxicity from players like this who thought doing hard mode content should be easy or simple for any AT, and they don't listen, think the leader's instructions aren't a big deal or are optional (such as barrier calls), and don't know how to position properly. And usually the biggest problem players on the teams are those who brought "whatever" into a 4* team. These are the players spamming holds on the green Nictus barrier in an ITF and telling you to STFU when you ask them to stop, or dying to every single Brickernaut despite clear instructions being given and everyone spamming RUN so much that they got chat timeouts, then after the 5th or 6th time STILL raging that they don't know why they keep dying and going on about how their build is so great and something must be wrong with the game. These are the players ignoring Shimmering Essences when fighting Ripplesurge, or getting up close and personal with the Hostless or trying to become one with the Assault Suits in death. And somehow, these are always the players who perfectly time being dear or are too far away from the team when it's their turn to barrier, so the team wipes seconds later. I'm not saying a 4* optimized builds means someone is going to know how to do those things, but it tells me that they likely care enough to listen to direction and be a team player, and they are willing to learn from the mistakes they make. That matters to me more than anything else, because it tells me that you value not only your time, but my time and the team's time, as well. There aren't any badges gated to 4* content that I am aware of. Otherwise, there wouldn't be so many people out there that have collected all of the badges without having ever touched 4* content. Any hardmode badges can be gotten at 1* difficulty, and it hardly takes more to do a 1* than it does to do a regular speed. Just a little more knowledge about TF mechanics. Thanks for coming to my TED Talk! This is all my opinion from my experiences doing 4* content with PUGs and with premade teams, so I'm happy to hear other opinions and experiences too! EDIT: Had a sentence out of place lol -
Reposting here form the Guides section on the suggestion of @Glacier Peak (Thank you). Didn't realize this section existed. Just autopiloted to Guides and posted it there. Over the last few months, I've gone down the rabbit whole of Hard Mode content and as I both have immersed myself in it as well as tried to help others, I realized there is a not a lot of information on how to actually do the different 4-star content. There aren't even a lot of videos demonstrating any of it, leaving a lot of it a total mystery. So, I started posting video content of some of the runs I feature, including creating a video walkthrough of the Omega K'ong fight from my perspective as the tank. Since there is no way to practice that fight outside of a 4-star context, and it's so busy visually that it can be very hard to tell what's actually happening or why you die at certain moments, I wanted to demystify some of that, set proper expectations for different phases of the fight, and help new people understand the important considerations to keep in mind. It's a longer video because I wanted to explain the context of WHY it's important to approach things a specific way, not just explain what to do. This was done on Excelsior, and I know different shards have different ways of approaching content. This is probably not the only way to do it, but this kind of approach has also resulted in sub-30-minute runs of the 4-star LGTF, and it's the only way I know how, so I wanted to share it since I have found success. Note that you have 25:00 on timer when Omega spawns, and with 4-star optimized builds and no full teamwipes during the fight itself, we still only completed it with 9 minutes remaining (granted, fire/melee on my tank is NOT a great option in this fight). Here are the main points for those who don't want to watch Setup: 1 T4 Incan Core, 1 T4 Clarion Core, 4 Barrier Core Teams (T1: 2 people, T2: 2 people, Flex 1: 1 person, Flex 2: 1 person) Gather in hospital just before Dra'Gon room Lores out, buff Lores (tank does not summon lores as they can pull aggro off of tank. I learned that after this video) Barrier and Clarion timing: Team 1 Barrier and Clarion in Hospital once pets are out Incan runs in and incans onto Dra'Gon Target Lores onto Dra'Gon (VERY IMPORTANT) After 25-30 seconds, Flex 1 barrier is called, this timing repeats every 25-30 seconds in order: Team 1, Flex 1, Team 2, Flex 2. The person calling Barriers should be on Barrier Team 1, as their own Barrier cooldown of 2 minutes can be used to track when it's time to call for the next barrier. Targeting Priority (once Kong spawns): War Priests, Chief Magus, Psi-Protector Primates, Dra'Gon, Assault Suits, Scientists. Positioning: Everyone fights Dra'Gon from behind, but hugs closesly to Dra'Gon for Kinetics buffs, heals, end, etc. Tank always keeps Dra'Gon in a corner after Kong spawns Avoid Omega K'ong whenever possible. He will make whatever corner he occupies an instant death zone. Fight Phases: 100-75%: Focus Dra'Gon (until Kong Spawns, no big AoEs or Judgements to avoid freeing psychicstt 75%-50%: Fold Space Chief Maguses to Dra'Gon, everyone bursts down one Magus at a time targeting through a shotcaller, killing a Primate during this if you can. Tank stays focused on Dra'Gon, Kin still heals off of Dra'Gon. It is not worth waiting to find a Primate before killing the Maguses. 50%-25%: Fold Space Assault Suits so they don't teleswap you around the room or into Kong gas, kill a Primate, and then focus Dra'Gon with single target damage and let AoEs bring assault suits low. As soon as assault suits are low enough to spike, incan or move away from them and spike them before they are able to follow you into the next corner. Rinse and repeat until each Assault Suit is dead. And of course, avoid neural fields until they despawn. 25%-0%: Fold Space Scientists and let AoEs kill them. Kill Primate and focus Dra'Gon until he is dead. Hope this is all helpful for someone! EDIT: Someone more knowledgeable than me pointed out something I wasn't aware of: When K'ong and Dra'Gon are Psi-Protected, their health regen is frozen. That happens each time they get reinforcements, so the Magus, the Suit, and the Scientist spawns all also come with a psi-protect field. This actually gives you three really solid "checkpoints" if you need them. For example, if you can hold out until a reinforcement point, and then a teamwipe happens, they won't regen at all! So, if barrier timers are weird or off because people were dying a lot, or you just can't seem to get into a good rhythm and it feels chaotic, or maybe things are rough and lores are about to come back up! That can be a good opportunity to wipe and reset. That being said, you shouldn't wipe if things are still going smoothly, even if lores are coming back up. Don't take those checkpoints unless you absolutely have to, as they will eat up valuable time. More than 2 wipes and you likely won't complete the fight in time. Whereas, if you wipe and reset inbetween these "checkpoints," it's likely they will have regened either most or all of the damage that's been done to them. Luckily, you won't have to repeat each checkpoint, so if Dra'Gon heals above 75% after you dealt with the Maguses, you won't have to deal with them again. So, don't kill a Psi-Protector Primate until you are confident your team will survive and everyone is in a good rhythm. It's totally safe to pause and focus all your attention on the reinforcements, then take out a Psi-Protector Primate and continue damaging Dra'Gon and K'ong!