

Cakes
-
Posts
28 -
Joined
-
Last visited
Content Type
Profiles
Forums
Events
Store
Articles
Patch Notes
Posts posted by Cakes
-
-
The mo durable version is legendary no doubt (already build it out as a saves preset infact =p) I was wondering about the zero defense version that @Tsuko came up with, but instead of rad/ss it was invuln/ss
-
On 8/24/2022 at 7:24 PM, Tsuko said:
Defence is for teenage gurl : this build can free the 4 stars oracles solo

Is there a INV/SS version of this concept?? 😃
-
Here is my slotting for cross punch, all proc'd out. Double stacking rage helps the to-hit
I have 3 different builds, one is with procs for dmg/one for exemping/one for pure tanking but usually my cross punch stays slotted the same -
Power creep has gotten so high that most t9 powers arnt in tune with set bonuses/incarnates anymore, but good on you for making it work for your play through!
Most players avoid or mule those powers, but in the early days they might have seen some use
-
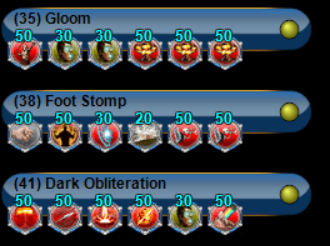
If you wanna take your inv/ss to the next level, consider soul mastery (gloom/obli) and cross punch, all procc'd out
or Handclap (for rage crash mitigation)
-
 1
1
-
-
On 8/22/2021 at 6:21 PM, DreadShinobi said:
Well, no Hasten and low global recharge jump out to me. Energize will have a 15 second downtime (66% uptime) which will have an affect on your endurance usage. No patron snipe or patron aoe are going to hold your damage back as well. Your AS recharges in 5.13s, and Crushing Uppercut in 8.85s, and Spinning Strike lacks a forcefeedback proc.
Take a look at my build. It doesn't use a patron AoE, the build is more single target oriented in role, but Mu Mastery is a great choice too for the ball lightning and zapp. This is a high recharge energy aura build that brings AS rchg down to 3.46s, and Crushing Uppercut to 6.21s, with double proc moonbeam at 6.29s. The total global recharge is +228.75%, or 248.75% with sg base buff. The enhanced value of AS is 348.63%, which is damn close to the recharge cap. Sprinkling in forcefeedback procs will cap out your recharge on things like crushing uppercut bringing it down to a 5s cooldown. All your damage is loaded into those crushing uppercuts and moonbeam so maximizing the recharge here has a huge effect on how the character feels to play. Energize and Hasten are also perma without forcefeedback. The build fit in 2 slots in Hurdle and 2 slots in sprint, and uses Musculature radial for a little extra in sprint in swift, the high unsuppressed movement speed feels great. Your toggles don't need to be slotted for endredux when energize is perma.
Villain Plan by Mids' Reborn : Hero Designer 2.6.1.25
https://github.com/Crytilis/mids-reborn-hero-designerClick this DataLink to open the build!
Level 50 Magic Stalker
Primary Power Set: Street Justice
Secondary Power Set: Energy Aura
Power Pool: Speed
Power Pool: Fighting
Power Pool: Leaping
Power Pool: Experimentation
Ancillary Pool: Soul MasteryVillain Profile:
Level 1: Heavy Blow -- SprBlsCol-Acc/Dmg(A), SprBlsCol-Dmg/EndRdx(15), SprBlsCol-Acc/Dmg/EndRdx(15), SprBlsCol-Acc/Dmg/Rchg(17), SprBlsCol-Dmg/EndRdx/Acc/Rchg(23), SprBlsCol-Rchg/HoldProc(25)
Level 1: Hide -- LucoftheG-Def/Rchg+(A), ShlWal-ResDam/Re TP(50)
Level 2: Sweeping Cross -- Arm-Dam%(A), Arm-Dmg/EndRdx(5), Arm-Acc/Dmg/Rchg(5), Arm-Acc/Rchg(7), Arm-Dmg(7)
Level 4: Kinetic Shield -- LucoftheG-Def/Rchg+(A), LucoftheG-Def(34)
Level 6: Assassin's Strike -- SprStlGl-Acc/Dmg(A), SprStlGl-Acc/Dmg/Rchg(9), SprStlGl-Dmg/Rchg(11), SprStlGl-Dmg/EndRdx/Rchg(11), SprStlGl-Acc/Dmg/EndRdx/Rchg(13), SprStlGl-Rchg/Hide%(13)
Level 8: Power Shield -- Rct-ResDam%(A), Rct-Def/EndRdx/Rchg(25), Rct-Def(31), Rct-Def/EndRdx(40), Rct-EndRdx/Rchg(42), Rct-Def/Rchg(42)
Level 10: Entropy Shield -- EndRdx-I(A)
Level 12: Build Up -- GssSynFr--Build%(A), GssSynFr--ToHit/Rchg(50)
Level 14: Hasten -- RechRdx-I(A)
Level 16: Kinetic Dampening -- GldArm-3defTpProc(A), StdPrt-ResDam/Def+(17)
Level 18: Spinning Strike -- PstBls-Acc/Dmg(A), PstBls-Dmg/EndRdx(19), PstBls-Acc/Dmg/EndRdx(19), PstBls-Dmg/Rng(21), PstBls-Dam%(21), FrcFdb-Rechg%(23)
Level 20: Boxing -- AbsAmz-Stun(A), AbsAmz-Stun/Rchg(43), AbsAmz-Acc/Stun/Rchg(46), AbsAmz-Acc/Rchg(46), AbsAmz-EndRdx/Stun(46)
Level 22: Tough -- UnbGrd-Max HP%(A)
Level 24: Weave -- LucoftheG-Def/Rchg+(A)
Level 26: Shin Breaker -- SprAssMar-Acc/Dmg(A), SprAssMar-Dmg/Rchg(27), SprAssMar-Acc/Dmg/Rchg(27), SprAssMar-Dmg/EndRdx/Rchg(29), SprAssMar-Acc/Dmg/EndRdx/Rchg(29), SprAssMar-Rchg/Rchg Build Up(31)
Level 28: Energy Drain -- LucoftheG-Def/Rchg+(A)
Level 30: Combat Jumping -- LucoftheG-Def/Rchg+(A)
Level 32: Crushing Uppercut -- Hct-Dam%(A), Hct-Dmg/EndRdx(33), Hct-Dmg/Rchg(33), Hct-Acc/Dmg/Rchg(33), Hct-Dmg(34), UnbCns-Dam%(34)
Level 35: Energize -- Prv-Heal(A), Prv-Heal/EndRdx(36), Prv-EndRdx/Rchg(36), Prv-Heal/Rchg(36), Prv-Heal/Rchg/EndRdx(37), Prv-Absorb%(37)
Level 38: Moonbeam -- StnoftheM-Acc/Dmg(A), StnoftheM-Dmg/EndRdx(39), StnoftheM-Dam%(39), StnoftheM-Dmg/EndRdx/Rchg(39), StnoftheM-Dmg/ActRdx/Rchg(40), Apc-Dam%(40)
Level 41: Soul Storm -- BslGaz-Acc/Hold(A), BslGaz-Acc/Rchg(42), BslGaz-Rchg/Hold(43), BslGaz-EndRdx/Rchg/Hold(43)
Level 44: Dark Blast -- CldSns-ToHitDeb(A), CldSns-Acc/ToHitDeb(45), CldSns-%Dam(45), CldSns-Acc/Rchg(45)
Level 47: Summon Widow -- ExpRnf-Acc/Dmg(A), ExpRnf-Acc/Dmg/Rchg(48), ExpRnf-EndRdx/Dmg/Rchg(48), ExpRnf-Acc/Rchg(48)
Level 49: Speed of Sound -- WntGif-ResSlow(A)
Level 1: Assassination
Level 1: Brawl -- Empty(A)
Level 1: Prestige Power Dash -- Empty(A)
Level 1: Prestige Power Slide -- Empty(A)
Level 1: Prestige Power Quick -- Empty(A)
Level 1: Prestige Power Rush -- Empty(A)
Level 1: Prestige Power Surge -- Empty(A)
Level 1: Sprint -- Run-I(A), Run-I(50)
Level 2: Rest -- Empty(A)
Level 4: Ninja Run
Level 2: Swift -- Run-I(A)
Level 2: Health -- NmnCnv-Regen/Rcvry+(A), Mrc-Rcvry+(3), Pnc-Heal/+End(9)
Level 2: Hurdle -- Jump-I(A), Jump-I(3)
Level 2: Stamina -- PrfShf-EndMod(A), PrfShf-End%(31), SynSck-EndMod/+RunSpeed(37)
Level 38: Experimental Injection
Level 1: Combo Level 1
Level 1: Combo Level 2
Level 1: Combo Level 3
Level 0: Marshal
Level 0: Invader
Level 0: High Pain Threshold
Level 0: Born In Battle
Level 50: Ageless Core Epiphany
Level 50: Musculature Radial Paragon
Level 1: Quick Form
------------| Copy & Paste this data into Mids' Reborn : Hero Designer to view the build | |-------------------------------------------------------------------| |MxDz;1582;736;1472;HEX;| |78DA65944B4F135114C7EFB4534B0B151028607958045A5AA98CBA303E62048A022| |DC190A871D34C70AC8DB56DDA12C1C7C2857B450D9FC0851B371AF55B883C35EA4A| |0DA0421156AEC6D3F91FDA269D64F23BF73FE775EF9D7BC3D38355AF2E3C3C2724C| |7405CCD64221359357E4B4B5BC26A34366916F458E975B21C096B714D0BF4A7D53B| |F15822EADA9307B51B5A22A30582092D1D9D899C9F4AABC23E9E4CC60313294DBBE| |E30CCA158F46696A2AA8C5148535334A83706C1E994968EDDD61259351B4B269A83| |A9D864602FF944722A1E09AB99AC969E69A266FAE85D710A7E748B782C0BA1C862F| |F13E62C58F314743E039B9E83FD360A938C58493490A1D884326A36B8EAE44F4297| |A5B3264393CF304F81FB4E334F820394CFCCF9CC9CCF5D0F7EA27C167CB358E6CD4| |6FD8A05D0FE91B908562D3197C141CA6BE558EB2EFA6BDA01DBB6404F0EECD966FE| |0583146B43ACB0B985A17DA65E2A3137A9F2257A575E801DB4CB0EF677F8E13F443| |9AA795ED5C790B7A69184569BF842B96A79FD6B5FC3FFC01BE63BB0FE2DF33DE87C| |845A12D5AAE335AE1B81E61B057B43CC30730C34534C03F7D7F00FBDC8A435B2D6C| |8EBFE95FA6AE6BE9AA7B1DF07679877C1967BCCFB60DB03F022CDD7254C463E17E7| |73528D56AED1CADA37AAD1CE35DAFDE8EF908FE9617A41773773181CA61A1DBCA71| |DEB98C7E10DE62FE66FB0F30F7313CCBB7771DDAE0F58D3EE79E6127311F42C3015| |D4CD97F022D6EC5D32197BD8B30CFA5698ABE01AF9FAD9D7FF1DDA911FCC75E64F3| |0DF72807D03DBA8757487B9CBCC81E33E9CDDFC5AF6B93027975C388B7A8B5C38D3| |F9A1AE0B5F99D257A62865CAF132E5449912924BEE805EAC95C21C970B7780900C6| |F5B0D9D7028FAA69DBEF21F217144AEA899A4CBF84B4C23448F4D54B831D3ADA28F| |24791167626E97C6CF62B5DAE6C0CE9C6C70CC57D87D7DAD78FBE9EB25F646897DC| |D6ECCCDB0AF96D8574AEC4B25F61C1D49856343799BF5515F7187FE0301A50A71| |-------------------------------------------------------------------|
What's the attack chain for this build? @DreadShinobi im suuuuuuuper curious
-
Not to highjack the thread here, but what's your opinion on sav melee/dark armor?
the building skill displayed here is eye opening, and curious what I can do to improve or jsut scrap it and reroll
-
Ok, decided to make a base line here to share from the research I did. Really wanted to play with the tool box DA has to offer, in exchange for a bit of defenses
This Hero build was built using Mids Reborn 3.0.4.7
https://github.com/Reborn-Team/MidsRebornClick this DataLink to open the build!
Cyan-: Level 50 Natural Scrapper
Primary Power Set: Katana
Secondary Power Set: Dark Armor
Power Pool: Teleportation
Power Pool: Leaping
Power Pool: Speed
Power Pool: Fighting
Ancillary Pool: Body MasteryHero Profile:
Level 1: Gambler's Cut- (A) Superior Scrapper's Strike - Recharge/Critical Hit Bonus
- (3) Superior Scrapper's Strike - Accuracy/Damage/Recharge
- (3) Superior Scrapper's Strike - Accuracy/Damage/Endurance/Recharge
- (5) Achilles' Heel - Chance for Res Debuff
- (5) Gladiator's Strike - Chance for Smashing Damage
- (7) Touch of Death - Chance of Damage(Negative)
Level 1: Dark Embrace
- (A) Unbreakable Guard - Resistance
- (7) Unbreakable Guard - Resistance/Endurance
- (9) Unbreakable Guard - RechargeTime/Resistance
- (9) Unbreakable Guard - Resistance/Endurance/RechargeTime
- (11) Steadfast Protection - Resistance/+Def 3%
Level 2: Flashing Steel
- (A) Eradication - Chance for Energy Damage
- (11) Fury of the Gladiator - Chance for Res Debuff
- (13) Obliteration - Chance for Smashing Damage
- (13) Superior Critical Strikes - Accuracy/Damage
- (15) Superior Critical Strikes - Accuracy/Damage/RechargeTime
- (15) Superior Critical Strikes - RechargeTime/+50% Crit Proc
Level 4: Death Shroud
- (A) Obliteration - Damage
- (19) Obliteration - Chance for Smashing Damage
- (19) Obliteration - Accuracy/Damage/Recharge
- (21) Obliteration - Accuracy/Damage/Endurance/Recharge
- (21) Obliteration - Damage/Recharge
Level 6: Combat Teleport
- (A) Blessing of the Zephyr - Knockback Reduction (4 points)
Level 8: Divine Avalanche
- (A) Superior Scrapper's Strike - Accuracy/Damage
- (23) Superior Scrapper's Strike - Damage/Endurance/Recharge
- (23) Superior Scrapper's Strike - Damage/Recharge
- (25) Luck of the Gambler - Defense/Increased Global Recharge Speed
Level 10: Combat Jumping
- (A) Kismet - Accuracy +6%
- (25) Luck of the Gambler - Defense/Increased Global Recharge Speed
- (27) Reactive Defenses - Scaling Resist Damage
Level 12: Obsidian Shield
- (A) Unbreakable Guard - Resistance
- (27) Unbreakable Guard - Resistance/Endurance
- (29) Unbreakable Guard - Endurance/RechargeTime
- (29) Unbreakable Guard - +Max HP
Level 14: Build Up
- (A) Gaussian's Synchronized Fire-Control - Chance for Build Up
- (31) Rectified Reticle - To Hit Buff
- (31) Rectified Reticle - To Hit Buff/Recharge
Level 16: Dark Regeneration
- (A) Theft of Essence - Chance for +Endurance
- (31) Eradication - Chance for Energy Damage
- (33) Obliteration - Chance for Smashing Damage
- (33) Obliteration - Accuracy/Damage/Recharge
- (33) Scirocco's Dervish - Chance of Damage(Lethal)
- (34) Superior Avalanche - Recharge/Chance for Knockdown
Level 18: The Lotus Drops
- (A) Armageddon - Damage
- (34) Armageddon - Damage/Recharge
- (34) Armageddon - Accuracy/Damage/Recharge
- (36) Armageddon - Accuracy/Recharge
- (36) Armageddon - Damage/Endurance
Level 20: Cloak of Darkness
- (A) Shield Wall - Defense
- (36) Shield Wall - Defense/Endurance
- (37) Shield Wall - +Res (Teleportation), +5% Res (All)
- (37) Shield Wall - Defense/Recharge
- (37) Luck of the Gambler - Defense/Increased Global Recharge Speed
Level 22: Murky Cloud
- (A) Unbreakable Guard - Resistance
- (39) Unbreakable Guard - Resistance/Endurance
- (39) Unbreakable Guard - RechargeTime/Resistance
- (39) Unbreakable Guard - Resistance/Endurance/RechargeTime
Level 24: Hasten
- (A) Recharge Reduction IO
- (40) Recharge Reduction IO
Level 26: Soaring Dragon
- (A) Force Feedback - Chance for +Recharge
- (40) Hecatomb - Chance of Damage(Negative)
- (40) Gladiator's Strike - Chance for Smashing Damage
- (42) Touch of Lady Grey - Chance for Negative Damage
- (42) Superior Blistering Cold - Accuracy/Damage
- (42) Superior Blistering Cold - Accuracy/Damage/Endurance
Level 28: Boxing
- (A) Hecatomb - Damage
- (43) Hecatomb - Damage/Recharge
- (43) Hecatomb - Damage/Endurance
- (43) Hecatomb - Accuracy/Damage/Recharge
- (45) Hecatomb - Accuracy/Recharge
Level 30: Tough
- (A) Gladiator's Armor - TP Protection +3% Def (All)
Level 32: Golden Dragonfly
- (A) Force Feedback - Chance for +Recharge
- (45) Armageddon - Chance for Fire Damage
- (45) Scirocco's Dervish - Chance of Damage(Lethal)
- (46) Touch of Lady Grey - Chance for Negative Damage
- (46) Superior Avalanche - Accuracy/Damage
- (46) Superior Avalanche - Accuracy/Damage/Endurance
Level 35: Weave
- (A) Red Fortune - Defense
- (48) Red Fortune - Defense/Endurance
- (48) Luck of the Gambler - Defense/Increased Global Recharge Speed
Level 38: Conserve Power
- (A) Recharge Reduction IO
Level 41: Physical Perfection
- (A) Performance Shifter - Chance for +End
Level 44: Oppressive Gloom
- (A) Endurance Reduction IO
Level 47: Calling the Wolf
- (A) Perfect Zinger - Chance for Psi Damage
Level 49: Cloak of Fear
- (A) Cloud Senses - Accuracy/ToHitDebuff
- (49) Cloud Senses - Accuracy/Recharge
- (50) Cloud Senses - Accuracy/Endurance/Recharge
- (50) Cloud Senses - ToHit Debuff/Endurance/Recharge
- (50) Glimpse of the Abyss - Chance of Damage(Psionic)
Level 1: Critical Hit
Level 1: Brawl| Copy & Paste this data into Mids Reborn : Hero Designer to view the build | |-------------------------------------------------------------------| |MxDz;1445;707;1414;HEX;| |78DA4D94CB4F135114C6EFB4532BE5DD5A793F5AA0B4940EC595CF100521E161487| |06BEA002336D6B699D644E2CA854B15D1441389891BA31BFF07B73E976E5CB8F0B1| |124D54D418ACA7F37DD036697E67BE7BCEBDDF3973DBB9CB13754FA7AE8E29AD613| |C63160AA98525DBCCE72DDB7BCA2C5EB2CD8C928F677CD5CC26BC12057796537356| |C6B28C19B36866CD8E5D75C23A67650B963161DA1752C7ED8B395BF9E773B98C715| |AD2F339BB6816D3B96C9D23CD5A663E9D5DF1390F0B79CB5AAE77C2C9F4CAF9A22C| |349FCCA7978C13B9E5D5D49C59285AF66AAB381894EFF5B215ADECACE4516FDC4A8| |DEACAF5927C0DEACF5C4A0584513CEF49958B7515ABD4EAEA07D77E827B7F91BF41| |5F8B2476E9EA86D4683C4FDBC4BEBE31E4D429F2ACEEB06191B4C021A975F33CF75| |F97A3F959E3FF87E77D25721B8C488D473935CAF30EDA9A685EC744C9ED7D8EFAFD| |AFC817606B50C3B3E4D6E04C57CDB6727AD8596BFF8EDC61C9A9458EBB967368E71| |C3AB7C83FE04DC9AD871F57FD13F8E9BE8F39746F80E5EBD1087F9E46BFDB39B3BB| |3C2B612FFBED65BFBD5794C3D043CC685D6A9BB1BFDE7C1039A143E461B0EF08791| |434A426C0B906A6B17FDF24D83F434E91EC3D2E3541F61C64CF11F61CE1BB8FF0DD| |8725B705B95A4B1C7E07C9DBB2D606BF9EB66B2EAE91BC6FB157788EADA1C7D83AA| |8496D077BED88206768901C22A3E0700C744B4D17BCA8AE03D8FF8E683DF4D0430F| |C3C748CE37410F890D9C9D7800EA521BE6FD08376036233E92B35A906306780707D| |8F723B90451FA88DEC5DE49D92B4E2D1E42DE2DD10C6A46017923A225F9BE921F70| |2F921FC1D1CFE427F23D3CF4E8BBBFD5526725566A06777AB65AABC139F33A25D1B| |47EF8F9E2DBFDFD2A2D016DB35A8B42FB5AD1342D8439374D6BCEFFC6B7EA35F6DE| |B485793E0E0BE8F35E40629C5F1A0B54F4B755F1A2AF129B55F199AA78BE2AFE0F3| |F76D0B6| |-------------------------------------------------------------------|
-
As the title suggests, word on the street is Kat/DA works well together. A resistance set paired with Divine Avalanche and low end cost primary, I would think DA auras can help Kats single target dmg.
Inspiration came from a samurai (Kenjutsu, Fear or presence on the battle field) so soul mastery for petrifying gaze, maybe dark wave attack for some ranged (also, opens up more winter sets), and combat teleport cause "Nani..?!" moments =p
Also, how practical is the presence pool for scrappers?
Any build advice or examples to start from would be super awesome!
-
CC baby, woot! 😃
-
 2
2
-
2
-
-
Heres my combat teleport macro set up. Pick and choose your power and plug it in. Mind you, I have a corsair gaming mouse with buttons on the side MOUSE 4 and 5 so those are for quick access
------------------------------------------------------Teleport------------------------------------------------
/bind lshift+lbutton powexec_name Teleport
/bind lshift+lbutton powexec_name Combat Teleport(( this is my main mobility teleport in general. Click a point in space and poof there))
/bind lshift+lbutton "powexec_name Teleport$$local *BAMF*"
/bind BUTTON4 "powexec_name Combat Teleport$$powexec_location target Combat Teleport"(( this is my main one for combat^))
/macro BAMF "powexec_name Combat Teleport$$powexec_location target Combat Teleport"
/macro Recall "tell $target, I'm about to move you to my location.$$powexecname Teleport Target"
-Hold Right Mouse, then Left click aiming center of screen for max distance teleport-
/bind mousechord+lshift powexeclocation camera:max teleport
/bind mousechord powexeclocation camera:max Combat Teleport
/bind mousechord "$$powexec_toggleon Fly$$+forward"
/bind mousechord "$$powexec_toggleon Speed of Sound$$powexeclocation camera:max Jaunt"
/bind lctrl+lbutton powexec_name Spring Attack
/bind lalt+lbutton powexec_name Team Teleport
/bind lctrl+lbutton powexec_name Teleport
3) Using the numberpad, select a Teammate by ordered number and teleport to them: [[ /bind numpad2 "team_select 2$$powexec_location target Teleport" ]]The example above is teammate #2. Set up a bind for each teammate 1 through 8. The tricky part about this is that it requires two clicks, one to select the target, and one to teleport. Just quickly double-click the key to get over there instantly.
-------------------------------------------------------------------------------------------------------
-
Here is my SM/DA stalker build thats based on Nightcrawler in game. Some of the powers are themed, but you can see my slotting
This Hero build was built using Mids Reborn 3.0.4.7
https://github.com/Reborn-Team/MidsRebornClick this DataLink to open the build!
Level 50 Mutation Stalker
Primary Power Set: Savage Melee
Secondary Power Set: Dark Armor
Power Pool: Teleportation
Power Pool: Leaping
Power Pool: Fighting
Power Pool: Leadership
Ancillary Pool: Body MasteryHero Profile:
Level 1: Savage Strike- (A) Superior Blistering Cold - Recharge/Chance for Hold
- (3) Superior Blistering Cold - Damage/Endurance
- (3) Superior Blistering Cold - Accuracy/Damage/Endurance
- (5) Superior Blistering Cold - Accuracy/Damage/Recharge
- (5) Superior Blistering Cold - Damage/Endurance/Accuracy/RechargeTime
Level 1: Hide
- (A) Luck of the Gambler - Defense/Increased Global Recharge Speed
- (7) Shield Wall - +Res (Teleportation), +5% Res (All)
- (7) Reactive Defenses - Scaling Resist Damage
- (9) Kismet - Accuracy +6%
- (9) Karma - Knockback Protection
Level 2: Maiming Slash
- (A) Superior Assassin's Mark - Accuracy/Damage
- (11) Superior Assassin's Mark - Damage/RechargeTime
- (11) Superior Assassin's Mark - Accuracy/Damage/RechargeTime
- (13) Superior Assassin's Mark - Damage/Endurance/RechargeTime
- (13) Superior Assassin's Mark - Accuracy/Damage/Endurance/RechargeTime
- (15) Superior Assassin's Mark - RechargeTime/Rchg Build Up
Level 4: Combat Teleport
- (A) Adjusted Targeting - To Hit Buff
- (17) Adjusted Targeting - To Hit Buff/Recharge
- (19) Adjusted Targeting - To Hit Buff/Endurance/Recharge
- (19) Adjusted Targeting - Endurance/Recharge
- (21) Adjusted Targeting - To Hit Buff/Endurance
- (21) Range IO
Level 6: Assassin's Frenzy
- (A) Superior Stalker's Guile - Accuracy/Damage
- (23) Superior Stalker's Guile - Recharge/Chance to Hide
- (23) Superior Stalker's Guile - Accuracy/Damage/Recharge
- (25) Superior Stalker's Guile - Damage/Endurance/Recharge
- (25) Superior Stalker's Guile - Accuracy/Damage/Endurance/Recharge
- (27) Touch of Death - Chance of Damage(Negative)
Level 8: Build Up
- (A) Recharge Reduction IO
- (27) Gaussian's Synchronized Fire-Control - Chance for Build Up
- (29) Recharge Reduction IO
Level 10: Dark Embrace
- (A) Unbreakable Guard - Endurance/RechargeTime
- (29) Unbreakable Guard - Resistance
- (31) Unbreakable Guard - Resistance/Endurance
- (31) Unbreakable Guard - Resistance/Endurance/RechargeTime
- (31) Gladiator's Armor - TP Protection +3% Def (All)
- (33) Steadfast Protection - Resistance/+Def 3%
Level 12: Murky Cloud
- (A) Unbreakable Guard - Resistance
- (33) Unbreakable Guard - Endurance/RechargeTime
- (33) Unbreakable Guard - Resistance/Endurance
- (34) Unbreakable Guard - Resistance/Endurance/RechargeTime
Level 14: Shadow Dweller
- (A) Luck of the Gambler - Defense
- (34) Luck of the Gambler - Defense/Increased Global Recharge Speed
Level 16: Obsidian Shield
- (A) Unbreakable Guard - Resistance/Endurance
- (34) Unbreakable Guard - Resistance
- (36) Unbreakable Guard - Resistance/Endurance/RechargeTime
- (36) Unbreakable Guard - Endurance/RechargeTime
Level 18: Rending Flurry
- (A) Obliteration - Damage
- (36) Obliteration - Accuracy/Recharge
- (37) Obliteration - Damage/Recharge
- (37) Obliteration - Accuracy/Damage/Recharge
- (37) Obliteration - Accuracy/Damage/Endurance/Recharge
- (39) Obliteration - Chance for Smashing Damage
Level 20: Dark Regeneration
- (A) Touch of the Nictus - Healing/Absorb
- (39) Touch of the Nictus - Accuracy/Healing/Absorb
- (39) Theft of Essence - Chance for +Endurance
- (40) Touch of the Nictus - Chance for Negative Energy Damage
Level 22: Combat Jumping
- (A) Luck of the Gambler - Defense/Increased Global Recharge Speed
Level 24: Kick
- (A) Kinetic Combat - Knockdown Bonus
Level 26: Tough
- (A) Unbreakable Guard - Resistance
- (40) Unbreakable Guard - Resistance/Endurance
- (40) Unbreakable Guard - RechargeTime/Resistance
- (42) Unbreakable Guard - Resistance/Endurance/RechargeTime
Level 28: Hemorrhage
- (A) Hecatomb - Damage
- (42) Damage Increase IO
- (42) Mako's Bite - Chance of Damage(Lethal)
- (43) Touch of Death - Chance of Damage(Negative)
- (43) Hecatomb - Chance of Damage(Negative)
- (43) Gladiator's Strike - Chance for Smashing Damage
Level 30: Weave
- (A) Luck of the Gambler - Defense
- (45) Luck of the Gambler - Defense/Increased Global Recharge Speed
Level 32: Savage Leap
- (A) Armageddon - Damage
- (45) Armageddon - Chance for Fire Damage
- (45) Scirocco's Dervish - Chance of Damage(Lethal)
- (46) Fury of the Gladiator - Chance for Res Debuff
- (46) Obliteration - Chance for Smashing Damage
- (46) Eradication - Chance for Energy Damage
Level 35: Superior Conditioning
- (A) Performance Shifter - Chance for +End
- (48) Performance Shifter - EndMod
Level 38: Maneuvers
- (A) Luck of the Gambler - Defense
- (48) Luck of the Gambler - Defense/Increased Global Recharge Speed
Level 41: Teleport
- (A) Blessing of the Zephyr - Knockback Reduction (4 points)
- (50) Blessing of the Zephyr - Run Speed, Jump, Flight Speed, Range
Level 44: Physical Perfection
- (A) Performance Shifter - Chance for +End
- (48) Performance Shifter - EndMod
Level 47: Team Teleport
- (A) Winter's Gift - Slow Resistance (20%)
Level 49: Tactics
- (A) Rectified Reticle - To Hit Buff
- (50) Rectified Reticle - To Hit Buff/Recharge
- (50) Endurance Reduction IO
Level 1: Brawl
- (A) Empty
Level 1: Sprint
- (A) Empty
Level 2: Rest
- (A) Empty
Level 2: Swift
- (A) Empty
Level 2: Hurdle
- (A) Empty
Level 2: Health
- (A) Panacea - +Hit Points/Endurance
- (15) Miracle - +Recovery
Level 2: Stamina
- (A) Performance Shifter - Chance for +End
- (17) Performance Shifter - EndMod
Level 1: Blood Frenzy
Level 1: Prestige Power Dash -
invuln/ss is my vote
-
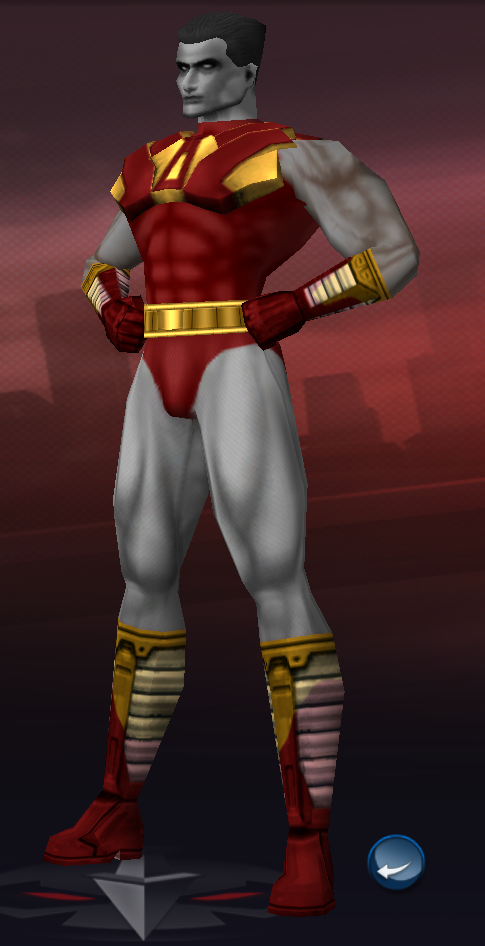
Ive been generic'd quite a few times, and solution I found was to have a costume for when out in public, and any favs you want for when your in a mission
Kinda like keeping a secret identity, cant wear the copywrite in public, only when with guild members or have an OC costume when visiting atlas/pocket d
keep the name ambiguous or a spin off, and you should be fine
Here's my colossus; I dont show it off in AP lol GM's will get you

-
-
The bind to end all binds. Ladies n Gents, I present to you, one-handed-at-will-ctp
/bind mousechord powexeclocation camera:max Combat Teleport
This will allow you to hold right mouse, then click left mouse and- ZOOM wherever the cameras pointing. GG.
----------------------------------------------------
other fan favorites-
/bind BUTTON4 "powexec_name Combat Teleport$$powexec_location target Combat Teleport"
this one is the same, but for regular teleport
/bind mousechord+lshift powexeclocation camera:max teleport
EDIT- FYI, it can take the stealth IO to hide you when you port for quick stealthing past stuff incase you fall short. I 5 slot mine with Adjusted targeting/1 slot teleport-stealth-IO-thingy
EDIT 2-
3) Using the numberpad, select a Teammate by ordered number and teleport to them: [[ /bind numpad2 "team_select 2$$powexec_location target Teleport" ]]
The example above is teammate #2. Set up a bind for each teammate 1 through 8. The tricky part about this is that it requires two clicks, one to select the target, and one to teleport. Just quickly double-click the key to get over there instantly.
I use this one ALL THE TIME when Im back tracking or caught up in steps.
DO NOTE, TELEPORT WORKS THROUGH WALLS WITH THIS (as long as your in range.
-
1
-
 1
1
-
-
15 hours ago, ninja surprise said:
Also Nightcrawler has no KB protection. If he gets hit he goes flying!
Is this part of his cannon or just a pun on dark armor? =p
I have him built as Savage melee/Dark armor and with the new combat teleport, he's prolly the most fun toon I've ever played, hands down (So much, id be tempted to make him my main for a long time)
Below is a compilation of bind I've set to make the most of combat teleport
-------------------------
(This one is the side mouse button btw)
/bind BUTTON4 "powexec_name Combat Teleport$$powexec_location target Combat Teleport"
or, as a button for the bar
/macro BAMF "powexec_name Combat Teleport$$powexec_location target Combat Teleport"
/bind mousechord powexeclocation camera:max Combat Teleport
/bind mousechord+lshift powexeclocation camera:max teleport
Using the numberpad, select a Teammate by ordered number and teleport to them
Example:
/bind numpad2 "team_select 2$$powexec_location target Teleport"
/macro Recall "tell $target, I'm about to move you to my location.$$powexecname Teleport Target"
---------------------------------------------------------
Big conflict in my head about NOT taking Teleport Target or Fold Space. Nightcrawler has to see and touch the people he's teleporting and I feel like targeting someone across the map kinda is more of summoning thing... Fold Space is kinda neat tho and the only application I can see would be pulling a bunch of mobs into an aoe storm or off an ally, but then again, that doesn't feel very NC'y. I could see the power useful for a tanker, but I'm on the fence about itNow team teleport I can easily see, and especially Incarnate Vorpal and the teleport recovery destiny, as lets face it, nightcrawlers super power isn't teleporting- its saving people all the time lol
-
1
-
-
21 hours ago, Jaegernault said:
F ? TW needs a drink raised to it, may it one day be practical or at least aesthetic again
How bad did TW get pooped on, and if so, how does it compete with other sets now? Im assuming there was a meta shift...
-
I know water is a popular option for corr (water/ice), but I'm lookin for a high recharge ice/cold build or just any build advice =p
my theme here is Shiva from the FF series, so id like hover/fly and able to freeze everything in place
I appreciate the time! 😃
-
6 hours ago, Jaegernault said:
Speed of sound is very fun, you can que up an attack for when you land and it's like fighting at super speed!
I ment where in the build would it be added?
-
Sorry to necro here, but seeing how Speed of Sound would fit in here would be amazing
-
with the new changes to teleport, we can definitely get some use outta the new BAMF mechanic 🥳
Dual blades revolves around the combo system. How will that work out with stalker and AS?
-
1 hour ago, beradical said:
This is actually a really solid point, the mechanics are the best clue we have. Straight up damage and survivability overlap a lot between the various ATs and sets, I have stalkers way tougher than my fire brute. And my proc'd out Defender does better ST dmg (solo) than my elec stalker.
So applying mechanics:
Wolverine clearly gets enraged, which could be considered fury making him a brute. The question is does his fighting style lend itself more to fury than crits? I say no, he loves his head-shots and joint-shots, he's just an angry scrapper.
Hulk doesn't seem to aim his shots for crits, he just smashes, and gets particularly nasty when angry, so I think the mechanics are clearly brute.
And DD is clearly crit-based. So the question is does he use more stealth/hide/placate tactics for his crits, or straight up melee for crits? I remember quite a few fights where DD killed the lights to use stealth to his advantage, and he definitely has stealth/hide mechanics. But I also remember even more fights where he used/threw his baton mid-battle for nasty crits and headshots. So despite being far squishier than Wolverine, he might just be a /SR scrapper whose toughness is limited solely to avoidance, and weak against an enemy with massive ToHit leveling out his defense, aka Bullseye or even Punisher. Who are both Blasters? The mythical ranged Scrapper that ya'll have been dreaming about?
This, I can agree on, especially the points about DD and wolverine rage just a part of his rp.
Nightcrawler sets in mind? Like I said, savage melee seems super thematic in CoH cause of the t9 pounce it gets, but that can be replaced with spring attack. I could see sabertooth no questions asked about SM, but nightcrawler-eh? Since he's a good melee combatant, but not the best out there, one could justify his non optimal picks for acrobatic attacks out of the Leaping tree. Definitely a stalker, especially since the ATO does that rehide mechanic, which pairs nicely with the indigo fur bit
I chose dark armor OVER sr for nightcrawler. Crawler is agile, don't get me wrong, but he can get hit and often does (assuming he's not on the offence with teleporting) Spiderman 100% SR cause spidey sense, but nightcrawler not so much, hence the dark armor gig. I could equate it to his interaction with the dimension and darkness for the fear and aura stuff.
Attack set, tho..? Still cant decide. =\
*edit - typos
-
I was thinking savage melee/dark armor stalker at first... but im not too sure on the stalker part
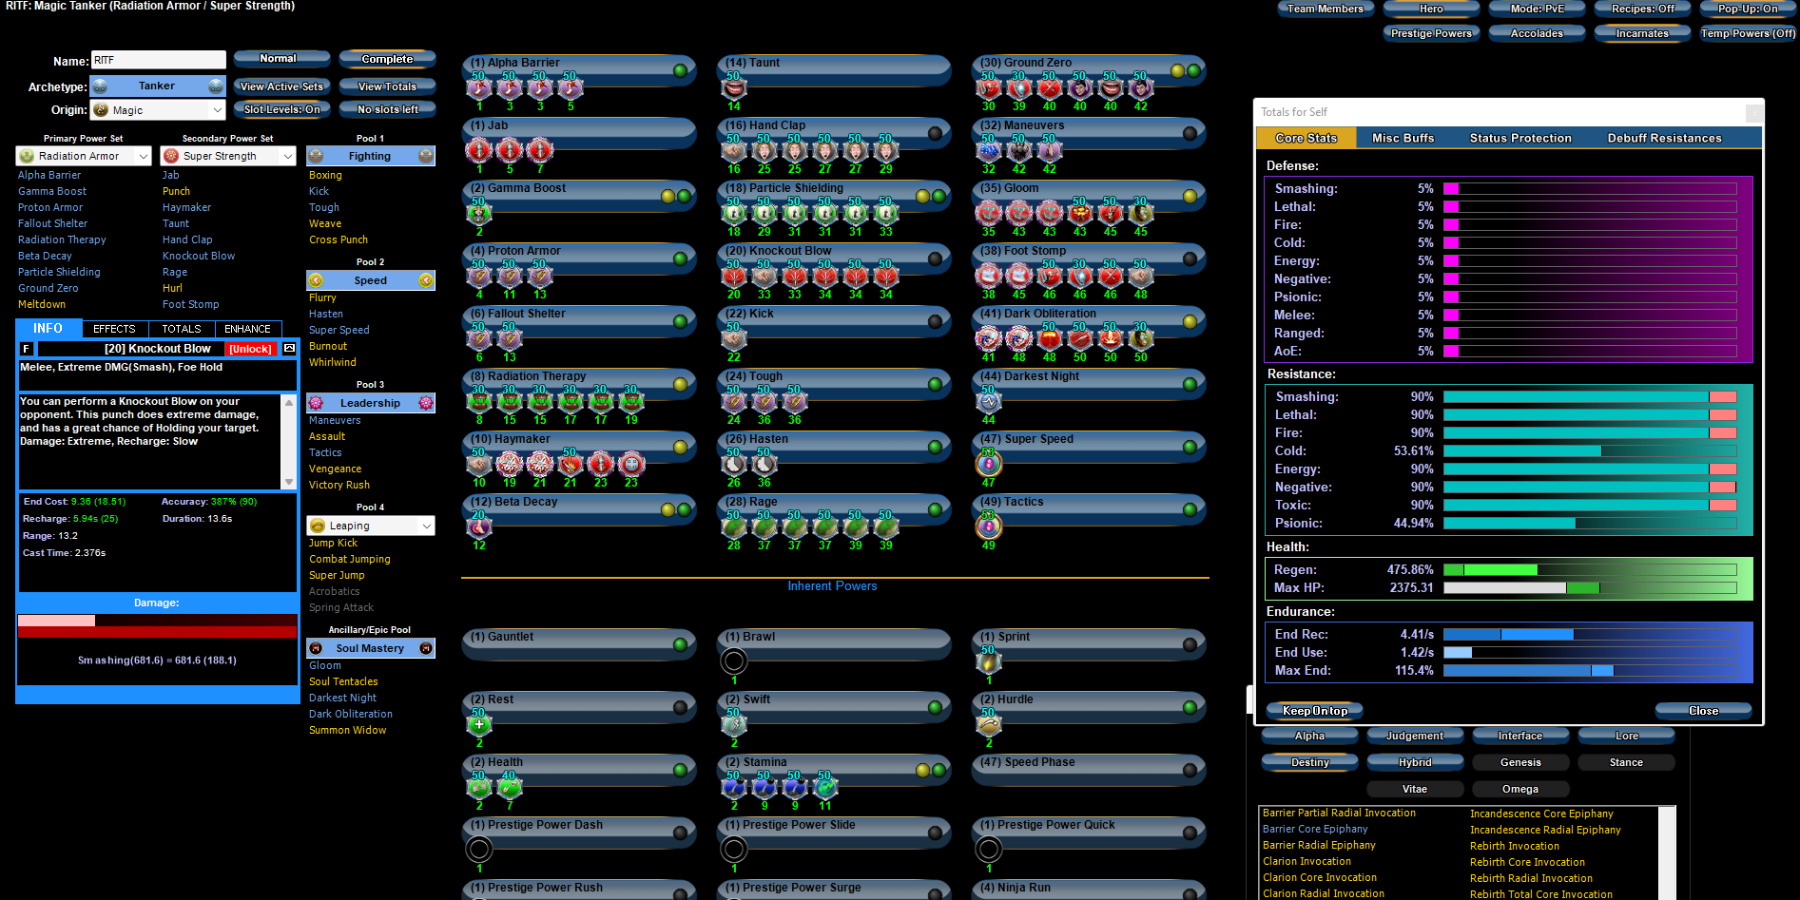


ITF Hard Mode recommendations
in Tanker
Posted
oohh good call- it would make sense to double down on a resistance based set. Ill roll up the rad/ss version, give it a spin then