venetiasilver
-
Posts
126 -
Joined
-
Last visited
Content Type
Profiles
Forums
Events
Store
Articles
Patch Notes
Everything posted by venetiasilver
-

Yet another "Help a returning player choose and build a DM scrapper" post
venetiasilver replied to fxds's topic in Scrapper
Dark Armor's heal is cracked. Dark Melee is mostly fine, not really good AoE. Dark Melee + Shield Would give you a good burst Shield Charge + Soul Drain + Crit Power ATO Proc + Epic AOE -
My little post of Melee AT's getting better AoE in their Primaries went into Taunt Auras Lol.
-
Power set pairings that are optimal on a Scrapper?
venetiasilver replied to BuiltDifferent5's topic in Scrapper
My preferred primaries lean more to the launch ones. Broad Sword / Martial Arts tend to rank as my favorites. Regen / Shield happen to be my enjoyable secondaries. -
To get out of your funk, Small Challenge. Scrapper Primary: Broad Sword Secondary: Regeneration No Temps, clear the Dr. Vahzilok AV in the Vazhilok Plague Story Arc. Only one Green Allowed.
-
Any final decisions on it?
-
Have the Same Arc radials as the Tanker per the Gauntlet Buff a few years back? Not the same Target Cap but at least the same Radius Buff?
-
I just mostly wonder to the mildly controversial Ston tests, why its so slow compared to mostly everything else except (Broken Kinetic Melee)
-
This mostly puts a big problem where no brute ever wants to complete a set to reach good survivability since any damage power you want has to be proc butchered. But then your sacrificing also global recharge for procs, and procs aren't reliable enough on their own.
-
I did a small experiment Simple Slotting for Two near identical powers. Martial Arts Brute: Cobra Strike / Crane Kick. Since they have the same exact numbers it was interesting to compare. I slotted one with 1 ACC / 1 END R / 3 Recharge / 1 Damage The other was as; 1 ACC / 1 END R / 3 Damage / 1 Recharge Seeing the results on the Yellow Number - I Barely got more than 25 points of Damage Difference. Fury carries nearly 75% of Brute Damage and Damage Enhancements almost feel pointless.
-
Introducing: Hardcore Paragon / Rogue Isles
venetiasilver replied to venetiasilver's topic in General Discussion
Just a fun alternative way of playing dear <3 -
Introducing: Hardcore Paragon / Rogue Isles
venetiasilver replied to venetiasilver's topic in General Discussion
If you've completed at least 3 Sets or so you can probably test your limits by +2'ing the missions. -
"Hardcore" Ruleset for CoX Death is Permanent No Auction House Can Use University If you start a fight you must finish the fight, no running away. (E.g. You initiate combat with a mob by pressing a power that inflicts damage to a mob) No Prior Bankrolling via Email Only 1 Inspiration of each type allowed except Reds/Yellows (Too easy to stack purples and not die) No START Vendor Bonuses at all (including the given bonus Athletic Run and Jetpack) Cannot set missions to -1, After acquiring all SO's in your powers must shift to +1 No Revive Powers at all, if you see the Death Textbox, you are dead.
-
Regen is the best armor set! Regen is the worst armor set! Yes
-
If you're still around, have you found the answer yet?
-
Regen Slander will not stand. It'll just get up again.
-
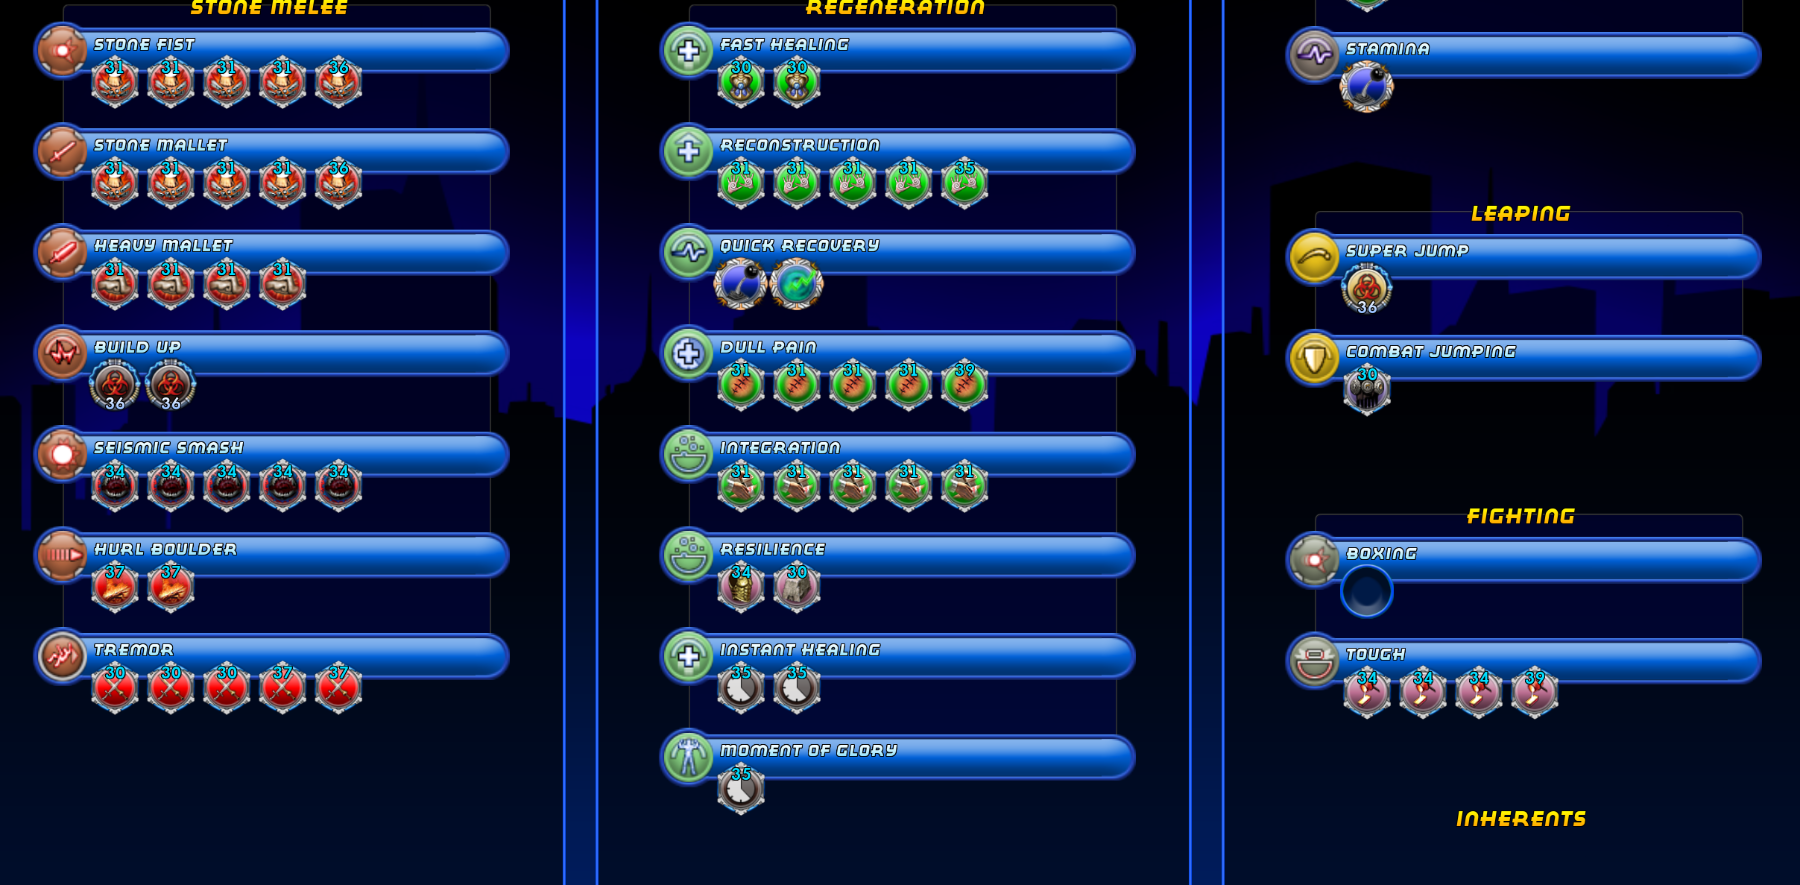
@Spaghetti Betty My Troll Regen Girl at 36

-
Stone just pawnches, Take Fault for extra controls and FFB proc. Energy Aura is a sturdy Scrapper Set, and gives you more recharge for More Seismic Smashing!
-
Stone Melee / Energy Aura
-
This toon was made before the small rework to stone melee, I was mostly working with what I had. I did get the next slots for the Crushing 5 pieces. Fault was considered a skip before, but I'll probably fit it in with a respec. The idea was to take a Grendel Troll Girl and make her real. (Atta's Cousin Twice Removed)
-
What do you think of this for a Little 31 Brute?
-
To me that just says "The less you get hit the less you're actually needing to heal" defeating the purpose of the set.
-
Sailor
-
We just need to get you unlimited supply of Hot Pockets, and Xena DVD's
-
Would you ever consider writing up a "Regenerator's Field Guide" Aka "Yes it hurts everytime"
-
Now overall how would we define the leveling process of Regeneration compared to others?