Dark Current
-
Posts
305 -
Joined
-
Last visited
-
Days Won
1
Content Type
Profiles
Forums
Events
Store
Articles
Patch Notes
Everything posted by Dark Current
-

DEFCON II: AFTERMATH — Do Controllers Still Outscale Defenders?
Dark Current replied to Dark Current's topic in Archetypes
@Maelwys I appreciate your detailed response, and I think we're close in thinking actually. Since this project leans on a Monte Carlo-inspired testing style, I wanted to explain a key tool I'm using to evaluate it called Cumulative Average Analysis. Cumulative Average tracks how the average value of a performance metric (like damage per minute) changes as each new mission data is added. It works like this: Trial 1 = just the first result Trial 2 = average of Trials 1 and 2 Trial 3 = average of Trials 1, 2, and 3 etc. until Trial 25 that is the average of all 25 trials This creates is a picture of performance over time where you can see if the trend is stabilizing (main goal in Monte Carlo). Monte Carlo methods need random inputs to stress-test the system. You're not looking to eliminate variability, but to see if a pattern emerges despite it. It's why I’m deliberately introducing variation in teammates, powersets, maps, etc. If an AT performs well consistently through all the noise, that’s a real signal, not a fluke. A cumulative average graph shows whether performance is converging. If a line rises, flattens and holds, that's telling you the performance metric is stable and meaningful across the variables — exactly what I'm looking for to test generalizable performance. DEFCON 5 Sample Results Here’s what I found when applying this to the DPM data from the 25 Defender missions and corresponding 26 Controller missions: The Controller line rises faster and flattens at a higher average DPM. The Defender line is more erratic and flattens lower. This suggests that, across randomized team setups and builds, trends that held as more data accumulated: Controllers outperform Defenders in average damage per minute. The Controller curve rises faster and flattens higher = stronger and more consistent offensive performance. The Defender line is more erratic, starting lower and stabilizing at a lower average, which suggests greater variability in support synergy or damage contribution. Now, you're absolutely right that I’m not sampling anywhere near the full powerset × slotting × epic × incarnate potential. But the point of these tests isn’t to simulate every combination. It’s to observe whether significant trends emerge from real, in-game randomness. If the 'signal' I measure is strong enough to stabilize over 25 varied conditions, it has value. If it collapses as soon as variables change, it wasn’t stable to begin with. I get the appeal of narrowing things to "median builds," and that kind of reductionist testing has its place — but it would overcontrol the environment IMO, hiding synergy or volatility that emerge in actual game environments. So no, this isn’t meant to be a perfectly controlled lab experiment. It’s more stress testing the 2 classic support ATs in the field, and letting large, messy data reveal patterns. And what the cumulative average graph above tells us is: in this pocket of noise, Controllers outperformed Defenders, and reliably so, in DPM. This is also true for other metrics, which is why I gave them the 'win' in DEFCON 5. The next questions are: Why? I think it had to do with 'perma' pets. Is it true on the margin? I suspect defender advantage from their higher buff / debuff numbers wasn't properly tested at the normal game setting of 54x8. -
XAOS was pretty damn good at team protection. If you get a chance, watch his team video (linked above). Dead Cell's principle was strong and solo he did great with it. His team performance was uncertain because there was some questionable actions and slotting by one of his teammates that made it look a lot worse than it would likely be in most scenarios. The one I'm testing now, Uncaged Psyche, is very interesting. She's getting a lot of mileage out of the Aura of Madness. I haven't done her team tests yet, so it's premature to call it better than the others so far or comparable to a defender or controller. But I'm loving the action potential. I've posted her build and solo vids to my channel if you want a sneak peek. I'm going to update this post with the links once I have the team trials and data analyzed. Here's the link to her on a pick up ITF I joined before I had her incarnates all T3d for the actual tests. No commentary, but you can see what she's able to do.
-
DEFCON II: AFTERMATH — Do Controllers Still Outscale Defenders?
Dark Current replied to Dark Current's topic in Archetypes
I’m absolutely enjoying the ride. That said, I want to clarify why I’m intentionally using random offensive powersets and team comps in these Defender vs Controller tests, rather than keeping them fixed. This isn’t apples to cauliflower as you dismiss it as — it’s a Monte Carlo approach, which is a real-world method used in science, finance, and engineering to figure out how things perform under uncertainty. To summarize it, you run the same type of test many times with randomized inputs to see if consistent patterns still emerge. Why? Because if a support set or archetype performs well no matter what kind of team or situation it's in, then we’ve uncovered a generalizable strength, not just a combo that works in one ideal setup. That’s what I’m after. If I used the same blast set or teammates every time as you're suggesting, I'd risk: Building in a bias toward a specific synergy, Missing the bigger picture of which support sets hold up across a variety of actual play conditions. So, the randomness of the tests isn't a flaw — it's the engine of the method. While it makes the results messier, it also makes them more meaningful, because patterns that emerge from the noise are the ones worth trusting. I appreciate your thoughts and the chance to explain the reasoning. I'm happy to debate Defenders vs Controllers on a per-case basis if you'd like, but I’m testing for robustness, not cherry-picked synergy that would come with locking into a specific blast or control set for every combo. -
DEFCON II: AFTERMATH — Do Controllers Still Outscale Defenders?
Dark Current replied to Dark Current's topic in Archetypes
Well I aim to find out if it's the player or the powerset. Last go round my controllers edged my defenders due to their perma pets from what the data indicated. But that was vs 54x8 standard content. What about vs. incarnate level content? Do those defender higher buff numbers matter or not? -
DEFCON II: AFTERMATH — Do Controllers Still Outscale Defenders?
Dark Current replied to Dark Current's topic in Archetypes
I love the Repeat Offenders concept. I ran Defenders of the Night SG back on live and we did all-defender stuff all the time until CoV came out. -
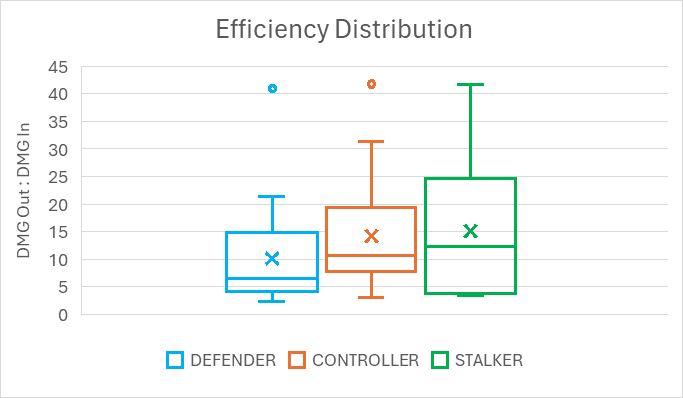
Dead Cell – The Drain Before the Pain Support Stalker Test #2: Electrical Melee / Bio Armor / Mu Mastery The second subject in the Support Stalker Experiment is Dead Cell, a mutant-born horror twitching with bioelectric energy. His strategy: disrupt enemy attacks through stuttered sleep cycles and crippling endurance drain. Concept: Where other Stalkers strike from the shadows, Dead Cell never hides. He pulses with a disruptive rhythm—briefly stunning or sleeping targets, only to do it again moments later. Bio Armor’s genetic auras reduce incoming damage and bolster survivability, while Mu Mastery’s blasts flood the field with powerful debuffs and control. He's not just draining life—he's draining will. Mids Build: Dead Cell - Stalker (Electrical Melee - Bio Armor).mbd Test Parameters: Content: Level 54 x8 Radios, Tip Missions, Boss rushes Team Composition: 5-man team with Dead Cell as the sole support Tools: Sythlin’s DPS Tracker, compared against other Support Stalkers and my earlier DEFCON Defender/Controller results Support Toolkit: Sleep-Based Control (The “Stutter Lock”): Charged Brawl, Havoc Punch, Jacob’s Ladder (Elec Melee) each apply brief Sleep effects Genetic Corruption (Bio Armor) pulses constant AoE Sleep + -DMG in Offensive Adaptation Mu Adept’s Cage of Lightning adds further Sleep support Endurance & Recovery Suppression: Ball Lightning, Mu Bolts, Zapp: Wide-area and ranged endurance drains Mu Adept layers on -END and -Recovery with every attack Enemies become ability-starved, reducing incoming DPS dramatically Damage Debuff & Regen Denial: Genetic Corruption & Parasitic Aura provide passive AoE -DMG DNA Siphon (Bio Armor): -Regen and group healing in one hit Mu Adept’s EM Pulse: AoE Hold and -Regen vs groups and bosses Crowd Control & Utility: Electric Shackles (Mu Mastery): Long-duration single-target Hold Shocking Bolt & EM Pulse: Frequent Stuns and AoE Holds from pet Together with Sleep cycling, this creates a battlefield under siege How It Played: Disruption: Most enemy attacks never fired. Sleep cycling combined with constant endurance drain shut down groups before they could retaliate. Safety via Denial: Rather than buffing allies, Dead Cell weakens the enemy’s ability to act—creating what felt like ambient protection. Solo Viability: With Bio Armor sustain and Siphon heals, Dead Cell handled +3/x8 solo missions with eerie stability. Verdict: Dead Cell doesn’t fight fair—he fights inevitability. His enemies stumble, spark, and fall unconscious before they understand what’s happening. He’s flashy. He’s loud. And if you’re near him, you will shut down. So when his enemies stop fighting back, everyone else gets to shine. Combined Stalker Stats:

-
Xaos Warden – The Shadow Before the Fall Support Stalker Test #1: Dark Melee / Shield Defense / Soul Mastery The Support Stalker Experiment kicks off with a full evaluation of Xaos Warden, a magic-origin guardian who turns the shadows into shelter and blunts incoming threats with cascading accuracy debuffs. Concept: What if a Stalker could protect their team not by vanishing… but by making sure the enemies miss? Xaos Warden isn’t a backline lurker. He’s a frontline phantasm wielding the Umbral Aegis, fusing Dark Melee’s -To Hit, Shield Defense’s +Defense auras, and Soul Mastery’s ranged suppression to serve as a living interference field. He layers debuffs, tanks selectively, and confuses priority targets through fear, holds, and knockdowns. Mids Build: Xaos Warden - Stalker (Dark Melee - Shield Defense).mbd Test Parameters: Content: Level 54 x8 Radios, Tip Missions, and Boss-heavy content Team Composition: 5 players, including Xaos Warden as the sole support Data Capture: Sythlin’s DPS Tracker (same format used in the DEFCON Series) Comparison: All Support Stalkers will be ranked against each other and against a baseline from traditional Defenders and Controllers Support Toolkit: -To Hit Stacking: Smite, Shadow Maul, Touch of Fear, Midnight Grasp, Dark Blast, Moonbeam, and the Widow’s Smoke Grenade +Team Defense: Grant Cover offers AoE +DEF and stealth to the team, plus resistance to debuff types Hard Control: Fear, Hold, Knockdown, and Immobilize effects let him neutralize threats instead of soaking them Durability: Defensive toggles from Shield and Shadow Meld make him surprisingly sturdy for a Stalker How It Played: Team Role: Functioned as a shadow tank-lite—blunting alpha strikes with Grant Cover, opening with Shield Charge, and using -To Hit suppression to make teammates feel “shielded” without ever drawing aggro Crowd Safety: Night Widow pet helped stack further accuracy debuffs, keeping lieutenants and bosses swinging wildly… and mostly missing Solo Efficiency: Surprisingly capable soloing at +3/x8, despite low mitigation tools beyond debuff layering and control pacing Verdict: Xaos Warden proved the core hypothesis: a Stalker can support a team. Not by healing, buffing, or mez-blasting—but by surgically suppressing enemy accuracy and stacking defense around their squad. Was he a Defender? No. But did he defend? Absolutely.
-
Can a predator become a protector? Hello all, Most know -or think they know - the Stalker as a deadly solo artist — a surgical assassin, a glass cannon in stealth, built to strike first and hard. But what if there was another path? Welcome to the Support Stalker Experiment — a project exploring the radical (is it?) idea that Stalkers can bring more than just damage to a team. By combining select powersets that include enemy debuffs, control effects, and team support tools, I’m testing whether a new role can emerge: the Support Stalker. The Concept This series flips the traditional script: What if the Stalker doesn’t just eliminate the target… but softens the entire battlefield for the team? Or even hardens the team for the fights ahead? These builds layer things like: -DEF, -To Hit, -Regen, -END, -Recovery Knockdown, Hold, Sleep, Immobilize, Fear Team buffs, heals, and debuff resistance Each build tests whether a Stalker — normally not thought of as “team utility” — can enable others to succeed while still bringing solid damage. The Method Each Support Stalker is tested as the only source of support on a small team of five characters. No traditional support ATs (no Defenders, Controllers, Corrupters, etc.) are included. The team runs: Level 54 x8 missions (radio/paper/tip) With DPS tracked using Sythlin’s real-time performance tool All builds compared against one another and also against my data from the DEFCON 5 and ongoing DEFCON II: Aftermath projects (which tested / are testing traditional support ATs in similar conditions). The 8 Support Stalker Test Builds These aren't your typical claws and capes. Each one is built for team-impact potential and thematic clarity: Name Powersets Tagline Role Summary Night Creeps Spines / Dark Armor / Dark Mastery The Dark Before the Doom AoE cone suppression via -To Hit, Fear, Stun, and Immobilize; excels at crowd softening and denial Edge of Winter Ice Melee / Ninjitsu / Ice Mastery The Frost Before the Freeze Heavy -Recharge / -Speed stacking with crowd control and battlefield shaping via AoEs and stealth Null Bind Psionic Melee / Ice Armor / Psionic Mastery The Chill Before the Kill Massive -Recharge + soft control (Hold, Confuse, Sleep); creates battlefield paralysis Over Exposure Radiation Melee / Energy Aura / Fire Mastery The Flash Before the Ash Heavy -DEF and -RES layering; AoE control through stuns, burns, and endurance draining Dead Cell Electric Melee / Bio Armor / Mu Mastery The Drain Before the Pain Sleep and endurance-drain synergy; disables entire mobs by staggering their energy and action loops Depleted Uranium Stone Melee / Radiation Armor / Energy Mastery The Quake Before the Break AoE Knockdown disruptor with -DEF/-Regen stacking and ranged cone scatter support Xaos Warden Dark Melee / Shield Defense / Soul Mastery The Shadow Before the Fall AoE and ST -To Hit stacking with team defense buffs; plays a guardian-style control tank for the squad Uncaged Psyche Savage Melee / Psionic Armor / Leviathan Mastery The Scream Before the Silence (Pending) high-impact mental disruption with Psionic absorb, fear/debuff effects, and water-based AoE Each one brings something unique: Stacking -To Hit, -DEF, and -Res Area denial and control Target lockdown or endurance drain Team defense and stealth auras Minor AoE heals or resistance toggles All built around cohesive stalker flavor Why It Matters We know Defenders and Controllers bring unparalleled support value — that’s been proven in the DEFCON project. But could a Stalker offer a leaner, faster, more dangerous kind of team utility? One that fits into smaller teams or faster content without sacrificing damage? This project aims to answer that question — both through raw data and practical experience. Interested? I’ll be sharing detailed concepts and builds along with recorded solo and team missions to discuss: Power choices Support toolkit Gameplay strategy Strengths and limitations Performance metrics compared to classic ATs I’d love to hear your feedback, thoughts, or even see your own takes on “Support Stalkers.” Do you run a Stalker that supports the team? Have you experimented with debuffs, controls, or buffs in your own stalker builds? Want to experience one of these firsthand with me in a team test run? Post below, DM me, or comment on my YT channel if you'd like to explore this more! Dark Current - YouTube
-
DEFCON II: AFTERMATH — Do Controllers Still Outscale Defenders?
Dark Current replied to Dark Current's topic in Archetypes
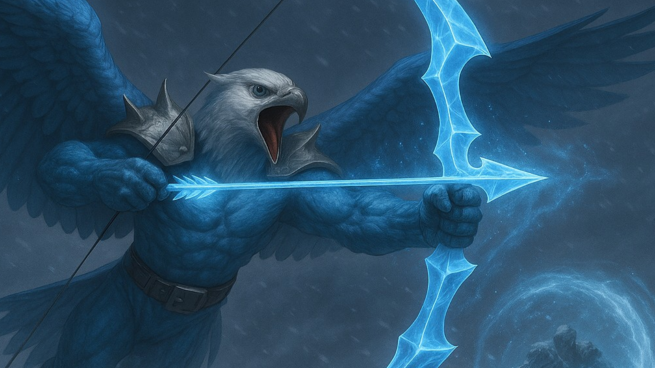
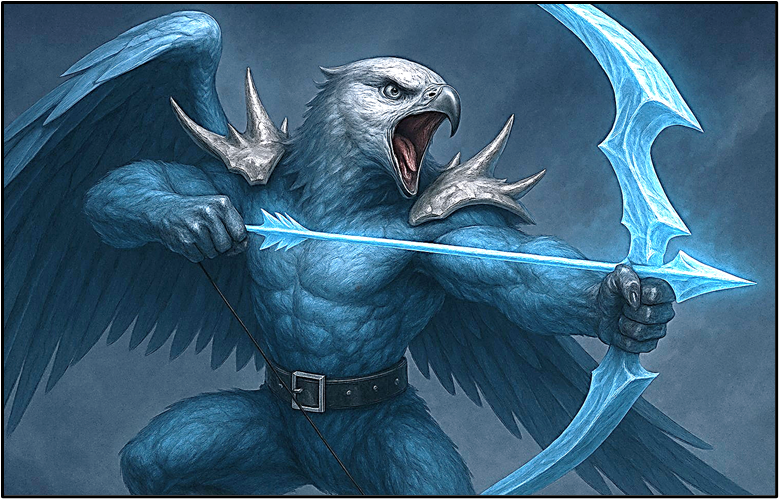
Gyr Falcon – Arctic Sentinel of the Stratosphere A high-altitude scout from the icy edge of the world, Gyr Falcon fights from above — raining pinpoint strikes down from his aerial perch while shielding his team from harm. A master of Cold Domination, he opens every battle with powerful, long-duration protections and follows up with relentless, precision fire from his Archery suite. With Energy Mastery reinforcing his staying power and burst, Gyr Falcon is built for sharp, repeatable alpha strikes and team durability — a Defender who sets the team up, then keeps the pressure on. Build Identity: Primary: Cold Domination – Powerful defense/resist shields, stealth auras, terrain debuffs, and regen suppression Secondary: Archery – Long-range, fast-recharging attacks with wide cones and bonus accuracy Epic Pool: Energy Mastery – Self-sustain, resistance toggle, and high-burst melee finisher Gyr Falcon’s Tactical Strengths: Pre-battle shielding lets the team open safely and strike confidently Precision strikes from flight — leveraging Archery’s range and speed without needing to reposition Power Build Up + Total Focus allows for devastating crit-burst moments when needed Free to focus on offense once shields and auras are deployed — little need for mid-fight upkeep Temp Invulnerability and Force of Nature provide emergency toughness in high-stakes pulls Gyr Falcon is front-loaded, fast, and focused — designed to make his team better right out of the gate, then blast safely from above. He’s not built to micromanage the field — he lets Cold do the lifting, and Archery do the cleaning. Watch for how Gyr Falcon leverages early shielding to stay mobile and maximize DPS while staying out of harm’s way. Mids Build: Gyr Falcon.mbd Build Discussion and Solo Strategy Video: AE 801 Incarnate Team Trials Video!
-
DEFCON II: AFTERMATH — Do Controllers Still Outscale Defenders?
Dark Current replied to Dark Current's topic in Archetypes
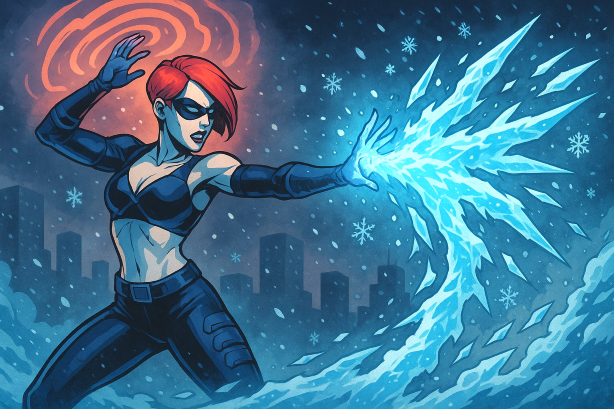
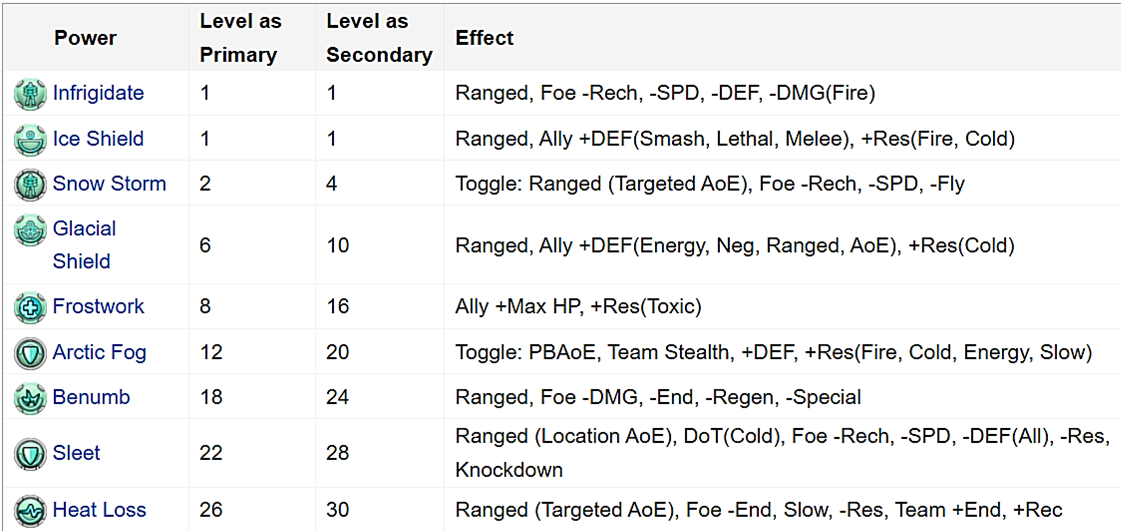
Shimr – Cryokinetic Controller of the Slow Horizon Shimr is a cryokineticist who doesn’t just wield cold — she manipulates time through it. Her control over molecular motion slows enemies to a crawl, dampens their reactions, and locks down the battlefield in a haze of frost and fear. Combining Ice Control and Cold Domination, Shimr specializes in soft AoE lockdown, layered debuffs, and team-wide sustain through suppression. She adds Ice Mastery for even more zone control and ranged threat. Build Identity: Primary: Ice Control – AoE-focused immobilizes, holds, slows, and fear effects Secondary: Cold Domination – Strong front-loaded shields, stealth auras, and debuff saturation Epic Pool: Ice Mastery – Adds heavy cold DoTs, personal defense, and terrain denial Tactical Strengths: Field saturation with stacked slows and recharge debuffs Persistent -RES, -DEF, -REGEN, and control layering via AoE patches Excellent mitigation through pets, positioning, and stealth-enhanced shielding High team uptime through +Recovery (Heat Loss), +Defense (Fog), and enemy softening Hibernate as a panic button or tempo reset in tough fights Shimr doesn’t aim to burn through enemies — she intends to outlast them, exhaust them, and immobilize them in place. Her playstyle rewards patience, battlefield awareness, and surgical deployment of slows, storms, and shields. Watch for how Shimr uses zone control to break aggro patterns, split spawns, and enable DPS to safely shred slowed enemies. Mids Build: Shimr - Controller (Ice Control).mbd Build Discussion and Solo Strategy Video: AE 801 Incarnate Team Trials Video!
-
DEFCON II: AFTERMATH — Do Controllers Still Outscale Defenders?
Dark Current replied to Dark Current's topic in Archetypes
Round One Cold Domination “Your powers allow you to manipulate cold and ice to protect your allies and weaken your enemies.” The Challengers Shimr Ice / Cold / Ice CONTROLLER Concept: Cryokineticist—slows time and matter through mental focus Playstyle: blankets the battlefield in slow-motion effects, punishing any who try to move or act too quickly VS Gyr Falcon Cold / Arch / NRG DEFENDER Concept: Arctic avian sharpshooter—rains frost-tipped arrows from above Playstyle: softens enemies with Cold, then picks them off with precision shots from range and altitude Match Up Discussion Video
-
In 2024, I launched DEFCON 5, a deep-dive project aimed at answering a deceptively simple question: When built for support and slotted for synergy… who brings more to the team — Defenders or Controllers? The results were surprising, their implications confounding, and even a little controversial. Controllers edged out the win with better threat contribution, pet-enhanced pressure, and control-driven efficiency — but Defenders held their ground in resilience, team enablement, and raw reliability. Now, it’s time to revisit that battlefield. With new builds. New support sets. And higher stakes. Enter: DEFCON II: AFTERMATH This new series expands the original DEFCON trials with: Five fresh Defender/Controller matchups A spotlight on less commonly tested support sets Full incarnate builds And a new goal: to push both archetypes to their limits in AE 801 content, where a team wipe is the end condition We’re no longer running radios and tip missions. These are battlefield stress tests — because if there's any gap in performance between ATs, it shows up at the margins. The Support Sets Being Tested: Each DEFCON test pairs one support set shared between both ATs, combined with contrasting secondaries. Builds blend a combination of engaging theme and high-performance synergy with epic pools, incarnate powers, and team-based contribution metrics in mind. According to Cathy, these support sets are described thusly: ❄️ Cold Domination – The Icy Engine of Buffed Control Cold Domination is one of the most well-rounded support sets in the game — a powerful buff/debuff hybrid that excels in both team sustain and enemy suppression. It front-loads its buffs through long-duration shields and stealth auras, then pivots into wide-area debuff layering that slows enemies to a crawl and drains them of power. 💖 Empathy – The Gold Standard of Ally Empowerment Empathy is the quintessential pure support set — focused entirely on keeping your team alive, energized, and operating at maximum potential. While it has no direct debuffs or control tools, its suite of heals, resistance buffs, and performance-boosting effects make it one of the most impactful force multipliers in the game when used skillfully. ☢️ Radiation Emission – The Debilitating Core Meltdown Radiation Emission is a field-control and debuff powerhouse, built around area-denial toggles, ally-boosting pulses, and enemy-crippling effects that stack over time. While it offers minimal direct control, it compensates with wide-area suppression and scaling pressure mitigation. 🌩️ Storm Summoning – Chaos as Crowd Control Storm Summoning is a high-disruption, high-risk support set that turns the battlefield into a turbulent, shifting stormfront. With minimal direct buffs and no hard control, it instead relies on repel, knockback, soft debuffs, and pseudopets to disorient and divide the enemy while cloaking allies in protective mist. 🎯 Trick Arrow – The Tactical Debuff Arsenal Trick Arrow is a 100% debuff set built around terrain control, status disruption, and targeted weakening. With no direct heals, buffs, or hard crowd control (outside of a few strategic holds), Trick Arrow instead floods the field with stacking resistance shredders, speed killers, and soft-control effects that create windows of opportunity for teams to dominate. What’s Being Measured? Like in DEFCON 5, I’ll be tracking: Survivability – Personal Defeats Risk – Ally Defeats Resilience – Damage Taken Lethality – Foe Defeats Threat – Damage Dealt Efficiency - DMG out : DMG in But with the addition of Sythlin's DPS Tool that allows real-time data parsing, I'll be looking at additional metrics that include: Avoidance – Hits Taken Disruption – Controls Provision – Heals/End All these in an effort to validate whether Controllers’ scaling still holds up — or if Defenders rise to the challenge when pressure is highest against incarnate content! Ready to See What Happens When the Buffs Hit the Fan? I’ll be releasing matchup breakdowns, build presentations, predictions, solo and team tests, and post-test analyses throughout the coming weeks — and your input is invaluable. Which matchups do you think favor the Controller? The Defender? Have you run support characters on incarnate teams lately? What gaps have you seen? Do you agree with the original DEFCON 5 verdict, or are you ready to flip the script? Follow this thread for updates, results, and test footage posted to YT to find out what happens AFTER THE BLAST RADIUS settles!
-
DEFCON 5: Defender vs Controller - Which is the Better Support AT?
Dark Current replied to Dark Current's topic in Archetypes
Final Verdict: SO…Which Archetype Emerged as the Superior Support — Defender or Controller? After 51 missions, 4,000+ total kills, nearly 2.5 million combined points of damage dealt, and dozens of metrics across five power set matchups, the Controller archetype edged out the Defender in overall performance — but not by dominance. Here’s the call: 🏆 VICTORY: Controller… but with an asterisk. Why Controllers Came Out on Top Higher Damage Output (Threat) Controllers had a statistically significant advantage in damage per minute. This wasn’t a fluke — it held across most matchups and showed correlation with mission time, indicating scalable impact. Superior Lethality Controllers averaged 3.6 kills per minute vs. 3.0 for Defenders — a significant lead. They also claimed 31.2% of total team kills on 5-player teams — punching well above their weight in offensive contribution. Better Damage Efficiency They absorbed less damage per minute and dealt more — ending with higher out:in ratios. Not overwhelming, but the margins were clean and consistent. Higher Threat Quotient Both ATs showed correlation between damage and kills, but Controllers converted their damage to kills more efficiently, often through pet synergy and AoE stacking of damage, controls, debuffs and pets. Caveats: Where Defenders Fought Back Stronger Individual Set Performances In Time Manipulation and Traps matchups, Defenders won clearly, showing that a smart, aggressive build can absolutely rival or exceed a Controller. These wins weren’t marginal — they came with superior personal performance and better team outcomes. Stronger Reliability in Support Roles Defenders consistently had lower standard deviation in key metrics — suggesting greater stability and less reliance on team comp or pet AI. Their Resilience Quotient was higher, meaning they absorbed more punishment before allies went down. -
DEFCON 5: Defender vs Controller - Which is the Better Support AT?
Dark Current replied to Dark Current's topic in Archetypes
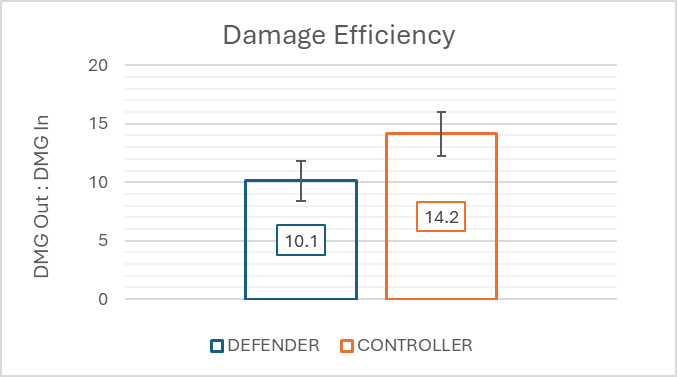
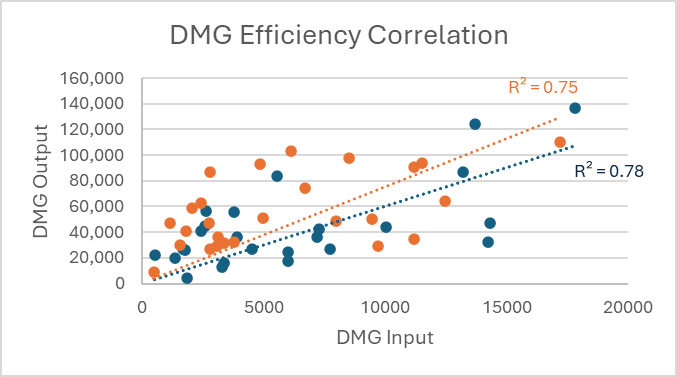
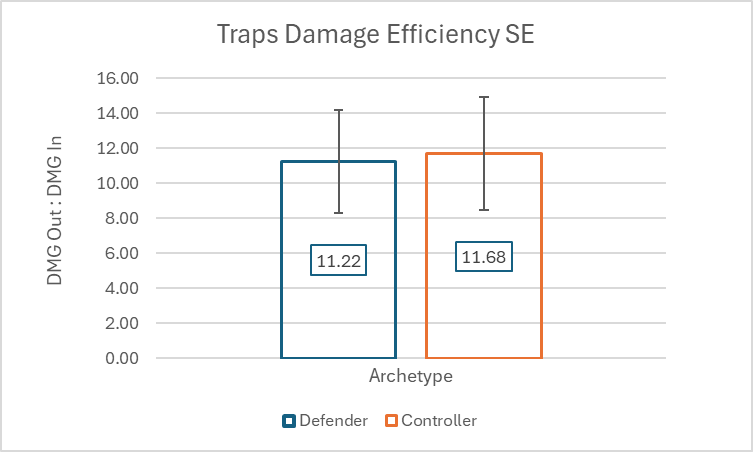
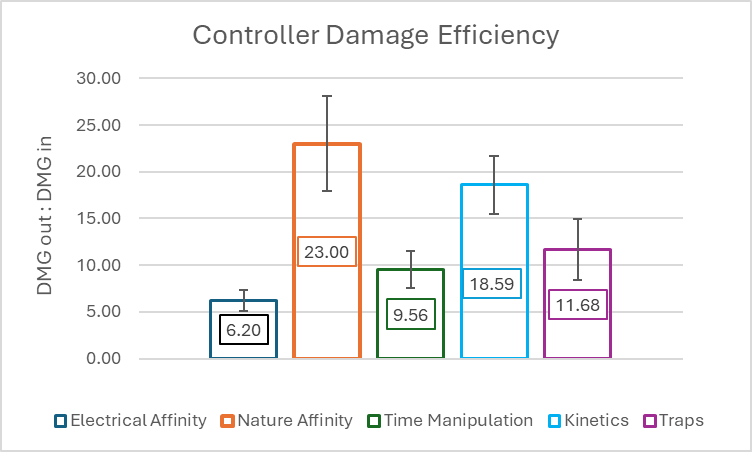
Damage Efficiency Interpretation Defenders: Average Efficiency Ratio = 10.1 Controllers: Average Efficiency Ratio = 14.2 Controllers were more efficient at trading hits for harm — they got more bang for each point of damage they endured. The gap was marginal, and in many missions, Defenders kept pace or even outperformed them. Composite distributions largely overlapped, especially in the middle range, with Controllers skewing higher at the top end. Controllers edged out ahead in overall efficiency — but it wasn’t a rout. It was a strategic win, not a show of overwhelming power.
-
DEFCON 5: Defender vs Controller - Which is the Better Support AT?
Dark Current replied to Dark Current's topic in Archetypes
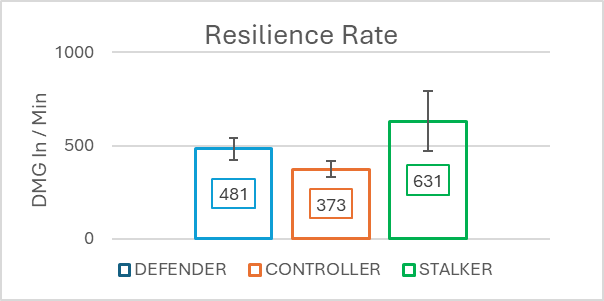
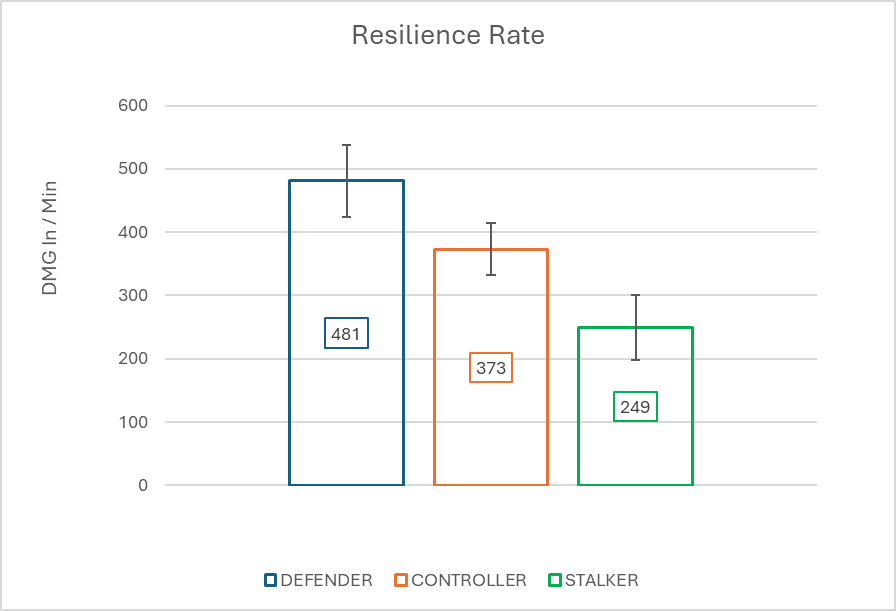
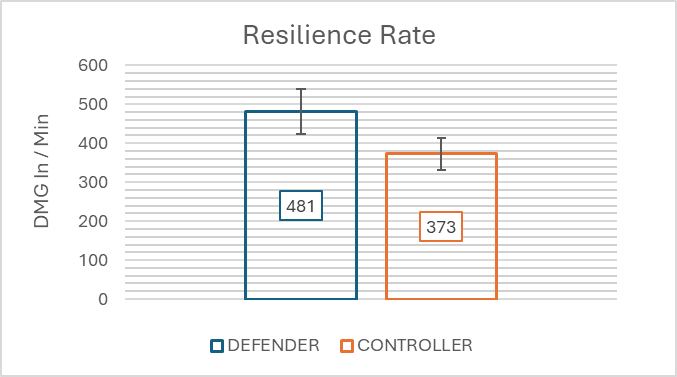
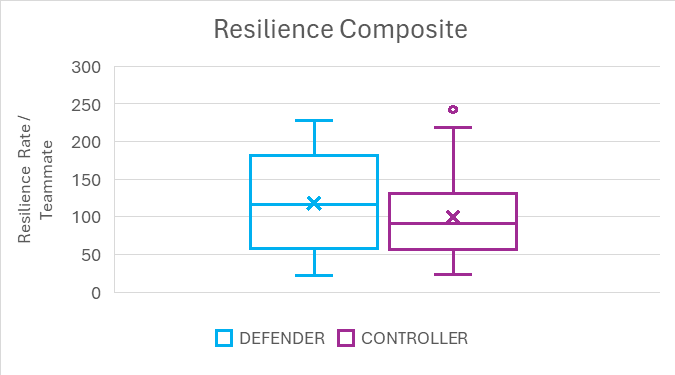
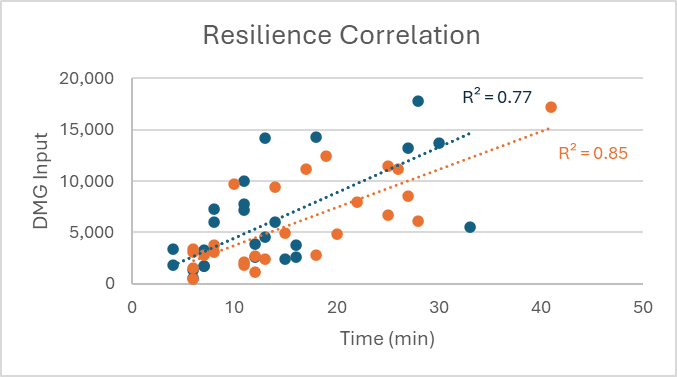
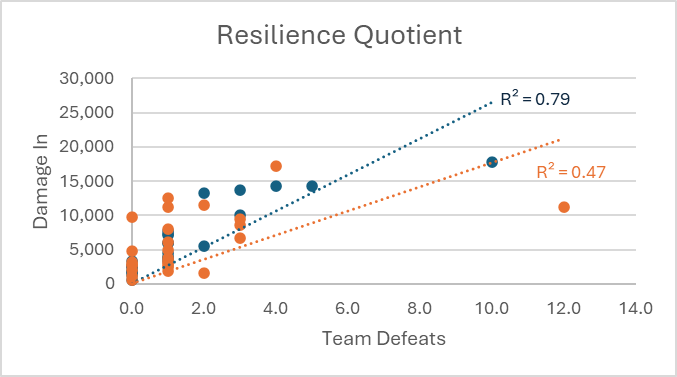
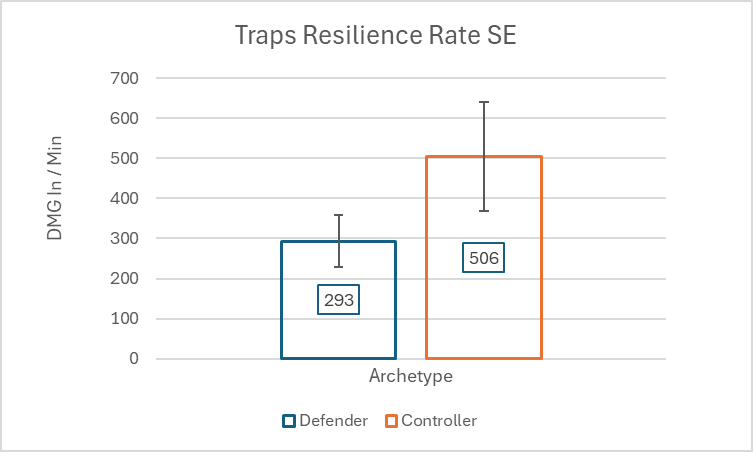
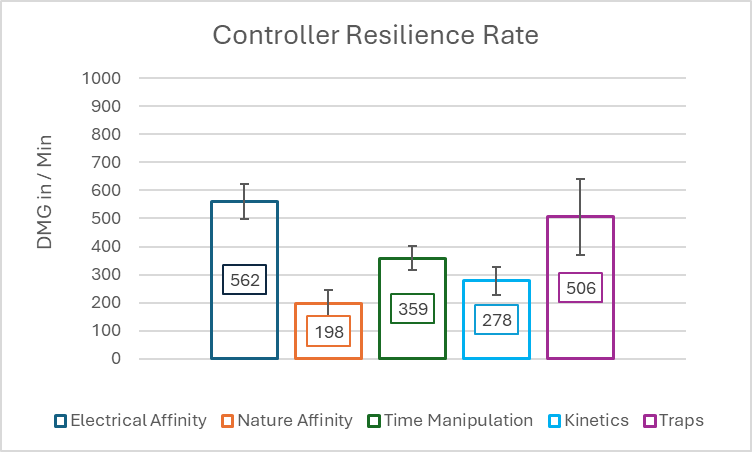
The Bulwark vs. The Binder… RESILIENCE Support Mission DMG In Time Teammate RATE COMPOSITE Support Mission DMG In Time Teammate RATE COMPOSITE Electrical 1 4519 13 3 348 116 Electrical 1 3102 8 4 388 97 2 10026 11 4 911 228 2 9459 14 4 676 169 3 7181 11 5 653 131 3 11204 17 4 659 165 4 14233 13 5 1095 219 4 12474 19 3 657 219 mayhem 17804 28 5 636 127 mayhem 11172 26 4 430 107 Nature 1 1764 7 4 252 63 Nature 1 1134 12 4 95 24 2 1352 6 4 225 56 2 2779 18 4 154 39 3 1870 4 4 467 117 3 2409 13 2 185 93 4 14316 18 4 795 199 4 2805 7 3 401 134 5 492 6 3 82 27 mayhem 13203 27 4 489 122 mayhem 6705 25 3 268 89 Time 1 7274 8 4 909 227 Time 1 11511 25 4 460 115 2 2624 12 4 219 55 2 6112 28 4 218 55 3 532 6 4 89 22 3 7993 22 4 363 91 4 2611 16 4 163 41 4 4986 15 4 332 83 safeguard 13706 30 3 457 152 safeguard 17166 41 4 419 105 Kinetics 1 5985 8 4 748 187 Kinetics 1 1557 6 4 259 65 2 3798 16 4 237 59 2 3773 8 4 472 118 3 3888 12 4 324 81 3 2071 11 4 188 47 4 3390 4 4 847 212 4 2739 12 4 228 57 5 7723 11 4 702 176 5 4845 20 4 242 61 Traps 1 5997 14 4 428 107 Traps 1 3117 6 4 520 130 2 2429 15 4 162 40 2 1800 11 4 164 41 3 1684 7 4 241 60 3 3359 6 4 560 140 4 3272 7 4 467 117 4 9696 10 4 970 242 mayhem 5571 33 4 169 42 Safeguard 8517 27 4 315 79 TOTAL 156752 337 4.04 481 118 AVG TOTAL 152977 413 3.77 373 100 286 66 STD 210 55 57 13 SE 41 11 Interpretation: Controllers took less damage per minute than Defenders by a statistically significant amount (SE ranges do not overlap). Controllers: 373 dmg/min (±41 SE) Defenders: 481 dmg/min (±57 SE) No correlation was found between incoming damage and mission time for either group. This tells us the trend wasn't due to longer fights — damage just arrived at a steadier clip for both. Composite distribution showed a more tightly packed curve for Controllers, but over 50% IQR overlap means the real difference lies in a small edge, not a massive gap. Resilience Quotient When a support character takes damage, does it protect the team from defeat? Resilience Quotient = Damage In / Ally Defeats A higher number might suggest a support that soaks damage before the team falls. A lower number might suggest that team defeats occurred even when the support wasn’t under fire — or that the damage taken wasn’t impactful. Interpretation: Defenders took more damage per team defeat (2,642) — suggesting they were absorbing more punishment without their team crumbling. Controllers, by contrast, showed a lower damage per defeat (1,763) — either they weren’t being hit as often, or their teams fell regardless of whether they were being targeted. But there was no correlation, so across dozens of missions, there was no consistent relationship between how much a support was hit and whether their allies lived or died. In other words, the damage a support character takes may not be the deciding factor in team safety at all. Maybe it’s not about who takes the hits — it’s about who stops the hits from happening in the first place.
-
DEFCON 5: Defender vs Controller - Which is the Better Support AT?
Dark Current replied to Dark Current's topic in Archetypes
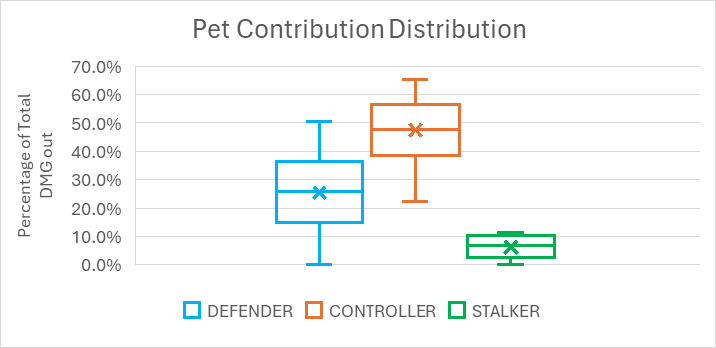
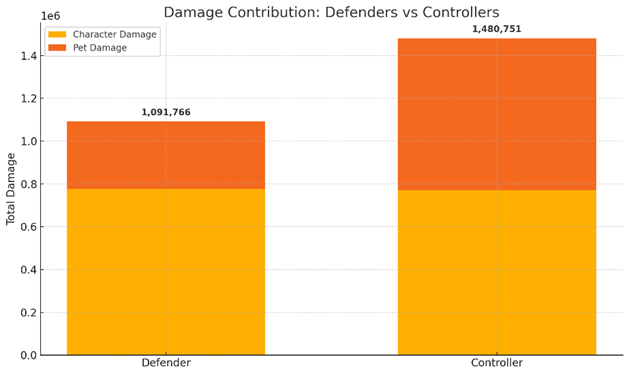
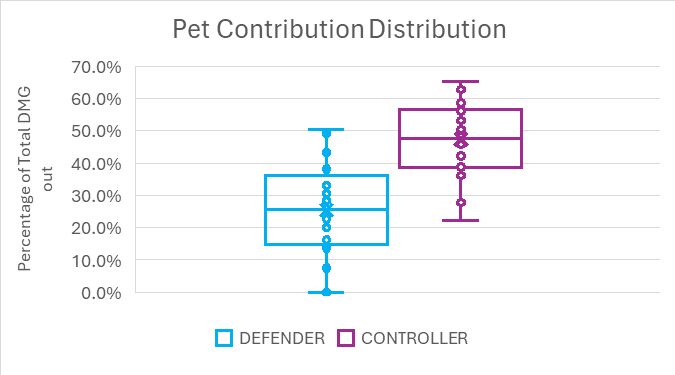
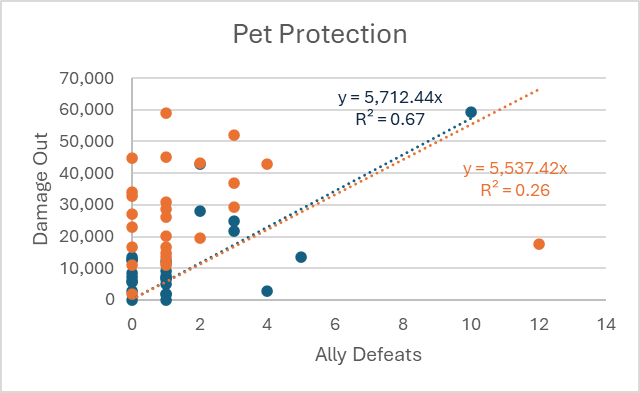
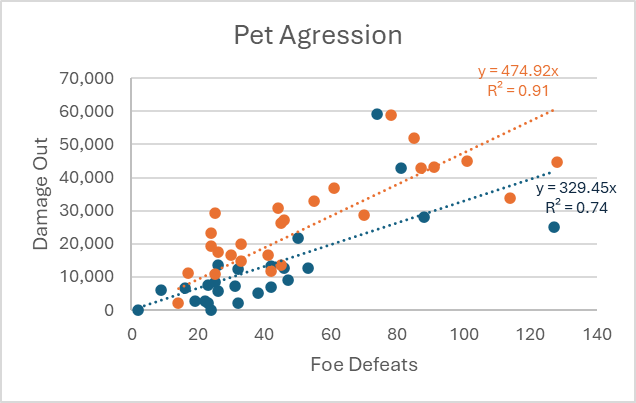
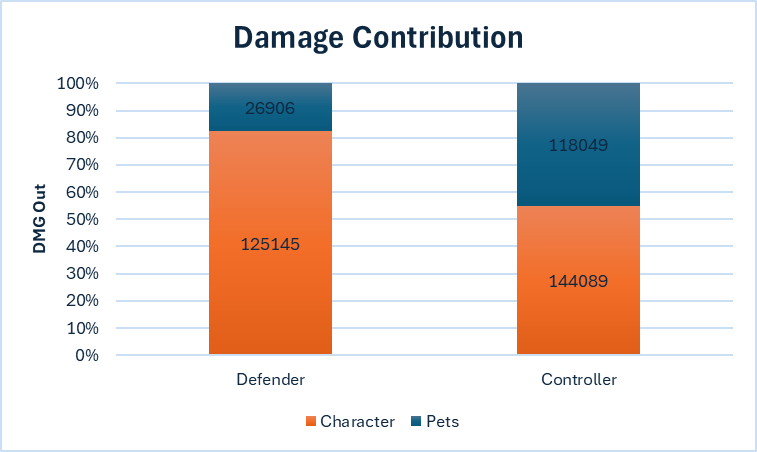
Controllers' Pet-centricity Interpretation: Controllers unleashed more overall damage, driven heavily by their high-performing pets (48% of their total damage on average). Defenders relied more on their personal output, with pet contributions making up a smaller share (only 28.8% of total damage). Statistically, this was a very large difference: Defender pet damage: 777k out of 1.09M Controller pet damage: 770k out of 1.48M This suggests Controllers act as force multipliers, leveraging summoned pets to maintain consistent pressure and damage across missions — even when the controller isn’t doing the bulk of the blasting. Meanwhile, Defenders embody a “do-it-yourself” ethos, channeling the bulk of their value through their own powers, not proxies. Pet Protection "Does higher pet damage correlate with fewer ally deaths?" Interpretation: Defender Slope: 5712 pet dmg per ally defeat Controller Slope: 5537 pet dmg per ally defeat No correlation for either AT Pets aren’t reliably absorbing or distracting enough enemies to reduce team casualties in a predictable way. The similar slope values show equal levels of investment in pet-generated threat, but the lack of correlation suggests their protection value is situational — maybe spiking during certain fights (e.g., large groups or drawn-out mayhems), but not reliable across all missions. Pet Aggression "Does pet damage lead directly to more kills?" Interpretation: Defender Slope: 329 pet dmg per foe defeated (no correlation) Controller Slope: 475 pet dmg per foe defeated (with correlation) Controller pets are delivering reliable finishing power — the correlation shows a direct link between pet damage and actual kills. Their minions aren’t just nibbling at edges; they’re actively closing fights. Defender pets are contributing solidly (lower slope), but their impact is more diffuse — possibly because they’re soaked into AoE fights where others land the kills, or because defenders mix more personal damage into the equation.
-
DEFCON 5: Defender vs Controller - Which is the Better Support AT?
Dark Current replied to Dark Current's topic in Archetypes
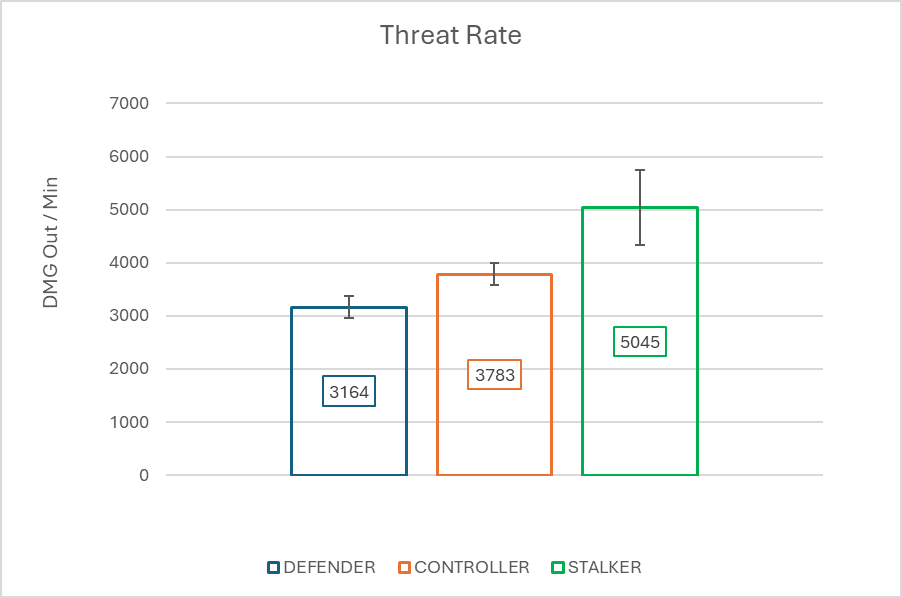
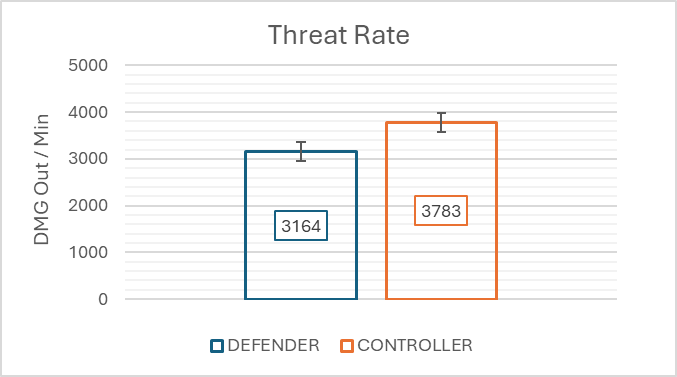
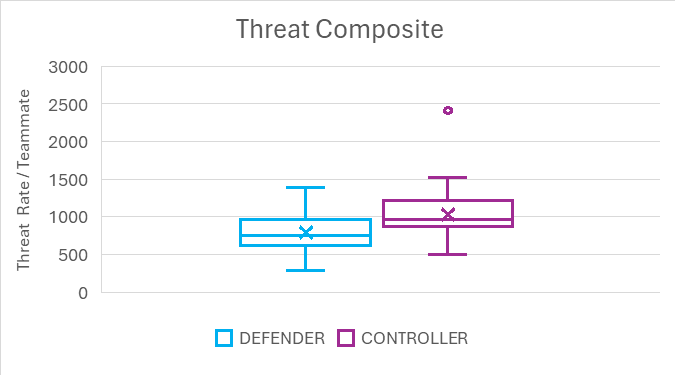
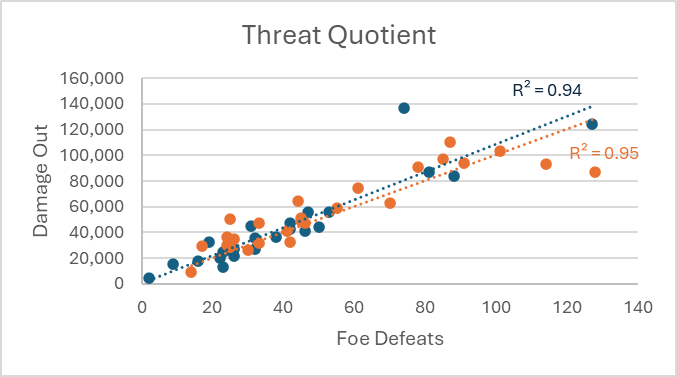
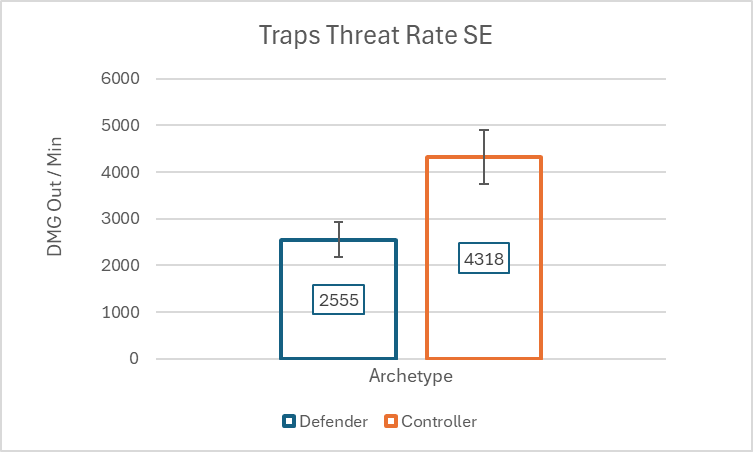
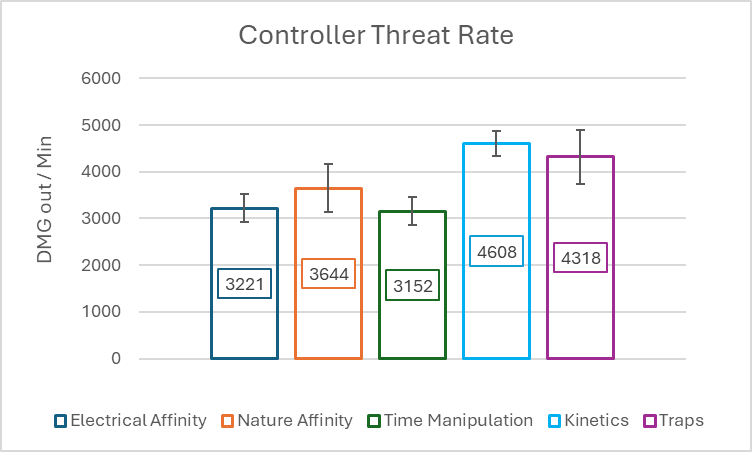
The Bulwark vs. The Binder… THREAT Support Mission DMG Out Time Teammate RATE COMPOSITE Support Mission DMG Out Time Teammate RATE COMPOSITE Electrical 1 26686 13 3 2053 684 Electrical 1 28898 8 4 3612 903 2 43998 11 4 4000 1000 2 50124 14 4 3580 895 3 35956 11 5 3269 654 3 34983 17 4 2058 514 4 32188 13 5 2476 495 4 64033 19 3 3370 1123 mayhem 136770 28 5 4885 977 mayhem 90620 26 4 3485 871 Nature 1 25917 7 4 3702 926 Nature 1 47382 12 4 3948 987 2 19978 6 4 3330 832 2 86902 18 4 4828 1207 3 4611 4 4 1153 288 3 62640 13 2 4818 2409 4 47292 18 4 2627 657 4 26531 7 3 3790 1263 5 9054 6 3 1509 503 mayhem 86752 27 4 3213 803 mayhem 74236 25 3 2969 990 Time 1 42504 8 4 5313 1328 Time 1 94081 25 4 3763 941 2 56179 12 4 4682 1170 2 103122 28 4 3683 921 3 21825 6 4 3638 909 3 48758 22 4 2216 554 4 44633 16 4 2790 697 4 51038 15 4 3403 851 safeguard 124568 30 3 4152 1384 safeguard 110426 41 4 2693 673 Kinetics 1 17597 8 4 2200 550 Kinetics 1 30271 6 4 5045 1261 2 55480 16 4 3467 867 2 32299 8 4 4037 1009 3 36397 12 4 3033 758 3 58663 11 4 5333 1333 4 15607 4 4 3902 975 4 47442 12 4 3953 988 5 26970 11 4 2452 613 5 93463 20 4 4673 1168 Traps 1 24937 14 4 1781 445 Traps 1 36405 6 4 6067 1517 2 41152 15 4 2743 686 2 41197 11 4 3745 936 3 26942 7 4 3849 962 3 31473 6 4 5246 1311 4 13016 7 4 1859 465 4 29218 10 4 2922 730 mayhem 83810 33 4 2540 635 Safeguard 97492 27 4 3611 903 TOTAL 1091766 337 4.04 3164 791 AVG TOTAL 1480751 413 3.77 3783 1029 1021 267 STD 1061 380 204 53 SE 208 74 Interpretation: Controllers delivered significantly more damage per minute on average: CON AVG: 3,783 damage/min DEF AVG: 3,164 damage/min Both archetypes showed a clear correlation between damage output and mission time — longer missions gave more room for their impact to build. Controllers also had more volatility, with a wider range of values and a high outlier that pushed their composite distribution further than defenders, who were more consistent with no outliers. Threat Quotient (DMG Out : Foe Defeats) "How much damage does it take for a support archetype to get a kill?" A lower Threat Quotient means: More of a character’s damage results in kills directly. The player is likely landing finishing blows or dealing high-impact, decisive bursts. A higher Threat Quotient might suggest: The character’s damage is spread across enemies, weakening them but letting teammates land the final blows. They’re playing a more enabling or support-through-damage role. Results Defender TQ: 1088 damage per foe Controller TQ: 1003 damage per foe Statistical Tie (no significant difference) Positive correlation for both ATs — more damage = more kills, consistently
-
DEFCON 5: Defender vs Controller - Which is the Better Support AT?
Dark Current replied to Dark Current's topic in Archetypes
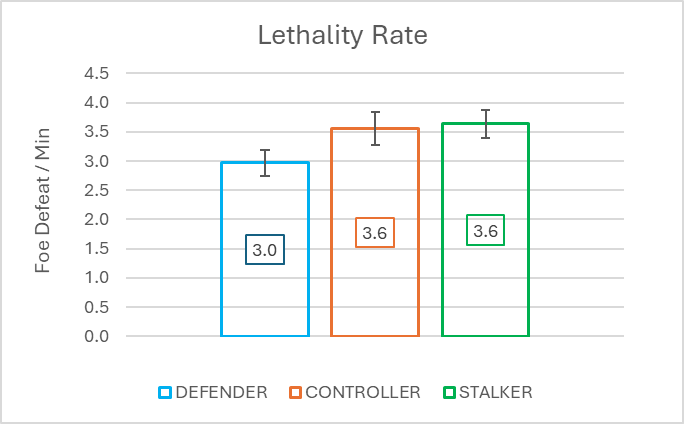
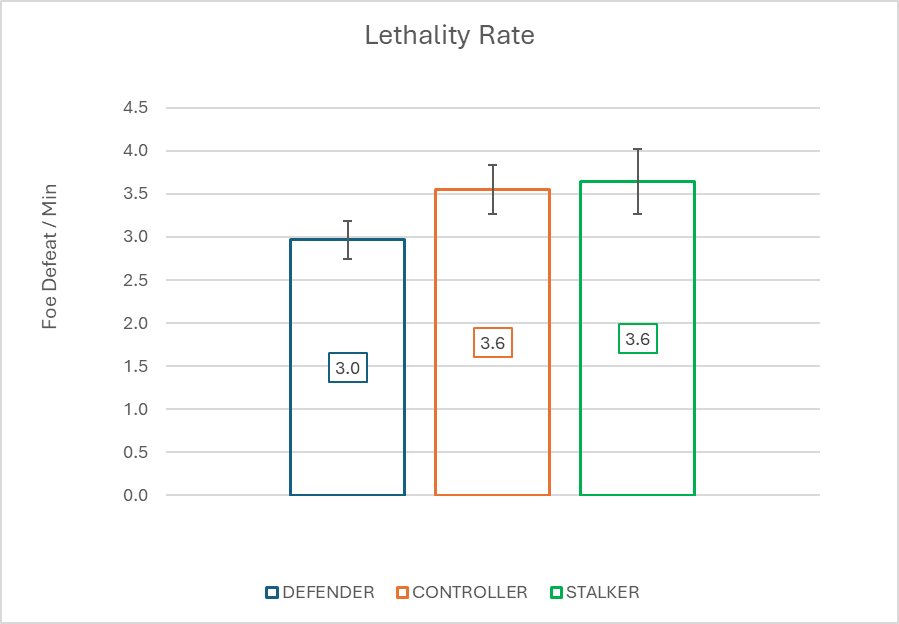
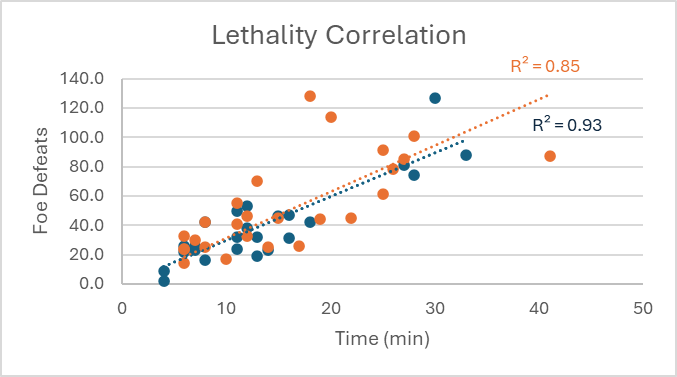
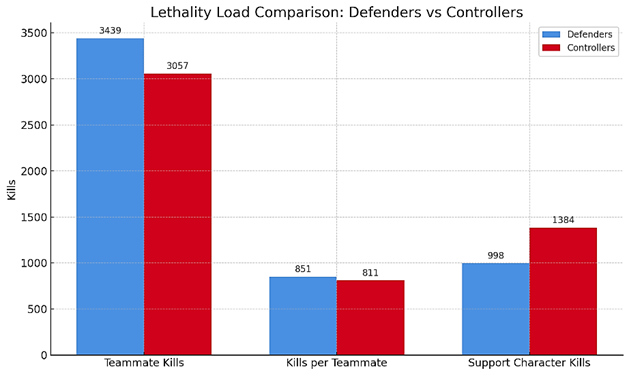
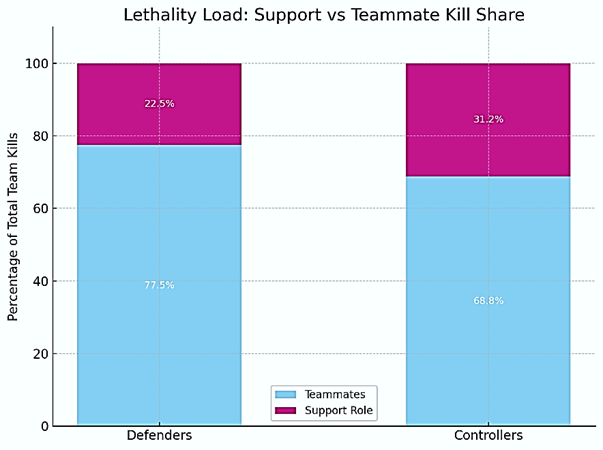
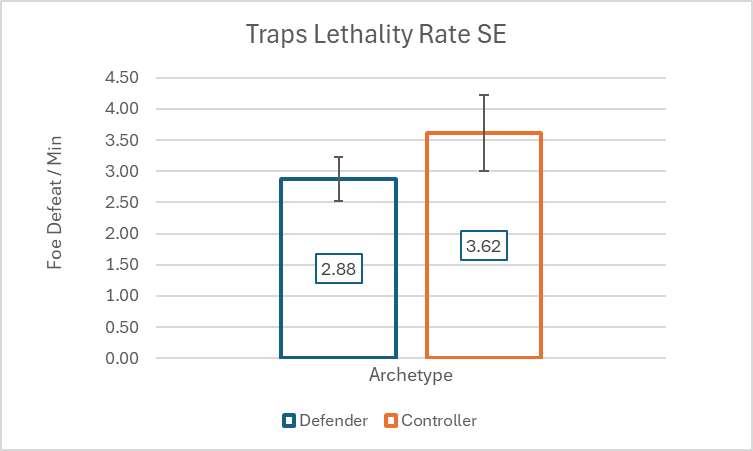
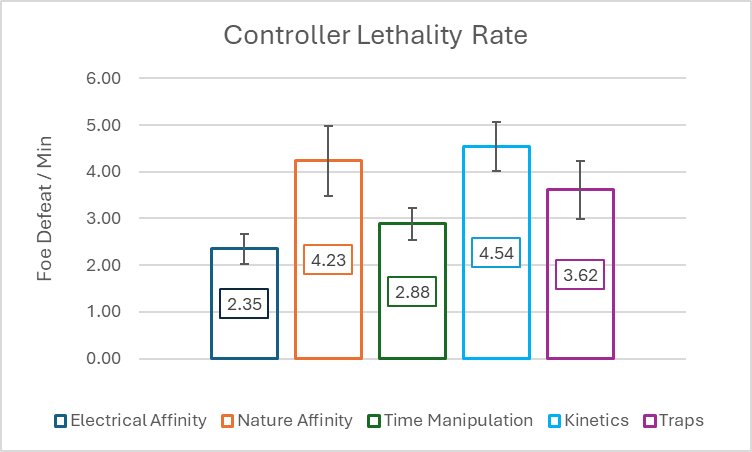
The Bulwark vs. The Binder… LETHALITY Support Mission F Defeats Time Teammate RATE COMPOSITE Support Mission F Defeats Time Teammate RATE COMPOSITE Electrical 1 32 13 3 2.5 0.8 Electrical 1 25 8 4 3.1 0.8 2 50 11 4 4.5 1.1 2 25 14 4 1.8 0.4 3 32 11 5 2.9 0.6 3 26 17 4 1.5 0.4 4 19 13 5 1.5 0.3 4 44 19 3 2.3 0.8 mayhem 74 28 5 2.6 0.5 mayhem 78 26 4 3.0 0.8 Nature 1 25 7 4 3.6 0.9 Nature 1 46 12 4 3.8 1.0 2 22 6 4 3.7 0.9 2 128 18 4 7.1 1.8 3 2 4 4 0.5 0.1 3 70 13 2 5.4 2.7 4 42 18 4 2.3 0.6 4 30 7 3 4.3 1.4 5 14 6 3 2.3 0.8 mayhem 81 27 4 3.0 0.8 mayhem 61 25 3 2.4 0.8 Time 1 42 8 4 5.3 1.3 Time 1 91 25 4 3.6 0.9 2 53 12 4 4.4 1.1 2 101 28 4 3.6 0.9 3 26 6 4 4.3 1.1 3 45 22 4 2.0 0.5 4 31 16 4 1.9 0.5 4 45 15 4 3.0 0.8 safeguard 127 30 3 4.2 1.4 safeguard 87 41 4 2.1 0.5 Kinetics 1 16 8 4 2.0 0.5 Kinetics 1 24 6 4 4.0 1.0 2 47 16 4 2.9 0.7 2 42 8 4 5.3 1.3 3 38 12 4 3.2 0.8 3 55 11 4 5.0 1.3 4 9 4 4 2.3 0.6 4 33 12 4 2.8 0.7 5 24 11 4 2.2 0.5 5 114 20 4 5.7 1.4 Traps 1 23 14 4 1.6 0.4 Traps 1 24 6 4 4.0 1.0 2 46 15 4 3.1 0.8 2 41 11 4 3.7 0.9 3 26 7 4 3.7 0.9 3 33 6 4 5.5 1.4 4 23 7 4 3.3 0.8 4 17 10 4 1.7 0.4 mayhem 88 33 4 2.7 0.7 Safeguard 85 27 4 3.1 0.8 TOTAL 998 337 4.04 3.0 0.8 AVG TOTAL 1384 413 3.77 3.6 1.0 1.1 0.3 STD 1.4 0.5 0.2 0.1 SE 0.3 0.1 Interpretation: Controllers had a higher average kill rate than Defenders — but this wasn't domination. It was consistency. Controllers are opportunists. They create fragile windows of vulnerability through control and illusion, then capitalize. Their damage output often comes in waves — phantasms, creepers, pets, DoTs — and it works because the battlefield is under their thumb. They aren't rushing. They're setting the stage and letting the clockwork run. Defenders, on the other hand, are slow burners. Their lethality builds. Their tools — often debuffs, auras, positional blasts — compound over time. And while their average kill rate was lower, the correlation with mission time tells a story: the longer the mission, the more dangerous the Defender becomes. That’s not just about output — it’s about traction. “Who kills more?” The answer is: Controllers, slightly. But if you’re asking, “Who shapes the kill tempo?”, then it becomes trickier. Controllers frontload and finish. Defenders ramp and sustain. LETHALITY LOAD – interpreting the kill pressure Across the entire DEFCON 5 series… How lethal were these teams overall? How much offensive pressure did they apply as a group? Which archetype generated more total team impact over time? To answer that, we calculate the Lethality Load: Add up all foe defeats from the mission logs. Divide by the average number of teammates (excluding the support character) to determine how many kills were generated per teammate slot across all missions. This gives a sense of teamwide combat output — and allows direct comparison to the individual Lethality stats of the Defenders and Controllers. Interpretation: Teammate Kills: Nearly identical — both archetypes led teams that delivered similar total kills. Kills per Teammate: Again, close — suggesting that teammates across both sides contributed evenly, kill-wise. Controller Lethality is concentrated, even though their teammates didn’t lag too far behind the defender’s. Defender kills = 22.5% of total team kills (998 / 4437) Controller kills = 31.2% of total team kills (1384 / 4441) Controllers may have had more tools or pets tagging final blows. Their builds could be funneling more combat to themselves — through summons, AoEs, or aggro manipulation. Or, their teammates were more supportive/less aggressive, letting Controllers shine. Defender Lethality is Distributed as their teams had higher kills per teammate than the controller’s. More ally throughput — teammates dealt the finishing blows more often. Defenders might not be logging the kills, but they’re boosting teammates’ performance. Defenders amplify the team’s total lethality, even if they personally don’t get the credit on the scoreboard.
-
DEFCON 5: Defender vs Controller - Which is the Better Support AT?
Dark Current replied to Dark Current's topic in Archetypes
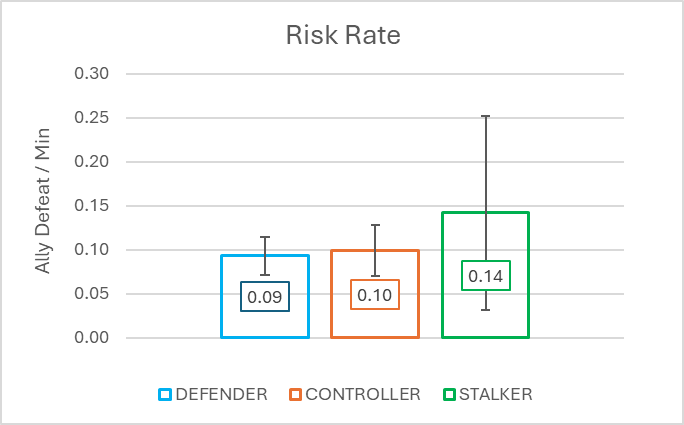
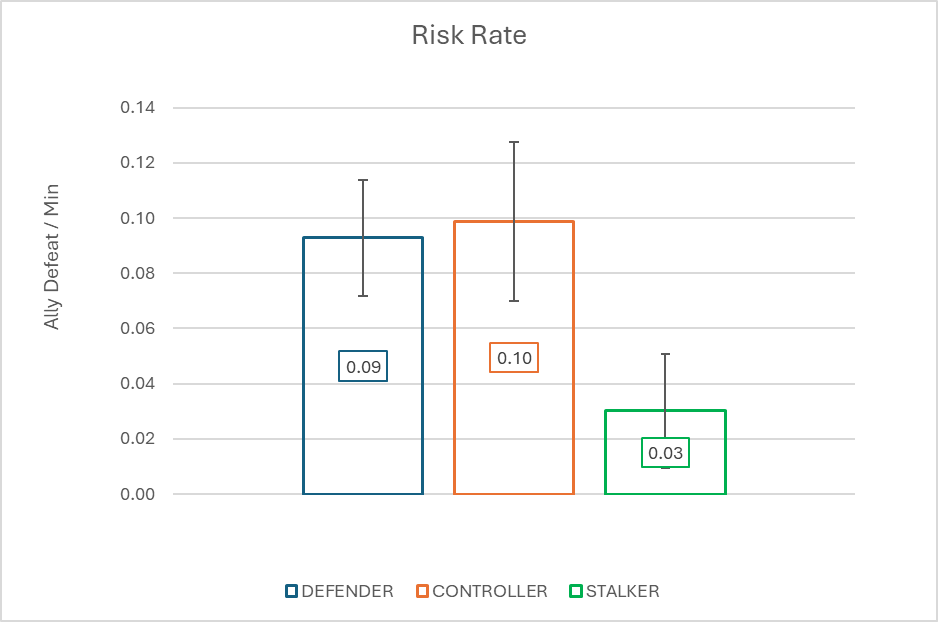
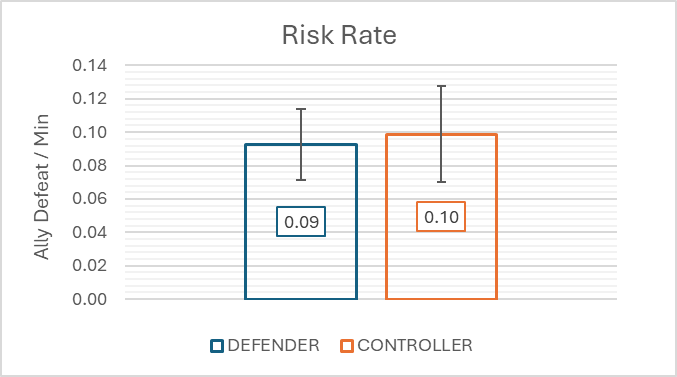
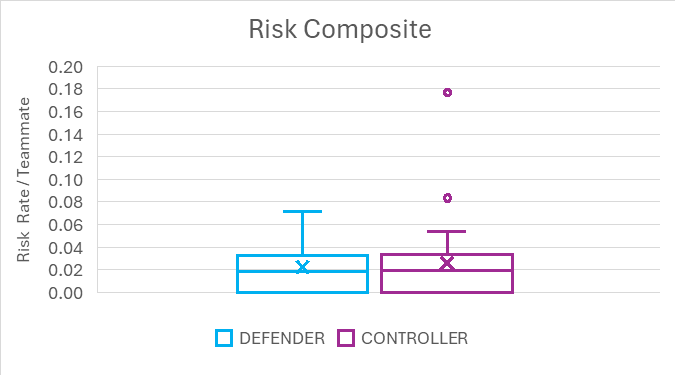
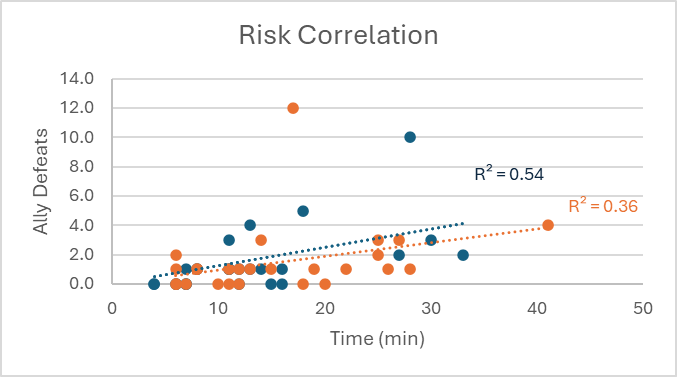
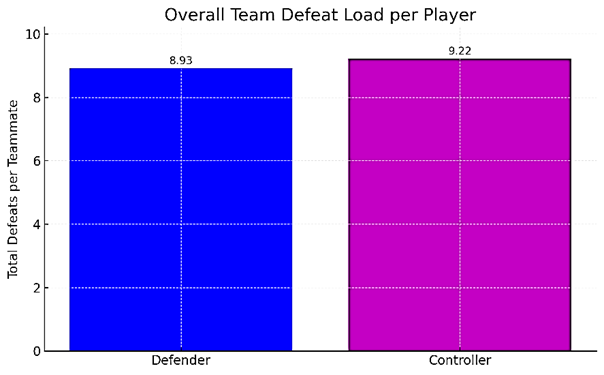
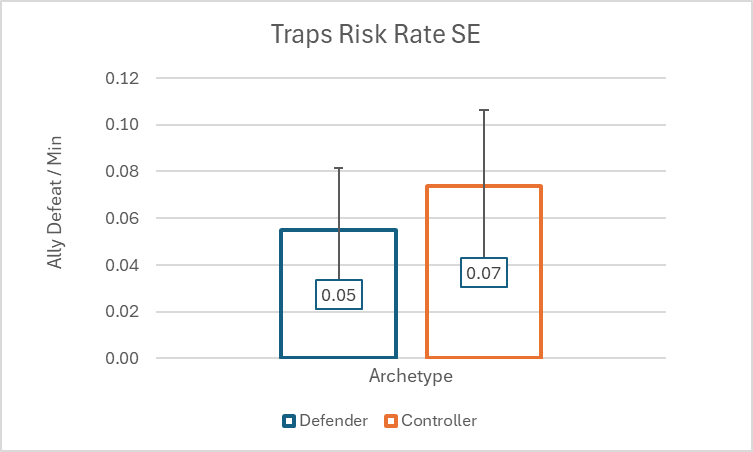
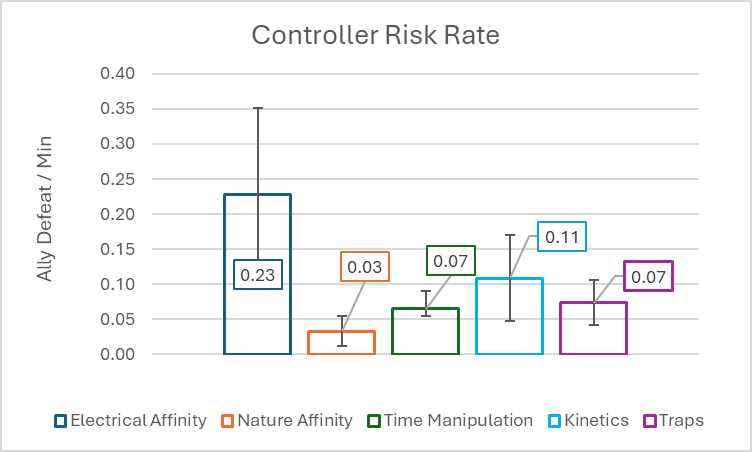
The Bulwark vs. The Binder… RISK Support Mission A Defeats Time Teammate RATE COMPOSITE Support Mission A Defeats Time Teammate RATE COMPOSITE Electrical 1 1 13 3 0.08 0.03 Electrical 1 1 8 4 0.13 0.03 2 3 11 4 0.27 0.07 2 3 14 4 0.21 0.05 3 1 11 5 0.09 0.02 3 12 17 4 0.71 0.18 4 4 13 5 0.31 0.06 4 1 19 3 0.05 0.02 mayhem 10 28 5 0.36 0.07 mayhem 1 26 4 0.04 0.01 Nature 1 0 7 4 0.00 0.00 Nature 1 0 12 4 0.00 0.00 2 0 6 4 0.00 0.00 2 0 18 4 0.00 0.00 3 0 4 4 0.00 0.00 3 1 13 2 0.08 0.04 4 5 18 4 0.28 0.07 4 0 7 3 0.00 0.00 5 0 6 3 0.00 0.00 mayhem 2 27 4 0.07 0.02 mayhem 3 25 3 0.12 0.04 Time 1 1 8 4 0.13 0.03 Time 1 2 25 4 0.08 0.02 2 0 12 4 0.00 0.00 2 1 28 4 0.04 0.01 3 0 6 4 0.00 0.00 3 1 22 4 0.05 0.01 4 0 16 4 0.00 0.00 4 1 15 4 0.07 0.02 safeguard 3 30 3 0.10 0.03 safeguard 4 41 4 0.10 0.02 Kinetics 1 1 8 4 0.13 0.03 Kinetics 1 2 6 4 0.33 0.08 2 1 16 4 0.06 0.02 2 1 8 4 0.13 0.03 3 1 12 4 0.08 0.02 3 0 11 4 0.00 0.00 4 0 4 4 0.00 0.00 4 1 12 4 0.08 0.02 5 1 11 4 0.09 0.02 5 0 20 4 0.00 0.00 Traps 1 1 14 4 0.07 0.02 Traps 1 0 6 4 0.00 0.00 2 0 15 4 0.00 0.00 2 1 11 4 0.09 0.02 3 0 7 4 0.00 0.00 3 1 6 4 0.17 0.04 4 1 7 4 0.14 0.04 4 0 10 4 0.00 0.00 mayhem 2 33 4 0.06 0.02 Safeguard 3 27 4 0.11 0.03 TOTAL 38 337 4.04 0.09 0.02 AVG TOTAL 40 413 3.77 0.10 0.03 0.11 0.02 STD 0.15 0.04 0.02 0.00 SE 0.03 0.01 Interpretation: Risk (Ally Defeats) Overall Outcome: No significant difference in Risk Rate between Defenders and Controllers. Both archetypes had an average team defeat rate of around 0.10 per minute — meaning their teams suffered a defeat roughly once every 10 minutes, on average. Consistency & Spread: Composite distributions for both archetypes were narrow and overlapping, indicating a stable and similar performance level. The Controllers showed two high outliers, indicating occasional team collapses that weren’t seen in the Defender runs — but those were exceptions, not patterns. No Correlation to Mission Length: Neither archetype showed a meaningful relationship between mission length and team defeat rate. Long or short, the rate remained consistent, suggesting reliability across mission types and durations. Conclusion: Despite Controllers occasionally having spike events (likely due to burst failure of controls or pet AI quirks), the overall team safety profile was nearly identical between the two archetypes. DEFEAT LOAD Across all the entire DEFCON 5 series… How punishing were these missions were on the team overall? How well the team was protected over time? Which archetype carried the weight of team safety better? If you add all player defeats (personal + ally) and divide by the average number of teammates (including the support character), you get a “Defeat Load” — or how many total defeats occurred per player on the team. Interpretation: The number is very close: both archetypes resulted in about 9 total defeats spread across each player slot over their missions. This backs up the previous conclusions: no meaningful difference in team-wide fragility or risk management. The load per player is basically the same.
-
DEFCON 5: Defender vs Controller - Which is the Better Support AT?
Dark Current replied to Dark Current's topic in Archetypes
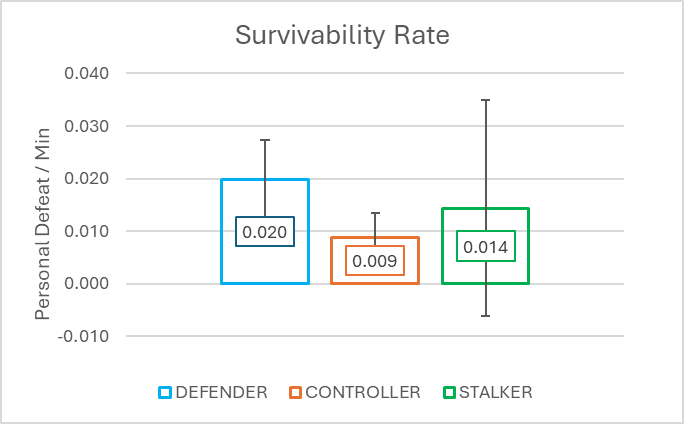
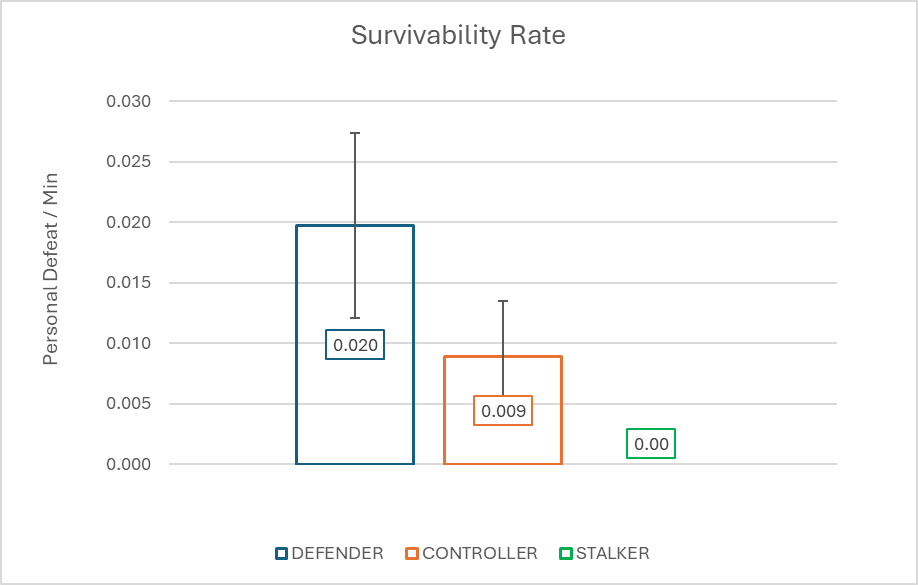
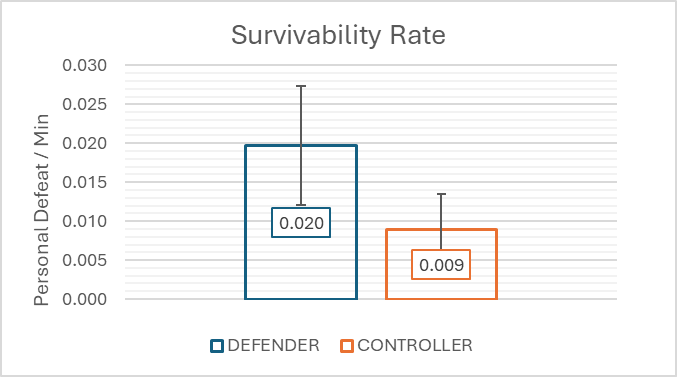
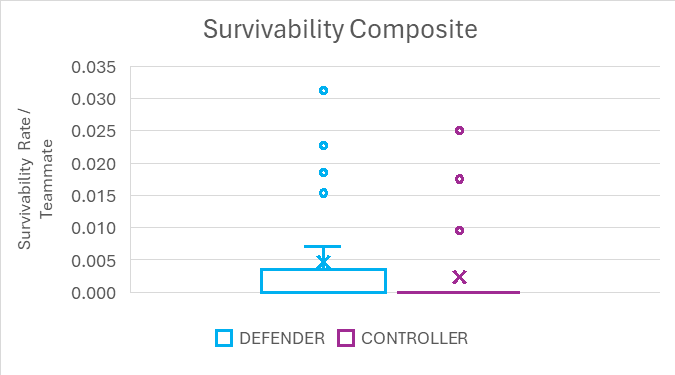
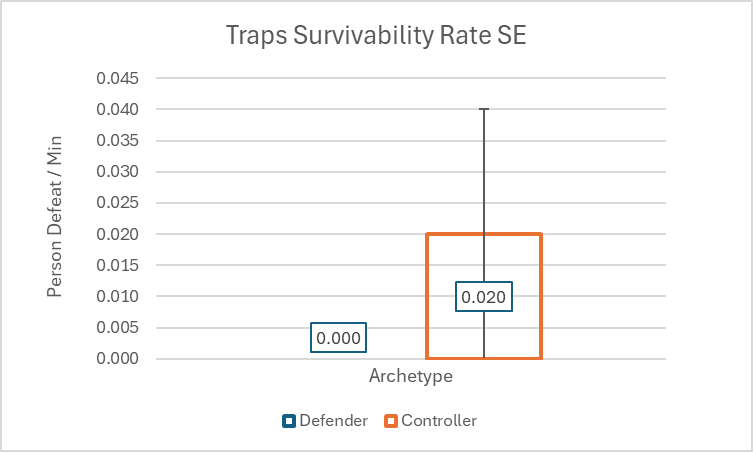
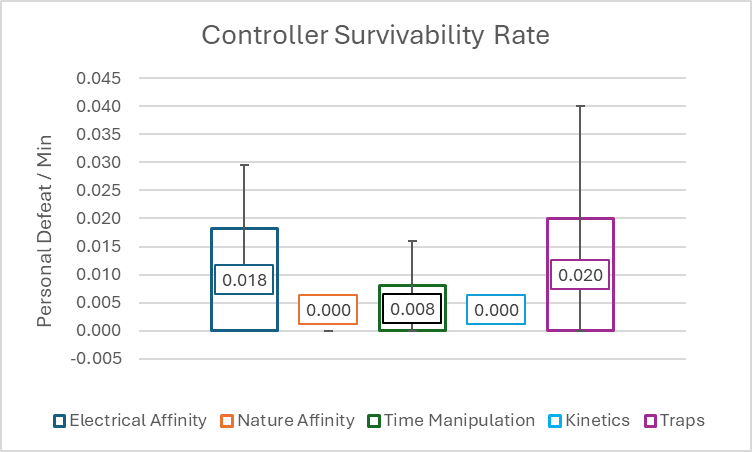
The Bulwark vs. The Binder… SURVIVABILITY Support Mission P Defeats Time Teammate RATE COMPOSITE Support Mission P Defeats Time Teammate RATE COMPOSITE Electrical 1 0 13 3 0.000 0.000 Electrical 1 0 8 4 0.000 0.000 2 1 11 4 0.091 0.023 2 0 14 4 0.000 0.000 3 0 11 5 0.000 0.000 3 0 17 4 0.000 0.000 4 1 13 5 0.077 0.015 4 1 19 3 0.053 0.018 mayhem 1 28 5 0.036 0.007 mayhem 1 26 4 0.038 0.010 Nature 1 0 7 4 0.000 0.000 Nature 1 0 12 4 0.000 0.000 2 0 6 4 0.000 0.000 2 0 18 4 0.000 0.000 3 0 4 4 0.000 0.000 3 0 13 2 0.000 0.000 4 0 18 4 0.000 0.000 4 0 7 3 0.000 0.000 5 0 6 3 0.000 0.000 mayhem 2 27 4 0.074 0.019 mayhem 0 25 3 0.000 0.000 Time 1 0 8 4 0.000 0.000 Time 1 1 25 4 0.040 0.010 2 0 12 4 0.000 0.000 2 0 28 4 0.000 0.000 3 0 6 4 0.000 0.000 3 0 22 4 0.000 0.000 4 0 16 4 0.000 0.000 4 0 15 4 0.000 0.000 safeguard 0 30 3 0.000 0.000 safeguard 0 41 4 0.000 0.000 Kinetics 1 1 8 4 0.125 0.031 Kinetics 1 0 6 4 0.000 0.000 2 0 16 4 0.000 0.000 2 0 8 4 0.000 0.000 3 0 12 4 0.000 0.000 3 0 11 4 0.000 0.000 4 0 4 4 0.000 0.000 4 0 12 4 0.000 0.000 5 1 11 4 0.091 0.023 5 0 20 4 0.000 0.000 Traps 1 0 14 4 0.000 0.000 Traps 1 0 6 4 0.000 0.000 2 0 15 4 0.000 0.000 2 0 11 4 0.000 0.000 3 0 7 4 0.000 0.000 3 0 6 4 0.000 0.000 4 0 7 4 0.000 0.000 4 1 10 4 0.100 0.025 mayhem 0 33 4 0.000 0.000 Safeguard 0 27 4 0.000 0.000 TOTAL 7 337 4.04 0.020 0.005 AVG TOTAL 4 413 3.77 0.009 0.002 0.038 0.009 STD 0.023 0.006 0.008 0.002 SE 0.005 0.001 Interpretation: Survivability – Personal Defeats Defenders: Took more defeats on average, but the difference wasn’t statistically meaningful. Slightly more volatile survivability. Controllers: Fewer defeats overall with tighter clustering, but isolated spikes skewed a few results. Distribution Insight: Defenders had more outliers (4 vs. 3), suggesting greater variance, but most data still clustered tightly around the mean. No correlation found between defeat rate and time for either archetype. Verdict: Neither side showed a consistent edge. Performance > archetype.
-
DEFCON 5: Defender vs Controller - Which is the Better Support AT?
Dark Current replied to Dark Current's topic in Archetypes
FINAL VERDICT: Controllers ARE the Superior Support Archetype vs. Defenders Recap of all DEFCON Matchups: Deep-dive Statistical Analysis of Aggregate Defenders vs Controllers: -
DEFCON 5: Defender vs Controller - Which is the Better Support AT?
Dark Current replied to Dark Current's topic in Archetypes
I had this done a week ago, but I'm just now getting around to releasing my DEFCON 1 Verdict: Traps goes to the DEFENDER!!! My detailed reasons are in my YT video linked below, but the short version is that while the statistics suggest a tie, the Controller had what I would call (in hindsight) a disqualifying team and therefore his stats are suspect, if not misleading. Overall, the defender provided better defenses while the controller provided superior offense. Now that all 5 levels of DEFCON are complete, all the stats will be combined and analyzed in totem and patterns looked for to answer the big question: who is the superior support archetyped? Is a defender with the better buff / debuff numbers and their arsenal of blasts, better? Or is the controller with their synergy between controls and support? Or are they statistically indistinguishable? Or is 'better' a situational product? Find out in the next video: DEFCON 5 FINAL JUDGEMENT... coming Soon
-
DEFCON 5: Defender vs Controller - Which is the Better Support AT?
Dark Current replied to Dark Current's topic in Archetypes
Thanks, Saw! I agree about character concepts being the foundation for fun. If I can't get into a character, I find it's generally the concept and costume just haven't gelled yet. I wish we had customizable objects beyond weaponry. Or powers you could replace with objects. I'd love the Blackwand to shoot dark blast powers from! -
DEFCON 5: Defender vs Controller - Which is the Better Support AT?
Dark Current replied to Dark Current's topic in Archetypes
My Reaction and Analysis video of the Vexaris team trials is up!
-
DEFCON 5: Defender vs Controller - Which is the Better Support AT?
Dark Current replied to Dark Current's topic in Archetypes
I sense zero bias in this statement.