Dark Current
-
Posts
305 -
Joined
-
Last visited
-
Days Won
1
Content Type
Profiles
Forums
Events
Store
Articles
Patch Notes
Everything posted by Dark Current
-

DEFCON 5: Defender vs Controller - Which is the Better Support AT?
Dark Current replied to Dark Current's topic in Archetypes
Here are the links to the Reaction Vids where I discuss some of the above DEF-DEF and CON-CON comparisons. DEFENDER - Nature / Sonic / Energy CONTROLLER - Dark / Nature / Dark The DEFCON 4 Verdict video is releasing tomorrow. -
DEFCON 5: Defender vs Controller - Which is the Better Support AT?
Dark Current replied to Dark Current's topic in Archetypes
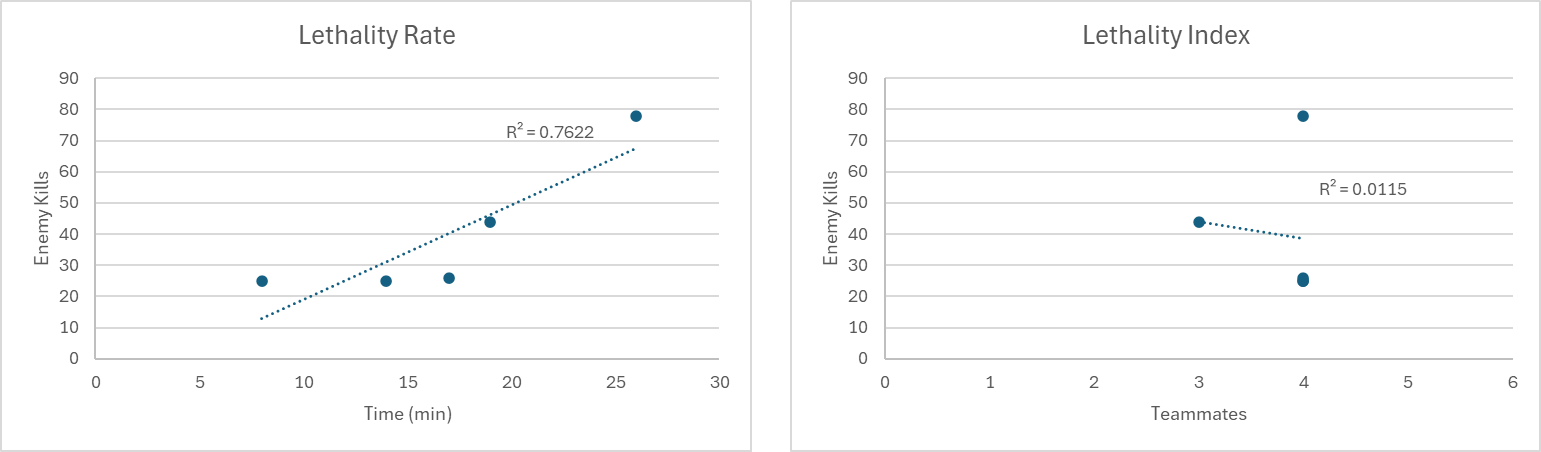
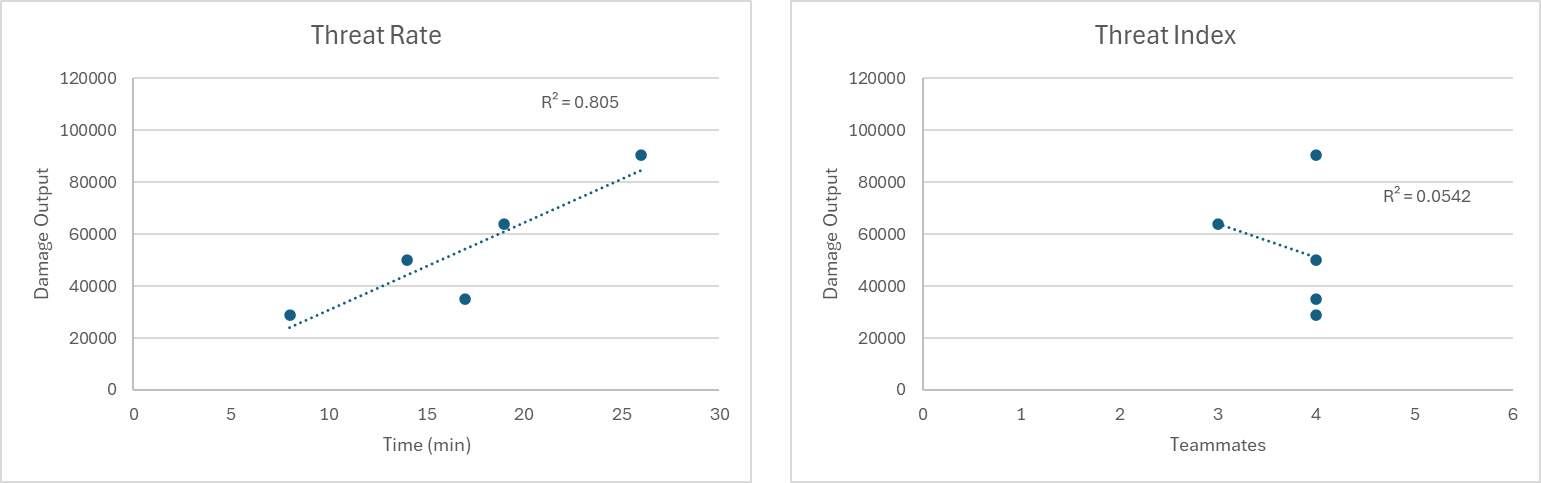
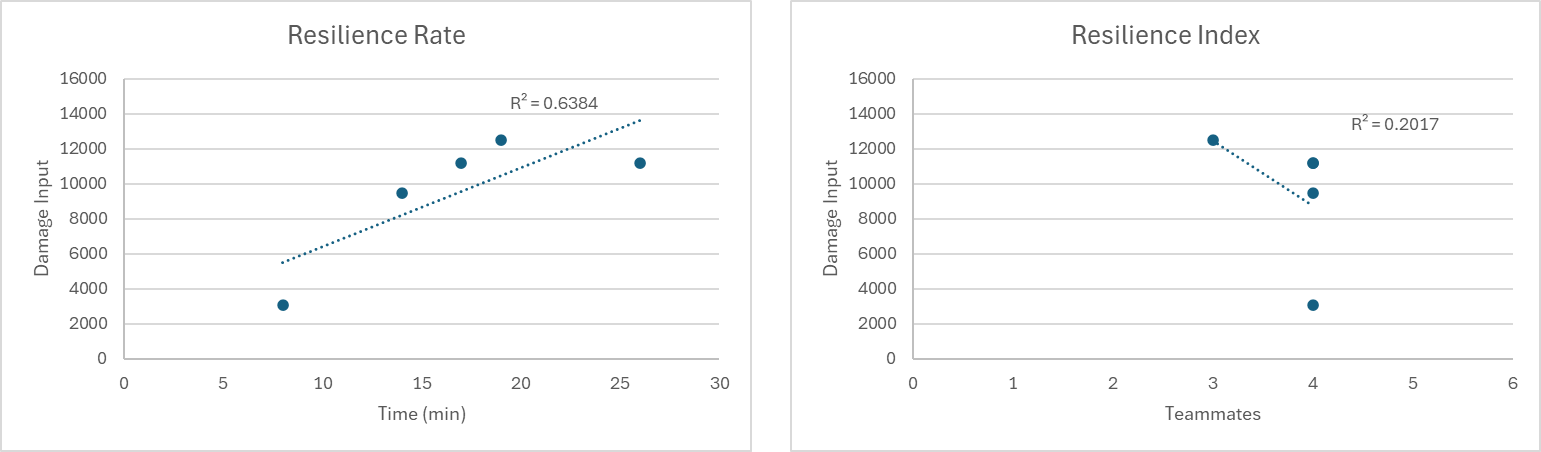
Taking a look at Fey Wode's numbers vs Ostara's numbers (from DEFCON 5) in a Controller Side-by-Side comparison: Rates are stat / minute (standard error) and Indexes are stat / teammate (distribution).
-
DEFCON 5: Defender vs Controller - Which is the Better Support AT?
Dark Current replied to Dark Current's topic in Archetypes
DEFCON 4 Nature Affinity - CONTROLLER Team Missions Fey Wode (Dark / Nature / Dark) scares up a few brave souls for two nights of spooktacular action: Part 1 Part 2 1. Survivability = Personal Defeats Mission Personal Defeats Time Teammate Survivability Rate Survivability Index 1 0 12 4 0.00 0.00 2 0 18 4 0.00 0.00 3 0 13 2 0.00 0.00 4 0 7 3 0.00 0.00 5 0 6 3 0.00 0.00 mayhem 0 25 3 0.00 0.00 Total à 0 81 0.00 0.00 ß AVG 2. Risk = Ally Defeats Mission Ally Defeats Time Teammate Risk Rate Risk Index 1 0 12 4 0.00 0.00 2 0 18 4 0.00 0.00 3 1 13 2 0.08 0.50 4 0 7 3 0.00 0.00 5 0 6 3 0.00 0.00 mayhem 3 25 3 0.12 1.00 Total à 4 81 0.03 0.25 ß AVG 3. Lethality = Foes Defeats Mission Kills Time Teammate Lethality Rate Lethality Index 1 46 12 4 3.83 11.50 2 128 18 4 7.11 32.00 45* 3 58 13 2 4.46 29.00 4 30 7 3 4.29 10.00 5 14 6 3 2.33 4.67 mayhem 61 25 3 2.44 20.33 Total à 337 81 4.08 17.92 ß AVG 4. Threat = Damage Output Personal Damage Output Mission: 1 2 3 4 Mayhem Attack Total: Dark Blast 1764 4492 2525 665 316 3495 13257 Dark Grasp 2210 5057 3298 680 587 4081 15914 Heart of Darkness 1027 1029 1027 84 166 1024 4357 Living Shadows 572 2592 1647 646 100 2069 7624 Sands of Mu 225 0 290 0 0 0 515 Shadowy Binds 1587 2816 2616 321 83 2623 10046 Umbral Torrent 1482 6215 4247 1639 707 2969 17259 Void Judgement 8236 12403 13300 3999 4083 16339 58359 Cloud Senses: Chance for Negative 427 3081 1969 795 224 1435 7930 Doublehit (Hybrid) 2019 3065 2098 775 485 2201 10644 Reactive Interface 654 1440 910 290 292 1095 4680 Mission Total: 20201 42190 33927 9895 7043 37330 150585 Pet Damage Output Pet 1 2 3 4 5 Mayhem Pet Total: Diviner Essence 16912 17696 13951 11107 0 13538 73205 Energy Font 355 1479 809 314 21 1788 4765 Shades 1178 4764 3561 988 755 2588 13835 Umbral Beast 8735 20773 10392 4229 1235 18991 64356 Mission Total: 27181 44713 28714 16637 2011 36905 156160 Combined Damage Output Mission DMG out Time Teammate Threat Rate Threat Index 1 47382 12 4 3948 11845 2 86902 18 4 4828 21726 *2500 3 62640 13 2 4818 31320 4 26531 7 3 3790 8844 5 9054 6 3 1509 3018 mayhem 74236 25 3 2969 24745 Total à 306745 81 3644 16916 ß AVG 5. Resilience = Damage Taken Type of Damage Taken Mission: 1 2 3 4 5 Mayhem Type Total Cold 16 0 0 0 9 0 24 Energy 640 668 326 735 55 3962 6386 Fire 60 0 135 0 0 404 600 Lethal 144 169 378 64 0 1261 2016 Negative Energy 16 0 1570 0 177 0 1763 Psionic 86 0 0 881 250 343 1561 Smashing 172 1767 0 0 0 734 2673 Toxic 0 175 0 1125 0 0 1300 Mission Total: 1134 2779 2409 2805 492 6705 16324 Overall Damage Taken Mission DMG in Time Teammate Resilience Rate Resilience Index 1 1134 12 4 95 284 2 2779 18 4 154 695 3 2409 13 2 185 1204 4 2805 7 3 401 935 5 492 6 3 82 164 mayhem 6705 25 3 268 2235 Total à 16324 81 198 919 ß AVG -
DEFCON 5: Defender vs Controller - Which is the Better Support AT?
Dark Current replied to Dark Current's topic in Archetypes
Taking a look at Skreaming Tree's numbers vs Ampere Avenger's numbers (from DEFCON 5) in a Defender Side-by-Side comparison: Rates are stat / minute (standard error) and Indexes are stat / teammate (distribution).
-
DEFCON 5: Defender vs Controller - Which is the Better Support AT?
Dark Current replied to Dark Current's topic in Archetypes
DEFCON 4 Nature Affinity Defender - Team Missions Screaming Tree (Nature / Sonic / Energy) lands a constant team of 5 for 5 straight missions: 1. Survivability = Personal Defeats Mission Personal Defeats Time Teammate Survivability Rate Survivability Index 1 0 7 4 0.00 0.00 2 0 6 4 0.00 0.00 3 0 4 4 0.00 0.00 4 0 18 4 0.00 0.00 mayhem 2 27 4 0.07 0.50 Total à 2 62 0.01 0.10 ß AVG 2. Risk = Ally Defeats Mission Ally Defeats Time Teammate Risk Rate Risk Index 1 0 7 4 0.00 0.00 2 0 6 4 0.00 0.00 3 0 4 4 0.00 0.00 4 5 18 4 0.28 1.25 mayhem 2 27 4 0.07 0.50 Total à 7 62 0.07 0.35 ß AVG 3. Lethality = Foe Defeats Mission Foe Defeats Time Teammate Lethality Rate Lethality Index 1 25 7 4 3.57 6.25 2 22 6 4 3.67 5.50 3 2 4 4 0.50 0.50 4 42 18 4 2.33 10.50 mayhem 81 27 4 3.00 20.25 Total à 172 62 2.61 8.60 ß AVG 4. Threat = Damage Output Personal Damage Output Mission: 1 2 3 4 Mayhem Attack Total: Dreadful Wail 3553 4984 1183 13199 10261 33181 Howl 683 1108 384 1345 2907 6428 Pyronic Judgement 6507 5939 849 11365 14907 39566 Sands of Mu 158 208 0 71 0 437 Scream 795 804 359 916 2492 5366 Shockwave 833 1394 555 895 1691 5368 Shout 1413 678 406 2443 3730 8670 Shriek 616 551 103 582 1772 3623 Siren's Song 1568 1571 499 1622 3937 9197 Total Focus 1006 0 273 1186 1780 4246 Mako's Bite Chance for Lethal Damage 244 0 0 244 433 921 Mission Total: 17377 17236 4611 33868 43909 117002 Pet Damage Output Mission: 1 2 3 4 Mayhem Pet Total: Diviner Essence 6402 2476 0 9161 35074 53114 Harpy Essence 2138 266 0 4262 7768 14434 Mission Total: 8540 2742 0 13424 42843 67548 Combined Damage Output Mission DMG out Time Teammate Threat Rate Threat Index 1 25917 7 4 3702 6479 2 19978 6 4 3330 4995 3 4611 4 4 1153 1153 4 47292 18 4 2627 11823 mayhem 86752 27 4 3213 21688 Total à 184550 62 2805 9228 ß AVG 5. Resilience = Damage Taken Damage Type Taken Type: 1 2 3 4 Mayhem Type Total Cold 0 0 80 0 0 80 Energy 0 177 0 10683 9336 20196 Fire 1044 413 0 14 807 2278 Lethal 720 12 0 0 1069 1801 Negative Energy 0 37 146 0 0 184 Psionic 0 713 0 0 1098 1810 Smashing 0 0 1644 126 601 2371 Toxic 0 0 0 3494 292 3786 Mission Total: 1764 1352 1870 14316 13203 32506 Overall Damage Taken Mission DMG in Time Teammate Resilience Rate Resilience Index 1 1764 7 4 252 441 2 1352 6 4 225 338 3 1870 4 4 467 467 4 14316 18 4 795 3579 mayhem 13203 27 4 489 3301 Total à 32506 62 446 1625 ß AVG -
DEFCON 5: Defender vs Controller - Which is the Better Support AT?
Dark Current replied to Dark Current's topic in Archetypes
Hello, thank you for the feedback. I appreciate the thoughtfulness and time taken to share your critique. As I’ve heard this and similar from a few sources, I think I need to clarify my position in regard to the design of the experiment. I am not disagreeing with any one point or saying anyone is wrong with their opinions - each flaw that has been pointed out crossed my mind at one point or another. I spent a good couple weeks before starting the tests puzzling over the variables and controls I was facing. I feel that my approach and the results I’m sharing with you are as honest and reliable as I can make them. To that end, here is my rebuttal to the critics: Strengths of the Approach 1. Acknowledgment of Variability: I clearly recognize the uncontrollable variables (teammates, enemies, missions) and am trying to mitigate their impact by collecting a large amount of data across diverse conditions. This is an accepted statistical approach, as large sample sizes often help "average out" noise, making it easier to detect meaningful signals. 2. Quantitative Analysis: I am compiling data into sums, averages, rates, and indices, and applying statistical methods (e.g., R-squared, whisker-and-box plots, standard error), to leverage valid statistical tools to extract insights from the data. 3. Holistic Evaluation: Comparing across multiple support sets (rather than just one) strengthens the generalizability of any findings I may uncover. It also acknowledges the complexity and variability inherent to archetypes in CoH - a highly dynamic MMO environment. Challenges 1. Random Team Composition Criticism: Different teammates, even with minimal incarnate powers and no other support sets, could drastically affect the outcome (e.g., a DPS-heavy team might make a support set look better than it is). Response: This is a valid concern, but it’s mitigated by the breadth of the dataset. Over many missions, random variability in teammates will tend to "wash out" if the sample size is large enough. While this introduces noise, it doesn’t invalidate the experiment—it just requires a cautious interpretation of the results. Supporting Principle: My approach aligns with the Central Limit Theorem: with a sufficiently large sample size, the effects of random variability diminish, and the mean of the sample (tested characters) approaches the true population mean (defenders and controllers in general). 2. Slotting and Secondary Powerset Variability Criticism: The differences in secondary powersets (e.g., blast vs. control) and slotting could bias results because the synergy of primary and secondary sets differs for Defenders and Controllers. Response: This variability reflects the nature of the two archetypes and is, therefore, part of the question I’m investigating. It isn’t a flaw but rather a feature of the real-world comparison I’m performing. Supporting Principle: This aligns with the principle of ecological validity, which emphasizes that experiments should reflect real-world conditions when evaluating practical differences. Since no player uses identical secondary sets or slotting across archetypes, my testing mirrors actual gameplay scenarios. 3. Mission Variability Criticism: Differences in mission goals, maps, and enemy factions could introduce noise that obscures the true differences between archetypes. Response: While true, this variability reflects the dynamic nature of CoH gameplay. By analyzing trends across a wide range of missions, I’m testing defenders and controllers under diverse conditions, which adds strength to any findings I may make. Supporting Principle: This aligns with the principle of robustness analysis, where varying conditions are intentionally included to ensure conclusions hold across a wide range of scenarios. 4. Training Bias from Repeated Missions Criticism: Repeating missions could lead to learning effects, where I become better at running specific missions over time, skewing results. Response: I’ve chosen not to repeat the same mission for this reason. I could, at a later date, include a few repeated missions as a control group to test for a learning effect. Summary My testing is not foolproof; however, it is based on four key principles from statistics and experimental design: 1. Central Limit Theorem: As sample size increases, the mean of the data approaches the true population mean, and random variability (noise) diminishes. My large dataset (50 missions total) should provide a basis for detecting significant trends despite uncontrolled variables. 2. Ecological Validity: The testing reflects real-world gameplay conditions, which include variability in teammates, enemies, and missions. This makes the results more applicable to practical gameplay rather than controlled, artificial conditions. 3. Robustness Analysis: By including multiple support sets, teammates and mission types, the analysis is robust across diverse scenarios, ensuring any trends are not artifacts of a specific setup. 4. Statistical Significance: If my statistical analysis (e.g., >95% confidence level) reveals significant trends despite variability, it strengthens the argument that the observed differences are real and meaningful. I am not saying any of this to shut off dissent or concern, as I am open to both. Hopefully, I have made my case, and this response demonstrates that I did not enter this experiment blindly. It is my belief that the logical and statistical principles the tests are built on will allow me to detect any significant differences between defenders and controllers despite the uncontrolled variables I openly acknowledge are present. Thanks! -
DEFCON 5: Defender vs Controller - Which is the Better Support AT?
Dark Current replied to Dark Current's topic in Archetypes
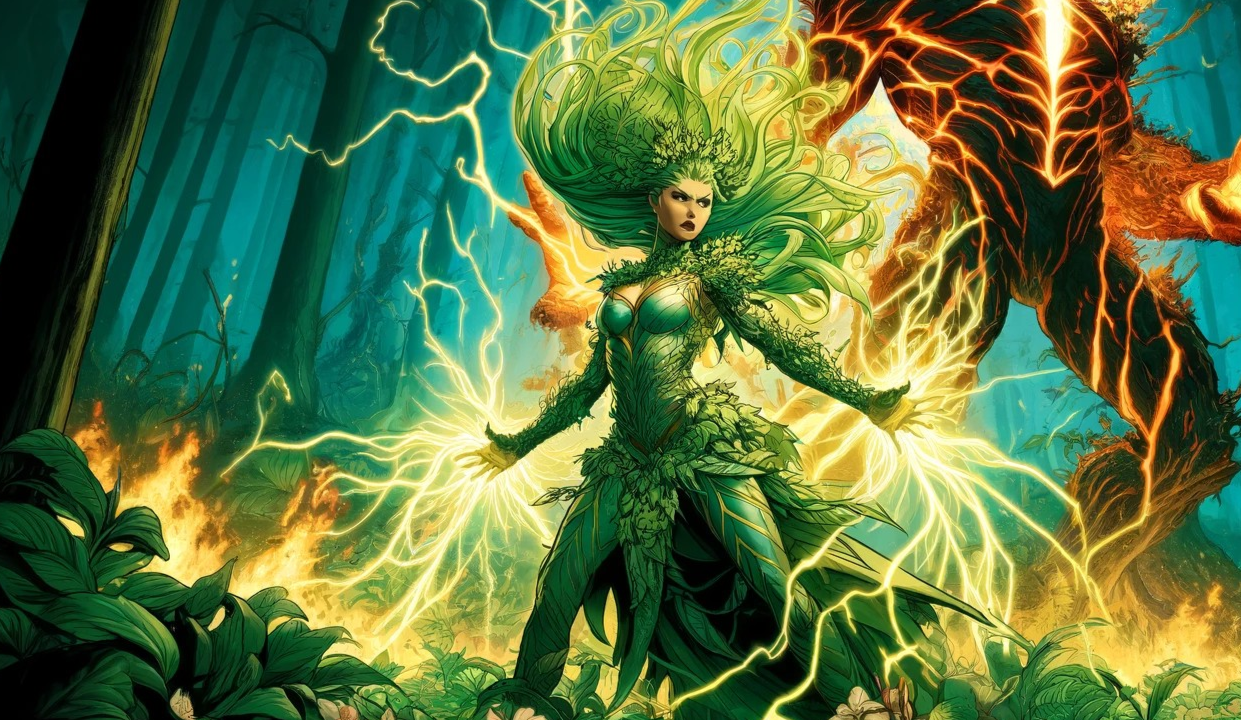
Fey Wode has arrived! Defenders across the shards are quaking in fear. -
DEFCON 5: Defender vs Controller - Which is the Better Support AT?
Dark Current replied to Dark Current's topic in Archetypes
Skreaming Tree makes his debut punishing Council alien collaborators. First part of the video presents an in-depth look at his Mids build. -
DEFCON 5: Defender vs Controller - Which is the Better Support AT?
Dark Current replied to Dark Current's topic in Archetypes
With DEFCON 5's Verdict behind us, we're taking things to DEFCON 4... NATURE AFFINITY! DEFCON Level 4 pits a Nature / Sonic / Energy Defender against a Dark / Nature / Dark Controller in a locked cage match to find out who is superior at supporting their team! ----------------------------------------------------------------------------------------- Starting in the Blue Corner... an Aerial Guardian defender, Skreaming Tree! MIDS Build: Screaming Tree - Defender (Nature Affinity).mbd Build Discussion and Solo Showcase Video: RELEASING 12/29 6 AM ------------------------------------------------------------------------------------ And in the Red Corner, a Night Terror controller, Fey Wode! MIDS Build: Fey Wode - Controller (Darkness Control - Nature Affinity).mbd Build Discussion and Solo Showcase Video: RELEASING 12/30 6 AM Place your bets now!
-
DEFCON 5: Defender vs Controller - Which is the Better Support AT?
Dark Current replied to Dark Current's topic in Archetypes
The Galvanic Sentinel and Voltaic Sentinel were a non-factor insofar as me worrying about what they were doing or where they were going in the team missions. I summoned them and off they went to do their thing. I had teammates to worry about buffing directly rather than concerning myself about the pets. In the solos, it was a totally different situation for the defender. He had to track his Galvanic as that was the only pet that he could reliably fire a buff off of. It became a metagame and not a fun one. For the controller, she didn't care about the Galvanic even solo as she had Fly Trap, Energy Font and Creeper Vines to chain off. As far as their contribution, VS was a HUGE source of damage for the defender with its primary attack, the Shocked bonus and the Preemptive proc'ing. His Galvanic did a solid job in endurance drain, but was less than Ball Lightning, Short Circuit and Thunderous Blast, but more than any of his single target attacks. I didn't look specifically at drain for the controller, but I imagine the contribution for her GS would have been about the same total amount, which wouldn't matter in the grand scheme of things as she wasn't attempting to leverage endurance drain. So overall, the pair of them were useful in all aspects to the defender, even though he had no idea what they were doing at any point in the team missions. So I guess that made them 'easy' to play. The controller could have given two shits about Galvanic I think as she had a ton more to focus on. -
DEFCON 5: Defender vs Controller - Which is the Better Support AT?
Dark Current replied to Dark Current's topic in Archetypes
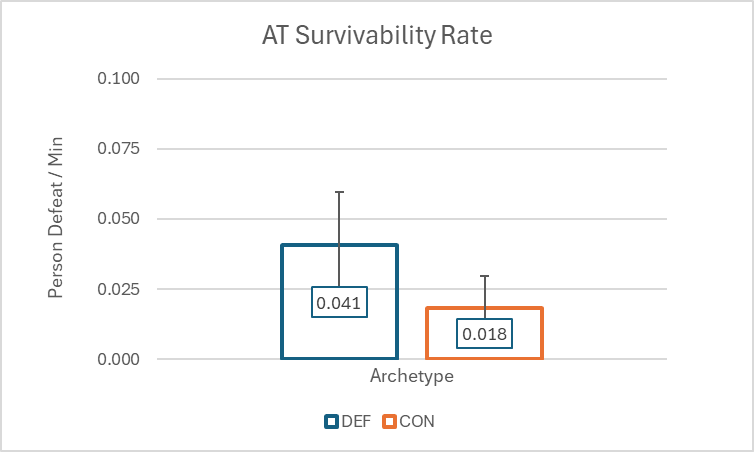
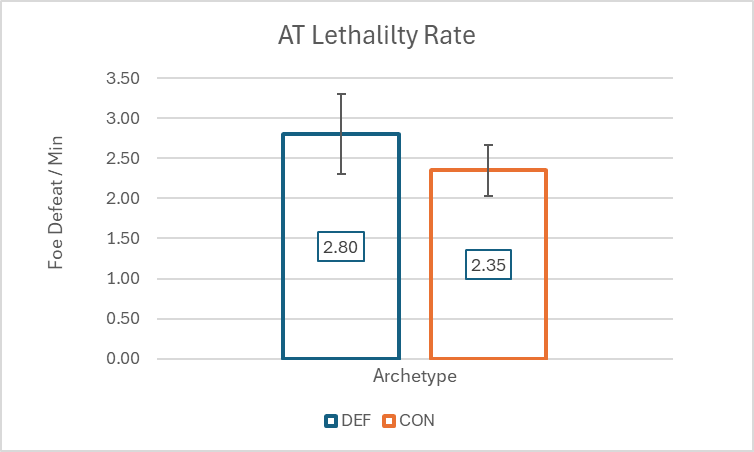
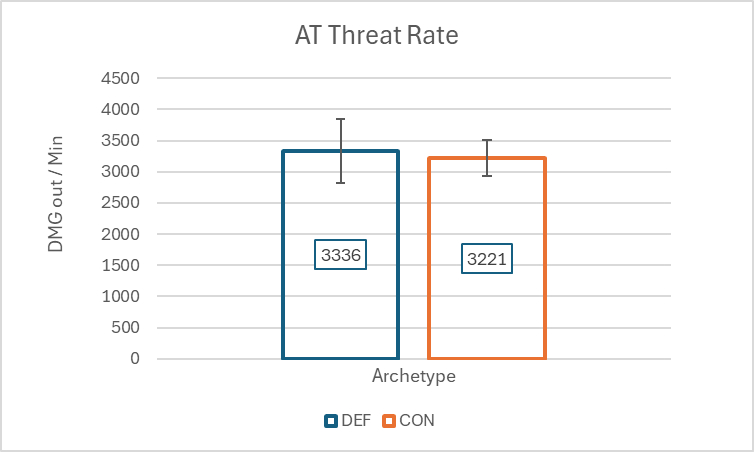
Ready for the Verdict on Electrical Affinity? 1. Survivability Who is more likely to be defeated performing their support duties? 2. Risk Whose allies are more likely to die while under their care? 3. Lethality Whose body count is higher? 4. Threat Who strikes greater fear into the hearts of their enemies? 5. Resilience Who is the tougher SOB? Bonus Stat - Liability Ratio (DMG out : DMG in) Who needs babysitting?
-
DEFCON 5: Defender vs Controller - Which is the Better Support AT?
Dark Current replied to Dark Current's topic in Archetypes
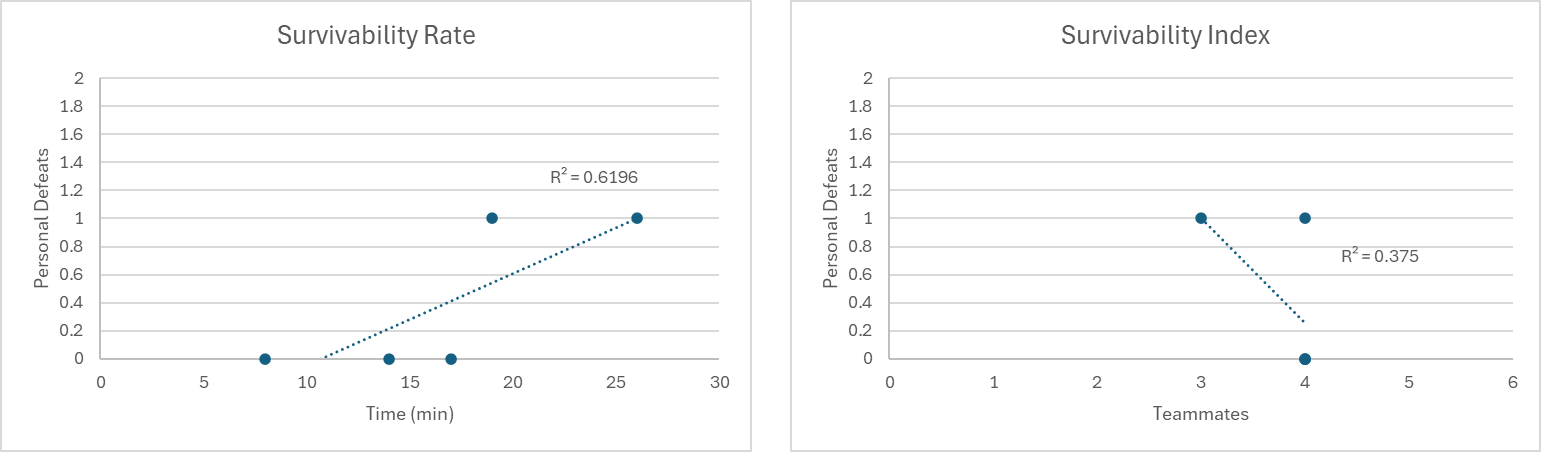
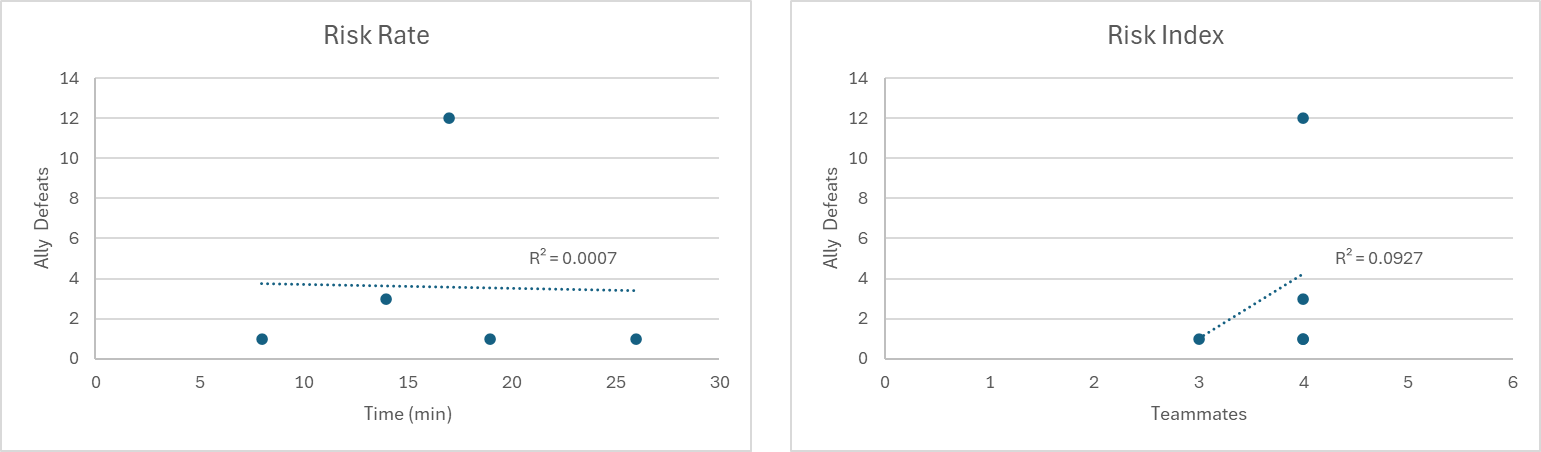
Ostara Team Mission - Reaction and Analysis Video Graphic Analysis of table data above plotting Rates (total stat / min) and Indexes (total stat / teammate). R2 values are a measure of correlation between the Stat and its denominator - time or teammate number. The range is 0.00 - 1.00, which is equivalent to percent confidence that the line of best fit truly represents the data. In other words, the closer to 1 (100%), the more reliable that graph is (the slope is real or the Cause : Effect is true). Summation For this controller and this set of missions, there are no strong correlations between any of the recorded metrics and either time or teammate number. The strongest relationship was found in Threat Rate, which measures Ostara's damage output related to mission time. This seems to agree with my hypothesis that the longer a mission lasts, the more damage a character deals. This is exactly what I saw with Ampere Avenger's runs where his strongest correlation of 0.93 was recorded. However, Ostara's correlation is only 0.81 (translating into 81% 'true'). I would only accept that as a supporting statement only with an R2 approaching 0.90 and higher. None of the Indexes indicated any sort of relationship between statistic measured and number of teammates.
-
DEFCON 5: Defender vs Controller - Which is the Better Support AT?
Dark Current replied to Dark Current's topic in Archetypes
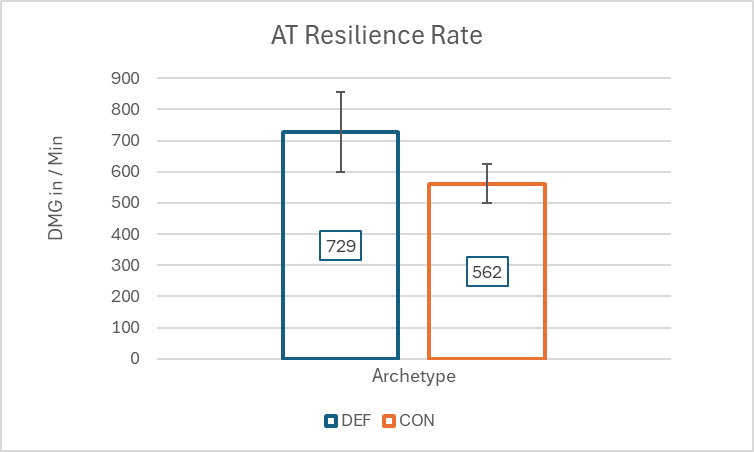
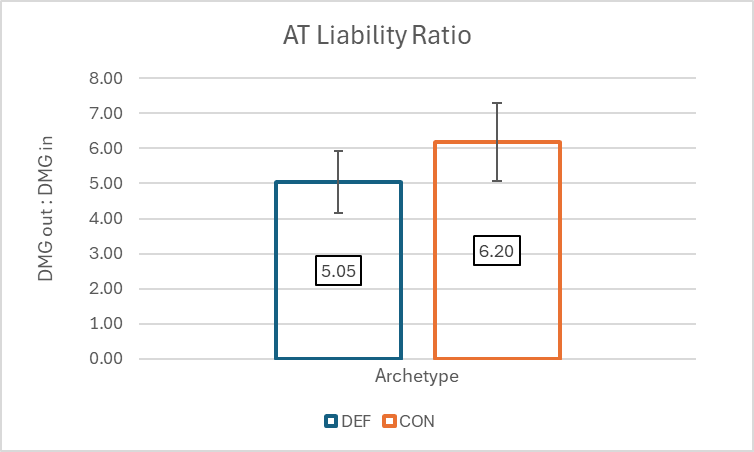
In advance of Thursday's release of my reaction and analysis of the team missions featuring my /Electrical Affinity controller, I'm releasing the complete stats now for your number-crunching pleasure! Hot Button Topic: DMG Procs in Carrion Creepers. Broken or WAI? Ostara - Plant / Elec / Earth Controller Mission Retrospective Mission 1 (Carnies escort) from 13:26 – 13:33 = 8 minutes with 4 teammates Mission 2 (Council escort) from 13:34 – 13:47 = 14 minutes with 4 teammates Mission 3 (Malta boss) from 13:50 – 14:06 = 17 minutes with 4 teammates Mission 4 (Arachnos, Council tip) from 14:13 – 14:31 = 19 minutes with 3 teammates Mayhem (PPD and LB, Cacophony) from 14:41 – 15:06 = 26 minutes with 4 teammates Total Time = 84 minutes DEFCON 5 Controller Stats: Rates = per minute calculations; Indexes = per teammate calculations 1. Survivability Total Personal Defeats = 2 Mission Personal Defeats Time Teammate Survivability Rate Survivability Index 1 0 8 4 0.00 0.00 2 0 14 4 0.00 0.00 3 0 17 4 0.00 0.00 4 1 19 3 0.05 0.33 mayhem 1 26 4 0.04 0.25 Total à 2 84 0.02 0.12 ß AVG 2. Risk Total Ally Defeats = 18 Mission Ally Defeats Time Teammate Risk Rate Risk Index 1 1 8 4 0.13 0.25 2 3 14 4 0.21 0.75 3 12 17 4 0.71 3.00 4 1 19 3 0.05 0.33 mayhem 1 26 4 0.04 0.25 Total à 18 84 0.23 0.92 ß AVG 3. Lethality Total Foes Killed = 198 Mission Kills Time Teammate Lethality Rate Lethality Index 1 25 8 4 3.13 6.25 2 25 14 4 1.79 6.25 3 26 17 4 1.53 6.50 4 44 19 3 2.32 14.67 mayhem 78 26 4 3.00 19.50 Total à 198 84 2.35 10.63 ß AVG 4. Threat Total Damage Output = 268,658 Personal Damage Output Mission: 1 2 3 4 Mayhem Attack Total: Corrosive Vial 182 81 43 127 429 862 Chance of Negative 260 272 174 546 696 1949 Ion Judgement 12172 9990 9054 19012 10512 60740 Entangle 492 1077 368 1307 1330 4573 Fissure 516 0 0 631 732 1878 Roots 1191 2780 1976 2995 5648 14590 Chance for Fire 194 441 310 590 952 2488 Seismic Smash 0 0 0 371 472 844 Chance for Lethal 0 0 0 82 99 181 Strangler 850 2164 1011 1725 2564 8315 Toxic Dart 181 799 296 795 377 2448 Cognitive Psionic (Interface) 93 372 177 383 663 1688 Waylay Psionic (Hybrid) 499 888 609 909 1355 4260 Will of Controller Psionic (Seeds) 1371 1878 3304 3609 5735 15897 Mission TOTAL: 18002 20742 17323 33081 31565 120712 Pet Damage Output Pet 1 2 3 4 Mayhem Pet Total: Creeper Patch 2343 3201 5218 4217 12188 27167 Creeper Vine 899 4286 3189 3928 9988 22290 Chance for Cold 1367 3350 2484 4438 9936 21575 Dark Ring Mistress 0 7361 1991 6105 7528 22985 Energy Font 310 440 229 321 2211 3511 Giant Fly Trap 5659 10081 4074 11060 15538 46411 Cognitive Psionic (Interface) 319 664 475 885 1666 4008 Mission TOTAL: 10943 29429 17707 30994 59101 147946 Combined Damage Output Mission DMG out Time Teammate Threat Rate Threat Index 1 28898 8 4 3612 7225 2 50124 14 4 3580 12531 3 34983 17 4 2058 8746 4 64033 19 3 3370 21344 mayhem 90620 26 4 3485 22655 Total à 268658 84 3221 14500 ß AVG 5. Resilience Total Damage Taken = 47,410 Type of Damage Taken Mission: 1 2 3 4 Mayhem Type Total Cold 0 0 353 0 0 353 Energy 592 0 1692 4489 7761 14534 Fire 373 898 2680 724 998 5672 Lethal 280 931 6479 377 1382 9448 Negative Energy 23 7317 0 0 0 7340 Psionic 1702 0 0 4085 0 5787 Smashing 132 314 0 417 730 1592 Toxic 0 0 0 2383 302 2685 Mission Total: 3102 9459 11204 12474 11172 47410 Mission Damage Taken Mission DMG in Time Teammate Resilience Rate Resilience Index 1 3102 8 4 388 776 2 9459 14 4 676 2365 3 11204 17 4 659 2801 4 12474 19 3 657 4158 mayhem 11172 26 4 430 2793 Total à 47411 84 562 2578 ß AVG Liability Ratio = DMGout : DMGin = 5.67
-
DEFCON 5: Defender vs Controller - Which is the Better Support AT?
Dark Current replied to Dark Current's topic in Archetypes
I considered using a standard mission or arc or TF for these tests. However, I felt running the same thing over and over will unfairly skew the data to favor later runs as I become an 'expert' at that TF. Also, a particular set just might be better tuned to the enemies on that TF than another set. Same is true if I run with the same teammates who learn 'what to do' each time. Aside from the impracticality of getting those people to 'report for duty' to 10 identical TFs. I wish things were as straightforward as you suggest. It sure would make the execution simpler. But I fear the only true way to compare is to embrace randomness and run enough missions to obtain a large enough sample size to identify significant trends or patterns. If one AT is truly superior to the other, then that should show consistently regardless of team or enemy. At least that's my hypothesis. -
DEFCON 5: Defender vs Controller - Which is the Better Support AT?
Dark Current replied to Dark Current's topic in Archetypes
Wow Creepers put out a lot of chatter! Below is just one mission and just the Patch, not the Vines. Holey Schmoley! Even ChatGPT is saying WTF is this? I need to break it down into smaller chunks and feed the beast. This will take awhile to analyze my controller's data. -
DEFCON 5: Defender vs Controller - Which is the Better Support AT?
Dark Current replied to Dark Current's topic in Archetypes
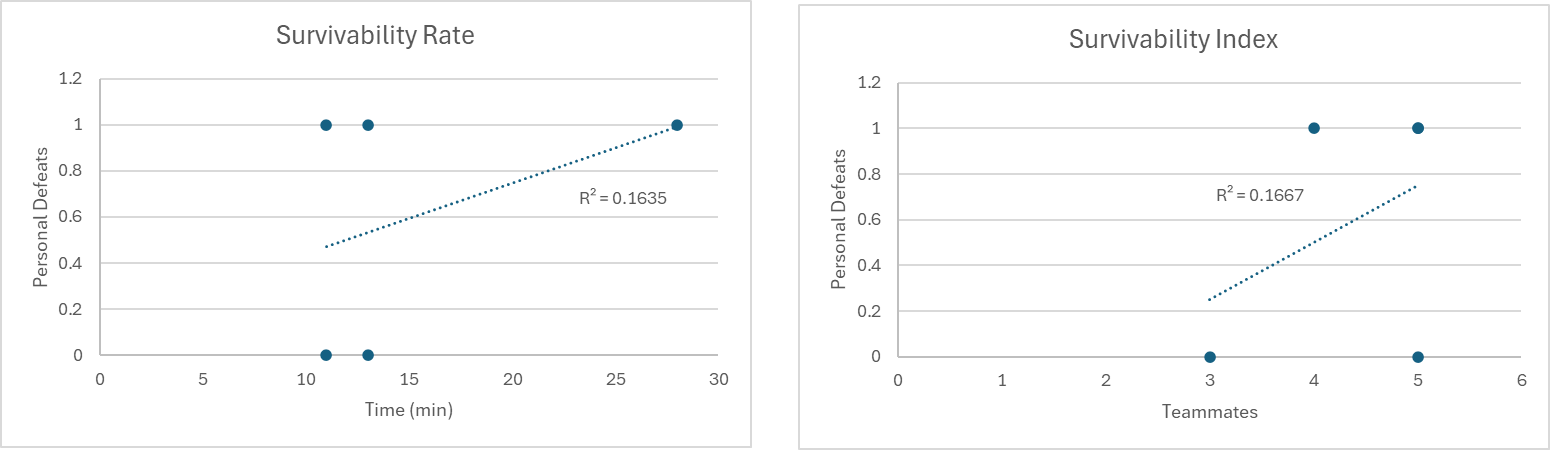
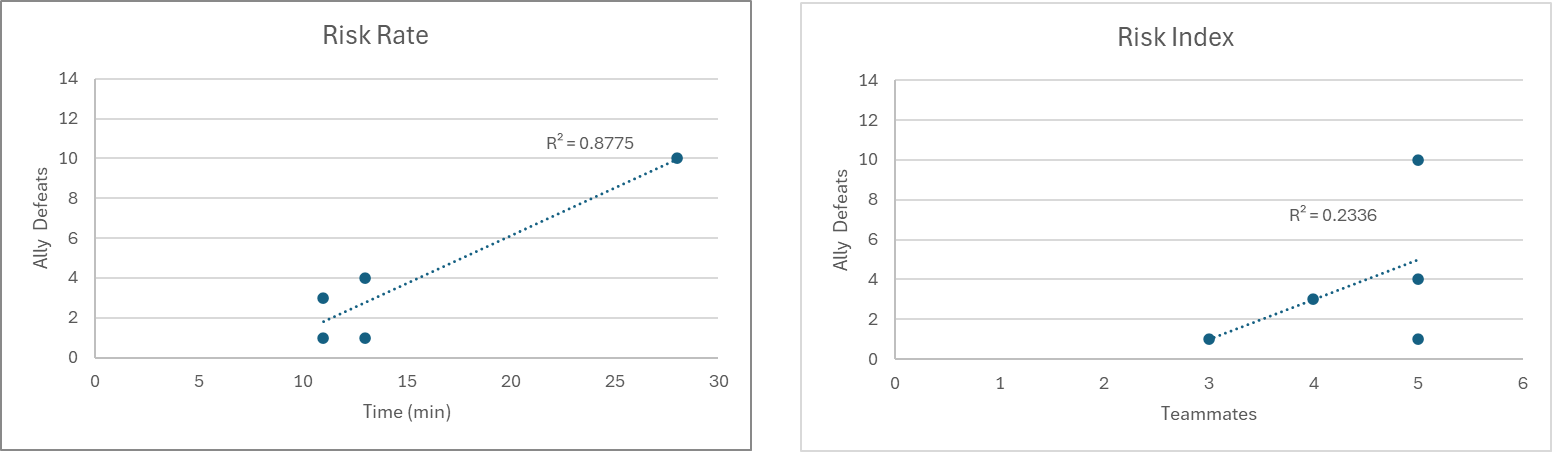
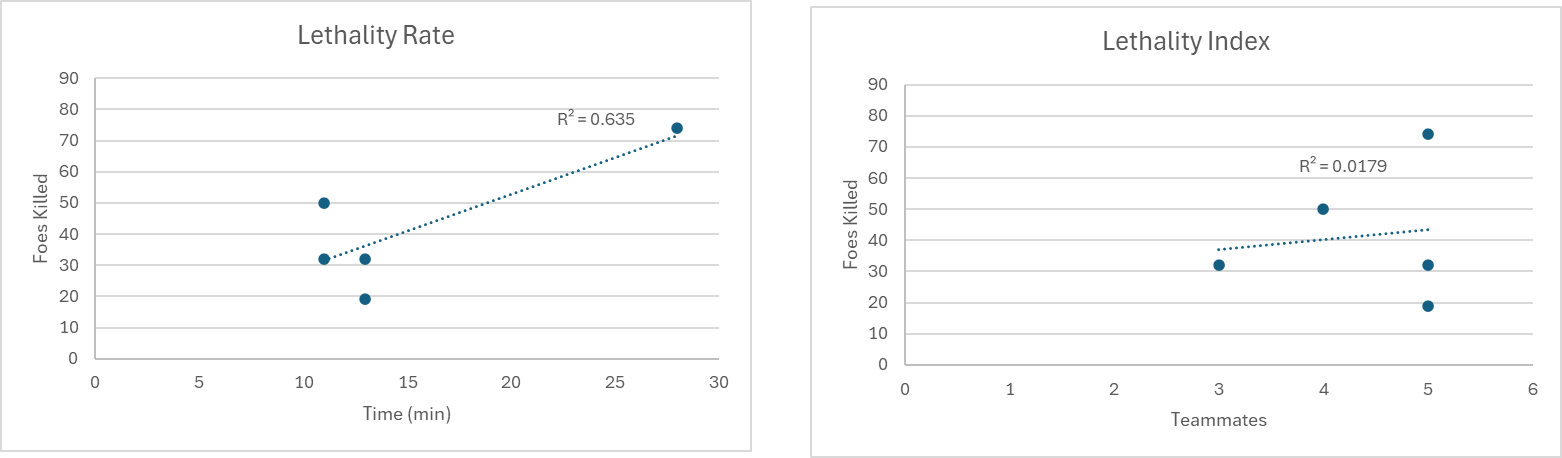
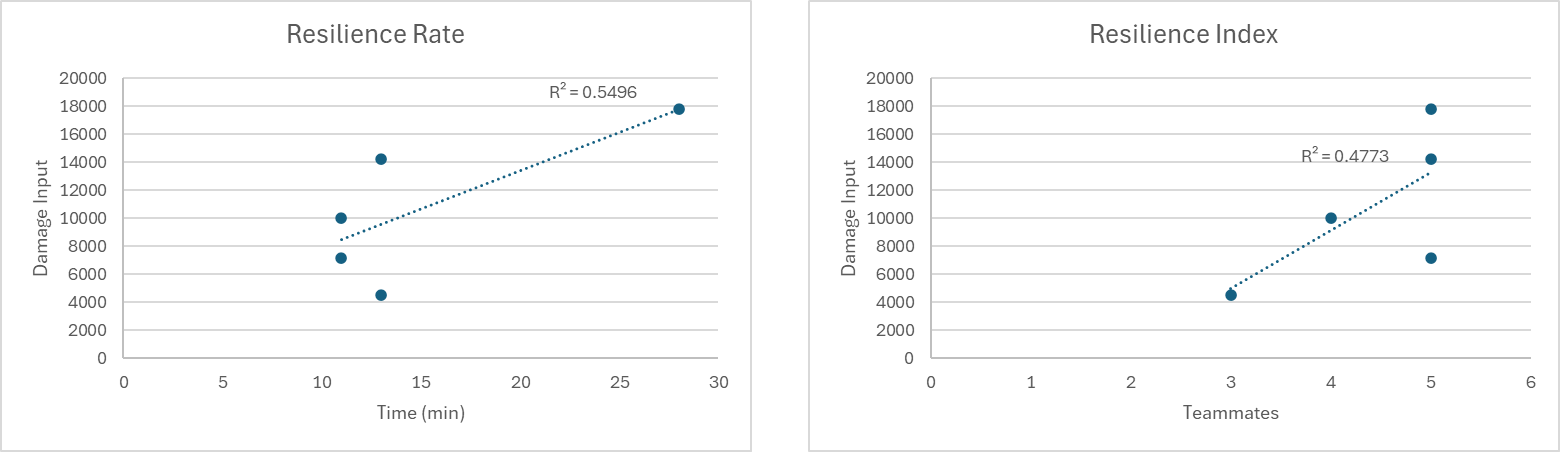
And here is my Reaction and Analysis video of the Team Trials. I discuss these stats in detail there as well as point out key moments from the missions that produced the results. Graphic Analysis of table data above plotting Rates (total stat / min) and Indexes (total stat / teammate). R2 values are a measure of correlation between the Stat and its denominator - time or teammate number. The range is 0.00 - 1.00, which is equivalent to percent confidence that the line of best fit truly represents the data. In other words, the closer to 1 (100%), the more reliable that graph is (the slope is real or the Cause : Effect is true). Summation For this defender and this set of missions, the only possible correlations are Risk Rate and Threat Rate. Risk is measuring an Ally's chance of dying and the graph suggests it grows the longer the missions are. Threat Rate measures Ampere Avenger's damage output over time and that graph likewise shows a potential relationship with time. None of the Indexes indicated any sort of relationship between statistic measured and number of teammates.
-
DEFCON 5: Defender vs Controller - Which is the Better Support AT?
Dark Current replied to Dark Current's topic in Archetypes
That's the idea! Generate enough data, and actual trends will show through the noise. Speaking of Stats, here are the first batch from my run with Ampere Avenger during the above-linked Team Trials video. These are the numbers and calculations (rates and indexes) I will compare with my /Electrical Affinity controller, Ostara. Then, these numbers will be combined with the other 4 defenders' numbers and compared to the 5 controllers' to see if any patterns emerge. This is a work in progress, so I'm sure I'll change lenses as I get more data. Ampere Avenger - Elec / Elec/ Elec Defender Mission Analysis Mission 1 = 13 minutes, 3 teammates Mission 2 = 11 minutes, 4 teammates Mission 3 = 11 minutes, 5 teammates Mission 4 = 13 minutes, 5 teammates Mayhem = 28 minutes, 5 teammates Total Time = 76 minutes DEFCON 5 Stats: Rates = per minute calculations; Indexes = per teammate calculations 1. Survivability Total Personal Defeats = 3 Mission Personal Defeats Time Teammate Survivability Rate Survivability Index 1 0 13 3 0.00 0.00 2 1 11 4 0.09 0.25 3 0 11 5 0.00 0.00 4 1 13 5 0.08 0.20 mayhem 1 28 5 0.04 0.20 Total à 3 76 0.04 0.13 ß AVG 2. Risk Total Ally Defeats = 19 Mission Ally Defeats Time Teammate Risk Rate Risk Index 1 1 13 3 0.08 0.33 2 3 11 4 0.27 0.75 3 1 11 5 0.09 0.20 4 4 13 5 0.31 0.80 mayhem 10 28 5 0.36 2.00 Total à 19 76 0.22 0.82 ß AVG 3. Lethality Total Foes Killed = 207 Mission Kills Time Teammate Lethality Rate Lethality Index 1 32 13 3 2.46 10.67 2 50 11 4 4.55 12.50 3 32 11 5 2.91 6.40 4 19 13 5 1.46 3.80 mayhem 74 28 5 2.64 14.80 Total à 207 76 2.80 9.63 ß AVG 4. Threat Total Damage Output = 275,598 Personal Damage Output Mission: 1 2 3 4 Mayhem Attack Total: Ball Lightning 4216 3287 2469 3864 8374 22208 Charged Bolts 1268 828 620 892 2866 6474 Ion Judgement Direct 223 700 896 1025 2570 5413 Ion Judgement Jumps 6185 6053 10815 11020 37408 71481 Lightning Bolt 1653 1857 1011 1941 4491 10953 Preemptive Interface 503 435 317 532 1149 2937 Shocking Bolt 134 115 110 100 280 739 Short Circuit 1923 2426 1424 2006 5912 13690 Tesla Cage 236 273 255 153 870 1787 Thunder Strike 128 0 137 461 565 1290 Thunderous Blast 5209 3634 3385 4136 6449 22813 Zapp 3003 2718 2163 3188 6524 17595 Mission TOTAL: 24681 22326 23601 29316 77457 177381 Pet Damage Output Mission: 1 2 3 4 Mayhem Pet Total: Anti-Matter Particles 0 5918 2813 0 13191 21922 Builder Essence 0 4348 2639 0 6660 13647 Dismantler Essence 0 7831 5474 0 26326 39631 Voltaic Sentinel 2005 3576 1428 2872 13135 23016 Mission TOTAL: 2005 21673 12354 2872 59313 98216 Combined Damage Output Mission DMG out Time Teammate Threat Rate Threat Index 1 26686 13 3 2053 8895 2 43998 11 4 4000 11000 3 35956 11 5 3269 7191 4 32188 13 5 2476 6438 mayhem 136770 28 5 4885 27354 Total à 275598 76 3336 12176 ß AVG 5. Resilience Total Damage Taken = 53,763 Personal Damage Taken Mission: 1 2 3 4 Mayhem Type Total Cold 0 0 28 0 0 28 Energy 245 54 0 2839 8119 11257 Fire 223 2021 2486 230 3137 8098 Lethal 49 473 805 224 3926 5477 Negative Energy 171 7177 3623 0 0 10971 Psionic 3319 63 71 6549 1404 11407 Smashing 512 238 167 896 926 2738 Toxic 0 0 0 3494 292 3786 Mission Total: 4519 10026 7181 14233 17804 53763 Mission DMG in Time Teammate Resilience Rate Resilience Index 1 4519 13 3 348 1506 2 10026 11 4 911 2507 3 7181 11 5 653 1436 4 14233 13 5 1095 2847 mayhem 17804 28 5 636 3561 Total à 53763 76 729 2371 ß AVG Liability Ratio = DMGout : DMGin = 5.13 -
DEFCON 5: Defender vs Controller - Which is the Better Support AT?
Dark Current replied to Dark Current's topic in Archetypes
Ampere Avenger - Team Mission Video: Mission Overview Mission 1* (Carnies escort) from 19:06 – 19:10, and 19:12 – 19:19 = 13 minutes with 3 teammates (combined 2 short escorts into a single stat chunk) Mission 2 (Council) from 19:22 – 19:32 = 11 minutes with 4 teammates Mission 3 (Council escort) from 19:36 – 19:46 = 11 minutes with 5 teammates Mission 4 (Arachnos ambush) from 19:48 – 20:00 = 13 minutes with 5 teammates Mayhem (PPD and LB, Holoman) from 20:03 – 20:30 = 28 minutes with 5 teammates Total Time = 76 minutes --------------------------------------------------- Ostara - Team Mission Video: Mission Overview Mission 1 (Carnies escort) from 13:26 – 13:33 = 8 minutes with 4 teammates Mission 2 (Council escort) from 13:34 – 13:47 = 14 minutes with 4 teammates Mission 3 (Malta boss) from 13:50 – 14:06 = 17 minutes with 4 teammates Mission 4 (Arachnos, Council tip) from 14:13 – 14:31 = 19 minutes with 3 teammates Mayhem (PPD and LB, Cacophony) from 14:41 – 15:06 = 26 minutes with 4 teammates Total Time = 84 minutes -
DEFCON 5: Defender vs Controller - Which is the Better Support AT?
Dark Current replied to Dark Current's topic in Archetypes
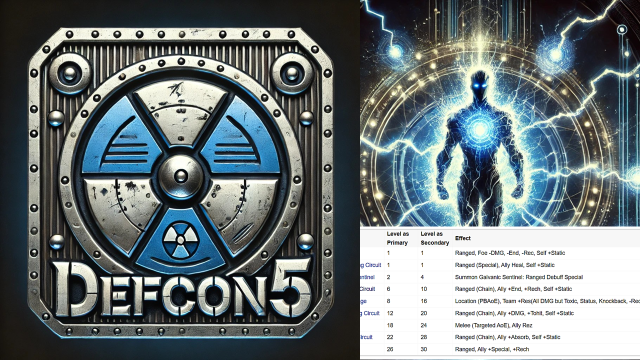
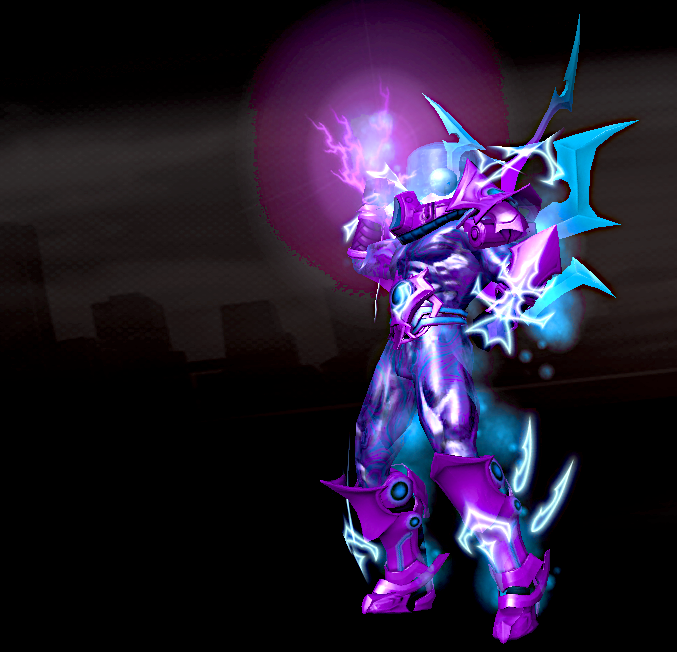
Starting at DEFCON 5, we have Electrical Affinity! DEFCON Level 5 pits an Elec / Elec / Elec Defender vs. a Plant / Elec / Earth Controller in a no-holds barred who is better at protecting their team challenge! ----------------------------------------------------------------------------------------- Starting in the Blue Corner... an E3 Defender, The Ampere Avenger! MIDS Build: Ampere Avenger - Defender (Electrical Affinity - Electrical Blast).mbd Build Discussion and Solo Showcase Video: -------------------------------------------------------------------------- And in the Red Corner.... a Controller of primal fury, Ostara, the Spring Maiden! MIDS Build (UPDATED AGAIN - explanation forthcoming with TEAM video releasing SOON): Ostara - Controller (Plant Control).mbd Build Discussion and Solo Showcase Video:
-
Tearing open an old wound with this one, folks. We all remember the OG argument from City of Heroes... "Defenders are better for a team because of superior buff numbers! Their blasts add dps!" "Controllers are better because controls synergize with the buffs! Their dps is better with Containment!" /jranger Ok, I know what the numbers say on paper, but I want to know what actual, in-game action reveals. I don't think anyone has ever attempted an honest-to-goodness comparison of these two ATs. So, I am setting out to do just that... or at least provide some empirical data to chew on. I therefore bring you... DEFCON 5 is a video series that will compare 5 different defenders to 5 different controllers, with head-to-head pairings built around the same buff set. I will show you the builds, run a solo mission to discuss the character's tactics, and then a series of team missions to gather test data for analysis. Test Parameters: 5 Defenders vs 5 Controllers 5 Shared Support Sets – buff and debuff 5-Mission Runs (54x8, random map, escort only) vs 5 different factions 5-man Teams with no other DEFCON 5 Stat Analysis (completion time, foe defeats, ally defeats, ally close calls, damage out:in) 5 Star YT Opinion Poll for performance evaluations And just to stir up some controversy at the end, the AT with the 'most points' based on Stats and Votes will be declared the Superior Support Archetype! Check out the Introduction video here: Need more Build and Playtest Videos? 50 - 50 Showcase 20/20 Rewind
-
Welcome to the Grand Finale of the 20/20 Rewind! I present to you my most devastating build yet! 20) Thebe Dark / Fire / Soul Defender Concept: Personification of the Egyptian deity Kauket - bringer of the night, or dusk. Burn them with the fires of the setting sun and smother them with the darkness of rising night. Kauket: Egyptian Deity Of Darkness And Chaos Mids Build: Thebe - Defender (Dark Miasma).mbd Videos Pt 1. Build Discussion Pt 2. Solo Strategy https://youtu.be/BNbWtiBsguA Pt 3. Team Tactics https://youtu.be/kg36yrXm3Q0
-
Thanks, my main inspiration was Black Manta, but I have a soft spot for Mysterio as well and didn't realize he does have that vibe. Artwork is generated through conversations I have with OpenAI's DALL-E 3 about my characters. I share information about backstory and powersets, as well as give the 'flavor' I'm looking forward. DALL-E interprets my concepts, and we go back and forth until we land on something I like. A lot of times the results inspire me to go back into the costume generator to match a detail I hadn't though of.
-
Corrupting with Homecoming's latest powersets! 19) Admiral Nautilus Storm / Marine / Leviathan Corruptor Concept: Ancient species of sentient deep-sea life rises from the depths to wreak havoc on the defilers of the ocean. Mids Build: Admiral Nautilus 1 - Corruptor (Storm Blast - Marine Affinity).mbd Videos Pt 1. Build Discussion Pt 2. Solo Strategy Pt 3. Team Tactics
-
18) ORTSENIS SHIELD / PSI / PSI Pop-O-Matic Trouble! Mids Build: Ortsenis - Tanker (Shield Defense - Psionic Melee).mbd Videos Part 1. Build Discussion Part 2. Solo Strategy Part 3. Team Tactics
-
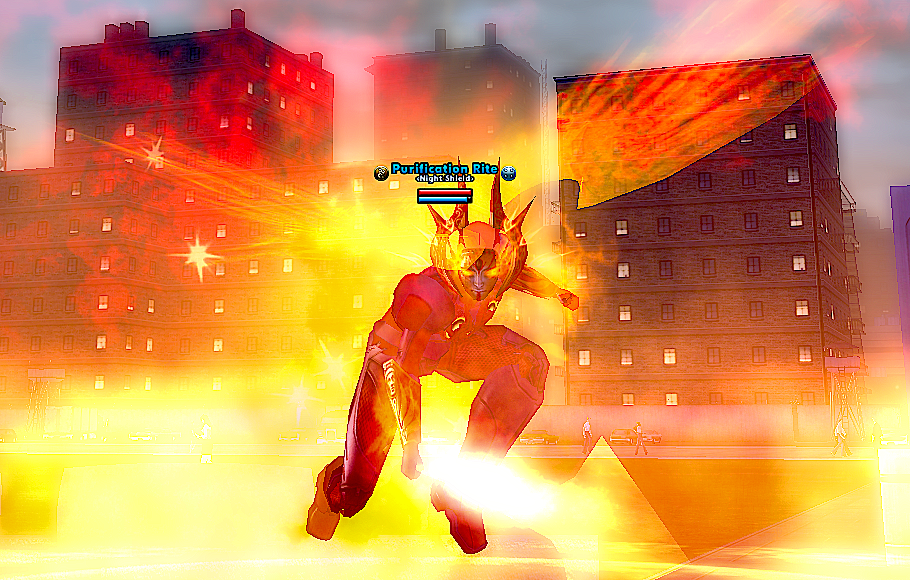
17) PURIFICATION RITE WP / Fire / Fire Concept: Angel of No Mercy! Mids Build: Purification Rite - Tanker (Willpower).mbd Videos Part 1. Build Discussion Part 2. Solo Strategy Part 3. Team Tactics