
serxiom
-
Posts
146 -
Joined
-
Last visited
Content Type
Profiles
Forums
Events
Store
Articles
Patch Notes
Posts posted by serxiom
-
-
While Beta testing someone suggested to replace Tri-cannon Pet with a Nemesis Jaeger Type Pet which i consider is a great idea. Im talking from my ignorance about programming and implement this Jaeger Pet in Arsenal Control.. no idea how hard would be. But i really think this change will separate Arsenal from the rest and would give it a unique touch to the set.
-
 1
1
-
-
Would be helpful if you can provide information about what other ATs your friends will be using. Regardless if you seek for a Dominator recommendation i can give you some feedback.
Plant Control is maybe the top tier pick. You have best AoE confusion in game Seeds of Confusion plus Carrion Creepers. NPCs groups melts fast when you run Plant. A good complement talking about Secondaries now, i would recommend Psionic Assault. Drain Psyche and Psionick Shockwave are great wotrking together.
Also you should consider Dark Control that have one of the best Pets in game besides solid group control. Energy or Fire are good secondries also for combining.
I recommend you to try new Arsenal Control as well. Its performing really nice now is live and you have such a fun and nice tools.
-
 1
1
-
-
Hey!
Indeed Ill/Sonic is a wierd combo. However i put together a build for you with the usual stuff: Permadom, ranged softcap and enough resist to survive anywhere.
This is not a cheap one but if you can afford it you will not regret it at all.
Enjoy!
-
3
-
-
8 hours ago, netphenix said:
Alright, took updating my mids through two failed attempts to be able to open those
I recommending uninstall Mids completely and download a fresh intall file from their website. It happened to me yesterday and just deleted Mids from my PC and re installig from zero.
Whenever you got your Dominator full IOéd and runnine let us know how it worked. Im interested to see S/L/S softcap how develops in high levels.
-
I tested a Ars/Savage in Beta lvl 50 full IOs and had a blast with it. So now im leveling same combo and got him up to 14 yesterday.
Smoke Canister is my favorite power on the set. Also having a cloak that stacks +def is nice. This set requires some positional management due having many targeted AoE powers.
Control wise is good (too early to compare with other sets) and damage wise... well lets hit 50 and see how it works on 54 x 8.
I will recommend to try Arsenal Control... set is too much fun.
-
54 minutes ago, Wimbochismo said:
I wanted to leave the OP with something a bit more viable so I took your edit and made some additions.
@Wimbochismo your take is better from Resist stand point agree. If you add Nerve or Agility incarnate you will nearly hit softcap on ranged defense. So yes i would put my money on what you posted. Thanks for the improvement.
-
 1
1
-
-
@netphenix Hey!
I checked your build and also read what you looking for with your Dominator. I understand you are aiming for L/S/L defense mostly and its OK but also softcaping your Ranged defense is important. So i handled to softcap both in the next build. Also got Permadom 170% with hasten so you will be never at risk. However and this is important, i would advice against this build im posting here.
My reason is simple: Any attack against you that goes through your Defense (ranged or S/L) will impact greatly in your health because you are not building for somekind of resistance to mitigate incoming damage. This is why always i take a resist shield besides fighting pool. But being Ice Mastery your choice then we can not achieve that.
If you want to try this build and see if it works for you... field test is the final answer.
P.S: In case you are in a budget replace Ragnaroks for Positron Blast.
-
2
-
-
- Fire/Psy/fire Dominator - Shuts down an entire group and start the massacre
- Plant/Traps Controller/ Mace - GM / AV Killer
- Elec/Elec/Ice Blaster - Drains , AoE/PBaoe damage
- StJ/Energy/Soul Stalker - Got all the tools you need, ST/AoE dps, heal, end drain etc
- Illusion/Storm/Mu Controller - GM / AV killer
-
1
-
4 hours ago, Random Axis said:
-Caltrops macro.
Ok the downside of Caltrops is that will make foes run away (Council Wolves become Speedy Gonzales) dispersing more the entire group and making you chasing npcs anywhere. Thats why i respected out of Caltrops in my Plant/MA Dominator. I dont find caltrops useful for my playstyle.
10 hours ago, EnjoyTheJourney said:It's phantasm that blows mobs all over unless "knockback to knockdown" IOs are used.
100% accurate on this one. Phantasm is the KB guilty. As i said above just fitting Sud Acel IO KB to KD will fix this.
-
10 hours ago, Sky Silverwing said:
Since enemies spawn in clustered groups, the moment I summon my Phantom Army/Phantasm, they start blowing enemies away which causes them to disperse. Once dispersed, it becomes difficult to keep them all held or disoriented at once.
Hi @Sky Silverwing about the knockback issue with your Phantasm there is something you can do. Change the 4 Call to Arms set for the next IO,s:
3 x Explosive Strike + 1 x Sudden Acceleration Knockback to Knockdown - Leave Soulbound Alliegance and Force Feedback +rech
This would fix the problem you commented above.

Here a small video on my Ill/Ice 54 x 8 Councils. Last seconds i left Phantasm attack alone so you can see how is not knockinback foes once you slot Sudden Acceleration KB to KD.
-
1
-
-
1 hour ago, Sky Silverwing said:
Ah, I wanted to ask @serxiom, what incarnates do you recommend? I assume it's not quite the same as what a Brute or Scrapper/Stalker would take, right?
@Sky Silverwing for most of my dominators i chose Agility Core +def +rech +end mod or Musculature Radial if you decide full dps. Hibryd i go with Assault no questions. About Destiny i would say test your dominator endurance performance and then decide if going with Ageless or Rebirth.
-
1
-
-
Hey @DirtyBoxerz!
Just put something together for you. This build is permadom, ranged softcap and also have /Fire as epic. I would advice to take Agility as Incarnate to reach 44% ranged defense which is optimal for facing +54 foes.
Take this as an ideal build to aim for. If you cant gather the influence to affordit just replace the Very Rare IOs for Rares with +rech bonus.
Have Fun!
-
1
-
-
Ok @Sky Silverwing. First at all your build was a good attempt to achieve Permadom and was ok. Looks like you are fan of Procs IO which is fun, but Dominators have a tight build always.
So im placing here 2 builds you can aim to. Both builds are permadom, and ranged defense softcap. Is my preference Primal over Psy because Illusion is high end demanding and Conserve Power gives you the advantage in long fights. However you chose Psy and thats why i gave you a second choice.
Dominator (Illusion Control - Martial Assault) Psy.mbd Dominator (Illusion Control - Martial Assault).mbd
-
1
-
-
Hi! for some reason i cant get your build with the chunk code. Maybe you can share your *.mbd file as an attachment with us so we can look at it?
-
Hello! Plant/Psy/Psy is one of the best combos. Im sure you will have a lot of fun whith this AT.
I checked your build and was tight on +recharge bonuss. Also you got Teleport a Foe which is a personal choice and thats ok. What i saw that you had Maneuvers and Tactics overslotted and also yous ST hold had just a Accuracy what i consider a mistake because this power will let you nullify a Boss, EB even a Hero/Villian in a single move. Your ST hold is bread and butter in your playing.
So in this build im sharing there is some improvements that would let you run 54 x 8 solo content and any incarnate end content without visiting the Hospital.
Some of the improvements:
- Permadom (of course)
- Ranged Defense softcap (even without Link Minds)
- Perma Link Minds
- 177.5 % Global recharge bonuss (+26% what you had)
- 44.3% To hit bonuss (+30% what you had)
This build is not cheap and in my eyes is an ideal build respecting your power choices excepting Teleport, Spirit Tree (doesnt worth to take in my opinion), Entangle and Indomitable Will. My take on your build will allow you solo any content or team up and shine.
Villain Dominator
Build plan made with Mids' Reborn v3.6.6 rev. 3
──────────────────────────────- Primary powerset: Plant Control
- Secondary powerset: Psionic Assault
- Pool powerset (#1): Flight
- Pool powerset (#2): Speed
- Pool powerset (#3): Fighting
- Pool powerset (#4): Leadership
- Ancillary powerset: Psionic Mastery
──────────────────────────────
Powers taken:
Level 1: Strangler
- A: Basilisk's Gaze: Accuracy/Hold
- 3: Basilisk's Gaze: Accuracy/Recharge
- 3: Basilisk's Gaze: Recharge/Hold
- 5: Basilisk's Gaze: Accuracy/Endurance/Recharge/Hold
Level 1: Mind Probe
- A: Mako's Bite: Accuracy/Damage
- 5: Mako's Bite: Damage/Endurance
- 7: Mako's Bite: Damage/Recharge
- 7: Mako's Bite: Accuracy/Endurance/Recharge
- 9: Mako's Bite: Accuracy/Damage/Endurance/Recharge
- 9: Mako's Bite: Chance of Damage(Lethal)
Level 2: Roots
- A: Superior Ascendency of the Dominator: Accuracy/Control Duration
- 11: Superior Ascendency of the Dominator: Control Duration/Recharge
- 11: Superior Ascendency of the Dominator: Endurance/Recharge
- 13: Superior Ascendency of the Dominator: Accuracy/Control Duration/Endurance
- 13: Superior Ascendency of the Dominator: Accuracy/Control Duration/Endurance/Recharge
- 15: Superior Ascendency of the Dominator: Recharge/Chance for +Damage
Level 4: Hover
- A: Luck of the Gambler: Defense/Increased Global Recharge Speed
Level 6: Fly
- A: Hypersonic: Flying / Increased Fly Protection
Level 8: Seeds of Confusion
- A: Coercive Persuasion : Confused
- 15: Coercive Persuasion : Confused/Recharge
- 17: Coercive Persuasion : Confused/Recharge/Accuracy
- 19: Coercive Persuasion : Recharge/Accuracy
- 19: Coercive Persuasion : Confused/Endurance
- 21: Coercive Persuasion : Contagious Confusion
Level 10: Mental Blast
- A: Decimation: Accuracy/Damage
- 45: Decimation: Damage/Endurance
- 46: Decimation: Damage/Recharge
- 46: Decimation: Accuracy/Endurance/Recharge
- 46: Decimation: Accuracy/Damage/Recharge
Level 12: Hasten
- A: Invention: Recharge Reduction
- 45: Invention: Recharge Reduction
Level 14: Boxing
- (Empty)
Level 16: Tough
- A: Gladiator's Armor: TP Protection +3% Def (All)
- 17: Steadfast Protection: Resistance/+Def 3%
Level 18: Vines
- A: Basilisk's Gaze: Accuracy/Hold
- 39: Basilisk's Gaze: Accuracy/Endurance/Recharge/Hold
- 43: Basilisk's Gaze: Accuracy/Recharge
- 43: Basilisk's Gaze: Recharge/Hold
- 45: Lockdown: Chance for +2 Mag Hold
Level 20: Psychic Scream
- A: Ragnarok: Damage
- 21: Ragnarok: Damage/Recharge
- 40: Ragnarok: Damage/Recharge/Accuracy
- 42: Ragnarok: Recharge/Accuracy
- 43: Ragnarok: Damage/Endurance
Level 22: Drain Psyche
- A: Numina's Convalesence: Heal/Endurance
- 23: Numina's Convalesence: Endurance/Recharge
- 23: Numina's Convalesence: Heal/Recharge
- 39: Numina's Convalesence: Heal/Endurance/Recharge
- 40: Numina's Convalesence: Heal
- 40: Numina's Convalesence: +Regeneration/+Recovery
Level 24: Carrion Creepers
- A: Positron's Blast: Chance of Damage(Energy)
- 25: Javelin Volley: Chance of Damage(Lethal)
- 25: Bombardment: Chance for Fire Damage
- 37: Ice Mistral's Torment: Chance for Cold Damage
- 37: Trap of the Hunter: Chance of Damage(Lethal)
Level 26: Fly Trap
- A: Expedient Reinforcement: Accuracy/Recharge
- 27: Expedient Reinforcement: Accuracy/Damage
- 27: Expedient Reinforcement: Damage/Endurance
- 36: Expedient Reinforcement: Accuracy/Damage/Recharge
- 36: Expedient Reinforcement: Endurance/Damage/Recharge
- 37: Expedient Reinforcement: Resist Bonus Aura for Pets
Level 28: Subdue
- A: Apocalypse: Damage
- 29: Apocalypse: Damage/Recharge
- 29: Apocalypse: Damage/Recharge/Accuracy
- 34: Apocalypse: Recharge/Accuracy
- 36: Apocalypse: Damage/Endurance
Level 30: Psionic Lance
- A: Sting of the Manticore: Accuracy/Damage
- 31: Sting of the Manticore: Damage/Endurance
- 31: Sting of the Manticore: Accuracy/Interrupt/Range
- 31: Sting of the Manticore: Damage/Interrupt/Recharge
- 34: Sting of the Manticore: Damage/Endurance/Recharge
Level 32: Psychic Shockwave
- A: Armageddon: Damage
- 33: Armageddon: Damage/Recharge
- 33: Armageddon: Damage/Recharge/Accuracy
- 33: Armageddon: Recharge/Accuracy
- 34: Armageddon: Damage/Endurance
Level 35: Weave
- A: Luck of the Gambler: Defense/Increased Global Recharge Speed
Level 38: Link Minds
- A: Reactive Defenses: Defense/RechargeTime
- 39: Red Fortune: Defense/Recharge
Level 41: Mind Over Body
- A: Reactive Armor: Resistance
- 42: Reactive Armor: Resistance/Endurance
- 42: Reactive Armor: Resistance/Recharge
Level 44: Psionic Tornado
- A: Explosive Strike: Damage/Knockback
- 48: Explosive Strike: Accuracy/Knockback
- 48: Explosive Strike: Chance for Smashing Damage
- 48: Sudden Acceleration: Knockback to Knockdown
Level 47: Maneuvers
- A: Luck of the Gambler: Defense/Increased Global Recharge Speed
Level 49: Tactics
- A: Gaussian's Synchronized Fire-Control: Chance for Build Up
──────────────────────────────Inherents:
Level 1: Brawl
- (Empty)
Level 1: Domination
Level 1: Sprint- (Empty)
Level 2: Rest
- (Empty)
Level 1: Swift
- (Empty)
Level 1: Health
- A: Panacea: +Hit Points/Endurance
- 50: Miracle: +Recovery
Level 1: Hurdle
- (Empty)
Level 1: Stamina
- A: Performance Shifter: EndMod
- 50: Performance Shifter: Chance for +End
- 50: Invention: Endurance Modification
Level 6: Afterburner
Level 49: Quick Form
-
TW is broken plane and simple. The set is mid / low tier and you will realize it whenever you playing it in a team. By the time you start to land Arc of Destruction your target is dead by your team mates and you still are finishing the animation. Also add that the set mechanic is useless and disabled. So maybe TW will work in a Tank but for a scrapper or a brute no point to take it. Animation is too slow and after the last dps nerf makes this set very frustating when teaming.
Still looks cool.
-
Toxic Control:
- Narcotic dart (ST Foe Inmob) - You throw a jeringe that injects paralitic poison to your target
- Nerve Agent (ST Foe Hold) - You crash a nerve gas flask to the floor causing the victim to stay in shock for a few seconds
- Arsenic Blower (Ranged Targeted AoE Inmob) - You activate your gas blower spreading a toxic cloud to NPCs causing a nerve shock inmobilizing the entire group
- Corrosive Fluid (Toggle PBAoE - Slow - Res) - You surround yourself with toxic wastes crating a dense fluid around you slowing and weakening foes close to you
- Toxin Trap (Place - PBAoe - Fear) - You place a vaporizer spreading a fear toxin affecting all foes in range
- Barrel Spill (Ranged Targeted AoE Knockdown - Slow - Res) - You throw a barrel causing a toxic pool around a group of foes. The floor becomes slippery knocking all NPCs in area.
- Ether Alkaloid (Cone Foe Sleep - Slow - Res) - You throw several flask to the ground spreading ether fiumes in a group of foes sleeping all the NPCs around
- Sulfide Bomb (PBAoE Foe Hold - Slow - Res) - You throw a Sulfide canister paralyzing and holding a entire group of foes
- Radioactive Creature (Summon Pet - Melee -ST Hold - Slow - Res) - Yous summon a toxic monster that holds and attacks foes in range
This is a rough draft of a control set i would like to see someday in game.
-
 1
1
-
Im testing a Arssonist/Savage dominator in Test Server, Is just too fun to play with, Cant wait for this new set to come out.
-
Hi there!
One of may favorites Dominators is Elec/elec/Primal. Im sharing my build which is ranged defense softcap for end game. Also is perma (of course) and besides the good control and end drain, got a decent ST and AoE dps (Energy Trabsfer does worth to take and most in Elec set that lacks of ST dps)
The build aint cheap but if you can afford it you will fly through any type of content +4 x 8
Villain Dominator
Build plan made with Mids' Reborn v3.6.6 rev. 3
──────────────────────────────- Primary powerset: Electric Control
- Secondary powerset: Electricity Assault
- Pool powerset (#1): Speed
- Pool powerset (#2): Leaping
- Pool powerset (#3): Fighting
- Pool powerset (#4): Leadership
- Ancillary powerset: Primal Forces Mastery
──────────────────────────────
Powers taken:
Level 1: Tesla Cage
- A: Basilisk's Gaze: Accuracy/Hold
- 3: Basilisk's Gaze: Accuracy/Recharge
- 3: Basilisk's Gaze: Accuracy/Endurance/Recharge/Hold
- 5: Basilisk's Gaze: Recharge/Hold
Level 1: Charged Brawl
- A: Crushing Impact: Accuracy/Damage
- 5: Crushing Impact: Damage/Endurance
- 7: Crushing Impact: Damage/Recharge
- 7: Crushing Impact: Accuracy/Damage/Recharge
- 9: Crushing Impact: Accuracy/Damage/Endurance
Level 2: Chain Fences
- A: Superior Ascendency of the Dominator: Accuracy/Control Duration
- 11: Superior Ascendency of the Dominator: Control Duration/Recharge
- 11: Superior Ascendency of the Dominator: Endurance/Recharge
- 13: Superior Ascendency of the Dominator: Accuracy/Control Duration/Endurance
- 13: Superior Ascendency of the Dominator: Accuracy/Control Duration/Endurance/Recharge
- 15: Superior Ascendency of the Dominator: Recharge/Chance for +Damage
Level 4: Lightning Bolt
- A: Thunderstrike: Accuracy/Damage
- 15: Thunderstrike: Accuracy/Damage/Recharge
- 17: Thunderstrike: Accuracy/Damage/Endurance
Level 6: Jolting Chain
- A: Gladiator's Javelin: Chance of Damage(Toxic)
- 19: Apocalypse: Chance of Damage(Negative)
Level 8: Conductive Aura
- A: Preemptive Optimization: Accuracy/Recharge
- 9: Preemptive Optimization: EndMod/Endurance/Recharge
- 21: Preemptive Optimization: EndMod/Endurance
- 23: Preemptive Optimization: EndMod/Recharge
- 23: Preemptive Optimization: EndMod/Accuracy/Endurance
- 25: Preemptive Optimization: EndMod/Accuracy/Recharge
Level 10: Havoc Punch
- A: Hecatomb: Damage
- 21: Hecatomb: Damage/Recharge
- 27: Hecatomb: Damage/Recharge/Accuracy
- 27: Hecatomb: Recharge/Accuracy
- 29: Hecatomb: Damage/Endurance
Level 12: Hasten
- A: Invention: Recharge Reduction
- 29: Invention: Recharge Reduction
Level 14: Combat Jumping
- A: Luck of the Gambler: Defense/Increased Global Recharge Speed
Level 16: Build Up
- A: Rectified Reticle: To Hit Buff/Recharge
- 17: Rectified Reticle: To Hit Buff
Level 18: Paralyzing Blast
- A: Lockdown: Accuracy/Hold
- 31: Lockdown: Accuracy/Recharge
- 31: Lockdown: Recharge/Hold
- 33: Lockdown: Endurance/Recharge/Hold
- 33: Lockdown: Accuracy/Endurance/Recharge/Hold
- 33: Lockdown: Chance for +2 Mag Hold
Level 20: Super Jump
- (Empty)
Level 22: Synaptic Overload
- A: Coercive Persuasion : Confused
- 34: Coercive Persuasion : Confused/Recharge
- 34: Coercive Persuasion : Confused/Recharge/Accuracy
- 34: Coercive Persuasion : Recharge/Accuracy
- 36: Coercive Persuasion : Confused/Endurance
- 36: Coercive Persuasion : Contagious Confusion
Level 24: Zapp
- A: Sting of the Manticore: Accuracy/Damage
- 37: Sting of the Manticore: Damage/Endurance
- 37: Sting of the Manticore: Accuracy/Interrupt/Range
- 37: Sting of the Manticore: Damage/Interrupt/Recharge
- 39: Sting of the Manticore: Damage/Endurance/Recharge
Level 26: Gremlins
- A: Expedient Reinforcement: Accuracy/Recharge
- 39: Expedient Reinforcement: Accuracy/Damage
- 39: Expedient Reinforcement: Damage/Endurance
- 40: Expedient Reinforcement: Accuracy/Damage/Recharge
- 40: Expedient Reinforcement: Endurance/Damage/Recharge
- 40: Expedient Reinforcement: Resist Bonus Aura for Pets
Level 28: Static Discharge
- A: Ragnarok: Damage
- 42: Ragnarok: Damage/Recharge
- 42: Ragnarok: Damage/Recharge/Accuracy
- 42: Ragnarok: Recharge/Accuracy
- 43: Ragnarok: Damage/Endurance
Level 30: Thunder Strike
- A: Armageddon: Damage
- 31: Sudden Acceleration: Knockback to Knockdown
- 43: Armageddon: Damage/Recharge
- 43: Armageddon: Damage/Recharge/Accuracy
- 45: Armageddon: Recharge/Accuracy
- 45: Armageddon: Damage/Endurance
Level 32: Boxing
- (Empty)
Level 35: Tough
- A: Gladiator's Armor: TP Protection +3% Def (All)
- 36: Steadfast Protection: Resistance/+Def 3%
Level 38: Weave
- A: Luck of the Gambler: Defense/Increased Global Recharge Speed
Level 41: Energy Transfer
- A: Mako's Bite: Accuracy/Damage
- 45: Mako's Bite: Damage/Endurance
- 46: Mako's Bite: Damage/Recharge
- 46: Mako's Bite: Accuracy/Endurance/Recharge
- 46: Mako's Bite: Accuracy/Damage/Endurance/Recharge
- 50: Mako's Bite: Chance of Damage(Lethal)
Level 44: Conserve Power
- A: Invention: Recharge Reduction
Level 47: Temp Invulnerability
- A: Impervious Skin: Resistance/Endurance
- 48: Impervious Skin: Resistance/Recharge
- 48: Impervious Skin: Endurance/Recharge
- 48: Impervious Skin: Resistance/Endurance/Recharge
- 50: Impervious Skin: Status Resistance/Regeneration
Level 49: Maneuvers
- A: Luck of the Gambler: Defense/Increased Global Recharge Speed
──────────────────────────────Inherents:
Level 1: Domination
Level 1: Brawl- (Empty)
Level 1: Sprint
- (Empty)
Level 2: Rest
- (Empty)
Level 1: Swift
- (Empty)
Level 1: Hurdle
- (Empty)
Level 1: Health
- A: Panacea: +Hit Points/Endurance
- 19: Miracle: +Recovery
Level 1: Stamina
- A: Performance Shifter: Chance for +End
- 25: Invention: Endurance Modification
- 50: Performance Shifter: EndMod
Level 20: Double Jump
Level 49: Quick Form
-
1
-
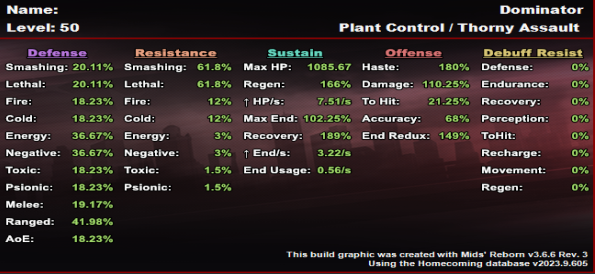
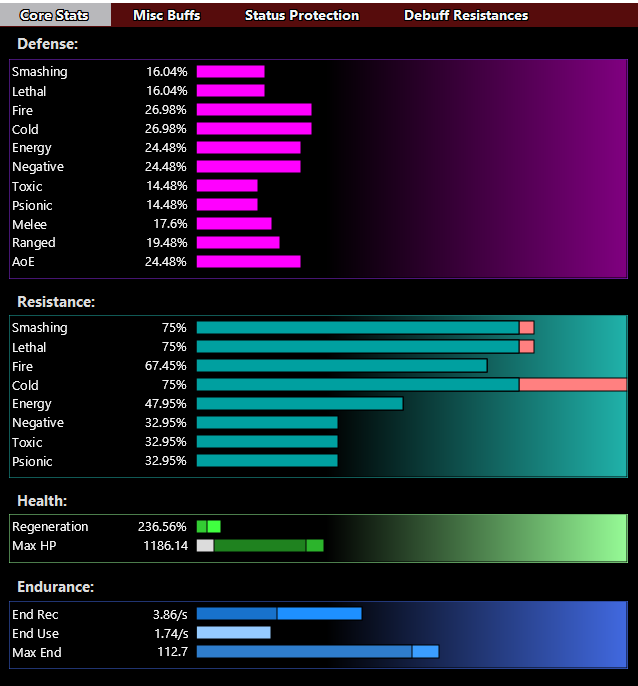
Hello!
This build below is ranged softcap with good recharge and also endurance friendly. Will require Agility incarnate to ensure ranged defense and will allow you to pick rebirth for heals cause you endurance will be safe and covered.
You will be able to solo 54x8 without issues.
Villain Dominator
Build plan made with Mids' Reborn v3.6.6 rev. 3
──────────────────────────────- Primary powerset: Plant Control
- Secondary powerset: Thorny Assault
- Pool powerset (#1): Leaping
- Pool powerset (#2): Speed
- Pool powerset (#3): Fighting
- Pool powerset (#4): Leadership
- Ancillary powerset: Primal Forces Mastery
──────────────────────────────
Powers taken:
Level 1: Strangler
- A: Basilisk's Gaze: Accuracy/Hold
- 3: Basilisk's Gaze: Accuracy/Recharge
- 3: Basilisk's Gaze: Recharge/Hold
- 5: Basilisk's Gaze: Accuracy/Endurance/Recharge/Hold
Level 1: Skewer
- A: Crushing Impact: Accuracy/Damage
- 5: Crushing Impact: Damage/Endurance
- 7: Crushing Impact: Damage/Recharge
- 7: Crushing Impact: Accuracy/Damage/Recharge
- 9: Crushing Impact: Accuracy/Damage/Endurance
Level 2: Roots
- A: Superior Ascendency of the Dominator: Accuracy/Control Duration
- 11: Superior Ascendency of the Dominator: Control Duration/Recharge
- 11: Superior Ascendency of the Dominator: Endurance/Recharge
- 13: Superior Ascendency of the Dominator: Accuracy/Control Duration/Endurance
- 13: Superior Ascendency of the Dominator: Accuracy/Control Duration/Endurance/Recharge
- 15: Superior Ascendency of the Dominator: Recharge/Chance for +Damage
Level 4: Fling Thorns
- A: Ragnarok: Damage
- 48: Ragnarok: Damage/Recharge
- 50: Ragnarok: Damage/Recharge/Accuracy
- 50: Ragnarok: Recharge/Accuracy
- 50: Ragnarok: Damage/Endurance
Level 6: Combat Jumping
- A: Luck of the Gambler: Defense/Increased Global Recharge Speed
Level 8: Seeds of Confusion
- A: Coercive Persuasion : Confused
- 45: Coercive Persuasion : Confused/Recharge
- 45: Coercive Persuasion : Confused/Recharge/Accuracy
- 46: Coercive Persuasion : Recharge/Accuracy
- 46: Coercive Persuasion : Confused/Endurance
- 46: Coercive Persuasion : Contagious Confusion
Level 10: Impale
- A: Decimation: Accuracy/Damage
- 17: Decimation: Damage/Endurance
- 40: Decimation: Damage/Recharge
- 43: Decimation: Accuracy/Endurance/Recharge
- 45: Decimation: Accuracy/Damage/Recharge
Level 12: Super Jump
- (Empty)
Level 14: Hasten
- A: Invention: Recharge Reduction
- 15: Invention: Recharge Reduction
Level 16: Build Up
- A: Rectified Reticle: To Hit Buff
- 17: Rectified Reticle: To Hit Buff/Recharge
Level 18: Vines
- A: Basilisk's Gaze: Accuracy/Hold
- 19: Basilisk's Gaze: Accuracy/Recharge
- 19: Basilisk's Gaze: Recharge/Hold
- 39: Basilisk's Gaze: Accuracy/Endurance/Recharge/Hold
Level 20: Thorn Burst
- A: Obliteration: Damage
- 21: Obliteration: Accuracy/Recharge
- 21: Obliteration: Damage/Recharge
- 37: Obliteration: Accuracy/Damage/Recharge
- 39: Obliteration: Accuracy/Damage/Endurance/Recharge
Level 22: Carrion Creepers
- A: Javelin Volley: Chance of Damage(Lethal)
- 23: Bombardment: Chance for Fire Damage
- 23: Positron's Blast: Chance of Damage(Energy)
- 25: Trap of the Hunter: Chance of Damage(Lethal)
- 25: Ice Mistral's Torment: Chance for Cold Damage
Level 24: Boxing
- (Empty)
Level 26: Fly Trap
- A: Expedient Reinforcement: Accuracy/Recharge
- 27: Expedient Reinforcement: Accuracy/Damage
- 27: Expedient Reinforcement: Damage/Endurance
- 36: Expedient Reinforcement: Accuracy/Damage/Recharge
- 37: Expedient Reinforcement: Endurance/Damage/Recharge
- 37: Expedient Reinforcement: Resist Bonus Aura for Pets
Level 28: Thorny Darts
- A: Thunderstrike: Accuracy/Damage
- 29: Thunderstrike: Damage/Endurance
- 29: Thunderstrike: Damage/Recharge
- 34: Thunderstrike: Accuracy/Damage/Recharge
- 36: Thunderstrike: Accuracy/Damage/Endurance
- 40: Thunderstrike: Damage/Endurance/Recharge
Level 30: Ripper
- A: Armageddon: Damage
- 31: Armageddon: Damage/Recharge
- 31: Armageddon: Damage/Recharge/Accuracy
- 31: Armageddon: Recharge/Accuracy
- 34: Armageddon: Damage/Endurance
Level 32: Thorn Barrage
- A: Apocalypse: Damage
- 33: Apocalypse: Damage/Recharge
- 33: Apocalypse: Damage/Recharge/Accuracy
- 33: Apocalypse: Recharge/Accuracy
- 34: Apocalypse: Damage/Endurance
Level 35: Tough
- A: Gladiator's Armor: TP Protection +3% Def (All)
- 36: Steadfast Protection: Resistance/+Def 3%
Level 38: Weave
- A: Luck of the Gambler: Defense/Increased Global Recharge Speed
Level 41: Energy Transfer
- A: Mako's Bite: Accuracy/Damage
- 42: Mako's Bite: Damage/Endurance
- 42: Mako's Bite: Damage/Recharge
- 42: Mako's Bite: Accuracy/Endurance/Recharge
- 43: Mako's Bite: Accuracy/Damage/Endurance/Recharge
- 43: Mako's Bite: Chance of Damage(Lethal)
Level 44: Conserve Power
- A: Invention: Recharge Reduction
Level 47: Temp Invulnerability
- A: Reactive Armor: Resistance
- 48: Reactive Armor: Resistance/Endurance
- 48: Reactive Armor: Resistance/Recharge
Level 49: Maneuvers
- A: Luck of the Gambler: Defense/Increased Global Recharge Speed
──────────────────────────────Inherents:
Level 1: Brawl
- (Empty)
Level 1: Domination
Level 1: Sprint- (Empty)
Level 2: Rest
- (Empty)
Level 1: Swift
- (Empty)
Level 1: Health
- A: Panacea: +Hit Points/Endurance
- 40: Miracle: +Recovery
Level 1: Hurdle
- (Empty)
Level 1: Stamina
- A: Performance Shifter: Chance for +End
- 9: Performance Shifter: EndMod
- 39: Invention: Endurance Modification
Level 12: Double Jump
-
2
-
I got the chance to enter to Beta test server yesterday and try both new power sets for dominators. First at all, i have to remark the crativity designing a rifle/devices control set and the concept that developers wanted to bring to the game. It was unexpected to see a power set like this and the outcame is really nice. Having a dominator Rifle based set it opens a great door for character creation.
I must to say that Arsenal Control have all the tools to be a top tier set as Plant Ice or Dark or better. Here my opinion on each power:
- Tranquilazer (ST Sleep) I didnt take it on my build
- Sleep Granade (Targeted AoE Sleep) In terms of control is really nice if solo a group. A good opener for your rotation. Animation is cool showing a gas cloud around the affected npcs
- Cryo Freeze ray (ST Hold) Your single bread and butter hold. A must to have. Animation is like block of ice. Fast and easy.
- Liquid Nitrogen (Ranged Targeted Inmob Slow) This is a targeted Ice Patch also a must have for damage mitigation and control. Still not sure about how to slot this one if use a complete IO set for bonusses or use Chance damage IOs or just regular Rech Time IOs.
- Cloaking Device (Toggle Stealth + Def) A must have as well. A good tool for a surprise attack and also for stack +DEF
- Smoke Canister (Ranged Location -Perception -To hit Confuse) This one is just great. We never had a targeted locatio AoE confuse in game. Love this power and the targeted location mechanics add a world of possibilities about how to use it. Must Have 100%
- Flash Bang (Aoe Stun disorient) Great tool for crowd control.
- Tear Gas (AoE Hold) A must have. Animation is fast and looks nice
- Gun Drone (Pet) Of course i dont have numbers but my impression is that this could be the most dps pet out there. It rounds up the set very good because brings the damage on the table. Besides is a flying machinegun that looks cool
Overall the set provides a great control and mitigation, animations are fast and easy going and havin tools as stealth and a dangerous pet coming along with you... yes it fills all my boxes on the cool for dominators check list.
Cant wait until release. Well done devs!
-
1
-
2
-
14 hours ago, Scarlet Shocker said:
I would advice not going this route. Your defense numbers are really low, meaning that you will not be able to avoid all incoming damage and will be "absorbing" most of it. +75% of resistance will not help to survive in such low HP toon.
I would drop +resistance bonusses in favor of ranged defense bonusses. With your current build will be difficult to solo through high end content unless you planning to be all the time teaming with a pocket healer.
Ill drop a MIDs build later when i get back home so you can compare and decide.
-
I have a Ice/Energy (my second main) which is a NPC group killer even that /energy is not AoE focused. I did all kind of solo content with him and still do. Ice provides such a nice control being Ice Patch your main source of incoming damage mitigation. My advice is: chose a secondary with Power Boost, thats why i chose /Energy. Why? because will maximize the confusion that provides Artic Air, will improve your defense, your holds... everything.
Jack Frost is one of my favorite pets lightly behind Stone Pet. I take care of Lts and Bosses and he can handle minnions easy.
I respected out of Cold Snap (fear) and didnt take Flash Freeze (sleep) and Chillblain (ST inmob). Those 3 powers are not necessary at all in my opinion.
Besides /Enrgy other secondaries you can consider with Power Boost is /Ice , / Dark, /Stone and /Sonic. I tried all these secondaries and i would lean to /dark (more AoEish) or /Stone of single target is what you looking for.
You have many choices here and can´t go wrong with any of these.
Good Luck i hope you can find a fun combo to play with.
-
1
-
-
One thing about Stealth if you are a controller/dominator. Once you have a pet out, you are breaking invisibility and losing all the defense that these invisibility powers are providing.
I find more useful Maneuvers if you are looking for stacking defense. Your pets and team mates will benefit from Maneuvers all the time toggle is on. You can "fix" your stealth status placing a Stealth IO in a running power + Ninja Run from P2W vendor (or similar). With these 2 running powers with stealth IO will be enough to run through some NPCs and skip some rooms.
I dont use Invisibility Pool anymore at all in any of my toons.
-
1
-

Where the heck should the Ascendancy +DMG proc go?
in Dominator
Posted
I always slot Ascendancy in AoE inmobs or Fear that i will keep spamming over and over. I found thats the best place for these sets.