

Harakh
-
Posts
215 -
Joined
-
Last visited
Content Type
Profiles
Forums
Events
Store
Articles
Patch Notes
Posts posted by Harakh
-
-
4 hours ago, Laucianna said:
I just tested my little modified version of the build too and whilst Rikti at +4/x8 solo were easy as ever, Arachnos on the same difficulty however were killer, would have to pop a purple to boost my def enough to make it all the way through.- Lauci x
O good its not just me >.<
Yes the build works great on non arachnos (and carnie) just like any other perma lightform build would.
I almost feel like Koopax has either a major modified build that just incorporates the +end recover factor, or you, Koopax, are so good with #'s you theory played the build in your mind hah. Shiet comedy aside @Koopak can you help us achieve your success pleeeeassseeeee.
@Clam Leader you were the original creator of the build in discussion. Are you able to shed any light on what we might be doing wrong?
-
 1
1
-
-
*couple macro edits + added cross punch macro
-
On 12/27/2023 at 11:02 AM, Koopak said:
It does, they just don't play the same animations normal humanoid enemies do and don't ragdoll. think of it like when you get hit with KB while flying, its less impactful but not nothing.
Not so, -end only impacts your existing endurance so cant stop you from doing anything if you act before it hits you and -recovery can only negatively impact what i quoted if you fall below the 100% base. Given the VAST majority of Mu attacks ONLY apply -end, and the ones that do apply -recovery only last 4 seconds, you need to be facing multiple Mu Bosses before the -recovery becomes a critical issue.
Recovery% defines the time it takes to get an endurance tick, not how much endurance you actually get, you ALWAYS get 1/15th of your max endurance back on a tick. At base 100% that tick occurs once every 4 seconds, Clam's build brings it over 200% recovery which puts it at every 2 seconds.
Now consider the cost of shapeshifting, there is no activation cost, its just the first tick of its maintenance cost. Mids will show it uses .26 endurance per second, but it actually ticks twice a second, the activation cost of your transformation is 0.13 endurance BEFORE factoring in any endurance reductions you might have.
If I am not messing up my proc logic, the chance of a performance shifter proc occurring when you activate your transformation is about 25%, that means that on average you can pay 0.52 endurance to gain 10 endurance (or more if your max end is higher from accolades). This lets you bootstrap from a single endurance tick to a workable amount in about 4 server ticks, which is a fraction of a second. That is as much 'tactics' as you need, and that's only if you actually crash which is highly unlikely since if you are animation canceling to weave your powers, you are constantly rolling that performance shifter proc chance. As an aside this is why Power Transfer is in there as well, the PT proc actually alone means that this build can spam shape shift to heal at rate almost on par with Instant Healing on a regen scrapper.
Casually = little effort. I only play on +4x8, i get bored at that difficulty, let alone anything lower.I just completed putting together a build very close to clams, and with just 1 mu boss and 1 lut I my end was zapped away with stuns constantly landing I needed dwarf to break free but couldn't. The -recovery was hitting often enough I couldn't do anything. Would you mind sharing your version of the build please? Feels really weak so far (at least the way Im playing it) compared to my defense build.
... attempting a few more tries and I just can't make it happen. Any knockback that is applied to Mu is negligible. As other mobs are hitting the floor they appear to keep on attack... so if kb is happening its not helping me.
This build has such little psi resist also makes it very difficult to leverage between Mu mobs, and psi mobs. If I pull them to a corner there is a some hope but still feeling off.
-
6 minutes ago, Laucianna said:
Basically you shift forms so fast that you proc endurance faster then they can drain it whilst firing off attacks and killing them ❤️
- Lauci McQueen XD
Excited to try this out ^.^
-
1
-
-
19 minutes ago, Koopak said:
It does, they just don't play the same animations normal humanoid enemies do and don't ragdoll. think of it like when you get hit with KB while flying, its less impactful but not nothing.
Not so, -end only impacts your existing endurance on cant stop you from doing anything if you act before it hits you and -recovery can only negatively impact what i quoted if you fall below the 100% base. Given the VAST majority of Mu attacks ONLY apply -end, and the ones that do apply -recovery only last 4 seconds, you need to be facing multiple Mu Bosses before the -recovery becomes a critical issue.
Recovery% defines the time it takes to get an endurance tick, not how much endurance you actually get, you ALWAYS get 1/15th of your max endurance back on a tick. At base 100% that tick occurs once every 4 seconds, Clam's build brings it over 200% recovery which puts it at every 2 seconds.
Now consider the cost of shapeshifting, there is no activation cost, its just the first tick of its maintenance cost. Mids will show it uses .26 endurance per second, but it actually ticks twice a second, the activation cost of your transformation is 0.13 endurance BEFORE factoring in any endurance reductions you might have.
If I am not messing up my proc logic, the chance of a performance shifter proc occurring when you activate your transformation is about 25%, that means that on average you can pay 0.52 endurance to gain 10 endurance (or more if your max end is higher from accolades). This lets you bootstrap from a single endurance tick to a workable amount in about 4 server ticks, which is a fraction of a second. That is as much 'tactics' as you need, and that's only if you actually crash which is highly unlikely since if you are animation canceling to weave your powers, you are constantly rolling that performance shifter proc chance. As an aside this is why Power Transfer is in there as well, the PT proc actually alone means that this build can spam shape shift to heal at rate almost on par with Instant Healing on a regen scrapper.
Casually = little effort. I only play on +4x8, i get bored at that difficulty, let alone anything lower.You hit that response on the nail thank you!!
Ill be trying a similar endurance set up next.
-
1
-
-
41 minutes ago, Clam Leader said:
Nah, as shown in the video I just do enough damage and KD that they dont get a chance to attack my lack of defense. Between that and lightform and the many healing options Ive never had much trouble.
Knock back doesn't work in Mu I believe. But reading what Koopax said after you really shed some light.
I imagine there might be some tactics such as keeping range when crashed? Otherwise if you're continuously hit with -end / -recov you won't be able to activate shapeshifting forms.
31 minutes ago, Koopak said:I'll just pop in and add iv used a variant of @Clam Leader's build myself as well as a Warshade version, and yes it handles Arachnos casually. Thing is the Mu drain is oversold, i have several builds that are not end stable and intentionally run so that they run out of endurance in 2 minutes or less. Those builds kill enemies much MUCH slower than an optimized Kheld going ham, but as long as i prioritize the Mu and Tarantula Mistresses, iv never needed anything built specifically for them, at least not until I'm rocking a support AT with low damage.
Worst case you do crash, but you have no toggles to crash, and since Performance Shifter is in your nova and dwarf forms you can LITERALLY just spam shapeshift to recover endurance quickly. Since you don't care about toggles, a shifter proc, or an end tick is all you need to throw an attack. You will get an end tick about once every 2 seconds, and each performance shifter will tick every ~40 seconds assuming you never shape shift and if you do it'll proc quite often.Casually... What do you mean +4/x8 at its own pace?
-
1
-
-
4 minutes ago, Clam Leader said:
I just run a 0 defense changeling build and have solod most non-4 star content on +4×8. The key with Arachnos is just kill everything.
I actually happen to have an early trapdoor run to demonstrate.
also it appears my earlier build was the wrong version. This is the actual build O run.
Im most certainly going to dig into your build and see what I can take away.
As for your tip on killing arachnos... There is more to it than that 😂 ... The endurance drain alone from arachnos and high energy resist I imagine would leave you drained of endurance before you can kill all the Mu. Do you mean "load up on inspirations, and kill"? Nothing wrong with that, although I tend to not rely on inspirations, not every single build, but I like to use them as a treat not a gap filler.
Either way your playstyle looks enjoyable, tyty for the share.
-
1
-
-
6 minutes ago, Clam Leader said:
Theres nothing wrong with FoW realistically, the opportunity cost is just too high. You need 3 power slots (two of which wind up mostly dead) and a pool pick, and thats not even accounting for any slots you might want.
I myself used it for a while and loved it, but realizing I was investing so much for a situational power lead to alot more efficient building after the fact.
As for specific suggestions, PBs have so many good utility powers already I would look into those, or cross punch, I love me some cross punch.
Appreciate you sharing your perspective on the use of UP from FoW. It definitely has its place in certain builds such as my ranged defense build. I wouldn't use it if I didn't build for defense however.
I've also seen a lot of talk about best PB dps chain and cross punch being in that chain. I've yet to try CP in my build, but would really like to try something new. My concern with switching out UP is then the soloing of harder content (I like to keep at max difficulty to bring some form of challenge to an easy game). Are you capable of soloing arachnos at max if so could you tell me how you do it without UP? If you've got the fix please open my eyes lord ^.^**what was more efficient building? More dps?
-
1
-
-
10 minutes ago, Laucianna said:
What in Force of Will are you using hun? And what are the other power pools you already have?- Lauci x
Unleash Potential from FoW.
I'm more curious what pool combos you'd advice to accomplish soloing the harder mobs for pb since you don't advice FoW. Or I guess why do you see it as not useful for pb? I'm either unaware of some awesome combo or it's possible FoW can be useful for peacebringers and as such you might not want to turn people off it so quickly.
-
Just checking out the additions to the guide and wow you've added a bunch.
Statement & Question though:
"Power Pools:
- Force of Will - Not seen anyone use this as there are better pools. ...."
FoW can be very powerful, as my main build is currently using it. I'm more easily able to solo +4x8 arachnos and carnies with it.
I'm curious to know what you'd recommend that i use instead since there are better pools that I may achieve the same solo content?Also glad to see you added "- White Dward Flare, 80% chance of 0.7 KB. No mitigation needed, unless you’re fighting a lot of low-level targets."
I don't know why but when I said that in discord the information wasn't received. -
On 5/28/2023 at 8:26 AM, inqueblawt said:
After coming back to this build from the initial incarnation @Harakhand I chatted about on the first page and this latest one. I appreciate the additional heal, smoother rotation, and the choices of the exemplar build. Going from one to the other back to back, I vastly prefer the newer build.
I have plenty of other characters that can go hard at soloing 54+ content, but it is really really nice to have an all-rounder that works well with exemplaring. Between the Hybrid Widow and the exemplar PB, they are my favorites. Been doing different types of content lately across the levels and the ability to fill roles your team needs is amazing. At the very least with TP/stealth utility if you are completely outshined in DPS/tanking and some ranged DPS/spot healing for a chill time.
Sincere thank you for the updates after so long!
Thank you for the post. This last Peacebomber build just plays better throughout all levels of content, I agree.
I've been enjoying a Night Widow build on my Fort my last few sessions. Solo's arachnos easier than any other Widow Files build (easier not faster). I believe the most current version is posted in the Widow Files if you get bored of hybrid. -
On 5/14/2023 at 7:49 AM, Dungeoness Eloora said:
Cool, glad I was able to contribute!
Out of curiosity, can I ask what incarnate/hard mode content you like to run your PB in?
I haven't run much if more than just one attempt at the literal "Hard Mode" content. Rather I don't shy away from attempting what is challenging +4/x8 content on the Peacebringer; carnies, arachnos, longbow, incarnate content to a degree.
If I do get around to playing real HM I'll let you know how it goes.
-
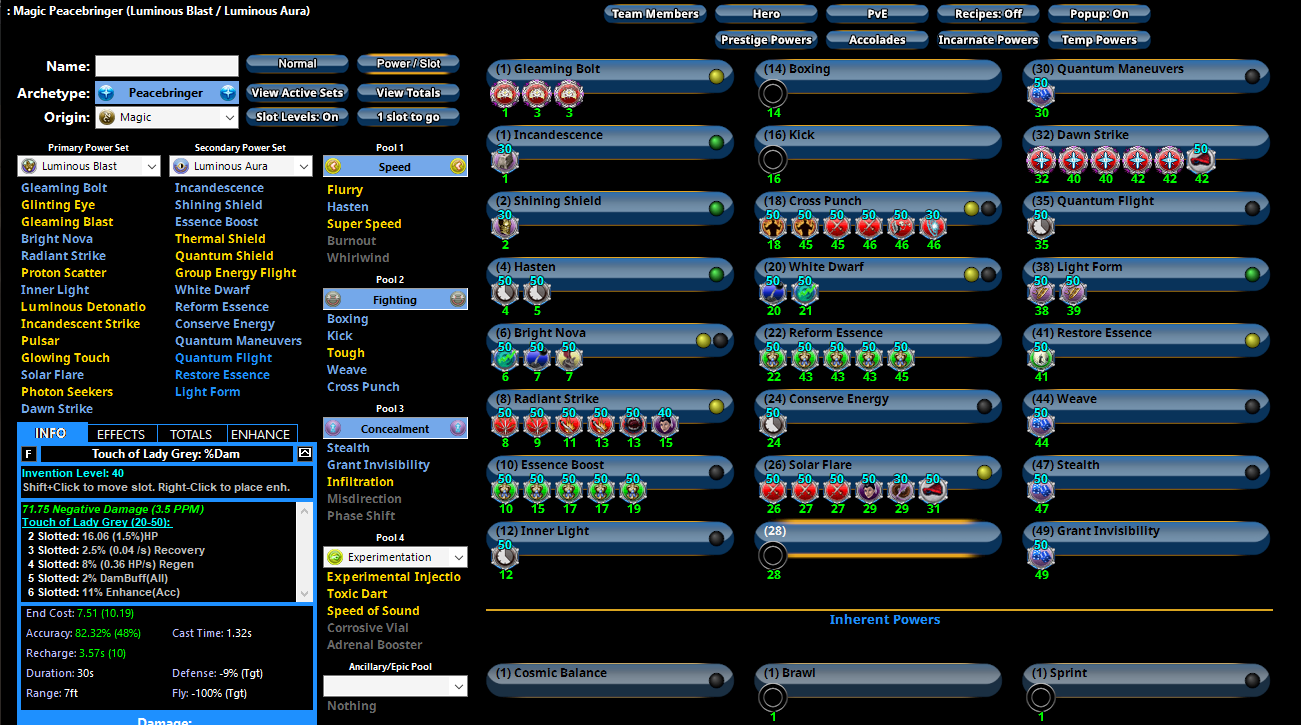
Just stopping back to post the build with your changes @Dungeoness Eloora
SpoilerThis Hero build was built using Mids Reborn 3.4.6
https://github.com/LoadedCamel/MidsRebornClick this DataLink to open the build!
Level 50 Natural Peacebringer
Primary Power Set: Luminous Blast
Secondary Power Set: Luminous Aura
Power Pool: Speed
Power Pool: Leaping
Power Pool: Concealment
Power Pool: Force of WillHero Profile:
Level 1: Glinting Eye -- Dvs-Acc/Dmg(A)
Level 1: Incandescence -- GldArm-3defTpProc(A), ImpArm-ResPsi(9)
Level 2: Shining Shield -- StdPrt-ResDam/Def+(A)
Level 4: Bright Nova -- RctRtc-Pcptn(A)
Level 6: Radiant Strike -- Hct-Acc/Dmg/Rchg(A), Hct-Dam%(13), Hct-Dmg(13), Hct-Dmg/Rchg(15), Hct-Acc/Rchg(46), Hct-Dmg/EndRdx(40)
Level 8: Essence Boost -- NmnCnv-Heal/EndRdx(A), NmnCnv-EndRdx/Rchg(9), NmnCnv-Heal/EndRdx/Rchg(11), NmnCnv-Heal/Rchg(11), NmnCnv-Heal(31), NmnCnv-Regen/Rcvry+(39)
Level 10: Inner Light -- RechRdx-I(A), GssSynFr--Build%(21)
Level 12: Luminous Detonation -- SprFrzBls-Acc/Dmg(A), SprFrzBls-Acc/Dmg/EndRdx(17), TchofLadG-%Dam(7), Bmbdmt-+FireDmg(17), SuddAcc--KB/+KD(19), FrcFdb-Rechg%(23)
Level 14: Hasten -- RechRdx-I(A), RechRdx-I(21)
Level 16: Combat Jumping -- LucoftheG-Def/Rchg+(A), ShlWal-ResDam/Re TP(33), Rct-ResDam%(50)
Level 18: Stealth -- LucoftheG-Def/Rchg+(A)
Level 20: White Dwarf -- ImpArm-ResPsi(A), UnbGrd-Max HP%(29)
Level 22: Reform Essence -- DctWnd-Heal/Rchg(A), Prv-Heal/Rchg(29)
Level 24: Conserve Energy -- RechRdx-I(A)
Level 26: Dawn Strike -- Arm-Dam%(A), Arm-Dmg/EndRdx(34), Arm-Acc/Rchg(34), Arm-Acc/Dmg/Rchg(36), Arm-Dmg/Rchg(36), SuddAcc--KB/+KD(36)
Level 28: Quantum Maneuvers -- LucoftheG-Def/Rchg+(A)
Level 30: Mighty Leap -- WntGif-ResSlow(A)
Level 32: Light Form -- Ags-Psi/Status(A), Ags-ResDam/EndRdx(33), Ags-ResDam/Rchg(39), Ags-EndRdx/Rchg(34), Ags-ResDam/EndRdx/Rchg(39), Ags-ResDam(40)
Level 35: Restore Essence -- Prv-Absorb%(A)
Level 38: Weaken Resolve -- AchHee-ResDeb%(A)
Level 41: Unleash Potential -- RedFrt-Def/Rchg(A), LucoftheG-Def/Rchg(46), Rct-Def/Rchg(50)
Level 44: Grant Invisibility -- LucoftheG-Def/Rchg+(A)
Level 47: Quantum Shield -- ImpArm-ResPsi(A)
Level 49: Thermal Shield -- ImpArm-ResPsi(A)
Level 1: Cosmic Balance
Level 1: Brawl -- Empty(A)
Level 1: Sprint -- Clr-Stlth(A)
Level 2: Rest -- Empty(A)
Level 2: Swift -- Run-I(A)
Level 2: Hurdle -- Jump-I(A)
Level 2: Health -- Mrc-Rcvry+(A), Pnc-Heal/+End(50)
Level 2: Stamina -- PrfShf-End%(A), PrfShf-EndMod(40)
Level 1: Energy Flight -- BlsoftheZ-Travel(A)
Level 10: Combat Flight -- LucoftheG-Def/Rchg+(A)
Level 1: Quantum Acceleration
Level 6: Bright Nova Blast -- SprKhlGrc-Acc/Dmg(A), SprKhlGrc-Dmg/Rchg(7), SprKhlGrc-Acc/Dmg/Rchg(27), SprKhlGrc-Dmg/EndRdx/Rchg(31), SprKhlGrc-Acc/Dmg/EndRdx/Rchg(33), SprKhlGrc-Rchg/FormBuff(42)
Level 6: Bright Nova Bolt -- SprEssTrn-Rchg/Global Heal(A), SprEssTrn-Dmg/Rchg(3)
Level 6: Bright Nova Detonation -- Rgn-Dmg(A), Rgn-Dmg/Rchg(45), Rgn-Acc/Dmg/Rchg(46), Rgn-Acc/Rchg(48), Rgn-Dmg/EndRdx(48), SuddAcc--KB/+KD(48)
Level 6: Bright Nova Scatter -- Artl-Acc/Dam(A), Artl-Dam/End(19), Artl-Dam/Rech(31), Artl-Acc/Dam/Rech(43), Artl-Acc/Rech/Rng(43), Artl-End/Rech/Rng(45)
Level 20: White Dwarf Antagonize -- MckBrt-Taunt/Rng(A)
Level 20: White Dwarf Flare -- Erd-Acc/Dmg/EndRdx/Rchg(A), Erd-%Dam(37), Erd-Acc/Dmg/Rchg(37), TchofLadG-%Dam(37), AchHee-ResDeb%(43), FrcFdb-Rechg%(45)
Level 20: White Dwarf Smite -- Mk'Bit-Acc/Dmg(A), Mk'Bit-Dmg/EndRdx(3), Mk'Bit-Dmg/Rchg(5), Mk'Bit-Acc/EndRdx/Rchg(5), Mk'Bit-Acc/Dmg/EndRdx/Rchg(25), Mk'Bit-Dam%(27)
Level 20: White Dwarf Step -- Wrp-+Special(A)
Level 20: White Dwarf Strike -- SprEssTrn-Acc/Dmg(A), SprEssTrn-Acc/Dmg/Rchg(15), SprEssTrn-Dmg/EndRdx/Rchg(23), SprEssTrn-Acc/Dmg/EndRdx/Rchg(25)
Level 20: White Dwarf Sublimation -- Prv-Heal/Rchg(A), DctWnd-Heal/Rchg(42), NmnCnv-Heal/Rchg(42)
Level 44: Takeoff
Level 1: Prestige Power Dash -- Empty(A)
Level 1: Prestige Power Slide -- Empty(A)
Level 1: Prestige Power Quick -- Empty(A)
Level 1: Prestige Power Rush -- Empty(A)
Level 1: Prestige Power Surge -- Empty(A)
Level 4: Ninja Run
Level 50: Pyronic Core Final Judgement
Level 50: Barrier Core Epiphany
Level 50: Reactive Radial Flawless Interface
Level 50: Vigor Core Paragon
Level 50: Assault Radial Embodiment
Level 50: Portal Jockey
Level 50: Task Force Commander
Level 50: The Atlas Medallion
Level 50: Freedom Phalanx Reserve
------------
------------Really great input to gain just that much more while hitting the defense goal, love it.
-
2 hours ago, Dungeoness Eloora said:
Hey, thanks for the response. Great counterpoints all around, and of course at the end of the day, builds are very personal, with a lot of room for adaptation and personalization.
To just clarify what I did with the slot swapping, Energy Flight and Dwarf Step lose all their extra slots. Two go into Essence Boost to replace their IOs with 6 Numina's. The spare slot then goes in Nova Bolt for the 3% health bonus from Superior Essence Transfer. It's not that big a change, and still just one psi res lost, but it's probably what I'll do if I get around to a respec.
O yep there was my cramp lmao... that 3rd slot in dwarf step... forgot I did 3 slots there and they didn't catch my eye last night >.< !
You brought attention that the range in teleport should be Warp: +perception(apparently I fixed this and posted in OP but didnt save to my comp doh). And now that I just made your recommended switches in Mids I think Im gonna try it out. Thank you for getting that through to me lolol Thank YOU 😁 -
Thanks for checking it out. I'll try to touch on everything you mentioned:
9 hours ago, Dungeoness Eloora said:That's an interesting flex on an incarnate level PB, Harakh! Once again, let me thank you for maintaining these posts and sharing your builds over the years.
I must admit, I've never built a PB without Solar Flare! It's such a fast recharging, satisfying bit of extra damage and soft CC, particularly when used back to back with Dwarf Flare. If it were equal in damage to DF I'd feel less bad about only having that, but it does about 34% more damage. I know, I know, this is a ranged build, and you get DF for "free" so having one if you need it is better than none.
A couple reasons I didn't take solar flare this build. I was capitalizing on macro form switching (fast casting) more so than I ever have before and solar flare being human form interrupts that flow. And this:
Spoiler
3 posts down on page 1 I have saved many of the peacebomber builds and every single one has dual solar flare. "Been there done that" wanted to expand my horizons. I agree with everything you said about it tho. So if someone is playing and being a well mannered kheild and not quick macroing then 100%.
9 hours ago, Dungeoness Eloora said:You could eke out a little more ranged def, at the expense of the 6% psi resist IO, by forgoing the smaller bonus from slotting 2x sets of Blessing of the Zephyrs, and instead 6 slotting Essence Boost with Numina's. You also gain that set's unique, some hit points and more global healing. You also gain a slot back, which you can put in Bright Nova Bolt and slot the last remaining Superior Essence Transfer ATO, to get 3% health from that 2 set. Just my opinion, but all that seems like a reasonable return for losing a little psi res.
Alternatively, if you're still attached to that Impervium Armor being there, Essence Boost is rather easily made perma with just 2 boosted heal/recharge IOs, still freeing that slot to migrate over to get the 2 set ATO bonus.
I hit the ranged defense number I needed in order to be at 45% with barriers 5% and unleash potential so I think the 6% psi to fill the hole is better suited for the build vs the extra ~1% ranged def. But the rest I don't know if my brain is cramping cause I'm having a hard time making sense of it. Essence Boost is currently 4 slotted if, I could move 1 slot from energy flight, and then most likely have to give up another psi resist IO for a total of 2 psi IOs gone, and no extra slots.
I might give up the 3rd slot in EB though. I was just squeezing that HP without much thought toward changing that for free a slot. Thanks for opening a window ^.^
9 hours ago, Dungeoness Eloora said:Lastly, it might be worth considering how valuable the self rez is. Having a fairly low recharge rez, plus untouchable time to rebuff and heal up, has always been a nice little extra in the Kheldian toolset. With how easy it is to keep email stocked with big rez inspirations, and the relative infrequency of needing the skill at all, I wonder if there isn't a more useful one-slot-wonder to consider. Nothing jumps out at me as a clear winner, so I'll just list a few to spark discusison:
- Pulsar. Sure it's a universally skipped, slow animating, damage-less mag 3 stun, but has a 20 ft. radius, which is greater than all of our other aoe powers save Dawn Strike. A better looking choice if you go with Control Radial Hybrid option. Easily usable outside of melee range.
- Solar Flare. Grab it as a quick, guaranteed way to proc Force Feedback. You can safely hover out of reach of melee to use it as well.
- Photon Seekers. Throw the Soulbound Allegiance dam/rech/acc in there and throw these out for even more AoE damage whenver the mood strikes you.
- Quantum Flight. Could be a clutch power to hit if you know something nasty is coming, or if you really, really want to skip through a bunch of enemies with impunity.
- (The absorb proc from the rez could easily be moved to replace one of the dwarf heal's heal/rech IOs without losing anything substantial)
Anyhoo, those are my observations on the build. I haven't tried it yet but I am pretty tempted to try some incarnation of it out.
I love self rez because I try to push my builds so deaths will happen and it normally fits in without any lose to performance or missing out on a gain.
Pulsar is a mag 2 stun with a 50% chance for +1 mag, total of 3. I think the PB gets more value by attacking and knocking down harder targets while shrugging off the damage of the minions you'd stun with pulsar. Control hybrid can be amazing on PB without pulsar I will say that.
Solar flare (see above)
Photon seekers, slow a clunky and the dmg really isn't that great if this build is playing using macro attacks. However, I do have them on an alternative build not posted (the exempt build w/o TP pool). Them and Quantum Flight actually. Although I don't care for their damage I slot just the -kb IO. Seekers will become phased when you do with Quantum Flight. They can be summoned before or during QF. They will try to engage enemies when near and gain their attention. This means, at times with Malta Ill phase let the sappers and the rest of them attack me and the seekers and then unphase with the attention divided and a knockdown to get things started.
If I missed something feel free to highlight lol Otherwise much appreciation for the input again ^.^
-
48 minutes ago, KaizenSoze said:
I added it, but it was only 80 extra hp at 50. So, I tried using that slot in another place to get more resists.
Yah, 80 at its max isn't impressive. Just to compare though. You've got a fourth slot in tough giving you an extra 3% s/l. While I love tough for s/l, that last 3% isn't adding much, and exempt not till level 33. VS using that fourth slot for the +HP which which can be available at level 17 and is a buffer against all damage types. Its going to be a small amount of HP, but whats 3% of the s/l damage coming in ~lv33? Honestly I couldn't say if that last 3% s/l or +HP would win out, but in terms of sooner availability and the fact you're running that set in tough I'd use the HP or find some where else all together for that 4th slot.
*Meant to mention the 3rd slot in indomitable will - its adding the tiniest bit of psi resist and a small end reduction, I don't think either of those smaller amounts missing would make for much notice.
-
1
-
 1
1
-
-
Been working on Night Widow for a few days now. I like how you're baking in resist. I've gone that route on Fort but will have to give your creation a try. I don't see how you'd really fill the toxic hole early on. I did want to mention in case it wasn't intentional you're not using Unbreakable Guard +HP (I know you know of it so if it was ignore me).
-
#5 the Eluded
x lv 50+ & Exempt Night Widow Build
x Aid Self
x Follow-up
x Defense, Defense, Defense
A Night Widow has joined the ranks. While we've seen some come through using Rune of Power and very successfully. Its a pleasure to witness enough defenses stacked, and the support of Smoke Grenade that the Eluded remains soft capped through some of those defense debuffs flying around out there. the Eluded's positional ranged defense is at 72% (in combat). Fighting +4/8 arachnos if a Mistress and Crab each apply -def debuff, the Eluded ranged defense drops to 39%, but add the non resistible -6% to-hit from SG and this Widow is essentially back at soft capped. We witnessed this fighter facing the Banished +4/x8, same story was wrote - defenses + smoke bomb held up. Of course with such a small HP reserve a few lucky monsters will send em to the Hospital.
(Elude can easily replace Smoke Bomb - I first ran this way and really enjoyed it. The 3 minute duration feels really long, and the ~2 min downtime goes by quickly. The end crash sometimes didn't detoggle, and using Ageless am able to get back in right away. Defenses are so high just retoggle mez protection and keep fighting (if you're not debuffed that is)
[Incarnates: Agility Radial, no travel power this stacks nicely with ninja run, sprint, mental training
Hybrid 3 great options, 1- Melee Core for extremely tanky moments filling the resist hole + the extra regen goes along way
2- Melee Radial (for easier dps) further defense to combat debuffs + regen, ++the taunt goes ALONG way to speed up solo
4/8 content when this
build can't successfully immobilize bosses & imm resistant mobs
3- Assault on teams but if I was to invest in just 1 "dps" hybrid I'd use Melee Radial to cover better solo play]
Note: Powers and slot selection done in priority of exempt play. I like to over slot Mind Link for the lv20s but didn't here. Could move 1 def slot from Foresight or Mask Presence to Mind Link for this. The extra slot in Foresight is used because it yields more defense than the 2nd slot in Mask Presence.
Code 1 Smoke Grenade
for Smoke Grenade to reach 6% 3 basic -tohit were used, 2 being +5
SpoilerThis Villain build was built using Mids Reborn 3.4.6
https://github.com/LoadedCamel/MidsRebornClick this DataLink to open the build!
Level 50 Natural Arachnos Widow
Primary Power Set: Night Widow Training
Secondary Power Set: Widow Teamwork
Power Pool: Fighting
Power Pool: Medicine
Power Pool: Leadership
Ancillary Pool: Mu MasteryVillain Profile:
Level 1: Mental Blast -- SprWntBit-Acc/Dmg(A), SprWntBit-Dmg/Rchg(3), SprWntBit-Acc/Dmg/EndRdx(3), SprWntBit-Acc/Dmg/Rchg(5), SprWntBit-Dmg/EndRdx/Acc/Rchg(5), SprWntBit-Rchg/SlowProc(7)
Level 1: Combat Training: Defensive -- Rct-ResDam%(A), LucoftheG-Def/Rchg+(7), ShlWal-ResDam/Re TP(9)
Level 2: Strike -- SprDmnofA-Acc/Dmg(A), SprDmnofA-Rchg/DmgFear%(9), SprDmnofA-Acc/Dmg/Rchg(11), SprDmnofA-Dmg/EndRdx/Rchg(11), SprDmnofA-Acc/Dmg/EndRdx/Rchg(13), SprSpdBit-Rchg/Global Toxic(46)
Level 4: Tactical Training: Maneuvers -- LucoftheG-Def/Rchg+(A), LucoftheG-Def(17)
Level 6: Dart Burst -- SprFrzBls-Acc/Dmg(A), SprFrzBls-Dmg/EndRdx(19), SprFrzBls-Acc/Dmg/EndRdx(39), SprFrzBls-Acc/Dmg/Rchg(39), SprFrzBls-Dmg/EndRdx/Acc/Rchg(40), SprFrzBls-Rchg/ImmobProc(40)
Level 8: Follow Up -- Mk'Bit-Acc/Dmg(A), Mk'Bit-Dmg/EndRdx(19), Mk'Bit-Dmg/Rchg(21), Mk'Bit-Acc/EndRdx/Rchg(21), Mk'Bit-Acc/Dmg/EndRdx/Rchg(50), Mk'Bit-Dam%(50)
Level 10: Indomitable Will -- StdPrt-ResDam/Def+(A), GldArm-3defTpProc(23)
Level 12: Lunge -- Hct-Dam%(A), Hct-Dmg/EndRdx(29), Hct-Dmg/Rchg(29), Hct-Acc/Dmg/Rchg(31), Hct-Acc/Rchg(31), TchofDth-Dam%(31)
Level 14: Spin -- SprAvl-Dmg/EndRdx(A), SprAvl-Acc/Dmg(23), SprAvl-Acc/Dmg/EndRdx(25), SprAvl-Acc/Dmg/Rchg(25), SprAvl-Rchg/KDProc(27), SprAvl-Acc/Dmg/EndRdx/Rchg(27)
Level 16: Kick -- Empty(A)
Level 18: Slash -- SprBlsCol-Acc/Dmg(A), SprBlsCol-Dmg/EndRdx(33), SprBlsCol-Acc/Dmg/EndRdx(33), SprBlsCol-Acc/Dmg/Rchg(33), SprBlsCol-Dmg/EndRdx/Acc/Rchg(34), SprBlsCol-Rchg/HoldProc(34)
Level 20: Mask Presence -- LucoftheG-Def/Rchg+(A), LucoftheG-Def(46)
Level 22: Foresight -- LucoftheG-Def/Rchg+(A), LucoftheG-Def(34), DefBuff-I(36)
Level 24: Mind Link -- LucoftheG-Def/Rchg+(A), LucoftheG-Def/Rchg(36), RedFrt-Def/Rchg(36), Rct-Def/Rchg(37)
Level 26: Mental Training -- Run-I(A)
Level 28: Tough -- UnbGrd-Max HP%(A), UnbGrd-ResDam/EndRdx(37)
Level 30: Weave -- LucoftheG-Def/EndRdx(A), LucoftheG-Def(37)
Level 32: Aid Other -- Prv-Absorb%(A)
Level 35: Maneuvers -- LucoftheG-Def(A), LucoftheG-Def/Rchg+(39)
Level 38: Electrifying Fences -- HO:Endo(A), HO:Perox(40), GrvAnc-Hold%(42), HO:Perox(42), Bmbdmt-+FireDmg(42), PwrTrns-+Heal(43)
Level 41: Ball Lightning -- Artl-Acc/Dam(A), Artl-Dam/End(43), Artl-Dam/Rech(43), Artl-Acc/Dam/Rech(45), Artl-Acc/Rech/Rng(45), Artl-End/Rech/Rng(45)
Level 44: Tactical Training: Leadership -- GssSynFr--ToHit/EndRdx(A), GssSynFr--Build%(46)
Level 47: Aid Self -- IntRdx-I(A), Prv-Heal/Rchg(48), Prv-Heal(48)
Level 49: Smoke Grenade -- ToHitDeb-I(A), ToHitDeb-I(50), ToHitDeb-I(48)
Level 1: Conditioning | Hidden
Level 1: Brawl -- Empty(A)
Level 1: Sprint -- Clr-Stlth(A)
Level 2: Rest -- Empty(A)
Level 2: Swift -- Empty(A)
Level 2: Hurdle -- Empty(A)
Level 2: Health -- NmnCnv-Regen/Rcvry+(A), Mrc-Rcvry+(13), Pnc-Heal/+End(15)
Level 2: Stamina -- PrfShf-EndMod(A), PrfShf-End%(15), PwrTrns-+Heal(17)
Level 1: Prestige Power Dash -- Run-I(A)
Level 1: Prestige Power Slide -- Empty(A)
Level 1: Prestige Power Quick -- Empty(A)
Level 1: Prestige Power Rush -- Empty(A)
Level 1: Prestige Power Surge -- Empty(A)
Level 4: Ninja Run
Level 50: Ion Core Final Judgement
Level 50: Assault Radial Embodiment
Level 50: Reactive Radial Flawless Interface
Level 50: Ageless Core Epiphany
Level 50: Born In Battle
Level 50: High Pain Threshold
Level 50: Invader
Level 50: Marshal
Level 50: Agility Radial Paragon
------------
------------Code 2 Elude
can remove 1 slot from aid self to put else where
SpoilerThis Villain build was built using Mids Reborn 3.4.6
https://github.com/LoadedCamel/MidsRebornClick this DataLink to open the build!
Level 50 Natural Arachnos Widow
Primary Power Set: Night Widow Training
Secondary Power Set: Widow Teamwork
Power Pool: Fighting
Power Pool: Medicine
Power Pool: Leadership
Ancillary Pool: Mu MasteryVillain Profile:
Level 1: Mental Blast -- SprWntBit-Acc/Dmg(A), SprWntBit-Dmg/Rchg(3), SprWntBit-Acc/Dmg/EndRdx(3), SprWntBit-Acc/Dmg/Rchg(5), SprWntBit-Dmg/EndRdx/Acc/Rchg(5), SprWntBit-Rchg/SlowProc(7)
Level 1: Combat Training: Defensive -- Rct-ResDam%(A), LucoftheG-Def/Rchg+(7), ShlWal-ResDam/Re TP(9)
Level 2: Strike -- SprDmnofA-Acc/Dmg(A), SprDmnofA-Rchg/DmgFear%(9), SprDmnofA-Acc/Dmg/Rchg(11), SprDmnofA-Dmg/EndRdx/Rchg(11), SprDmnofA-Acc/Dmg/EndRdx/Rchg(13), SprSpdBit-Rchg/Global Toxic(46)
Level 4: Tactical Training: Maneuvers -- LucoftheG-Def/Rchg+(A), LucoftheG-Def(17)
Level 6: Dart Burst -- SprFrzBls-Acc/Dmg(A), SprFrzBls-Dmg/EndRdx(19), SprFrzBls-Acc/Dmg/EndRdx(39), SprFrzBls-Acc/Dmg/Rchg(39), SprFrzBls-Dmg/EndRdx/Acc/Rchg(40), SprFrzBls-Rchg/ImmobProc(40)
Level 8: Follow Up -- Mk'Bit-Acc/Dmg(A), Mk'Bit-Dmg/EndRdx(19), Mk'Bit-Dmg/Rchg(21), Mk'Bit-Acc/EndRdx/Rchg(21), Mk'Bit-Acc/Dmg/EndRdx/Rchg(50), Mk'Bit-Dam%(50)
Level 10: Indomitable Will -- StdPrt-ResDam/Def+(A), GldArm-3defTpProc(23)
Level 12: Lunge -- Hct-Dam%(A), Hct-Dmg/EndRdx(29), Hct-Dmg/Rchg(29), Hct-Acc/Dmg/Rchg(31), Hct-Acc/Rchg(31), TchofDth-Dam%(31)
Level 14: Spin -- SprAvl-Dmg/EndRdx(A), SprAvl-Acc/Dmg(23), SprAvl-Acc/Dmg/EndRdx(25), SprAvl-Acc/Dmg/Rchg(25), SprAvl-Rchg/KDProc(27), SprAvl-Acc/Dmg/EndRdx/Rchg(27)
Level 16: Kick -- Empty(A)
Level 18: Slash -- SprBlsCol-Acc/Dmg(A), SprBlsCol-Dmg/EndRdx(33), SprBlsCol-Acc/Dmg/EndRdx(33), SprBlsCol-Acc/Dmg/Rchg(33), SprBlsCol-Dmg/EndRdx/Acc/Rchg(34), SprBlsCol-Rchg/HoldProc(34)
Level 20: Mask Presence -- LucoftheG-Def/Rchg+(A), LucoftheG-Def(46)
Level 22: Foresight -- LucoftheG-Def/Rchg+(A), LucoftheG-Def(34), DefBuff-I(36)
Level 24: Mind Link -- LucoftheG-Def/Rchg+(A), LucoftheG-Def/Rchg(36), RedFrt-Def/Rchg(36), Rct-Def/Rchg(37)
Level 26: Mental Training -- Run-I(A)
Level 28: Tough -- UnbGrd-Max HP%(A), UnbGrd-ResDam/EndRdx(37)
Level 30: Weave -- LucoftheG-Def/EndRdx(A), LucoftheG-Def(37)
Level 32: Aid Other -- Prv-Absorb%(A)
Level 35: Maneuvers -- LucoftheG-Def(A), LucoftheG-Def/Rchg+(39)
Level 38: Electrifying Fences -- HO:Endo(A), HO:Perox(40), GrvAnc-Hold%(42), HO:Perox(42), Bmbdmt-+FireDmg(42), PwrTrns-+Heal(43)
Level 41: Ball Lightning -- Artl-Acc/Dam(A), Artl-Dam/End(43), Artl-Dam/Rech(43), Artl-Acc/Dam/Rech(45), Artl-Acc/Rech/Rng(45), Artl-End/Rech/Rng(45)
Level 44: Tactical Training: Leadership -- GssSynFr--ToHit/EndRdx(A), GssSynFr--Build%(46)
Level 47: Aid Self -- IntRdx-I(A), DctWnd-Heal/Rchg(48), Prv-Heal/Rchg(48), Prv-Heal(48)
Level 49: Elude -- RechRdx-I(A), RechRdx-I(50)
Level 1: Conditioning | Hidden
Level 1: Brawl -- Empty(A)
Level 1: Sprint -- Clr-Stlth(A)
Level 2: Rest -- Empty(A)
Level 2: Swift -- Empty(A)
Level 2: Hurdle -- Empty(A)
Level 2: Health -- NmnCnv-Regen/Rcvry+(A), Mrc-Rcvry+(13), Pnc-Heal/+End(15)
Level 2: Stamina -- PrfShf-EndMod(A), PrfShf-End%(15), PwrTrns-+Heal(17)
Level 1: Prestige Power Dash -- Run-I(A)
Level 1: Prestige Power Slide -- Empty(A)
Level 1: Prestige Power Quick -- Empty(A)
Level 1: Prestige Power Rush -- Empty(A)
Level 1: Prestige Power Surge -- Empty(A)
Level 4: Ninja Run
Level 50: Ion Core Final Judgement
Level 50: Assault Radial Embodiment
Level 50: Reactive Radial Flawless Interface
Level 50: Ageless Core Epiphany
Level 50: Born In Battle
Level 50: High Pain Threshold
Level 50: Invader
Level 50: Marshal
Level 50: Agility Radial Paragon
------------
------------ -
Thanks for another project @Goddess Laucianna
------------------> Laucianna Inspired - I just fulfilled a request
Artwork is Laucianna's, she requested the zone backgrounds and I just recorded. Easy enough.
-
2
-
-
I gave it another attempt. I needed to figure how to accomplish this gif and avoid the gillion errors. This round I managed to figure that out. A different glow was used so its a bit brighter this time. I didn't brighten the toon as much tried to leave more of his preexisting tint while still being able to see him better. The background was also lightened slightly. Toon scale slightly lowered to fit nearly his whole outline in frame. His eyes and tree are 100% on the same track, but the eyes at times seem off to me I think cause how the glow is appearing on the different shades of his eyes/face. I fiddled with it for a while, but need to learn a bit more before I can make it look even more sleek.
------------------> -
 1
1
-
-
On 4/29/2023 at 8:44 PM, Glacier Peak said:
That's actually an ice block in the background - I took that in the Winter Forest zone through Pocket D. It's lots of layers over like 60 frames, then flattened in to a gif. I think that's all that was done.
Hot damn thats dedication 0.o
Great job
-
Strongest Hybrid Widow I've built yet:
#2 the Magenta Scrapper v2
x lv 45+ Hybrid Fortunata Claws/Psi Build
x Aid Self
x Both Aim + Follow-up
x use of Red Inspiration Macros/keybinds to play like a scrapper
This is my first tour feeling truly scrapper-like being able to keep my damage boosted using red inspiration combination macros. With ageless covers end issues, aid self for health bar, stacked defenses and controls to counter damage. I never felt so equipped to smash Reds before.
Red Inspiration Combo Macros & Keybinds:
Hide contents(thank you, source: www.reddit.com/r/Cityofheroes/comments/c0dtrc/inspiration_combining_macros_for_farming/ )
Macro's:
Small insp: /macro red "inspcombine Sturdy Enrage$$inspcombine Insight Enrage$$inspcombine Respite Enrage$$inspcombine Catch_A_Breath Enrage$$inspcombine Break_Free Enrage$$inspcombine Luck Enrage"
Medium insp: /macro Red "Inspcombine Keen_Insight Focused_Rage$$inspcombine Dramatic_Improvement Focused_Rage$$inspcombine Take_A_Breather Focused_Rage$$inspcombine Good_Luck Focused_Rage$$inspcombine Emerge Focused_rage$$inspcombine Rugged Focused_Rage"
Large insp: /macro RED "nspcombine Uncanny_Insight Righteous_Rage$$inspcombine Resurgence Righteous_Rage$$inspcombine Second_Wind Righteous_Rage$$inspcombine Phenomenal_Luck Righteous_Rage$$inspcombine Robust Righteous_Rage"
Delete wakies: /macro del "inspdelete Awaken$$inspdelete Bounce_Back$$inspdelete"
Use reds+: /macro use "Inspexec_Name enrage$$Inspexec_name Focused Rage$$Inspexec_Name Righteous rage$$Inspexec_name Tactical$$inspexec_name Keen$$inspexec_name Rage Imbuement$$inspexec_name Precise$$inspexec_name Tactical imbuement"
Keybinds:
Small insp: /bind "KEY" "inspcombine Sturdy Enrage$$inspcombine Insight Enrage$$inspcombine Respite Enrage$$inspcombine Catch_A_Breath Enrage$$inspcombine Break_Free Enrage$$inspcombine Luck Enrage"
Medium insp: /bind "KEY" "Inspcombine Keen_Insight Focused_Rage$$inspcombine Dramatic_Improvement Focused_Rage$$inspcombine Take_A_Breather Focused_Rage$$inspcombine Good_Luck Focused_Rage$$inspcombine Emerge Focused_rage$$inspcombine Rugged Focused_Rage"
Large insp: /bind "KEY" "nspcombine Uncanny_Insight Righteous_Rage$$inspcombine Resurgence Righteous_Rage$$inspcombine Second_Wind Righteous_Rage$$inspcombine Phenomenal_Luck Righteous_Rage$$inspcombine Robust Righteous_Rage"
Delete wakies: /bind "KEY" "inspdelete Awaken$$inspdelete Bounce_Back$$inspdelete"
Use reds+: /bind "KEY" "Inspexec_Name enrage$$Inspexec_name Focused Rage$$Inspexec_Name Righteous rage$$Inspexec_name Tactical$$inspexec_name Keen$$inspexec_name Rage Imbuement$$inspexec_name Precise$$inspexec_name Tactical imbuement"
Fortunata defenses are two tiered, straight out defense on one, and control on the other. Since we Forts don't have the physical aptitude (small HP pool) to stand still and withstand damage we must employ our abilities to control.
v2 leans strongly into these strengths;
Defense: using Nerve Alpha
before Mind Link: Melee 56.15%, Ranged 47.21%, AoE 45.96%
with Mind Link: Melee 73.42%, Ranged 64.48%, AoE 63.23%
enough defense to withstand some -Def debuffs
Controls: using Nerve Alpha
Dominate - single target hold 33.42 sec with chance for hold proc
Follow-up - hold proc
Electrifying Fences - AoE immobilize 38.2 sec (easily imo AVs) with chance for hold and chance for +HP
Ball Lightning - AoE knockdown proc and chance for +HP
Psionic Tornado - AoE chance for knockdown -30% recharge debuff and chance for +recharge proc
Aura of Confusion - AoE confuse duration 61.5 sec pseudo-nuke
Psychic Wail - AoE disorient, -70% recharge debuff, nuke
Strike/Lunge - ST - 20%/30% recharge debuff, -20%/30% movement debuff
if counting: Judgement Void: -50% damage debuff, nuke
Equipping yourself with this arsenal tips the scales of incoming and outgoing damage favorably to the Widows side. Solo, nerve alpha is recommended to push defensive play, and muscular for +dmg and teams. My personal locker has both stocked but primarily running Nerve Alpha to compliment both defense numbers and control duration; the better position of our HP bar the more we keep slicing damage.
Round out the edges using Void Judgement for the -50% dmg debuff. To be extra use Hybrid Melee +res, between it and void you've got a layer of on demand resistance. I'll mostly run Assault unless I want to dare-to-not-care in hard hitting mobs like arachnos crabs and banes, but we v2s fair superior without it.
v2 swapped out Mace Master for Mu Mastery, and picked up aid self. To fit everything this arsenal could hope for a travel power was dropped. Aim could be replaced but the extra on demand damage boost is as good as freshly baked bread (loaf in the oven now, i know)
Code
This Villain build was built using Mids Reborn 3.4.6
https://github.com/LoadedCamel/MidsRebornClick this DataLink to open the build!
Level 50 Natural Arachnos Widow
Primary Power Set: Fortunata Training
Secondary Power Set: Fortunata Teamwork
Power Pool: Speed
Power Pool: Medicine
Power Pool: Fighting
Ancillary Pool: Mu MasteryVillain Profile:
Level 1: Telekinetic Blast -- SprSpdBit-Rchg/Global Toxic(A), SprSpdBit-Acc/Dmg(3), SprSpdBit-Acc/Dmg/EndRdx/Rchg(5), SprSpdBit-Acc/Dmg/Rchg(7)
Level 1: Combat Training: Defensive -- LucoftheG-Def/Rchg+(A), Rct-ResDam%(3), ShlWal-ResDam/Re TP(9)
Level 2: Strike -- Mk'Bit-Acc/Dmg(A), Mk'Bit-Dmg/Rchg(31), Mk'Bit-Dmg/EndRdx(43), Mk'Bit-Acc/EndRdx/Rchg(43), Mk'Bit-Acc/Dmg/EndRdx/Rchg(46), Mk'Bit-Dam%(50)
Level 4: Tactical Training: Maneuvers -- LucoftheG-Def/EndRdx(A), LucoftheG-Def(9)
Level 6: Aim -- GssSynFr--Build%(A)
Level 8: Hasten -- RechRdx-I(A), RechRdx-I(23)
Level 10: Indomitable Will -- StdPrt-ResDam/Def+(A), GldArm-3defTpProc(21)
Level 12: Dominate -- HO:Perox(A), HO:Perox(13), Apc-Dam%(13), GldJvl-Dam%(17), UnbCns-Dam%(15), Dvs-Hold%(15)
Level 14: Psionic Tornado -- SprFrzBls-Acc/Dmg(A), SprFrzBls-Dmg/EndRdx(27), SprFrzBls-Acc/Dmg/EndRdx(27), SprFrzBls-Acc/Dmg/Rchg(29), SprFrzBls-Dmg/EndRdx/Acc/Rchg(29), FrcFdb-Rechg%(48)
Level 16: Lunge -- Hct-Dam%(A), Hct-Dmg/EndRdx(36), Hct-Dmg/Rchg(37), Hct-Acc/Dmg/Rchg(19), Hct-Acc/Rchg(19), TchofDth-Dam%(31)
Level 18: Follow Up -- SprBlsCol-Acc/Dmg(A), SprBlsCol-Dmg/EndRdx(23), SprBlsCol-Acc/Dmg/EndRdx(33), SprBlsCol-Acc/Dmg/Rchg(36), SprBlsCol-Dmg/EndRdx/Acc/Rchg(36), SprBlsCol-Rchg/HoldProc(37)
Level 20: Tactical Training: Leadership -- GssSynFr--ToHit(A)
Level 22: Foresight -- LucoftheG-Def/EndRdx(A), LucoftheG-Def(33), DefBuff-I(50)
Level 24: Mind Link -- LucoftheG-Def/EndRdx(A), RedFrt-Def/Rchg(5), LucoftheG-Def/Rchg(34), Rct-Def/Rchg(34)
Level 26: Mask Presence -- LucoftheG-Def/EndRdx(A)
Level 28: Psychic Wail -- Arm-Dmg/Rchg(A), Arm-Acc/Dmg/Rchg(39), Arm-Acc/Rchg(39), Arm-Dmg/EndRdx(40), Arm-Dam%(40), Erd-%Dam(40)
Level 30: Aid Other -- Prv-Absorb%(A)
Level 32: Aid Self -- Prv-Heal/Rchg(A), DctWnd-Heal/Rchg(17), Prv-Heal(25), IntRdx-I(31)
Level 35: Aura of Confusion -- CrcPrs-Conf(A), CrcPrs-Conf/Rchg(37), CrcPrs-Acc/Conf/Rchg(43), CrcPrs-Acc/Rchg(25), CrcPrs-Conf/EndRdx(11), CrcPrs-Conf%(11)
Level 38: Electrifying Fences -- GrvAnc-Hold%(A), GrvAnc-Immob/EndRdx(42), GrvAnc-Immob/Rchg(42), GrvAnc-Acc/Immob/Rchg(46), GrvAnc-Acc/Rchg(48), PwrTrns-+Heal(50)
Level 41: Ball Lightning -- Rgn-Knock%(A), Rgn-Dmg(42), Rgn-Dmg/EndRdx(45), Rgn-Acc/Dmg/Rchg(45), Rgn-Acc/Rchg(45), PwrTrns-+Heal(46)
Level 44: Kick -- Empty(A)
Level 47: Tough -- UnbGrd-Max HP%(A), UnbGrd-ResDam/EndRdx(48)
Level 49: Weave -- LucoftheG-Def/EndRdx(A), LucoftheG-Def(7)
Level 1: Conditioning | Hidden
Level 1: Brawl -- Empty(A)
Level 1: Sprint -- Clr-Stlth(A)
Level 2: Rest -- Empty(A)
Level 2: Swift -- Empty(A)
Level 2: Hurdle -- Empty(A)
Level 2: Health -- Mrc-Rcvry+(A), NmnCnv-Regen/Rcvry+(33), Pnc-Heal/+End(34)
Level 2: Stamina -- PrfShf-End%(A), PrfShf-EndMod(21), PwrTrns-+Heal(39)
Level 1: Prestige Power Dash -- Run-I(A)
Level 1: Prestige Power Slide -- Empty(A)
Level 1: Prestige Power Quick -- Empty(A)
Level 1: Prestige Power Rush -- Empty(A)
Level 1: Prestige Power Surge -- Empty(A)
Level 4: Ninja Run
Level 50: Ion Core Final Judgement
Level 50: Assault Radial Embodiment
Level 50: Reactive Radial Flawless Interface
Level 50: Ageless Core Epiphany
Level 50: Nerve Radial Paragon
Level 50: Born In Battle
Level 50: High Pain Threshold
Level 50: Invader
Level 50: Marshal
------------
------------_____________________________________________
Updated Other page 6 builds and/or added 2nd build option with Aid Self.
Added more build details.
-
1
-
-
2 minutes ago, Glacier Peak said:
I did something similar with my avatar, added some subtle glints of color. Fun stuff.
I noticed yours and really liked it. I want to figure out how to do that moving outline along your wings and bands.
Have any tips?
4 minutes ago, Glacier Peak said:Incredible work!
Thank you much 🙂
-
6 hours ago, biostem said:
Would it be possible to add a slow pulse to the eyes, and maybe the chest logo? Otherwise, maybe a less busy background effect? I love what you came up with and really appreciate you taking the time to create something great! Thanks!
@biostem lets see if we're closer to the mark with these:
---------------> ------------------> (close background) (wide background) (attempt to smooth-out the gif restarting)
My computer is hating something I'm doing while working on this gif. I've had to restart computer multiple times and given errors when trying to save before restarting... I apologize if its not 100% synced in the effects I have to post what i have at the moment and try to sync again... these restarts erRRRrrmmm lol.
-
1
-
1
-

 ------------------>
 ------------------>
 --------------->
  ------------------>
Mind Telekinesis/Levitate question...
in Dominator
Posted
Enemies wake up when TK is activated.